Add inventory items
Inventory Management is where you create inventory item entries for all of your IT assets. To edit an existing item, see Edit an individual inventory item.
Caution: Any time an inventory item is added, or an existing item is modified, the changes must be saved within 24 hours, otherwise they are erased. To make sure that changes are not erased, it's best to save changes immediately or shortly after making them.
Add an inventory item:
- Go to Inventory > Inventory Management.
-
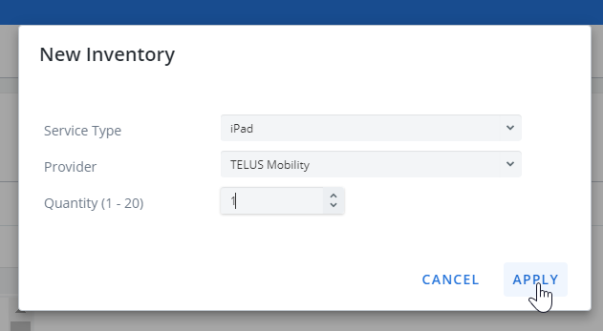
Click + New. A pop-up opens.
Note: You can click Cancel at any point to terminate the process.
-
Select the Service Type. You can search by entering text into the service type field to automatically filter.
-
Select a Provider. You can search by entering text into the service type field to automatically filter.
-
Enter the quantity of items.
-
Click Apply. A blank inventory record opens.
-
Enter the Service ID. This is the unique identifier for the asset. It could be a phone number, circuit ID, or license key, depending on the asset-type you are entering.
Note: DO NOT include dashes, parenthesis, spaces, commas, etc. when entering a Service ID.
Example: Correct: 5141234567. Incorrect: (514)123-4567
-
If it is a wireless item, Enter the SIM number.
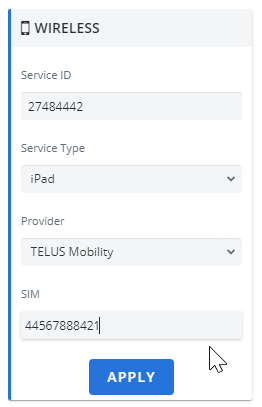
- Click Apply.
- Adjust the other information fields as needed:
Device/ Accessories:
- Click + Add Device/Accessories. A drop-down menu opens.
- Select Device Type: Equipment, Accessory, Software. A Catalogue opens.
- Select an item from the Catalogue.
Click Apply.
Note: If the SKU number and (unit) price for the asset you've selected were defined for the selected provider in the Configuration Module, then this information pre-populates in the inventory record in the Devices/Accessories. Changes to SKU/pricing, and provider information in the inventory record does not impact this information elsewhere in Cimpl. To make permanent adjustments to this information you must do so from, respectively, the Catalogue Management and Providers sections of the Configuration Module.
Account:
- Click the pencil icon. A list of available accounts opens.
- Select the account. The selection is saved to the inventory item.
Contract:
- Click the pencil icon. A list of available contracts opens.
- Select the contact entry. The selection is saved to the inventory item.
Note: When assigning or modifying a service contract to an item in Inventory (i.e., making contract changes in an inventory record), term (expiration) and upgrade eligibility information fields is pre-populated if the service contract you've selected has had these parameters set up in Configuration. You can adjust these fields while updating the record. The contract's expiry date and upgrade eligibility date is calculated based on the start date and the periods defined. Changes to service contract information in the inventory record does not impact the service contract's "default" form. To make permanent adjustments to a service contract, you must do so from the Service Contracts section of the Configuration Module.
Options:
- Click +.
- From the Option Type menu that opens, select an Option. The name, cost, and currency appear on the inventory item.
- Click Apply.
Assignment:
- Click + .
- From the list of employees that opens, select an employee. The selection is saved to the inventory item.
Address:
Note: This is the address which the service is located at. For wireless services, the address is normally the Employee as they inherit the employee’s address.
- Select the address type: None, Employee, Department, Other Company Address. A list of available addresses opens.
- Select the Address or enter the address details.
- Click Apply.
Used for:
- Click +. A drop of available Used For entries opens.
- Select a Used For entry. The selection is saved to the inventory item.
Rules:
- Click +. A dropdown of available Rule opens.
- Select a Rule. The selection is saved to the inventory item.
Relations:
Note: Relations are only applicable to wireline or infrastructure services.
- Select Add Internal Service or Add External Service.
Enter Comments.
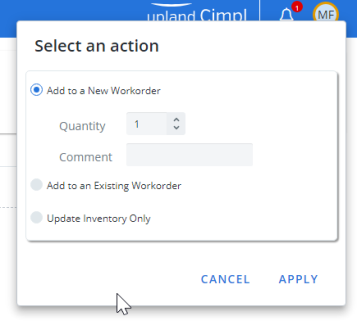
- Click Execute.
- Select one of the following options:
- Add to a New Workorder
- Add to an Existing Workorder
Update Inventory Only
-
Click Apply.
Note: If you chose either of the workorder options from the Execute menu, the confirmation message will ask if you want to be taken to the associated workorder. Click OK to navigate to the Workorder Center. Click Cancel to remain in the Inventory Management Section.
Make sure your items are saved
Any time a new inventory item is added, or an existing item is modified, the changes must be saved within 24 hours, otherwise they are erased. This is done automatically by Cimpl. To ensure that changes do not end up erased, it's best to save changes immediately or shortly after making them.
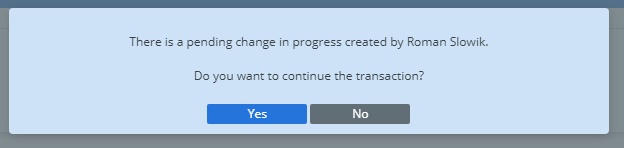
Unsaved items have an exclamation mark in the inventory:

- Open the inventory item.
- Click Edit. A message opens.
-
Click Yes to continue the transaction.
- To save the changes, click Execute.
- Select Update Inventory Only.
- Click Apply.