Manage Program Resources
Resources are used in Eclipse to identify whom is working on which projects and programs and the related activity.
To display and compare a resource planned effort vs the allocated or actual effort on a certain program
- On the left icon bar, on the Home page, click the Search
 icon.
icon.
An icon sub-menu is displayed. - Click Programs.
The Programs page is displayed.
![]()
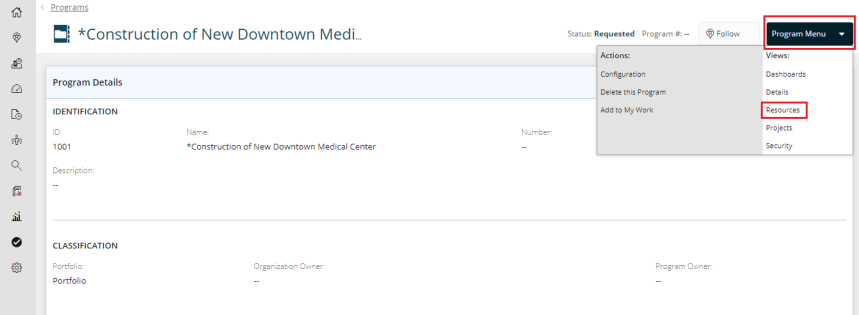
- Click the program required.
The Program Details page is displayed. - Click Program Menu.
A drop-down menu is displayed. - Select Resources.
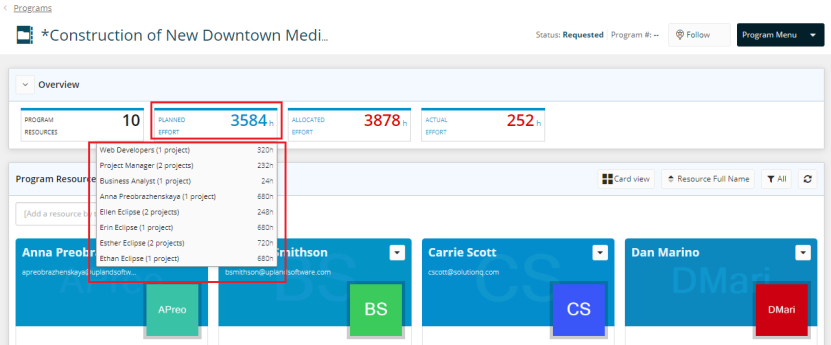
- Under Overview, click the Planned Effort, Allocated Effort or Actual Effort box.
A drop-down menu is displayed with the detailed effort.
To add a program resource
- On the left icon bar, on the Home page, click the Search
 icon.
icon.
An icon sub-menu is displayed. - Click Programs.
The Programs page is displayed.
![]()
- Click the program required.
The Program Details page is displayed. - Click Program Menu.
A drop-down menu is displayed. - Select Resources.

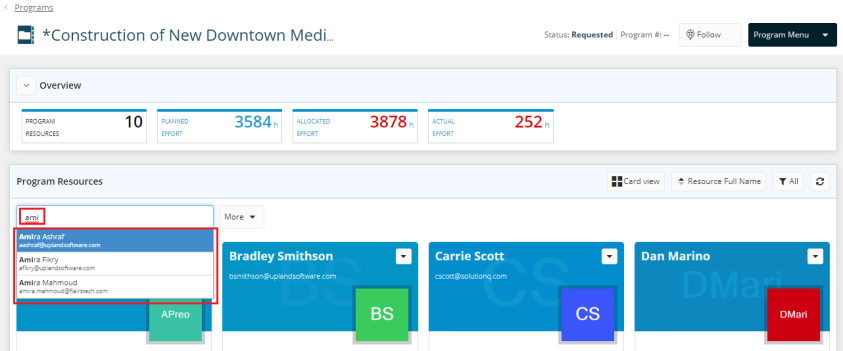
- Under Program Resources section, type the name of the resource required to be added.
A list of suggested name(s) is displayed. - Select the name required.
An Add Program Resource pop-up window is displayed.
Note: You can also click on More tab  , and then select the name(s) you want to add.
- Click the Role field.
A drop-down menu is displayed. - Select the role required.
- Click Ok.

To edit a program resource role
- On the left icon bar, on the Home page, click the Search
 icon.
icon.
An icon sub-menu is displayed. - Click Programs.
The Programs page is displayed.
![]()
- Click the program required.
The Program Details page is displayed. - Click Program Menu.
A drop-down menu is displayed. - Select Resources.

- Under Program Resources section, click the Edit
 icon of the required project.
![]()
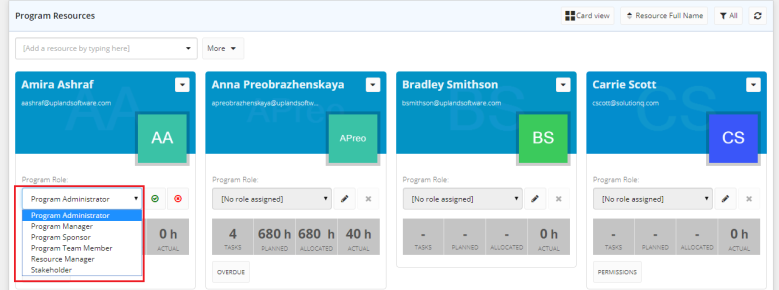
- Click the Program Role field.
A drop-down menu is displayed. - Select the role required.
- Click Ok
 or Cancel
  .
.
To delete a program resource role
- On the left icon bar, on the Home page, click the Search
 icon.
icon.
An icon sub-menu is displayed. - Click Programs.
The Programs page is displayed.
![]()
- Click the program required.
The Program Details page is displayed. - Click Program Menu.
A drop-down menu is displayed. - Select Resources.

- Under Program Resources section, click the Delete
 icon of the required project.
A delete confirmation pop-up window is displayed.
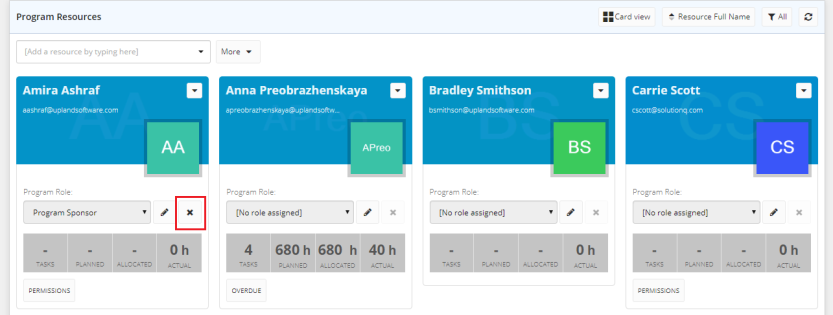
- Click Yes to confirm deleting the selected resource.

To filter program resources
- On the left icon bar, on the Home page, click the Search
 icon.
icon.
An icon sub-menu is displayed. - Click Programs.
The Programs page is displayed.
![]()
- Click the program required.
The Program Details page is displayed. - Click Program Menu.
A drop-down menu is displayed. - Select Resources.

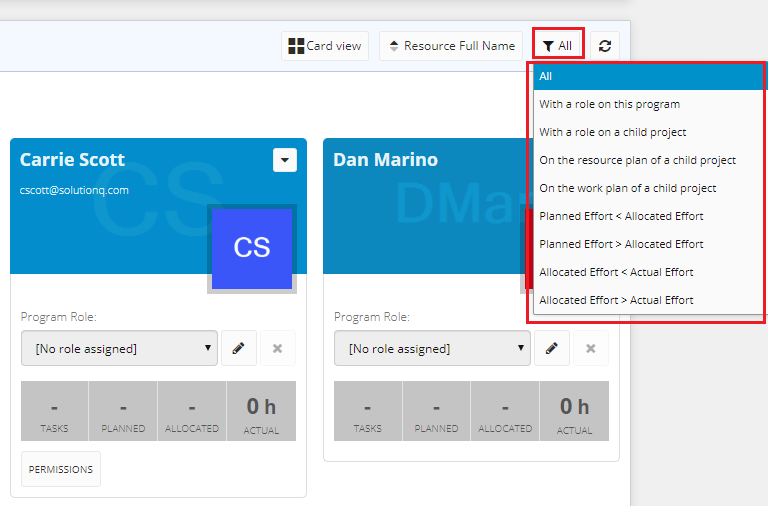
- Under Program Resources section, click the Filter icon
 .
.
A drop-down menu is displayed. - Select the filter required.
To sort program resources
- On the left icon bar, on the Home page, click the Search
 icon.
icon.
An icon sub-menu is displayed. - Click Programs.
The Programs page is displayed.
![]()
- Click the program required.
The Program Details page is displayed. - Click Program Menu.
A drop-down menu is displayed. - Select Resources.

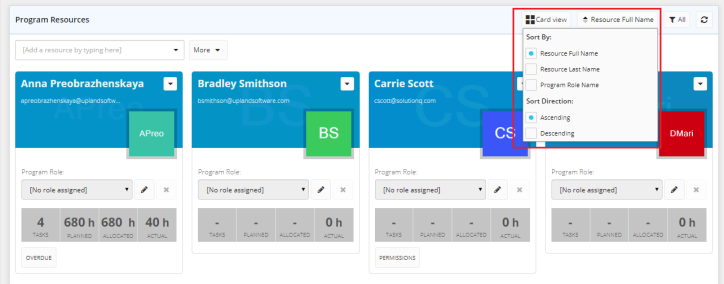
- Under Program Resources section, click the Sort icon
 .
.
A drop-down menu is displayed. - Select the sort options required.
To select the program resources list view
- On the left icon bar, on the Home page, click the Search
 icon.
icon.
An icon sub-menu is displayed. - Click Programs.
The Programs page is displayed.
![]()
- Click the program required.
The Program Details page is displayed. - Click Program Menu.
A drop-down menu is displayed. - Select Resources.

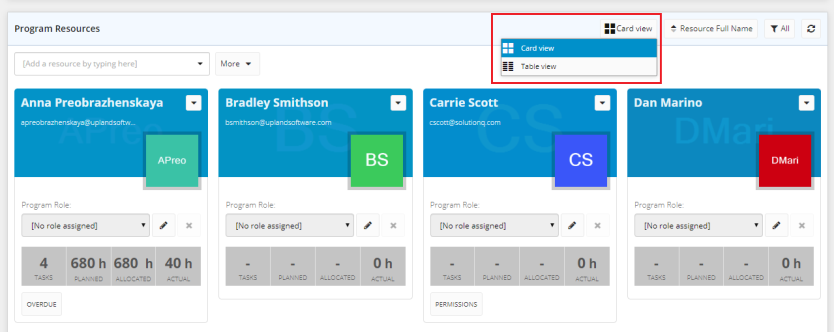
- Under Program Resources section, click the View icon
 .
.
A drop-down menu is displayed. - Select the view required.
To send a comment to the user
- On the left icon bar, on the Home page, click the Search
 icon.
icon.
An icon sub-menu is displayed. - Click Programs.
The Programs page is displayed.
![]()
- Click the program required.
The Program Details page is displayed. - Click Program Menu.
A drop-down menu is displayed. - Select Resources.

- Under Program Resources section, click the arrow next to the resource required.
A drop-down menu is displayed. - Select Send Comment to User.
A New Comment pop-up dialog box is displayed.
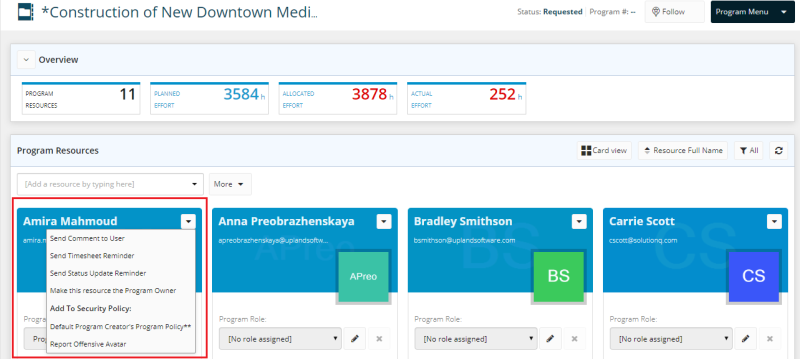
- In the Actions field, the selected resource name is displayed by default.
- Click the Actions arrow.
A drop-down menu is displayed. - Select the resources category required.
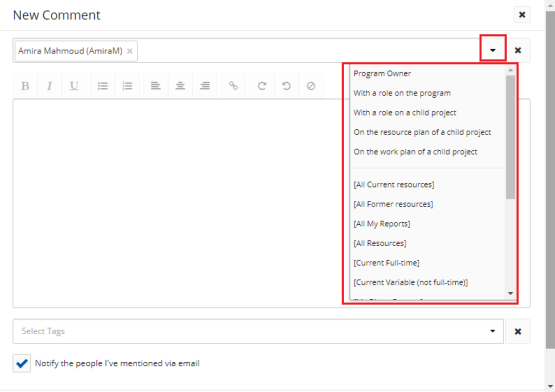
- In the Comment field, type the comment required.
- Click the Tags field.
A drop-down menu is displayed. - Select the tag(s) required.
- Select the check box Notify the people I've mentioned via email if needed.
- Click Save.
To send a timesheet reminder
- On the left icon bar, on the Home page, click the Search
 icon.
icon.
An icon sub-menu is displayed. - Click Programs.
The Programs page is displayed.
![]()
- Click the program required.
The Program Details page is displayed. - Click Program Menu.
A drop-down menu is displayed. - Select Resources.

- Under Program Resources section, click the arrow next to the resource required.
A drop-down menu is displayed. - Select Send Timesheet Reminder.
A dialog box is displayed to select the email account to send the timesheet from. - Select the email account required.

To send a status update reminder
- On the left icon bar, on the Home page, click the Search
 icon.
icon.
An icon sub-menu is displayed. - Click Programs.
The Programs page is displayed.
![]()
- Click the program required.
The Program Details page is displayed. - Click Program Menu.
A drop-down menu is displayed. - Select Resources.

- Under Program Resources section, click the arrow next to the resource required.
A drop-down menu is displayed.
- Select Send Status Update Reminder.
A dialog box is displayed to select the email account to send the status update from. - Select the email account required.

To make a resource a program owner
- On the left icon bar, on the Home page, click the Search
 icon.
icon.
An icon sub-menu is displayed. - Click Programs.
The Programs page is displayed.
![]()
- Click the program required.
The Program Details page is displayed. - Click Program Menu.
A drop-down menu is displayed. - Select Resources.

- Under Program Resources section, click the arrow next to the resource required.
A drop-down menu is displayed.
- Select Make this Resource the Program Owner.
A message is displayed at the upper right corner of the page indicating that the selected resource is now the program owner.


To add a resource to Default Program Creator's Program Policy
- On the left icon bar, on the Home page, click the Search
 icon.
icon.
An icon sub-menu is displayed. - Click Programs.
The Programs page is displayed.
![]()
- Click the program required.
The Program Details page is displayed. - Click Program Menu.
A drop-down menu is displayed. - Select Resources.

- Under Program Resources section, click the arrow next to the resource required.
A drop-down menu is displayed.
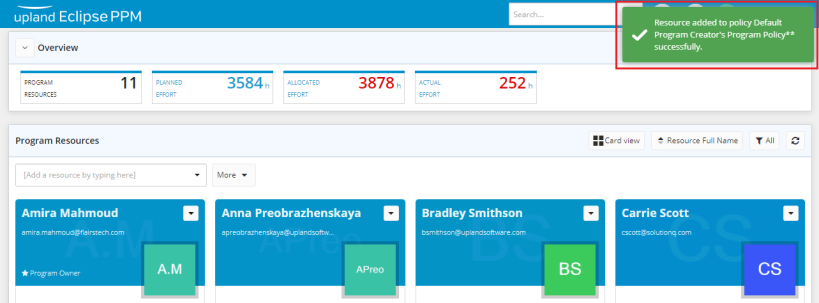
- Select Default Program Creator's Program Policy**.
A message is displayed at the upper right corner of the page indicating that the selected resource is added to policy Default Program Creator's Program Policy** successfully.

To report an offensive avatar
- On the left icon bar, on the Home page, click the Search
 icon.
icon.
An icon sub-menu is displayed. - Click Programs.
The Programs page is displayed.
![]()
- Click the program required.
The Program Details page is displayed. - Click Program Menu.
A drop-down menu is displayed. - Select Resources.

- Under Program Resources section, click the arrow next to the resource required.
A drop-down menu is displayed. - Select Report Offensive Avatar.
A dialog box is displayed to select the email account to send the report from. -
Select the email account required.
