Manage Project Resource Plan
A project Resource Plan is used to describe the resource demand and effort on a project.
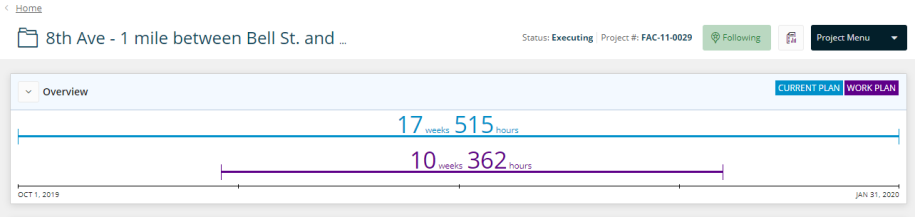
To display a resource Current Plan vs a resource Work Plan
- On the left icon bar, on the Home page, click the Search
 icon.
icon.
An icon sub-menu is displayed. - Click Projects.
The Projects page is displayed.

- Click the project required.
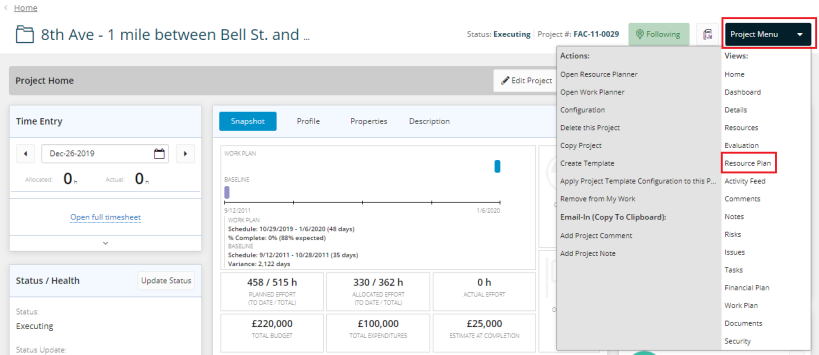
The Project Home page is displayed. - Click Project Menu.
A drop-down menu is displayed. - Select Resource Plan.
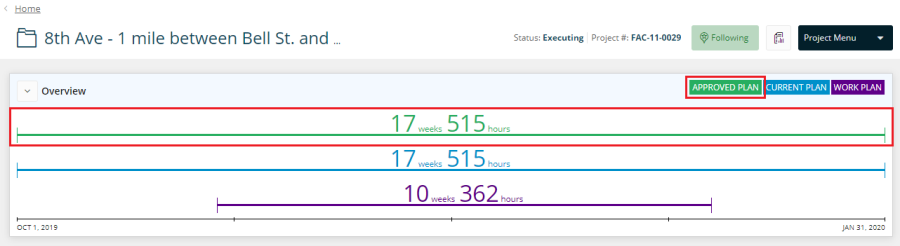
Note: Under Overview, the CURRENT PLAN line is displayed in blue color while the WORK PLAN is displayed in purple.
To add or edit a resource plan
- On the left icon bar, on the Home page, click the Search icon.
An icon sub-menu is displayed. - Click Projects.
The Projects page is displayed.
- Click the Project required.
The Project Home page is displayed. - Click Project Menu.
A drop-down menu is displayed. - Select Resource Plan.
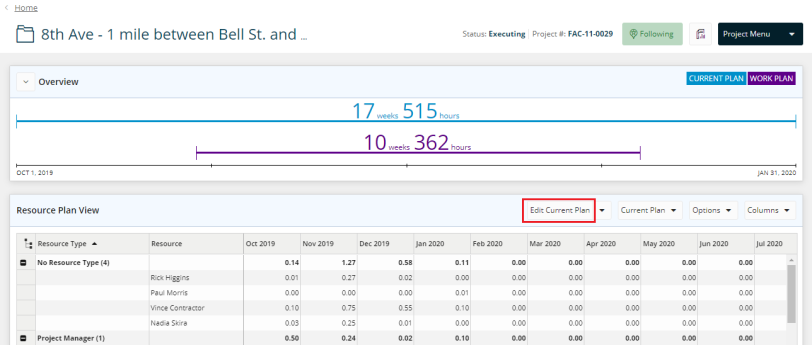
- Under Resource Plan View section, click Edit Current Plan.
A new page is displayed.
- Type the resource name required.
A list of suggested name(s) is displayed.
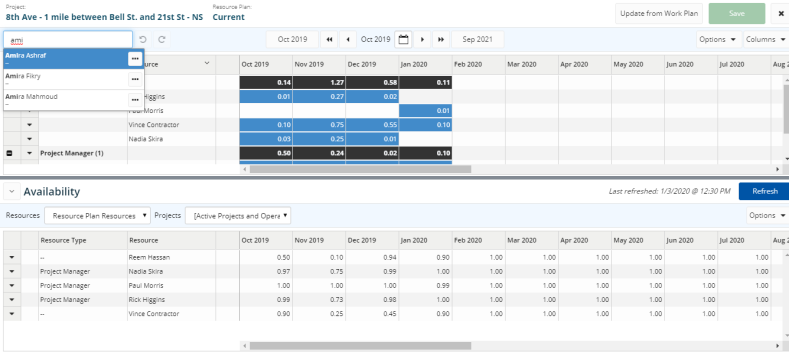
- Select the resource required.
The resource name is displayed below the Resource field. - Click the arrows


 to set the month and year required for the time period required to edit.
 - Double-click the field below the required month.
- Type the time required or click the arrows
 to set the time.
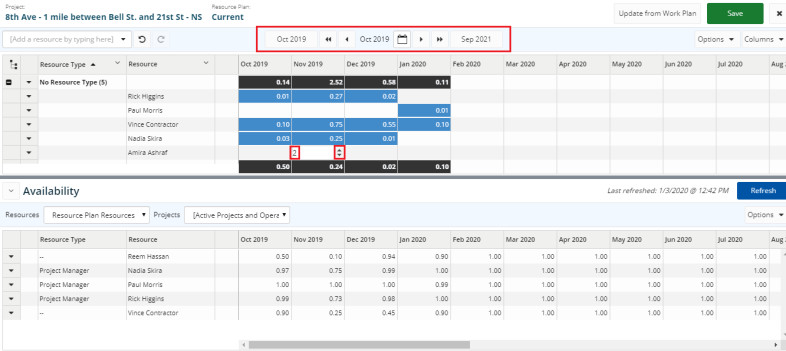
- Double-click any field required to edit it.
- Click Save.
Note: You can also update the Resource Plan from the Work Plan by clicking 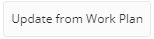 on the top right corner on the Resource Plan page.
To approve a current plan
- On the left icon bar, on the Home page, click the Search icon.
An icon sub-menu is displayed. - Click Projects.
The Projects page is displayed.
- Click the Project required.
The Project Home page is displayed. - Click Project Menu.
A drop-down menu is displayed. - Select Resource Plan.
- Under Resource Plan View section, click the arrow next to Edit Current Plan.
A drop-down menu is displayed. - Select Approve Current Plan.
An APPROVE PLAN pop-up window is displayed.
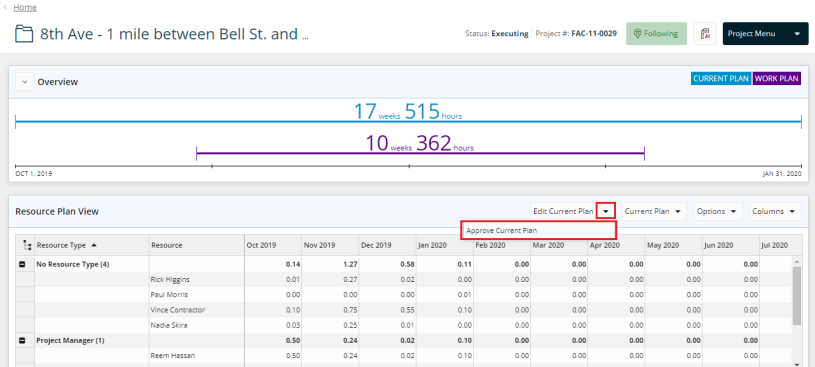
- Click Approve.
A green icon is displayed on the top right corner of the page showing that the plan is an Approved Plan.

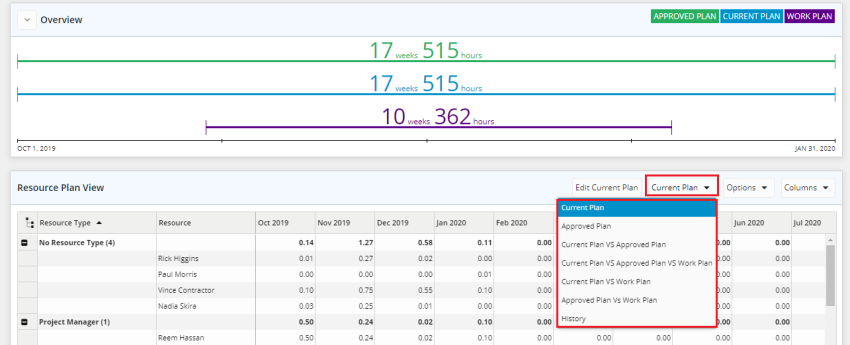
To display different plans
- On the left icon bar, on the Home page, click the Search icon.
An icon sub-menu is displayed. - Click Projects.
The Projects page is displayed.
- Click the Project required.
The Project Home page is displayed. - Click Project Menu.
A drop-down menu is displayed. - Select Resource Plan.
- Under Resource Plan View section, click Current Plan.
A drop-down menu is displayed. - Select the plan required to be displayed.
- Current Plan
- Approved Plan
- Current Plan Vs Approved Plan
- Current Plan Vs Approved Plan Vs Work Plan
- Current Plan Vs Work Plan
- Approved Plan Vs Work Plan
- History
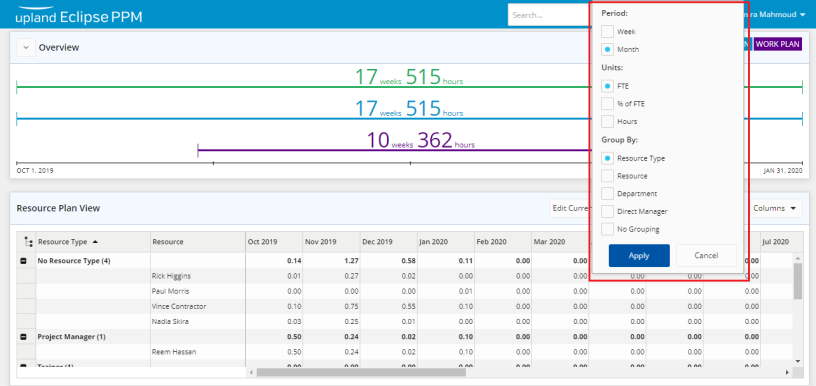
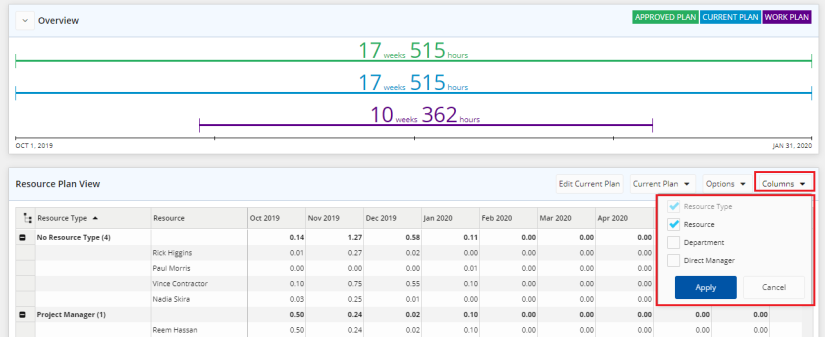
To filter the Resource Plan View
- On the left icon bar, on the Home page, click the Search icon.
An icon sub-menu is displayed. - Click Projects.
The Projects page is displayed.
- Click the Project required.
The Project Home page is displayed. - Click Project Menu.
A drop-down menu is displayed. - Select Resource Plan.
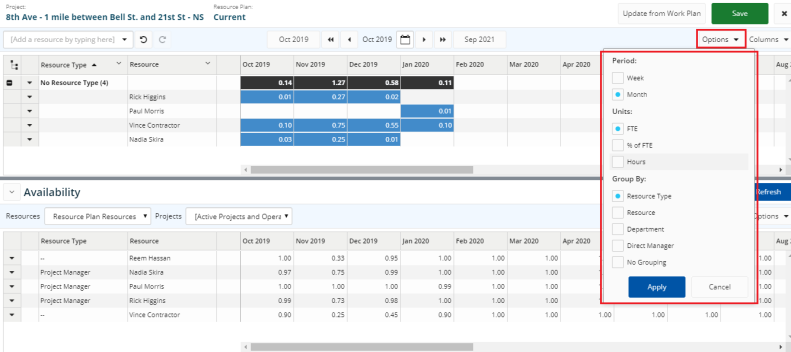
- Under Resource Plan View section, click Options.
A drop-down menu is displayed. - Select the Period, Units and Group By required.
- Click Apply.
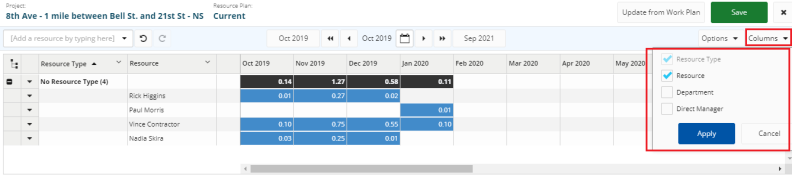
- Click Columns.
A drop-down menu is displayed. - Select the columns to be displayed on the Resource Plan View.
- Click Apply.
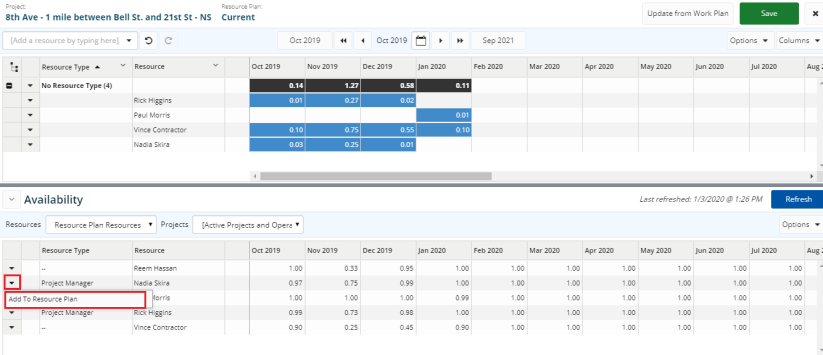
To add a resource from the availability
- On the left icon bar, on the Home page, click the Search icon.
An icon sub-menu is displayed. - Click Projects.
The Projects page is displayed.
- Click the Project required.
The Project Home page is displayed. - Click Project Menu.
A drop-down menu is displayed. - Select Resource Plan.
- Under Resource Plan View section, click Edit Current Plan.
A new page is displayed.
- Under Availability section, click the drop-down arrow
 next to the resource required to be added.
A drop-down menu is displayed. - Click Add To Resource Plan.
To delete a project resource plan
- On the left icon bar, on the Home page, click the Search icon.
An icon sub-menu is displayed. - Click Projects.
The Projects page is displayed.
- Click the project required.
The Project Home page is displayed. - Click Project Menu.
A drop-down menu is displayed. - Select Resource Plan.
- Under Resource Plan View section, click Edit Current Plan.
A new page is displayed.
- Click the arrow next to the resource plan required to be deleted.
A drop-down menu is displayed. - Select Delete.
A delete confirmation pop-up window is displayed.

- Click Yes to confirm deleting the selected resource.

To filter project resource plan
- On the left icon bar, on the Home page, click the Search icon.
An icon sub-menu is displayed. - Click Projects.
The Projects page is displayed.
- Click the project required.
The Project Home page is displayed. - Click Project Menu.
A drop-down menu is displayed. - Select Resource Plan.
- Under Resource Plan View section, click Edit Current Plan.
A new page is displayed.
- Click Options.
A drop-down menu is displayed. - Select the required Period, Units and Group By.
- Click Apply.
- Click Columns.
A drop-down menu is displayed. - Select the columns required to be displayed.
- Click Apply.
- Click Save.
To filter project resource plan availability
- On the left icon bar, on the Home page, click the Search icon.
An icon sub-menu is displayed. - Click Projects.
The Projects page is displayed.
- Click the project required.
The Project Home page is displayed. - Click Project Menu.
A drop-down menu is displayed. - Select Resource Plan.
- Under Resource Plan View section, click Edit Current Plan.
A new page is displayed.
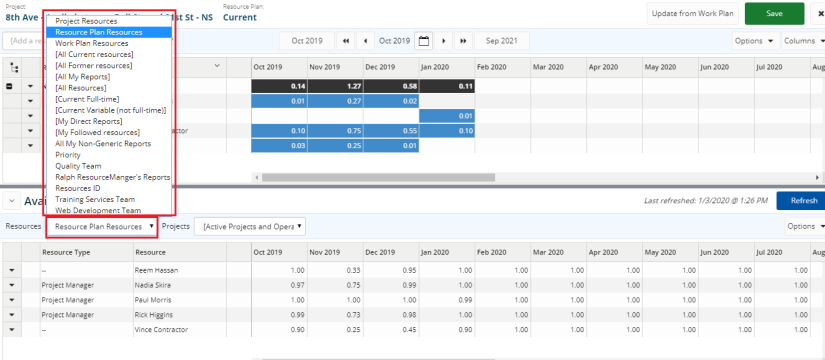
- Under Availability section, click the Resources field.
A drop-down menu is displayed. - Select the resources category required.
- Click the Projects field.
A drop-down menu is displayed. - Select the projects category required.
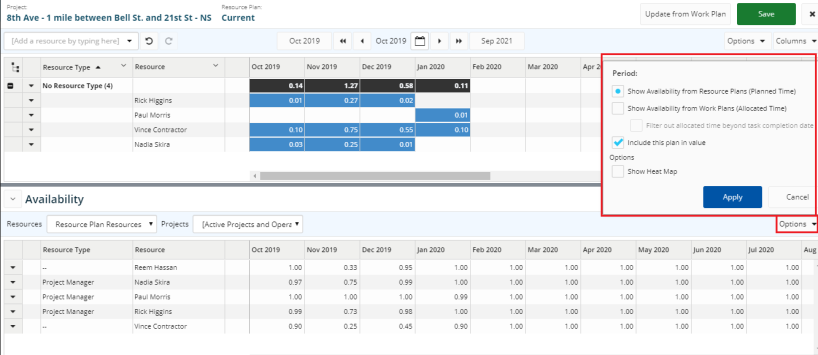
- Click Options.
A drop-down menu is displayed. - Select the Period and Options required.
- Click Apply.
- Click Refresh to apply changes.
To edit a resource in a resource plan
- On the left icon bar, on the Home page, click the Search icon.
An icon sub-menu is displayed. - Click Projects.
The Projects page is displayed.
- Click the project required.
The Project Home page is displayed. - Click Project Menu.
A drop-down menu is displayed. - Select Resource Plan.
- Under Resource Plan View section, click Edit Current Plan.
A new page is displayed.
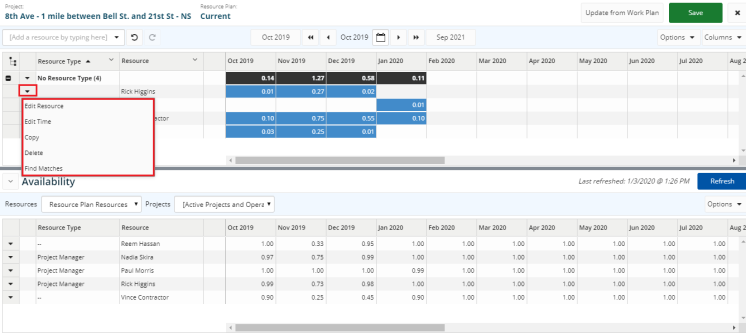
- Click the arrow next to the resource required.
A drop-down menu is displayed. - Select Edit Resource.
An Edit Resource pop-up window is displayed.
Note: The resource name is displayed in the Resource field by default.
- Click the Resource Type field.
A drop-down menu is displayed. - Select the resource type required.
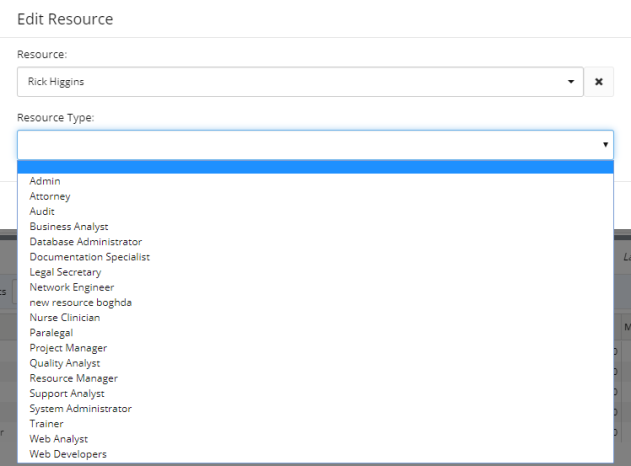
- Click Ok.
To edit time in a resource plan
- On the left icon bar, on the Home page, click the Search icon.
An icon sub-menu is displayed. - Click Projects.
The Projects page is displayed.
- Click the project required.
The Project Home page is displayed. - Click Project Menu.
A drop-down menu is displayed. - Select Resource Plan.
- Under Resource Plan View section, click Edit Current Plan.
A new page is displayed.
- Click the arrow next to the resource required.
A drop-down menu is displayed. - Select Edit Time.
An Edit Time pop-up window is displayed.
- In the Value field, click the arrows to set the time required.
- Select the category Hours, FTE, % of FTE or Days.
- In the Method field, the period is set by default.
- Click the Start field.
A drop-down menu is displayed. - Select the date required.
- Click the End field.
A drop-down menu is displayed. - Select the date required.
Note: You can also click the Calendar icon  to set the required dates.
- Select the check box for Clear data outside this range if required.

- Click Ok.
To copy a resource
- On the left icon bar, on the Home page, click the Search icon.
An icon sub-menu is displayed. - Click Projects.
The Projects page is displayed.
- Click the project required.
The Project Home page is displayed. - Click Project Menu.
A drop-down menu is displayed. - Select Resource Plan.
- Under Resource Plan View section, click Edit Current Plan.
A new page is displayed.
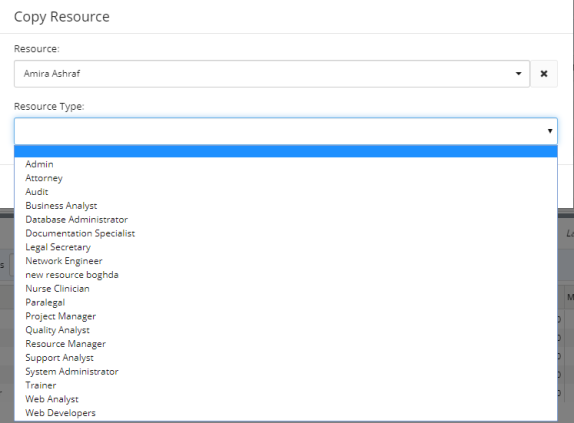
- Click the arrow next to the resource required.
A drop-down menu is displayed. - Select Copy.
A Copy Resource pop-up window is displayed.
- In the Resource field, type the name of the resource required.
A list of suggested names is displayed. - Select the resource required.
- Click the Resource Type field.
A drop-down menu is displayed. - Select the resource type required.
- Click Ok.
To delete a resource
- On the left icon bar, on the Home page, click the Search icon.
An icon sub-menu is displayed. - Click Projects.
The Projects page is displayed.
- Click the project required.
The Project Home page is displayed. - Click Project Menu.
A drop-down menu is displayed. - Select Resource Plan.
- Under Resource Plan View section, click Edit Current Plan.
A new page is displayed.
- Click the arrow next to the resource required.
A drop-down menu is displayed. - Select Delete.
A DELETE RESOURCE FROM THE PLAN pop-up window is displayed.
- Click Yes to confirm deleting the resource.

To find a resource match
- On the left icon bar, on the Home page, click the Search icon.
An icon sub-menu is displayed. - Click Projects.
The Projects page is displayed.
- Click the project required.
The Project Home page is displayed. - Click Project Menu.
A drop-down menu is displayed. - Select Resource Plan.
- Under Resource Plan View section, click Edit Current Plan.
A new page is displayed.
- Click the arrow next to the resource required.
A drop-down menu is displayed. - Select Find Matches.
The Match Results are displayed below instead of Availability.
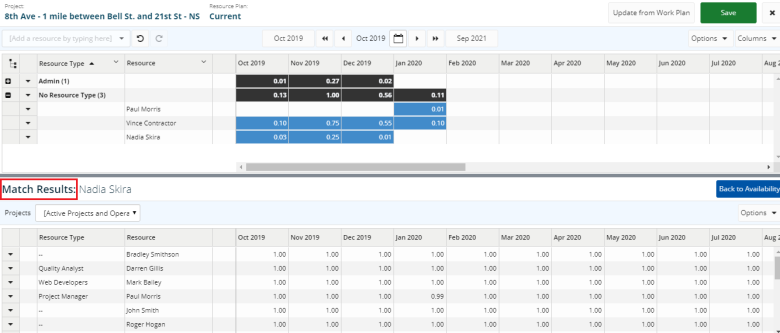
Note: Click Back to Availability to move from Match Results to Availability.