Manage Project Resources
Resources are used in Eclipse to identify whom is working on which projects and programs and the related activity.
To display and compare a resource planned effort vs the allocated or actual effort on a certain project
- On the left icon bar, on the Home page, click the Search
 icon.
icon.
An icon sub-menu is displayed. - Click Projects.
The Projects page is displayed.

- Click the project required.
The Project Home page is displayed. - Click Project Menu.
A drop-down menu is displayed. - Select Resources.

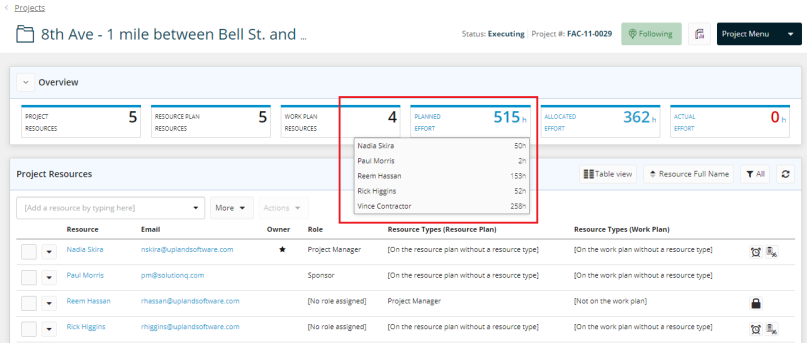
- Under Overview, click the Planned Effort, Allocated Effort or Actual Effort box.
A drop-down menu is displayed with the detailed effort.
To add a project resource
- On the left icon bar, on the Home page, click the Search icon.
An icon sub-menu is displayed. - Click Projects.
The Projects page is displayed.
- Click the Project required.
The Project Home page is displayed. - Click Project Menu.
A drop-down menu is displayed. - Select Resources.
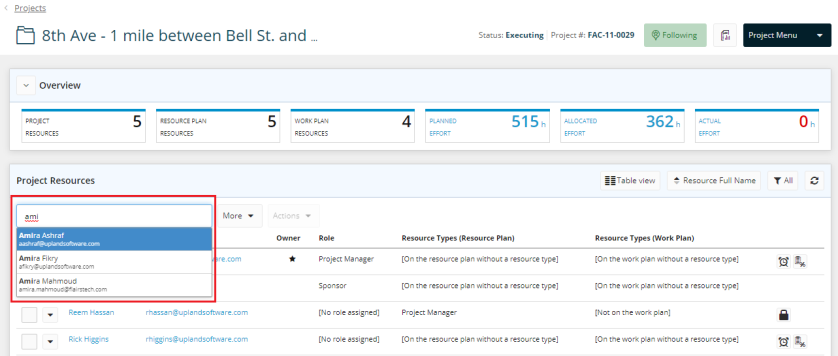
- Under Project Resources section, type the name of the resource required to be added.
A list of suggested name(s) is displayed. - Select the name required.
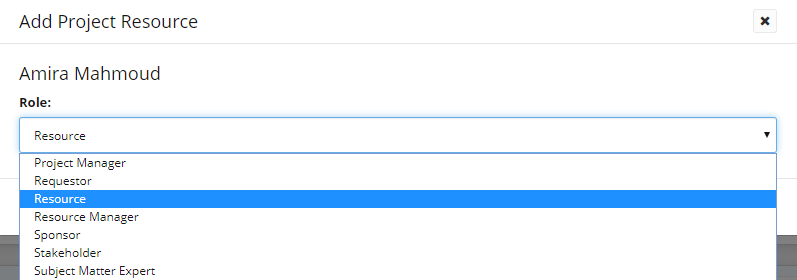
An Add Project Resource pop-up window is displayed.
Note: You can also click on More tab  , and then select the name(s) you want to add.
- Click the Role field.
A drop-down menu is displayed. - Select the role required.
- Click Ok.
To edit a project resource role
- On the left icon bar, on the Home page, click the Search icon.
An icon sub-menu is displayed. - Click Projects.
The Projects page is displayed.
- Click the Project required.
The Project Home page is displayed. - Click Project Menu.
A drop-down menu is displayed. - Select Resources.
- Click the arrow next to the resource name.
A drop-down menu is displayed. - Select Edit Resource Role.
An Edit Resource Role pop-up window is displayed.

- Click the Role field.
A drop-down menu is displayed. - Select the role required.
- Click Ok.

To delete a project resource role
- On the left icon bar, on the Home page, click the Search icon.
An icon sub-menu is displayed. - Click Projects.
The Projects page is displayed.
- Click the project required.
The Project Home page is displayed. - Click Project Menu.
A drop-down menu is displayed. - Select Resources.
- Click the arrow next to the resource name.
A drop-down menu is displayed. - Select Delete from Project Resource List.
A delete confirmation pop-up window is dispalyed.
- Click Yes to confirm deleting the selected resource.

To filter project resources
- On the left icon bar, on the Home page, click the Search icon.
An icon sub-menu is displayed. - Click Projects.
The Projects page is displayed.
- Click the project required.
The Project Home page is displayed. - Click Project Menu.
A drop-down menu is displayed. - Select Resources.
- Under Project Resources section, click the Filter icon
 .
.
A drop-down menu is displayed. - Select the filter required.

To sort project resources
- On the left icon bar, on the Home page, click the Search icon.
An icon sub-menu is displayed. - Click Projects.
The Projects page is displayed.
- Click the project required.
The Project Home page is displayed. - Click Project Menu.
A drop-down menu is displayed. - Select Resources.
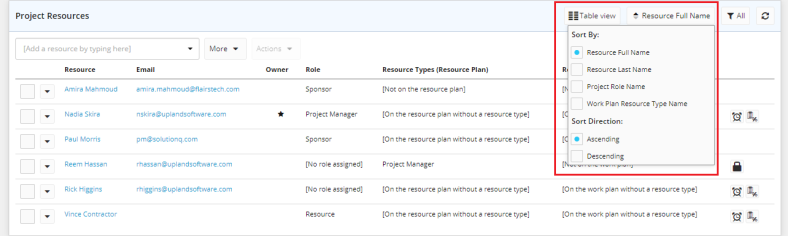
- Under Project Resources section, click the Sort icon
 .
.
A drop-down menu is displayed. - Select the sort options required.
To select the project resources list view
- On the left icon bar, on the Home page, click the Search icon.
An icon sub-menu is displayed. - Click Projects.
The Projects page is displayed.
- Click the project required.
The Project Home page is displayed. - Click Project Menu.
A drop-down menu is displayed. - Select Resources.
- Under Project Resources section, click the View icon
 .
.
A drop-down menu is displayed. - Select the view required.

To send a comment to the user
- On the left icon bar, on the Home page, click the Search icon.
An icon sub-menu is displayed. - Click Projects.
The Projects page is displayed.
- Click the project required.
The Project Home page is displayed. - Click Project Menu.
A drop-down menu is displayed. - Select Resources.
- Under Project Resources section, click the arrow next to the resource required.
A drop-down menu is displayed. - Select Send Comment to User.
A New Comment pop-up dialog box is displayed.
- In the Actions field, the selected resource name is displayed by default.
- Click the Actions arrow.
A drop-down menu is displayed. - Select the resources category required.

- In the Comment field, type the comment required.
- Click the Tags field.
A drop-down menu is displayed. - Select the tag(s) required.
- Select the check box Notify the people I've mentioned via email if needed.
- Click Save.
To send a timesheet reminder
- On the left icon bar, on the Home page, click the Search icon.
An icon sub-menu is displayed. - Click Projects.
The Projects page is displayed.
- Click the project required.
The Project Home page is displayed. - Click Project Menu.
A drop-down menu is displayed. - Select Resources.
- Under Project Resources section, click the arrow next to the resource required.
A drop-down menu is displayed. - Select Send Timesheet Reminder.
A dialog box is displayed to select the email account to send the timesheet from. - Select the email account required.
To send a status update reminder
- On the left icon bar, on the Home page, click the Search icon.
An icon sub-menu is displayed. - Click Projects.
The Projects page is displayed.
- Click the project required.
The Project Home page is displayed. - Click Project Menu.
A drop-down menu is displayed. - Select Resources.
- Under Project Resources section, click the arrow next to the resource required.
A drop-down menu is displayed.
- Select Send Status Update Reminder.
A dialog box is displayed to select the email account to send the status update from. - Select the email account required.
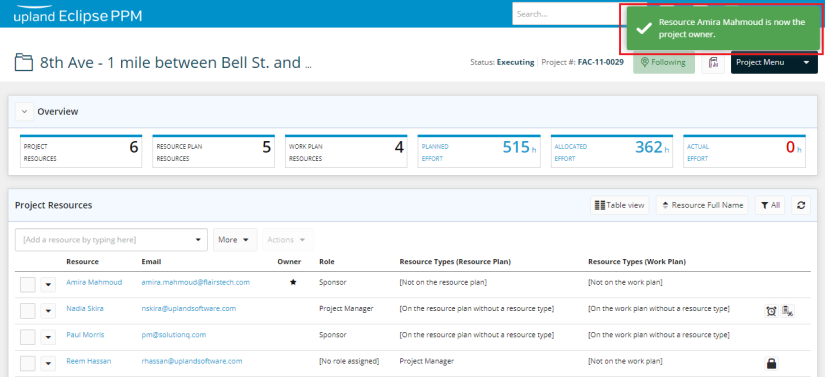
To make a resource a project owner
- On the left icon bar, on the Home page, click the Search icon.
An icon sub-menu is displayed. - Click Projects.
The Projects page is displayed.
- Click the project required.
The Project Home page is displayed. - Click Project Menu.
A drop-down menu is displayed. - Select Resources.
- Under Project Resources section, click the arrow next to the resource required.
A drop-down menu is displayed.
- Select Make this Resource the Project Owner.
A message is displayed at the upper right corner of the page indicating that the selected resource is now the project owner.
To add a resource to the Default Project Creator Policy
- On the left icon bar, on the Home page, click the Search icon.
An icon sub-menu is displayed. - Click Projects.
The Projects page is displayed.
- Click the project required.
The Project Home page is displayed. - Click Project Menu.
A drop-down menu is displayed. - Select Resources.
- Under Project Resources section, click the arrow next to the resource required.
A drop-down menu is displayed.
- Select Default Project Creator Policy.
A message is displayed at the upper right corner of the page indicating that the selected resource is added to policy Default Project Creator Policy successfully.

Note: To add more than one resource to the Default Project Creator Policy, select the check boxes for the required resources under the Project Resources list, click Actions icon  then select Default Project Creator Policy.