Install Eclipse PPM Excel Add-In
The Excel Add-In provides end users with a flexible and intuitive desktop tool enabling them to access Eclipse PPM data through the API services without the need for developer intervention. This tool provides a great platform for custom data analysis and reporting. The add-in supports the same secure authentication used in the Eclipse PPM web application, and also supports the selection from multiple environments for those customers that have more than one Eclipse PPM environment. This tool integrates with the custom reports and searches you already built in Eclipse PPM, providing access to that data in a platform that can be customized, shared with others and refreshed on demand.
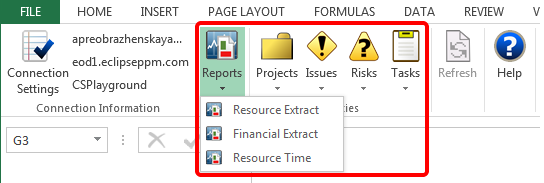
Reports available in the Excel Add-In include:
- Custom Project Reports
- Custom Risk Reports
- Custom Issue Reports
- Custom Task Reports
- Resource Extract Report
- Financial Extract Report
- Resource Time Report
Once a Custom Report has been selected, the data will be imported into one MS Excel tab and a pivot table, referencing that data, will be created in a second tab. You will then be able to drag fields into the appropriate area of the Pivot Table Field List to define your report requirements. You can format and manipulate your data, create expressive charts, and perform in-depth analysis with pivot tables.
The following are required before installing the Eclipse PPM Add-In:
- The URL https://eod1.eclipseppm.com needs to be added as a Trusted Site under browser options to complete installation (this is still required for Canadian users with the EOD2 URL already in the Trusted Site list).
- If Add-In is not installed through ClickOnce, .NET 3.5, Microsoft Visual Studio Tools 2010 and Windows Installer 3.1 (or higher) must be installed on the PC before the setup.exe will run.
- Add-In is only compatible with Excel 2007, 2010, 2013 and 2016. It is also compatible when Office 365 is installed locally on the user's PC.
- An Upland Software certificate installed on your device. To obtain the certificate before installing the add-in, complete the following steps:
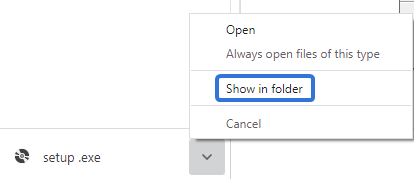
Select this link to download the Eclipse Add-In .exe file onto your device.
Select the downward arrow on the downloaded file and select Show in folder:
Right-click on the "setup.exe" file and select Properties.
Select the Digital Signatures tab:

Select the Upland Software, Inc. signature from the "Signatures" list and select Details:

Select View Certificate from the "General" tab:

Select Install Certificate:

Complete the installation process.
Note: Your organization's current web access policies may restrict the download and install of an .exe file. In the event that this occurs, you will require the Windows desktop administrator to complete the Add-In installation for you.
Note: User permissions are respected by this tool feature, and so data that can be retrieved from Eclipse PPM is according to the permissions specified for individual Users.
To Install Eclipse PPM Excel Add-In
-
Click this link and begin the installation process.
- Follow the Install Eclipse PPM Excel Add-In on screen prompts until the add-in is installed successfully.

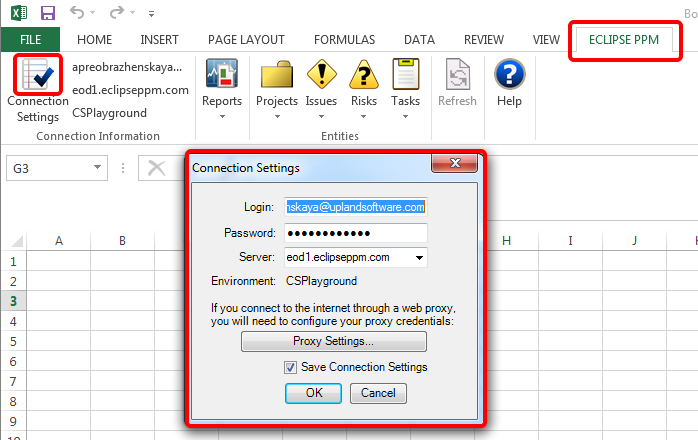
- In the Connection Settings pop-up window, type the same login and password credentials used when logging into the Eclipse PPM application (outside of Single Sign-On).
- Select which data center your environment resides in.
- Select Save Connection Settings to ensure ease of subsequent access.
Note: Occasionally, there may be a need for a minor update to the Eclipse PPM Add-In. Should this be required, the Add-In will automatically update after connecting to the Eclipse PPM API Service and you may briefly see a message dialog stating Updating Office Customization.