Submit Time for Approval
The Time Approval functionality provides a means through which individuals can submit their time for approval by their direct manager, a project manager, or a designated approver.
Note: Submitter needs permissions to "View Timesheet" and project.
To approve time
- On the left icon bar, click the Timesheet icon
 .
.
The Timesheet page is displayed.

- Click the Calendar icon
 .
.
A calendar is displayed. - Select the date required.
The required timesheet is displayed.

- Click the arrow next to the project/task.
A drop-down menu is displayed. - Select the approval type required.
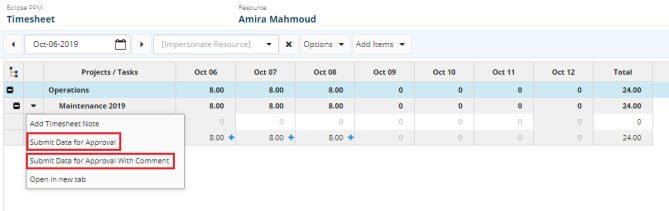
Submit Data for Approval: Submit unapproved timesheet data for the selected project for the current week.
Submit Data for Approval With Comment:Submit unapproved timesheet data for the selected project for the current week and add comments.
Note: When data is submitted for approval, only time entry records for the selected week are submitted. To submit all other time entry records, navigate to the week in question using the Date Selector and submit all applicable time records.
Note: Once time is submitted for a project, you will not have the option to add additional time unless you cancel the pending request first. Once the pending request has been canceled, you will be able to add additional time or modify the previously recorded time.
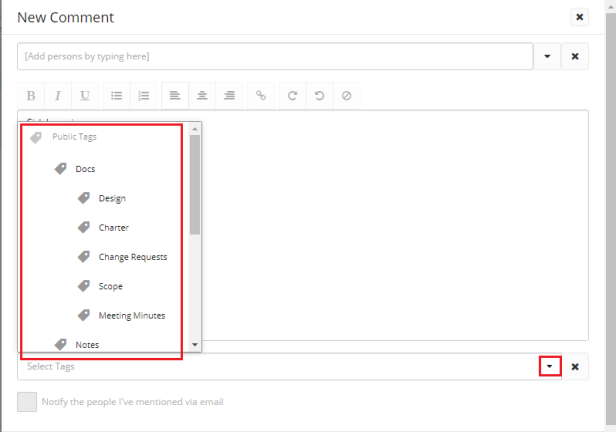
- In case of selecting Submit Data for Approval With Comment, a dialog box is displayed.
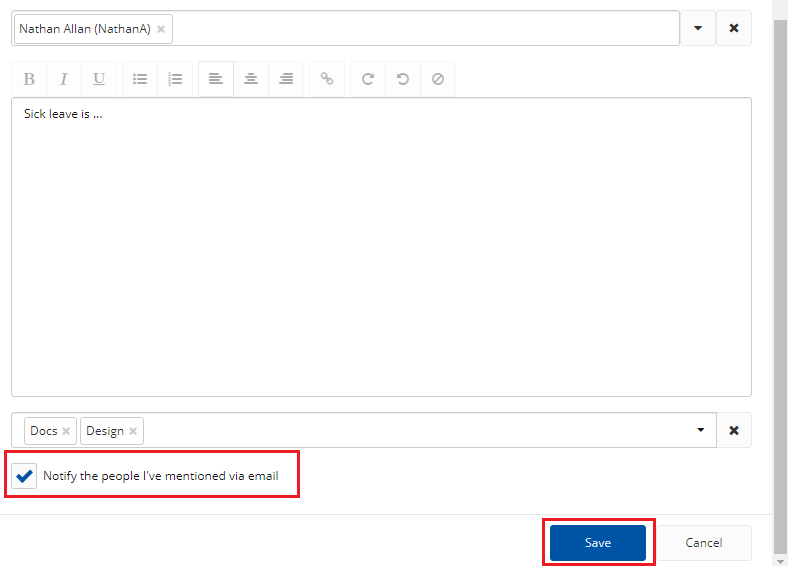
- In the Name field, type the name of the person(s) required.
A list of suggested name(s) is displayed. - Select the name(s) required.
- In the Comment field, type the comment required.

- Click the arrow in the Tags field.
A drop-down menu is displayed. - Select the tag(s) required.
- Select Notify the people I've mentioned via email if required.
- Click Save.
Timesheet is successfully submitted for approval.

To cancel a pending approval
- On the left icon bar, click the Timesheet icon .
The Timesheet page is displayed.
- Click the Calendar icon .
A calendar is displayed. - Select the date required.
The required timesheet is displayed.
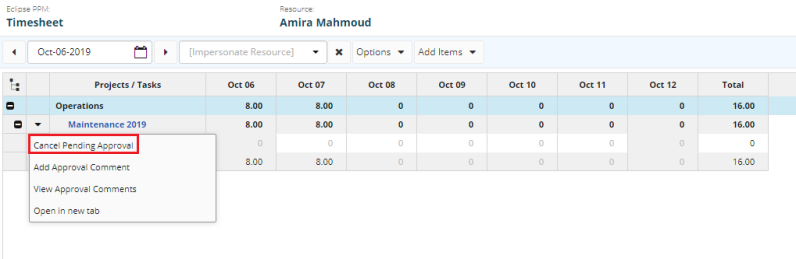
- Click the arrow next to the project/task.
A drop-down menu is displayed. - Select Cancel Pending Approval.
Directly on your timesheet, all projects with actual time records that have been approved will be highlighted in green. If the time approval request was denied, the project where the actual time record resides will be highlighted in red. In a case where a decision has not been made, the project will be highlighted in blue.
Note: You will be able to re-submit rejected time records. Before you do, review any comments provided by the approver or follow up with them to confirm the reason for their decision. Make the necessary adjustments and re-submit your time.