Dividers are used to group documents logically in a file. Dividers can also be used to implement security and restrict access to documents. You can set properties for dividers using the following methods:
- Setting project properties of a divider, which are applicable to all the dividers of that project.
- Setting properties of an individual divider.
You must configure the dividers, after you have added the dividers to a project.
Example: Keith Adam's file may contain documents that deal with general correspondence about a loan application and the loan application received from him. You can set up two dividers 'General Correspondence' and 'Loan Applications'. Once the dividers are added, you can scan or add documents to the appropriate divider so that the documents are grouped meaningfully for easy retrieval.
Topics include:
Add a new divider
You can add dividers to a project one at a time, or you can add multiple dividers to a project at a time. In both cases, you must configure the divider or dividers, after you have added the dividers to a project.
- On the Navigation menu, click Administration, then click Projects.
- Click Edit next to the project you want to add a divider to.
- Select Fields/Dividers/Separator from the Configuration list.
- Click the Dividers tab.
-
Click Add.

-
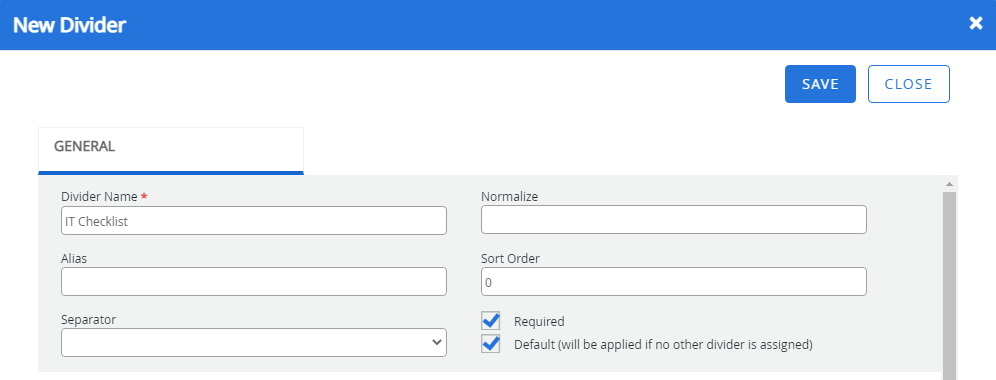
Specify new divider details, then click Save.

Divider Name: The name of the divider.
Normalize: An alternative divider name used when documents are exported or emailed from the Viewer. This field is optional.
Example: Insurance or mortgage companies may have divider names in FileBound that make sense to their users but when they export from the Viewer so they can upload to a mortgage paying company, the divider name needs to be changed to something else. Basically, they export the “packet” to the outside company. So, for your FileBound users, you may use “Mortgage Loan”, but the mortgage paying company needs it to be “User Loan” or they will reject it. You would type "User Loan" in the Normalize box and when the file is exported, “Mortgage Loan” will be converted to “User Loan”.
Alias: An alternative divider name used while generating barcode index for the documents. This is helpful to use when the divider name is very long or contains a lot of punctuations. This field is optional.
Example: When barcodes are printed from FileBound, a barcode named “Miscellaneous Documents” does not fit within the width of the page. You could type "Misc" into the Alias field and that is what prints for the barcode. Then, when someone scans in Capture or the Web Viewer, it reads the "Misc" barcode and knows that it should be converted to “Miscellaneous Documents”.
Sort Order: Allows you to alter the order of the list of dividers by typing the numerical order. By default, FileBound organizes dividers in alphabetical order.
Separator: Select a separator name from the list to associate a separator with the divider.
Required: A required divider is simply a visual indication that a document is required in the divider. The divider name will appear red in the viewers until a document has been added to it.
Default (will be applied if no other divider is assigned): Makes the divider the default divider. The default divider is selected when a document is uploaded.
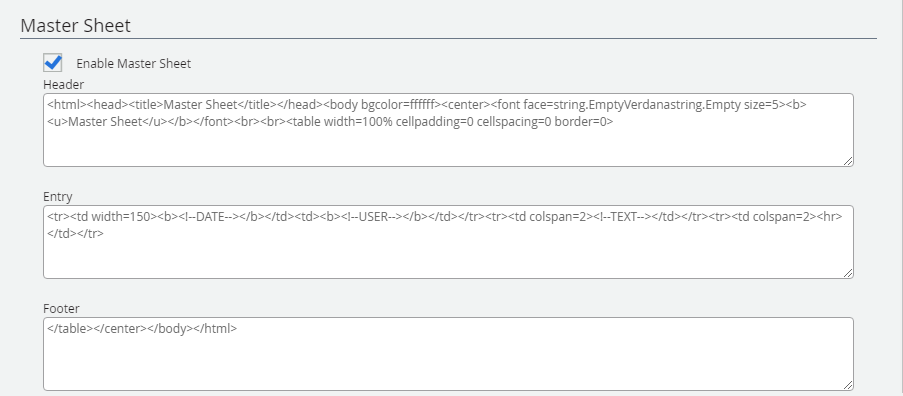
Master Sheet
Note: Master sheets have been moved to read-only mode with the 9.0.0 release. New writes/edits are no longer be allowed.
A master sheet is an HTML document that is associated with dividers and allows you to add notes for files. The notes displays the name of the user, date, and time stamp when the note was added. You can specify HTML parameters that are used while generating master sheet for a file for the first time.
Master sheet parameters are set for a project and are applicable to all the files in that project.
Note: A project should only have one divider configured with a master sheet. The master sheet divider cannot contain any other documents in the Web Viewer.

Enable Master Sheet: Adds divider specific notes in the Viewer. The default HTML parameters are displayed in the Header, Entry, and Footer boxes.
Edit a divider
Caution: Edits to divider names are not retroactive. Contact the Professional Services team prior to making changes to an existing divider name.
-
Click Edit next to the divider you want to edit.

-
Edit the divider as necessary, then click Save. See Add a new divider for more information.
Delete a divider
After a divider is deleted, it is no longer available in the Search or File Entry. The deleted divider is still available in the Viewer. This behavior is to prevent the loss of documents when a divider is deleted. The deleted divider is displayed in the Viewer until it is changed or deleted from the Viewer.
-
Click Delete next to the divider you want to delete.

-
Click Yes to confirm the deletion.
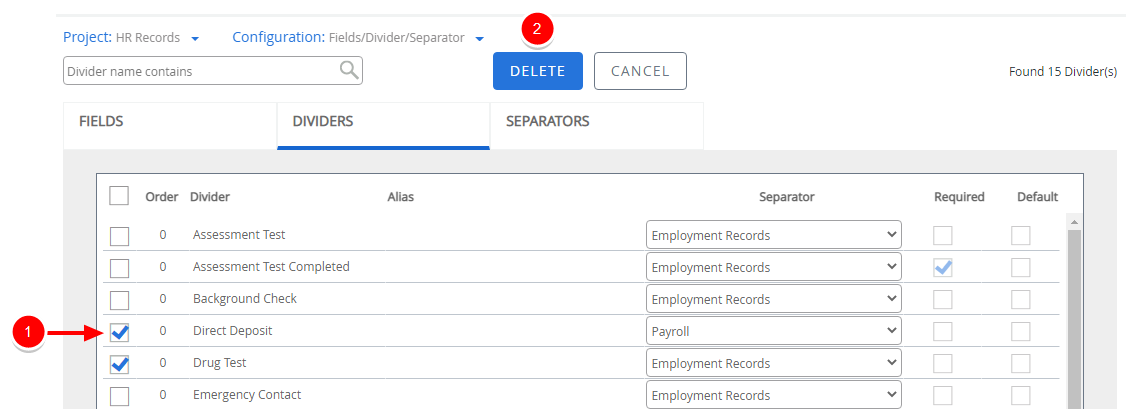
Delete multiple dividers
-
Click Delete.

-
Select the check box next to the divider(s) you want to delete, then click Delete.

-
Click Yes to confirm the deletion.