Plug-ins allow you to create custom add-ins. Plug-ins can be added at the project level which limits the functionality offered by the plug-in to the project where the plug-in was added and enabled.
Topics include:
Add a project plug-in
Note: The Professional Services team will provide the appropriate settings for any custom plug-ins.
- Click Administration, then click Projects.
- Click Edit next to the project you want to add a plug-in for.
- Select Plug-ins in the Configuration list.
-
Click Add.

-
Configure the plug-in, then click Save.
Plug-In Information tab

Enabled: Determines whether the plug-in is enabled or disabled.
Plugin Name: A name for the plug-in.
Plugin ID: The plug-in ID. The ID is automatically assigned when a plug-in is created. The value of this field cannot be edited.
Replace Page: The FileBound page to be replaced with the plug-in for customization.
Hidden: Determines whether the plug-in will be visible in the Plug-ins panel in the viewers.
Plugin Display Options

Web Viewer: Determines how the plug-in can be viewed in the Web Viewer from the Web Viewer list. The following options are available:
- Popup: Opens the plug-in in a separate pop-up window that appears on top of the window where the plug-in was activated.
Drop Down Menu: Determines how the plug-in can be viewed in the Dropdown menu. The following options are available:
- In Browser: Opens the plug-in in a new tab within a browser.
- Popup: Opens the plug-in in a separate pop-up window that appears on top of the window where the plug-in was activated.
File Detail: Determines how the plug-in is displayed on the File Details page from the File Detail list. The following options are available:
- In Browser: Opens the plug-in in a new tab within a browser.
- Popup: Opens the plug-in in a separate pop-up window that appears on top of the window where the plug-in was activated.
Button Icon
Select an icon to be displayed for the plug-in button.
![]()
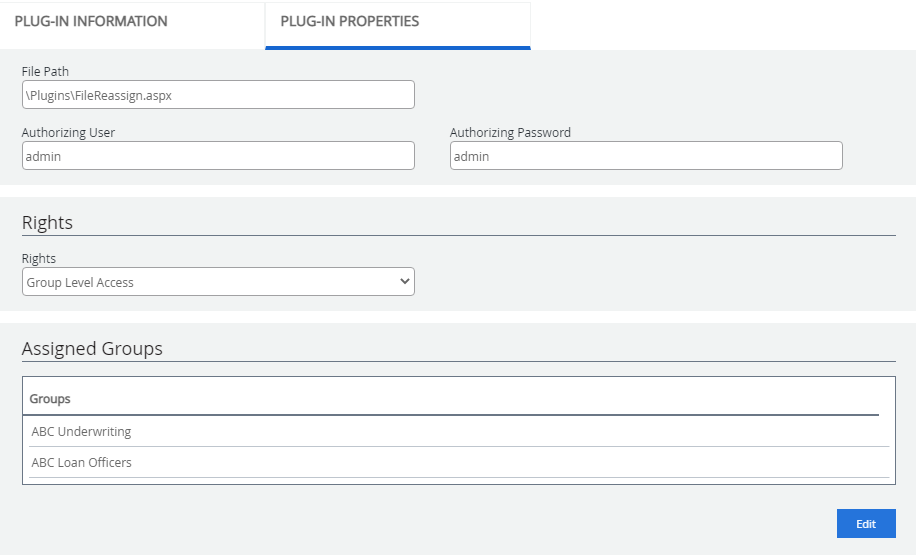
Plug-in Properties tab

File Path: The location or path of the plug-in file.
Authorizing User: For some specific plug-ins, you may be required to provide an authorized username and password to use the plug-in.
Authorizing Password: For some specific plug-ins, you may be required to provide authorized username and password to use the plug-in.
Rights: The users who will have access to the plug-in. The following options are available:
- All User Access: Access to the plugin is given to all the FileBound users.
- Admin Only Access: Access to the plugin is given to System Administrators and Project Administrators.
- Group Level Access: Access to the plugin is given to the selected groups. If you select this option, you are required to assign one or more groups in the Assigned Groups section. Click Edit to select groups.
Edit a project plug-in
-
Click Edit next to the plug-in you want to edit.

- Edit the plug-in configuration as needed, then click Save.
Delete a project plug-in
-
Click Delete next to the plug-in you want to delete.

- Click Delete to confirm the deletion.