Widgets are displayed in sections within the Workspace and give you easy access to projects, files, documents, and assignments. Widgets help you organize frequently used FileBound features in the Workspace. Administrators can add new widgets, edit existing widgets, and delete widgets from a site.
To manage widgets, in the Navigation Menu, click Administration, then click Widgets.
Topics include:
Add a widget
-
Click Add.

-
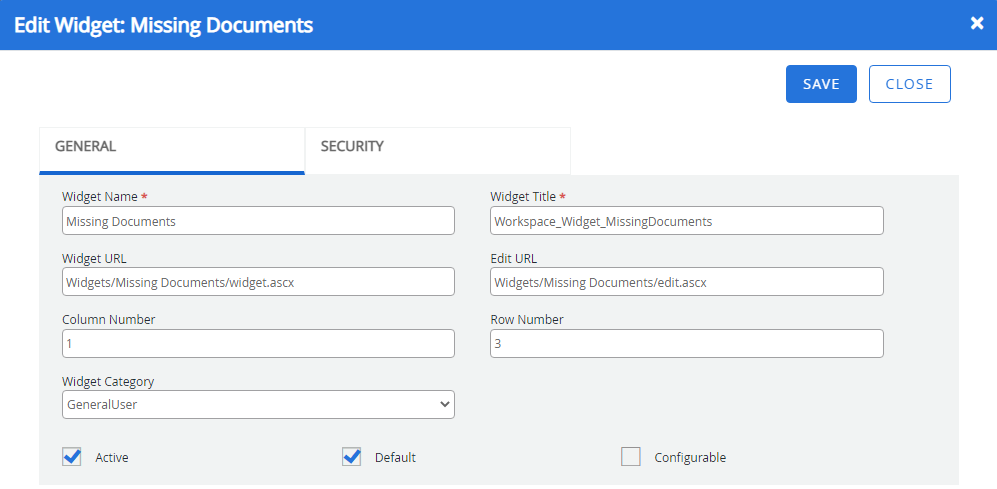
In the New Widget dialog box, configure the widget, then click Save.
General tab

Widget Name: The name of the widget.
Widget Title: The title of the widget. This title will be displayed in the widget title bar.
Widget URL: The URL where code for the widget is located.
Edit URL: The URL used for editing the widget.
Column Number: The column number where the widget will be displayed.
Row Number: The row number where the widget will be displayed.
Note: The widget will be displayed on the Workspace page at the intersection of the column and row position specified in the Column Number and Row Number boxes.
Widget Category: The category that the widget will be displayed under when adding a widget to the Workspace.
Active: Displays the widget name as an option in the Workspace Options menu within the Workspace page.
Default: Makes the widget appear automatically on a new user's Workspace.
Configurable: Allows users to access the Workspace Options menu in the Workspace page and make changes to the widget's configuration.
Security tab
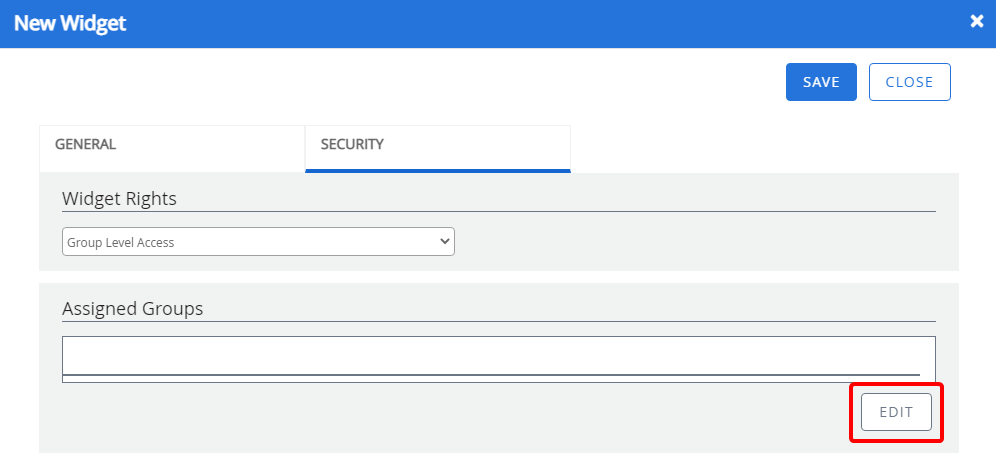
On this tab, you can configure which users can view the widget.
-
Select an option from the Widget Rights list. The following options are available:
- All User Access: Makes the widget available to all users.
- Admin Only Access: Makes the widget available only to Administrators.
- Group Level Access: Makes the widget available to all of the users of one or more selected groups.
-
If you have selected Group Level Access, you are required to assign one or more groups. Click Edit in the Assigned Groups section.

-
In the Assign Groups dialog box, select the check box next to one or more groups, then click Save Changes.
Edit a widget
-
Click Edit next to the widget you want to edit.

-
In the Edit Widget dialog box, edit the widget configuration as needed, then click Save.
Delete a widget
-
Click Delete next to the widget you want to delete.

- Click Delete to confirm the deletion.
Delete multiple widgets
-
Click Delete.

-
Select the check box next to the widget(s) you want to delete, then click Delete.

-
Click Delete to confirm the deletion.
Refresh the Widgets page
To ensure that your Widgets page is up to date, you can refresh it.
-
Click Refresh.
