-
To access step properties, in the Diagram pane of the Workflow Designer, perform one of the following:
- Double-click a step.
- Right-click a step and select Properties.
- Select a step and press the F4 keyboard shortcut.
-
Edit step information, then click OK.
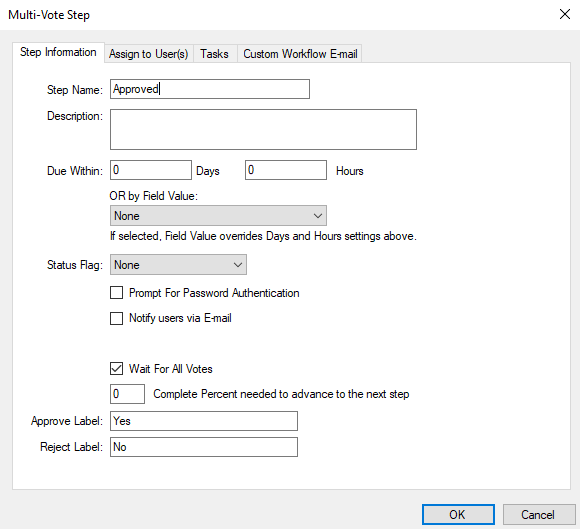
Step Name: Describes the location of a document in a workflow and will be reflected on a user's Assignments page or any workflow report. It is recommended that the name of the step represent the action or activity that needs to take place or is taking place while the document is on that step.
Description: The step description is displayed in two different places. First, on the stencil within the workflow diagram and second, in the body of the email message that is sent to a user when a document is assigned to the step.
Note: The description will only show in the email message if the default message is used and a custom email message has not been configured for the step or for the workflow process.
Due Date: Specifies the amount of time that is allowed for the user assigned to the step to perform the required activities. You can specify the due date in number of days or number of hours, or combination of both. You can also use a date that is contained in an index field of the file that the assigned document belongs to. If an index field for the project is configured as a date field that field appears in the Field Value list.
The start of a given time duration is based on the time when the previous step was completed. If the step is not completed by the duration specified, then the step appears in a red color on the user's Assignments page. The step also appears in the workflow report for overdue tasks.
Status Flag: The status flag provides a visual clue to users on their Assignments page when there are several pending tasks or steps listed. Colors that have 'Pulse' in front of them will fade from the color to white and back to the color again creating a pulsing effect.
Prompt for Password Authentication: Requires password authentication in order to complete the step. This is useful when you need to verify that the person that was assigned to the workflow step is the person that actually completes the step.
Notify users via E-mail: Sends email notifications to users when a document is assigned to a step that they are responsible for. It notifies the user about the documents that are routed to them without having to log in to FileBound.
Queue Action: For Queue steps only, specifies the order of which documents are processed in the queue. Select one of the following:
- FIFO: The first item to enter the queue is the first item to be processed.
- LIFO: The last item to enter the queue is the first item to be processed.
Wait For All Votes: For Multi-Vote steps only, makes the system wait for all votes from users.
Once all users have submitted their vote, the result will be calculated and the document will be sent down the appropriate connection. If the check box is not selected, each time a user submits a vote the system determines the majority based on the number of votes submitted. Once enough votes have been received to determine a majority vote for either 'Yes' or 'No', the document will be sent down to the appropriate connection. In this situation, it is possible that a few users may not get a chance to vote.
Complete Percent needed to advanced to the next step: For Multi-Vote steps only, the percentage of 'Yes' votes that are needed for the document to be sent down the 'Yes' connection. If the number of 'Yes' votes is not equal to or more than this percentage, the document will be sent down the 'No' connection.
Approve Label: For multi-vote steps only, the label that will be displayed for the 'Yes' vote.
Reject Label: For multi-vote steps only, the label that will be displayed for the 'No' vote.