Disposition Notification
The Disposition Notification page is located in the Navigation Menu and is only available to users who are Record Administrators. This page displays a list of records that have met their specified record series notification date. A Record Administrator can either approve or reject the disposition of a record.
Approve a record for destruction
Dismiss a record for destruction
Refresh the Disposition Notification page
They can either approve record to destroy or dismiss and apply new destruction date parameters. - Filter: User can filter records by project or by records series. - View: User can view records into viewer as well as can approve and dismiss from viewer. - Preview: User can preview record/document by click on preview icon.

Approve a record for destruction
The calculation of date when the record goes for approval is based on the destruction date and number of notification days selected for the policy. When a document is approved for destruction, it will be destroyed as per the schedule set for destruction of the record. When a record is destroyed, it will also remove the physical document that existed as the record from the document storage location, all the renditions of the record, any OCR data of the record, and all revisions of the record.
Note: If the Retain File Information after destruction check box is cleared for the record series the record belongs to, the file containing the record is also deleted if no documents are available in the file after deleting the record.
-
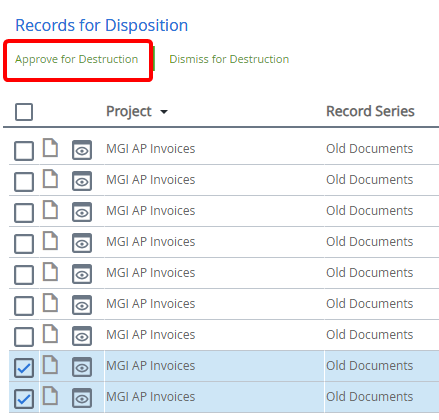
Select the check box next to the records you want to approve for destruction, then click Approve for Destruction.

-
Click Continue on the confirmation message.
The selected records are approved for destruction and are no longer available on the Disposition Notification page.
Dismiss a record for destruction
When you dismiss a record, you can specify the duration by which you want to extend the current destruction schedule or specify a destruction date.
-
Select the check box next to the records you want to dismiss for destruction, then click Dismiss for Destruction.

-
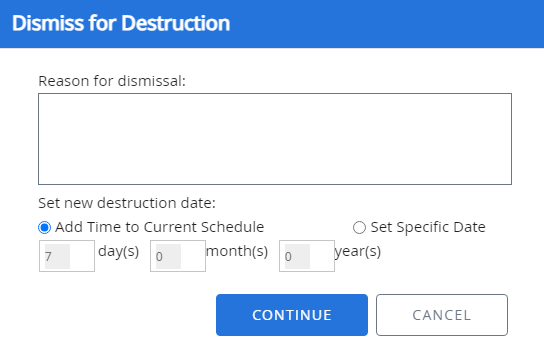
If needed, enter a reason for dismissing the record in the Reason for dismissal box.
-
Select the Add Time to Current Schedule option to extend the current destruction schedule by a specified duration. Specify the day(s), month(s), and year(s), to be added to the current destruction schedule.
-
Or, select the Set Specific Date option, to set a particular date for the record destruction.

-
Click Continue.
The new destruction schedule is set for the record and is no longer available in the destruction notification queue.
View a document in the viewer
You can open a document from the Disposition Notification page in the viewer.
-
Click View next to a document.

The document opens in the default viewer.
Preview a document
-
Click Preview next to a document.

-
View the document.
Refresh the Disposition Notification page
To ensure that the list of records on the Disposition Notification page is up to date, you can refresh it.
-
Click Refresh.

Print list of records
The list of records on the Disposition Notification page can be printed.
-
Click Options, then click Print.

-
In the Print List dialog box, select the pages you want to print, then click OK. The following options are available:
- All records on current page: Prints the list of records on the current page.
- All records on pages: Allows you to provide a page range for the list of records that will be printed.
Export list of records
The list of records on the Disposition Notification page can be exported in Microsoft Excel or .csv format.
-
Click Options, then click Export.

-
In the Export List dialog box, select the pages to export. The following options are available:
- All records on current page: Exports the list of records on the current page.
- All records on pages: Allows you to provide a page range for list of records that will be exported.
-
Select the export file format. The following options are available:
- Export To Excel: Exports the list of records to Microsoft Excel format.
- Export To CSV: Exports the list of records in .csv format.

-
Click OK.
- In the Save As dialog box, select a location to save the file, then click Save.