Add an index field
You can add index fields to a project one at a time, or you can add multiple index fields at once. In both cases, you must configure the index field(s) after they have been added to the project.
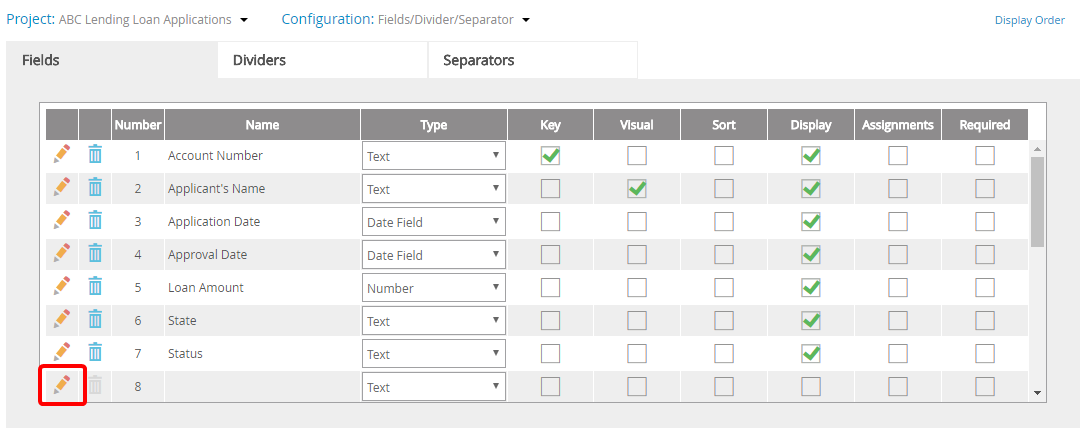
- On the Navigation menu, click
- Click Edit next to the project you want to add an index field to.
- Select Fields/Dividers/Separator from the Configuration list.
- Click the Fields tab.
-
Click Edit next to an empty or unassigned index field.
- Specify index field details, then click Save.
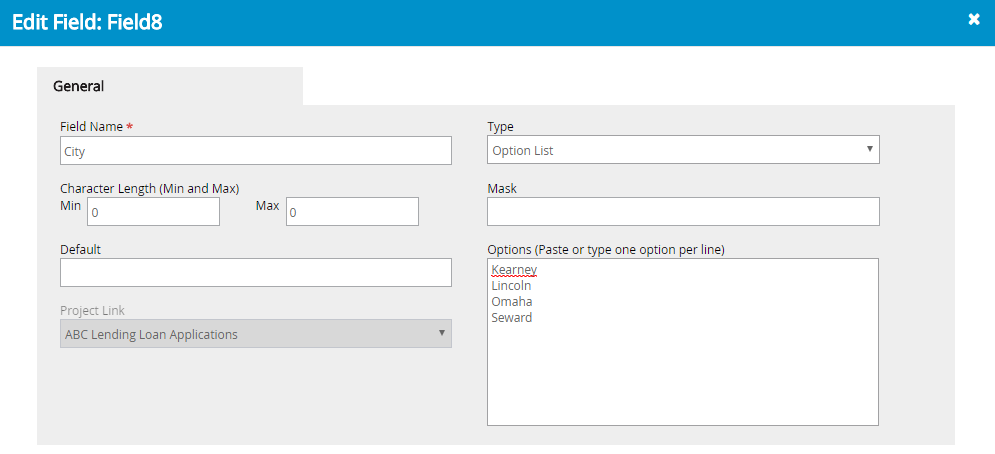
Name: A name for the index field.
Type: The index field type. The following options are available:
- Text: Contains alphanumeric characters that are not used for calculations.
- Number: Contains numeric values, plus symbol characters, and minus symbol character only. The number type can be used for calculations.
- Date Field: Contains a date. Displays a calendar control for selecting the date in the index field.
- Terminal Digit: Contains a number grouping mechanism for storing medical records. The last 2, 3, or 4 digits of the number are considered as a single unit. For example, the number 123 can represent the last 3 digits of a longer number. The number 123 is then considered as the ending or terminal digits, and the files can be grouped according to the index field of terminal digit type.
- Auto-Counter: Contains a number that gets incremented by 1 with every new file entry.
- Option List: Contains a list of values for the index field. A list is displayed for the index field, from which a value can be selected. The optional values can be specified in the Options box separated by commas.
- Auto-Text: Contains alphanumeric characters that begin with alphabets and end with numeric characters. The numeric characters part gets incremented by 1 with every new file entry.
- Project Link: Contains a pre-populated list of the visual values from a linked project. See Project Link index fields for more information.
-
Cascade: Contains a list of values that is dependent on a selection in a prior index field. Cascading index fields must be configured in Advanced Indexing. See Cascading index fields for more information.
Character Length (Min and Max): If the number of characters typed in the index field is less than the minimum length specified, or more than the maximum length specified, then a message is displayed. By default, the Character Length boxes contain zeroes, meaning no minimum or maximum lengths are specified for the value to be entered in the index field.
Mask: Masks characters into the index field when it is displayed. The following can be used in the Mask box:
- Use 'X' to specify alphanumeric values in the mask.
- Use '#' to specify numeric values in the mask.
- Use '?' to specify values of any type in the mask.
- Use '$' to apply the dollar sign, appropriate comas, and the decimal points to a numeric field or text field.
Default Value: A default value for the index field. You can enter replaceable text variables as the default value to automatically populate specific information in this field. The following variables are available for index field values:
| Variable | Returns |
|---|---|
| $$DATE$$ | The current date in mm/dd/yyyy format. |
| $$TIME$$ | The current time in HH:MM AM or PM format. |
| $$DATETIME$$ | The current date and time in mm/dd/yyyy HH:MM:SS AM or PM format. |
| $$USER$$ | The username of the currently logged in user. |
| $$USERID$$ | The user ID number of the currently logged in user. |
| $$CONTACT$$ | The display name of the currently logged in user. |
Options: For Option List type index fields only, specify the options for the index field list in this box. Each option should be on its own line in the order that you want them to appear.
Project Link: For Project Link type index fields only, select a project from this list to display the Key Visual Field of all of the active files in the selected project in a drop-down list for the index field.
Settings

Key Field: Sets the index field as the key field for the project. The key field is required to match and merge files from other applications into the FileBound project.
Required: Makes the index field mandatory.
Default Sort: Sorts search results based on the index field. You can sort search results based on a single index field only.
Unique: Requires a unique value to be entered in the index field.
Separator Relationship: Allows the index field to be related with separators. A specific value for the related index field is assigned to the separator. While adding documents to files, the separator becomes available only for the files, having an index field value that is the same as the value assigned to the separator.
Double Entry: Requires the index field value to be entered twice.
Key Visual Field: Displays the selected index field instead of the default key field. The index field is displayed as the main tab for each file in the left pane of the Viewer window or in the Web Viewer. You can set only a single index field for the visual option. You can include more than one index field in the visual by selecting a value option for the Key Visual Mask while setting properties for the index field.
Key Visual Mask: Specify the field number of the fields to be displayed in the treeview for the file in the Key Visual Mask box. The field number must be specified in $$FieldNumber$$ format. For example, to display Invoice Number, Vendor, and Invoice Date fields in treeview, you need to specify $$F1$$, $$F2$$, and $$F3$$ in the Key Visual Mask box.
Visual Options

Search Results List: Displays the index field as a column on the Search results page.
Assignments Page: Displays the index field as a column on the Assignments page.
Menu