Document Actions are the functions that can be carried out at the document level.
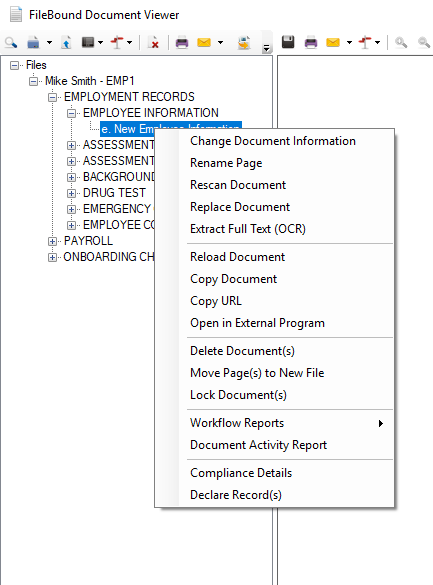
To access Document Actions, right click a document in the File Tree.

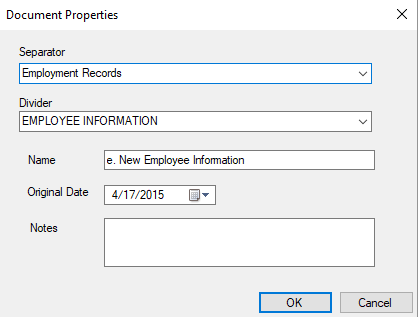
You can change the information related to a document such as the separator and divider the document belongs to, the name of the document, and notes.
You will only be able to change document information if you are assigned to a group with the Document Editing right.
- In the Document Actions menu, click Change Document Information.
-
In the Document Properties dialog box, update document information as needed, then click OK.

This option allows users to change the name of a document.
- In the Document Actions menu, click Rename Page.
- Type the name of the document, then press Enter.
This option allows users to scan a document to replace an existing document and store it at the same location. This is helpful when the original document was a bad scan or the original was unreadable.
- In the Document Actions menu, click Rescan Document.
- Make required changes to the scanner settings in the scanner settings dialog.
- Click OK to scan pages.
This options allows users to replace a document with an imported document. The name of the document remains unchanged.
- In the Document Actions menu, click Replace Document.
-
In the Select Document(s) to Import dialog box, locate the document(s) you want to use to replace the selected document with.
You can select multiple documents by pressing Ctrl and selecting each file. You can select all the documents by pressing Shift and selecting the last document in the range you want to select.
- Click Open.
This option performs Optical Character Recognition (OCR) on a document within the Windows Viewer. This feature works for TIFF files, Word documents, PDF files, and XLS files when an OCR license is installed on the computer and the OCR engine is registered with FileBound.
- In the Document Actions menu, click Extract Full Text (OCR).
-
Click OK to acknowledge the confirmation message.
This option loads the document in the Windows Viewer again.
- In the Document Actions menu, click Reload Document.
This option copies the selected document. Documents can be copied and then pasted into another divider or separator in the same file or into a different file.
- In the Document Actions menu, click Copy Document.
To paste the document, right click the divider, separator, or file that you want to place the document under, then select the option to paste the document.
This option copies a link or URL to a document in the File Contents pane of the Windows Viewer and pastes the link to any editor. You can send the link or URL to other users. Other users can click the link or URL to open the document within FileBound. The users must have a valid user name and password to open FileBound and view the document.
- In the Document Actions menu, click Copy URL.
The link to the document is copied into the computer's temporary memory.
This option allows users to open a document in an external program, make changes to the document, and save the document back in the FileBound server.
- In the Document Actions menu, click Open in External Program.
-
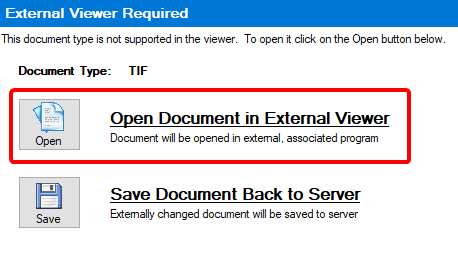
Click Open Document in External Viewer.

- Make required edits in the external program and save the document.
-
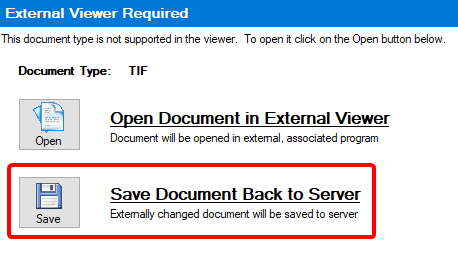
Click Save Document Back to Server to save the changes back to the FileBound server.

This option delete the selected document. If the System Administrator has enabled the Recycle Bin, all the deleted documents are stored in the Recycle Bin.
You will only be able to delete documents if you are assigned to a group with the Document Deleting right.
- In the Document Actions menu, click Delete Document(s).
- Click Yes to confirm the deletion.
This option allows users to move documents from a file and paste them into a newly created file with the same name and the same set of dividers and separators as the current file.
- In the Document Actions menu, click Move Page(s) to New File.
A file with the same name and set of separators and dividers is created. The document is moved to the new file.
You can select the check box next to the multiple documents before clicking Move to new File to move multiple documents to the new file. The Multi-Select Option must be turned on in order to allow the selection of multiple documents.
This option allows users to lock a document from a within the Windows Viewer. The locked document can be updated only by the user who has locked it.
This option will only be available if an Administrator has enabled document locking rights for the project.
- In the Document Actions menu, click Lock Document.
- Click Yes.
- Click OK to acknowledge the confirmation message.
This option allows users to view workflow and file activity reports quickly from the Windows Viewer.
You will only be able to view reports if you are assigned to a group with the Print and View All Reports right.
The following reports are available:
- Workflow Reports - Overdue: Displays the Workflow Status report for items with a status of Overdue. See Workflow Status Report for more information.
- Workflow Reports - All: Displays the Workflow Status report. See Workflow Status Report for more information.
- Workflow Reports - Current: Displays the Workflow Status report for items with a status of Current. See Workflow Status Report for more information.
- Workflow Reports - Incomplete: Displays the Workflow Status report for items with a status of Incomplete. See Workflow Status Report for more information.
- Workflow Reports - System Steps: Displays the Workflow Status report for items with a status of System Steps. See Workflow Status Report for more information.
- Document Activity Report: Displays the Document Activity report. See Document Activity Report for more information.
Menu