The DTT Import is a tool used by Administrators to import a company’s destination information from a CSV (comma-separated values) file into the Destination Translations Table (DTT). The DTT is a SQL table that exists in the
Import Add
The DTT Import tool performs a query to determine if there is an existing entry. For example, if a fax number does not exist, a new entry is added with the properties defined in the CSV file.
Import Remove
If the fax number exists, the DTT Import tool retrieves its properties, removes the existing entry and creates a new entry after merging existing properties with the new definition.
Import Failures
During the DTT Import process, failed records are skipped and reported after the import is complete at the Command Prompt or in a Log file. See Viewing DTT Import errors for more information.
How routing works after a DTT Import
The Dispatch component checks the DTT to see if the original Email, Fax, Folder and other destination types need to be translated.
Note: In the context of this topic, the use of the term “translated” means “changed”.
The Dispatch component changes the destination to one of the following types.
- Device
- Folder
- Printer
- RightFax Connector
It translates the actual destination address by adding the new destination as a localized destination. Fax number translations occur after the Normalization process so DTT fax numbers match normalized numbers.
Routing rules are then applied after the translation takes place. The job will find the appropriate routing rule using the new type and destination.
Before you begin
You must create a CSV file that contains the destination information needed for the DTT Import process.
Use any application that allows you to save a file as a CSV file; for example, Notepad or Excel.
Note: A CSV file that contains device definitions will be used for illustrative purposes only in the steps below and may not reflect your specific workflow configuration.
To create the CSV file
1. Use the following parameters as the header in the CSV file. No spaces are allowed.
- FAX_NUM,IP_ADDRESS,HOSTNAME_MATCH,SERIAL_NUM,REGISTERED,REG_EMAIL,BUSINESS_UNIT,SERVER,UNCPATH
2. Specify the actual information using the Parameters Description table and example below.
3. Save the CSV file when you are done.
See the Parameters Description table below.
|
Parameter |
Description |
Required or Optional |
|---|---|---|
| FAX_NUM | Normalized fax number for matching | Required |
| IP_ADDRESS | Device IP address | Optional |
| HOSTNAME_MATCH |
Destination definition Note: If not supplied, the system will default to setting the field to “IP:IP_ADDRESS” |
Optional |
| SERIAL_NUM | Device serial number | Optional, Required for the Device Action Type |
| REGISTERED | Specifies registered printer as a regulated printer. The device is not registered if not set. Use a value of “1” to define the device as registered. | Optional |
| REG_EMAIL | Specifies email address for regulatory notification. | Optional, Required for the Email Action Type and if the device is registered |
| BUSINESS_UNIT |
The business unit the device is assigned to. Note: This parameter is used to set the \\prDeviceMetaData (DEVICE_BUSINESS_UNIT) property. It can also be used in the Document Stamp properties enclosed with the percent (%) symbols. |
Optional |
| SERVER | The RightFax server associated with the Fax Server connector. | Optional, Required for the RightFax Action Type |
| UNCPATH | The UNCPath for UNC destinations | Optional, Required for the UNC Action Type |
See the Notepad example below.

Third entry after the header
The following parameters are specified in the third entry in the Notepad example above.
- Fax Number
- Device IP Address
- Host Name – the double commas (,,) indicate that the parameter is blank and was omitted.
- Device Serial Number
- Device is registered – The one (1) value indicates that the device is registered.
- Registered Email – The email address for regulatory notification.
Note: The double commas (,,) at the end of the third entry indicate that the remaining parameters are blank and were omitted.
See the Excel example below.
This example illustrates how the file will appear when you open a Notepad CSV file in Excel.

You can run the DTT Import tool by using the following executable file and its parameters at the Command Prompt.
To run the DTT Import
- Go to the Command Prompt where the HP CR server is located.
- Go to the following directory.
- \Program Files (x86) \HP Capture and Route\HP Capture and Route\Bin\>
- Run dttimport.exe and specify the following parameters using the following syntax at the Bin directory.
- Dttimport CSVFilePath ActionType HP Capture and Route Server
Note: A space is required between the parameters at the Command Prompt.
- Specify the CSV file location.
- Specify the Action Type; for example, Device. See the Action Type Description table below.
|
Action Type |
Description |
|---|---|
| Device | Creates definition to routes messages to a configured device (print job). |
| Creates definition to route messages to email. | |
| Remove |
Removes definitions. |
| RightFax |
Creates definition to route messages to the RightFax FSP (Fax Service Provider). Note: RightFax requires a license. Contact your Account Manager, if necessary. |
| UNC | Creates definition to route messages to a folder. |
- Specify the HP CR server name to connect and import.
- Press Enter.
Note: Each Action Type requires its own CSV file. Action Types cannot be combined into a single CSV file.
See the DTT Import and its Device parameters example below.
| CSV File Path | Action Type | Server Name |
| ….\Bin>dttimport d:\temp\device.csv | device | localhost |
See the DTT Import with Document Stamp example below.

Document Stamp
Document Stamp information can also be included with your DTT Import by specifying the name of your document stamp in quotes; for example, “Fax Stamp”.
Note: Use the quotes (“ “) only if your document stamp name contains spaces.
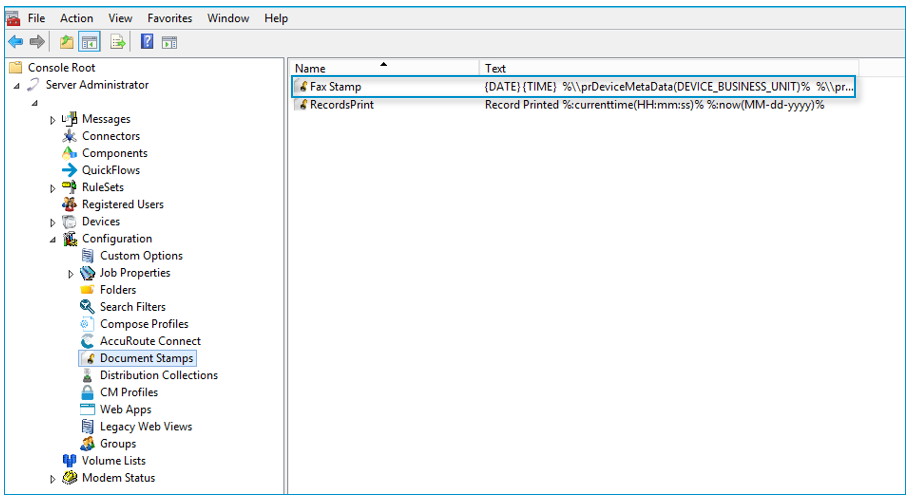
You can find the document stamp name by using Server Administrator > Configuration.
To find the document stamp name
- Start the Server Administrator.
- Expand Configuration.
- Select Document Stamps. The Document Stamps Details pane appears.
- Make a note of the appropriate document stamp name.
See the Document Stamps example below.
You can view any errors related to a DTT Import at the Command Prompt or in a log.
Tip: Use a log to capture the DTT Import errors if you have a large CSV file.
See the DTT Import with errors example below.

In the example above, the serial number is required and cannot be left blank.
Capturing DTT Import errors
You can capture DTT Import errors by specifying a location and log name.
To capture the errors
- Use the Greater than (>) symbol at the end of your parameters.
- Specify the location and name of the Log file.
- Press Enter.
Go to the appropriate location, open, and view the Log file.
See the DTT Import and log example below.

Note: A DTT Import can be run with or without the *.exe file extension.
See the NotePad Log example below.

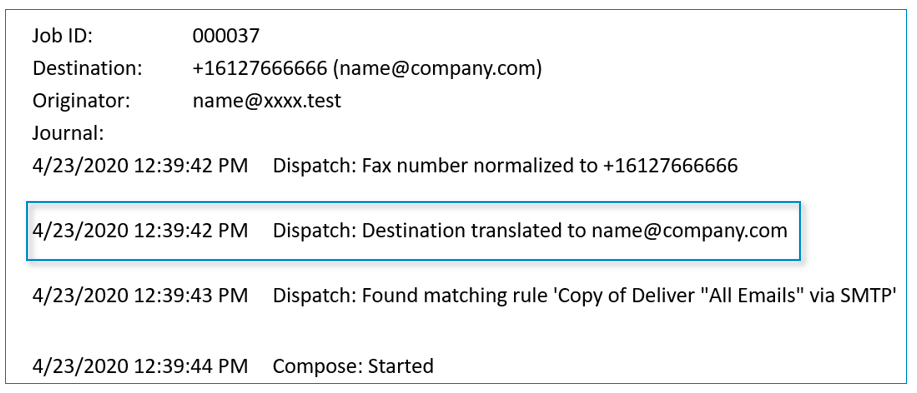
You can view the translations as messages are successfully routed to their new destinations by using the Journal in the History folder.
To view the Journal
- Start the Server Administrator.
- Expand Messages.
- Select History. The History folder opens.
- Select the Job ID you want to view. The Recipient Properties dialog box appears.
- Select the Journal tab. The Journal entries appear.
- Select the Dispatch Journal entry to view the translation.
- Click Close on the Journal Entries Properties dialog box.
- Click Close on the Recipient Properties dialog box.
See the Journal example below.
The DTT Export is a tool used by Administrators to export a company’s destination information from the Destination Translations Table (DTT). The DTT is a SQL table that exists in the HP CR database. The server and its components use the DTT to route messages to their appropriate destination. The DTT Export tool is useful for companies that need to review their current destination information, identify where changes are required and any errors that may exist.
Running DTT Export
You can run the DTT Export tool by using the following executable file and its parameters at the Command Prompt.
- Go to the Command Prompt where the HP Capture and Route server is located.
- Go to the following directory.
- \Program Files (x86) \HP Capture and Route\HP Capture and Route\Bin\>
- Run dttexport.exe and specify the following parameters using the following syntax at the Bin directory.
- Dttexport ServerName Backup BackupFilename Stamp
See the Parameters Description table below.
|
Parameter |
Description |
Required or Optional |
|---|---|---|
| ServerName | Description Name of the HP CR server | Required |
| Backup | Generates the DTT into a JSON file. | Optional |
| BackupFilename |
Saves the DTT JSON file with the filename provided. |
Optional |
| Stamp |
Generates a list of all stamps referenced by individual DTT entries at the end of the list. |
Optional |
- Press Enter.
Note: If the Backup and Backup Filename parameters are not specified then the DTT Export tool will generate a CSV file with the following information.
Creating a DTT Export CSV file
You can create a DTT Export CSV file instead of the JSON file by using the following parameters at the Command Prompt.
- dttexport servername > outputfilename
The DTT Export CSV file contains the following entries that you specified in the DTT. See the CSV File Description table below.
|
Parameter |
Description |
|---|---|
| GUID | Unique row id |
| Reference | Reference DTT entries |
| FaxNumber |
Fax number DTT entries |
| BusinessUnit |
Business Unit DTT entries, job destinations to match |
| Destination | Job re-route to destination DTT entries |
| Type | Destination type DTT entries |
| RegulatedDestination | Regulated Destination DTT entries |
Requesting DTT Export Stamp information
You can request stamp information to be included in the DTT Export by using the following parameters at the Command Prompt.
- dttexport servername stamp > outputfilename
Note: A list of the stamps referenced by the DTT entries is generated at the end of the output.