Administrators can set up an Address Book Manager application that will enable designated HP CR Client users to seamlessly create, update, delete, and search Address Book entries from a company’s database.
Before you begin
Administrators must complete the following tasks.
-
Determine which database and fields will be used for the HP CR Client Address Book Manager.
-
-
New - Create new Address Book database entries
-
Properties – Update Address Book database entry properties
-
Delete - Delete Address Book database entries
-
Search – Filter results based on search criteria
-
Note: These actions will directly impact the database. You can set up all or limit the actions, if necessary.
You can add Address Book Manager to a HP CR Client profile by using Configuration > HP CR Client > Default Profile. There are two profiles that can be used; Admin (Administrators) and Default (Domain users). These profiles can be used simultaneously if you configured these groups and want to limit the actions between Administrators and HP CR Client users.
Note: The Default HP CR Client profile is used as an example in the following steps.
To add the Address Book Manager
-
Start the Server Administrator.
On the Start menu, click
-
Expand the Server Administrator tree, if necessary.
-
Expand Configuration and select HP CR Client. The HP CR Client profiles appear in the details pane.
-
Select Default. The Default Profile Properties dialog box appears.
-
Select the Applications tab.
-
Click Add and select Administration.
-
Select Address Book Manager on the Administration drop-down list. The Address Book Manager Application Properties dialog box appears and shows the General default properties.
-
Continue with Setting up the Address Book provider.
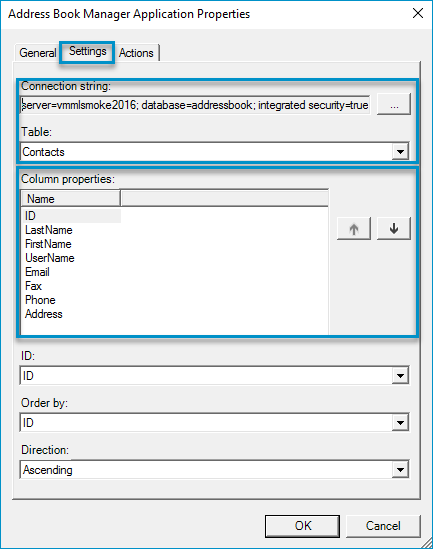
The Address Book provider is used to connect and identify the database table and fields HP CR Client users will have access to. You can set up an Address Book provider and specify the following details by using the Address Book Manager Applications Properties > Settings dialog box.
-
Connection String
-
Table
-
Column Properties
-
ID
-
Order by
-
Direction
To set up an Address Book provider
-
Complete the Adding Address Book Manager to HP CR Client profile steps, if necessary. The Address Book Manager Application Properties dialog box appears.
-
Select the Settings tab.
See the Address Book Manager Application Properties > Settings dialog box example below.
-
Click the Ellipsis (…) button, specify the database connection string in the Connection String box and click OK.
-
Specify the database table in the Table box. The database fields (columns) appear in the Column properties area.
Note: Select the appropriate database table on the Table drop-down list if the database you have connected to has multiple tables.
Use the Up and Down arrows to rearrange the fields displayed in the Address Book table, if necessary.
-
Choose an ID on the ID drop-down list.
-
Choose a field to sort the entries; for example, LastName on the Order by drop-down list.
-
Choose how the entries are displayed; for example, Ascending on the Direction drop-down list.
-
Click OK.
-
Continue with Setting up the Address Book Manager Actions.
You can set up the Address Book Manager actions by using the Address Book Manager Application Properties > Actions tab. It includes the following default actions for HP CR Client users.
-
New - Create new Address Book database entries
-
Properties – Update Address Book database entry properties
-
Delete - Delete Address Book database entries
-
Search – Filter results based on search criteria
You can allow access to all default actions or limit these actions, if necessary. The Search action must be configured with the columns specified in the Address Book Manager Application Properties > Settings dialog box. These columns will serve as Search criteria for HP CR Client users.
Before you begin
-
Ensure that the Address Book Manager application has been added to the default HP CR Client profile and your Address Book provider settings are complete and saved.
-
Make note of the column names. The column names must be the same when you create the job properties in the next series of steps.
Note: You may need to select OK or the Close icon on the Default Profile Properties dialog box to exit.
The Search action can be configured by using Configuration > Job Properties > System or User properties.
See example below.
Example: Let’s say you want HP CR Client users to search by the ID, LastName, FirstName, Email, and Fax columns then user properties with the same names must be created if they do not exist as system properties. In this scenario, Email is a system property and does not need to be created. However, ID, LastName, FirstName, and Fax are not pre-defined system properties and must be created as user properties.
To configure Job properties
-
Expand Configuration and Job Properties on the Server Administrator tree.
-
Right-click User. The Properties shortcut menu appears.
-
Select New > Job Property. The Job Property dialog box appears.
-
Type the column name in the Name box.
Note: The column and job property names must be the same.
-
Click OK.
-
Repeat steps 2 through 5 until you are done.
To configure Search by
-
Expand Configuration and select HP CR Client. The HP CR Client profiles appear in the details pane.
-
Select Default. The Default Profile Properties dialog box appears.
-
Select the Applications tab.
-
Double-click Address Book Manager in the Name/Description table. The Address Book Manager Application Properties dialog box appears.
-
Select the Actions tab.
See the Address Book Manager Application Properties > Actions dialog box example below.

-
Double-click Search in the Text/Description table. The Search Action Properties dialog box appears.
-
Select the Search by tab.
-
Click Add. The Search Property dialog box appears.
-
Click Select. The Select Job Property dialog box appears.
-
Type the column name in the box to search for system or user properties.
-
Select the appropriate system or user property.
-
Click OK.
-
Type a column name in the Display name box.
-
Click OK on the Search Property dialog box.
-
Repeats steps 8 through 14 until you are done.
-
Click OK on the Search Action Properties dialog box.
Use the Up and Down arrows to arrange the Action buttons from left to right in the HP CR Client Address Book Manager toolbar. In addition, you can use the Add button to add line separators between the Action buttons, if necessary.
-
Click OK on the Address Book Manager Application Properties dialog box.
-
Click OK on the Default Profile Properties dialog box.
You can limit HP CR Client user actions by using the Address Book Manager Application Properties > Remove button.
-
Click the Actions tab, if necessary.
-
Select the action you want to remove in the Actions > Text and Description table.
-
Click Remove.
-
Click OK.
Note: Removed actions can be added back at any time by using the Add button.
Ensure members of your groups have the appropriate Web view and HP CR Client profile enabled.
-
Expand Configuration on the Server Administrator tree.
-
Double-click Groups. The Groups details pane appears.
-
Select the appropriate group; for example, Default. The Group dialog box appears.
-
Expand Clients on the General (left) pane, if necessary.
-
Select Web.
-
Select the Enable members of this group…. check box.
-
Select the appropriate web view on the Web View drop-down list; for example, View.default.xml.
-
Select the appropriate profile; for example, Default.
-
Click OK.
See About Groups for more information.
Note: Multiple HP CR Client profiles and Search actions can be configured for different groups. For example, you can create an Admin profile for power users that will have access to all actions and a Default profile with limited actions for general WebApps users. Each profile must be defined and have an Address Book provider. The appropriate job properties must be created and applied to the Search by parameters. Finally, ensure that the appropriate web views and profiles are enabled for the members of each group.
See also
Using HP CR Client Address Book Manager