The HP CR server is installed with the following services, components, connectors and more.
- Specialized Windows services that carry out the document distribution responsibilities of the server
- Components used to complete message processing tasks
- Connectors used to connect the server with external systems that submit messages to the server and distribute them to their final destinations
- Server Administrator, the server management application
Before you begin
The server setup program has a verification utility that checks the server for compliance with installation requirements. All installation requirements must be met before the server can be installed. If you are setting up a server cluster, review Setting up Server Cluster before starting the server installation.
Note: The server installation includes a 60-day demonstration license.
The pre-installation package automatically verifies, installs, and/or configures a variety of prerequisites, including:
- Minimum versions of the OS, Internet Explorer, .NET, and Microsoft SQL
Note: Internet access is required for the system to install Microsoft.Net v3.5.1. Note also that in a Windows 2012 environment, MS.Net 3.5.1 is not included or configured with the preinstallation pack. As a requirement for Device Client installations, you need to independently download and install MS.Net 3.5.1 to your Windows 2012 system.
- SMTP and IIS services
- 32-bit IIS applications
- DCOM and IIS configuration
- Installation of required runtime libraries
- Application of Windows firewall settings
- Print spooler and IIS services set to automatic
- User Access Control (UAC) set to required setting
Some post-installation configuration requirements are automated as well. Post-installation configurations for the server include:
- Setting the Doc, Docx, XLS, XLSX, PPT, PPTX, HTM and HTML formats to use the Aspose compose engine
- Setting a Cleanup task in Maintenance is not automated and must be manually configured.
See About Cleanup for more information.
Note: It is recommended to run this program on all servers that will run components on host or remote servers.
The server setup program has a verification utility that checks the server for compliance with installation requirements. All installation requirements must be met before the server can be installed.
Tip: Before you start installing the server, review and verify that you have met all requirements.
Note: If you are setting up a server cluster, review the Cluster Service setup instructions before beginning the server installation. If you are setting up the server with a Telco Connector, see Installing Dialogic modem driver before beginning the server install.
- Log in to the system where the server is being installed using the service account.
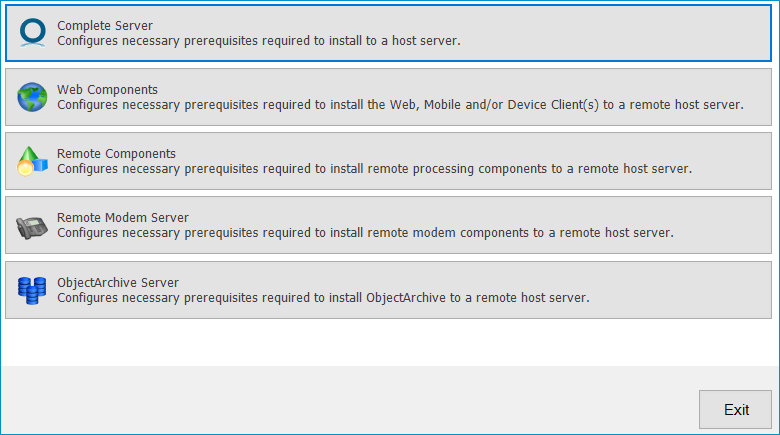
- Go to the network copy of the server setup and run \HP Capture and Route\Install.exe. The Prerequisite Install dialog box appears.
- Select the appropriate prerequisite install check; for example, Complete Server.
Note: Each option checks for and (if not already present) installs and/or configures the necessary prerequisites based on your selection.
See the Prerequisite Install Check dialog box example below.
See a description of each option below.
Complete Server – prepares the system to install the server onto one host server, including:
- Microsoft.NET Framework 4.6.1
- Microsoft.NET Framework 3.5 SP1
- Microsoft SQL Server 2012 Express
- Web Server IIS installation
- Sets the W3SVC Service (from the Web Server) to Automatic Startup
- SMTP Service installation
- Sets the SMTP Service to Automatic Startup
- Adds a DCOM Exception in the Windows Firewall
- Sets the Print Spooler Service to Automatic Startup
Web Components – prepares the system to install the Web, Mobile and/or Device Client(s) to a remote host server, including:
- Microsoft.NET Framework 4.6.1
- Microsoft.NET Framework 3.5 SP1
- Web Server IIS installation
- Sets the W3SVC Service (from the Web Server) to Automatic Startup
- Adds a DCOM Exception in the Windows Firewall
Remote Components – prepares the system to install remote processing components onto a remote host server, including:
- Microsoft.NET Framework 4.6.1
- SMTP Service installation
- Sets the SMTP Service to Automatic Startup
- Adds a DCOM Exception in the Windows Firewall
- Sets the Print Spooler Service to Automatic Startup
Remote Modem Server – prepares the system to install remote modem components to a remote host server, including:
- Microsoft.NET Framework 4.6.1
- Adds a DCOM Exception in the Windows Firewall
A default list of components to be configured before installation appears.
See the default list of components example below.
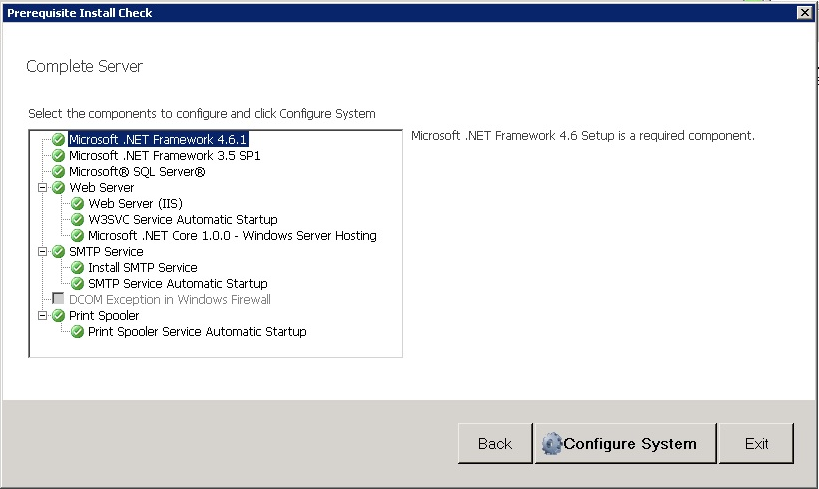
- Click Configure System.
Note: A File In Use Windows dialog box may appear in the background. Find the dialog box and click OK to proceed with the configuration.
When the system finishes configuring your prerequisites, a Successful Summary dialog box appears, listing components and their status.
See the Successful Summary dialog box example below.
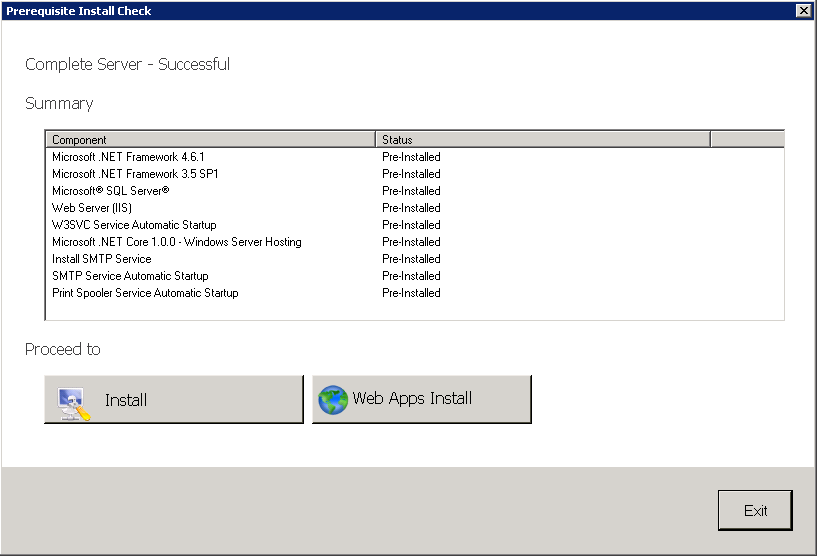
- Select Install. The InstallShield wizard appears.
- Click Next. the License Agreement appears.
- Review the License Agreement, scroll to the bottom of the agreement and select I accept the terms....
- Click Next and select one of the following Setup types.
Note: The default destination folder is
- Typical for an installation that does not support faxing
- Custom, to select options, such as the modem server
If you select Custom, select options for the server installation. The following features are selected by default.
- Message Server
- Connector Package
- Component Package
- Server Administrator
- Intelligent Device Client
- Client Installs
The following features must be selected for a server installation.
- Message Server
- Connector Package
- Component Package
- Server Administrator
- Client Installs
The remaining features can be installed on remote systems based on the planned environment structure.
Note: Important! Select the Modem Server option to support faxing with a local modem server.
Note: Important! ObjectArchive is only supported when installed on a system remote from the server. See Installing ObjectArchive for more information. Note that ObjectArchive is not cluster aware.
- Click Next. The setup checks the system for installation requirements and displays the results.
-
Review the results and perform one of the following actions.
- To exit the setup or to install components that are required for the installation, click Cancel and then click Yes to exit the setup.
- To continue with the installation, click Next.
- Specify the Service Account login credentials.
- Type the Windows domain name in the NT Domain box.
- Type the user name in the User Name box, if necessary. By default, the User Name field is populated with the name of the user logged in to Windows.
Type the user password in the Password and Confirm Password boxes, enter the password and click Next.
-
Review the installation settings on the Installation Settings dialog box and click Next to proceed with the installation. The Setup Status progress details appear.
- Click Finish on the InstallShield Wizard Complete dialog box.
See also
Creating and Configuring the Database