Configure Microsoft Dynamics Channel Integration Framework (CIF)
Note: This guide is only applicable to Microsoft Dynamics 365. Continue to the next step.
You must configure your Channel Integration Framework (CIF) V1 correctly for InGenius to appear in Microsoft Dynamics. CIF V1 is intended for model driven apps (such as Hubs).
Configure Channel Integration Framework (CIF) V1
First, consult the Microsoft Dynamics documentation on how to configure CIF here.
While following the steps outlined in the link, ensure to input the following data:
- Name: InGenius
- Label: InGenius
- Channel URL: The URL of your org up until .com. After .com, copy and paste: /WebResources/ingenius_/tunnel/index.html. An example of a complete Channel URL is: "https://<Your-Org-URL>/WebResources/ingenius_/tunnel/index.html"
- Enable Outbound Communication: Yes
- Channel Order: 1
- API Version: 1.0
- Add apps under Unified Interface Apps for the Channel. Ensure not to add all apps at once, as there is a known issue in Microsoft Dynamics when adding all apps at the same time.
- Under Select the Role for the Channel, select the InGenius security role you created earlier. (InGeniusProfile_User)
- Custom Parameters: Input in
{"isLocalhost":false,"region":"<YourRegion>"}
Note: <YourRegion> is determined by your deployment region for InGenius (e.g 'ca-central-1', 'us-west-2', 'eu-est-1', or 'ap-southeast-2', as detailed here.)
-
Select Save & Close to complete the configuration.
Configure Channel Integration Framework (CIF) V2 (Optional)
Follow the steps listed in this section if you would like to configure CIF V2 in Microsoft Dynamics. CIF V2 is intended for multi-session apps (such as Omnichannel for Customer Service).
To configure CIF V2 for Microsoft Dynamics with InGenius, follow the steps below to import the InGenius configuration data.
Import InGenius CIF V2 Configuration Data
The following method allows you to import CIF V2 data using a supplied ZIP file to make the template and fields configuration process simpler.
-
To import the InGenius CIF V2 configuration data:
-
In Microsoft Dynamics, navigate to Advanced Settings > Data Management.
-
Select Imports.
-
Select Import Data.
-
Import the ZIP file located in this link.
-
Ensure Files and Delimeter Settings are the same as in the image below, then select Next.
_thumb_0_250.png)
-
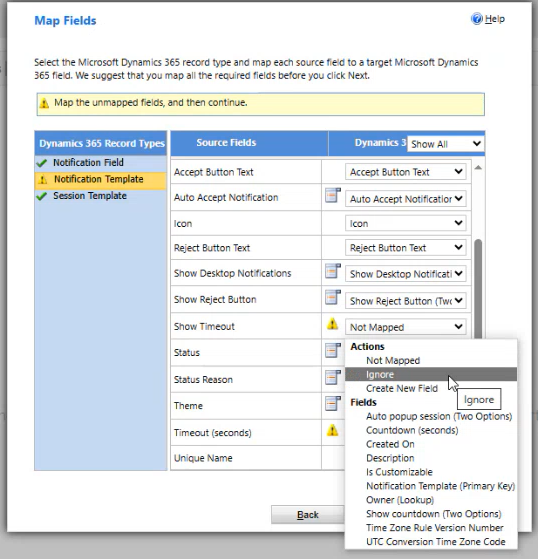
Under System Data Maps, select Default (Automatic Mapping), then select Next.
Note: If the Notification Template record type displays a warning, check to see if the "Show Timeout" and "Timeout (Seconds)" fields are unmapped. These can be set to "Ignore".

-
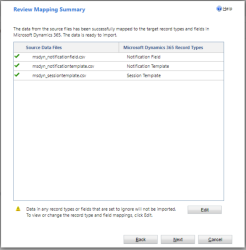
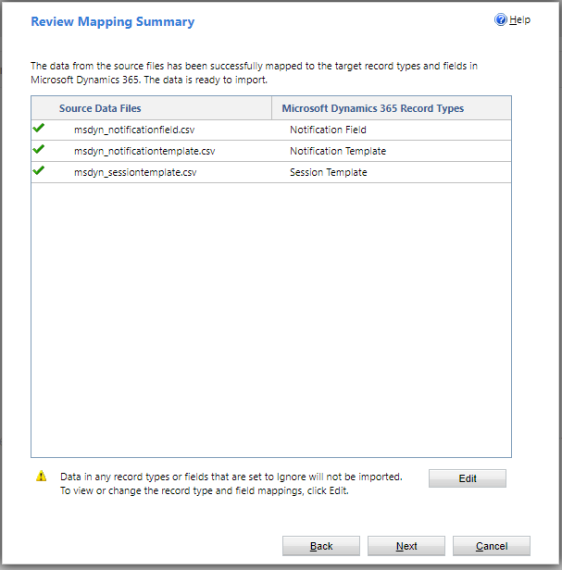
Ensure Source Data Files and Record Types are the same as in the image below, then select Next.
-
Ensure to select No under Allow Duplicates, then select Submit.
-
Click Finish.
-
The Status Reason for the job progresses from Submitte > Parsing > Transforming > Complete. Refresh the page to see the latest status.
.png)
Template and Fields Configuration
The following section provides an overview of how to configure the templates and fields for CIF V2 and the imported InGenius data.
Configure Application Tab
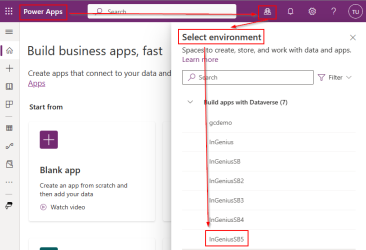
- Navigate to the Power Apps Page.
- On the top banner, click on the Environment tab and select your D365 environment which contains Customer Service Workspace.
-
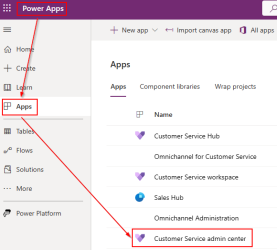
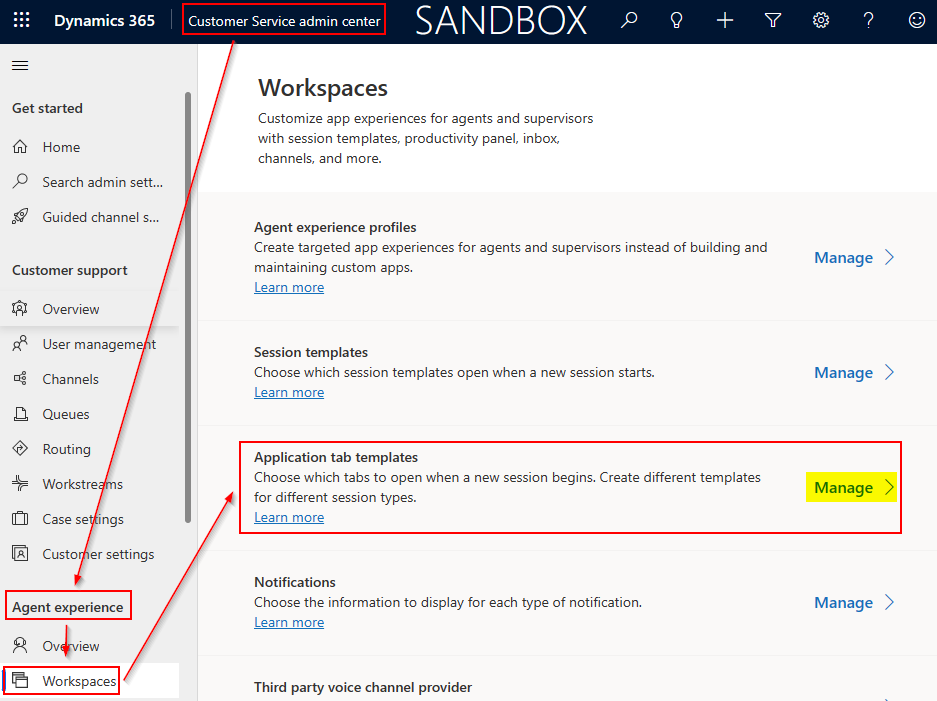
Navigate to the Apps section, select All, and open the Customer Service Admin Center app.
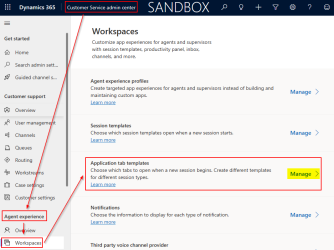
- In the Customer Service Admin Center, navigate to Agent Experience | Workspaces in the side menu, and then select Manage under the Application tab templates section.
-
From the top banner, click the New button to create a new Application tab template and fill in the following information:
-
Name - InGenius - Default Tab
-
Unique Name - ingenius_defaulttab
Note: The unique name field must match the above name exactly.
-
Title - InGenius
-
Page Type - Dashboard
-
Description - Empty
-
Can close - Yes
-
-
Click Save & Close on the top banner.


Configure Session Template
- In the Power Apps Page, click on the Environment tab from the top banner and select your D365 environment which contains Customer Service Workspace.
-
Navigate to the Apps section and open the Customer Service Admin Center app.
-
Navigate to Agent Experience | Workspaces from the side panel, and select the Manage under the Session templates section.
-
Click New from the top menu bar to create a new Session Template, and fill out the required fields as follows:
-
Name: InGenius - Default Session
-
Unique Name: ingenius_defaultsession
Caution: The unique name must be exactly as above.
-
Type: Generic
-
Title: InGenius
-
Communication panel mode: Docked
-
Owner: <Your D365 Admin account>
-
Anchor Tab: InGenius - Default Tab (Or as created in the previous step)
-
-
Select Save & Close.
Configure Notifications
- In the Power Apps Page, click on the Environment tab from the top banner and select your D365 environment which contains Customer Service Workspace, as done previously, and open the Customer Service Admin Center app
- Navigate to Agent Experience | Workspaces and then select Manage under the Notifications section.
- Click the New Notification Template button to create a new Notification, and fill in the information as follows:
- Name: InGenius - Incoming Call
- Unique Name: ingenius_incomingcall
- Title: InGenius
- Icon: /WebResources/ingenius_/tunnel/u_blue.svg
- Auto Assign Work Items: No
- Show Timeout: Yes
- Countdown (Seconds): Any desired value
- Accept Button: Answer
- Show Reject Button: No
- Owner: <Your D365 Admin account>
- Select the Add Existing Notification Fields and add all existing InGenius fields that have been imported:
- InGeniusCallType
- InGeniusRemotePartyName
- InGeniusRemotePartyNumber
- InGeniusTransferredByName
- InGeniusTransferredByNumber
- InGeniusTrunkNumber
- If you must manually create these fields, select New Record > Notification Fields > OK
- Enter the following information, then select Save. Select New if you wish to create more than one field:
- Name: InGeniusRemotePartyName
- Unique Name: ingenius_remotepartyname
- Title: Name
- Value: {InGeniusRemotePartyName}
- Repeat the above step and enter the following information for the following notification fields:
Remote Party Number
Name: InGeniusRemotePartyNumber
Unique Name: ingenius_remotepartynumber
Field Header: Number
Value: {InGeniusRemotePartyNumber}
Trunk Number
Name: InGeniusTrunkNumber
Unique Name: ingenius_trunknumber
Field Header: Dialed #
Value: {InGeniusTrunkNumber}
Call Type
Name: InGeniusCallType
Unique Name: ingenius_calltype
Field Header: Call Type
Value: {InGeniusCallType
Transferred By Name
Name: InGeniusTransferredByName
Unique Name: ingenius_transferredbyname
Field Header: Name
Value: {InGeniusTransferredByName}
Transferred By Number
Name: InGeniusTransferredByNumber
Unique Name: ingenius_transferredbynumber
Field: Header Number
Value: {InGeniusTransferredByNumber}
- Enter the following information, then select Save. Select New if you wish to create more than one field:
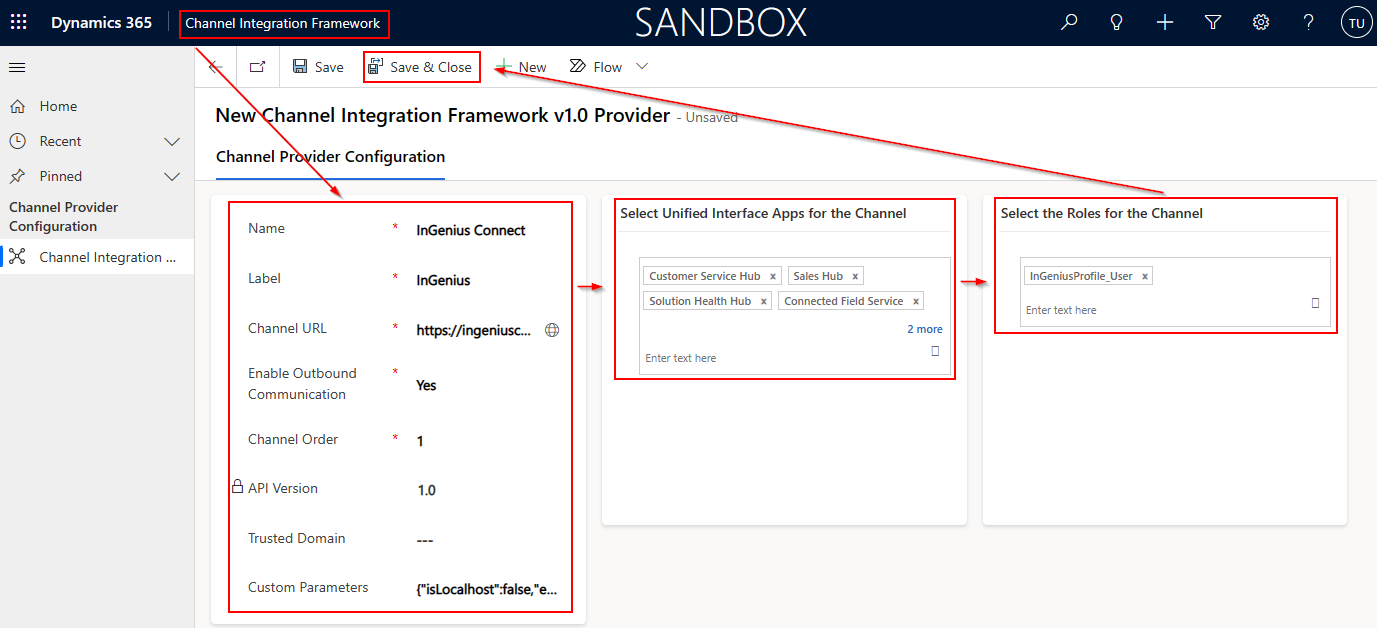
Configure Channel Provider
- In the Power Apps page, click on the Environment tab from the top banner and select your D365 environment which contains Customer Service Workspace.
-
Navigate to the Apps section, select All Apps, and open the Customer Service Admin Center app.
-
Navigate to Agent Experience | Workspaces from the side panel, and select the Manage under the Third party voice channel provider section.

-
Click New from the top menu bar to create a new Channel Provider, and fill out the required fields as follows:
-
Name: INGENIUS_CIF
-
Unique Name: ingenius_cif
-
Label: InGenius
-
Channel URL: The URL of your org up until .com. After .com, copy and paste: /WebResources/ingenius_/tunnel/index.html. An example of a complete Channel URL is: "https://<Your-Org-URL>/WebResources/ingenius_/tunnel/index.html"
-
Enable Out Bound: Yes
-
Channel Order: 1
-
API Version: 2
-
Trusted Domain: N/A
-
Custom Parameters: Input in
{"isLocalhost":false,"region":"<YourRegion>"}Note: <YourRegion> corresponds to your deployed InGenius region. (i.e ca-central-1, us-west-2, eu-west-1, or ap-southeast-2. Refer to Network Requirements for more information.)
-

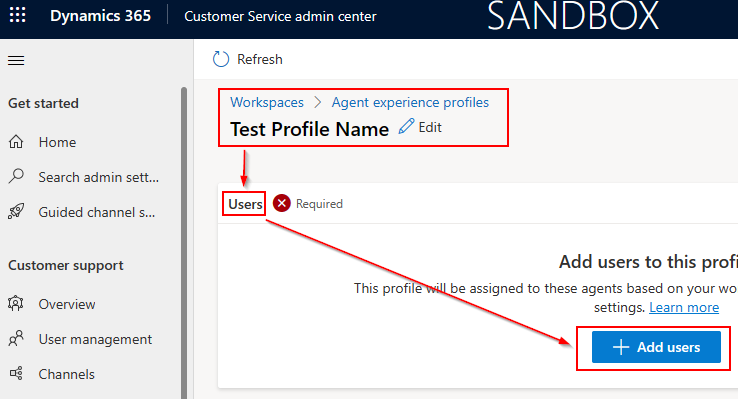
Configure Agent Experience Profile
After having configured the templates and fields, you will need to create and configure an Agent Experience profile to utilize them, and then add users to it.
- In the Power Apps page, click on the Environment tab from the top banner and select your D365 environment which contains Customer Service Workspace.
-
Navigate to the Apps section and open the Customer Service Admin Center app.
-
Navigate to Agent Experience | Workspaces from the side panel and click the Manage button under Agent experience profiles.
-
Click the New button from the top menu to create a new Agent experience profile, and fill in the name fields without any spaces, then click Create to confirm.
-
Under the Agent experience profiles list, select the profile that was just created.

-
In the Users section, click the Add users button and use the search functionality to add desired users, then click Add.
-
Under the Agent experience profile page, scroll down to Channel providers and select the Edit button.
-
In the Channel Provider pop-out, configure the options as follows:
-
Toggle Omnichannel and Unified Routing to On for all active channels.
-
Under Third party voice channel providers, select the channel provider created in the previous step ("INGENIUS_CIF").
-
-
Click Save & Close.