Telephony Transcription Configuration
Before proceeding with the configuration steps described on this page, make sure you have setup your recording solution at an accessible address as described in the previous section. Your Genesys environment must then be configured with a recording application and a resource manager. For more information, refer to the official Genesys documentation on integrating with third party vendors.
Note: Upland Transcription Service is currently only available for Genesys Engage telephony with SCV.
Configure IVR Profile
-
Log into your Genesys Engage Administrator environment.
-
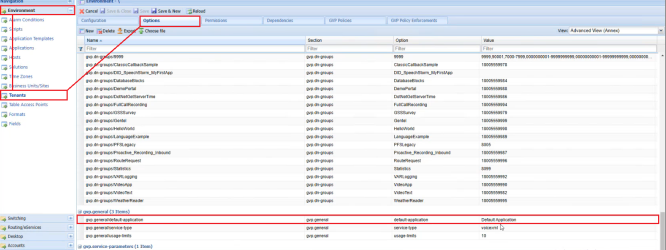
Determine your default IVR application by navigating to PROVISIONING | Environment | Tenants | Options tab and search for 'default' under the option column filter.
-
Navigate to PROVISIONING | Voice Platform | IVR Profiles and select the default application you identified in the previous step.
-
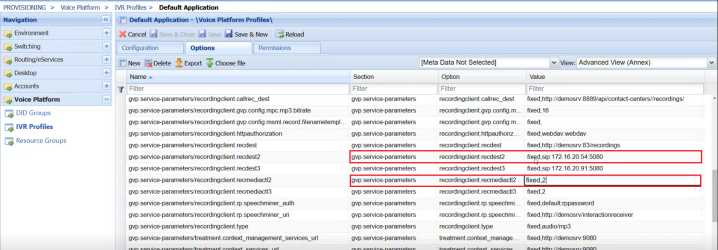
Under the Options tab, scroll down to find the "gvp.service-parameters" section.
-
Find and select an unassigned "recordingclient.recdest" option and modify the Value column as follows:
Note: You may have up to 5 recording destinations (Recordingclient.recdest2, ...recdest3, etc.), select one that is unassigned to setup. Each recording destination has a corresponding "recordingclient.recmediactl" entry.
-
"fixed,sip:<Capture-Device-IP-address>:5080"
-
-
Find the corresponding "recordingclient.recmediactl" and modify the Value column as follows:
-
"fixed,2"
Note: "fixed" sets it to be a static IP address, and the "2" parameter are the number of SIP invites.
-
-
Select Save from the top banner.

Setup Recording Application
-
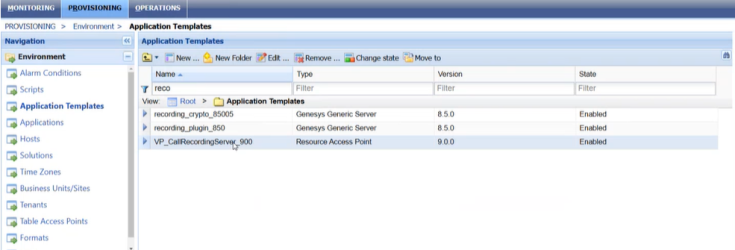
Navigate to PROVISIONING | Environment | Application Templates and search for the "VP_CallRecordingServer" application and ensure it is available and enabled.
Note: This application template is available through imported Genesys APD or XML files.
-
Navigate to PROVISIONING | Environment | Applications and select New from the top menu banner, configure the application as follows:
-
Name: Choose an appropriate name.
-
Application Template: Select the "VP_CallRecordingServer" template.
-
-
Under the Options tab, there will be a mandatory field Resource AOR (Address of Resource). Fill in the Value field with "sip,<Capture-Device-IP-address>:5080"
-
Select Save & Close from the top menu banner.

Create and Configure a Resource Group
Caution: 3rd-party recorders need to be added to individual recording resource groups. This is to ensure that if a recording capture device stops, the other recording capture device will continue. If they are part of the same resource group you may encounter issues with your recordings.
-
Navigate to PROVISIONING | Voice Platforms | Resource Groups and select New from the top banner to open the resource group creation wizard.
-
In the Resource Manager Selection step, select your default or desired enabled resource manager and click Next.
-
In the Group Name and Type step, add in an appropriate name and set the Group Type to 'Recording Server'
-
In the Tenant Assignment step, click +Add and add your enabled environment from the list.
-
In the Group Properties step, make sure to set the following:
-
Monitoring Method: SIP OPTIONS
-
Load Balancing Scheme: Round robin
-
-
In the Resource Assignment step, check the box next to the recording application you had setup in the previous step and then select Next.
Note: The recording application you had setup in the previous step should be available for selection, but the 'Host Name or IP' column must be set to the IP address of your capture device and the 'SIP Port' column to 5080. Ensure you change these values if they are not set by default.
-
Select Finish.
Note: After creating the resource group, the application will be available under the PROVISIONING | Environment | Business Units/Sites section of the Genesys Administrator app.