Capture Device Configuration
Before proceeding with the setup of your telephony and IVR profile to work with the Upland Transcription Service, the capture application must first be installed and configured to work for your environment. An Upland team member will walk you through this process.
Note: Upland Transcription Service is currently only available for Genesys Engage telephony with SCV.
Deploying the Capture Service
An Upland support member will provide you with a package for the capture appliance. This will need to be installed and configured as a Windows Service. Follow the steps below:
-
Unzip the package file to the folder where you want it located.
-
Open a command prompt window and input the following to create the capture application as a Windows Service:
Note: Replace <unzipped-folder-path> with the file path of the location you have placed the package.
Copysc create UplandCaptureAppliance binPath="C:\<unzipped-folder-path>\CaptureApplianceService.exe" DisplayName="Upland Capture Appliance" -
In your Windows search bar, search for and click on Services.
-
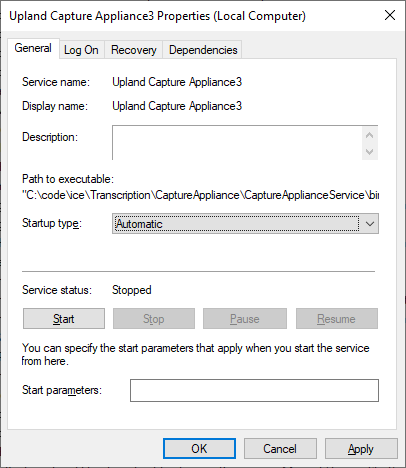
Right-click on the service named 'Upland Capture Appliance' to open its properties window
-
Under the General tab, set the 'Startup type' dropdown to Automatic.

-
Under the Recovery tab, configure the service to restart 1 minute after failure, then press OK.

-
Open a command prompt window and start the service by inputting:
Copysc start UplandCaptureAppliance
Configuring Capture Device
Within the unzipped package, some environment specific settings must be configured in the settings.xml file. Follow the instructions below:
-
Open the settings.xml file located inside your unzipped capture appliance folder.
-
Under the <CloudUrl> heading, update with your cloud URL as follows:
-
Copy
<CloudUrl>wss://{org-id}.ingenius.com?uuid={uuid}</CloudUrl> -
Replace {org-id} and {uuid} with your environment's values
-
-
Under the <HeadersForCloudSink> heading, update as follows:
-
Copy
<HeadersForCloudSink>
    <Header name="token">token_for_transcription_service_web_socket_auth</Header>
</HeadersForCloudSink>
-
-
Under the <AllowedDns> header, update as follows for selective transcription:
-
Copy
<AllowedDns>
    <Dn>7260</Dn>
    <Dn>7270</Dn>
</AllowedDns>
-
-
Under the <CloudActiveCallsUrl> header, update as follows for receiving active call UUIDs:
-
Copy
<CloudActiveCallsUrl>wss://{org-id}-active-call.ingenius.com</CloudActiveCallsUrl> -
Replace {org-id} with your environment's value
-
-
Save your changes.