Deployment
This section outlines the steps that the InGenius deployment specialist will guide you through.
Telephony Integration
Integrate support for your telephony system on the InGenius telephony gateway with your deployment specialist. Follow the instructions for your telephony below:
Asterisk Integration
Follow the steps below with your deployment specialist to integrate Asterisk with InGenius Connect:
Asterisk Integration
- Open the Configuration Tool.
- Navigate to the Configuration | Telephony tab.
- In the PBX/Switch section, select Asterisk.
- Click Save.
Avaya Integration
Follow the steps below with your deployment specialist to integrate Avaya with InGenius Connect:
Avaya Integration
- Open the Configuration Tool.
- Navigate to the Configuration | Telephony tab.
- In the PBX/Switch section, select Avaya.
- Click Save.
Cisco UCCE Integration
Follow the steps below with your deployment specialist to integrate Cisco UCCE with InGenius Connect:
Cisco UCCE Integration
- Open the Configuration Tool.
- Navigate to the Configuration |Telephony tab.
- In the PBX/Switch section, select UCCE.
- Click Save.
Primary CTI Server
- Primary IP Address: This is the IP address of the Primary CTI Computer telephony integration. server.
- Port: By default this is 42027.
- Use Secure Server Named: Used to authenticate to a secure server.
- Peripheral ID: The Unified ICM Intelligent Contact Management Peripheral ID Identification or type of unique identifier. of the ACD Automatic Call Distribution where devices to be monitored is located.
- CTI Server Protocol Version: By default this is 13.
- Client ID: A default agent ID that is set to InGenius.
- Password: The default Client ID password that is set to Password.
- Test: Verifies the settings are correct.
Alternate CTI Server
- Primary IP Address: This is the IP address of the Alternate CTI server.
- Port: By default this is 42027.
- Use Secure Server Named: Used to authenticate to a secure server.
- Peripheral ID: The Unified ICM Peripheral ID of the ACD where devices to be monitored is located.
- Test: Verifies the settings are correct.
Finesse
Within the Finesse tab, select the Use Finesse checkbox to enable Finesse. From here you can add your primary and alternate server information.
Note: If you are using Finesse, ensure the Password checkbox is selected. If it is disabled/not selected, all attempts to log in as an agent fail when using Finesse.
Agent Login
Select which of these parameters your agents will be required to supply on login:
- Agent ID
- Password
- Instrument
- Position ID
- Work Mode
- Skillgroup
- Mobile Agent
Agent Logout
These are the codes displayed to end users in the InGenius UI when the agent logs out.
- Logout Agent when Monitor Stopped: If checked, this will automatically log agents out if the monitor has stopped, like when the browser is closed or the session times out.
- Default Logout Reason Code: This is the reason code that is automatically selected if the agent is logged out some way other than by pressing the Log Out button, like when the browser is closed or the session times out.
- Agent Logout Reason Codes:
- Reason codes: The reason code number should match those already programmed in the Cisco UCCE. If reason codes do not match those already programmed in Cisco UCCE, reason codes selected by agents will still be captured and available for reporting. However, the reason codes will not be consistent with those in Cisco UCCE.
- Comment: This is the translation of the numbered reason code and is displayed for agents in the InGenius UI.
Agent Not Ready
These are the codes displayed to end users in the InGenius UI when they are Not Ready.
Default Not Ready Reason Code: This is the reason code that is automatically selected if the agent is logged out while in Ready state some way other than by pressing the Not Ready button, for example when the browser is closed or the session times out.
Agent Not Ready Reason Codes:
- Reason codes: A number should ideally match those already programmed in your Cisco UCCE. If reason codes do not match those already programmed in Cisco UCCE, reason codes selected by agents will still be captured and available for reporting however will not be defined and consistent with those in Cisco UCCE.
- Comment: This is the translation of the numbered reason code and is displayed for agents in the UI.
Note: To transition from one Not Ready state to a different Not Ready state without going into a Ready state, select the appropriate Not Ready reason code from the list.
Agent Wrap-up
These are the codes displayed to end users in the InGenius UI when they complete a call and go into wrap-up.
- Only Allow These Entries: If checked, the users can only input wrap-up entries from the Wrap-up Text list.
- Wrap-up Text: Wrap-up codes are used to indicate how the call finished. InGenius recommends to match the wrap-up codes with the Cisco UCCE registry codes already configured. If wrap-up codes do not match the UCCE configuration, wrap-up codes selected by agents will still be saved and available for reporting. However, the InGenius codes will not be consistent with the UCCE registry codes.
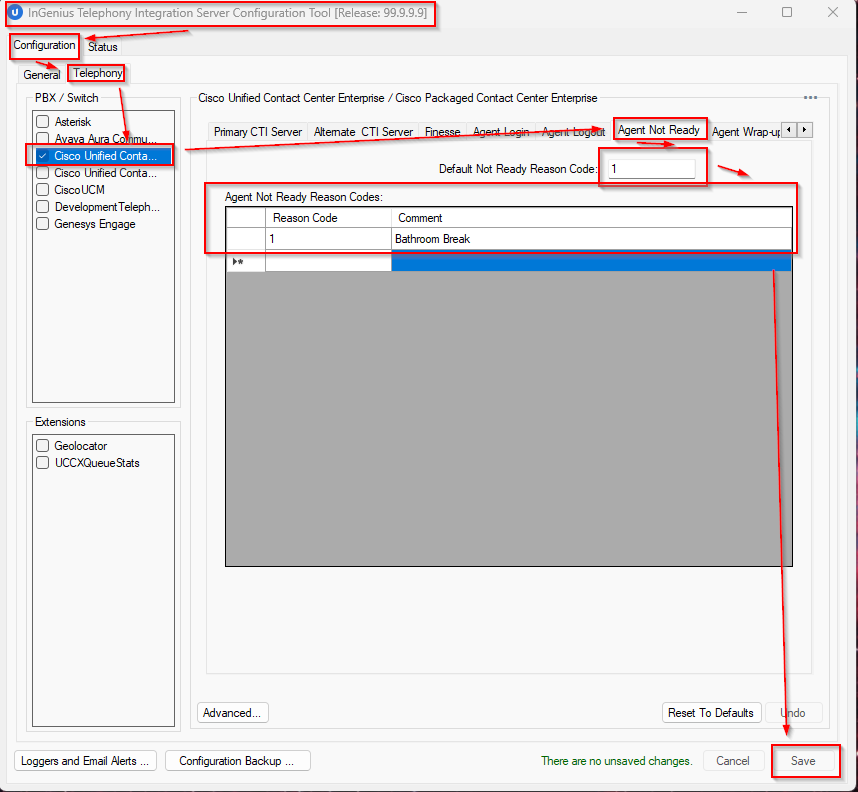
Work Mode on Incoming
If the Agent Desk settings have been configured with the attribute Work mode on incoming set to Required with Wrapup Data, the InGenius Telephony Integration Server Configuration Tool must be configured with an Agent Not Ready Reason Code default set as demonstrated in the steps below:
-
Open the Configuration Tool.
-
Navigate to the Configuration |Telephony tab.
- In the PBX/Switch section, select UCCE.
- Select the Agent not Ready tab.
- For the Default Not Ready Reason Code textbox, input a value of 1.
- For the Agent Not Ready Reason Code Table -
- Input a Reason Code value which is numerical, such as 1
- Input a Comment value which is alpha-numerical, such as 'Bathroom Break'
- Click the Save button located in the bottom-right corner.
Call Info
- Call Info Displayed: Select which Cisco UCCE call parameters will appear within the InGenius call display:
- Call ID
- Call Type
- DNIS
- ANI
- Caller Entered Digits
- Dialed Number
- Customer Phone Number
- Customer Account Number
Note: Selecting Reset to Defaults eliminates all the settings in the Cisco CTI tabs (CTI Server Connection, Agent Logout, Agent Not Ready, and Agent Wrap-up).
Cisco UCCX Integration
Follow the steps below with your deployment specialist to integrate Cisco UCCX with InGenius Connect:
Cisco UCCX Integration
- Open the Configuration Tool.
- Navigate to the Configuration | Telephony tab.
- In the PBX/Switch section, select UCCX.
- Click Save.
To configure the Cisco UCCX gateway:
- Select the CiscoUCCX checkbox on the left-hand side of the Configuration Tool. This brings up Cisco UCCX connection information.
- Choose the Agent information mode you want for the CTI Server Connection:
- Manual: Allows you to configure all the agent settings directly through InGenius.
- LDAP: Takes the agent settings as they are configured on the Cisco switch.
- Finesse: Takes the agent settings as they are configured through Cisco Finesse.
- Fill in the following fields:
- Primary CTI Server IP Address: This is the IP address of the Master CTI server.
- Port: By default this is 12028.
- CTI Server Protocol Version: By default this is 14.
- Primary Finesse URL: The URL address of primary server's Finesse connection. Available only in Finesse mode.
- Port (Finesse): By default this is 8082. Available only in Finesse mode.
- If you have an alternate CTI server for resiliency, fill in the following fields:
- Alternate CTI Server IP Address: This is the IP address of the Slave CTI server.
- Port: By default this is 12028.
-
Alternate Finesse URL: The URL address of alternate server's Finesse connection. This URL is only available only Finesse mode.
- Port (Finesse): By default this is 8082. This port is only available in Finesse mode.
Testing
- Click Test Primary to ensure you have the correct settings.
- If you have an alternate CTI server for resiliency, click Test Alternate to ensure you have the correct settings.
Agent Logout
Available only in Manual mode.
- To program the Agent Logout reason codes, select the Agent Logout tab.
- Program the Agent Logout codes to be displayed to end users in the InGenius UI when they log out.
- Logout Agent when Monitor Stopped: Automatically logs agents out if the monitor has stopped.
- Default Logout Reason Code: This reason code is automatically selected if the agent does not manually select a code in the allotted wrap-up time frame.
- Agent Logout Reason Codes
- Reason codes: Use the same reason code numbers that are configured on the Cisco UCCX registry. If reason codes do not match the Cisco UCCX registry, reason codes selected by agents will still be recorded for reporting but the codes will not be consistent with those in the registry.
- Comment: This is the translation of the numbered reason code and is displayed for agents in the UI.
Agent Not Ready
Available only in Manual mode.
- To program the Agent Not Ready reason codes select the Agent Not Ready tab.
- Program the Agent Not Ready codes to be displayed to agents in the InGenius UI when they are not ready.
- Default Not Ready Reason Code: This is the reason code that is automatically selected if the agent does not manually select a code in the allotted wrap-up time frame.
- Agent Not Ready Reason Codes:
- Reason codes: Use the same reason code numbers that are configured on the Cisco UCCX registry. If reason codes do not match the Cisco UCCX registry, reason codes selected by agents will still be recorded for reporting but the codes will not be consistent with those in the registry.
- Comment: This is the translation of the numbered reason code and is displayed for agents in the UI.
Agent Wrap-up
Available only in Manual mode.
- To program the Agent Wrap-up reason codes select the Agent Wrap-up tab.
- Program the Agent Wrap-up codes to be displayed to end users in the InGenius UI when they complete a call and go into wrap-up.
Wrap-up Text: Various wrap-up codes to indicate how the calls wrap up. Ideally these should match those already programmed into the registry in your Cisco UCCX. If wrap-up codes do not match those already programmed into the registry, wrap-up codes selected by agents will still be captured and available for reporting, however, they will not be defined and consistent with those in the registry.
Call Info
To select which Cisco UCCX call parameters will appear within the InGenius call display, select the Call Info sub-tab.
Cisco UCM Integration
There are no additional instructions to list for integrating Cisco UCM.
Genesys Engage Integration
Follow the steps below with your deployment specialist to integrate Genesys Engage with InGenius Connect:
Genesys Integration
- Open the Configuration Tool.
- Navigate to the Configuration | Telephony tab.
- In the PBX/Switch section, select GenesysPureEngage.
- Click Save.
Genesys Cloud Integration
There are no additional instructions for integrating Genesys Cloud.
Modify D365 App Web Redirect URIs
The InGenius customer care team will provide you with the redirect URI for your deployment. If you have not filled in the redirect URI during the pre-deployment steps when creating the registration, follow the instructions below:
Note: If you have not been provided with a URI, contact the InGenius support team.
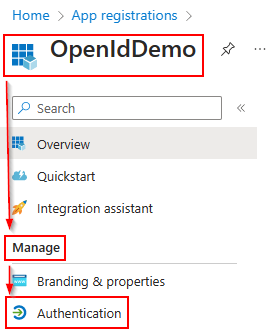
-
Navigate to Azure Active Directory | Applications | App Registrations, and under Owned applications, select your registered app created in the pre-deployment section.
-
Under the Manage group in the left-hand panel, select Authentication.
-
Expand the Web section, and then paste the Redirect URI you have been provided into the text field.
-
Click the Save button to complete your changes.