To manage settings for your inbound faxes, in the Navigation Menu, click Settings, then click Inbound Settings.This menu item will only be available to users with an active receive faxes service.
There are three tabs that make up the Inbound settings:
General tab
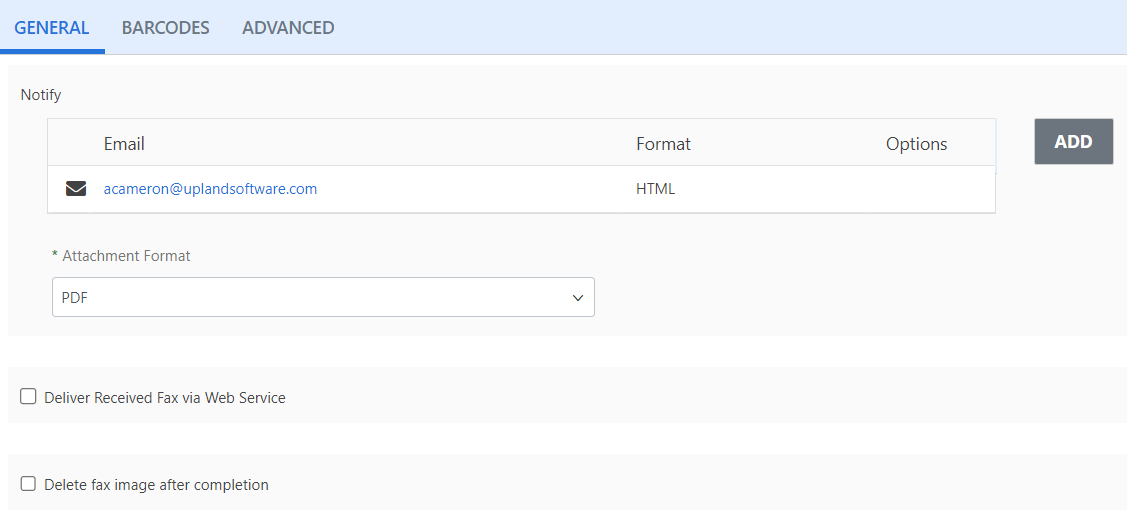
Notify: It is possible for you to receive fax notifications to multiple email addresses simultaneously. In this section, you can add and remove email addresses that fax notifications are sent to.
-
Click Add.

- In the Email box, enter the email address that you want to add.
-
Select the format you would like to receive emails in from the Format drop-down menu. The following options are available:
-
HTML
-
Plain Text
-
NEC
-
Plain Text with Link
-
-
Select the Sign messages check box to have all emails sent to you with incoming faxes signed by InterFAX. This allows you to verify that the message was sent from the InterFAX service and not from a third-party posing as InterFAX. This setting is automatically selected when you send a signed message as described under Digital ID Status below.
Note: When this setting is selected, the InterFAX service identifies itself as "From: securefax@interfax.net".
-
Select the Encrypt messages check box to have all emails sent to you with incoming faxes encrypted. Others will not be able to read your faxes, even if the emails carrying the faxes are intercepted in transit. This setting is automatically selected when you send a signed message as described under Digital ID Status below.
-
The Digital ID Status displays the status of your Digital ID Public Key in the InterFAX service.
To upload your public key to the InterFAX system, simply send a signed (not encrypted) email message to the following address: digitalid@interfax.net. Once the InterFAX system receives this email, the Sign messages and Encrypt messages options will automatically be selected for all inbound accounts associated with that email address.
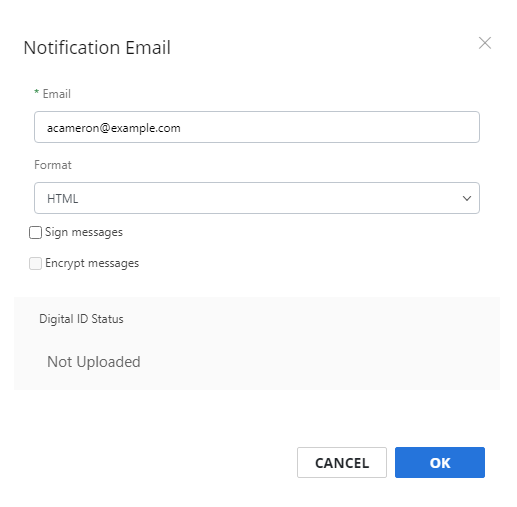
- Click OK.
Attachment Format: Select the format for attached fax images. The following options are available:
-
PDF
-
TIF
-
TIFF-G3
-
TIFF-G4
Deliver Received Fax via Web Service: Select this check box to initiate a web callback when a fax is received.
Method: Select the method to use for web callbacks. The following options are available:
-
 HTTP Post
Callbacks are sent to the specified URL using the HTTP POST method.

URL: The callback URL.
-
XML Web Service
Callbacks are sent to the specified URL using XML as the data format.

URL: The callback URL.
-
Fax Link
Callbacks are sent to the specified URL using a REST call to a defined schema.
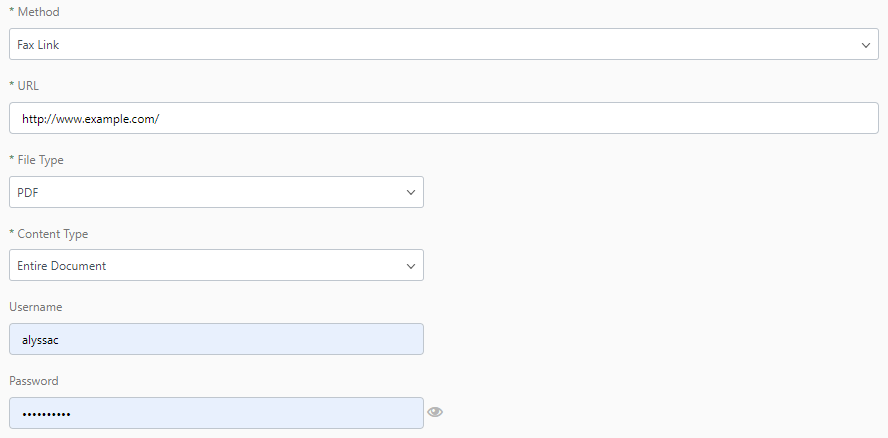
URL: The callback URL.
File Type: The document will be included in the format selected here.
Content Type: The format in which the document is inserted into the call.
-
Entire Document: The entire document is encoded as Base64 as a whole.
-
Individual Pages: Each page of the document is encoded as Base64.
Username: The username and password for the account.
Password: The password for the account.
-
-
Advanced HTTP
Advanced HTTP allows you to control all aspects of the HTTP call.
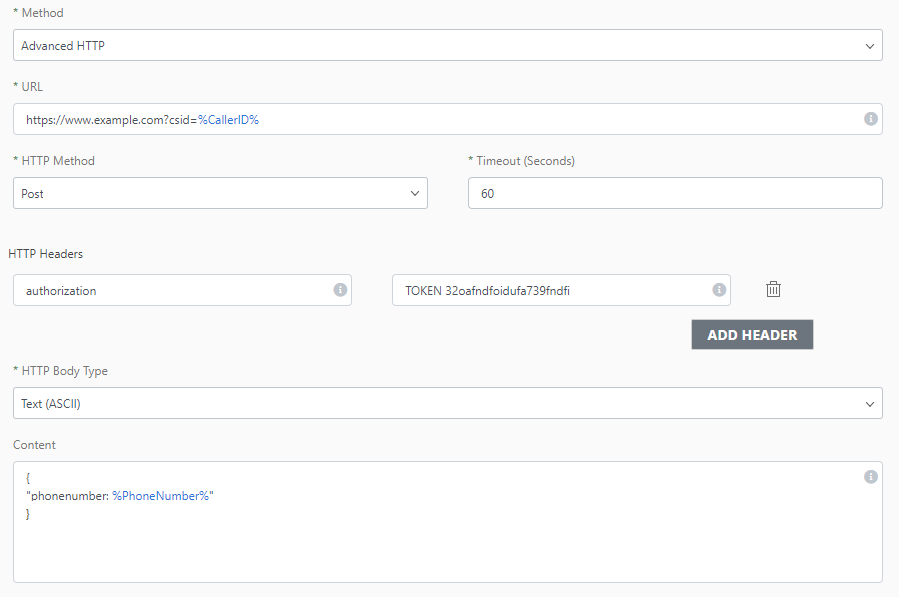
URL: The URL for the web service. This field supports data field substitution. Enter % to view a drop-down list of all the available fields.
HTTP Method: The HTTP method to use.
Timeout: The duration (in seconds) to attempt to establish a connection.
HTTP Headers: Add HTTP headers to determine what information is exchanged. To add a header:
-
Click Add Header.

-
Enter the HTTP header name in the first box, followed by the HTTP header value in the second box. Both of these fields support data field substitution. Enter % to view a drop-down list of all the available fields.

-
Repeat Steps 1-2 to add additional headers if necessary.
The header order does not matter and there is no limit to the number of headers that can be added.Click Delete Header to remove a header from the configuration.
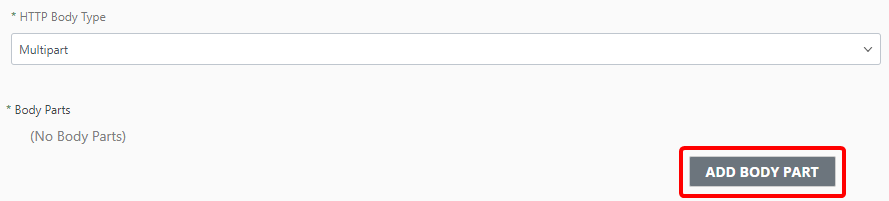
HTTP Body Type: The format of the HTTP body. The following options are available:
-
Text (ASCII): The content being transmitted in the HTTP body is encoded using the ASCII character encoding scheme. When this option is selected, enter HTTP body content in the Content field. This field supports data field substitution. Enter % to view a drop-down list of all the available fields.
-
Text (UTF8): The content being transmitted in the HTTP body is encoded using the UTF-8 character encoding scheme. When this option is selected, enter HTTP body content in the Content field. This field supports data field substitution. Enter % to view a drop-down list of all the available fields.
-
Text (UTF16): The content being transmitted in the HTTP body is encoded using the UTF-16 character encoding scheme. When this option is selected, enter HTTP body content in the Content field. This field supports data field substitution. Enter % to view a drop-down list of all the available fields.
-
Document (PDF): The raw bytes that make up a PDF file are transmitted in the HTTP body.
-
Document (TIF): The raw bytes that make up a TIFF file are transmitted in the HTTP body.
-
Multipart: The HTTP body consists of multiple sections. Each body part can have its own set of headers and HTTP body. To add a body part:
-
Click Add Body Part.
-
Click Add Header to add an HTTP header.
-
Select the HTTP Body Type.
-
Enter content for the HTTP body if necessary.
-
Repeat Steps 1 - 4 to add additional body parts if necessary.
Click Delete Body Part to remove a body part from the configuration.
-
-
Automatically Delete Fax Image: Fax images are permanently removed from our servers, so that any sensitive data cannot be exposed. The following options are available:
-
Never: Fax images are not automatically removed from our servers.
-
After notifications are completed: Fax images are automatically removed from our servers once notifications are completed. A fax notification email must be configured when this option is selected.
-
After fax is retrieved using the XML Web service: Fax images are automatically removed from our servers after being retrieved from the XML web service.
Barcodes tab
Barcode processing allows you to automatically extract barcode data from your received faxes and store the values into custom properties or private tags.
To add barcode mappings for inbound faxes:
-
Select the Process received faxes for Barcodes check box to enable barcode processing for inbound faxes.
-
Click Add.

-
Select the page that the barcode will be found on from the On Page drop-down list. If Custom is selected, enter a page number in the box to the right.
-
In the Matches box, enter the regex pattern to match against the barcode value. See Regex examples.
-
In the Store in box, select where you want to map the value to. Values can be stored in a private tag or in a custom field.
-
In the Value box, enter the value you want to store for the barcode. Enter %barcode% to store the barcode value. Substitution variables are supported for this field.
-
From the Handle multiple matches drop-down list, select an option to determine what to do if the pattern match finds more than one barcode that matches. The following options are available:
-
First: If more than one match is found, use the first barcode.
-
Last: If more than one match is found, use the last barcode.
-
None: If more than one match is found, do not use either barcode.
Tip: Barcodes are read left to right and top to bottom, so the first is the closest to the top/left and last is the closest to the bottom/right.

-
-
Click Save.
-
Repeat Steps 1 - 8 to add additional barcode mappings.
Advanced tab
Auto Sharing
Instead of sharing each fax manually, you can use InterFAX’s auto sharing feature to automatically share received faxes with one or more users or groups of users under an account.
-
Select the Enable Auto Sharing check box.
-
Click Add.

-
Click Add (>) next to the user(s) or group(s) you want to automatically share received faxes with. Or, move users or groups from the Available box to the Selected box using a drag-and-drop operation.
To remove a user or group from auto share, click Remove (X) next to the user or group in the Selected box.
-
Select the desired permission level for the user(s) or group(s) from the Permissions drop-down menu. The following options are available:
-
View
-
View and edit
-
View and share
-
View, edit and share
-
-
Click OK.
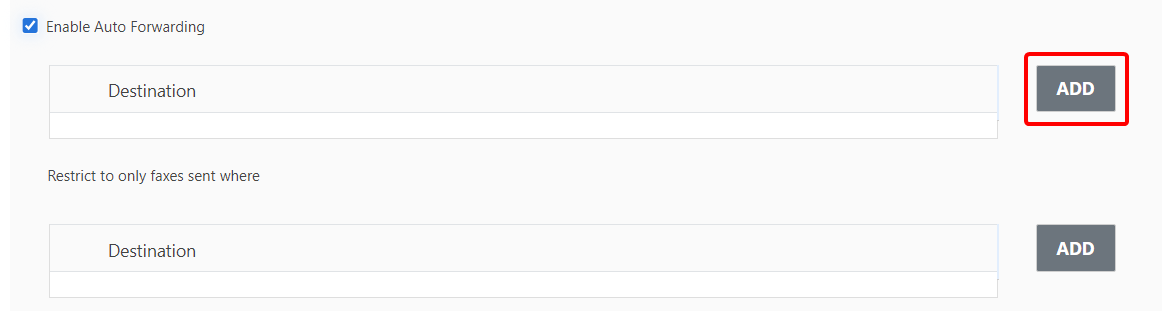
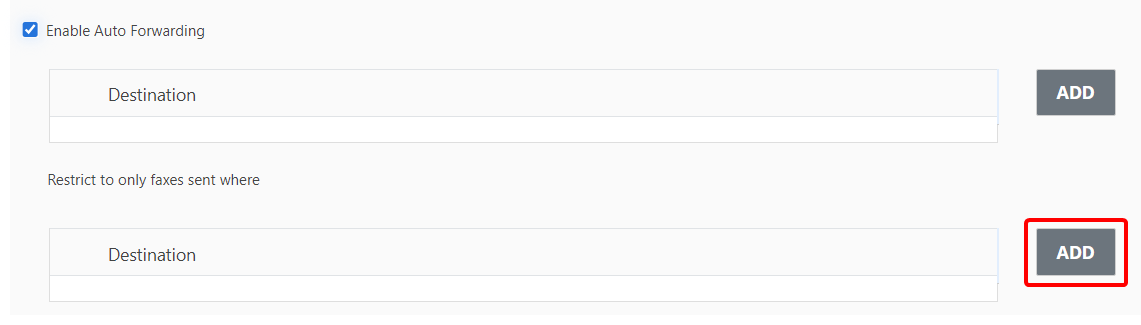
Auto Forwarding
You can use InterFAX’s auto forwarding feature to automatically forward received faxes to another fax number or to a contact list. This option is only available for users with outbound services.
-
Select the Enable Auto Forwarding check box.
-
Click Add.
-
To forward received faxes to another fax number, select Fax from the Type drop-down list, then enter the fax number in the Fax field.
-
To forward received faxes to a contact list, select Contact List from the Type drop-down list, then select the appropriate contact list from the Contact List drop-down list.
-
Click OK.
You can restrict faxes that are forwarded based on either the caller ID or CSID.
-
In the Restrict to only faxes sent where section, click Add.
-
To restrict auto forwarding based on a caller ID, select Caller Id from the Type drop-down list, then enter the caller ID number in the ID field.
-
To restrict auto forwarding based on a CSID, select CSID from the Type drop-down list, then enter the CSID in the ID field.
-
Click OK.
Received fax backup notification
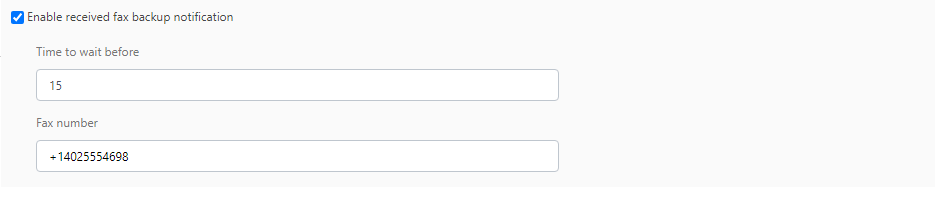
If we encounter an issue emailing a fax to you, we can fax it to a backup number after a specified number of minutes.
-
Select the Enable received fax backup notification check box.
-
In the Time to wait before field, specify the number of minutes to wait after a notification has failed before sending to the specified fax number.
-
In the Fax number field, specify the fax number to send faxes to.