Document Viewer
The InterFAX Document Viewer allows you to view faxes and documents, and provides advanced options for sorting, sharing, and formatting faxes.
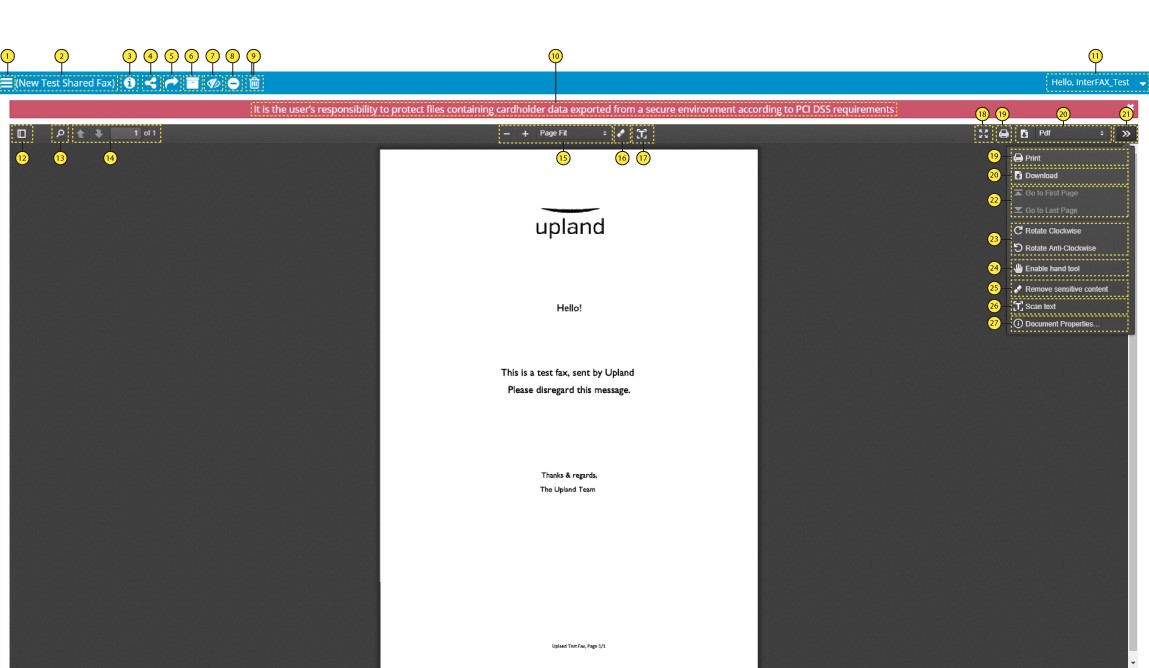
The above image shows an InterFAX test fax which has been opened in the Document Viewer.
The available options have been numbered and are defined below
1. Expand or collapse the navigation panel
Expands or collapses the navigation panel, giving links to Inbox, Settings, etc.
2. Subject
Each fax can be assigned a subject and this is displayed here.
A subject can be assigned by clicking the More details icon and navigating to the Subject setting under Customized Properties.
3. More details
Opens the More details window, which gives access to customized properties, as well as the user’s permissions, and general information about the fax.
4. Share
Opens the Sharing window, which gives information and controls for sharing faxes.
5. Transfer ownership
Opens the Transfer Ownership window, which gives options for transferring ownership of a fax, as well as amending the user’s own permissions.
6. Archive / Back to Inbox
Owners of a fax, and users with ‘Can view and edit’ shared permissions can archive faxes to hide them from the Inbox.
Archiving faxes is effectively stating that this fax has been handled and hides it from users queues. Once hidden, users can use the advanced search to view archived faxes and use the link to return them to the Inbox. Only owners of a fax and users with ‘Can view and edit’ share permission may archive faxes.
7. Mark as read / unread
Control for marking a fax as read or unread.
8. Hide
Gives the option to hide a fax from a shared user’s queue.
9. Delete
Deletes the fax from the user’s own queues, as well as that of any users the fax has been shared with.
For more information, see .
10. PCI warning
The PCI warning displayed in this section is shown only to users with the ‘Inbound PCI’ service.
11. User name and menu
Displays the username of the user currently logged in. Expanding the drop-down menu gives links to profile settings, language selection, help center, contact us, and to log out.
12. Expand / collapse page preview panel
Shows or hides the ‘Page Preview’ panel, giving previews of individual pages for navigational purposes.
13. Search document
Gives options for searching text within a fax, has options for previous and next instances, ‘Highlight All’ to highlight all instances of the selection within the fax, and ‘Match case’ to define the case sensitivity of the selection.
14. Page controls
Controls for navigating between pages within multi-page faxes.
15. Zoom controls
Controls for adjusting the scale of the fax.
16. Toggle remove sensitive content (blackout) tool
Selects/deselects the ‘Remove Sensitive Content’, or “Blackout” tool.
This tool allows a user with edit permissions to hide selected areas of content, in order to hide sensitive or private information that may be visible in the received fax. The tool permanently removes visible text and graphics from a fax by imprinting a black box over the selected area.
In order to black out certain areas, zoom in to a sensitive content area, toggle the “Remove Sensitive Content” tool, draw a rectangle above the fax, and then confirm the process. The action is permanent. After covering the selected area, the fax cannot be restored.
17. Toggle Scan Text tool
Selects and deselects the ‘Scan Text’ tool. This tool looks to extract text from images.
18. Full Screen mode
Opens the fax or document to be viewed full screen, press the Esc key to return.
19. Print document
Control for printing a fax.
20. Download document
Control for downloading a fax in a selected file format.
21. Expand / collapse document options menu
Expands or collapses the ‘Document Options’ menu containing the links defined below;
22. Go to first / last page
Navigate to the first or last page in a fax.
23. Rotate document
Rotate the fax clockwise or counterclockwise.
24. Hand tool
Enable or disable the hand tool.
25. Toggle remove sensitive content (blackout) tool
Selects/deselects the ‘Remove Sensitive Content’, or “Blackout” tool.
This tool allows a user with edit permissions to hide selected areas of content, in order to hide sensitive or private information that may be visible in the received fax. The tool permanently removes visible text and graphics from a fax by imprinting a black box over the selected area.
In order to black out certain areas, zoom in to a sensitive content area, toggle the “Remove Sensitive Content” tool, draw a rectangle above the document, and then confirm the process. The action is permanent. After covering the selected area, the fax cannot be restored.
26. Toggle Scan Text tool
Selects and deselects the ‘Scan Text’ tool. This tool looks to extract text from images.
27. Document properties
Displays the document properties window.