Integrate with Seismic
You must have access to a Seismic account with a premium user license to perform this integration.
Tip: We recommend that you create a Kapost-specific integration user in Seismic. This will prevent the integration from breaking should the connected user leave your company and their credentials and user records are revoked.
If you already have a Kapost app in Seismic, you can skip the following steps and reuse your existing app.
To create an app, do the following:
-
Go to https://apps.seismic.com and log in as the Kapost-specific integration user we recommended above.
-
Create a new 'Kapost' app for the user’s Seismic tenant.
Once the app is created, you need to configure the authentication.
-
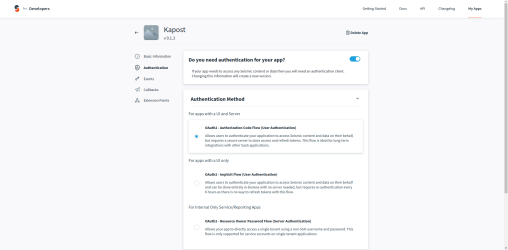
Click on the Authentication tab.
-
Enable the following setting: Do you need authentication for your app?.
-
On the Authentication Method pane, enable the following setting: the OAuth2 - Authorization Code Flow (User Authentication), as shown in the example below:
-
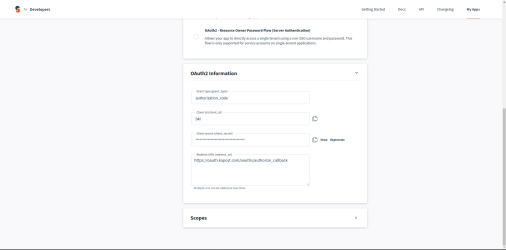
On the OAuth2 Information pane, check that a Client id (client_id) and Client secret (client_secret) are generated, and ensure that 'authorization_code' is displayed as the Grant type (grant_type) - this is the default setting.
Note: Make a note of the Client id and Client secret as you will need to enter these values when you are establishing the connection in the Kapost App Center.
-
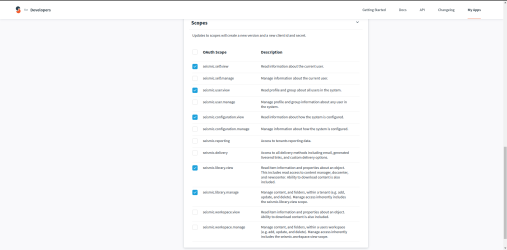
On the Scopes section, enable the following scopes:
-
Click Save Changes.
If you are asked whether you want to create a new version of the app, confirm your choice by clicking OK.
Enabling the Kapost app for the tenant
Now that the app has been created, it is necessary to enable it for the tenant. To do this, follow these steps:
-
Log in to Seismic.
-
Go to Admin and then System Settings.
-
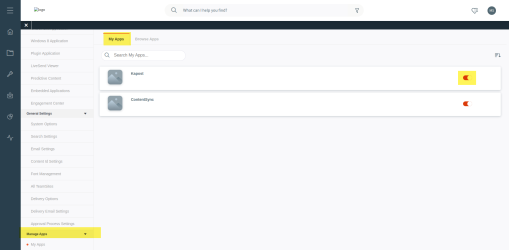
Scroll down and select the Manage Apps option.
-
Click the My Apps tab and enable the Kapost option (as shown below).
It can take between 5 to 10 minutes before the app is fully enabled, after which it is possible to establish a connection in the Kapost App Center.
To connect your Kapost instance with Seismic, do the following:
-
Go to the App Center and in the Apps section, click on Install more apps.
-
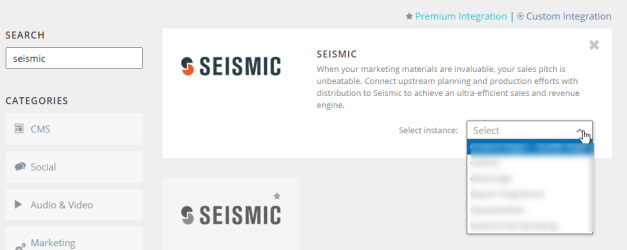
Search for 'Seismic' and click on its tile. You can select a Kapost instance if you have more access to more than one (as shown below).
-
Click Install.
-
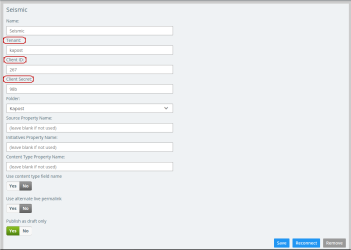
On the next screen, enter the following information:
-
Tenant - in effect, this is a sub-domain of the Seismic instance. For instance, if your Seismic instance URL is 'sales.seismic.com', then your Tenant is going to be 'sales'.
-
Client ID & Client Secret: copy and paste these values from the Authentication tab in Seismic (as described above).
-
-
Click the Connect button to authorize the connection with Seismic and establish the connection.
Note: this will authorize the connection with the currently logged in user in Seismic. If you are using a Kapost- specific Seismic user (as recommended), then be sure to log in with it on the Seismic side before hitting Connect.
If there are any errors, the page will refresh and an error message will be shown, allowing you to determine the cause of the error and repeat the steps above.
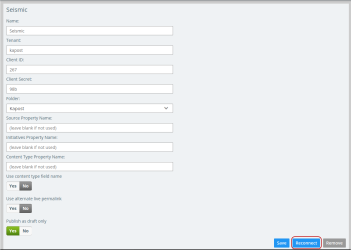
Once the connection has been established, you can configure the following
-
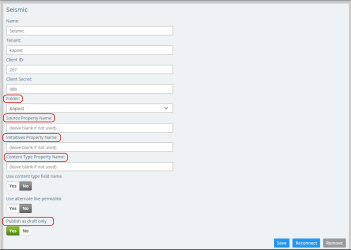
Kapost displays a Folder drop-down containing all the top level folders for each library (teamsite) the connected user has access to.
If no folder is explicitly selected, then the integration will default to the first valid one from the list.
-
The Source Property Name can be set to map a Seismic Content Property that the integration will automatically fill out with the value “Kapost”.
-
The Initiatives Property Name can be used to map the selected initiatives on a piece of content in Kapost to a given Seismic Content Property. The initiative names (case sensitive) must match the values in Seismic for this to work and map successfully.
-
In order for Kapost to automatically map the display name of the current content type of the content being published to a content property in Seismic, it is necessary to fill out the Content Type Property Name field while connecting in the App Center. Otherwise, the field must be left blank.
In addition, you can limit the connection to only allow publishing to draft by enabling the Publish as draft only setting.
-
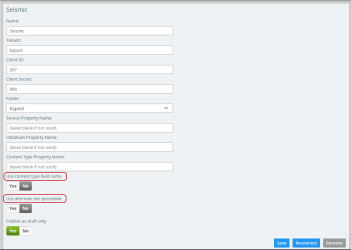
The Use content type field name should be set to Yes if you want the integration to use the field name of the content type instead of its display label when used with the Content Type Property Name mapping.
-
When publishing as Live in Seismic, the users can turn On Use Alternative Live Permalink toggle button to get an alternative permalink to show as the published URL.
Note: This published URL can be viewed by everyone.
Another important thing to note is that Kapost will fetch and cache the schema of the custom properties. This is done in order to reduce unnecessary API calls during the publishing process. What this means in practice is that if new custom properties or values for existing custom properties are added in Seismic, and those custom properties are mapped in Kapost, the connection has to be refreshed by coming back to the App Center and hitting Reconnect on the connection.
This will reauthorize and refresh the connection, and store a fresh copy of the content (custom) fields.
After the connection has been configured, it is possible to configure who can publish to Seismic with this connection.
To do this, click the manage publish access link for the Seismic connection and select either the entire instance, or groups and users as needed.
For more information, see Manage Existing Apps.
Configuring Seismic as a primary publish destination for content types
Before your users can publish to Seismic via the connection established in the App Center, it is necessary to add the integration as a primary destination for all the content types that need to be published to Seismic.
The integration can be added to all content types with a file, document, video, audio and photo body type.
For more information, see Assign A Primary Destination To A Content Type.
This integration allows the Kapost admin to freely map Kapost custom fields to Seismic content properties as well as a few other built-in Seismic fields.
In order to map a Kapost custom field to one of the content properties in Seismic, you just need to find the label of the content property in Seismic and then set up a custom field mapping by using the following special format:
seismic_property[Internal/External]
In the example above, the content property in Seismic is labeled Internal/ External. In other words, the format is:
seismic_property[Seismic Property Label]
For drop-down and multi-select custom fields in Kapost the values need to match and line up with the values in Seismic. Any values that do not match up, will simply be dropped during the publishing process, because the integration validates and filters those values based on the content property schema it gets from Seismic.
In the case of Boolean properties, represented as 'True' or 'False' in Seismic, it is possible to create a drop-down custom field in Kapost with two values: namely 'Yes' and 'No' (or 'True' and 'False' works just as well).
For more information, see Mapping Custom Fields.
Mapping to 'built-in' Seismic fields
In addition to the content properties, it is also possible to create a couple of additional custom fields and map them to fields in Seismic that aren’t user definable content properties, but rather built-in fields.
If the property schema includes a property named 'Kapost ID', then Kapost will send the Kapost 'Content ID' or the 'Universal Content ID' (depending on which has been enabled in the instance).
Also, Kapost will also pass the 'external ID' ('always equal to the Universal Content ID) and 'external connection ID' ('always equal to Kapost) to Seismic, as recommended by the Seismic API documentation.
Title field
To override the default title of a file in Seismic, you can create a text custom field in Kapost with its field name mapped to the following:
seismic_builtin[name]
Description field
To set the description of a file in Seismic, you can create a multi-line text custom field in Kapost with its field name mapped to the following:
seismic_builtin[description]
Expiration date
It is also possible to set the Expiration Date of a file in Seismic. To do that you can create a date custom field in Kapost with its field name mapped to the following:
seismic_builtin[expires_at]
This date is then converted to UTC and sent to Seismic during the publishing process. Please note that Seismic will ignore the time component and will use only the date component.
Owner
By default, the integration will take the assignee/author of the piece of content in Kapost and use the relevant user's email to look up the corresponding user in Seismic. If such a user can be found in Seismic and they have a premium user license, then that user will be set as the Owner of the file in Seismic.
If the user couldn’t be found, then the integration user that is connected in the Kapost app center will be used as the owner. This is the default behavior of the Seismic API when no explicit owner has been specified.
It is possible to alter this behavior by creating an owner drop-down custom field in Kapost with a special field name mapping as follows:
seismic_builtin[owner]
This custom field should have owner names as its values and the emails of said users as mapped values. What this means in practice is that for each name, you will have a corresponding custom field value mapping with their respective email.
Once this has been setup and an owner is selected in this custom field, Kapost will use this field instead of the assignee/author of the content.
Please note, that if nothing is selected in this field, then Kapost will fall back to using the assignee/author as owner.
Once everything has been configured it should be possible to publish and republish a piece of content.
During the publishing and republishing process, Kapost will take the current file revision and any mapped custom fields and send them over to Seismic.
Publishing content
When publishing as draft, the integration will simply create a draft in Seismic, on the other hand when publishing as live (if allowed by your configuration, see above), it will promote the draft into a Ready to be Published state in Seismic.
Note: The maximum file size that can be published is 1GB.
Republishing content
When republishing as draft, the integration will simply create a new draft version/revision in Seismic. When republishing as live (once again if enabled), it will either promote or publish the latest version/revision in Seismic, depending if the file in Seismic has been previously published or not.
An important thing to call out is that if a new file body has not been uploaded in Kapost, then only the metadata (i.e. Content Properties) will be updated in Seismic during the republish process, as it doesn’t make sense to keep creating new versions of the same file.
Another thing to note is that any Content Properties that aren’t mapped in Kapost, but were set in Seismic, will be left untouched during the republish process. This preserves any previously set values unknown to Kapost.
After publishing
After a piece of content has been published, Kapost will display a permanent URL linking to the file in Seismic. It will take the user to the file in the File Details View. As you would expect, only people who have access to Seismic will be able to see the file once they click through the link as it is not a publicly accessible URL.
If the content in Kapost is added to the Kapost Gallery and the content has been published to Seismic initially (instead of another destination), then the same permanent URL is displayed in the content details in Gallery.
