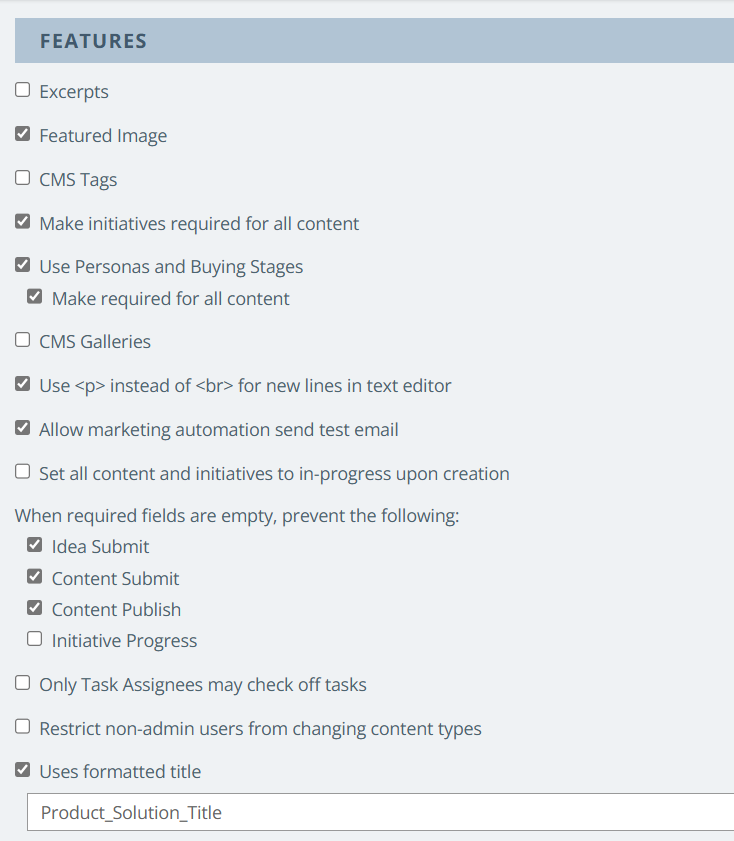
In this section, configure Kapost as per your requirement by enabling/disabling functionalities from the Features list.

- Excerpts: When the Excerpts feature is turned on, a small HTML field displays below your content title, allowing you to specify an excerpt from your post that will appear on you preview.
- Featured Image: Check the featured image box if you would like to be able to upload or choose an image to feature. You can do this as an attachment or on the post itself by clicking the star that appears when hovering over the top left corner of a picture on your post.
- CMS Tags: Checking the "Tags" feature will allow you to create searchable tags for your content directly on your post. Tags allow you to then filter content based on tag information.
- Make initiatives required for all content: This feature reinforces the use of Initiatives. Your users will be prompted to ensure there's an initiative associated with each content asset. If you have prevented certain actions until mandatory fields are filled out (see below) your users will not be able to take that action until they have associated the content with an initiative. If you have not switched that setting a reminder will pop up but your user can override it.
- Use Personas and Buying Stages: Checking this box unlocks the Personas and Buying Stages section of your instance, which allows you to categorize your content according to the various people and situations you are aiming your product towards. Like initiatives, this box should be checked by default and you have the option to make Personas and Buying stages mandatory. This section is not needed if custom fields are created.
- CMS Galleries: Photo galleries, not to be mistaken for the Kapost Gallery, are picture slideshows that you can add directly to your blog post. This is used only for blog post entries.
- Assign sequential Content ID to content: Enabling this setting allows users to view the unique sequential Content ID on the content details page for every piece of content. If you are using Universal ID, then this setting will not be displayed on the Content settings page. For more details, reach out to your CSM.
- Use <p> instead of <br> for new lines in text editor: By default, Kapost uses line breaks when you hit "enter" in the text editor to move to another line. Some people would prefer the text editor to skip two lines when "enter" is it - if this is the case for you, you should check the box and Kapost will use the paragraph tag instead of the line break tag on the backend of your posts.
- Allow marketing automation send test email: This is for your Eloqua, Pardot or Marketo integration - it allows you to send test emails from Kapost.
- Set all content and initiatives to in-progress upon creation: When this setting is checked, content will skip the planned stage and start at the stage of in progress.
- When required fields are empty: This is a setting that ensures your content is tagged before a particular action is taken. You can choose to prevent users from progressing initiatives, submitting or publishing content without mandatory fields filled out. You can also require mandatory fields to be filled out before an idea is submitted.
- Fields are marked as mandatory by visiting Settings > Custom Fields, expanding the appropriate field with the pencil icon and checking the box next to "Mandatory". If you choose not to prevent a particular action here in the content settings, your users will be reminded on mandatory fields when publishing but can override it and publish anyway.
Note: Content completion is not prevented even if this field is checked.
- Only Task Assignees may check off tasks: This prevents users other than the owner of a task from checking off tasks.
- Restrict non-admin users from changing content types: Requires only admins are given the ability to change a content type.
-
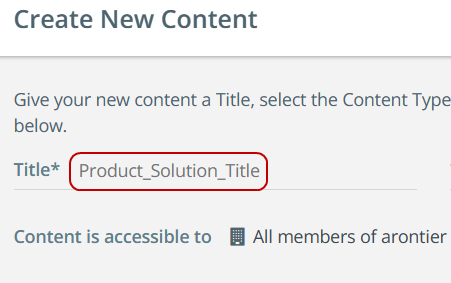
Uses formatted title: Allows admins to set a title format that will be displayed in the "Create New Content" modal to guide users to follow best practices. If you select the checkbox but do not enter a title format, then the default placeholder of Content title will display.

-
Allow admins and content authors to duplicate completed tasks: Admins and content authors can duplicate completed tasks in bulk, and the duplicated tasks are displayed as open tasks.
Click Save Changes to apply the selection.