Creating a template
The exercises in this lesson introduce the concepts of sections, content and formatting. You will also learn how to navigate the content.
1. Creating a template
In this exercise you will learn how to create a new document for print. A Print template can be printed to a printer, to a file, or it can be attached to an email designed in Connect Designer.
- Launch the Designer application by double-clicking the application icon.
- Choose File > New... > Template > Print Template and click Next, or in the Welcome screen, under Create/Open, click New Template and choose Print. The New Print Template wizard is shown.
The dialog lets you enter parameters for the new document, which includes its page size, the page margins and the number of sections. A section contains one or more pages. Text will flow automatically from one page to the next. - Make the following settings:
- Page size: Letter
- Margin Top: 1.4in
- Margin Left: 1.6in
- Margin Bottom: 1.2in
- Margin Right 0.8in
- Click Finish. The new document is shown in the main area of the user interface.
- On the Resources pane at the left, expand the Context, and then the Print folder. Right-click Section 1 and rename the section to Invoice.
- To save the document, choose File > Save As. The Save Template dialog box displays.
- Navigate to a folder (the folder where you unzipped the Walkthrough files, for example), enter My OLSG Invoice.OL-template in the File name field and then click Save.
2. Importing images
In this exercise you will learn how to import images into a template. Images can be static elements or they can be dynamically replaced by scripts based on a data field. They can also be used as a dynamic element to fill white space, as you will see in a later exercise.
- In case the Resources pane is not shown, choose Window > Show View > Resources.
- Locate the images folder provided with this tutorial.
- Drag OLSG_letterhead-green.pdf to the Images folder in the Resources pane.
3. Adding a Virtual Stationery background
In this exercise you will learn how to set a PDF image as a background to emulate pre-printed paper. After specifying a so called "virtual stationery image" you can preview the pre-printed media and place the content in the correct position. The image will be repeated for all pages that use this media.
To set a PDF as media:
- Locate the file OLSG_letterhead-green.pdf in the Images folder on the Resources pane (the image was added in the previous exercise).
- Drag OLSG_letterhead-green.pdf to the Media 1 entry in the Media folder on the Resources pane. The first page in the PDF will be set as the front side image of the media.
After adding the image to the Media you will see that the image appears in the background of the page(s).
What if you dropped the wrong PDF on the Media or want to change it? The Media properties dialog allows you to delete a PDF file from a Media. It also lets you select an image for both the front and back of the Media and specify the position of the image.
To open the dialog, right-click the Media 1 entry and select Virtual Stationery from the shortcut menu.
By default, Media backgrounds are omitted from the output (because in the end, the pre-printed paper will have this imagery). In case you are printing on blank paper you could print this background image together with the document by selecting the Print Virtual Stationery option in the Advanced section of the Print Wizard interface or in an Output Creation Preset.
4. Adding text and applying basic formatting to it
In Connect Designer every print section consists of a main text flow. This is the area defined by the page size and margins. The margin guides are shown in light blue.
- Place the cursor at the start of the document.
- Type INVOICE.
- Select the word INVOICE and change the style from Paragraph to Heading 1 using the Formatting toolbar.
- Press Enter and type Terms and Conditions on the next line. Change the style to Heading 3.
- Press Enter and then click the Insert Lorem Ipsum toolbar button to enter dummy text.
- Select one word in the dummy text and use the Bold toolbar button to make it bold.

Alternatively you could copy-paste text from a text processor, such as MS Word. Basic style characteristics specified in MS Word travel with the content to Connect Designer. Formatting options like bold, italic and formats like Heading 1, Heading 2 are maintained.
5. Exploring the document
In this exercise you will learn how to explore and quickly select elements on the page using the Outline pane and the breadcrumbs. The Outline pane at the left shows a hierarchical tree structure of the pages and their elements. Advanced users will refer to this as the HTML Document Object Model or DOM.
- The Outline pane is located in the same area as the Resources pane. Click the Outline tab to open it. If the Outline tab isn’t visible at all, choose Window > Show View > Outline.
The Outline pane lists the elements that are currently present in the document: two headings and one paragraph. The subheadings are marked with <h1> and <h3> and the paragraph is represented by the <p> entry in the tree.
A <p> element defines a paragraph in HTML. Other common HTML elements are:- h1 through h6 (headings)
- img (image)
- table
- tr (table rows)
- td (table data: table cells)
- span (a piece of styled text inside another HTML element)
- div (a box).
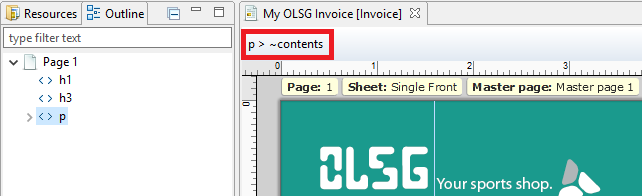
- Click the <p> element in the Outline pane. The main document window jumps to that paragraph and shows an outline around its contents. The paragraph is now selected and you can see a p in the bar below the tab that holds the title of the document. This line is referred to as the breadcrumbs.
- Click on INVOICE in the text. Note that both the Outline pane and the breadcrumbs are updated to show that the currently selected element is h1.
- Click on the word under Terms and Conditions that you’ve bolded. The breadcrumbs show that the selected, bold word is located inside a paragraph: p > b > ~contents.
- Now click on the p in the breadcrumbs. Note that the paragraph gets selected in both the text and the Outline pane.
- With the paragraph still selected, select font-size 9pt in the Formatting toolbar to reduce the size of the Lorem ipsum text.
- Save the template.