Node-RED OAuth authentication with GitHub
Node-RED authentication with GitHub and the auth module
-
The Node-RED auth authentication package (https://www.npmjs.com/package/node-red-auth-github) will need to be installed into your Node-RED user directory. If you are working with OL Connect Automate Automate on Windows, then this directory is:
C:\ProgramData\Objectif Lune\OL Connect AutomateIn the Command Prompt, enter:
Copy$ npm install node-red/node-red-auth-github -
Client and Secret tokens will also need to be created. This can be done via a GitHub user account.
When logged into GitHub, click your profile icon and then in the subsequent drop-down menu click Settings. On this settings page at the foot of the main navigation menu there is a link to a page called Developer settings. This link takes you to the GitHub Apps page.
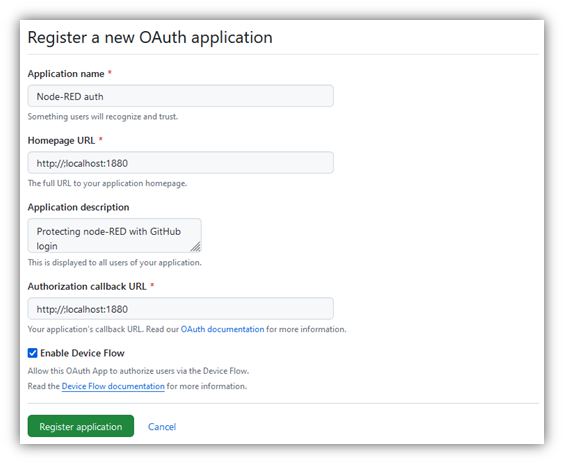
From there you can register a new GitHub App. The following image details the required app configuration. It is important to note that the Homepage URL and Authorisation callback URL are the landing page of the Node-RED installation. This is perfectly okay when using the provided Node-RED authentication plugin.
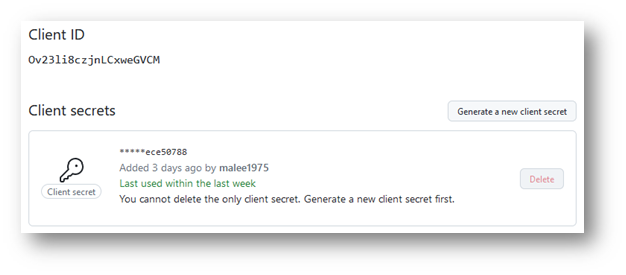
After registering the application, you will need to go to the app's setting page to take a copy of the client ID as well as to generate a secret token.
(This is also documented on: https://docs.github.com/en/apps/creating-github-apps/registering-a-github-app/registering-a-github-app).
-
To complete the installation it is necessary to make some settings to the settings.js file.
On line 119 there is the start of a section called securing Node-RED. If enabled, you will need to disable the default form of authentication.
Then paste the following code into the settings.js file directly underneath the disabled default admin auth code block.
Do not forget to follow the trailing parenthesis with a comma.CopyadminAuth: require('node-red-auth-github')({
clientID: GITHUB_CLIENT_ID,
clientSecret: GITHUB_CLIENT_SECRET,
baseURL: "http://localhost:1880/",
users: [
{ username: "knolleary",permissions: [*}}
]
]
}),The client ID and client secret need to be replaced with the credentials you have copied from your GitHub account. The base URL should match the home page URL defined within the GitHub app.
Also, within the user’s property you will need to add a user name that corresponds to your GitHub user name, or if operating on an organizational level, a list of users that are permitted access.
-
If Node-RED is running, stop and restart, otherwise start node-RED. When you open Node-RED in the browser you should see, instead of the flows, a page with a login prompt.
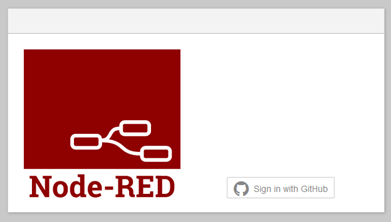
Log in
When the Sign in with GitHub button is clicked you will be taken to an external web page. The contents of this page are as illustrated in the next image.
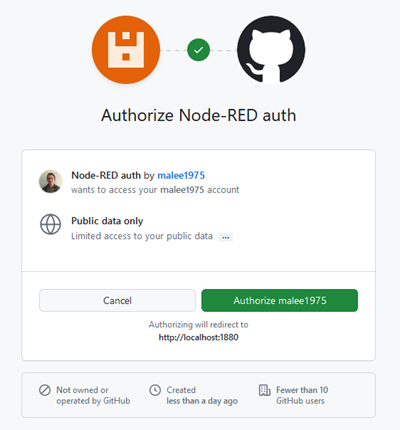
On clicking the Authorize button, the user making the request will be authorized and redirected back to the Node-RED home page URL. If login has been successful, full access to the flows is now possible, and the icon associated with the user's GitHub account should now be visible in the right-hand side of the Node-RED top header bar.
As with all forms of OAuth authorization, if a user logs back in to their Node-RED installation they will not have to revalidate themselves with the third-party app.
Node-RED authentication with GitHub, without the auth module
There is an alternate way of protecting node-RED with GitHub-based authentication. This is to directly use a strategy provided by passport.
If you have previously installed the GitHub authentication package provided by Node-RED, the first thing to do is to remove it:
$ npm uninstall node-red-auth-githubIf it is not removed, false positives will be received when testing the authentication method.
-
To install the relevant passport package, open the Command Prompt and enter:
Copy$ npm install passport-github -
Following installation, it is necessary to configure the settings.js file.
On line 119 there is the start of a section called securing Node-RED. If enabled, you will need to disable the default form of authentication.
Replace any auth admin blocks with the code snippet below, adding GitHub credentials and user name where relevant.
CopyadminAuth: {
type: "strategy",
strategy: {
name: "github",
label: "Sign in with GitHub",
icon: "fa-github",
strategy: require("passport-github").Strategy,
options: {
clientID: "Ov23li8czjnLCweGVM",
clientSecret: "47bc3c3a1738d2fbd0377b5c1c56b85fee1a5a",
callbackURL: "http://localhost:1880/auth/strategy/callback",
verify: function (accessToken, refreshToken, profile, done) {
profile.image = profile._json.avatar_URL;
done(null, profile);
},
},
},
users: [{ username: "malee1975", permissions ["read"] }],
},There are two important points to take note of.
-
The callback URL is simply the URL of the Node-RED homepage followed by ‘/auth/strategy/callback’.
-
The profile image must be set via a modification to the
verifycallback function. From the code snippet you can see that the image is applied to the profile object from the processed OAuth response.
-
The appearance of the login button is the same as with the auth module and the login process the same (see Log in). However this time the icon and button name are defined within the strategy implementation.
As with all forms of OAuth authorization, if a user logs back in to their Node-RED installation they will not have to revalidate themselves with the third-party app.