Integrate Workflow and Automate
OL Connect Automate and OL Connect Workflow can coexist in environments where existing Workflow processes are being migrated to Automate, or where certain Workflow capabilities are not yet available in Automate. In these scenarios, particularly in the latter case, OL Connect Automate can trigger Workflow processes to leverage the required features and then continue processing the resulting output.
This page outlines two approaches for using OL Connect Automate to trigger OL Connect Workflow processes:
-
Folder-based integration using Folder Capture.
-
Endpoint-based integration using the NodeJS Server Input task.
Each approach is better suited for particular applications, as outlined in the examples below. Both approaches can be used, even in the same flow.
The examples below assume that OL Connect and OL Connect Workflow are installed on the same machine. However, the same approaches can be used when the products are installed on separate machines, provided that network access and security considerations are addressed.
Folder-based integration
Folder-based integration is the more straightforward approach.
OL Connect Automate writes one or more files to a folder that is monitored by a Folder Capture task in OL Connect Workflow. Workflow processes the incoming file or files, performs one or more specialized tasks, and writes its output to a separate folder that is monitored by OL Connect Automate. The image below outlines the steps.
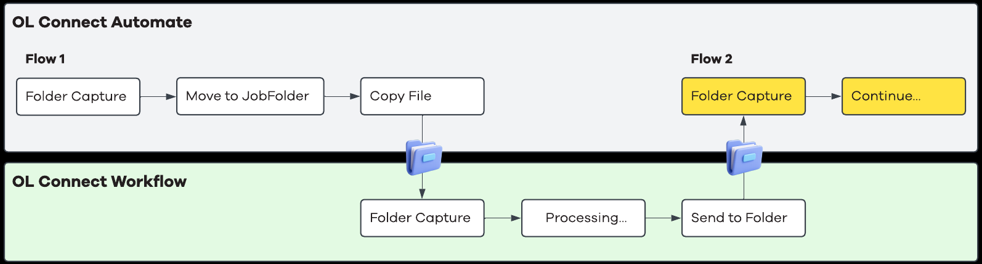
Typical flow
-
OL Connect Automate processes an incoming file (for example, PDF or data file), using the folder capture node.
-
The processing moves the file to a job folder and writes a copy to a folder monitored by Workflow’s Folder Capture task.
-
OL Connect Workflow processes the file and:
-
Executes Workflow-specific tasks (e.g., Barcode Scan, metadata extraction/manipulation, or other features not available in Automate).
-
Produces one or more output files.
-
-
OL Connect Workflow writes the output to a return folder.
-
OL Connect Automate monitors this folder and resumes processing in a new flow, for example by moving the file to the Job Folder created earlier. The image below shows the nodes and two flows in OL Connect Automate.

Best Practices
Use predictable file names
Rewrite output filenames in Workflow to be a clear abstraction of the original input file. This makes correlation and orchestration in Automate significantly easier. This can be done using system variables like %O.
Separate content and metadata
A common pattern is:
-
Input:
document.pdf -
Output from Workflow:
-
document.json,document.csv,document.xml(metadata extracted or transformed in Workflow). -
document.pdf(altered input file).
-
Normalize metadata formats
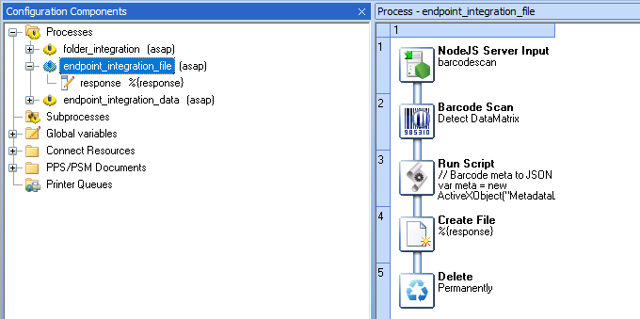
Convert Workflow data to JSON before returning it to Automate. This enables Automate flows to process the returned data automatically. The image below shows the processing (from step 3 above) and the data conversion.

Folder-based integration is simple to configure, easy to debug, and well suited for batch-oriented or file-centric processes. However, it provides limited support for real-time error handling. If OL Connect Workflow does not respond or a process fails, OL Connect Automate does not receive immediate feedback and must rely on indirect indicators such as missing output files or timeouts. This makes robust error trapping more complex to implement.
Endpoint-based integration
Endpoint-based integration is a more dynamic and event-driven approach.
OL Connect Automate sends data directly to a Workflow process that starts with a NodeJS Server Input task. The Workflow process is triggered when the endpoint is called and can return the result directly in the response. The image below outlines the steps.
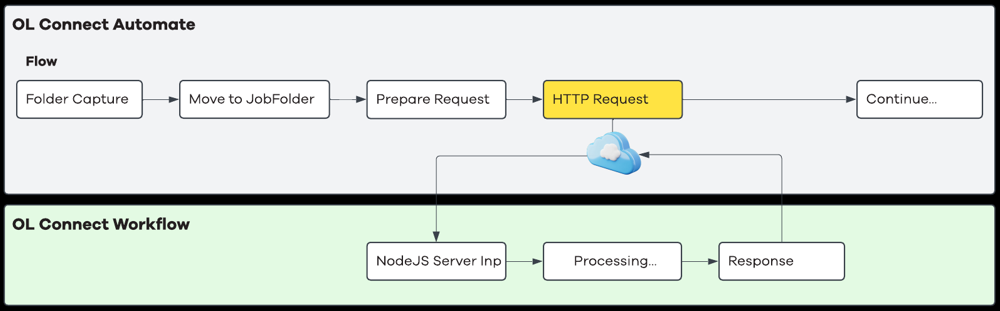
Typical flow
-
OL Connect Automate sends an HTTP or HTTPS request to an OL Connect Workflow process exposed via a Node.js Server Input task.
-
The request payload may contain structured data (for example XML, CSV, or JSON), or use a multipart/form-data structure to upload one or more files.
-
-
Workflow receives the submitted data as one or more attachments and executes the required tasks:
-
Ensures that Loop through each attachment as a data file is enabled.
-
Ensures that Discard XML envelope is enabled. This prevents the process from running twice by avoiding processing of Workflow’s XML envelope as a data file.
-
-
The Node.js Server Input task returns the active job data in the response. The image below shows the processing in Workflow.
File uploads
When uploading files to a Workflow process via a Node.js Server Input task, the request payload must use a multipart/form-data structure, as described in the documentation for the HTTP Request node in Node-RED.
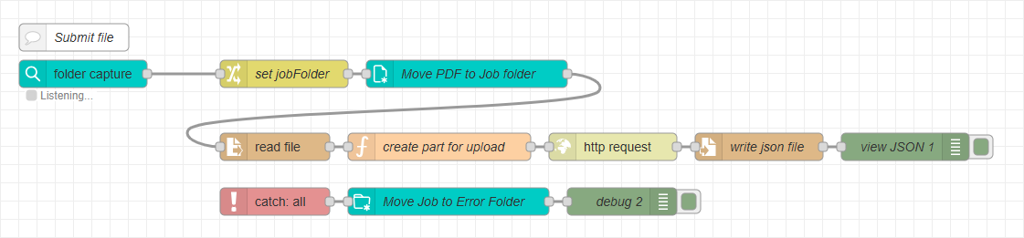
A common implementation for this in OL Connect Automate is:
-
Use the read file node to read the file into a single
Bufferobject. -
Use a function node to construct the multipart form data, combining file metadata with the binary file content.

Upload the file
-
Set
msg.headers["content-type"]tomultipart/form-data. -
Set
msg.payloadto an object that represents the multipart structure, where:-
The key is a logical name for the file (for example, the file name without its extension).
-
The value contains:
-
The file data as a
Bufferobject. -
The original file name.
-
-
Sample Function node implementation
const fileData = msg.payload
const keyName = msg.file.name
const fileName = msg.file.basename
const part = {
[keyName]: {
value: fileData,
options: {
filename: fileName
}
}
};
msg.payload = part
return msg;Best Practices
Use endpoints for low-latency or transactional use cases
This approach is well suited when immediate feedback or synchronous control is required.
Keep payloads concise
Avoid sending large binary payloads unless necessary.
Endpoint-based integration is generally easier to harden than folder-based integration. Because the interaction is request–response based, OL Connect Automate can use standard Node-RED mechanisms such as the catch node to detect and handle errors.
If an error occurs in the OL Connect Workflow process, the Node.js Server Input task can return an HTTP error response (for example, 500 Internal Server Error or 400 Bad Request), allowing Automate flows to implement explicit retry, fallback, or escalation logic.
Summary
Both integration approaches are valid and address different integration requirements.
Folder-based integration is well suited for batch-oriented and file-centric processes where simplicity, loose coupling, and clear file-based orchestration are key. However, it provides limited real-time feedback and typically requires more effort to implement robust error detection and recovery mechanisms.
Endpoint-based integration is better suited for real-time, event-driven, or transactional scenarios. Its request–response model enables immediate feedback, explicit error handling using HTTP status codes, and simpler implementation of retry and fallback logic.
In practice, many environments use a combination of both approaches, selecting the approach that best matches the performance, complexity, and operational requirements of each use case.