Adding the dynamic invoice data
The Dynamic Table feature provides an easy way to lay out rows and columns for line item information such as the description of a product, the unit price, total price, quantity etc. Table rows are automatically inserted based on the number of rows in a detail table. Once the table reaches the bottom of the page a new page is inserted automatically. The invoice will continue on the next page. Headers and footers can be repeated across pages, and subtotals, transport lines and the invoice’s total can be added automatically.
You’ll learn how to insert a Dynamic Table to lay out the information of a detail table stored in the data set.
1. Adding the dynamic table
- Toggle to the Design mode and place the cursor at the beginning of the heading 'Terms and Conditions'.
- Choose: Insert > Table > Dynamic Table...
The Insert Dynamic Table dialog appears. - Change the value of the ID field to: invoice-data.
- Make sure that the Detail table field reads products. This is the detail table in the data that holds the invoice line items.
- From the Location drop-down, choose Before element. This causes the table to be inserted directly before the level 3 heading (h3).
- Click Next. The Dynamic Table Builder is shown.
It contains one 'row' which is associated to the selected detail table. The row will be repeated in the output (or in Preview mode) as many times as necessary to display all the records in the associated detail table.
The 'fields' - cells in the table - correspond to data fields in the detail table. - Delete the "Ordered" and "BackOrder" fields by clicking on the red cross. The following fields should be listed:
- ProdNumber
- Description
- UnitPrice
- Shipped
- Total
The fields will appear in the table in the order in which they are listed here. To rearrange them, you can drag and drop them by clicking to the left of a field.
- Without currency signs the values in the Unit Price and Total columns will look better. Change the Format for these fields to Currency No Symbol.
-
Note how the alignment is set for text in different kinds of fields: text is left-aligned, amounts in currency fields are right-aligned and numbers are centered.
- Click Next. The Dynamic Table Options page is shown. The options on this page let you add subtotals to the footer and transport lines (in case the table runs across multiple pages).
- Check the Calculate Subtotals item.
- Verify that Total is selected as the data field that will be used to calculate the subtotals and totals.
- Check Show subtotal lines before page break options to have subtotals shown before page break and after end of the table.
-
Click Next. The predefined table styles are shown. Select the 6th table style (the second from the top right) and click Finish to insert the table.
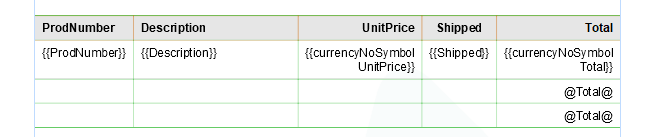
How to further style the table is demonstrated later in this walkthrough.The table is inserted at the current cursor position. It has a column for each of the selected data fields. The cells in the body table row, between the header and footer rows, each have an expression (the name of a data field, enclosed in double curly brackets). The currencyNoSymbol Format Helper formats the amounts as a currency without a currency sign.
Tip: Click the Show Edges button on the toolbar to show the edges of the table with thin green lines. These lines are visible in Preview mode, but will not be printed.
-
Toggle to Preview mode. You will see that the body table row is repeated for each detail record and that the expressions are replaced with the corresponding values.
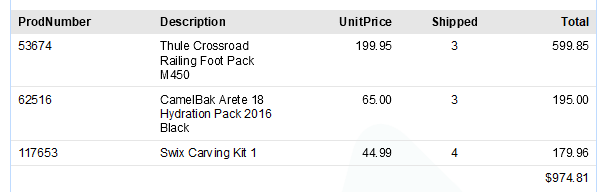
Note that there is only one subtotal row on each page in output and in Preview mode, whereas in Design mode, you can see two. The bottom footer row is only shown on the last page. The row above it is shown on all other pages, if the table runs over multiple pages.


2. Adding labels and rows
At this point the table shows the basic information of the invoice line items. In this exercise you’ll learn how to add additional rows and information to this table.
To add a label to the subtotals in the footer:
- In Design mode, place the cursor in the cell next to the @Total@ cell in the first row of the footer of the table. Type Subtotal.
- Do the same in the bottom footer row.
Now add additional rows for the tax and invoice total:
- Right-click one of the cells in the bottom row and choose Row > Insert Below from the shortcut menu. Repeat this to add a second row.
-
On the Outline pane, click on the second to last footer row (the third <tr> in <tfoot>).
Alternatively you click in the row and then on tr in the breadcrumbs: ... > tfoot > tr > td ...
-
On the Attributes pane, change Show Row to: At end of table. This prevents that a row is shown on every page if the table runs over multiple pages.
Tip: The Show Row setting on the Attributes pane can also be used to show a row at the top or bottom of every page. For example, for a row that reads: To be continued on the next page, you would set it to Before page break.
- Repeat the previous step for the last footer row.
- Place the cursor below the last Subtotal cell and type: VAT.
- Move the cursor one row down and type: Total inc VAT.
- Locate the InvTaxTotal data field in the Data model panel and drag this field into the cell next to the VAT cell.
- Drop the InvTotal data field in the last table cell of the table.
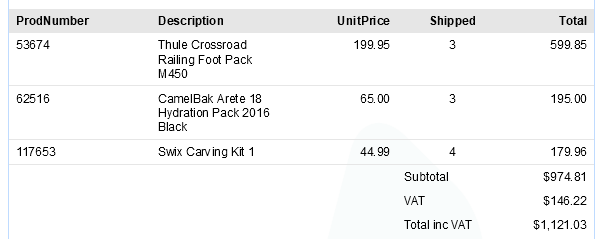
Now, in Preview mode the table will look like this: