Creating a print process
Creating a Workflow configuration
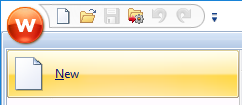
To start creating a new Workflow configuration, click the Workflow button (W) at the upper left hand corner and choose New.
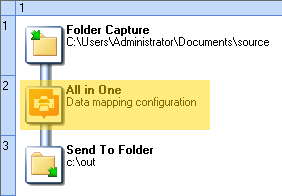
A Workflow configuration can consist of many processes. One process is always added at the start of a new configuration. By default it has two tasks: a Folder Capture input task and a Send To Folder output task.
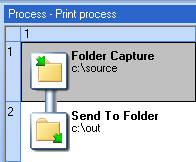
The Folder Capture task is configured to pick up any file from the C:\source folder. The Send To Folder task outputs the input file, renamed but otherwise unchanged, to the C:\out folder.
- Save the configuration: click the Workflow button (W) and choose Save As. Type a name and click OK.
Creating a process and renaming it
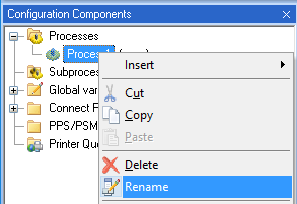
The automatically added process is a good starting point for the print process so you don’t have to add a process. But if you’d want to, you can add a process by right-clicking on Processes in the Configuration Components pane and then selecting Insert > Insert Process, or by clicking Process on the Home ribbon. To delete a process, right-click on the process and select Delete.
- Rename the process by right-clicking on it and then selecting Rename. Enter Print process, for example.

Configuring the Folder Capture task
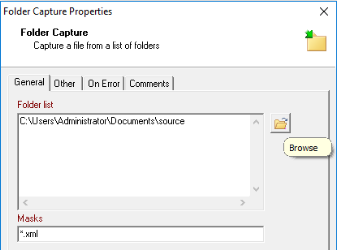
There are different kinds of Input tasks, as you can see on the Inputs tab in the Plug-in Bar. (The Plug-in Bar is located to the right of the Process area). The Folder Capture task retrieves files corresponding to a specified file mask, from a specified folder. In this exercise you will learn how to configure the Folder Capture task.
- Double-click the Folder Capture task in the process area, or right-click on it and select Properties.The Folder Capture Properties dialog appears.
-
Click the Browse button next to the Folder List, and select the folder that you want to be monitored. For this walkthrough it doesn’t matter which folder you choose, as long as you have access to it.
-
Change the Masks to *.xml

JOB FILE
Every time a file is picked up, the process starts and the input file becomes the job file. This file will be handed down through the process, from one task to another. It may be changed, copied, and split by tasks in the process. Often, as in this case, the job file is a data file, but it could also be an image or another type of file.
Each branch in a Workflow process can hold no more than one job file. If more than one file is retrieved via an Input task, then the entire process is run for each file sequentially. If the job file gets split during the process, then the rest of the process is run as a loop for each split portion.
(In this walkthrough the job file is not split. It does get copied, in part 3).
Adding the All In One task
Now you can add and configure the All In One task.
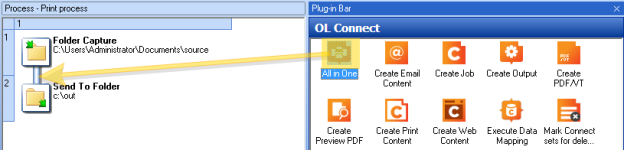
- Click on the OL Connect tab in the Plug-in Bar. This is where all OL Connect tasks are displayed.
-
Locate the All in One task and drag and drop it below the input task.
- Choose Action to insert this task as an Action task.
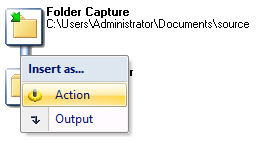
ACTION/OUTPUT TASK
An Action task can be followed by other tasks, while an Output task is always located at the end of a process or branch.
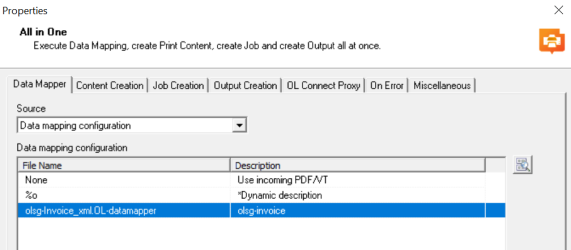
The All In One Properties window appears.
-
On the Data Mapper tab, select the data mapping configuration OLSG-invoice_XML.OL-datamapper (or your own data mapping configuration, if you’ve made one with the DataMapper walkthrough).
-
On the Content Creation tab, select the template OLSG-invoice.OL-template (or the template that you have made following the Designer walkthrough ‘Creating an Invoice’).
- On the Job Creation tab, select the option Default ("use the IDs in the Metadata"). The process will create a job without sorting, filtering or grouping the print content items.
-
On the Output Creation tab select the Output Preset you have made in the preparation phase: PDF-no-options.OL-outputpreset.
-
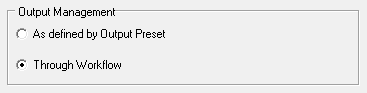
On the same tab, in the Output Management section, check the Through Workflow option. This means that the output file will be handed down to the next task in the process (the Send To Folder task in this case). Every option set in the Output Preset is still used, except for the output location.
-
Click OK.
The process looks like this:
Note: In this part of the walkthrough the Send To Folder task is maintained as a separate output task to be able to introduce you to a few key concepts in Workflow. But the simplest possible print process would consist of the Folder Capture and All In One task only. You could simply drag the All In One on the Send To Folder task to add it as an Output task. For this the Output Preset would have to define an actual directory or printer to send the output to.


Configuring the Send To Folder task
Now we will configure the Send To Folder task. The Send To Folder task saves the job file to a file.
The last task in the All In One (the output creation task) replaces the original job file – the input data file - with the output PDF file. So, at this point in this particular process the job file is the output file.
- Double-click the Send To Folder task, or right-click it and select Properties. The Send To Folder Properties window appears.
- On the General tab, click the Browse folder button next to the Folder field and select an output folder. Again, for this walkthrough it doesn’t matter which folder you choose, as long as you have access to it.
- The File name field reads %f. This is a system variable that represents the job file name. Right-click the File name field. A contextual menu appears, giving access to variables and data selection functions.
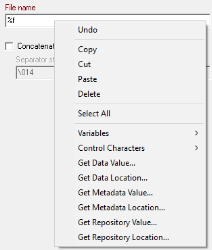
Tip: Right-clicking on any a field with a maroon field name opens the contextual menu that gives access to variables and data selection functions.
-
Select Variables > System > %O (Original file name without extension) and complete the file name by adding .PDF
-
Click OK.
