Sample print flow with all in one node
This topic describes sample print flows that generate paginated print output for XML data using the OL Connect all in one node.
Note: Sample flows are provided by OL Connect Automate, once installed. It appears in the flows folder in the Import dialog in Node-RED which allows you to import the sample into a new or existing flow; see Importing and Exporting Flows in the Node-RED documentation. Instructions are given in this topic, but can also be found in the Read me comment that comes with the sample flow.
For a list of all sample flows, see Sample flows.
The all in one node executes the following tasks:
-
It extracts data from a data file. This requires a data mapping configuration, and a data file of course. (Data mapping configurations are made with the DataMapper, which is included in OL Connect Designer. See Data mapping configurations.)
-
It merges the data with an OL Connect template, producing Print Content Items. (Templates are made with OL Connect Designer. See Templates.)
-
It turns a set of Print Content Items into a print job. Any job settings (for sorting, filtering, and/or grouping) are passed on via a Job Preset which is made with OL Connect Designer. (Job Presets are made with OL Connect Designer. See Job Presets.)
-
Finally the node generates the actual output file(s) and stores them in the File Store. Any settings that it needs are passed on via an Output Preset which is made with OL Connect Designer. (Output Presets are made with OL Connect Designer. See Output Presets.)
Prerequisites
Before running the sample flow:
-
Download the following resources and deploy them to the OL Connect Server using the Send to Server option in OL Connect Designer (see Sending files to Connect Server or to another server):
-
In the settings of the all in one node, select the OL Connect Server to which the resources have been sent.
-
Create the following directory in the root of your drive:
\workspace\all in one\out -
Download the following data files and save them in the
\workspace\all in onedirectory.
The sample flow
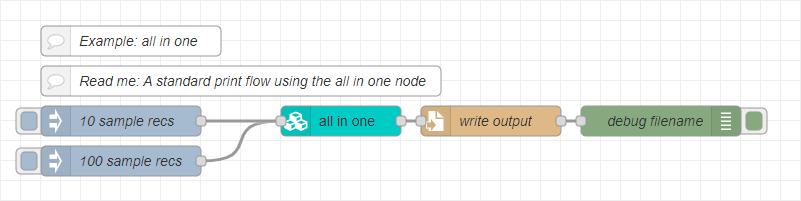
In its simplest form, a print flow may consist of a node that captures a data file, such as a folder capture node or read file node, the all in one node, and a node to save the result to disk.
For this example the flow is triggered using one of two inject nodes, each providing a hard-coded path to a data file in msg.filename. Use the inject nodes to trigger the process with a data set of 10 records or 100 records.
Tip: Adding multiple inject nodes to your flow is a great way to test the flow with data files of different sizes.
The flow uses the write file node to store the print output file to disk. The print output file, a zip archive containing all documents, is written to workspace\all in one\output.zip.