Creating a letter
This lesson introduces the concepts of sections, content and formatting. You will also learn how to navigate the content.
1. Creating a print template
Start by creating a new document for print.
- Launch the Designer by double-clicking the application icon.
- In the Welcome screen, click Create a New Template and choose Word-based Print. Or choose File > New > Template > Word-based Print Template and click Next. The New Word-based Print Template dialog is shown.
The dialog lets you enter parameters for the new document, which includes its page size, the page margins and the number of sections. A section contains one or more pages. Text will flow automatically from one page to the next.
-
Click Browse icon next the path: field to select a Word document. The file explorer opens. Select the sample file letter-text.docx from your local drive.
Note: The Word document letter-text.docx is included in the resources that you have already saved to your local drive.
-
Click Next. The initial page size, margins, and orientation are taken from the original document settings and displayed in the dialog window that appears. You can adjust them on that dialog window.
- Make the following settings:
- Margin Top: 1,5in
- Margin Right, Bottom and Left: 0,75in
The values may be converted into another measurement unit, depending on your settings (Window > Preferences > Print > Measurements).
Note: After the template is created, you can change the size of images and text boxes, and adjust the page size and margins.
- Click Finish.
The new document is shown in the workspace. A Print context is created with the specified number of sections in it. For each page in the document, one page is created in the Print section. A separate word.css file is created in the Stylesheets. The css file is linked to the active section. - To save the template, click File > Save As. The Save Template dialog box displays.
- Navigate to a folder (preferably, the folder where you unzipped the sample files), enter My OL Mobile letter.OL-template in the File name field and then click Save.
2. Formatting text
OL Connect Designer has many text editing and formatting capabilities. Applying formatting to selected text is referred to as local or inline formatting. Formatting could also be handled via style sheets, as will be demonstrated later.
- Select the text of the subject line: “Take advantage of our Bundle Offers”.
- Common text properties (e.g. font, size, color) can be set via the options in the Formatting toolbar.
Click the B icon on the toolbar to bold the text. - Another option is to format selected text using the Text formatting dialog. To open it, click Format > Text….
The dialog can also be invoked by pressing Ctrl + T or via the shortcut menu: right-click the selected text and choose Text...
- Change the font size to: 16pt.
- In the Text Formatting dialog, click the Edit Color icon (the small square next to the color field). The Color Picker dialog appears. Colors can be specified in CMYK, RGB and HEX color values.
- Choose the following color values:
- Cyan: 0, Magenta: 92, Yellow: 77, Black: 22
- Color mode: CMYK (this will store the specified color using the CMYK values)
- Click OK twice, to close the dialogs.
Note: The style changes are applied to the selected text. When you press Enter somewhere in this text, a new paragraph is created that inherits these text styles.

3. Exploring the document
This exercise shows how to explore the document and select elements on the page.
- Take a look at the Outline pane. The Outline pane can be reached in the upper left area next to the main editor. In case the Outline pane isn’t available, choose Window > Show View > Outline.
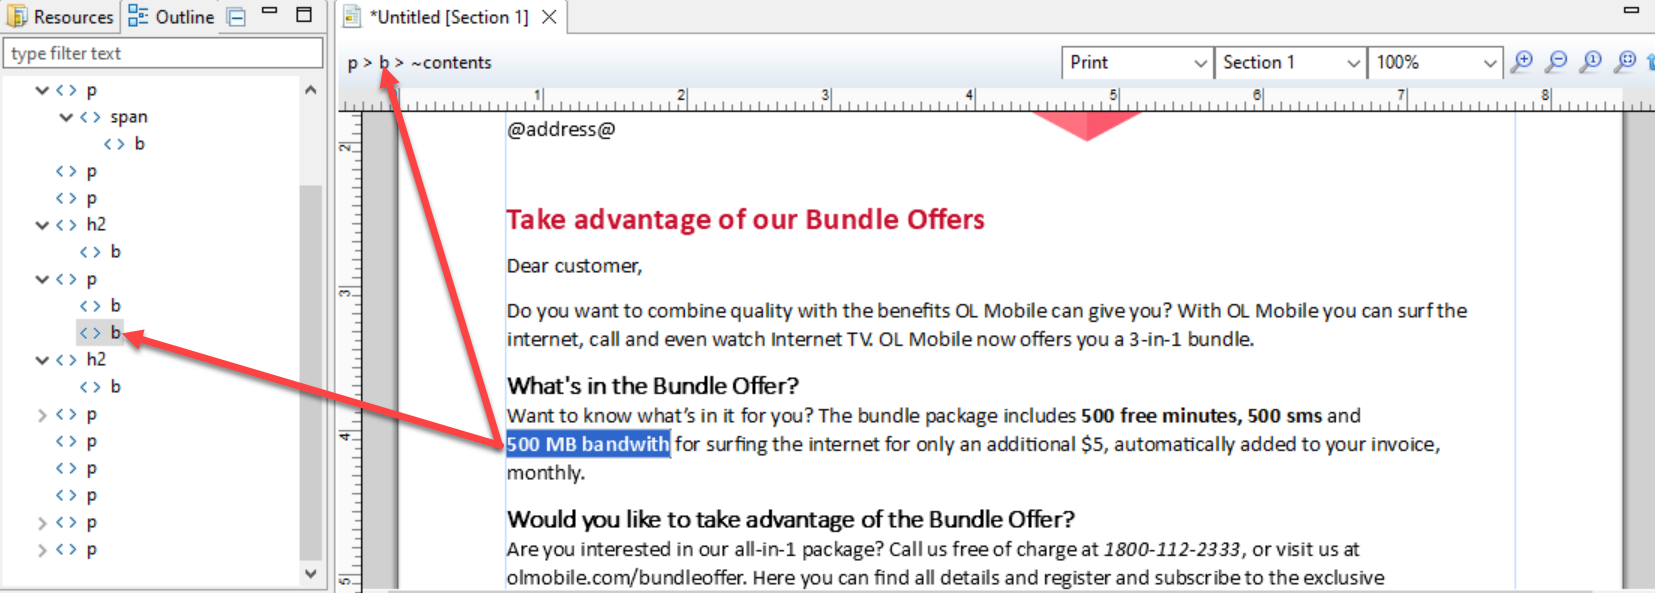
The Outline pane shows a hierarchical tree structure of the pages and their elements and is useful to quickly select elements. It represents the HTML Document Object Model or DOM - a term advanced HTML users will recognize.
In this example the Outline pane shows a series of paragraphs and two subheadings. The paragraphs are presented by the <> p entries in the tree and the subheadings are marked with <> h2. Other common HTML elements are: h1 through h6 (headings), img (image), table, tr (table rows), td (table data or table cells), b (bold), span (a piece of styled text). - Click a paragraph element in the outline. The main document window highlights that paragraph and shows a thin line around its contents. The paragraph is now selected.
Note that the same information is shown below the title of the document. This line is referred to as the breadcrumbs.
- Use the arrow up and arrow down buttons to navigate through the elements in the outline.
- Place the cursor in the text “500 MB bandwidth”. Now the breadcrumbs read p > b. This signifies that the bold text is a child element of the paragraph.
- Click the b in the breadcrumbs to select the bold text.
- Click the p in the breadcrumbs to select the paragraph. Note that the element gets selected in the Outline pane too.
