Address Block
When you create a template, the first piece of content you add is likely to be the address. Address blocks are essential in a variety of documents, such as business letters, cover letters, invoices, quotes, postcards, policy documents, and contracts.
The Address Block wizard makes it easy to create an address block built according to country standards. It allows you to map fields from the data model to elements in an address block format of your choice.
If data is missing because a record is incomplete, empty lines or white space in the final address block are automatically removed.
For specific countries the wizard provides options to render postal barcodes, for example the Dutch KIX barcode.
Before inserting an address block
You can only insert an address block if there is an open data mapping configuration, Data Model, data file or database; see: Loading data.
How to use the Address Block wizard
To insert an address block with the wizard:
-
Select Insert > Address Block, from the menu, or click the
 Address Block icon on the toolbar.
 -
Select an Address format. Currently, address block formats are provided for the following countries: Australia, Belgium, Canada, France, Germany, Italy, Malaysia, Netherlands, Spain, United Kingdom, and United States.
If you wanted a region or postal service specific format that is not in the list, you can select the Generic format.
Another alternative is to create your own address format. (See Creating an address format.) -
The fields in the Address Fields column are organized roughly in the same way they will appear in the address block.
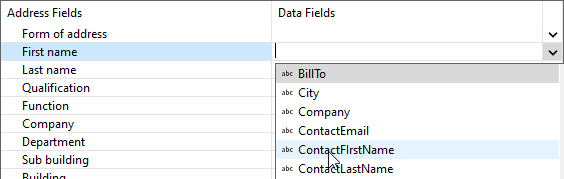
To connect a data field to an address field, click the Data Fields column, then select the field that provides the data for that address field.
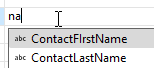
Tip: To shorten the list, start typing (part of) the name of the data field you are looking for.
The example of the address block at the bottom left will be populated with data from the current record in the currently open dataset.
To remove the connection between a data field and an address field, click the field in the Data Fields column, then press the Delete or Backspace key and navigate out of the field.
-
Click the checkbox Align text to bottom if you want the address to be aligned to the bottom of the address block.
-
Finally click OK to insert the address block.
The Address Block wizard remembers your settings - per address format - and will attempt to link the same address fields and data fields the next time you create an address block.
Changing the address block
Once an address block is added to the template, you can preview it, move it, resize it, and change the data fields it is filled with.
-
To see the address block filled with data, toggle to the Preview tab at the bottom of the workspace (or select View > Preview View on the menu).
-
To reopen an address block with the Address Block wizard, right-click it and select Address Block from the popup menu.
-
To move the box that contains the address block, click the edge of the box and drag it.

Alternatively, click the address block and set its top and left on the Attributes pane.
-
By default, the box that contains the address block is 95x38 mm. To resize it, click and drag one of the handles of the box.

Alternatively, click the address block and set its width and height on the Attributes pane.
Styling an address block
To style an address block that you inserted with the wizard, right-click the address block box, select Box... and make the appropriate settings in the Box Formatting dialog.
Alternatively, select the address block box, enter an ID on the Attributes pane, and use that ID to create CSS rules for this address block. See Styling templates with CSS files.