Adding personal data
To create any personalized document, you need data about the recipients. Typically such data include fields like the first name, last name, email address, job title etc. This chapter shows how to load data and demonstrates various techniques to add data fields to the page.
1. Loading data
In this exercise you will learn how to load data by opening a data mapping configuration. It is also possible to open a data file or database in the Designer, but transactional data – such as line items in an invoice – can’t be imported in the Designer directly. That's why we need a data mapping configuration.
- Go to the Welcome screen by clicking the Home icon at the top right.
- On the right, under Create/Open, click Open File. Change the file type to DataMapper files (*.OL-datamapper).
- Select the data mapping configuration provided with this tutorial: OLSG-invoice.OL-datamapper, or a data mapping configuration made by you with a DataMapper walkthrough.
The DataMapper workspace is now shown. - Toggle back to the Designer perspective by clicking the My OLSG Invoice.OL-template tab at the top of the workspace.
- The Data Model pane now shows the data model and the data of the first record in OLSG-invoice.OL-datamapper. If not, hit the Synchronize Fields and Structure button in the Data Model pane to update the Data Model to the current data mapping configuration.
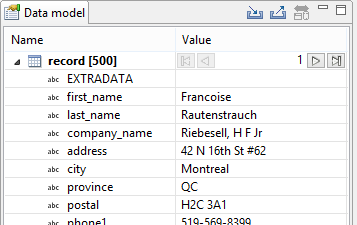
- Use the browse buttons at the top of the Value column to browse through the imported data.
- Scroll down in the Data Model pane to see the detail table and browse through its detail records.

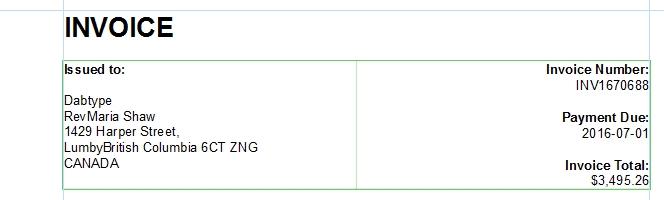
2. Adding a table to hold the address and invoice information
A table can function as a container for the address of the client and the invoice information. The table, which in this case is placed in the main text flow, will have two columns: the left column is meant to hold the address data and the one on the right contains invoice information.
The following image shows the end result.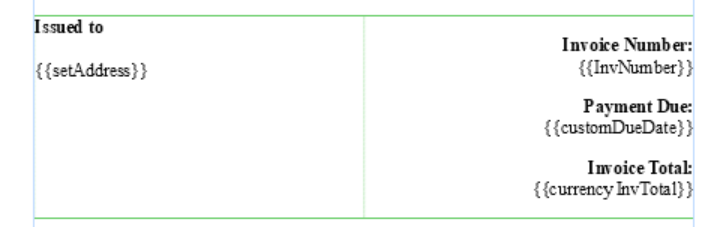
To add a table to the main text flow:
- In the invoice template, create a new paragraph after the INVOICE heading by pressing the Enter key after the last character of the heading.
- Select Insert > Table > Standard… from the Menu or click the Insert Table icon on the toolbar. The Insert Table dialog appears. This dialog lets you configure the new table.
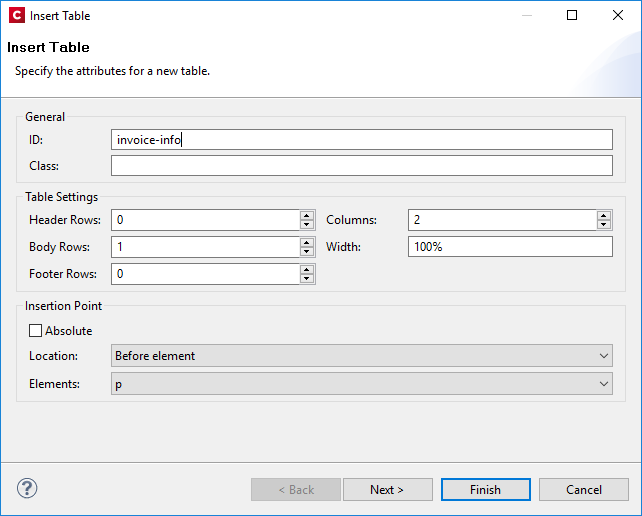
- Make the following settings on the first page of the Insert Table wizard:
- ID: invoice-info
- Header Rows: 0
- Body Rows: 1
- Footer Rows: 0
- Columns: 2
- Use the Location drop-down to select Before element as the insertion point. This will insert the table before the new paragraph.
- Click Next and select the table style at the top left, which does not have any borders or background colors. The table will take up the maximum available space horizontally and runs between the left and right margin guides.
- Click Finish to insert the table.
- As the table doesn’t have any borders or background it blends into the page. Click the Show Edges button on the toolbar to reveal its position. The table shows a non-printing green border.

3. Adding the invoice information
In this exercise you will add the invoice information like the invoice number, due date and invoice total to the table. You will do this by dragging the data fields into the template.
- Place the cursor in the right table cell of the initial table.
- Type the following text:
- Invoice Number: (press Enter)
- Payment Due: (press Enter)
- Invoice Total: (press Enter)
- Now, to add the variable data, drag the data fields InvNumber, DueDate and InvTotal one by one from the Data Model pane into the table, after the respective label. To push them to the next line, place the cursor before the first {{, press the Enter key once.
- Select the text of each label and click the Bold icon on the toolbar to set the font-weight for the selected label.
- Click the Preview tab along the bottom of the main editor to view the merged template. When viewing the document in Preview mode (or when generating output), the scripts are executed, by which the placeholders get replaced with the value of the data field.


4. Adding the address
In this step you will learn how to add variable data, not by dragging data fields to the document but by using the Handlebars Helper wizard instead.
One of the big advantages of using a Handlebars Helper wizard is that empty lines and spaces will be removed when data fields are empty.
The Handlebars Helper wizard creates a Helper that concatenates multiple data fields and that can add a prefix and/or suffix to each data field.
Note: A Helper is a function that can be used in an expression.
Tip: Although the Helper wizard can be used to create an address block, like we do in this walkthrough, it is actually much easier to add an address block with the Address Block wizard.
- Type the following text in the first table cell: Issued to.
- Select 'Issued to' and click the Bold icon in the Formatting toolbar.
- Click after 'Issued to', press Enter two times
-
Open the Handlebars Text Helper wizard: on the Scripts pane at the bottom left, click the black triangle on the New button and click Handlebars Text Helper. A script entry is added to the Scripts pane and opened in the Edit Text Helper dialog.
- Change the name of the script so that it clearly describes the purpose of the script (e.g. setAddress). The name must be unique.
- The Handlebars Text Helper wizard is able to combine data from multiple data fields. Each field is placed on its own line in the wizard. New lines can be added by clicking the Plus sign next to the table or simply by clicking on the next empty line.
The Prefix and Suffix fields add text to the data of each field.Important! When a data field is empty the respective line is skipped including its prefix and suffix.
Add lines for the following fields and set the respective suffix text.Prefix Field Suffix Company <br/> (adds a line break) Title one space FirstName one space LastName <br/> Address1 <br/> City , (comma, then space) State one space
ZipCode
<br/>
Country
Tip: For two spaces to be used as a prefix or suffix, enter two non-breaking space characters (represented by the HTML entity: ) instead of two regular spaces. In HTML by default multiple regular spaces will be collapsed to a single space character.
-
At the bottom of the dialog, click Options and verify that the Insert Method is HTML
- Click OK. The Handlebars Text Helper will be added to the Scripts pane under Control scripts folder.
- Drag and drop the helper setAddress from the Scripts pane to the template after the text 'Issued to:' in the first cell of the invoice information table. Alternatively, you can write the name of the Helper enclosed in double curly braces {{setAddress}}.
- Toggle to the Preview mode and use the browse buttons of the Data Model pane to navigate through the records. The address block should look like this:
Company
Title First name Last Name
Address1
City, State Zip code
COUNTRY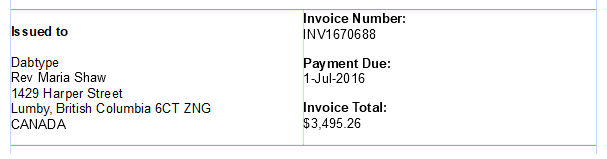

5. Changing the date format
Predefined date format
When you drag and drop data from the Data Model, they will initially have the default format. For a date, this is the medium date format, for example "Apr 1, 2022". To change this, you need a Format Helper.
In this exercise you’ll change the format of the due date to the long date format in which the month is written out in full, for example "April 1, 2022".
-
In Design mode, click the cell that contains {{date DueDate}}.
-
In the expression, change date into dateLong. There should be a space between dateLong and DueDate: {{dateLong DueDate}}.
-
Toggle to the Preview mode and use the browse buttons of the Data Model pane to navigate through the records.
Note: "dateLong" is a Format Helper. OL Connect comes with a number of Helpers to format a value in an expression. See Format Helpers.
Locale
The actual date format also depends on the locale, set for the document.
- Choose: Edit > Locale… The Locale dialog appears. By default the template makes use of the system locale.
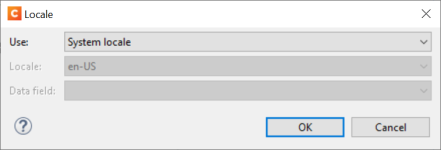
- Change the Use field to Explicit Locale and select a different entry from the Locale drop-down.
- Click OK to store the new setting and see its effect.

Tip: The Data field drop-down in the Locale dialog gives you the possibility to use a variable locale, that is, if your data contains a field that holds a locale code. The locale will be record-specific in this case. Language codes (en, fr etc.) and language-country codes (en-CA, fr-FRA) are both valid locales.
Yet another option is to use a runtime parameter. Runtime parameters can be defined in the template and filled with a value in Workflow.
Custom date format
In addition to the predefined date formats, it is possible to use a custom format like "MMM/yyyy/dd". You can specify a custom pattern after the name of the data field, and enclose it in double quotes.
In this exercise you’ll change the format of the due date to MMM/yyyy/dd custom date format, for example "01/2022/17".
-
In Design mode, click the cell that contains {{dateLong DueDate}}.
-
In the expression, change dateLong into date. Put the custom pattern MMM/yyyy/dd after the data field name DueDate separated with space like this: {{date DueDate "MMM/yyyy/dd"}}.
-
Toggle to the Preview mode and use the browse buttons of the Data Model pane to navigate through the records.
6. Aligning text in table cells
The texts in the two table cells are not aligned at the same height. This is because the text is aligned vertically to the middle of the cell. Changing the alignment of the text in the table cells will make the invoice prettier.
- Switch to the Design tab.
- Select the paragraphs in the right table cell, one by one, and click the Align Right icon in the toolbar.
- Select the table as a whole. You can do this by clicking table #invoice-info in the breadcrumbs.
- Select Format > Table Cell… from the Menu.
- On the Cell tab, set the Vertical Align drop-down to top.
- Click OK. The text in both table cells will now be aligned to the top of the cell.
- Switch to the Preview tab to see the result.