Cloning sections
Print sections can be cloned (copied) on the fly, so that documents in the output can have a variable number of sections, based on data. Each clone can have its own background image and variable data.
Types of documents for which cloning sections can be useful are, for example:
-
Insurance policies, loan statements. The number of policies and statements can vary per customer.
-
Under-copies of delivery notes or picking lists. Under-copies may need to contain additional information.
-
Textbooks and course material. These usually consist of a varying combination of chapters. Chapters that are available as multipage PDFs can be set as section backgrounds. The number of pages in each section will match the number of (selected) pages in the corresponding PDF.
-
Exam information (answering sheets). Student-specific exam information can be set as a section background and supplemented with personalized content.
-
Pick lists; box and shipping labels. Each of the section clones can display details about the contents of a single box in a shipment or a single item on a pick list.
-
Postal payment slips. These are typically attached to a reminder letter.
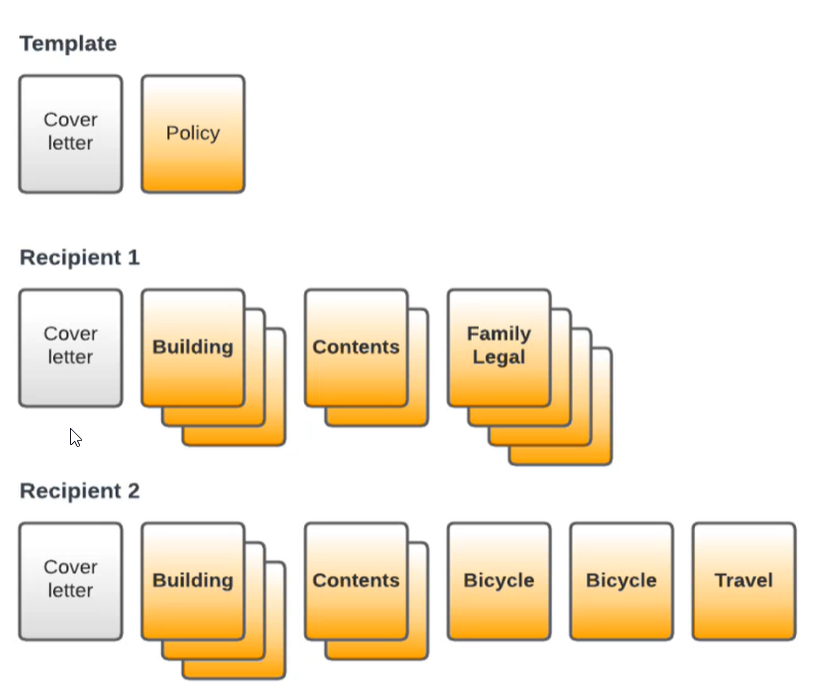
In the case of insurance policies, for example, a template would only need to contain a cover letter section and a policy section. For each recipient, the policy section would be cloned as many times as necessary, i.e. once for each insurance the recipient has.
Cloning a section using the wizard
A Control Script that clones a section can be created with a wizard. This topic explains how to use the wizard.
The code in a Clone Section script, and how to enhance it, is covered in more detail in another topic: Clone Section scripts.
-
Right-click the section on the Resources pane and select Clone Section...
Or, on the Scripts pane at the bottom left:
-
Click the black triangle on the New button
 and select Clone Section Script.
 -
Or, right-click the Control Scripts folder and select New > Clone Section script.
The wizard appears.
-
-
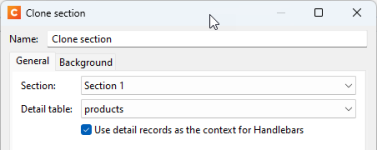
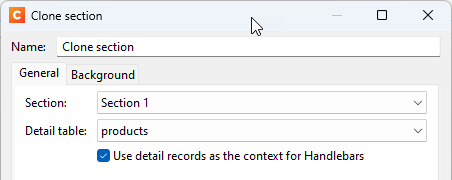
On the General tab, change the name of the script so that it reflects what the script does.
Note: Scripts can only have the same name when they are not in the same folder.
-
Select the section that must be cloned.
-
Select a detail table. As many clones are created for each recipient as there are records in that detail table.
-
Normally, Handlebars expressions in sections and clones retrieve data from the current main record. To make Handlebars expressions work on the detail record that was used to create the clone, rather than on the main record, select Use detail records as the context for Handlebars. The benefit of this is explained in Handlebars expressions in section clones.
Note that with this option selected, Handlebars expressions can still access the main record and any detail tables indirectly (via @root, see Handlebars expressions in section clones).
-
(Optional:) Switch to the Background tab if you want to apply PDF background images to the clones. See Setting a background image for section clones.
-
Click OK.
Tip: If the functionality required goes beyond what the wizard provides, you can click the Expand button to access the script code. The code for a Clone Section script, and how to enhance it, is covered in more detail in another topic: Clone Section scripts.
Note that once the expanded script dialog is closed, this action cannot be undone.
When browsing through the records in Preview mode, you will now see the section clones on the Resources pane. Double-click a section clone to open it.
Note: Section clones are only visible on the Preview tab. The maximum number of section clones visible is 50 by default, to prevent the Designer from becoming less responsive. This number can be changed; see: Editing preferences.
By default, clones have the same name as their source section with an index in round brackets.
Example: Source: "Section 1"
Clone names: "Section 1 (1)", "Section 1 (2)", "Section 1 (3)", ...
Clones can be renamed in code, after expanding the script. See Renaming a clone.
Setting a background image for section clones
Section clones automatically get the same background image as the original section. If each section clone needs a different background image, this is easily set in the section clone wizard.
Note: The wizard expects the path to a background PDF to be specified in the detail table record on which the clone is based. If the path to a PDF is not specified in the data, follow the steps below, but select a random field in step 3. Then expand the script to construct the path in code. An example is given in the topic Clone Section scripts.
-
Open the Section Clone wizard; see Cloning a section using the wizard.
If you've already added the Section Clone script with the wizard, reopen the wizard by double-clicking the script. Or, right-click the section and select Section Cloning....
-
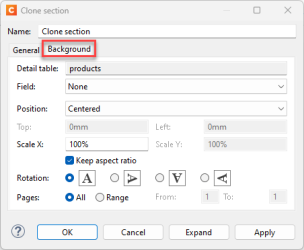
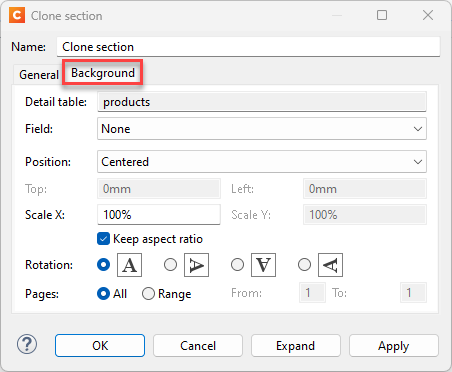
Switch to the Background tab.
-
Select the field that holds the path to a PDF. What the path should look like depends on the location of the image; see Resources.
-
Select the desired position, scaling, rotation and page range. For an explanation of these options, see Settings for a background image.
-
Click OK.
Or, click Expand if you need to change the script, for example if the path to the PDF needs to be constructed in the code (see Assigning a background PDF to a section clone).
Handlebars expressions in section clones
The easiest way to personalize section clones is by using Handlebars expressions and partials in the original section (see Handlebars expressions and Partials).
In section clones, Handlebars expressions will either work on the detail record that was used to create the clone, or on the main record like they normally do. This depends on whether the Use detail records as the context for Handlebars option was checked in the Section Clone wizard (step 5 in Cloning a section using the wizard).
For example: if the option was checked, the expression {{Company}} will display the value found in the Company field in the detail table record. If the option was unchecked, the same expression {{Company}} accesses the Company field in the main record.
Note that even if they work on the detail record, Handlebars expressions still have access to the entire record:
-
@root represents the top level of the data.
-
With . or / you can navigate down into the record and access fields and detail tables.
(See Accessing data at different levels.)
Example: {{@root.Company}}
This expression accesses the Company data field at the root level of the record.
Example: {{@root.Products[0].ProdNumber}}
This expression gets the ProdNumber data field from the first record in the Products detail table.
Retrieving data from the meta property
The @meta helper for Handlebars gives access to information stored in the section's meta property (see meta entries in section clones).
Just like with @root, you can use . to access fields in the meta property.
Example: {{@meta.detail-table}}
This expression returns the name of the detail table that contains the record for which the clone was created.
Example: {{ @meta.detail-table-record}}
This expression returns the index of the current detail table record.
Example: {{+myPartial (lookup @root.policies @meta.detail-table-record)}}
This expression loads a partial and passes the current detail table record to it. To find the current detail record, the lookup helper is used (see lookup in the Handlebars documentation). It is given a detail table called 'policies' and the record index set in the clone's meta property.
Tip: The Section Clone script can easily be changed to add more fields to the meta property. See meta entries in section clones.
Accessing detail table data for section clones in scripts
Note: Standard scripts are repeated for every section. This includes clones.
In scripts that apply to section clones that are based on a detail table, there are two ways to get access to data in the corresponding detail table record.
1. Use the detail table name and index
The Section Clone script automatically adds information to the meta property of each clone. That information can be used in scripts to retrieve data from the corresponding record in the detail table. The two meta fields that you need are:
-
detail-table - Name of the detail table
-
detail-table-record - The index of the clone's record in the detail table
These two meta fields can be accessed in code via merge.section.meta["detail-table"] and merge.section.meta["detail-table-record"].
Here is a simple example. The script's selector is h1. The script adds the text found in the summary detail table field to the heading.
let detailTable = merge.section.meta["detail-table"]
let detailRecordIdx = merge.section.meta["detail-table-record"]
if (detailTable in record.tables) {
    let detailRecord = record.tables[detailTable][detailRecordIdx]
    let summary = detailRecord.summary
    results.text(summary)
}
Tip: The in operator returns true if the specified property is in the specified object or its prototype chain.
2. Use the meta property
If many scripts need to have access to the same data field, it can be worth the effort to modify the Section Clone script by adding an entry to the clone's meta property and writing the value of a specific field in the detail table record into that entry. By default, Standard Scripts will then have access to that value via the meta property.
How to write data into the meta property and how to access that data in a Standard Script is described in another topic, see: meta entries in section clones.
Targeting individual section clones
When working with a variable number of section clones, it is less obvious to write scripts and styles that target individual section clones. By loading Handlebars partials dynamically, you can customize both the content and the layout of individual section clones. Give elements in partials a class and write CSS for them. (See Partials and Styling templates with CSS files).
However, if it is necessary to target a specific clone, the selector to use is: [section="name of the clone"].
This selector can be used in CSS as well as in Standard Scripts.
Example: This script changes the color of all h1 headings in the section named "Section 1 (1)":
Selector: [section="Section 1 (1)"] h1
Script: results.css('color','red');
Note: The selector is case sensitive.