The finishing touch
1. Adding page numbers
Invoices consist of a variable number of pages, so they need to have page numbers. This exercise shows how to add page numbers to a template.
- Open the Master Page. The page number should appear on every page, so the best place to put it in is the Master Page.
- Add a Positioned Box and put it at the bottom right, next to the box for the company address.
- In the box, type Page (followed by a space).
- From the menu, select Insert > Special Character > Markers > Page Number.
- Type a space, then of, followed by a space.
- From the menu, select Insert > Special Character > Markers > Page Count.
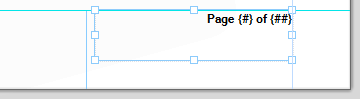
- Click the Align Right icon on the toolbar to align this text to the right of the box.
- Save the Master Page.
- Reopen the Invoice template.
- Toggle to Preview mode to see if the page numbers are inserted correctly.

Tip: To change the page number format to, for example, uppercase Roman numerals (I, II, III) or lowercase letters (a, b, c), right-click the Invoice template on the Resources pane and select Numbering.
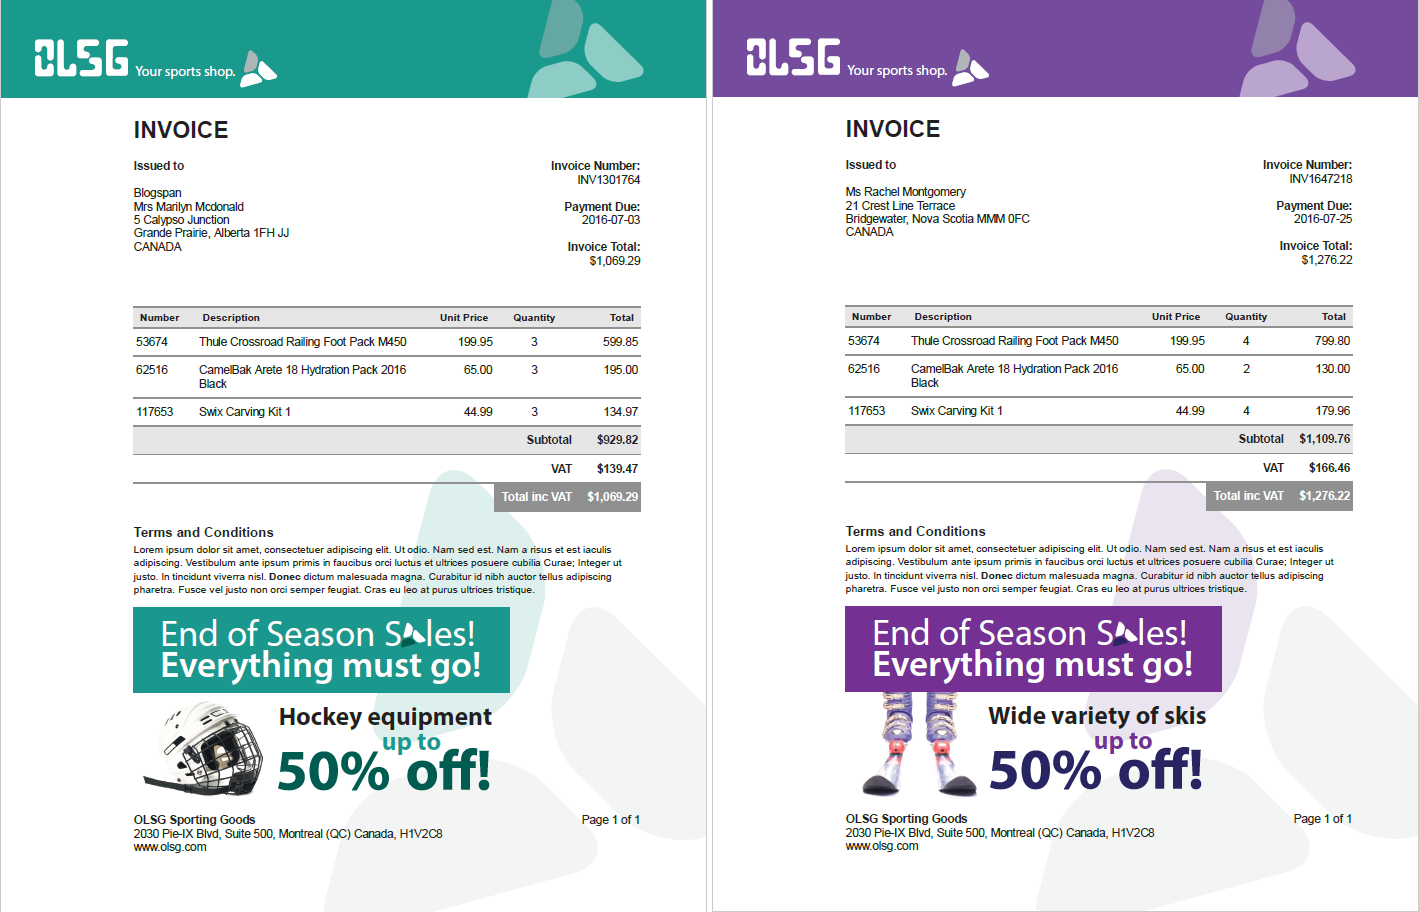
2. Using an image as a whitespace element
In this exercise you will add an image to the invoice to be used as a white space filler.
White space on an invoice can be very well used to include an advert or announcement. If there is white space on some invoices, but not on others, you may insert an image in the template and tag it as a whitespace element. A whitespace element will only be included in the output if it fits in the available white space on the current page.
- In Design mode, add one new paragraph below the paragraph Terms and Conditions: place the cursor at the end of that paragraph and press Enter.
- Import the image: locate the images folder provided with this tutorial, and drag olsg_whitespace_hockey_M.pdf from that folder to the Images folder in the Resources pane.
- Place the image in the template: drag olsg_whitespace_hockey_M.pdf from the Images folder to the empty paragraph. The image is inserted at the cursor position and anchored to the text. This means that new lines added above the image will push the image down.
- Select the image in the document. When selected, images can be resized by dragging the resize handles. Resize the image if needed. Keep the Shift key pressed while resizing to scale the image proportionally.
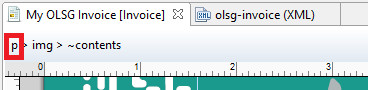
Note that the Source field in the Attributes pane shows the path to the image e.g. “images/olsg_whitespace_hockey_M.pdf”. In this path, "images" refers to the Images folder in the Resources pane. - The breadcrumbs show that the selected image is inside a paragraph. Click the p in the breadcrumbs to select the paragraph that contains the image.

Note: Only top-level elements can be used as whitespace element. In the breadcrumbs, top-level elements come first.
- On the Attributes pane, check the Whitespace option.
- Switch to Preview mode and browse the records to see that the invoice only shows the image if it has space for it.
Note: If you want a larger distance between the text of the invoice and the whitespace filler image, do not add a paragraph; that could result in an extra page. Instead, set a top margin for the image:
- Right-click the image and choose Image…
- On the Spacing tab, in Margins, uncheck All sides and enter a top margin (for example, 10px).
3. Switching images dynamically
In this exercise you will learn how to write a script that replaces one image by another, depending on values in the record set.
The Marketing department has provided four images:
- The hockey advert should only be presented to people who like hockey; men should get the green version (olsg_whitespace_hockey_M.pdf) and women the purple version (olsg_whitespace_hockey_F.pdf).
- Recipients whose favorite hobby is to ski should get the skiing advert; olsg_whitespace_skis_M.pdf is for men, olsg_whitespace_skis_F.pdf for women.
- Import the extra images: locate the images folder provided with this tutorial and drag the images that are needed to the Images folder in the Resources pane.
- Click the image in the template to select it and give it an ID: on the Attributes pane, in the ID field, type olsg-banner.
- Right-click the image and choose New Script from the shortcut menu. The Script editor appears. The selector of the script is added automatically.
- Change the script name to Switch Banner.
-
Add the following script:
Copyif (record.fields.FavHobby == "skate") {
results.attr("src", "images/olsg_whitespace_hockey_" +
record.fields.Gender+".pdf");
} else {
results.attr("src", "images/olsg_whitespace_skis_" +
record.fields.Gender+".pdf");
}Scripts start by performing a query: they scan the template to find all elements that match the specified selector. This script will look for an element that has the ID
olsg-banner. Then, following the conditions, it attributes a different source to the results of that query – which in this case is the image. The "F" or "M" at the end of the images' name can be returned dynamically by the Gender data field - Click OK to close the dialog and toggle to Preview mode to see if the script works as expected.
4. Switching Media dynamically
The Marketing department has also provided a new letterhead, to match the images that are colored purple. In this exercise you will use that as a second Media and create a script to switch the Media based on a data value.
- Import the new letterhead: locate the images folder provided with this tutorial and drag olsg-letterhead-letter-purple.PDF to the Images folder in the Resources pane.
- Right-click the Media folder in the Resources pane and select New Media. The Media Properties dialog appears.
- On the Virtual Stationery tab, check the Front option and click the Select Image icon.
- Select olsg-letterhead-letter-purple.PDF from the list of resources and click OK.
- Click OK to create the new Media entry.
- Right-click the Media 1 entry and select Rename. Rename the Media to Media_green.
- Rename the second Media entry to Media_purple.
- Open the Sheet Configuration dialog: right-click the invoice and select Sheet Configuration.
- Click the Edit Script icon.
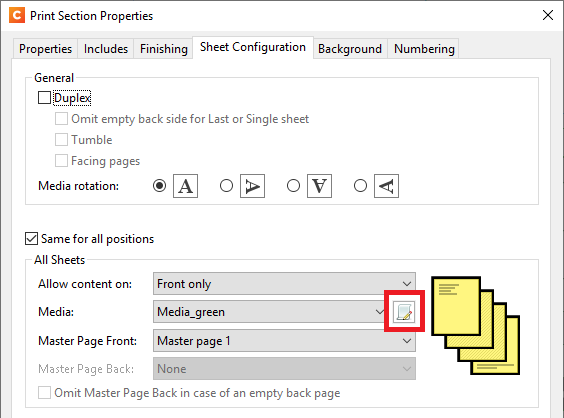
- The Edit Script dialog appears. Change the name of the script to Switch Media.
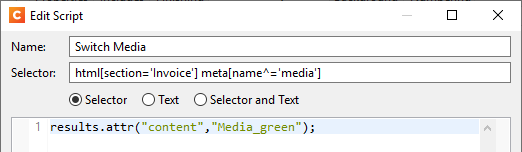
- Replace the existing script with the following code. It contains a condition to toggle the Media when the hobby of the recipient is skating:
Copy
if (record.fields.FavHobby == "skate") {
    results.attr("content","Media_green");
} else {
    results.attr("content","Media_purple");
} - Click OK to create the script entry. The entry is added to the Scripts pane.
- Click OK to close the Sheet Configuration dialog.
- Toggle to the Preview mode and browse through the records to see if the script works as expected.

5. Keeping elements together
While browsing the records in Preview mode you may have noticed that sometimes the heading "Terms and conditions" and the paragraph beneath it are on different pages. These two elements should stick together. This can be arranged using the CSS page-break-after property.
- Choose Edit > Stylesheets… to make the Stylesheets dialog appear.
- From the Context drop-down, choose Print.
- Click the Plus icon to create a new style rule.
- In the dialog that appears, type h3 in the Selector field. This means that the rule will apply to all level 3 headings.
- Click the Formats tab.
- In the Breaks section, from the After drop-down, choose avoid.
- Reduce the space between the heading and the paragraph: on the Spacing tab, in Margins, uncheck All sides and add a margin of 2px to the bottom of the heading.
- Click OK to close the Rule editor.
- Click Save to close the Stylesheet editor and go to Preview mode to check the effect of the rules.
The invoice is now ready. The result should look similar to this: