Adding personalization
To create a personalized document, you need information about the recipients: the first name, last name, email address, job title, etc. This chapter shows how to import a sample CSV data file and demonstrates various techniques to add data fields to the page and create dynamic content.
1. Loading a data file
A Comma Separated Values file (.csv) is a simple text format in which data are separated by commas or semicolons. When you load a CSV file, a wizard guides you through the process of importing the data and lets you set several import options.
- Choose File > Data > Open Data File.... The Open Data Sample File dialog appears.
- Select the sample letter-data.csv file and click Open. The wizard for loading CSV files is now shown.
- Click Next to navigate to the second page of the wizard. Make the following settings:
- Separator: Semicolon
- Check the First row contains field names option.
- Click Finish. The extracted data is shown in the Data Model pane at the right. If this pane isn’t visible, choose Window > Show View > Data Model.
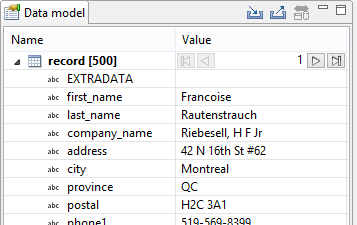
- Use the browse buttons in the Value column to browse through the imported data.
Note: The Professional and Enterprise editions of OL Connect have more advanced options for importing data. The built-in DataMapper allows to create data mapping configurations to extract, manipulate and use data from a wide range of data sources, including line printer data and PDF documents. It is not available in OL Connect Desktop edition.
2. Adding a data field to the document
As soon as data have been imported, you are ready to start personalizing the document by adding data fields to the template. When you add a data field to the template, an expression is inserted at the cursor position. Expressions look like this:
{{fieldname}}
When the document is viewed in Preview mode (or when output is generated), the expression gets replaced with the value of the data field.
- Remove the text “customer” in the salutation of the letter.
- Select the first_name field in the Data Model view and drag the field after the text “Dear” in the document. On releasing the mouse button, the expression {{first_name}} is inserted at the cursor position.

- Switch the view mode of the document from Design to Preview by clicking the Preview tab at the bottom of the workspace. This shows the merge result. Use the browse controls in the Data Model pane to scan through the records.
The expression {{first_name}} gets replaced with the value of the first_name data field in the current record. This is done by the Handlebars library which is integrated in OL Connect. For more information see the online help: Handlebars in OL Connect.
In previous versions, variable data used to be inserted in a template via scripts and placeholders (see the online help: Variable data in text: scripts and placeholders).
The advantage of expressions is that fewer scripts and sometimes no scripts at all are needed in a template.
3. Adding multiple data fields in a single action
Now you will learn how to add multiple data fields to the document in a single action. We will add the name and job title of the sales representative who is the sender of this letter, to the end of the body.
- Toggle to the Design view of the document.
- Place the cursor after the text “Best Regards” and insert a few new paragraphs.
- Select the rep_first, rep_last and rep_title field in the Data Model pane by clicking each field while pressing the Ctrl key.
- Drag the selected fields to the end of the document.
An expression for each of the fields is added at the cursor position. The expressions are placed on a single line. The document shows the following expressions: {{rep_first}}{{rep_last}}{{rep_title}}. - Type a space between {{rep_first}} and {{rep_last}}.
- Place your cursor between {{rep_last}} and {{rep_title}} and press Shift + Enter to put the job title on a new line.
A line break is added to the text. (In HTML this is the <br> element, as you can see in the Source view of the document.) - The expressions can be formatted via the Format menu and the icons on the toolbar. Select the expressions {{rep_first}} and {{rep_last}} and click the Bold icon on the formatting toolbar.
- Toggle to the Preview mode and note that the value that replaces the expression is formatted just like the expression.

4. Creating an address block
The Address Block wizard makes it very easy to create address blocks that conform to country standards.
- Add about 10 lines before the text "Profit from our Bundle Offers".
-
Select Insert > Address Block from the menu, or click the
 Address Block icon on the toolbar to open the wizard.
 -
Under Address Format, select Canada.
-
Now match the following data fields and address fields:
Address field Data field First name first_name Last name last_name Function rep_title Company company_name Street address City city Region province Postal code
postal
- Click OK.
- Toggle to the Preview mode and use the browse buttons of the Data Model pane to navigate through the records. Note that when some data are missing - the company name, for example - the remaining address lines automatically move up.
5. Adding a dynamic date
In Connect Designer you can quickly insert a date. When you are preparing a template today and finish it tomorrow, the date can be updated automatically, so you don’t have to manually delete earlier dates.
To replace the “@date@” placeholder with a date:
- Toggle to the Design mode and select the “@date@” placeholder at the beginning of the template.
- Choose Insert > Date.... The Insert Date dialog appears.
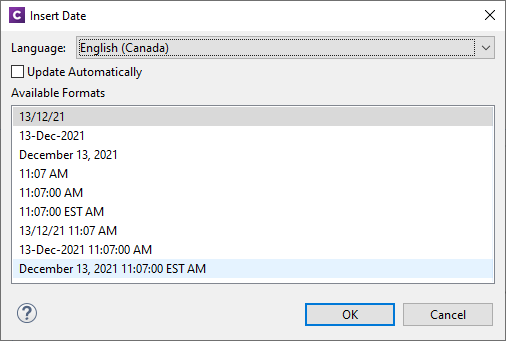
- Select a language to define the notation of the date.
- Select the Update Automatically checkbox and choose the format of your preference.
- Click OK. The expression that is added to the template returns today's date.
- Toggle to the Preview mode to see the expression in action.
6. Creating a conditional paragraph
Now you will learn how to create conditional content using the Make Conditional script wizard. This wizard provides a user interface to define when a certain element (or elements) should be hidden or shown. In this case we will show a paragraph for recipients living in the city of Montréal and hide it for others.
- Toggle to the Design mode and place the cursor in the paragraph that starts with the text: “If you have friends living close by”. Click the p in the breadcrumbs. The paragraph is now selected.
-
On the Attributes pane, type promo in the ID field.
-
Right-click this paragraph and select Make Conditional in the shortcut menu. The Edit Script script wizard appears.
Note that the ID of the paragraph has become the selector of the script.Tip: In selectors, the # sign is used to refer to an ID. A dot (for example: .promo) refers to a class.
- Make the following settings:
- Data field: city
- Operator: Equal to
- Value: Montreal
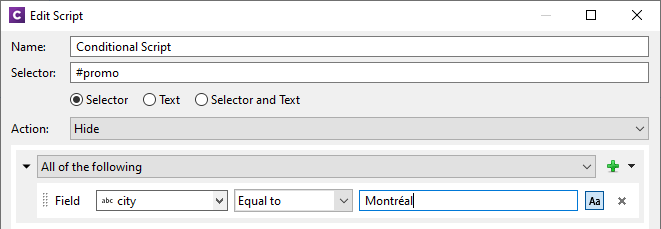
- Enter a meaningful name for the script and click OK to save the script.
- Toggle to Preview mode and browse through the records. The paragraph is shown for residents of Montreal and is hidden for others. Note that the text below this paragraph moves up when the content is not shown.

Tip: The same technique can be used to show and hide images.