Advanced PCL to PDF options
Note: The option to use PCL input can be purchased with the Professional and Enterprise editions of OL Connect.
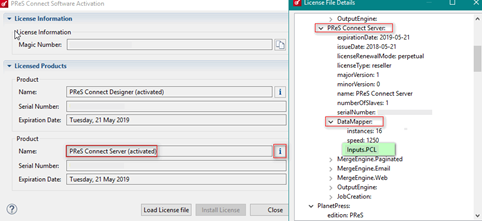
To import PCL input files, you require the PCL Input license, in addition to OL Connect. To check if you have a PCL Input license:
-
Open the Connect Software Activation module.
-
Click on the "i" icon next to the OL Connect Server product.
-
When the License File Details window opens, expand the OL Connect Server, then expand the DataMapper node. If the Inputs.PCL entry is present in that node, you have a PCL Input license.
-
If you require a PCL input license, please contact Support or your sales representative.
Configure PCL Input
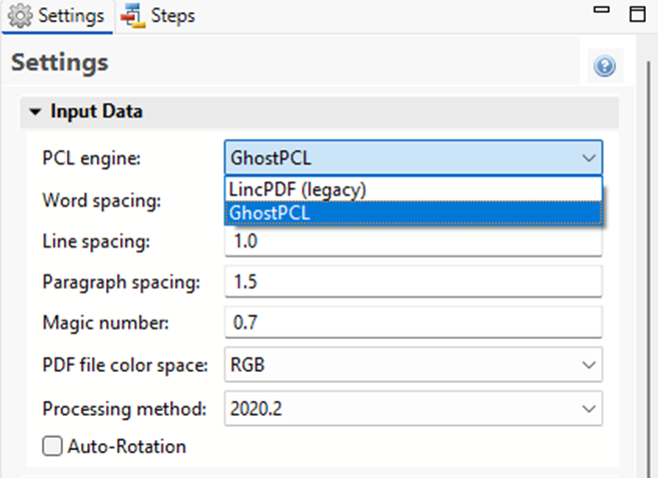
PDF files have a natural, static delimiter in the form of pages, so the options here are interpretation settings for text in the PDF file. The Input Data settings for PDF files determine how words, lines and paragraphs are detected in the PDF when creating data selections. Each value represents a fraction of the average font size of text in a data selection, meaning "0.3" represents 30% of the height or width.
-
PCL Engine (if using PCL input): By default, the Connect DataMapper uses GhostPCL to convert PCL files to PDF files. Previously created configurations used the legacy LincPDF to convert PCL files to PDF files, and this is maintained when files are imported.
It's best to update all configurations to GhostPCL, however certain features of LincPDF are not supported in GhostPCL, such as right to left reading order and Chinese, Japanese, Korean, and Vietnamese. Some applications may require continued use of LincPDF. You can use save and maintain both LincPDF and GhostPCL configurations, but GhostPCL configurations will not work on OL Connect versions older than 2026.1.
-
Word spacing: Determines the spacing between words. As PDF text spacing is somehow done through positioning instead of actual text spaces, text position is what is used to find new words. This option determines what percentage of the average width of a single character needs to be empty to consider a new word has started. The default value is 0.3, meaning a space is assumed if there is a blank area of 30% of the width of the average character in the font.
-
Line spacing: Determines the spacing between lines of text. The default value is 1, meaning the space between lines must be equal to at least the average character height.
-
Paragraph spacing: Determines the spacing between paragraphs. The default value is 1.5, meaning the space between paragraphs must be equal to at least 1.5 times the average character height to start a new paragraph.
-
Magic number: Determines the tolerance factor for all of the above values. The tolerance is meant to avoid rounding errors. If two values are more than 70% away from each other, they are considered distinct; otherwise they are the same. For example, if two characters have a space of exactly the width of the average character, any space of between 0.7 and 1.43 of this average width is considered one space. A space of 1.44 is considered to be 2 spaces.
-
PDF file color space: Determines if the PDF if displayed in Color or Monochrome in the Data Viewer. Monochrome display is faster in the Data Viewer. This has no influence on the actual data extraction or the data mapping performance.
-
Processing method: This option determines which search method is used by the Goto step's Next Occurrence of option. The most recent method searches for text within the specified constraints. It is more precise and more reliable than the Original method which searches for the target text in the entire page and then determines if the text appears within the specified constraints.
Both methods may sometimes return slightly different values. Data mapping configurations made with previous version of the software are therefore set to use the original method by default. It is however recommended to modify them to use the newer method. -
Auto-Rotation (PostScript files only): If in the original PostScript file the orientation of a page and its text don't match, this option sets the page's orientation to match the orientation of the text.
For additional details about using GhostPCL, refer to Ghostscript documentation.
Using LincPDF
By default, the only options OL Connect passes to LincPDF are the input and output file names. Therefore, everything depends on LincPDF’s own default settings. However, in order to extract data from a PCL file it might be necessary to take some of the options into account that were set to create the PCL spool file, such as Edge-to-Edge, page X and Y offset values, page width and height in the case of a custom page type, or the number of lines per page to generate the correct number of PDF pages.
The Connect DataMapper uses LincPDF to convert PCL files to PDF files. By default, the only options it passes to LincPDF are the input and output file names. Therefore, everything depends on LincPDF’s own default settings. However, in order to extract data from a PCL file it might be necessary to take some of the options into account that were set to create the PCL spool file, such as Edge-to-Edge, page X and Y offset values, page width and height in the case of a custom page type, or the number of lines per page to generate the correct number of PDF pages.
This topic's intention is to provide you with a method to make LincPDF take these advanced settings into account, so the generated PDF can be correctly read in the DataMapper.
Note: The method described in this topic can only be done using OL Connect Workflow.
Calling LincPDFC via an external program
To set advanced conversion parameters, the PCL input file has to pass through an additional Workflow process before entering the process in which the data mapping takes place. The extra Workflow process should call the LincPDF command line module LincPDFC via the External Program plugin with the desired advanced conversion parameters. To create such a Workflow process:
-
Add a local variable to your process and name it lincPDFOptions.
-
Add another local variable named workingDir and give it a default Windows path (for example: C:\PCL2PDF\).
-
Add a plugin to capture the PCL File. You may use any input plugin that imports the PCL file into the process, such as Folder Capture, LPD Input, etc.
-
Using the Change Emulation plugin, change the Emulation to ASCII. This type of emulation allows to set the number of lines per page, remove or add lines or even remove some HP PCL escape sequences if necessary.
-
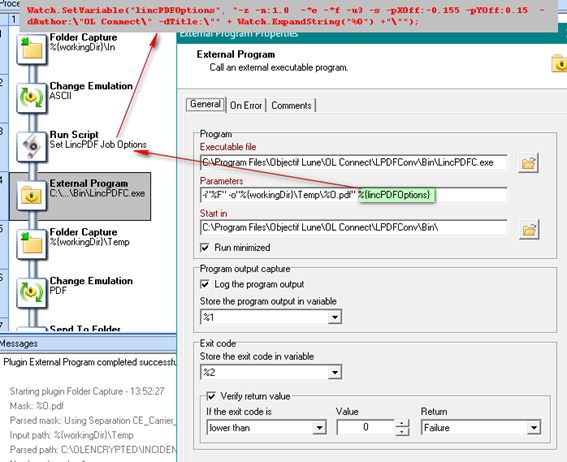
As the number of options you pass to LincPDFC may be high, it is recommended to assign all the desired options to the local variable lincPDFOptions. To do that you can use either the Set Job Infos and Variables plugin or a Run Script Action plugin, for example with the following JavaScript:
CopyWatch.SetVariable("lincPDFOptions","-z:1 -*e -*f -u3 -s -pXOff:-0.155 -pYOff:0.15 -dAuthor:\"OL Connect\" -dTitle:\"" + Watch.ExpandString("%O") + "\"");This example sets the following options or parameters:
Key Name Argument Value Type Description EdgeToEdgePrinting -z 0 or 1 Set the flag of “Allows edge-to-edge printing”(default: FALSE). Constant Alpha -n:num 0-1 Specify constant alpha value defined in PDF 1.4 (default: 0.5). UsePolygons *e 0 or 1 When enabled, Lincoln’s PCL interpreter will output vector graphics in a simpler mode (default: FALSE).
OutputRgb *f 0 or 1 When set (1), LincPDF will convert CMYK as RGB colorspace before writing (default: FALSE).
-u3 Emulate 300 DPI printers
-s Ignore Redundant Font ID
Page X Offset -pXOff:num number Specifies page’s X-direction offset (default: 0).
Page Y Offset -p YOff:num number Specifies page’s Y-direction offset (default: 0).
PDF Author -dAuthor:$s string PDF document’s author (default: null).
PDF Title -dTitle:$s string PDF document’s title (default: filename).
-
Next, use the External Program plugin to convert the PCL to PDF with the above %{lincPDFOptions} options.
In the General tab:
-
Set the Executable file to: C:\Program Files\Objectif Lune\OL Connect\LPDFConv\Bin\LincPDFC.exe
-
Set the Parameters to: -i"%F" -o"%{workingDir}\Temp\%O.pdf" %{lincPDFOptions}
-
As a minimum, LincPDFC requires an input file, which is set here via the parameter –i to which we are assigning the current job file path and name “%F”, and an output file path and name set here using the –o parameter with a dynamic value of "%{workingDir}\Temp\%O.pdf".
-
Select the "Run minimized" option to run the program in the background
-
You may select to Log the program output for additional troubleshooting. This is optional; however when activated LincPDFC detailed conversion will be added to the Workflow log.
-
-
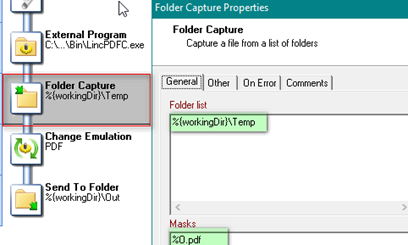
Save the output of LincPDFC using the –o folder specifier in the parameter (%{workingDir}\Temp, in this case.)
In another Workflow process, import the created PDF with the Folder Capture input plugin, specifying the output folder of the previous process (%{workingDir}\Temp in the example) as input folder, and %O.pdf as the file mask.
Once you have the PDF as job file, you may pass it to the Execute Data Mapping plugin for further processing.
LincPDFC Options
To view the available options that can be set in LincPDF, run the executable (LincPDFC.exe) in a command prompt window. It will display a help message with available options.
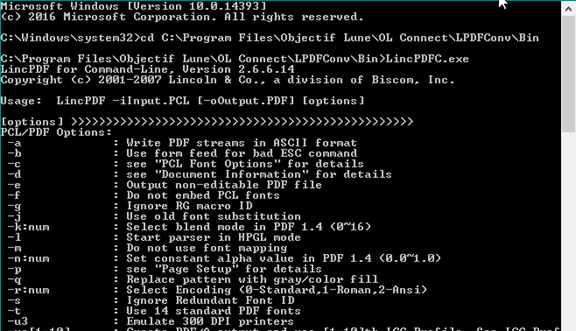
/*Open Windows Command Prompt
			Change directory
			cd C:\Program Files\Objectif Lune\OL Connect\LPDFConv\Bin
			C:\Program Files\Objectif Lune\OL Connect\LPDFConv\Bin\LincPDFC.exe
			LincPDF for Command-Line, Version 2.6.6.14
			Copyright (c) 2001-2007 Lincoln & Co., a division of Biscom, Inc.
			Usage:  LincPDF -iInput.PCL [-oOutput.PDF] [options]
[options]
PCL/PDF Options:
			-a     : Write PDF streams in ASCII format
			-b     : Use form feed for bad ESC command
			-c     : see "PCL Font Options" for details
			-d     : see "Document Information" for details
			-e     : Output non-editable PDF file
			-f     : Do not embed PCL fonts
			-g     : Ignore RG macro ID
			-j     : Use old font substitution
			-k:num : Select blend mode in PDF 1.4 (0~16)
			-l     : Start parser in HPGL mode
			-m     : Do not use font mapping
			-n:num : Set constant alpha value in PDF 1.4 (0.0~1.0)
			-p     : see "Page Setup" for details
			-q     : Replace pattern with gray/color fill
			-r:num : Select Encoding (0-Standard,1-Roman,2-Ansi)
			-s     : Ignore Redundant Font ID
			-t     : Use 14 standard PDF fonts
			-u3    : Emulate 300 DPI printers
			-ua[1-10]      : Create PDF/A output and use [1-10]th ICC Profile. See ICC Profiles for details
			-v     : View the result PDF file
			-w     : see "Watermark Options" for details
			-x     : Duplex printing for even pages output
			-y     : see "PDF Security Options" for details
			-z     : Allow edge-to-edge printing
			-*a#   : Auto Scan Direction: 1 for on and 0 for off
			-*b    : Skip same macro RG w/o RG creation
			-*c    : Use SMPTE RGB colorspace
			-*d    : Suppress blank pages
			-*e    : Use Polygons
			-*f    : Output CMYK as RGB colorspace
Document Information:
			-dTitle:$s     : PDF Title
			-dSubject:$s   : PDF Subject
			-dAuthor:$s    : PDF Author
			-dKeywords:$s  : PDF Keywords
			-dVersion:num  : PDF Version (multiply by 10)
Page Setup:
			-pWidth:num    : Page Width (required only if Page Type is Custom)
			-pHeight:num   : Page Height (required only if Page Type is Custom)
			-pXOff:num     : Page X Offset (see also Measurement)
			-pYOff:num     : Page Y Offset (see also Measurement)
			-pMeasure:num  : Page Measurement (0-inch, 1-mm, 2-point)
			-pOrient:num   : Page Orientation (0-Portrait, 1-Landscape)
			-pType:num     : Page Type (0-Letter, 1-A4, 2-B5, 3-Legal, 4-Exec.,
			5~8-Env., 9-Tabloid, 10-A3, 11-Custom, 12-A5)
PCL Font Options:
			-cPoint:num    : PCL Font Point (0.25~999.75)
			-cPitch:num    : PCL Font Pitch (0.1~576)
			-cNumber:num   : PCL Font Number (0~1000)
			-cSymbolSet:$s : PCL Font SymbolSet (e.g. 8U-US, 10U-EU)
			-cSource:num   : PCL Font Source (0-internal, 1-left, 2-right, 3-soft)
			-cTextPath:num : PCL Font TextPath (0-horizontal, 1-vertical)
			-cEncoding:num : PCL Font Encoding (see Encoding in LincPDFContrl.doc)
Watermark Options:
			-wApply:num    : Watermark Apply to (0-Whole, 1-Por~Land, 2-Odd~Even, 3-1st~Res
			t)
			-wType:num     : Watermark Type (0-Text, 1-Image)
			-wFont:num     : Watermark Font type (0~13)
			-wStr:$s       : Watermark Text String
			-wSize:num     : Watermark Font Size (1~1000)
			-wGray:num     : Watermark Text Grayscale (0-darkest ~ 100-lightest)
			-wDir:num      : Watermark Text Direction (0~7)
			-wPath:$s      : Watermark Image File Path
			-wPos:num      : Watermark Image Position (0~2)
			-wOnTop: Watermark on Top
PDF Security Options:
			-yEnable       : Enable PDF Encryption
			-yUserPassword:$s      : Open PDF Password
			-yOwnerPassword:$s     : Change PDF Permission Password
			-yPrintDocument: Enable Document Printing
			-yChangeDocument       : Enable Document Changing
			-yAddAnnotations       : Enable Adding Text Annotations
			-yCopyContents : Enable Copying Text and Graphics from Document
			-yUse128Bit    : Use 128-bit Encryption
			-yAssembleDocument     : Enable Assemble Document (128-bit encryption only)
			-yExtractText  : Enable Text and Graphics Extraction (128-bit encryption only)
			-yLowResolutionPrint   : Enable Lower-level Resolution Printing (128-bit encryption only)
Tips ----------------------------------------------------
			. using quotation mark for complicated string, for example,
			-dKeywords:"key1, key2"
			. you can convert multi- PCL files at one time, for instance,
			-iFile1.pcl -iFile2.pcl
			. for second watermark, please add '1' after each keyword, for example,
			-wSize:10 to set first watermark font size, -wSize1:12 for the second.
			. ICC Profiles for output intent are stored in the folder pointed to by "ICCPath
			" defined
			in the register or in the default folder c:\program files\lincoln\lincpd
			f and the
			profiles info are described in the text file: CMYKICCProfiles.txt in the
			same folder.
			C:\Program Files\Objectif Lune\OL Connect\LPDFConv\Bin
			*/