Snap or Unsnap Objects and/or Groups
To snap one object or group to another using the properties dialog boxes:
-
Determine the snapping point you want to use for each object and/or group, and whether or not you require an offset. In other words, determine the relationship you want to establish between the two.
-
In the Structure area, examine the relationship between the two and if necessary, edit their positions in the Structure area.
-
If, in the object/group of the two that is lower in the Structure area hierarchy, the Snap to previous object property is already selected and the proper offset set, proceed to step 9.
-
In the Structure area or the Page area, double-click that object or group to display the properties dialog box for the object/group that is lower in the Structure area hierarchy. This is the object/group PlanetPress Design moves when it performs the snap.
-
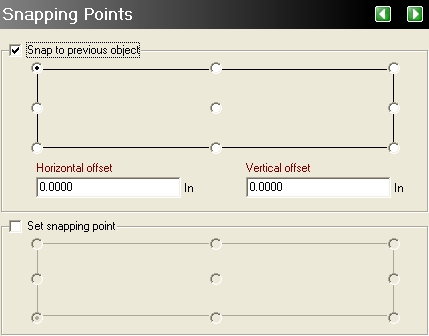
In the properties dialog box, click Snapping points.
-
Select Snap to previous object and click the snapping point you want this object/group to use when it snaps to an object/group that precedes it in the Structure area. A dot in the center of the snapping point indicates it is selected.

A. Selected snapping point
-
If necessary, set offsets for the snapping point.
Horizontal offset: Enter a horizontal offset for the snapping point.
Vertical offset: Enter a vertical offset for the snapping point.
-
In the properties dialog box, click OK.
If the Set snapping point property is already set in the object/group of the two that is higher in the Structure area hierarchy, you have completed this procedure. Otherwise, proceed to step 9.
-
In the Structure area or the Page area, double-click that object or group to display the properties dialog box for the second object/group. This object/group is the one higher in the Structure area hierarchy.
-
In the properties dialog box, click Snapping points.
-
Select Set snapping point and click the snapping point you want this object/group to use for all objects that snap to it.
-
In the properties dialog box, click OK.
To snap one object or group to another using the Object Inspector:
-
Determine the snapping point you want to use for each object and/or group, and whether or not you require an offset. In other words, determine the relationship you want to establish between the two.
-
In the Structure area, examine the relationship between the two and if necessary, edit their positions in the Structure area.
-
If, in the object/group of the two that is lower in the Structure area hierarchy, the Snap to previous object property is already selected and the proper offset set, proceed to step 6.
-
Select the object/group that is lower in the Structure area hierarchy. This is the object/group PlanetPress Design moves when it performs the snap.
The Object Inspector displays the properties of that object/group.
-
In the Object Inspector, set the following snapping points properties. If you have set the Object Inspector to use groups, all of these properties appear in the Snapping points group.
-
Set Snap to previous object to True. If an object/group that precedes it in the Structure area has its Set snapping point property set, PlanetPress Design snaps this object/group to it.
-
Set Snapping point before to the snapping point you want this object/group to use when it snaps to an object/group that precedes it in the Structure area (Top left, Top middle, Top right, for example).
-
Set Snapping point horizontal offset to the horizontal offset you want to use for the snapping point. This is useful when you want a horizontal offset between this object/group and the one to which you are snapping it. Units are as set in the User Options dialog box.
-
Set Snapping point vertical offset to the vertical offset you want to use for the snapping point. This is useful when you want a vertical offset between this object/group and the one to which you are snapping it.
If, in the object/group of the two that is higher in the Structure area hierarchy, the Set snapping point property is already selected, you have completed this procedure. Otherwise, proceed to step 6.
-
-
Select the object/group that is higher in the Structure area hierarchy.
-
In the Object Inspector, set the following snapping points properties for this object/group:
-
Set Snapping point after to the snapping point you want this object/group to use for all objects/groups that snap to it.
-
Set Snapping point after to True.
-
To unsnap one object or group from another using the properties dialog box:
-
In the Structure area or the Page area, double-click that object or group to display the properties dialog box for the object/group (of the two snapped together) that is lower in the Structure area hierarchy. This is the object/group PlanetPress Design moved when it performed the snap.
-
In the properties dialog box, click Snapping points.
-
Clear Set snapping point before.
-
In the properties dialog box, click OK.
If the object/group you just unsnapped was not the only one snapped to the other object/group, you have completed this procedure. Otherwise, proceed to step 5 to clear the Set snapping point property of the second of the two objects/groups.
-
In the Structure area or the Page area, double-click that object or group to display the properties dialog box for the second object/group. Of the two objects that were snapped together, it is the one higher in the Structure area hierarchy.
-
In the properties dialog box, click Snapping points.
-
Clear Set snapping point.
-
In the properties dialog box, click OK.
To unsnap one object or group from another using the Object Inspector:
-
Select the object/group that is lower in the Structure area hierarchy. This is the object/group PlanetPress Design moved when it performed the snap.
-
In the Object Inspector, set the Snap to previous objectproperty to False.
If the object/group you just unsnapped was not the only one snapped to the other object/group, you have completed this procedure. Otherwise, proceed to step 3 to clear the Set snapping point property of the second of the two objects/groups.
-
Select the object/group that is higher in the Structure area hierarchy.
-
In the Object Inspector, set the Set snapping point afterproperty to False.