Implement a Trigger under Novell 4.x and 5.x with NDS or Bindery Printers
It is important to create a "Print Device" for the "Organizational Unit" containing the printer you use to print the document. The "Print Job Definition" must be done for the "User" object, that is, for the "Organizational Unit" containing the "User" object used to do the "Capture".
To create a print device:
-
Start the Netware Administrator (z:\win32\nwadmn32.exe).
-
Right-click Organizational Unit and choose Details.
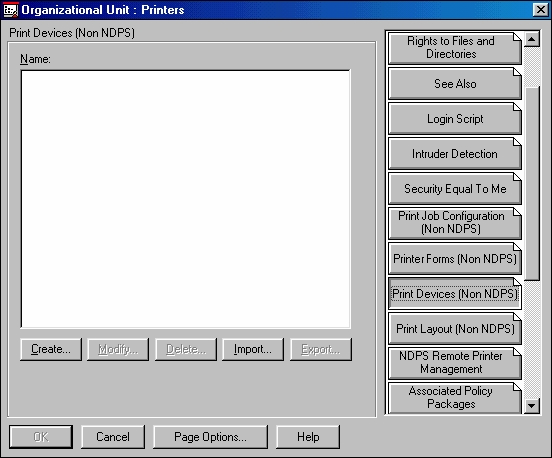
The Organizational Unit: Printers dialog box appears.
-
Click Print Devices (Non NDPS).
-
Click Create.
The Create New Device dialog box appears.
-
In the Create New Device dialog box, enter a descriptive name for the printer on which you intend to print the document, then click OK or press ENTER.
-
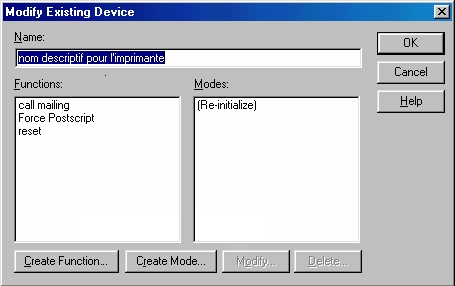
Select the newly created print device and click Modify.
-
You must now create three functions and a mode.
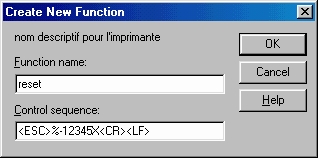
Create the first function
-
Click Create Function.
The Create New Function dialog box appears.
-
In the Create New Function dialog box, enter the following information:
-
In the Function name box, enter reset.
-
In the Control sequence box, enter <ESC>%-12345X<CR><LF>
-
-
Click OK.
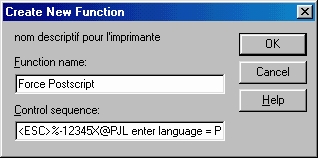
Create the second function
-
Return to the Create New Function dialog box.
-
In the Create New Function dialog box, enter the following information:
-
In the Function name box, enter Force Postscript.
-
In the Control sequence box, enter <ESC>%-12345X@PJL enter language = PostScript<CR><LF>
-
-
Click OK.
Create the third function
-
Return to the Create New Function dialog box.
-
In the Create New Function dialog box, enter the trigger information. For example, if the name of the document you want to execute is MAILING, and it exists on the hard drive of the printer, you would enter the following:
-
In the Function name box, enter call mailing.
-
In the Control sequence box, enter (MAILING) run MAILING.
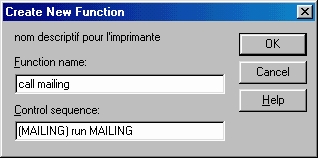
-
-
Click OK.
Define the mode
-
In the Modify Existing Device dialog box, click Create Mode.
-
In the Name box, enter a meaningful name. For this example, enter Mailing.
-
Select the three functions you just created, in the following order: reset, Force Postscript, call mailing. For each function, select it in the Device functions list, then click Add Below. The order in which you select the functions is important.
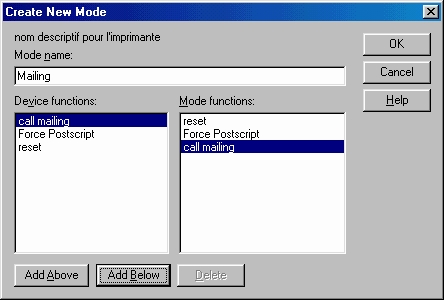
-
Click OK.
The Print Device is created with its functions and mode.
-
Create the Print Job Definition. You must create the Print Job Definition in the Organizational Unit that contains the user's object or the object used by the user. For this example, the users in the Organizational Unit will be able to use the Print Job Definition. Right-click Organizational Unit, and choose Details.
The Organizational: ol dialog box appears.
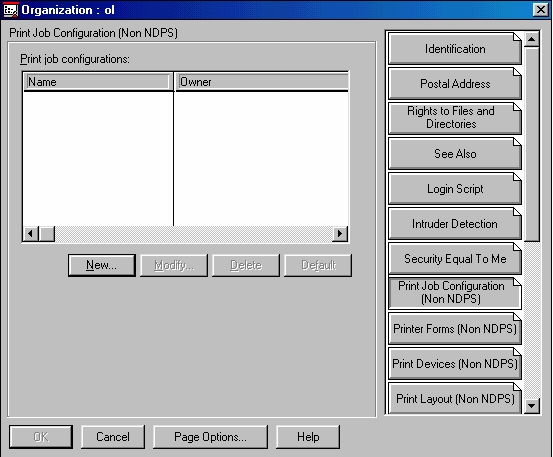
-
Click Print Job Configuration (Non NDPS).
-
Click New.
The Print Job Configuration dialog box appears.
-
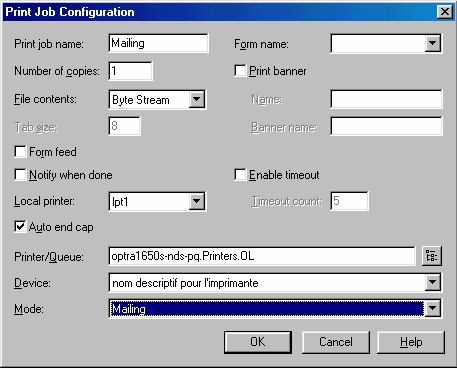
In the Print Job Configuration dialog box, enter the following:
-
In the Print job name box, enter a descriptive name. For this example, enter Mailing.
-
Clear the Print banner and From feed boxes.
-
In the Printer/Queue box, enter the printer on which you intend to execute the document. The queue can be NDS or Bindery.
-
In the Device box, select the name of the device you created.
-
In the Mode box, select the name of the mode you created.
-
-
Close the Netware Administrator.
-
You must now configure the client's (user's) portion. First, use the Capture command to direct the network printer to a port such as LPT1. You must also use the J option in the command to include your "job definition". The following command works with the above example:
CAPTURE Q=.OPTRA1650-NDS-PQ.PRINTERS.OL J=MAILING NB NFF TI=20
In this command, the J option indicates the name of the Print Job, NB signifies No Banner, NFF signifies No Form Feed, and TI specifies the time-out value in seconds (in this case, 20 seconds). If you use this command, be sure to substitute the Print Job name and the printer name with the ones that apply to your job.
-
Once you execute the Capture command (either locally or via Novell scripts), you must create a new printer in the user's Windows using the Generic Text pilot that points towards the local LPT1 port. You create the new printer as follows:
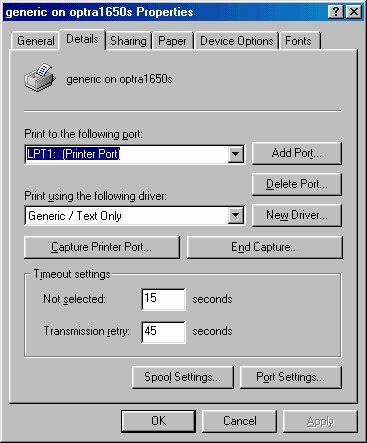
Users that perform the capture (with the J option) and have a generic printer pointing towards the LPT1 port can use the document configured in the Print Job Configuration.
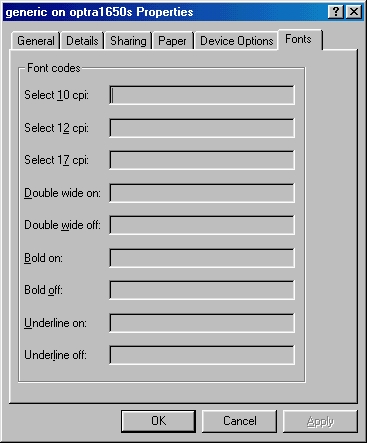
Note that certain versions of Windows have Generic Text pilots that can cause a well known problem: text aligned vertically instead of horizontally. To solve this problem, access the printer's properties. In the Fonts tab, add a space in every Font codes section.