Dynamic PPD Options
This page appears as part of the Advanced Print Wizard and the Output Creation Preset Wizard.
The Dynamic PPD mode options page allows you to add PostScript printer capabilities to Connect, through the printer's associated PostScript Printer Definition (PPD) file, and to assign rules to them to trigger those capabilities in conjunction with Connect Templates.
Note: This Print Wizard page is intended for use only by those operators who are very familiar with their PostScript printer's capabilities and the options available to them in the printer's associated PPD file.
A video example of how to set Dynamic PPD Options can be found here: Setting Dynamic PPD Options within Connect - An example.
Note: As of OL Connect 2019.1 JobPatchFile sections in PPDs are automatically added to the output, if the PPD includes them.
The Dynamic PPD mode Options page can be broken up as follows:
PPD Info group
This shows information about the selected PostScript Printer Definition. The information box contains general printer details (such as the model name) whilst the PPD file name field displays the name of the actual PPD file that is loaded.
If the incorrect PPD was assigned to this Printer Model, the PPD file can be changed at this point, via the Import PPD button  .
.
This is not considered good practice, however. It would be better to return to the Printer Model selection dialog and chose the correct Printer Model and PPD combination there.
PostScript Options
PostScript specific options that are not catered for by the PPD.
- Rotate landscape pages checkbox: For certain printers, printing in landscape orientation requires rotating the page content. Typically this cannot be derived from the PPD, nor does the PPD contain instructions for carrying out this rotation.
In such a scenario, selecting this checkbox will have those printers print in Landscape mode.
Rules
This group displays the print options for the template along with their associated triggers, as well at the more general Simplex/Duplex options.
If your Template already has Finishing and Media/Trays entries set, then those options will appear pre-populated in the Rules table along with their Triggers, to allow you to assign specific options as Printer Option entries.
Additional Rules (and Triggers) can be added (or deleted) and all Rules can be edited, and/or moved up or down within the table after being added.
Within a group of Rules, the Rules are processed sequentially, from top to bottom. Thus if two Rules apply to the same option (such as two different Rules applying for Tray 1), then the topmost Rule will be applied, once the Rule trigger is encountered. Thus it makes sense to have the most specific rules at the top of a group, with the more generic rules placed below them.
Note: Rules should have at least one Printer Option assigned to them. If they do not, then the page is considered incomplete and a warning symbol will be displayed and the offending Rules highlighted. As seen in the following screen-shot: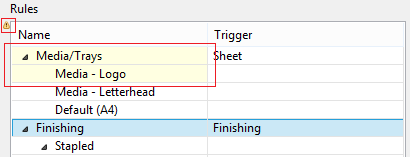
If a Media/Trays Rule has an associated Printer Option that matches a Media entry in the Template or Presets, then it is highlighted in light green.
It is possible to create a set of Rules in which none of the Rules ever evaluate to true, and thus no Rule will be applied. This could be done on purpose, to allow the printer's default settings to apply.
The types of Rules are as follows:
-
JCL (Job Control Language) Rules: This option only appears if the PPD contains a "
*JCL keywords" section.
Certain printers require Printer Job Language (a type of JCL) commands to function properly, or to allow certain features.
If such entries are included in the PPD, then rules can be added to use them via the Add button.
Note: JCL is a generic way to refer to languages like PCL's Printer Job Language.
-
Prolog Rules: This adds options to the Prolog section of a PostScript document.
You can add Prolog settings via the Add button. -
Setup Rules: This supplies PostScript resources for document or page setup.
You can add Setup settings via the Add button. -
Media/Trays Rules: This allows you to set Media/Trays options. The Media/Trays settings will be pre-populated from settings contained within the current Connect Template, if such exist.
They can also be added from other Templates, selected using the Import button.
You can import settings from as many Templates as you like.
You can also add additional Media/Trays settings via the Add button.
Media/Tray selections always apply to Sheets.
Once the Media/Trays are entered you will need to assign specific Printer Options (from those contained in the PPD) to the individual Media/Tray types. -
Finishing Rules: This allows you to set Finishing options.
These settings will be pre-populated from settings contained within the current Connect Template, if such exist.
They can also be added from Job Creation Presets and other Templates, selected using the Import button.
You can import settings from as many Templates as you like.
You can also add additional Finishing settings via the Add button.
The Finishing Rules support all industry standard binding options.
Once the Finishing Rules are entered you will need to assign specific Printer Options (from those contained in the PPD) to each of the individual Finishing Rules.Note: You should also choose an Option to switch off the Finishing selection, to cater for subset Finishing.
-
Plex rules: This fixed group allows you to set rules for sheet plexing. The choices are Duplex, Simplex or Tumble Duplex.
You should add Printer Options for each of these Plexing Rules. -
Custom rules: The Custom group does not appear by default, but can be added at any point via the Add
button.
The Rules Options. These options can either be selected via the icons to the right of the Rules table, or from right click context sensitive menus within the Rules table.
The options are:
-
Import: Allows importation of Rules from existing Job Creation Presets and/or Connect Templates. You will be presented with options to either Import Finishing Settings, or Import Media Settings, based upon what is currently selected and/or available in the Rules table.
Both options allow you to select an existing Connect Template, from which to import the settings from, whilst Finishing settings can also be imported from Job Creation Presets.
The settings will be added to those already in the Rules table. -
 Add: This allows you to Add various options, dynamically.
What options are available is dependant upon what rule is currently selected. For example, the Plex group does not have an option to Add Rules available to it.- Add Rule: This will add a Rule that is specific to the type of option was selected when the Add Rule was pressed. The options are as follows:
- Prolog : If the Rule is being added to a Prolog selection, then the Dynamic Custom Element Editor Dialog will be launched.You should add Printer Options for each of the Rules added. See the Printer Options section for how to do this.
- Setup : If the Rule is being added to a Setup selection, then the Dynamic Custom Element Editor Dialog will be launched.
You should add Printer Options for each of the Rules added.See the Printer Options section for how to do this. - Media/Trays : If the Rule is being added to a Media/Trays selection, then the Dynamic Tray Mapping Editor Dialog will be launched. This dialog allows the description of standard Media options, such as paper Weight and Color.
You should add Printer Options for each of the Rules added.See the Printer Options section for how to do this. - Finishing : If the Rule is being added to a Finishing selection, then the Dynamic Finishing Editor Dialog will be launched.
You should add Printer Options for each of the Rules added.See the Printer Options section for how to do this. - Plex : Add Rule is not available as an option for Plex settings.
You should add Printer Options for each of the Rules added.See the Printer Options section for how to do this. - Custom : If the Rule is being added to a Custom Group selection, then the Dynamic Custom Element Editor Dialog will be launched. The Custom Group selection allows for considerable customization and complexity.
For example, they could be used to separate large documents (that might not fit into an Inserter machine), or to use a letterhead stock that is based upon what city the document recipient lives in.
You should add Printer Options for each of the Rules added.See the Printer Options section for how to do this.
- Add Custom Group: This launches the Custom Group Editor Dialog which adds a new Custom Group entry, and associated Trigger.
- Add PSHeader Group: This adds a PostScript Header group (triggered on File).
To add the actual Rule details you must select the new Header entry and then select the Add Rule option.
Note that these rule are added in order the appear. - Add Media/Trays Group: This adds a new blank Media/Trays entry.
To add the actual Rule details you must select the new Media/Tray entry and then select the Add Rule option. - Add Finishing Group: This adds a new blank Finishing entry.
To add the actual Rule details you must select the new Finishing entry and then select the Add Rule option.
- Add Rule: This will add a Rule that is specific to the type of option was selected when the Add Rule was pressed. The options are as follows:
-
 Edit: This allows you to edit the current Rule, dynamically. What options are available is dependant upon what rule is currently selected.
The options are as follows:- Media/Trays : If the Rule is being edited is a Media/Trays selection, then the Dynamic Tray Mapping Editor Dialog will be launched.
- Finishing : If the Rule is being edited is a Finishing selection, then the Dynamic Finishing Editor Dialog will be launched.
- Plex : Plex Rules cannot be edited.
- Custom / Prolog / Setup : If the Rule being edited is any of these, then the Custom Group Editor Dialog will be launched.
-
 /
/  Move Up / Down: Move the selected rule(s) up or down within the Rules table. This allows sorting of options, for easier legibility, and more importantly, for Order Dependency.
Within a group of Rules, the Rules are processed sequentially, from top to bottom. Thus if two Rules apply to the same option (such as two different Rules applying for Tray 1), then the topmost Rule will be applied, once the Rule trigger is encountered. Thus it makes sense to have the most specific rules at the top of a group, with the more generic rules placed below them. -
 Delete: Delete the selected rule(s) from the Rules table.
Rule Details
This table displays the details of the currently selected Rule.
For Media/Trays, Finishing and Plex selections only the Properties are displayed. For Custom selections, the Condition can also be displayed.
The tabs can be broken down as follows:
-
Properties Tab: displaying all the relevant Rule Details. These are:
- Property: The list of properties available to this Rule.
What properties are displayed is dependent upon the type of Rule selected. - Value: The property's associated value, if set. If not set, the Value will remain blank.
-
Condition Tab: displays the logical condition that needs to be fulfilled before the Custom Rule is to be applied.
The table is read only and the details cannot be adjusted or edited from within the table. Rules need to be edited from within the Rules table directly, through either the Edit button or by double mouse clicking on the Rule.
Printer Options
This section allows for the selection and ordering of Printer Options to be associated with the active Rule. The Print Options are all those contained in the PPD.
If no Rule is active, the Printer Options section will not be available.
The Printer Options table displays :
- Name column: This column contains the names of the Printer Options, as taken from the PPD file.
- Option column: This column shows the selected Printer Option preference.
- Order column: This column displays any Dependency Order criteria that applies to the selected Printer Option.
The choices available to the Printer Options are as follows:
-
Add: This launches the Add Printer Option dialog which allows you to add one or more Printer Options. That dialog will be populated with options that relate to the Rule that was selected, when the Add Printer Options button was pressed.
-
 Add custom PostScript: This launches the Add Custom Printer Option dialog which allows you to add customized PostScript instructions.
Note that this option requires an in depth understanding of both the PostScript language and the specific printer itself. -
 Edit: This allows you to edit an existing Rule Printer Option. It launches the Add Printer Option dialog.
 -
/ Move Up / Down: Move the selected Printer Option(s) up or down within the table. This allows sorting of options for easier legibility, but manually moving options up and down is done without any check on Order Dependency.
-
Delete: Delete the selected Printer Option(s).
-
 Sort by Order dependency: This sorts the Printer Options by the order of their dependencies.
Not all Printer Options have dependencies, but for those that do, the order is important.
For example, consider these following PPD file Printer Option extracts:- PageRegion:
*OpenUI *PageRegion: PickOne
*OrderDependency: 50 AnySetup *PageRegion
...
*CloseUI: *PageRegion - InputSlot:
*OpenUI *InputSlot: PickOne
*OrderDependency: 20 AnySetup *InputSlot
...
*CloseUI: *InputSlot
We can see that one has an Order Dependency of 50 and the other 20.
If PageRegion was selected prior to InputSlot in the Add Printer Option dialog, then they would appear like this in the Print Wizard: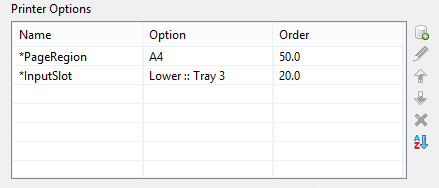
To sort them into the correct dependance order, use the Sort by Order dependency button. This will sort them into the proper dependency sequence. As seen below, where the lower dependency now appears first.
- PageRegion:
Caution: Nothing prevents the selection of conflicting and contradictory Print Options.
This can be seen in the following example, which shows multiple conflicting Folding Options have been chosen: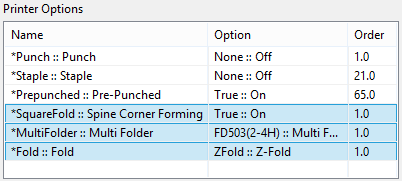
The breadth and diversity of PPD files as well as individual printer capabilities mean that the Print Wizard cannot meaningfully validate the selections made, and thus does not attempt to.
So you must be careful when making selections. We recommend that you always test each individual selection made, to confirm that they are valid and that they do what you expected of them.
This could entail considerable trial and error, but should lead to less anguish in the long run.
Advanced Print Wizard and Output Creation Preset Wizard navigation options
-
Preview button (active in Advanced Print Wizard only): Click to launch a Proof Preview window, which displays how the printed output would look based upon the currently chosen selections.
-
Back and Next buttons: Used to navigate back and forth through all the selected options within the Wizard. Up until the Print button is pressed, one can reverse all the way through the wizard to return to the main selection page (the Print options page) and add or remove printing options from the print run.
-
Print button (Advanced Print Wizard only) or Finish button (Output Creation Preset Wizard only):
Click to produce print output/finalize the Preset according to the current settings.
This can be done at any point within the Wizard, whether or not all the options selected in the Print options page have been completed or not. -
Cancel button: Cancels the Print Wizard, without creating any printout.