PPML Options
This page appears as part of the Advanced Print Wizard and the Output Creation Preset Wizard.
The PPML Options page is shown only when a PPML Print output type is selected in the Print Options dialog. It is used for tray selection.
PPML Tray Options
Use the drop-down list to specify what output Tray Options to use, if any. The options are as follows:
-
None: No Tray Options specified. This is the default selection.
-
SetPageDevice: This provides a table where one can allocate job Media to different types of print paper stock and assign them to the output via the SetPageDevice entry. The choices are a selection of common print stock Types and Colors.
-
Media column: The available job Media . These will initially be populated with the Job Media entries, but new Media can also be added via the Add
 button.
 -
Type column: Select the Media Type from the range available. The selections are standard print output media types, except for the Unspecified option, which resolves to the printer default, or to that which matches the PageSize setting.
-
Color column: Select the Media color from the range available, if needed.
The SetPageDevice table options are:
-
Add: Add new Media entries.
-
 Delete: Delete the selected Media from the table.
 -
 /
/  Move Up / Down: Move the selected Media up or down within the table.
 -
 Import: Import additional Media entries from existing templates.
Choose from:-
Import from current template: As the Media selections from the current template are automatically added to the table, selecting this option would either duplicate the existing entries (if they had not been deleted) or would repopulate the table with those entries (had they been deleted).
If the existing entries had not been deleted, then the newly imported Media names will be identical to the entries already in the table, and thus their names will need to be changed. -
Import from template file: Import Media settings from some other Connect Template file.
-
-
-
Mapped PPD Entries: This allows selection of a printer manufacturer's printer specific PostScript Printer Definition (PPD) file. These files contain what printing options are available for this specific printer.
-
PPD Info box: This is a read only box that contains the name of the selected PPD file, once such a selection is made.
-
PPD file name: Select a PostScript Printer Definition (PPD) file, using the Browse
 button.
Once the PPD is loaded, you will be asked to save this new Printer Definition type.
When the new Printer Definition is saved, the PPD Info box will be populated with information regarding it, and the following new dialog options become available:-
-
Add: Add new Media entries. This launches the Dynamic Tray Mapping Editor Dialog to allow you to set the Media properties.
-
Delete: Delete the selected Media from the table.
-
/ Move Up / Down: Move the selected Media up or down within the table.
-
Import tray settings: Import additional Media entries from existing templates. The choices are:
-
Import from current template: As the Media selections from the current template are automatically added to the table, selecting this option would either duplicate the existing entries (if they had not been deleted) or would repopulate the table with those entries (had they been deleted).
If the existing entries had not been deleted, then the newly imported Media names will be identical to the entries already in the table, and thus their names will need to be changed. -
Import from template file: Import Media settings from some other Connect Template file.
-
Media: This box will initially be populated with any existing Media found in the current Template. You can add or remove Media, as you wish. The options available to the Media table are:Double clicking the left mouse button on a Media table entry will launch the Dynamic Tray Mapping Editor Dialog to allow you to modify that Media's properties.
-
-
Details: This is a read only table that displays the Details of whatever Media has been selected in the Media box. Double clicking the left mouse button on a Media table entry will launch the Dynamic Tray Mapping Editor Dialog to allow you to modify that Media's properties.
-
Printer Options:
The Printer Options table displays :
- Name column: This column contains the names of the Printer Options, as taken from the PPD file.
- Option column: This column shows the selected Printer Option preference.
- Order column: This column displays any Dependency Order criteria that applies to the selected Printer Option.
The choices available to the Printer Options are as follows:
-
 Add: This launches the Add Printer Option dialog which allows you to add one or more Printer Options.
 -
 Edit: This allows you to edit an existing Rule Printer Option. It launches the Add Printer Option dialog.
 -
/ Move Up / Down: Move the selected Printer Option(s) up or down within the table. This allows sorting of options for easier legibility, but manually moving options up and down is done without any check on Order Dependency.
-
Delete: Delete the selected Printer Option(s).
-
 Sort by Order dependency: This sorts the Printer Options by the order of their dependencies.
Not all Printer Options have dependencies, but for those that do, the order is important.
For example, consider these following PPD file Printer Option extracts:- PageRegion:
*OpenUI *PageRegion: PickOne
*OrderDependency: 50 AnySetup *PageRegion
...
*CloseUI: *PageRegion - InputSlot:
*OpenUI *InputSlot: PickOne
*OrderDependency: 20 AnySetup *InputSlot
...
*CloseUI: *InputSlot
We can see that one has an Order Dependency of 50 and the other 20.
If PageRegion was selected prior to InputSlot in the Add Printer Option dialog, then they would appear like this in the Print Wizard: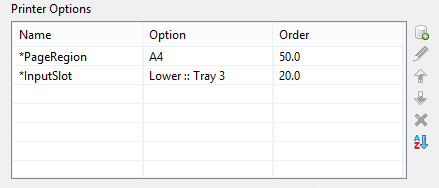
To sort them into the correct dependance order, use the Sort by Order dependency button. This will sort them into the proper dependency sequence. As seen below, where the lower dependency now appears first.
- PageRegion:
Caution: Nothing prevents the selection of conflicting and contradictory Print Options.
This can be seen in the following example, which shows multiple conflicting Folding Options have been chosen: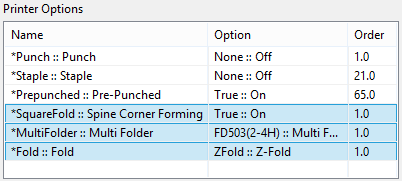
The breadth and diversity of PPD files as well as individual printer capabilities mean that the Print Wizard cannot meaningfully validate the selections made, and thus does not attempt to.
So you must be careful when making selections. We recommend that you always test each individual selection made, to confirm that they are valid and that they do what you expected of them.
This could entail considerable trial and error, but should lead to less anguish in the long run.
-
-
Advanced Print Wizard and Output Creation Preset Wizard navigation options
-
Preview button (active in Advanced Print Wizard only): Click to launch a Proof Preview window, which displays how the printed output would look based upon the currently chosen selections.
-
Back and Next buttons: Used to navigate back and forth through all the selected options within the Wizard. Up until the Print button is pressed, one can reverse all the way through the wizard to return to the main selection page (the Print options page) and add or remove printing options from the print run.
-
Print button (Advanced Print Wizard only) or Finish button (Output Creation Preset Wizard only):
Click to produce print output/finalize the Preset according to the current settings.
This can be done at any point within the Wizard, whether or not all the options selected in the Print options page have been completed or not. -
Cancel button: Cancels the Print Wizard, without creating any printout.