Capture a Baseline from the Summary Page
A schedule Baseline is a snapshot of the forecasted planned dates of a Project. The Baseline will record the current system start date and end date of a work item:

Tip: A Baseline is usually captured at the beginning of a Project once the Project Schedule has been approved.
Tip: Baselines can also be captured from Project Central. This is the recommended option for users who would like to control which of the work item's Descendants will also have Baselines captured.
The Baseline can be used to measure Project performance by reporting on schedule variance (how far a Project is ahead or behind the original schedule). As the start and end dates of a Project change, the Baseline dates can be referred to in order to see how the current dates differentiate from the original schedule. This is useful for planning future Projects as Project Managers will gain more visibility into how much time is needed for similar Projects compared to how much time was originally budgeted.
Up to 13 Baselines can be recorded for a single work item: one current Baseline (in bold font at the top of the list) and 12 supplemental Baselines:
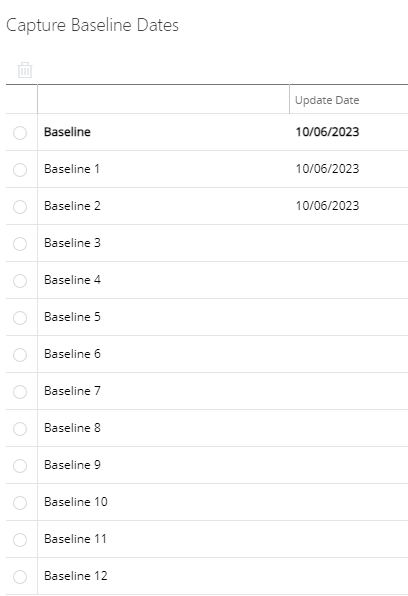
Some Project Managers prefer to utilize multiple Baselines in order to record the changes in a Project's lifecycle. This allows them to view the original Baseline as well as any changes to it that occurred afterward. This way, they can measure the impact of each change in the Project that resulted in new schedule dates.
Example: Paula has created a Project that is expected to last for six months. She immediately captures a Baseline for the Project, which reflects the initial system start and end dates. During the Project, her team members reach out to her whenever they need more time. For instance, the initial draft sketches took longer than expected so they needed another week. Also, some materials took longer to arrive so they needed an extra few days. Whenever this happened, Paula pushed back the end date of her Project schedule and captured a new Baseline in an empty Baseline slot.
The Project ended up completing after seven months, which was one month later than expected. While reflecting on the Project after completion, Paula looks at each of the Baselines she captured. She can see each time she was forced to change the Project schedule as well as the date in which the change occurred. This provides her with a reference to the obstacles that prevented the Project from completing on time. When she plans a similar Project in the future, she will better understand these obstacles and be able to plan the Project schedule more accurately.
This page covers the following topics:
Capturing Baselines from the Summary page
Schedule Baselines can easily be captured from the "Schedule" widget of a work item's Summary page. Once captured, they will be displayed in the "Schedule" widget along with any other work item dates.
Note: Prior to the 2023R1.2 release, Baselines could also be captured through the Navigation menu. This is no longer the case; users will need to follow the steps below in order to capture Baselines from a work item's Summary page.
Note: Capturing a Baseline from the Summary page will automatically capture a Baseline for all of the work item's Descendants as well. If you would like to control which Descendants will also have Baselines captured, you will need to use Project Central.
To capture Baselines from the Summary page:
Before You Start: PowerSteering users will require the "Set Baseline dates" Project permission to capture Baselines.
If users / administrators still cannot capture Baselines from the Summary page even though they have the required permission, reach out to your PowerSteering representative to enable it for you. Alternatively, you will still be able to capture Baselines from Project Central.
-
Navigate to a work item.
-
Open up the "Standard Details" module on the work item's Summary page:

Note: The "Standard Details" module can be renamed. Contact an administrator or the Project Manager if the module does not appear to be on the page.
Note: Alternatively, users can select the Edit All Details button in the top right-hand corner of the screen and skip Step 3:

-
Select the pencil icon in the "Schedule" widget:

-
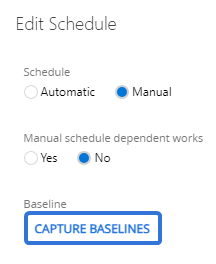
Select Capture Baselines:
-
Select which Baseline slot you would like to save the Baseline in:
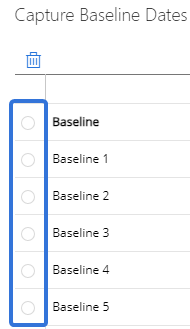
Note: If a Baseline already exists in the selected Baseline slot, it will be overwritten by the newly-captured Baseline. If you are interested in recording only one Baseline for the work item, you should always select the current Baseline (the choice at the top of the list with bold font). If you are interested in recording multiple Baselines at once, you can select an empty non-current (supplemental) slot with a number (1-12). Be aware that you can make a supplemental slot the current Baseline at any time, as well as delete any Baselines from the list.
Note: When capturing Baselines from the Summary page, all of the work item's Descendants will also capture a Baseline in the selected Baseline slot. For example, capturing a Baseline in the "Baseline 1" slot will result in the work item's Descendants automatically capturing a Baseline in the "Baseline 1" slot as well.
-
Select the Capture Baselines button:

-
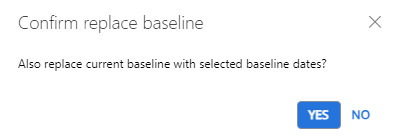
(If a supplemental Baseline slot was selected) Determine whether you would like your new Baseline to replace the current Baseline:
-
Yes: The new Baseline will replace and overwrite the current Baseline (in bold font at the top of the list). It will be displayed as "Baseline" in the "Schedule" widget.
-
No: The new Baseline will remain in the selected supplemental slot and the current Baseline will remain the same. It will be displayed in the "Schedule" widget as whichever slot was selected (Baseline 1-12).
-
-
Select the Save button at the bottom of the "Edit Schedule" window:

Note: This will be the Save All button if you chose to use the Edit Work Details button to capture Baselines.
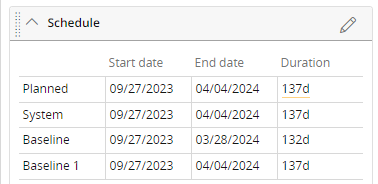
After selecting Save (or Save All), your new Baseline will be saved to the work item. The current Baseline and any supplemental Baselines can be seen in the "Schedule" widget:
Making a supplemental Baseline the current Baseline
Any of the supplemental Baselines (non-current Baselines that are numbered 1-12) can replace the current Baseline at any time. When this happens, the current Baseline dates will inherit the dates of the selected supplemental Baseline. The selected supplemental Baseline will remain as it is.
Tip: If you would like to capture a new Baseline and make it the current Baseline, simply follow the steps in Capturing a Baseline from the Summary page and select the top Baseline slot (in bold font) in Step 5. If you would like to make a previously-saved supplemental Baseline the current Baseline, follow the steps below.
Note: Replacing the current Baseline dates with another Baseline's dates from the Summary page will result in all of the work item's Descendants replacing their current Baselines as well. If you would like control over which Descendants replace their Baselines, you will need to use Project Central.
To make a supplemental Baseline the current Baseline:
Before You Start: PowerSteering users will require the "Set Baseline dates" Project permission to capture Baselines.
If users / administrators still cannot capture Baselines from the Summary page even though they have the required permission, reach out to your PowerSteering representative to enable it for you. Alternatively, you will still be able to capture Baselines from Project Central.
-
Navigate to a work item.
-
Open up the "Standard Details" module on the work item's Summary page:

Note: The "Standard Details" module can be renamed. Contact an administrator or the Project Manager if the module does not appear to be on the page.
Note: Alternatively, users can select the Edit All Details button in the top right-hand corner of the screen and skip step 3:

-
Select the pencil icon in the "Schedule" widget:

-
Select Capture Baselines:

-
Select the slot of the supplemental Baseline (non-current, numbered 1-12) you would like to make the current Baseline:
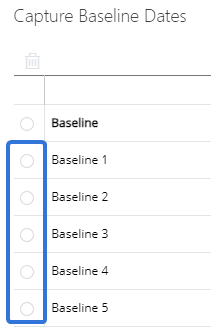
Note: When the current Baseline is replaced using the Summary page, all of the work item's Descendants will also replace their own current Baseline with the corresponding slot. For example, replacing the current Baseline with the dates from "Baseline 1" on a work item will cause all of the work item's Descendants to also replace their own current Baseline with the dates of their own "Baseline 1".
-
Select Make Current:

-
Select the Save button at the bottom of the "Edit Schedule" window:

Note: This will be the Save All button if you chose to use the Edit Work Details button to capture Baselines.
After selecting Save (or Save All), the dates of the selected Baseline in Step 5 will overwrite the dates of the current Baseline. The current Baseline (simply named "Baseline") and any supplemental Baselines ( numbered 1-2) can be seen in the "Schedule" widget:
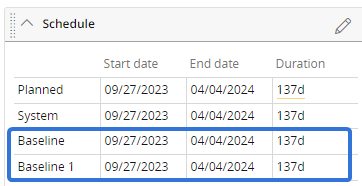
In this example, the user made the "Baseline 1" dates current. The dates in the current Baseline (simply named "Baseline") are now the same as the dates from "Baseline 1".
Deleting a Baseline
Any of the previously-recorded Baselines can be deleted at any time.
Note: Deleting a Baseline from the Summary page will NOT delete the corresponding Baseline from the work item's Descendants. For example, using the Summary page to delete the "Baseline 1" dates will not result in any of the work item's Descendants losing their own "Baseline 1" dates.
To delete a Baseline:
Before You Start: PowerSteering users will require the "Set Baseline dates" Project permission to capture Baselines.
If users / administrators still cannot capture Baselines from the Summary page even though they have the required permission, reach out to your PowerSteering representative to enable it for you. Alternatively, you will still be able to capture Baselines from Project Central.
-
Navigate to a work item.
-
Open up the "Standard Details" module on the work item's Summary page:

Note: The "Standard Details" module can be renamed. Contact an administrator or the Project Manager if the module does not appear to be on the page.
Note: Alternatively, users can select the Edit All Details button in the top right-hand corner of the screen and skip step 3:

-
Select the pencil icon in the "Schedule" widget:

-
Select Capture Baselines:

-
Select the Baseline slot of the Baseline you would like to delete:

-
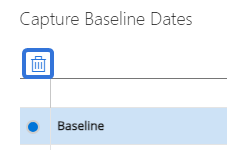
Select the trash icon at the top of the list:
-
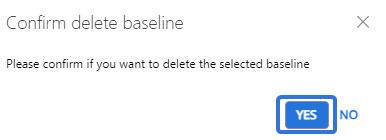
Select Yes from the "Confirm delete baseline" window:
-
Select Cancel:

Note: Selecting the Capture Baselines button will capture a new Baseline in the selected Baseline slot. If you are not interested in capturing a new Baseline at this time, be sure to select Cancel.
-
Select the Save button at the bottom of the "Edit Schedule" window:

Note: This will be the Save All button if you chose to use the Edit Work Details button to capture Baselines.
After selecting Save (or Save All), the Baseline dates will be deleted from the selected Baseline slot. They will appear empty on in the "Schedule" widget:
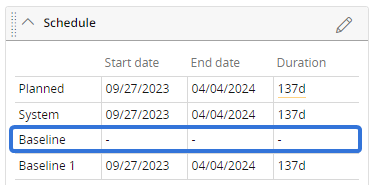
In this example, the dates from the current Baseline (simply named "Baseline") were deleted.