PSA 2020 R2 - Product Enhancements
Below is a summary of the features included in the PSA 2020 R2 release.
- Customer Driven Enhancements
- Receipt Capture
- Global Search
- Integrations
- Leave Request Manager
- Reporting
- Resource Management
- REST API/SDK
- Timesheet
- Upland Analytics
- User Experience Enhancements
2020.06.19.2020R2.V2.EB
Note: This page could be updated as new information becomes available.
Customer Driven Enhancements
Expense Manager

Description: With the addition of the Criteria tab within an Expense Workflow Transition, it is now possible to create conditional rules to move the Expense Report to the next State. The following criteria are available: Amount Due, Cash Advance, Client, Currency, End Date, Entry Date, Entry is Billable, Entry is Capitalized, Entry is Funded, Entry is Payable, Entry is R&D, Entry is Reimbursable, Expense Item, Gross Amount, Net Amount, Originator, Originator Approval Group, Originator Functional Group, Payment Method, Project, Reimbursable Total, Site, Start Date, Task, Total Amount, Total Billable and Total Reimbursable.
Benefit: You can now set special conditions under which a Transition is made visible such as a Billable Expense Report having to be actioned on by finance.
For more information see Enforcing a conditional transition criteria within the Expense Workflows.
Description: When importing Transactions, the Budget Restrictions set at the Project (Project List > Project edit > Planners > Budget > Associated Expense Items) or Task (Setup > Work > Tasks > Task Edit > Budget > Associated Expense Items) level(s) are now taken into consideration when associating a Task to a Transaction.
Benefit: You can now efficiently associate Tasks to an imported Transaction.
Notifications
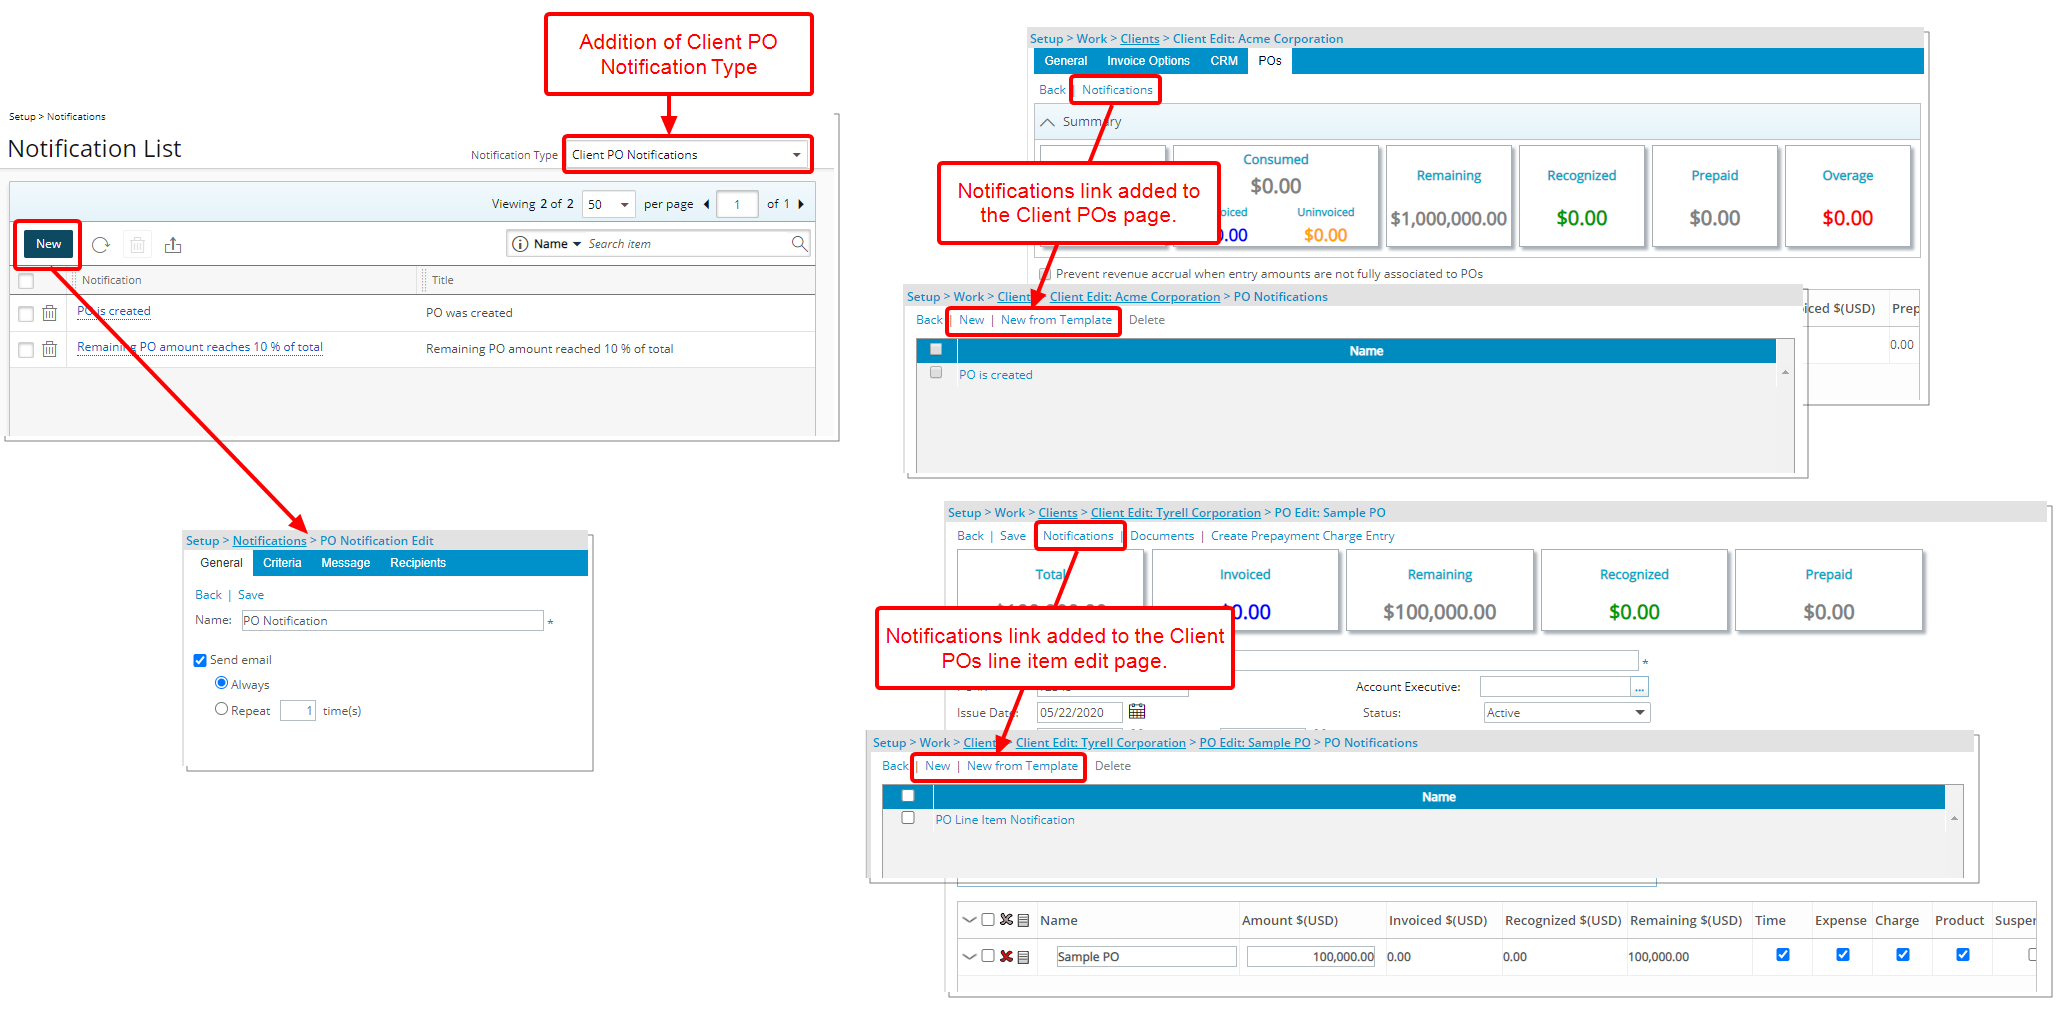
Description: With the addition of the Client PO Notification Templates it is now possible to Create, Edit, Delete, and configure Client PO Notifications at the system level. This allows for it to be used across the system for multiple clients, reducing the effort to recreate the same notification.
- From within the General tab choose the appropriate options such as to always send an email or only for a specific number of times.
- From the Criteria tab, you can select conditions based on:
- Creation of PO, Po Line Item, and/or Project Association.
- The Threshold reaching a percent of the total.
- Expiration within a specified period.
- From the Message tab, you can customize the Message, which can include Parameters, that will be sent when the Criteria is/are met.
- From the Recipients tab select or enter the required recipient(s) from the following options: Client Account Executive, PO Account Executive, Portfolio Manager, Project Manager, a specific User or, enter a Custom email address.
Furthermore, a Notifications link has been added to the Client Edit POs tab as well as when editing a PO line item where you can either create a New PO Notification or choose from the available templates to define for the specific Client PO or PO line item.
For additional information see:
- Creating a Client PO Notification Template
- Client PO Notification Parameters
- Creating Email Notifications for the Client POs
- Creating Email Notifications for a Client PO line item
Organization Breakdown Structure (OBS)
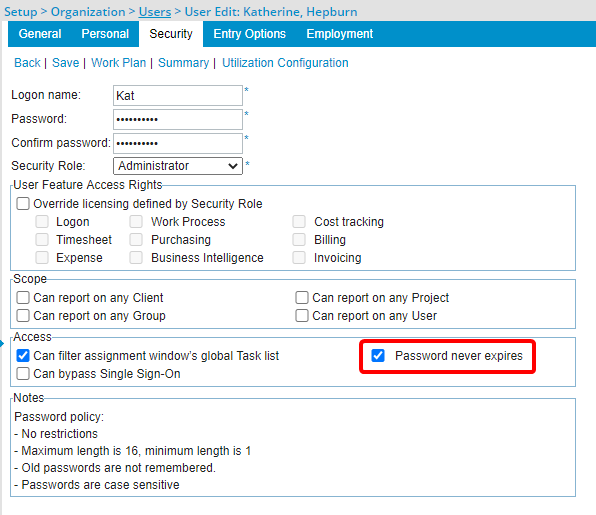
Description: With the addition of the option Password never expires, located within the Security tab of the User Edit, it is now possible to exempt User(s) from any Password Aging rule Password Policy.
Benefit: With this new feature select users will no longer be required to change their password.
Use case: Audrey, the administrator, whose login is associated with a third-party accounting application, no longer has to update this login information based on the Password Aging rule so as not to disrupt the integration with PSA.
For more information see Opting to never expire a User Password.
Projects
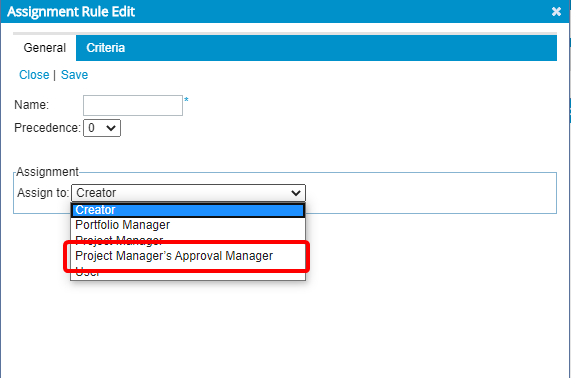
Description: A new Assignment option has been added to Project Workflows. Within the Assignment Rule Edit dialog box, where you can now select to assign a State to a Project Manager’s Group Approval Manager.
Benefit: Where necessary, a Project Manager’s Approval Manager can now be involved in the Project Workflow process.
Use case: Adam, the system administrator is tasked to set up a Project workflow so that the projects are reviewed and actioned on by the Project Manager’s Approval Manager. He can now easily assign the Submit State to the Project Manager’s Approval Manager.
Note: In cases where the Project Manager’s Approval Group Manager is set as Out Of Office in PSA, their Approval Group’s Alternate Manager will be assigned to the State.
For more information see:
- Defining the Assignment Rules for the Workflow States
- Workflow State Assignment options
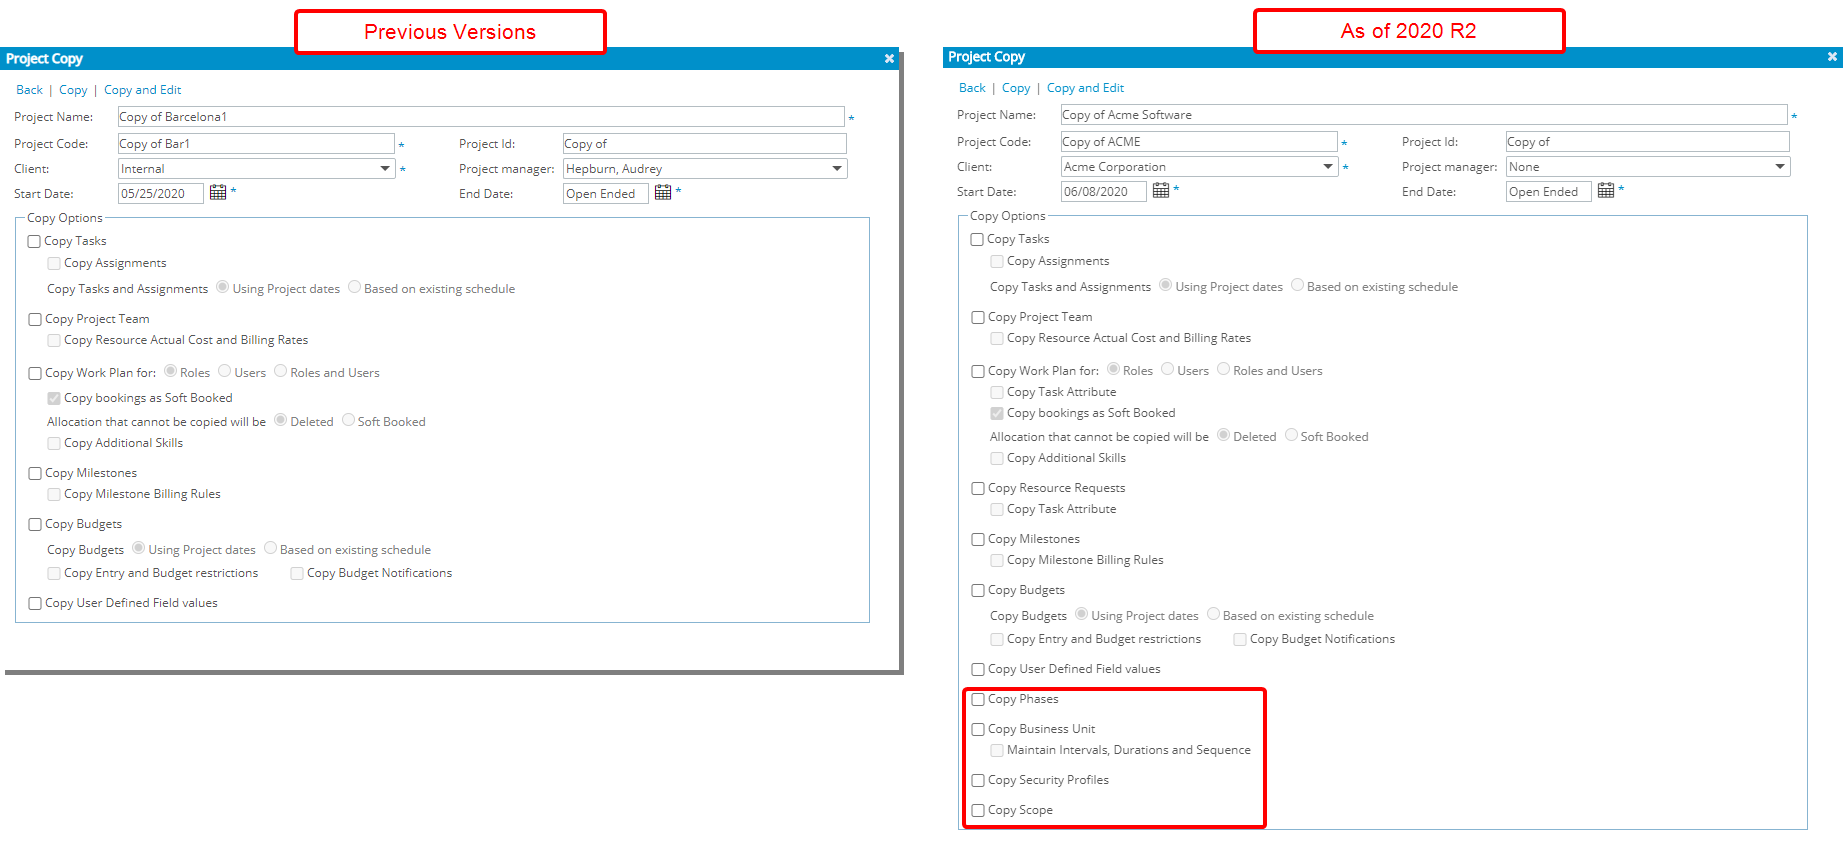
Description: When copying a Project, you can now choose to also copy Associated Phases, Business Units, Security Profiles and Scopes in addition to the existing options. Moreover, when selecting to copy associated Business Units, you also have the option to Maintain Intervals, Durations and Sequence.
Benefit: This addition reduces the duplication of re-entry of the information in the newly created project.
Use case: Lauren Hill is tasked to create several new Projects by maintaining the source project’s Business Units, Scope, and Security Profiles. She can now easily choose these options when copying the project.
For more information see:
- Copying a project
- Copying associated Phases, Business Units, Scopes and Security Profiles to a New Project
Description: Addition of the framework to enforce custom validation(s) within the Project module.
Benefit: This allows organizations to validate user actions based on custom rules that align with their specific business needs.
Use case: Audrey, an PSA Administrator is tasked to enforce a custom validation to bar users from deleting a project with hard booked hours. She can now communicate her business needs with contact PSA Support and have this custom validation configured in their instance of PSA.
Note: This functionality must be configured by the PSA Technical Services Team. If you are interested in using this functionality contact PSA Support to discuss your specific business requirements.
Resource Management
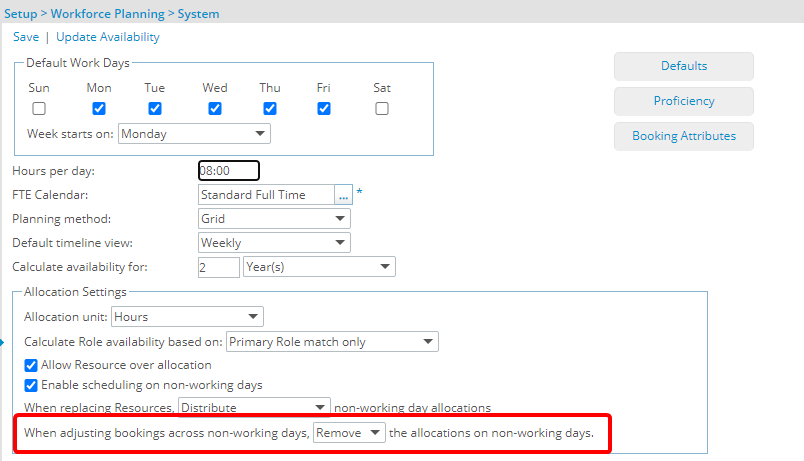
Description: With the addition of a new setting within the Allocation Settings of the Workforce Planning page you can now choose to either Ignore or Remove the allocations on non-working days upon adjusting bookings.
Benefit: The new option facilitates the updating of allocations across non-working days.
Note: The option When adjusting bookings across non-working days, [Ignore/Remove] the allocations on non-working days is visible when Enable scheduling on non-working days is selected.
For more information see: Use Cases when choosing to either Ignore or Remove the Allocations on Non-Working Days
Timesheet
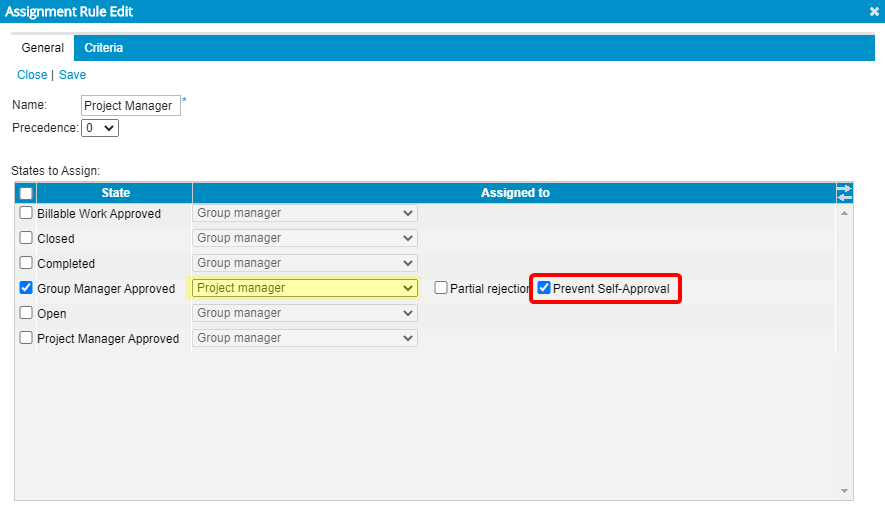
Description: A new workflow assignment option to prevent Project Managers from approving their own Timesheet has been added to Timesheet Workflows. When selected, the Project Managers Timesheet will be assigned to their Group’s Approval Manager. In cases where the Project Manager’s Approval Group Manager is set as Out Of Office in PSA, their Approval Group’s Alternate Manager will be assigned to the State.
Benefit: This enhancement ensures the project manager and the organization maintain integrity.
Use case: Adam, the system administrator is tasked to configure the Timesheet approval process that is to bar project managers from approving their own Time Entries. He can now easily select Prevent Self-Approval for a State assigned to Project Manager.
For more information see Preventing a Project Manager from approving their own Timesheet.
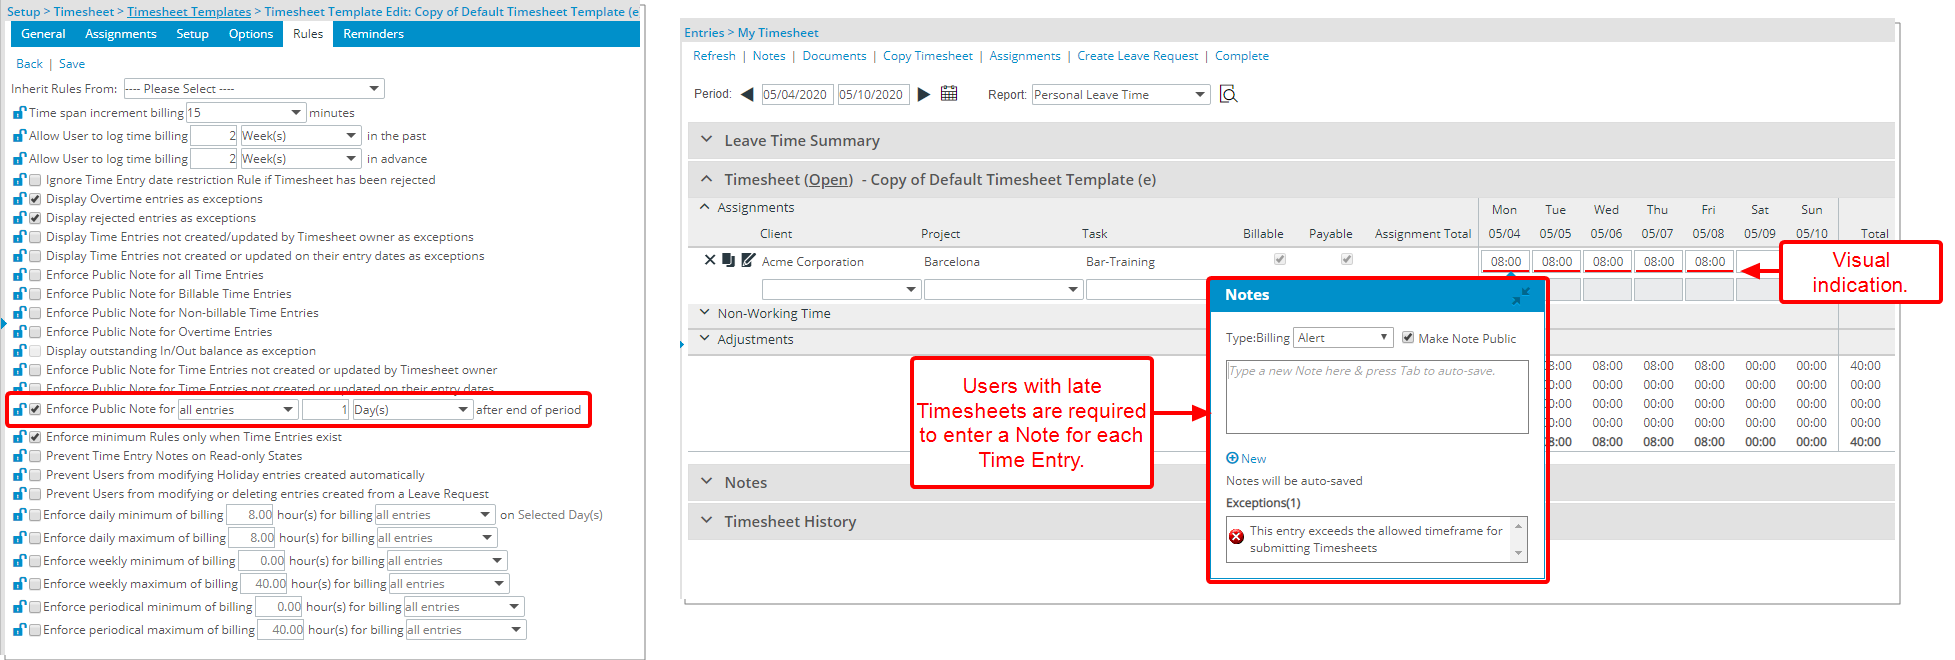
Description: With the addition of this enforce public note Rule for entries, it is now possible to require a Time Entry Note after a set number of days have elapsed from the Timesheet Period End date. A red bar located below the Time Entry visually indicates that the entry requires a note. Within the Notes dialog box, the reason is detailed under Exceptions.
Benefit: With this addition, the organization can enforce users to provide the reason(s) for late timesheet entries.
Use case: The system administrator Audrey, is tasked to enforce a Rule wherein users are mandated to create a note for each late billable time entry, 3 days beyond the end of Timesheet period. She can now easily navigate to the Rules tab of Timesheet Template page and select the Enforce Public Note for billable entries 3 Day(s) after end of period option. Users will then be forced to enter time when the set criteria for this Rule is met.
For more information see Enforcing Time Entry Notes after a set number of days have passed from the Timesheet Period End Date.
User Defined Fields
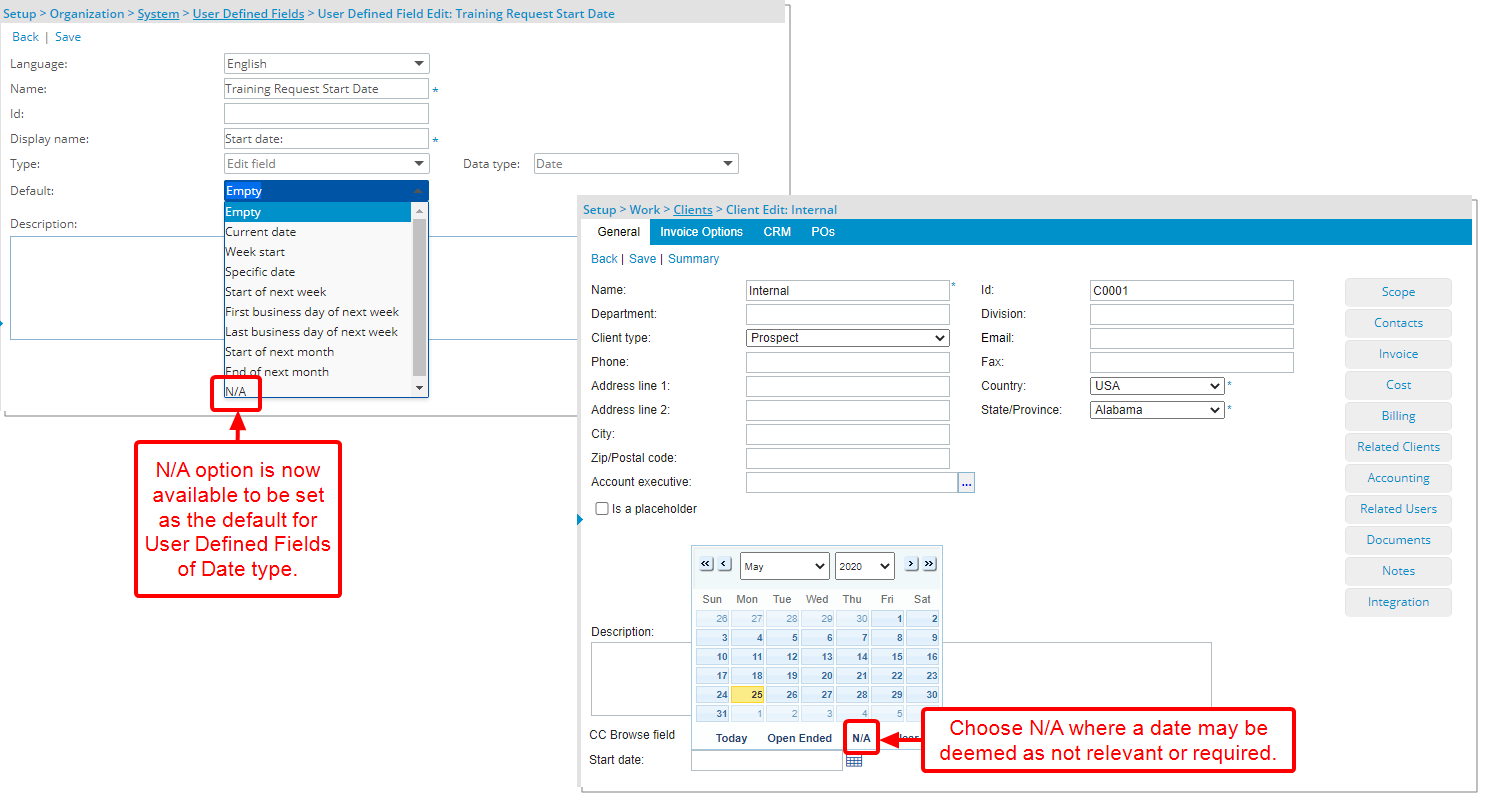
Description: With the addition of the option Not Applicable to a User Defined Field of Date type, it is now possible to select “N/A”.
Benefit: With this addition, you can now choose N/A where a date may be deemed as not relevant or required.
For more information see User Defined Field types.
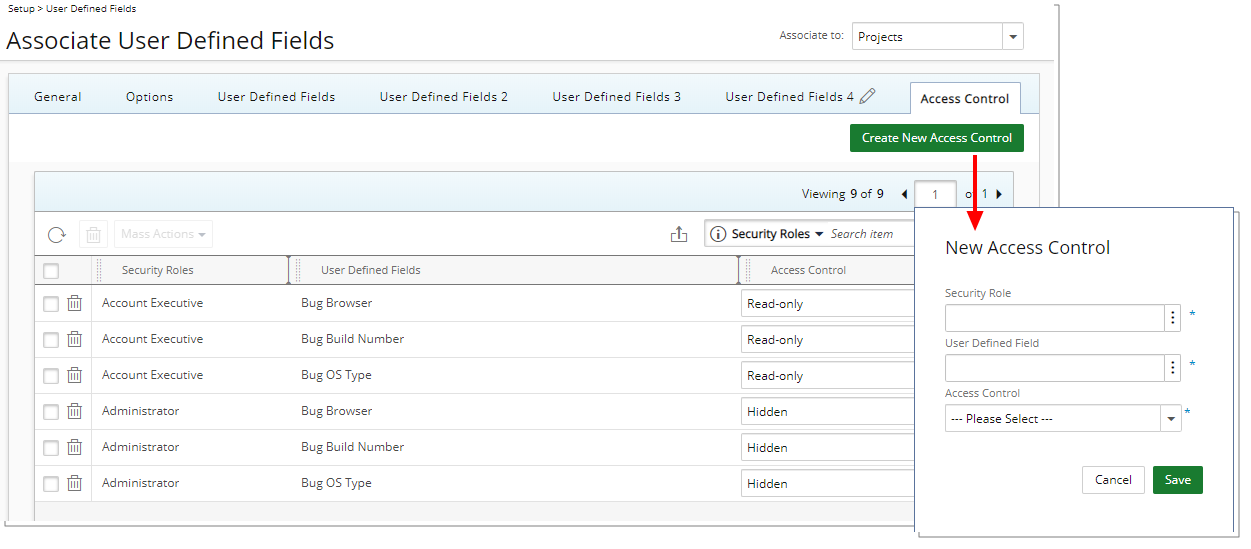
Description: It is now possible to define access limitations to User Defined fields associated with Projects based on Security Roles. Within the new Access Control tab, you can now choose to either hide or bar users from editing/updating the associated User Defined Field(s).
From the Access Control tab, you can:
- Click Refresh to refresh the page
- Delete selected Rules
- Mass Action on selected items: Change the visibility to Hidden or Read-only for multiple UDFs concurrently
- Export the list to Excel
- Use the contains-in logic search to search for items. The available criteria are: Security Roles and User Defined Fields
Benefit: With this addition, you can now have better control over the visibility and usage of UDFs.
Note:
- Tab Security options set (Setup > Organization > System > Security > Security Profile) supersede the User Defined Field Access Control settings.
- The Reporting module(s) are not impacted by this feature.
- Any changes made to the User Defined Field Access Control settings can be audited.
For more information see Limiting user access to the User Defined Field associated with Projects.
Work Breakdown Structure (WBS)
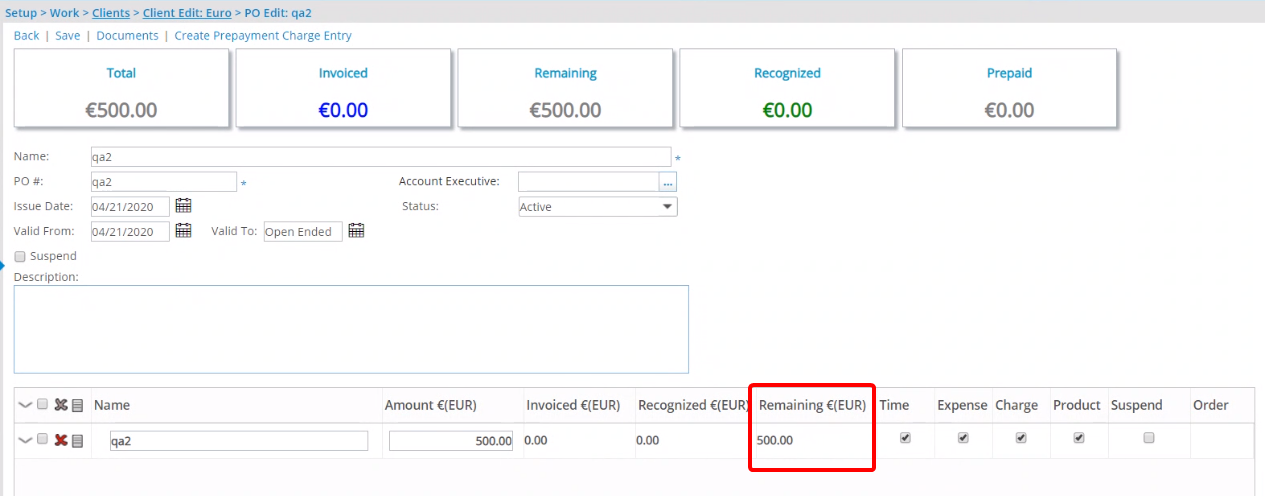
Description: The Remaining amount of the Client PO in the client currency is now visible on the Client PO line item(s) within the Client PO Edit page (Setup > Work > Clients > Client Edit).
Benefit: With this addition, the Remaining amount of the Client PO can easily and readily be viewed per line item.
For more information see Creating and Managing Client POs.
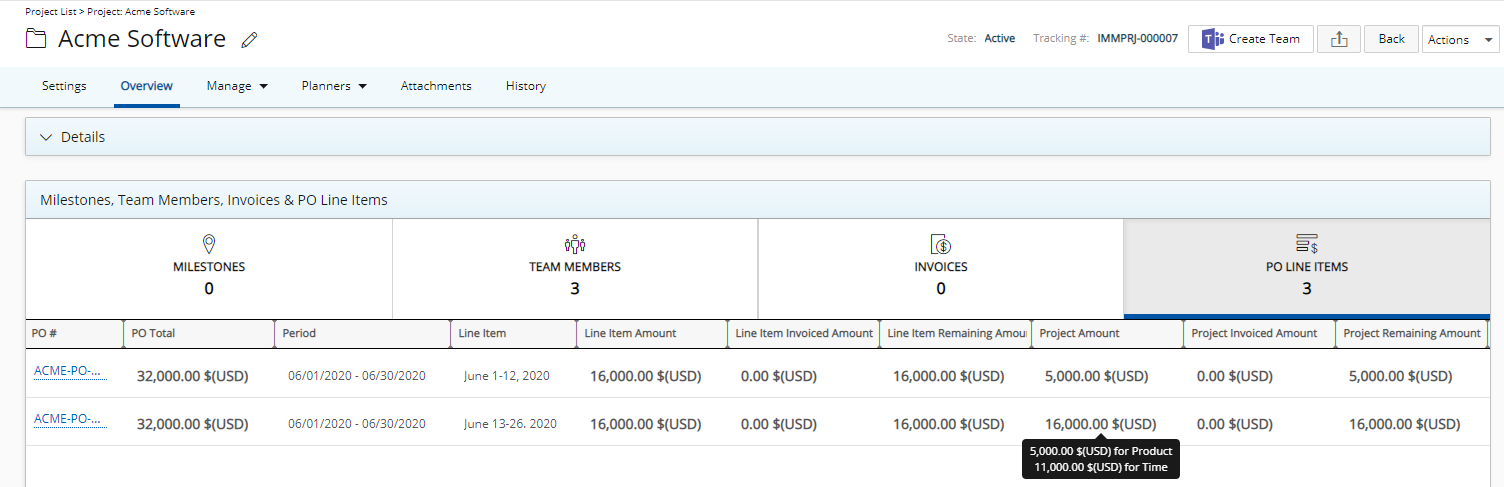
Description: Addition of the PO Line Items tab to the Milestones, Team Members & Invoices section of Project Overview where the associated or completely unassociated PO line items are listed. The Section was renamed to Milestones, Team Members, Invoices & PO Line Items to accommodate for this addition.
The following information is readily accessible from the PO Line Items tab: PO#, PO Total, Period, Line Item, Line Item Amount, Line Item Invoiced Amount, Line Item Remaining Amount, Project Amount, Project Invoiced Amount and Project Remaining Amount. The default sorting order is based on the Period column (Valid From to Valid To) in descending order.
Benefit: With this addition, the associated PO can readily be viewed for the given project.
Note: Clicking on a PO# will take you to the Client PO edit page.
For more information see Project Edit Overview tab.
Receipt Capture
Description: PSA now offers the Optical Character Recognition (OCR) technology to support the Expense Reporting module, allowing the reading and capturing of the receipt information attached to the entry by clicking the OCR Scan button which will recognize the information and populate the corresponding Expense Entry boxes.
Note: If you are interested in using this functionality, contact PSA Support to discuss your specific business requirements. Once the configuration is completed by the Upland team, the OCR feature will be turned on for your organization by default. The Master Administrator can turn it off at any time from the System Configuration page (Setup > Organization > System > System Setup).
Benefits: It is now easier for you to capture receipt information by reducing the necessary manual entries for your Expense Reports.
The following information is mapped to their respective Expense Entry boxes:
- Date: The Scanned Receipt date is mapped to the Date box. Note that if the date returned from the scan falls outside of the Report Date a message is displayed.
- Gross Amount: The Receipt total amount including Taxes (excluding Tips) is mapped to the Gross Amount box.
- Payment Method: Supported payment methods are VISA, Mastercard, American Express, Discover, ALIPAY, WE CHAT, CASH & Debit. If another payment method is used then the System Default is shown.
- Currency: Supported currencies are USD, EUR, GBP, AED, CHF, AUD, HKD, JPY.KRW, RMB, BRL, CAD otherwise the System default currency is used.
- Tax: Only Total Tax is mapped to the No Tax box. Note that if the user selects a Tax Group, it will override the one returned from the scan and the Net Amount will be recalculated.
- Establishment: The name of the establishment is captured from the receipt Title and returned within the Memo box.
- Expense Category: Currently only the following Expense Categories are captured and returned within the Memo box:
- Transportation-Rideshare/Uber/Lyft/Taxi
- Meals/Individual Meals While Travelling
- Travel Expenses/Hotel
- Supported file formats for this capability are .jpg, .png and .pdf (single page only).
- Some scanned results such as Tax and/or Tip are hidden until you select an Expense Item.
Caution: Capturing an acceptable quality image of your receipt is necessary to ensure that the information can successfully be scanned. It is also important for you to verify the Expense Entry for accuracy before submitting your Expense Report.
For more information see:
- Photographing and scanning receipts
- Common mistakes to avoid
- Supported file types
- Mapped information when scanning a Receipt
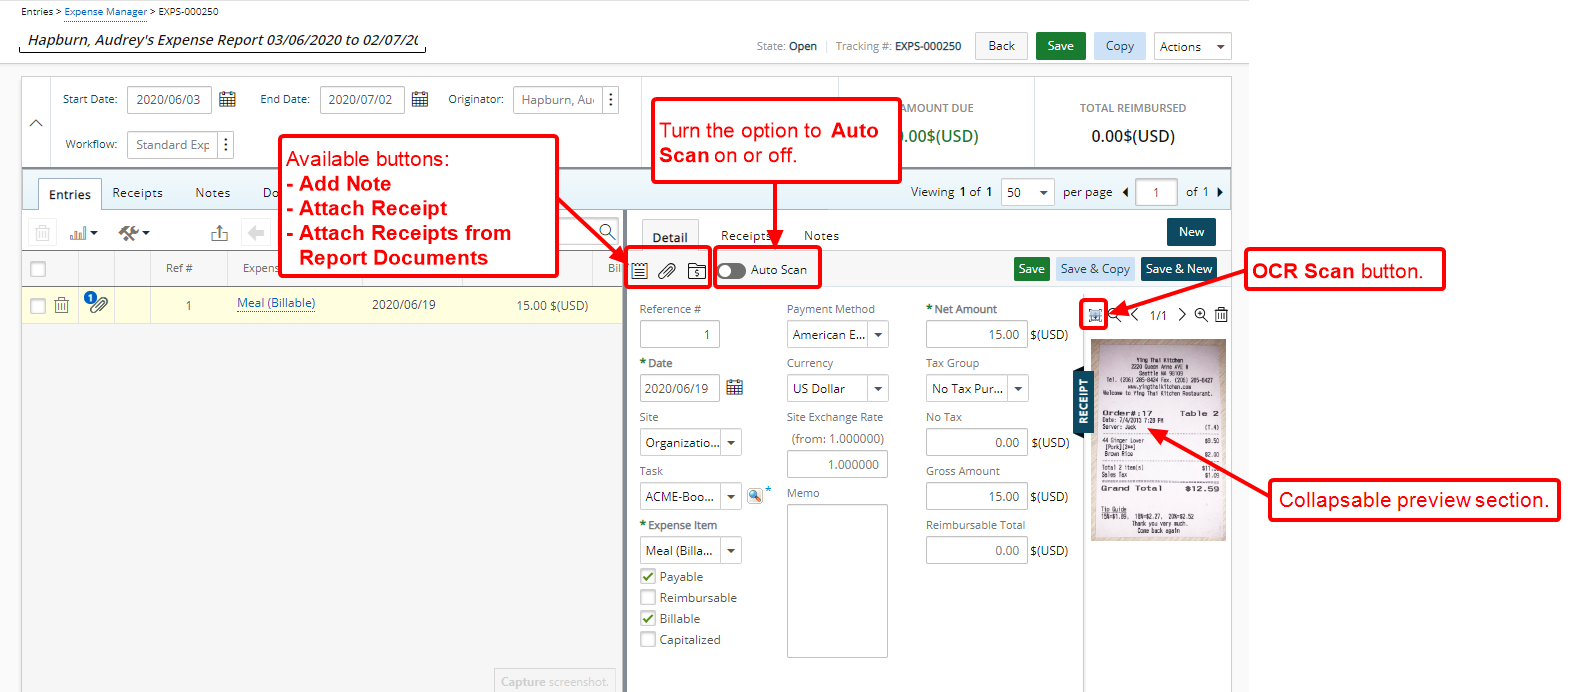
The right panel has been updated to include a collapsible receipt preview section where you can view the attached receipts and use the OCR Scan button. Furthermore, you can collapse it to maximize your Expense Detail panel.
The Add Note, Attach Receipt and Attach Receipts from Report Documents buttons are now available upon clicking New, allowing you to attach receipts without having to save the Entry first. Moreover, you can turn on the Auto Scan which automatically scans receipts that are being attached, otherwise, you can scan them at a later time by clicking the OCR Scan button.
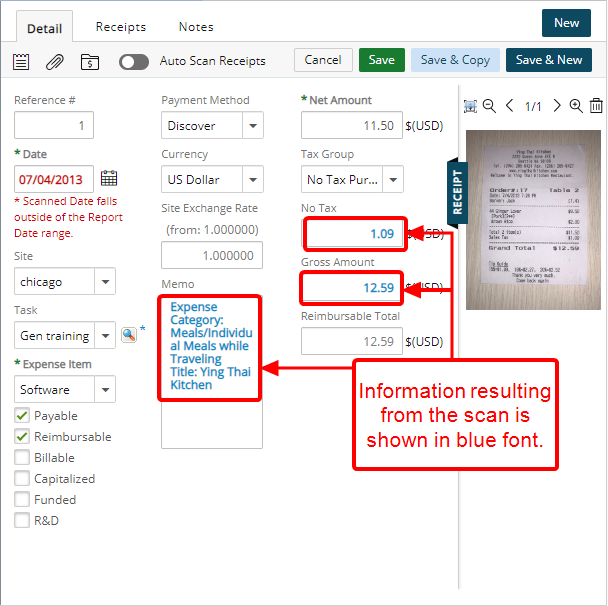
Upon scanning a Receipt, the information resulting from the scan is shown in blue font. You can then make any necessary changes to the Entry before saving it.
Note: The Auto Scan Receipts is selected by default. A message will inform you if the Auto Scan will override your previously entered Amounts. You can then choose to continue or not.
For more information see:
- Creating an Expense Report
- Adding an Expense Entry under a newly created Expense Report
- Adding an Expense Entry under an existing Expense Report
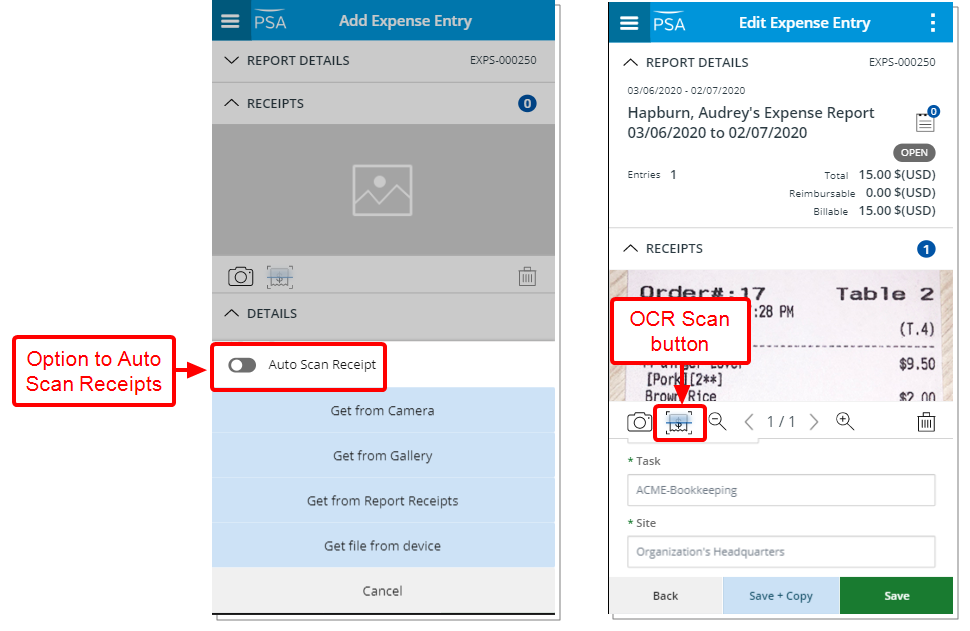
With the addition of the new OCR Scan button located on the Edit Expense Entry screen, you can now scan an attached Receipt. Upon scanning a Receipt, the information captured from the OCR is shown in blue font within the mapped boxes. You can then make any necessary changes to the Entry before saving it.
Furthermore, with the option to Auto Scan Receipts you can choose to automatically scan Receipts as you attach them by choosing either one of these options: Get from Camera, Get from Gallery, Get from Report Receipts and Get file from device.
Note: The Auto Scan Receipts is selected by default. A message bar will inform you if the Auto scan will override your previously entered Amounts. You can then choose to continue or not.
For more information see:
- Creating an Expense Entry through PSA Mobile
- Image capturing guidelines
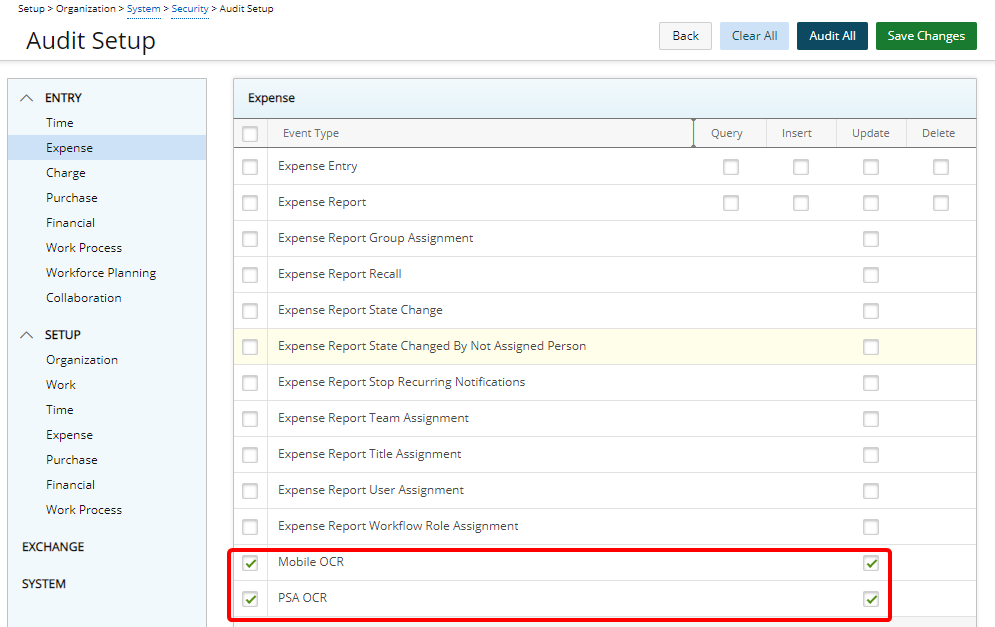
Description: Addition of two new Audit Trail options to track changes made to Expense Reports via the OCR capability, including:
- Action performed by who
- Date & Time
- Expense Report Id and Tracking Number
- Data returned from OCR
These new Audit Trail Event Types are located under Setup > Organization > System > Security > Audit Trail under Entry > Expense:
- Mobile OCR: When selected, changes made through the PSA Mobile app are tracked.
- PSA OCR: When selected, changes made through PSA web application are tracked.
Benefit: Any changes to the Expense Reports via the OCR capability can now be tracked to indicate when the update was made, by whom, and details of the modification(s).
Note: By default, the auditing of Mobile OCR and PSA OCR are not activated.
For more information see Auditing of changes to the Expense Reports via the OCR capability.
Global Search
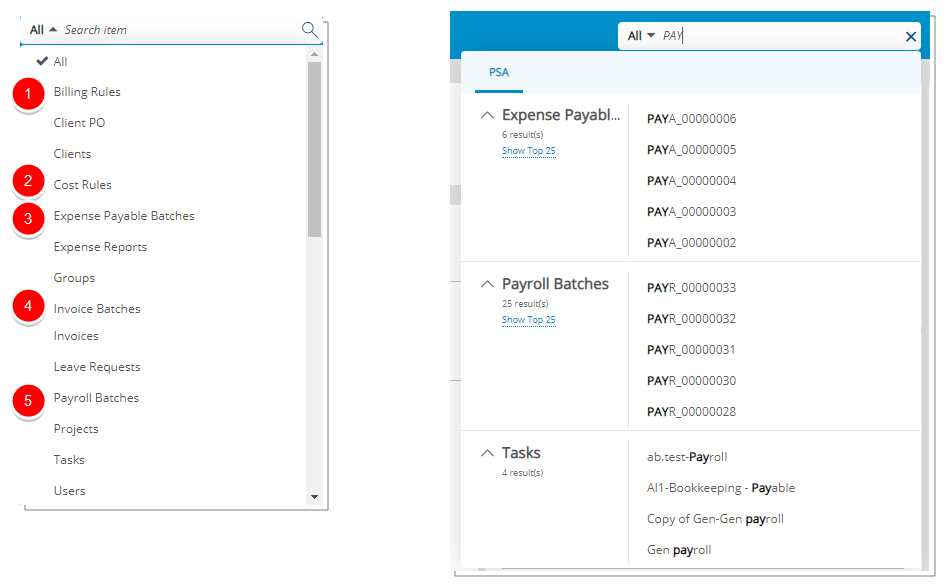
Description: You can now perform searches based on Invoice Batches, Payroll Batches, Expense Payable Batches, Cost Rules, and Billing Rules.
The following items can be searched for each category:
- For Billing Rules: Name, Id, and Description.
- For Cost Rules: Name, Id, and Description.
- For Expense Payable Batches: Batch Number.
- For Invoice Batches: Batch Number and Batch Name.
- For Payroll Batches: Batch Number.
The top 5 search results are grouped by category and ordered by date descending for each line item. You can expand the search results to show up to a maximum of 25 per category.
Hovering over each search result line item triggers a tool tip with the following information:
- For Billing Rules: Name, Id, and Description are displayed.
- For Cost Rules: Name, Id, and Description are displayed.
- For Expense Payable Batches: Batch Number and Company name are displayed.
- For Invoice Batches: Batch Number, Batch Name, State, and Company name are displayed.
- For Payroll Batches: Batch Number and Company name are displayed.
For more information see Global Search capability.
Integrations
Description: PSA now integrates with Salesforce Lightning.
Benefit: PSA is increasingly engaged with its clients to enable Salesforce Lightning and transition users to the new experience.
Description: PSA now supports the Dynamics 365 Unified Interface.
Benefit: PSA is increasingly engaged with its clients to enable the Unified Interface and transition users to the new experience.
Description: As a result of the rebranding of ACCPAC to Sage 300, all references within PSA to ACCPAC have been changed to now read Sage 300.
Note:
- Clients imported from Sage 300 post-upgrade will be listed under a new placeholder called SAGE 300 within the Clients list page.
- Existing Clients already under an ACCPAC placeholder will not be updated and will remain following a Sage 300 import.
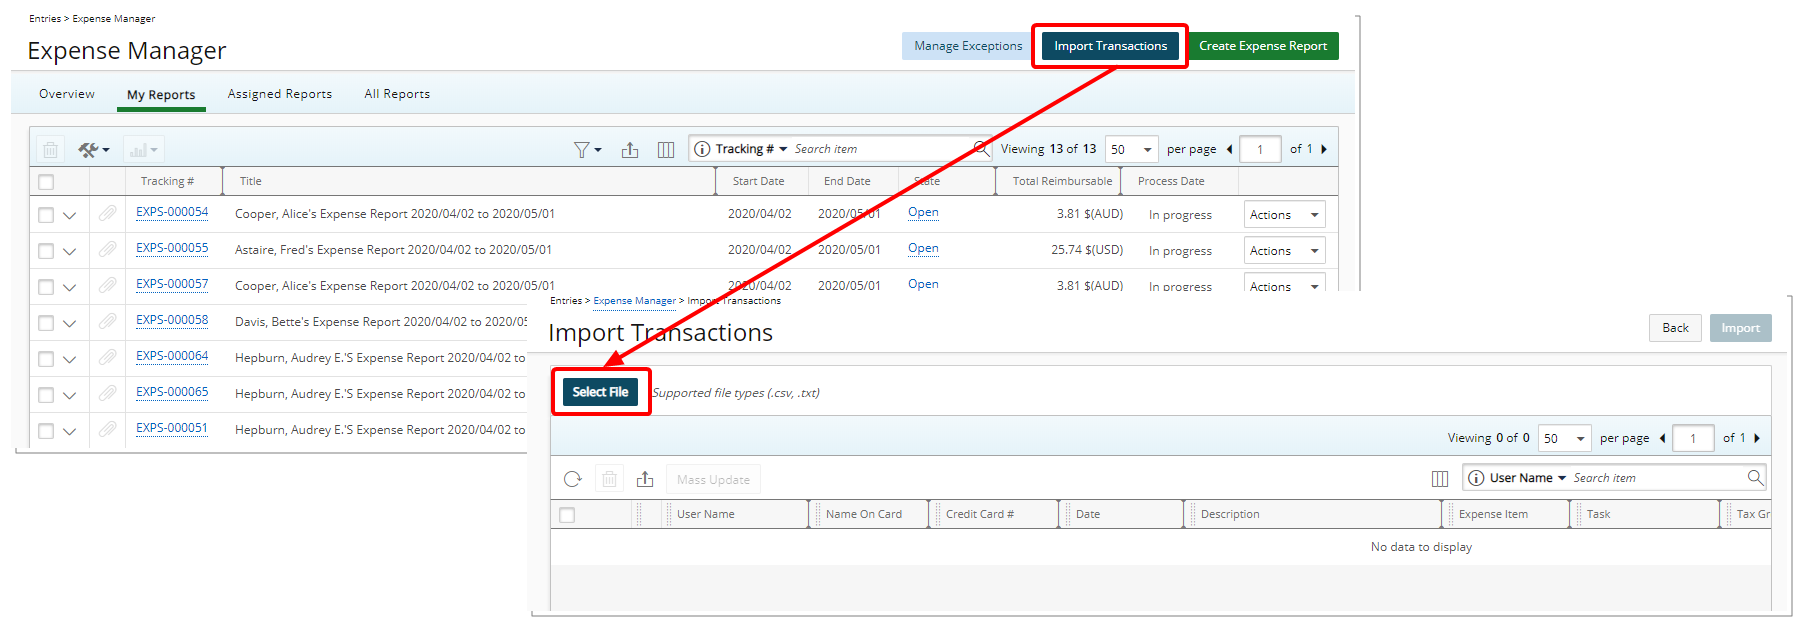
Description: PSA now offers the possibility to import transactions using a .txt file through the Import Transactions page. Click the Import Transactions button located in the upper right-hand side of the Expense Manager page (Entries > Expense Manager > Import Transactions).
Use case: Chloe is tasked to import the Expenses incurred with the corporate credit card at the end of the month. She downloads the corporate credit card statement from her financial institution's web site. After converting it to .txt file using the executable provided to her by the financial institution, the transactions can then be imported to Expense Report(s) by associating each transaction to an Expense Item and a Task.
Note: Supported file types are .csv and .txt.
For more information see Importing transactions using a .csv or .txt file.
Leave Request Manager
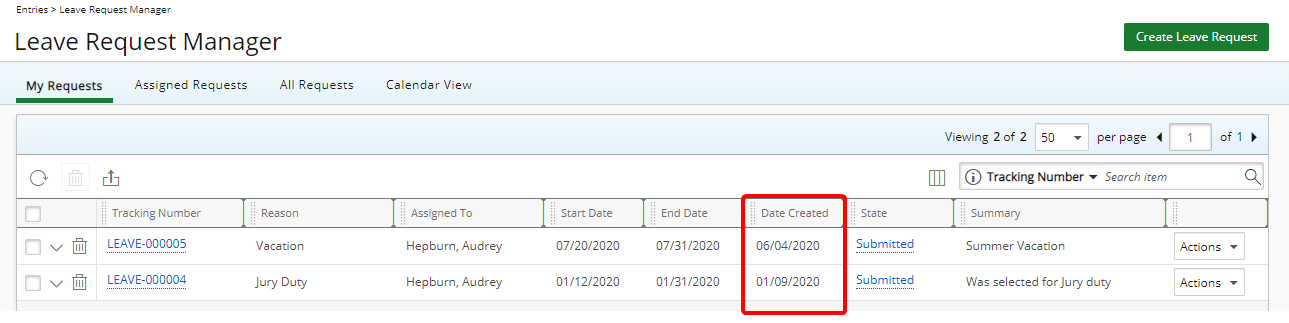
Description: The sorting order of the Leave Requests within My Requests tab has been updated to list, by default, the Entries by Date Created in descending order.
Benefit: The most recently created Leave Request is listed at the top of the list.
For more information on using the Leave Request Manager click here.
Reporting

Upon using the Advanced Reports and Dashboards capabilities, a warning message is now displayed as the solution will be phased out in an upcoming release.
Resource Management
With the new PSA Resource Request feature, Project managers can submit a request in an easily accessible way from within the Work Plans, after which the request is transitioned through the out-of-the-box Standard Resource Request Workflow for further processing by Resource Manager(s) to approve requests and assign named resources.
With the introduction of Resource Request the following additions have been made:
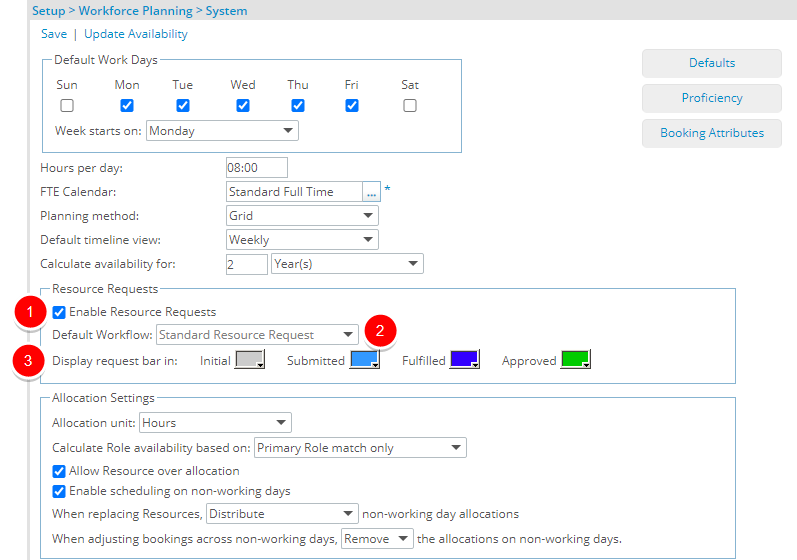
The Resource Requests section allows you to:
- Turn the Resource Request functionality on or off.
- View the Default Workflow.
- Define the colors of the Request bars based on the State they are within the Workflow: Initial, Submitted, Fulfilled and Approved.
Note:
- By default the Resource Request functionality is turned off.
- With this first release of the Resource Request feature, the Default Workflow option cannot be modified.
For more information see:
- Turning the Resource Request functionality on or off
- Defining the colors of the Request bars based on the State they are within the Workflow

Description: A new Resource Request Workflow has been added under Workforce Planning (Setup).
Benefit: With this addition, Resource Requests can automatically be transitioned through a Workflow process.
Note: This first release of Resource Request will only be driven by the out-of-the-box Standard Resource Request Workflow to which additional States or Transitions, at this time, cannot be added. However, you can opt to:
- Rename existing Transitions and States.
- Add/Modify State Notifications and Assignments.
- Add/Modify Workflow Roles and Notifications.
For more information refer to:
- Resource Request Workflow
- Resource Request Workflow Email Notification Parameters
- Workflow State and Transition Properties
- Workflow State Assignment options
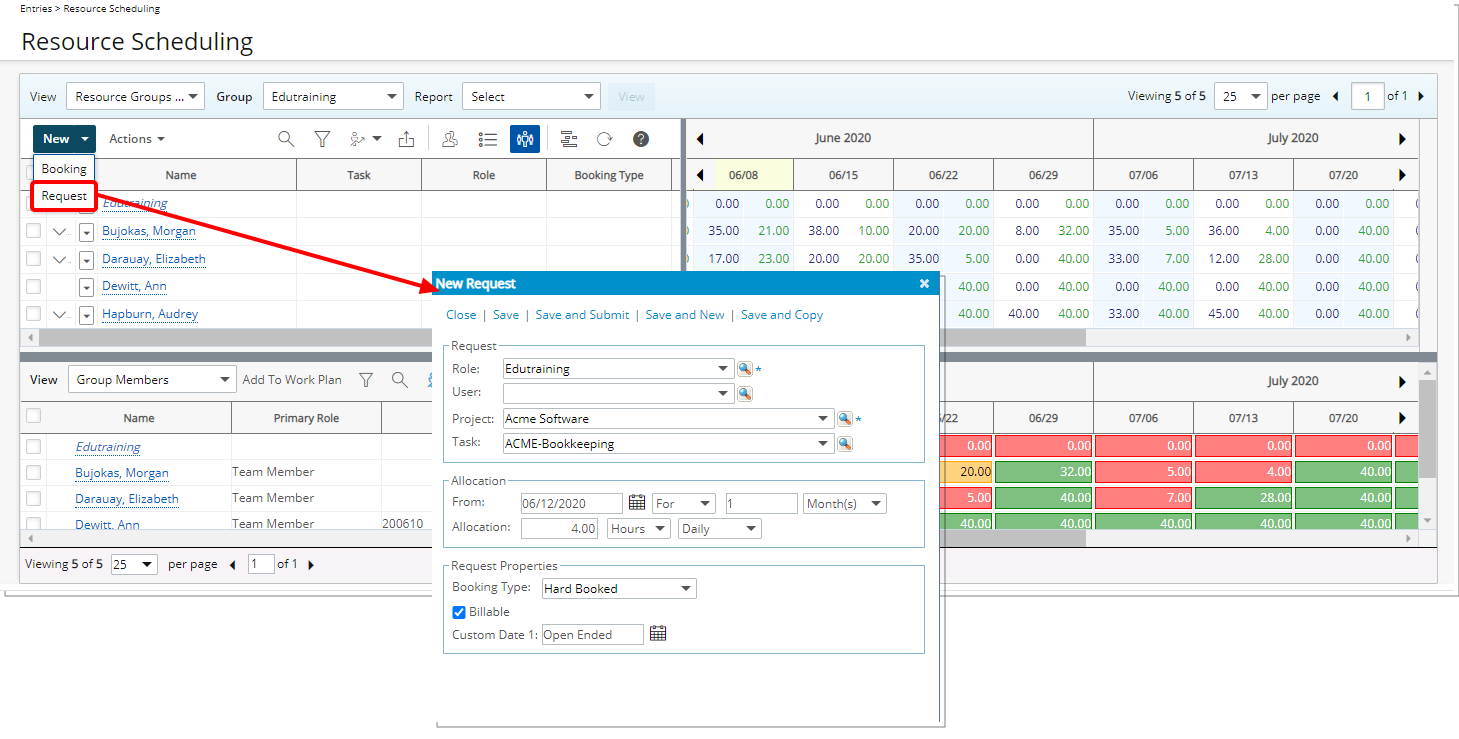
You can request for a resource by simply clicking the New button from a Work Plan and then select Request. You can then enter/select the required information/options within the New Request dialog box. Then choose the appropriate Save option.
Note: You can request for a hard booked resource even thought you may not have the permission to Create a Hard Booking. The actual Booking is created when the request is Approved.
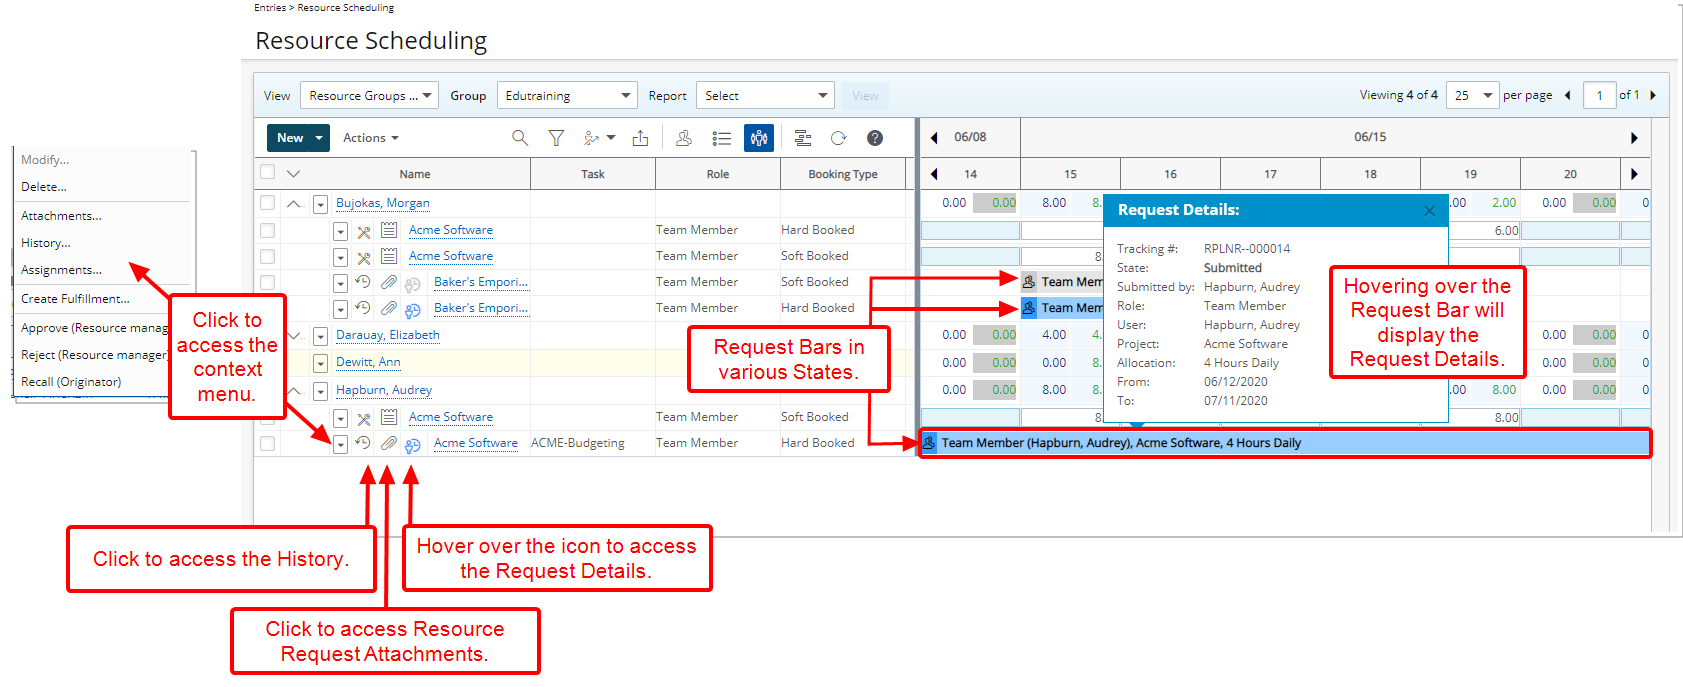
The saved resource Request bar will then be shown on the top grid in the color representing the State in which it’s in. Moreover, the following information displays on the bar: The Role, User Name (if one was chosen), Project and requested Allocation hours/FTEs.
For additional information see:
- Creating a new Resource Request
- Submitting a Resource Request
- Viewing the Resource Request History

Hovering over the Request bar displays the Request Details information box where it details the following:
- Tracking #
- State
- Submitted by
- Role
- User
- Project
- Allocation
- From
- To
Note: The style of the information box differs when in Grid View from that of the Chart View.

From a Resource Request context menu, if you are assigned to action on the request, you may see the following options to select from:
- Create Fulfillment
- Approve
- Reject
Moreover, the following options are typically available with the proper permissions
- Modify or Delete
- Add Attachments
- View the History
- View the Assignments
For additional information see:
- Submitting a Resource Request
- Recalling a Resource Request
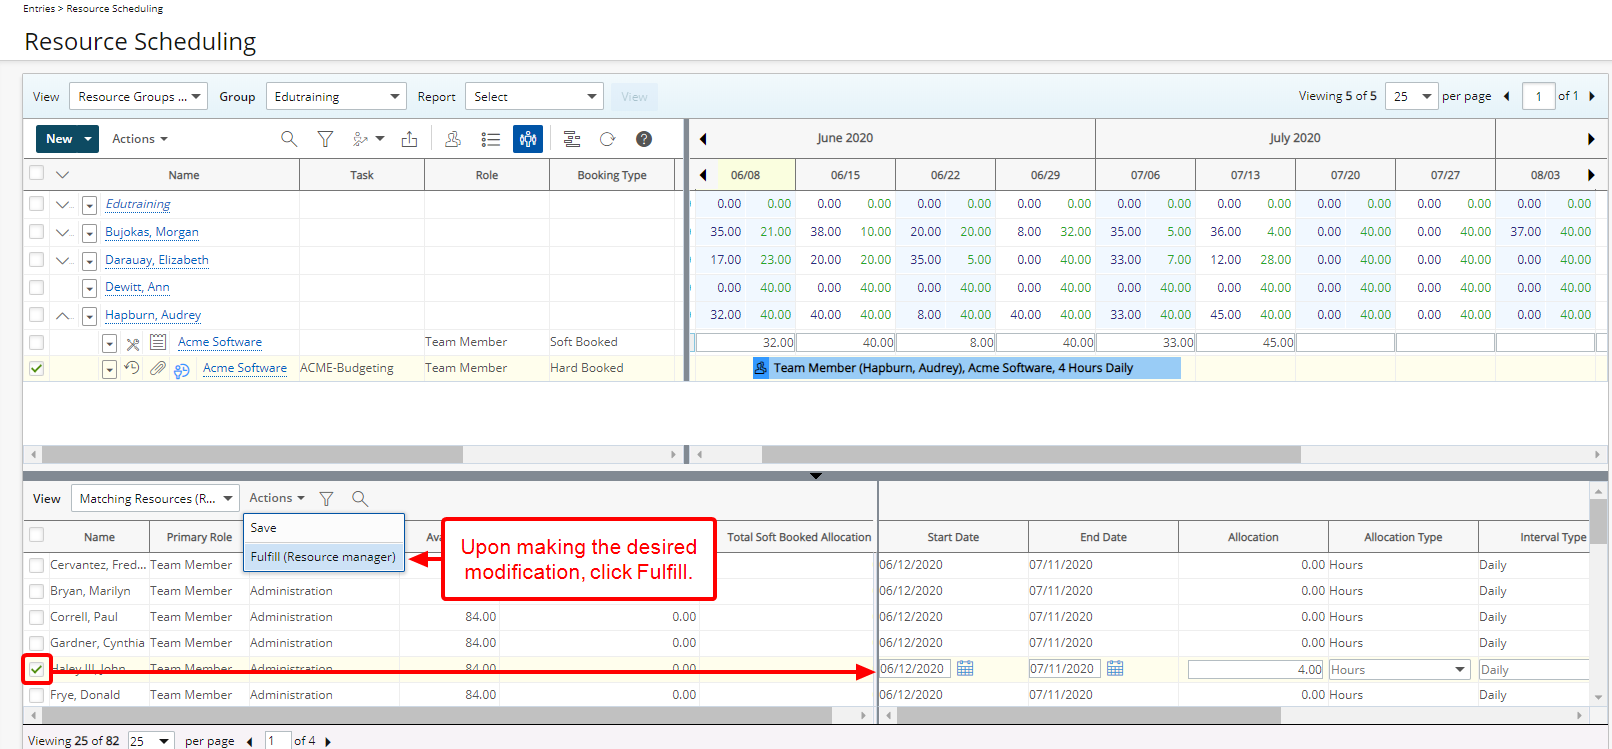
Clicking Create Fulfillment from the Resource Request context menu will expand the bottom grid with the Matching Resources View where you can choose from the available matching resources(s). The following information displays for each Resource listed: Name, Primary Role, Resource Group, Available, Total Hard Booked Allocation and Total Soft Book Allocation during the time period of the request.
Upon choosing a Resource, the Allocation box is automatically filled with the requested hours or FTEs. You can then modify the Start and End Dates, Allocation, Allocation Type and the Interval Type. The Request can be Transitioned to the next State by clicking Actions and then choosing Fulfill. The request is then transitioned to the next State and assigned to the originator.
Note: You can choose to allocate to a single or multiple resources.
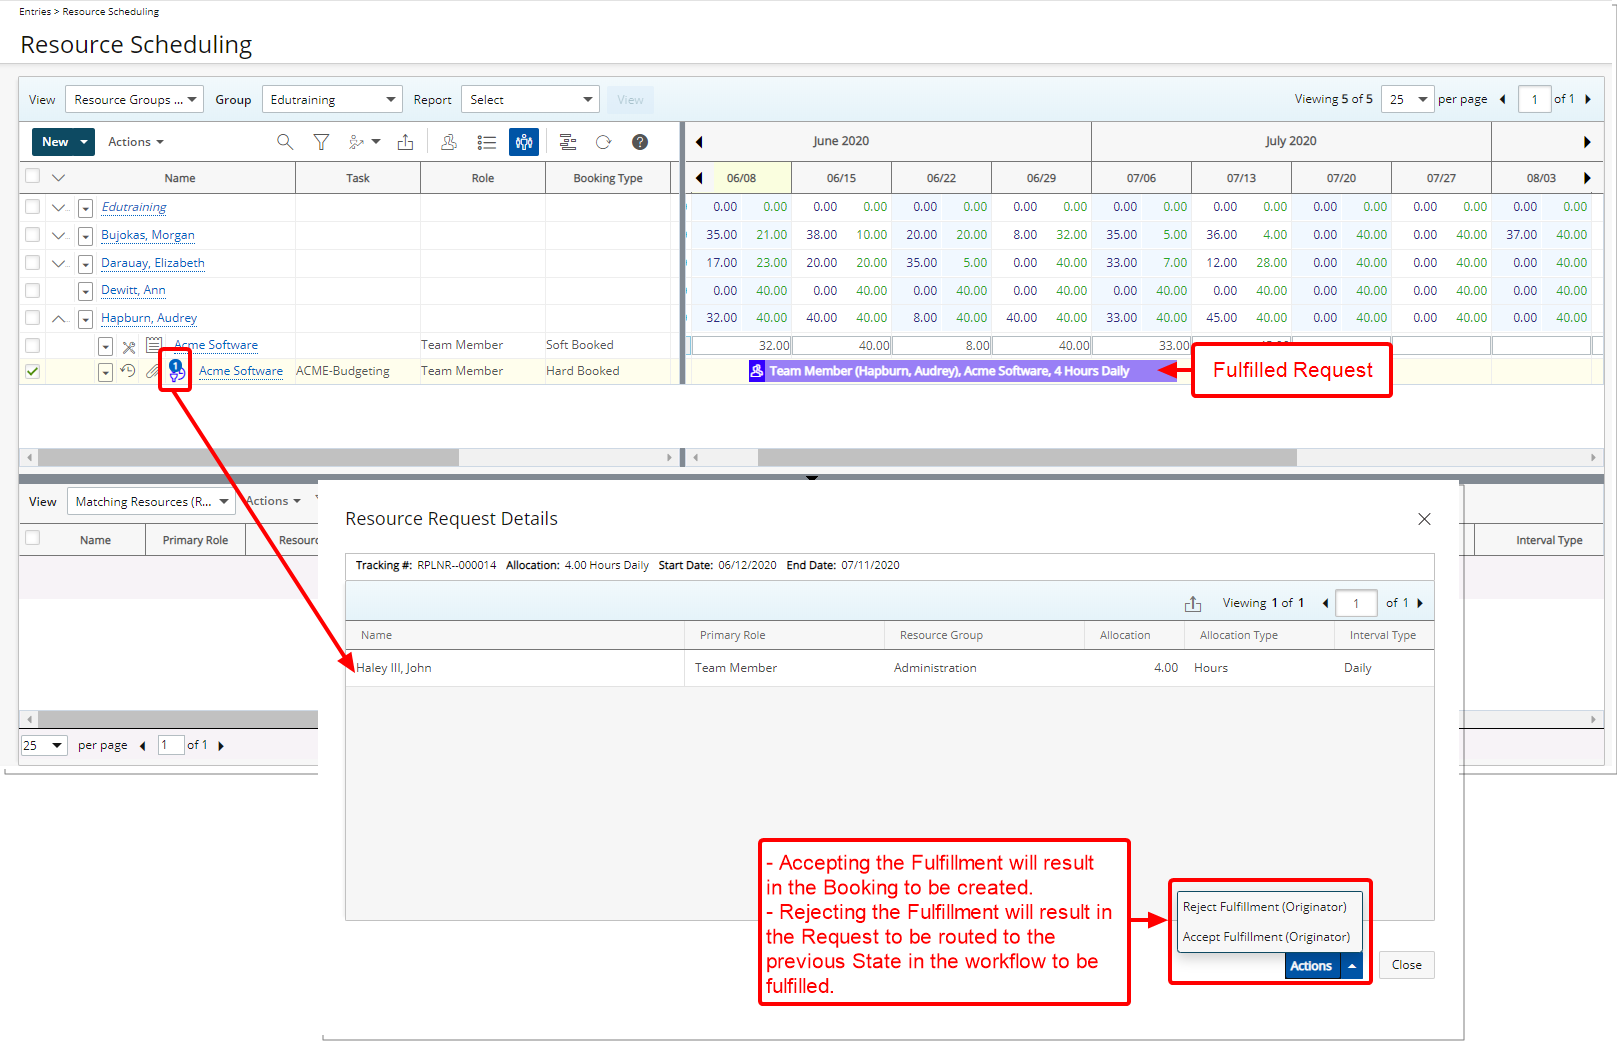
From the Resource Request Details dialog box, you as the Originator can view the Fulfillment Details and either Accept or Reject it.
- Accept: The Booking is created.
- Reject: You have the possibility to reject the Fulfillment and enter a Rejection Note. The Request will be re-routed to be fulfilled.
Note: Upon the creation of a Booking, the Resource Request associated to this Booking remains visible on the Work Plan. However, you can Archive it so it no longer displays on the Work Plan.
For additional information see:
- Creating a Fulfillment
- Viewing a Fulfillment
- Rejecting a Fulfillment
- Accepting a Fulfillment
- Archiving a Resource Request
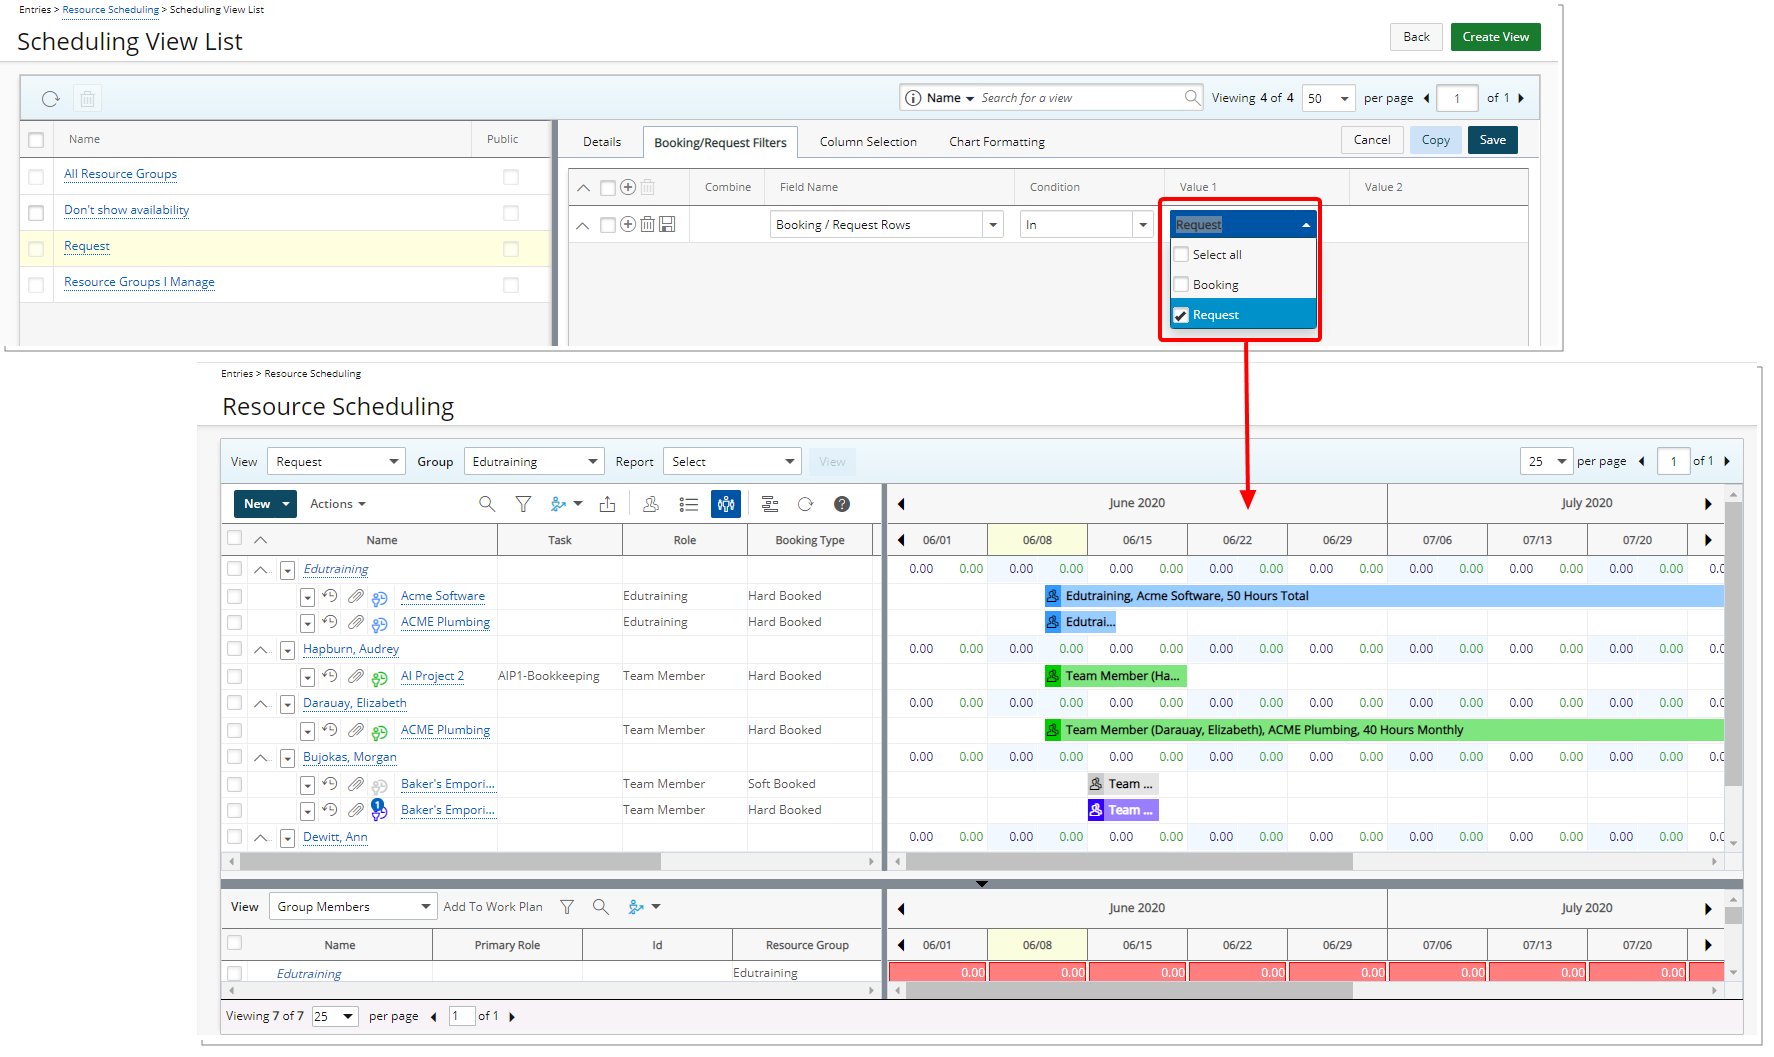
The following new filters have been added when setting up a View.
- Booking/Request Rows (allows you to view only Requests or only Bookings or both)
- Request Assigned To
- Request End date
- Request Originator
- Request Start Date
- Request State Attribute
- Request State Name
Note: The Booking Filter tab has been renamed to now read Booking/Request Filters.
For more information see Available Out-Of-The-Box Booking/Request Filter options
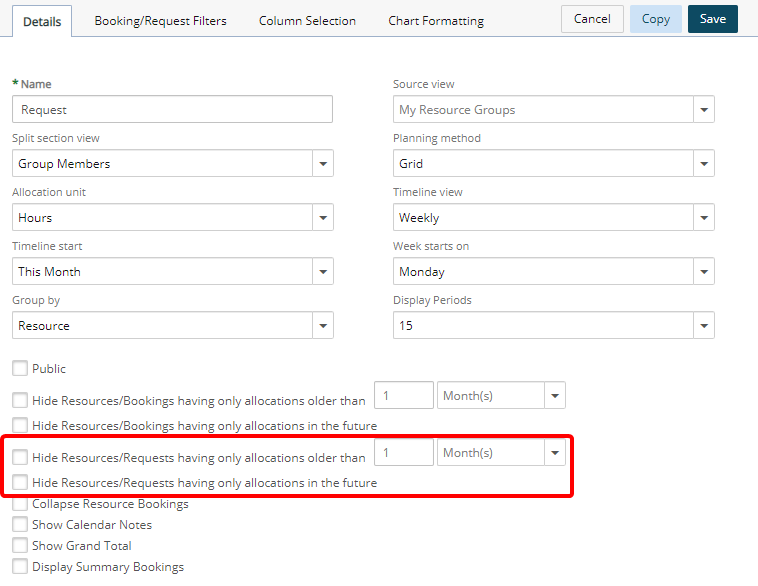
Description: Two new options have been added to the Details tab, when setting up a View which allow you to hide Resource Requests having only allocations in the future or the past.
For additional information see:
- Choosing to hide Resources/Requests having only allocations in the future
- Choosing to hide Resources/Requests having only allocations in the Past
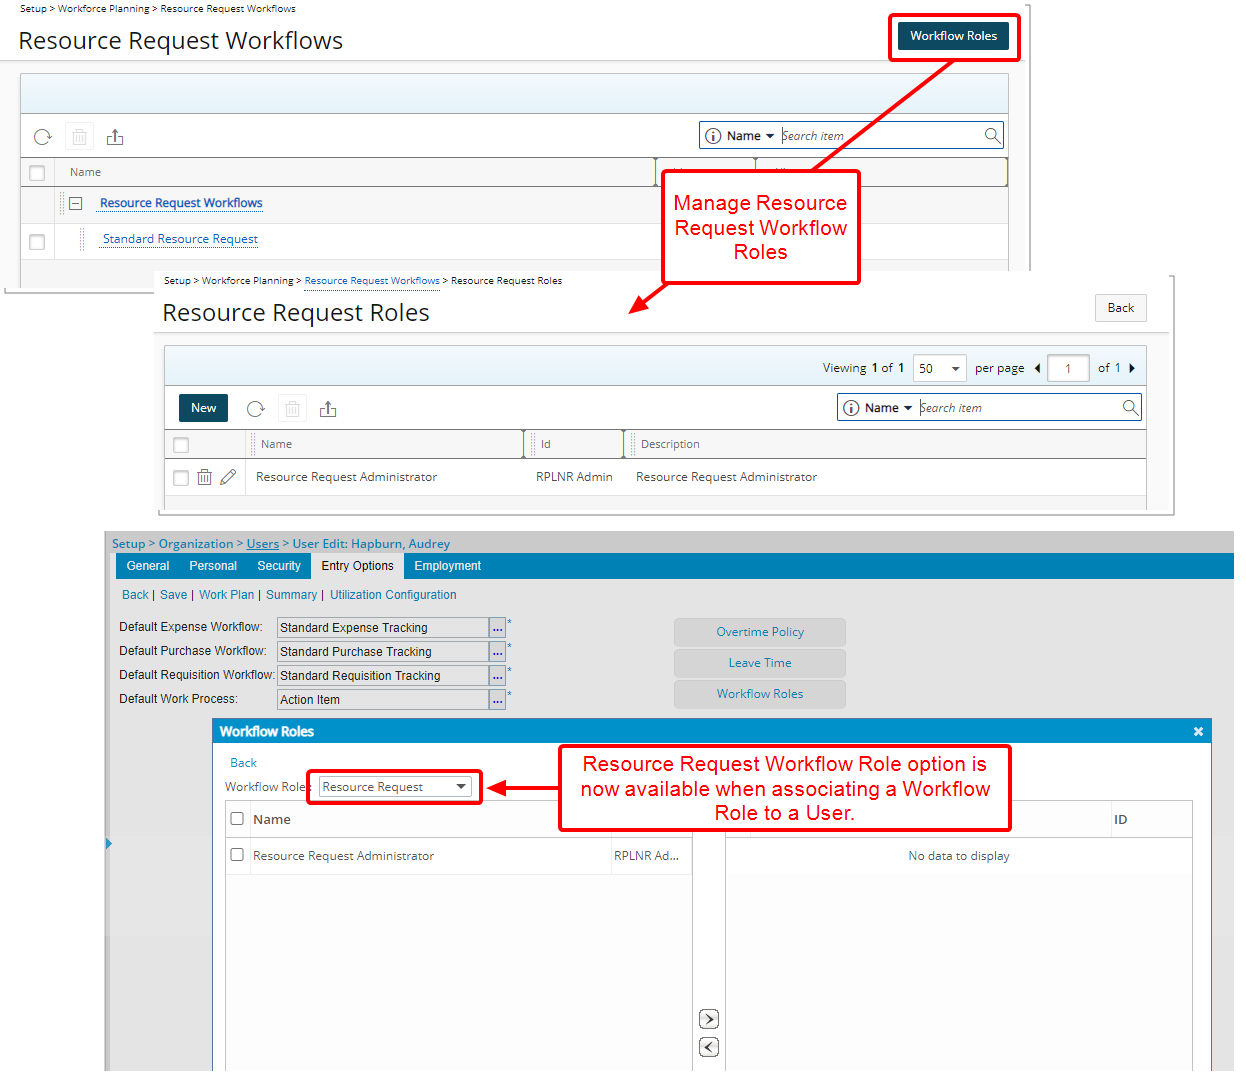
Description: Resource Request Workflow Roles can be managed through the Resource Request Roles accessed by clicking the Workflow Roles button found on the Resource Request Workflows page.
Moreover, when associating a Workflow Role to a User within their User profile, under the Entry Options tab, a new Resource Request Workflow Role option is now available.
For more information see Workflow Roles.
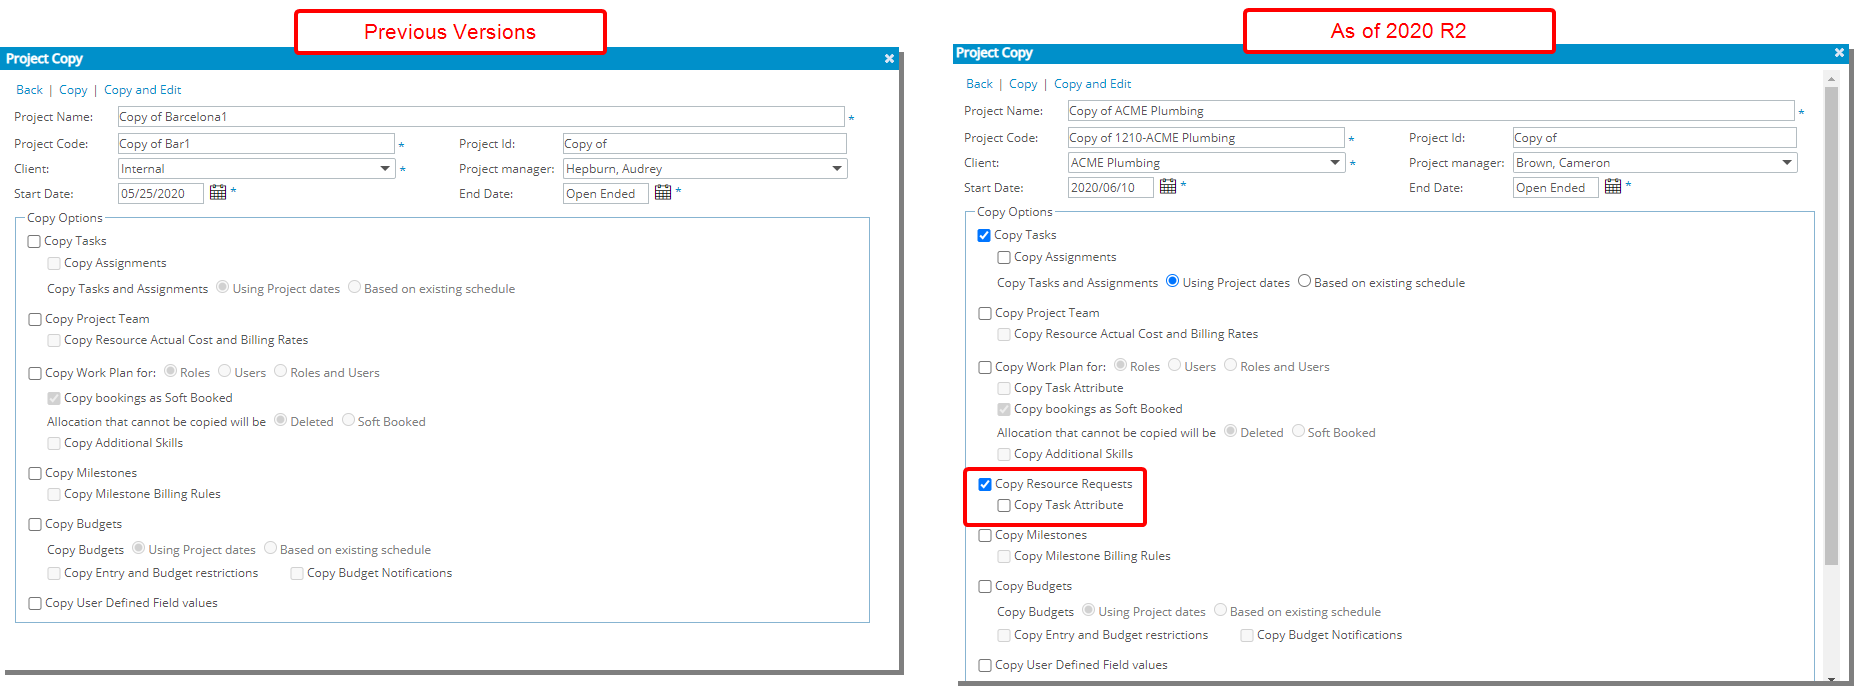
Description: When copying a Project, you can now choose to also copy associated Resource Requests.
Benefit: This addition reduces the duplication of re-entry of the information in the newly created project.
Note: The option to copy Task Attributes is available when Copy Tasks is selected.
For additional information see Resource Request.
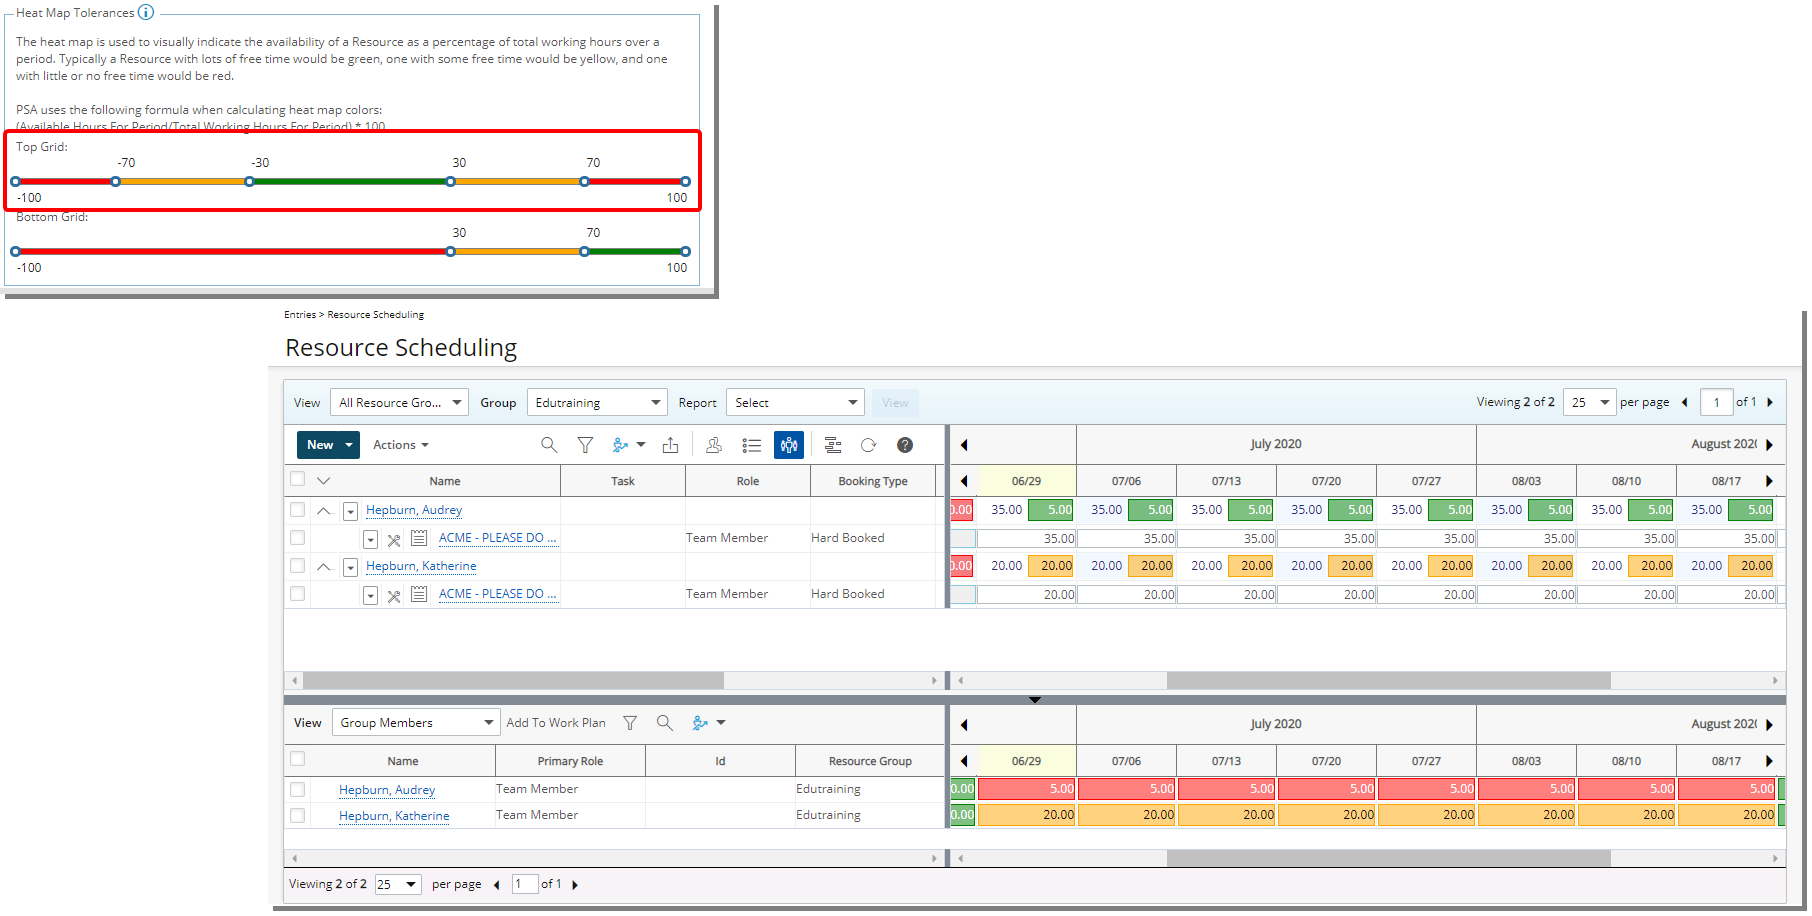
Description: A new Heat Map option has been added to the top section of the Work Plan when in Grid View with the Group by Resource grouping option selected. When the Heat Map is turned on, the chosen tolerance settings are applied.
The Heat Map threshold settings can be set at the organizational level by accessing the Workforce Planning System page (Setup > Workforce Planning > System) and can be overwritten at the User level by clicking the down arrow of the Heat Map button and choosing Use my own tolerances option.
Benefit: You can now define visual thresholds for the availability of Users and Roles on the top section of the Work Plan based on either the organizational level or at the user level settings.
For more information see:
- Overwriting the Heat Map threshold settings from the Work Plans
- Turning the Heat Map on or off
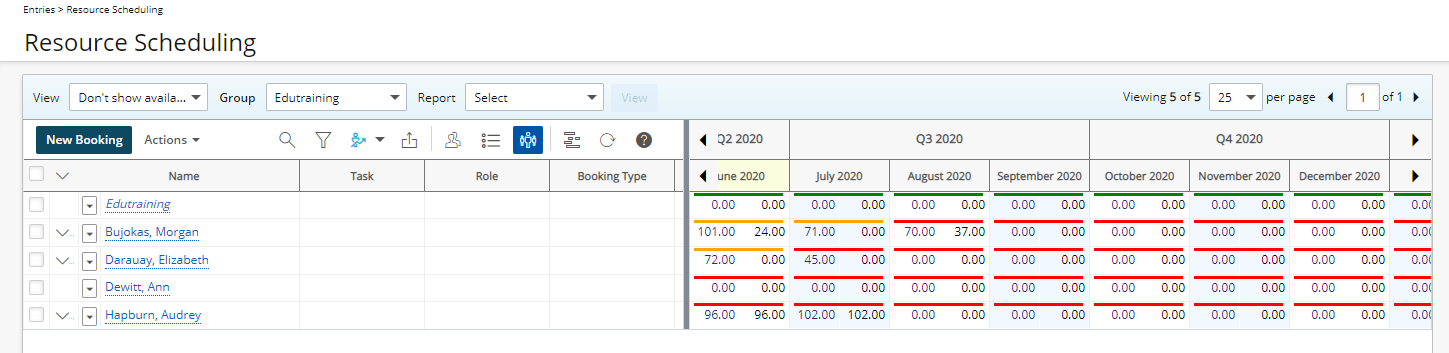
Description: When Availability is not selected to display among the Timeline Fields for a Work Plan View, a colored bar, based on the Heatmap configuration, is now shown on top of each cell.
Benefit: A visual indicator is now visible even when the Availability is not among the Timeline Fields displaying.
For more information see Removing Availability from the Timeline Fields for a View
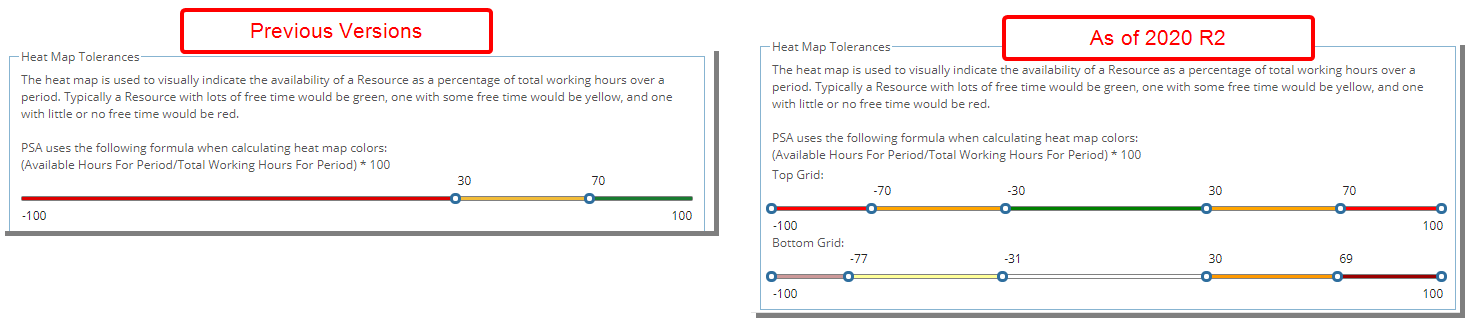
Description: You can now define a minimum of 1 and a maximum of 5 thresholds for the Heat Map. Furthermore, clicking on the colored bar of a section will trigger the color picker where you can set a custom color for the threshold.
Benefit: You can now further customize the number of the Heat Map thresholds as well as the color in which they are displayed based on your organizational or individual preferences.
Use case: Audrey is required to set the threshold setting for the Heat map so that users with properly allocated work are not highlighted when viewing the top grid. She can now choose a white/transparent background for users who are allocated appropriately so that they are not highlighted in the Work Plan when viewing the Heat Map. Whereas the over-allocated or the under-allocated resources will clearly stand out.
Note: By default, 3 tolerance settings are defined for the bottom grid and 5 for the top.
For more information see modifying the Heat Map Threshold settings at the System level.
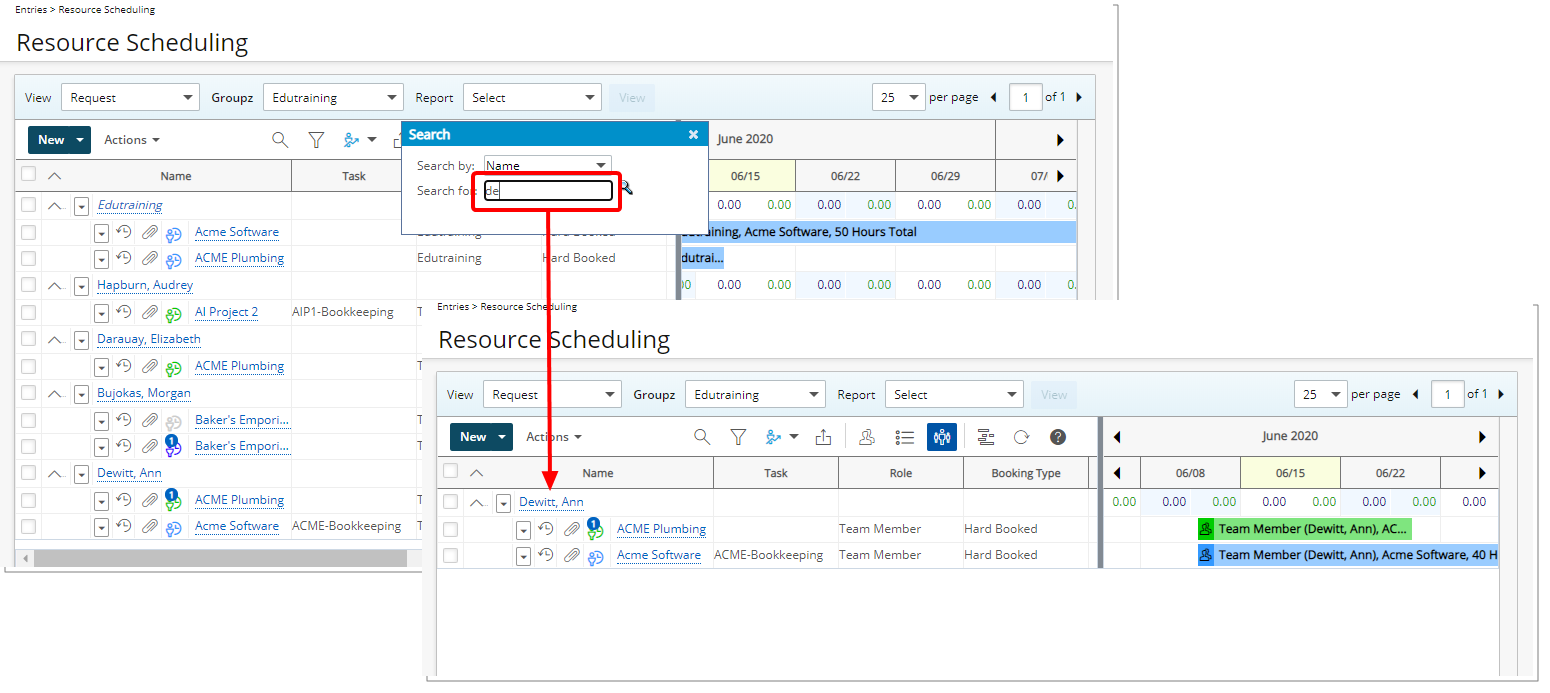
Description: The search capability within the Work Plans, is now based on the "Contains In" logic, whereby results will return any matches that contain the character(s) entered and found anywhere in the Name.
Note: With this improvement, using the percentage sign (%) to search will result in any Name that contains the percentage (%) sign.
For more information see Searching for a booked User or Role on the Work Plan.
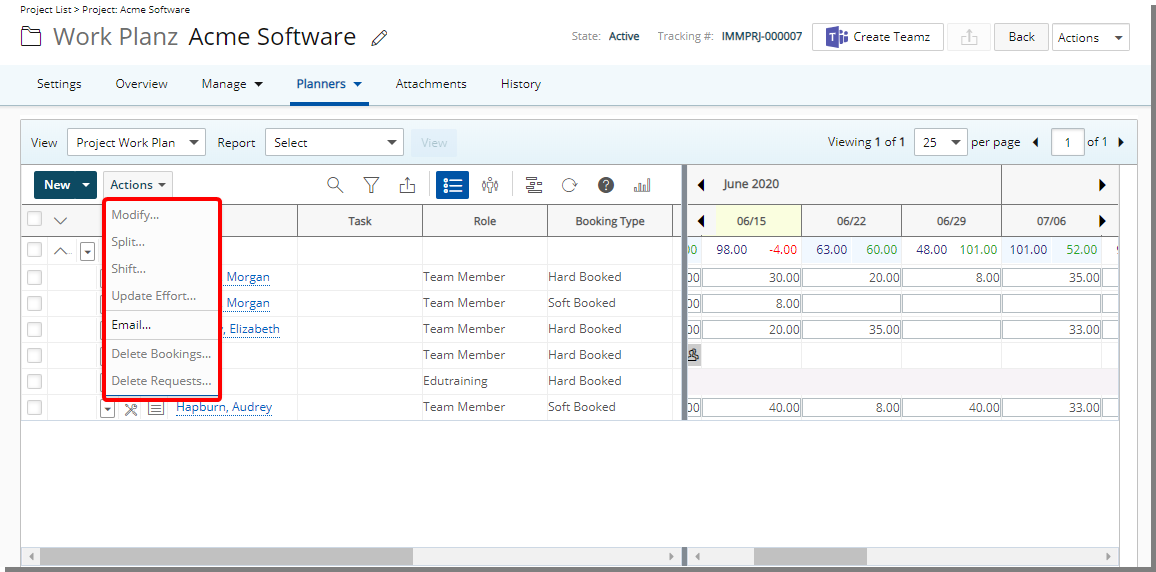
Description: The Modify, Shift, Split, Update Effort, Email and Delete Bookings options have been moved under the new Actions context menu.
REST API/SDK
PSA can be interacted with programmatically via a set of APIs. With this release, the View permissions are now enforced on all GET endpoints according to the corresponding user’s security profile apart from the Timesheet/Time Entries APIs as well as the APIs used by the mobile application.
The remediation actions to any problem arising from the changes outlined herein are to either grant the authenticated User the required permissions, change the authenticated User to an Administrator User or otherwise change the Users Security Profile to one having sufficient permissions for all required GET actions.
Caution: It is highly encouraged to use a Security Profile with Administrative privileges when working with the API.
The following changes were made:
- Project API: The CreatedBy and CreationDate are now read-only properties.
- ChargeEntries API: In addition to regular permission to view the logged user records, it is now required to have the Charge Administrator permission to see all the records.
- ProductEntries API: In addition to regular permission to view the logged user records, it is now required to have the Product Administrator permission to see all records.
- AssociatedRateRules, RateRuleEntries, RateRuleWBSEntries API: The results from a GET are now based on two levels of security: Cost and Billing. If the user has only Cost permission, only the Cost Rules will be retrieved, the same applies to Billing Rules. To get all records, the user must have Cost and Billing permissions.
- Bookings API: GET Bookings now returns all bookings for only the users with view access to the following permissions: User Work Plan, Project Work Plan, Role Work Plan, User object, Project object, and Role object. To GET a Booking by id and matching resources, the user must have the required permissions to see either the bookings’ User, Role, Project, or Group. If one of the above conditions is met, the booking will be returned. New endpoints are now created to view all bookings for a dedicated object, based on the object's permissions:
- Get bookings for the project: api/v2/Bookings/Project/[projectId]
- Get bookings for the user: api/v2/Bookings/User/[userId]
- Get bookings for the role: api/v2/Bookings/Role/[roleId]
- Get bookings for the group: api/v2/Bookings/Group/[groupId]
- BookingDetails API: The permissions for getting all Booking Details and the Details by id require the same permissions as the Booking API specified above.
- Custom Properties API: To GET the UDFs of any object, the user must have View permissions of that given object. Note that it is now possible to define access limitations to User Defined fields associated with Projects based on Security Roles.
- Contact API: The new Security property has been added on the Contact object which will be a required field if CanLogin is set to true (1).
- UserId is now read-only
- LoginName now requires an email as the format
- Client’s Country is now the default value for Country
- The following fields are now obsolete and should not be used: Appelation, LeadSource, Password, PurchaseType, ShippingType
- Invoice and Invoice Line Items API: To GET invoices, the authenticated user will need either the View permission for the Invoice Administrator or the Invoice Manager. With the former, all invoices are returned and with the latter, only invoices assigned to the authenticated user will be returned.
Timesheet
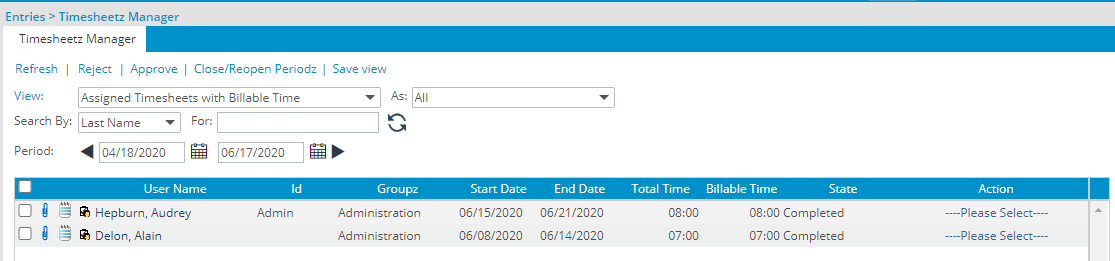
Description: The Assigned Timesheets with Billable Time View has been updated to display only the Billable Time amount entered against the logged user’s Projects within the Billable Time column (Instead of returning the sum of all project Billable time as in previous versions) and the Total Time column to display the sum of all Time Entries made against the logged user's Projects when View As Project Manager is selected.
Benefit: With this change, as a Project Manager, you can easily view the Billable Time amount associated only with your projects.
For more information see the available Views to filter the Timesheet list on the Timesheet Manager Page.
Upland Analytics
Description: Addition of a new Resource Request data source with the following Views: Alternate project manager, Booking details, Client, Creator, Project, Project manager, Request fulfillment, Resource alternate group manager, Resource group manager, Resource request, Role, Role resource group, Task, User and User resource group.
Scoping is available for: All groups, All projects, Available projects, My entries, My projects and My resource groups.
Benefit: With the addition of the new Resource Request data source, you now have access to more Fields to report on.
For more information see the Resource Request data source and relates views.
Description: The new Scope - Client Contacts View has been added to the following data sources:
- Client Purchase Order
- Expense
- Financial
- Invoice
- Invoice Entry Details
- Money Charge
- Product
- Project Entry Details
- Project Status Report Entry
- Timesheet
- Work
Benefit: With this addition, Client Contacts accessing their Dashboard through the Work Center can now view reports based on their associated Projects.
Description: A Client Contact granted the Upland Analytics Reporting permission combined with having been given the Can Logon access (Setup > Work > Clients > Client Edit > Contact List > Contact Edit) is automatically created as a user in Upland Analytics.
Benefit: Client Contacts are now able to view Reports based on their access rights and their associated Projects through Work Center.
For more information see Granting Client Contacts access rights to Upland Analytics.
Description: The following out-of-the-box reports will be available in Upland Analytics:
- Detailed Upcoming Resource Requests
- Resource Requests by Roles this Year
Benefit: The out-of-the-box reports save you time and the burden of creating these generally useful reports.
For more information see Out-of-the-Box Reports.
User Experience Enhancements
The improved Tables, Buttons, Options, Dialog Boxes, Icons and Search all fall in line with the upgraded standards that had already been applied on several pages during the recent releases.
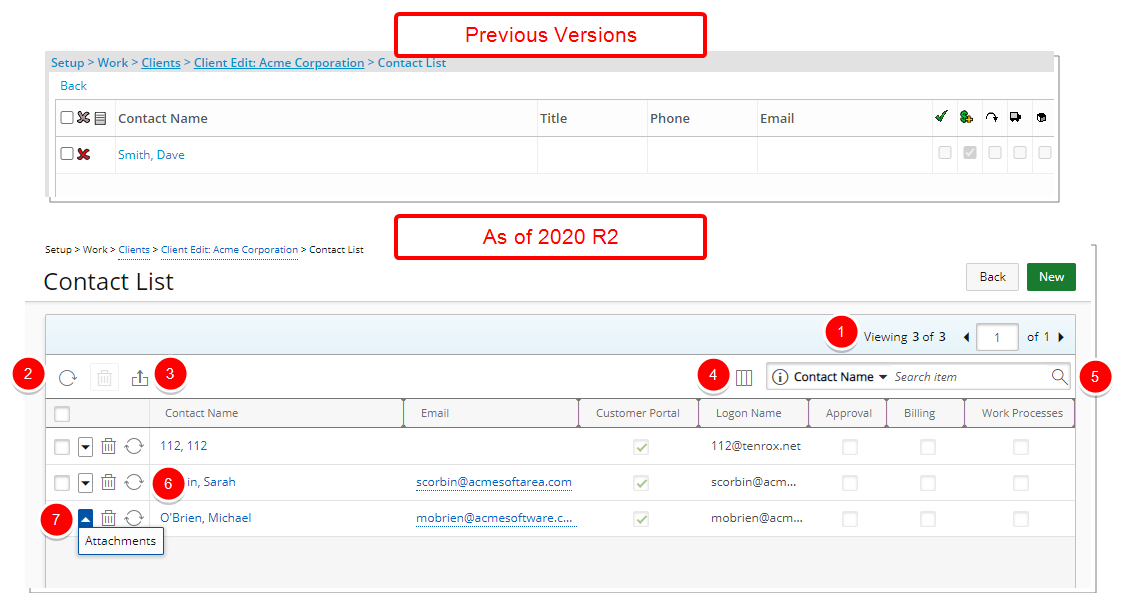
Description: The client Contact List page (Work > Clients > Client Edit) has been updated to improve overall user experience and establish consistency across all pages. From the improved list you ca clearly see the Client Contact Name and know which contacts are allowed to login to the Customer Portal.
The following updates have been made:
- Updated Pagination.
- Addition of a Refresh button.
- Updated and relocated Export to Excel button.
- Addition of Column Selection capability. By default, the following columns are displayed: Contact Name, Email, Customer Portal, Logon Name, Approval, Billing, and Work Processes. Additional columns to display are Phone and Title.
- Addition of “contains in” logic Search capabilities, with the following available search criteria: Contact Name, Email, Logon Name, Title, and Phone.
- Addition of synchronization button with Customer Portal.
- Addition of the context menu allowing you to access the Attachments page where you can add/manage Notes as well as Documents & Links.
Benefit: The look and feel has been improved, in keeping with the UplandOne mindset, wherein the layout of various elements within the page supports the unified experience across Upland products.
For more information see:
- Accessing and viewing the Client Contact List page
- Available option from the Client Contact List page
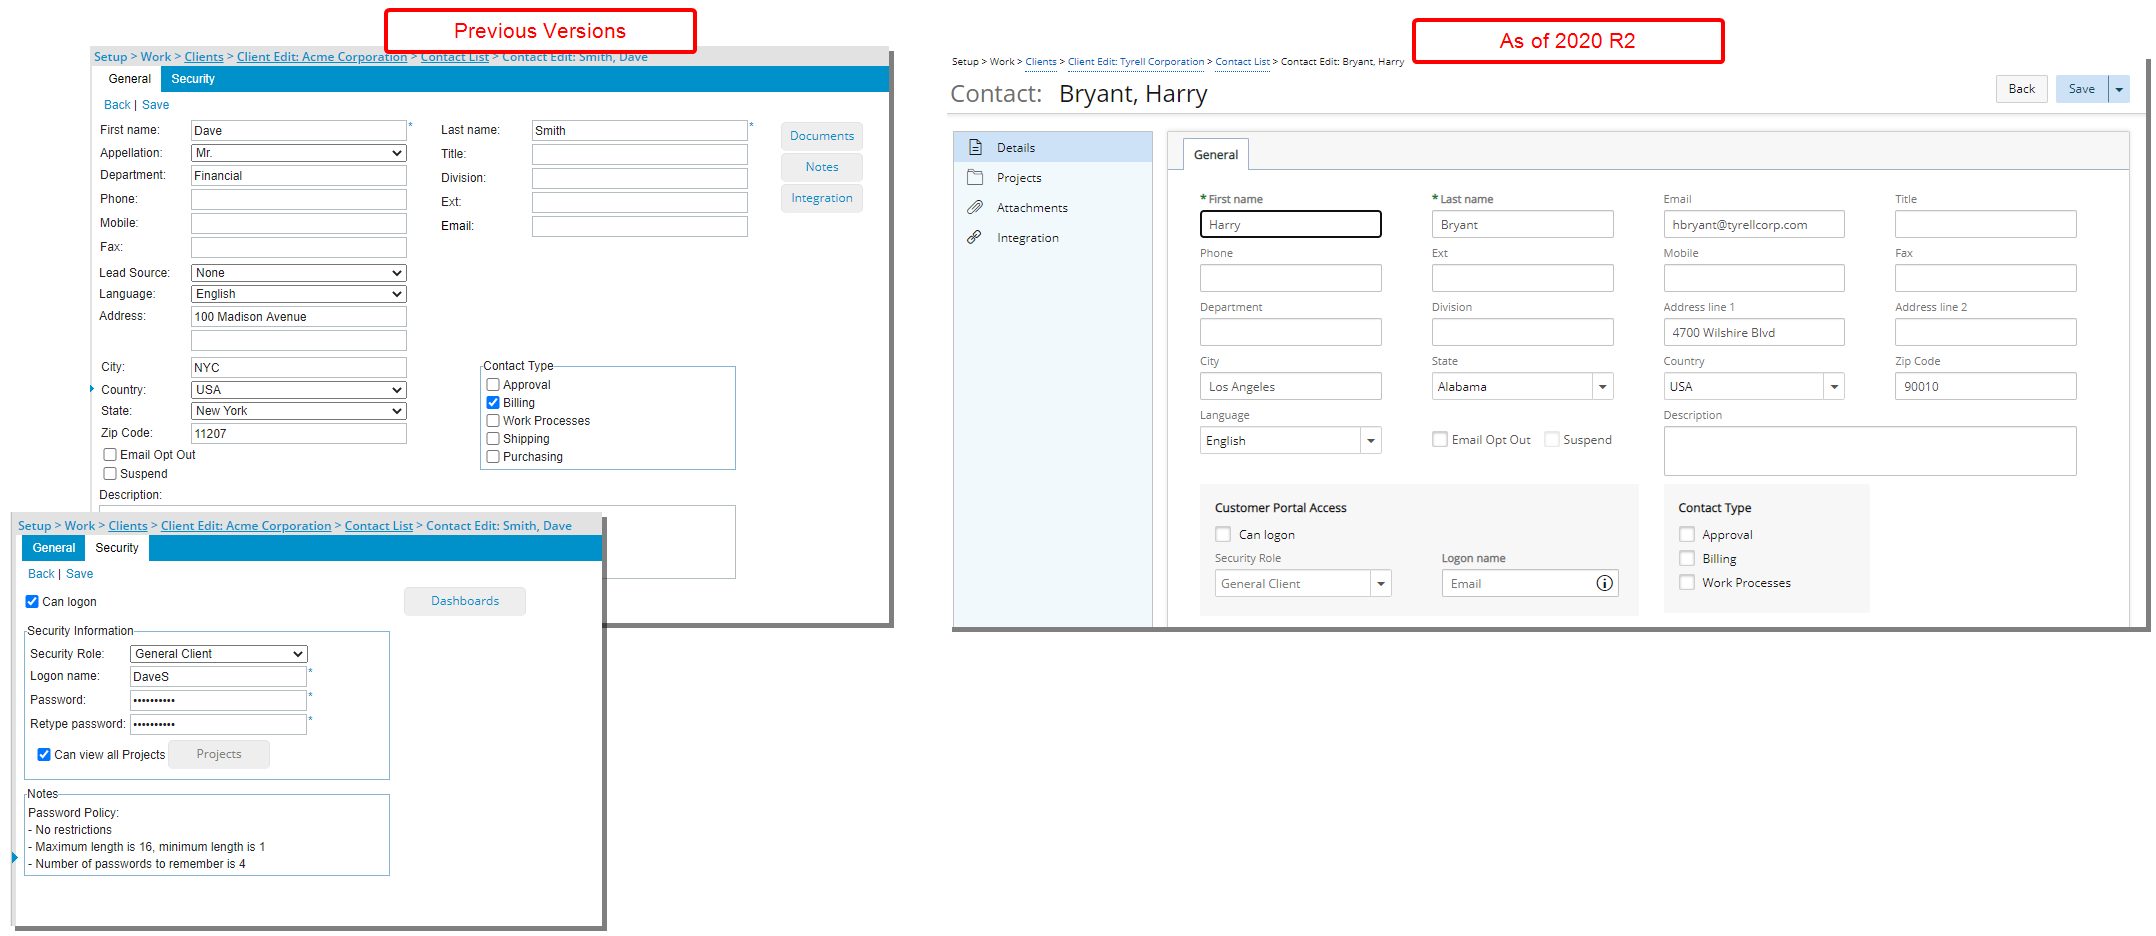
Description: The client Contact Edit page (Work > Clients > Client Edit > Contact List) has been updated for better user experience and establish consistency across all pages. The following are the improvements made:
- The General and Security tabs have been merged into one, eliminating the need to click through the tabs.
- Security Information has been renamed to Customer Portal Access wherein you can grant login access to the given Client Contact.
- The Shipping and Purchasing options, previously located under the Contact Type, have been removed.
- The Documents and Notes pages have been combined into the Attachments tab and can now be accessed from the left-hand side navigation of the improved Client Edit page.
- The Integration button previously accessed from the General tab can now be accessed from the left-hand side navigation.
- The Projects button previously located under the Security tab has been moved and can now be accessed through the left-hand side navigation.
- The Dashboards button previously located under the Security tab has been removed.
Benefit: The look and feel are further improved as well in keeping with the UplandOne mindset, wherein the layout of various elements within the page supports the unified experience across Upland products.
For more information see:
- Creating a Client Contact
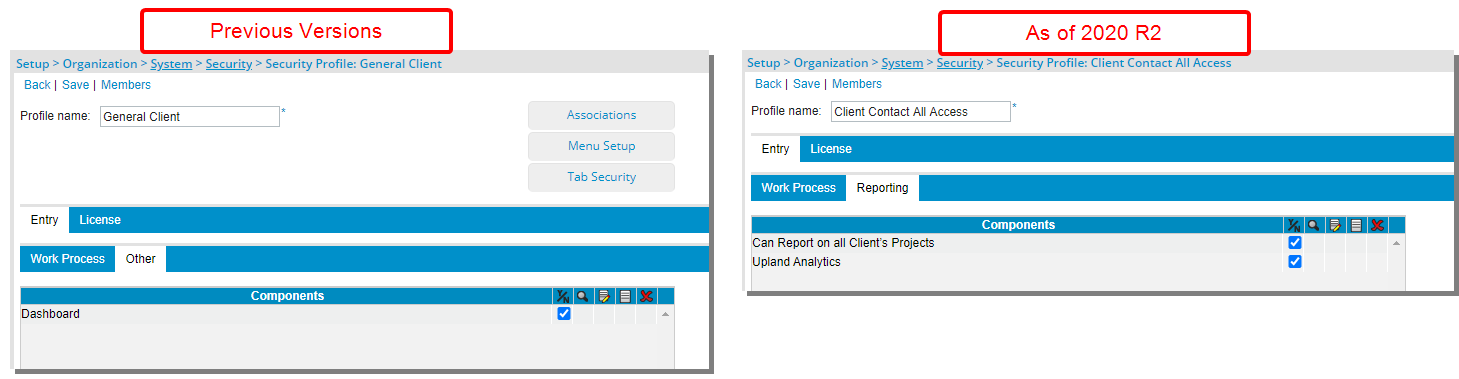
Description: A new Reporting sub-tab has been added under the Entry tab for Client-based Security Profile (Setup > Organization > System > Security > Client) allowing you to grant Client Contact(s) access to Upland Analytics and the ability to report on all Client’s Projects. Moreover, the Associations, Menu Setup, and Tab Security buttons, as well as the Other sub-tab (previously located under the Entry tab), have been removed.
For more information refer to Client Security Role.
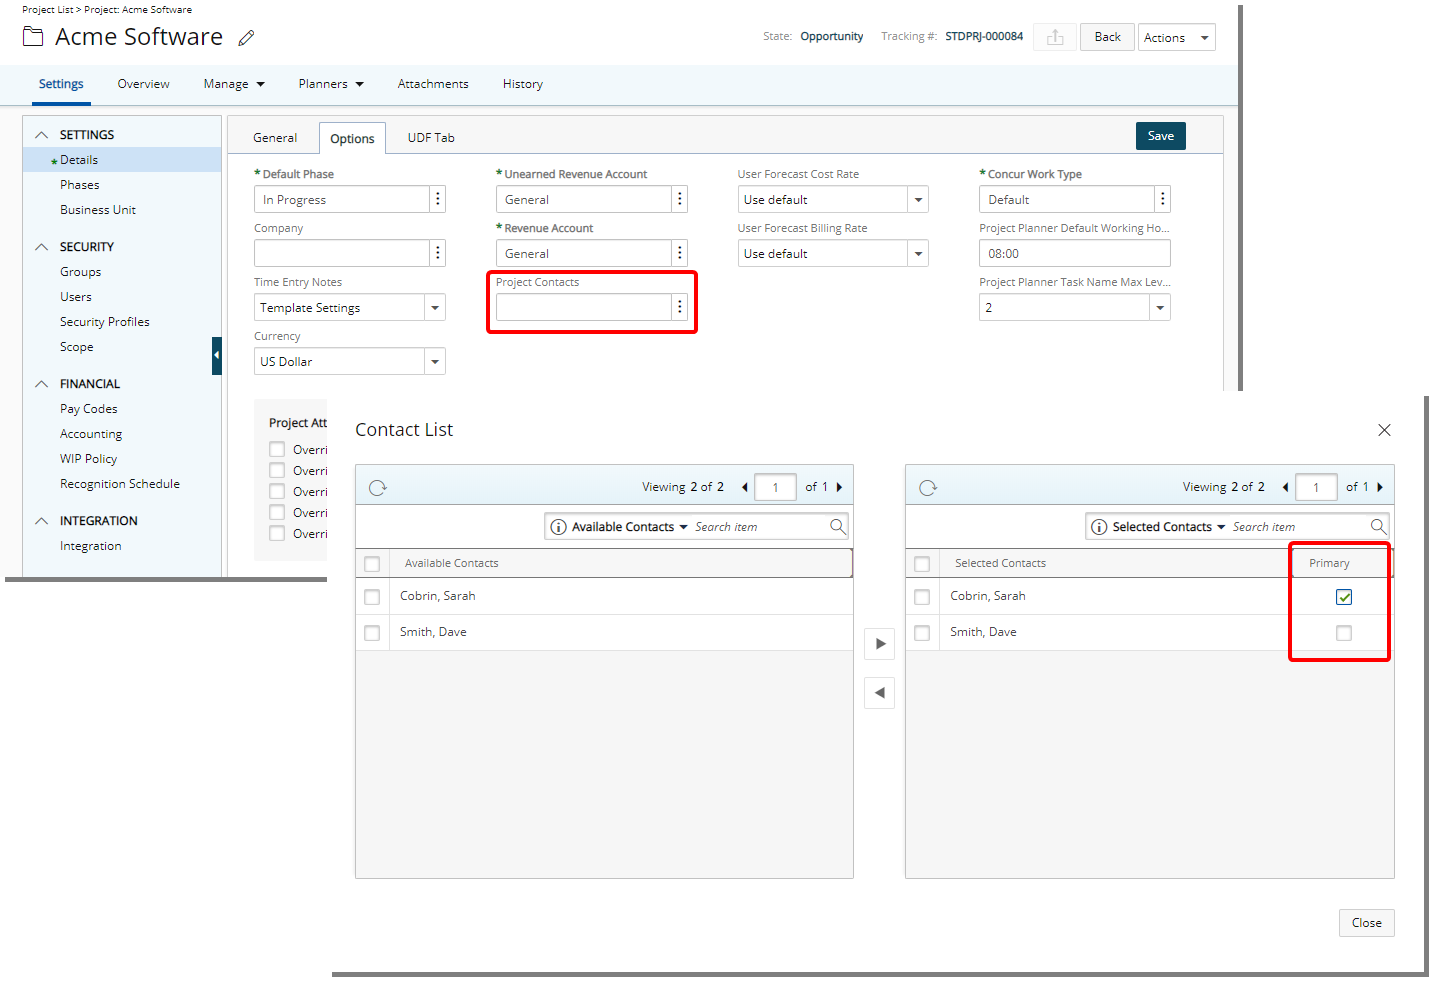
Description: You can now select multiple Client Contacts to associate to your Project and select a Primary Contact for Invoicing purposes from the Options tab of the Project Edit page. As a result of this improvement Project Contact was renamed to Project Contacts on the Overview tab of Project Edit.
Furthermore, the Primary option is also available when associating the Contact to Project(s) from the Client Contact Edit page.
Note:
- A Project can only have one Primary Contact.
- It is not mandatory to choose a Primary Contact.
-
If a Project Contact was chosen for existing Projects prior to 2020 R2, it will be set as Primary by default upon upgrading.
Caution: When generating Invoices, if you have chosen the Use Project Contact option, the Project Primary Contact will receive the Invoice Notification including the Invoice details as a report. Otherwise the Client Contact (Setup > Work > Clients > Client Edit > Invoice Options > Billing address) will receive the email notification.
For more information refer to:
- Associating Client Contact(s) to a Project (from the Options tab of the Project Edit page)
-
Associating Project(s) to Client Contact (from the Client Contact Edit page)

Description: The user interface of the Assign Tasks page has been improved for better user experience, consistent with the other interface updates that have been made thus far.
The following enhancements have also been made:
- The Filter link is now a button in the header of the available Tasks table with the following improved search options: Client Id, Client Name, Project Id, Project Name, Project Priority, Project state Name, Project Start, Project End, Portfolio Id, and Portfolio Name
- With the addition of the Assignment drawer from the selected table it is no longer necessary to be directed to another page to modify the Assignment Start and End Dates.
As a result of these improvements:
- The New link has been removed.
- The Back link has been converted to a button and moved to the right-hand side.
- It is no longer possible to access the Project/Task Edit page by clicking on a Task name
- The following security components located under the Entry > Time subtab (Setup > Organization > System > Security > Security Profile) were removed.
- Edit Project dates from Assignment page
- Edit Task attributes from Assignment page
- Edit Task dates from Assignment page
The above improvements have been made to the Assign Tasks page accessed through:
- Entries > My Timesheet > Assignments
- Home > Enter Time > Assignments
- Portals > Resource Central > User Edit > Assignment
- Entries > Timesheet Manager > User Name/Id/Group/Start Date/End Date > Assignments
- Setup > Organization > Users context menu > Assign
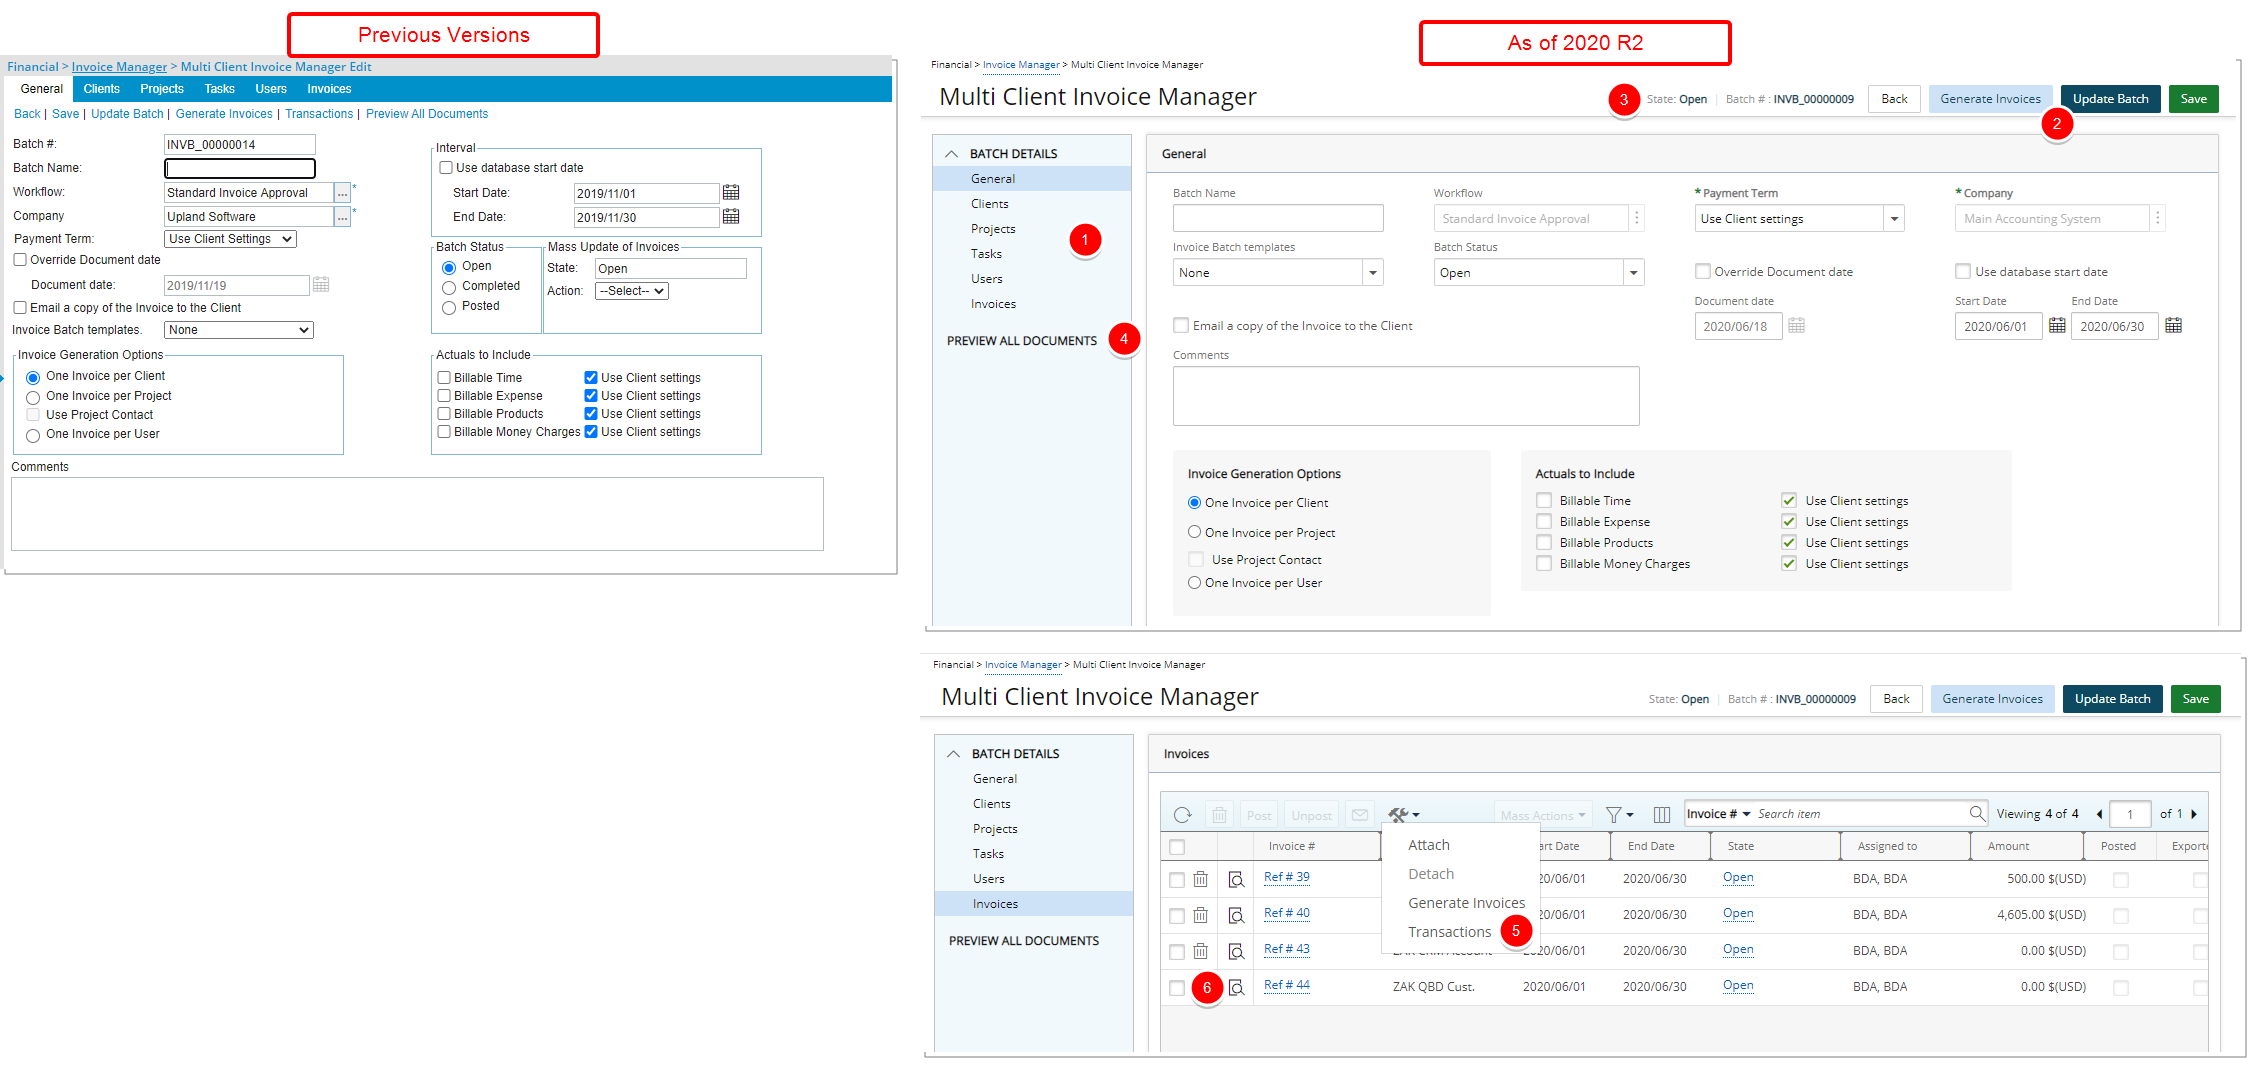
Description: The Multi Client Invoice Manager page (Financial > Invoice Manager) has been updated for better user experience, improved performance and consistency across all pages. The following are the improvements made:
- The General, Clients, Projects, Tasks, Users and Invoices tabs can now be accessed from the left-hand navigation.
- The Back, Generate Invoices, Update Batch and Save links have been converted into buttons and moved to the top right corner of the page.
- The Batch # and State are clearly visible at all time next to the buttons.
- The Preview All Documents link can now be accessed from the left-hand navigation.
- The Transactions link has been moved to the Invoices list page and can be accessed through the Tools context menu.
- The Preview link, previously located on the Invoices tab of an Invoice Batch (Financial > Invoice Manager > Multi Client Invoice Manager Edit) has been moved under the Batches tab of the Invoice Manager and has been renamed to now read Report. It is grayed out by default and available once you select a single Invoice Batch from the list.
Benefit: The look and feel are improved as well in keeping with the UplandOne mindset, wherein the layout of various elements within the page support the unified experience across Upland products.
For additional information see Working with Multi Client Invoice Batches
Description: The Failed Authentication page, displayed upon an unsuccessful SSO authentication, has been updated, consistent with the UplandOne look and feel.

Description: Enhancements have been made to the process of creating/updating Project Fixed Cost and Billing rules:
- The General and Details tabs have been merged into one for Prorating and Flat Charge Rate Types.
- Upon creating a Tiered Rate Type a Details drawer is created. Moreover, upon setting the Rate Type to User or Task for a given Tier, a second panel renders with the corresponding details.
- Clicking on the Tier Name will allow you to add the corresponding Users or Tasks.
Benefit: User Experience has been improved for more effective managing and setting of Project Fixed Cost or Billing Rate Rules.