PSA 2020 R3.1 - Product Enhancements
Below is a summary of the features included in the PSA 2020 R3.1 release.
- Financial
- Financial Planner
- Integration
- Leave Request Manager
- Mobile
- Organization Breakdown Structure (OBS)
- Other
- Program Management
- Project Management
- Project Status Reporting
- Resource Management
- REST API/SDK
- Security
- Timesheet Setup
- Upland Analytics
- User Experience Enhancements
- Work Breakdown Structure (WBS)
- Deprecated Functionality
2021.01.28.2020R3.1.V1.EB
Note: This page could be updated as new information becomes available.
Financial
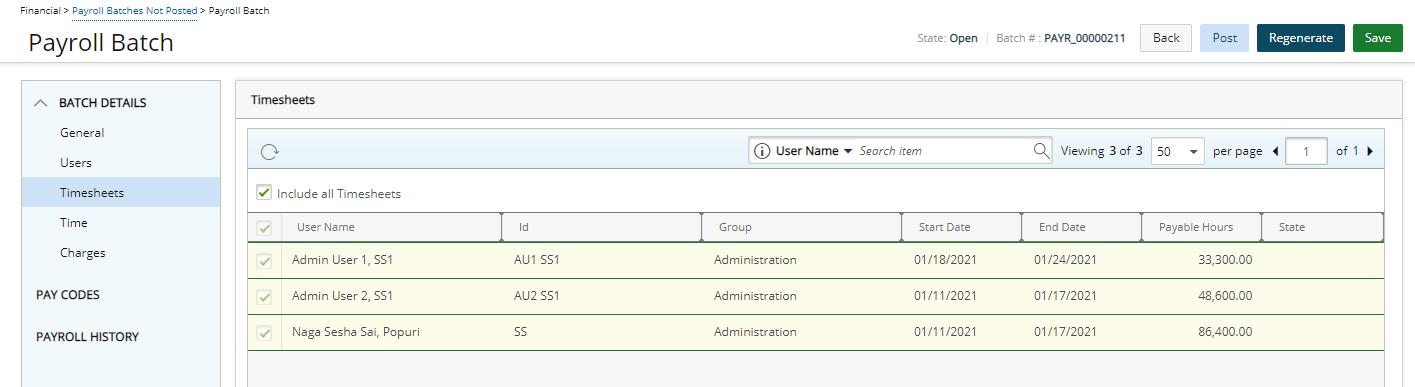
Description: The Timesheets option has been added to the Payroll Batch edit page (Financial > Payroll Batches Not Posted) under the Batch Details menu from where you can now opt to include selected User Timesheets within a Payroll Batch.
You can choose to include all or select specific Timesheets by selecting the Include all Timesheets option which is not selected by default.
The Timesheet list includes the following: User Name, Id, Group, Start Date, End Date, Payable Hours, and State. Furthermore, you can choose to search the list based on User Name, Id and Group.
Note: Only Time Entries within the selected date range, within the Payroll Batch, are displayed.
For further details refer to Creating a new Payroll Batch.
Financial Planner
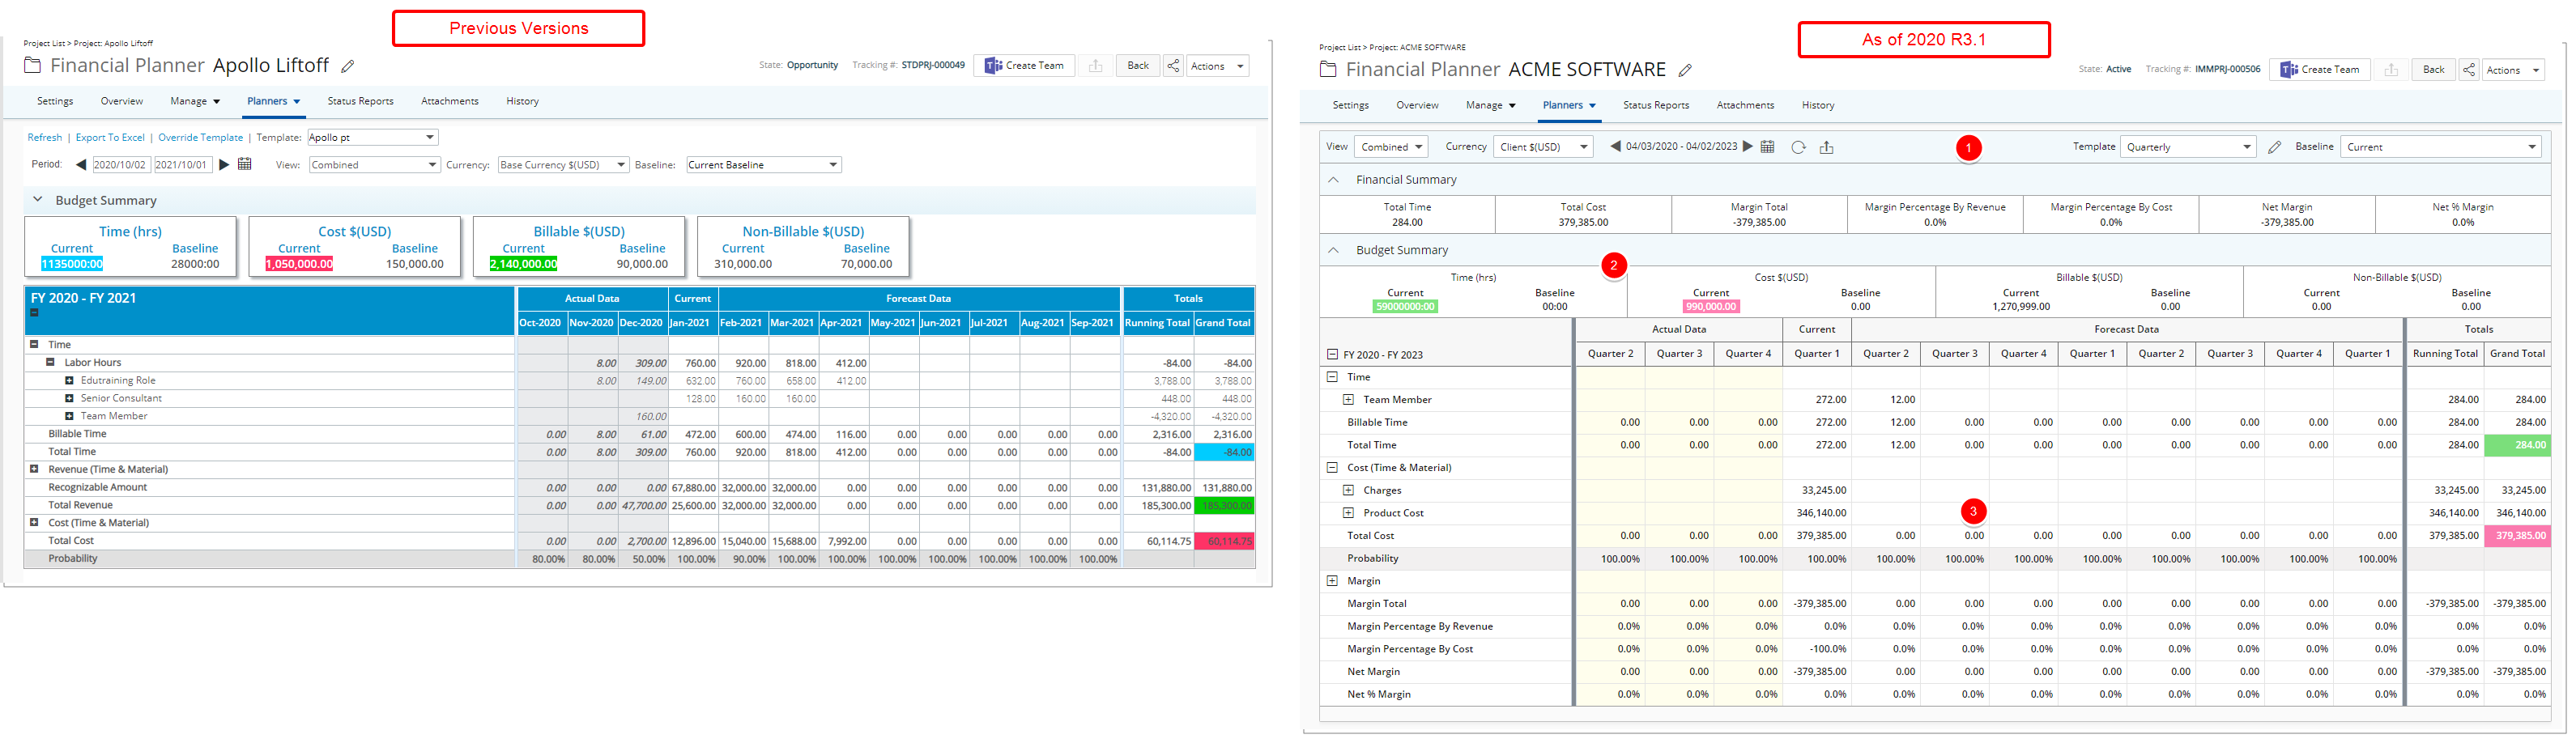
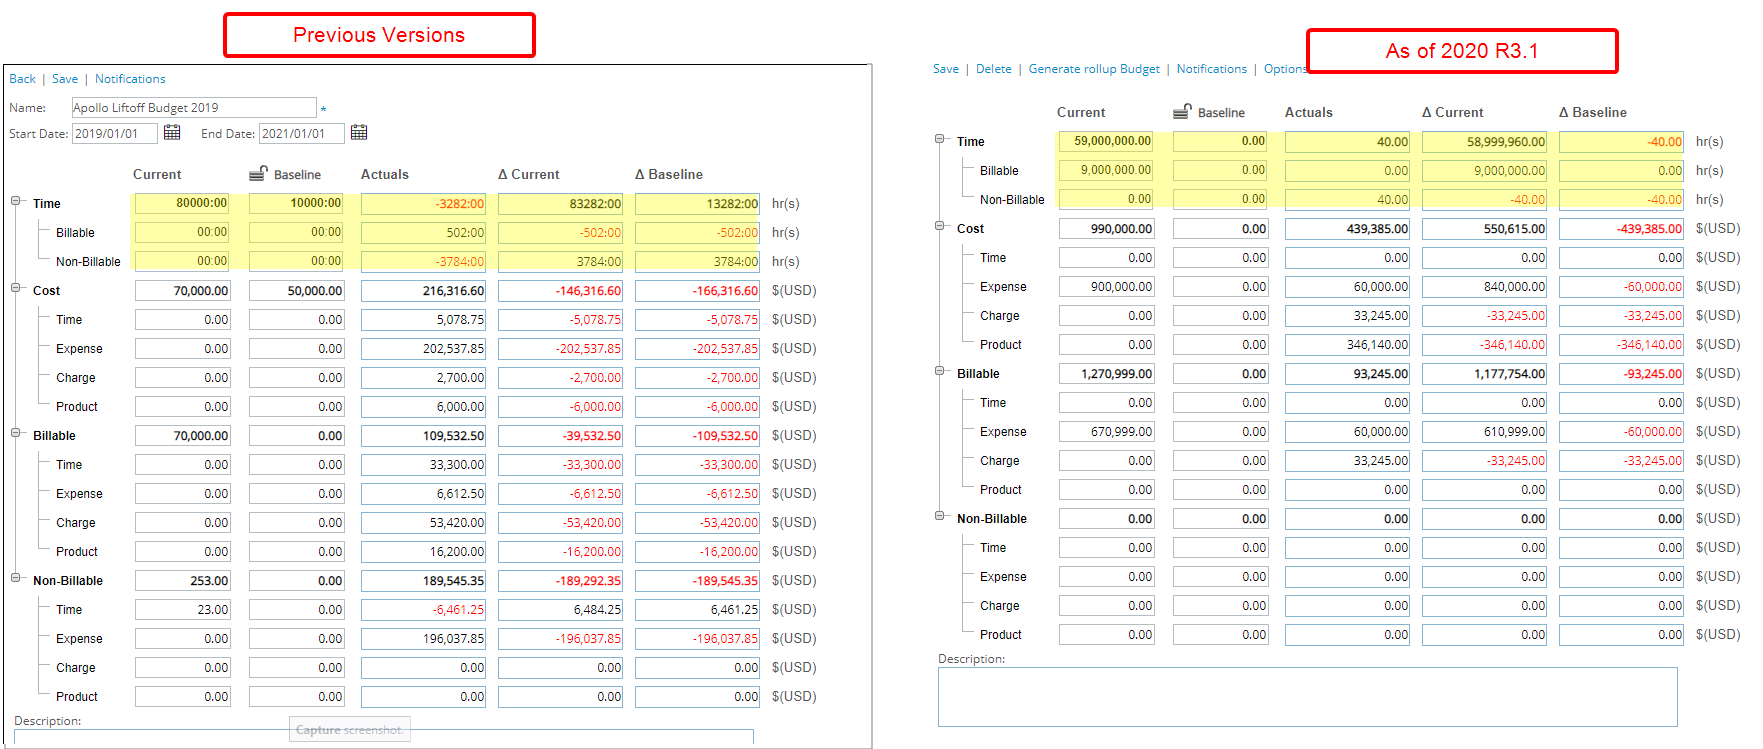
Description: The Financial Planner has been redesigned as follows:
- The View, Currency, Period, Refresh, Export to Excel, Template, Override Template and Baseline options are now located in the header section of the Financial Planner.
- The collapsible Budget Summary section has been expanded to the full horizontal length of the page with improved fonts.
- The spacing, colors and fonts of the Financial Planner table have also been enhanced.
Benefit: With these overall modifications, the look and feel are further improved, as well in keeping with the UplandOne mindset, wherein the layout of various elements within the page support the unified experience across Upland products. Consequently, the user experience is further elevated.
Moreover, the following features have been added to the Financial Planner:
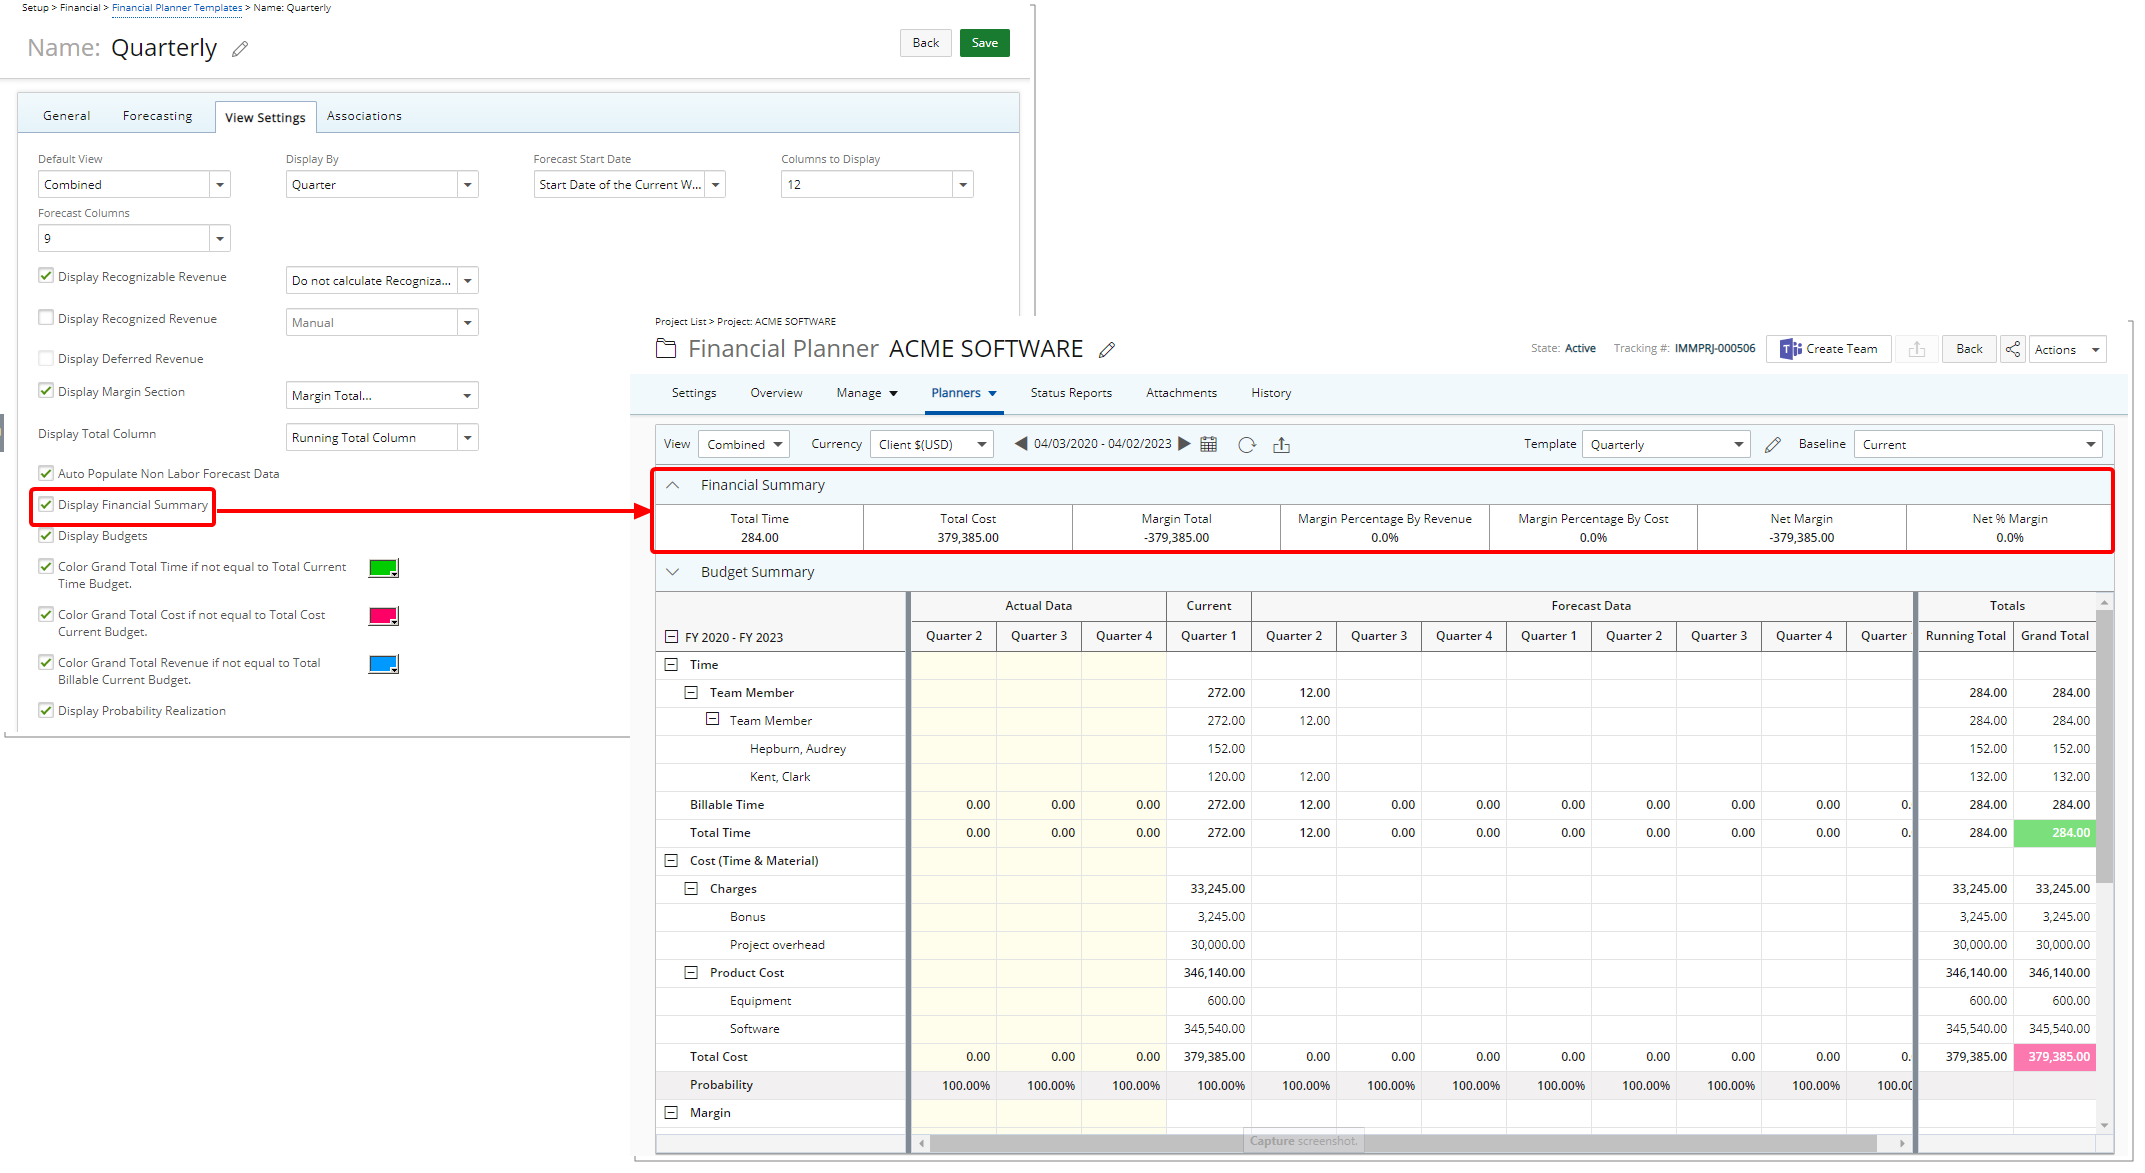
Description: The option Display Financial Summary is now available from the View Settings tab when creating/modifying or overwriting a Financial Planner Template.
When selected, the Financial Summary section is displayed above the Budget Summary section (if shown) with the following information if they are selected to be displayed:
- Total Time: Dependent on the displaying of the Time category.
- Total Revenue: Dependent on the displaying of the Revenue category within the Forecasting tab.
- Total Cost: Dependent on the displaying of the Cost category.
- Margin Total: Dependent on the selection of Margin Total in the Display Margin Section within View Settings.
- Margin Percentage by Revenue: Dependent on the selection of Margin Percentage by Revenue in the Display Margin Section within View Settings.
- Margin Percentage by Cost: Dependent on the selection of Margin Percentage by Cost in the Display Margin Section within View Settings.
- Net Margin: Dependent on the selection of Net Margin in the Display Margin Section within View Settings.
- Net % Margin: Dependent on the selection of Net % Margin in the Display Margin Section within View Settings.
For further details refer to Enabling the Financial Summary section to appear within the Financial Planner.
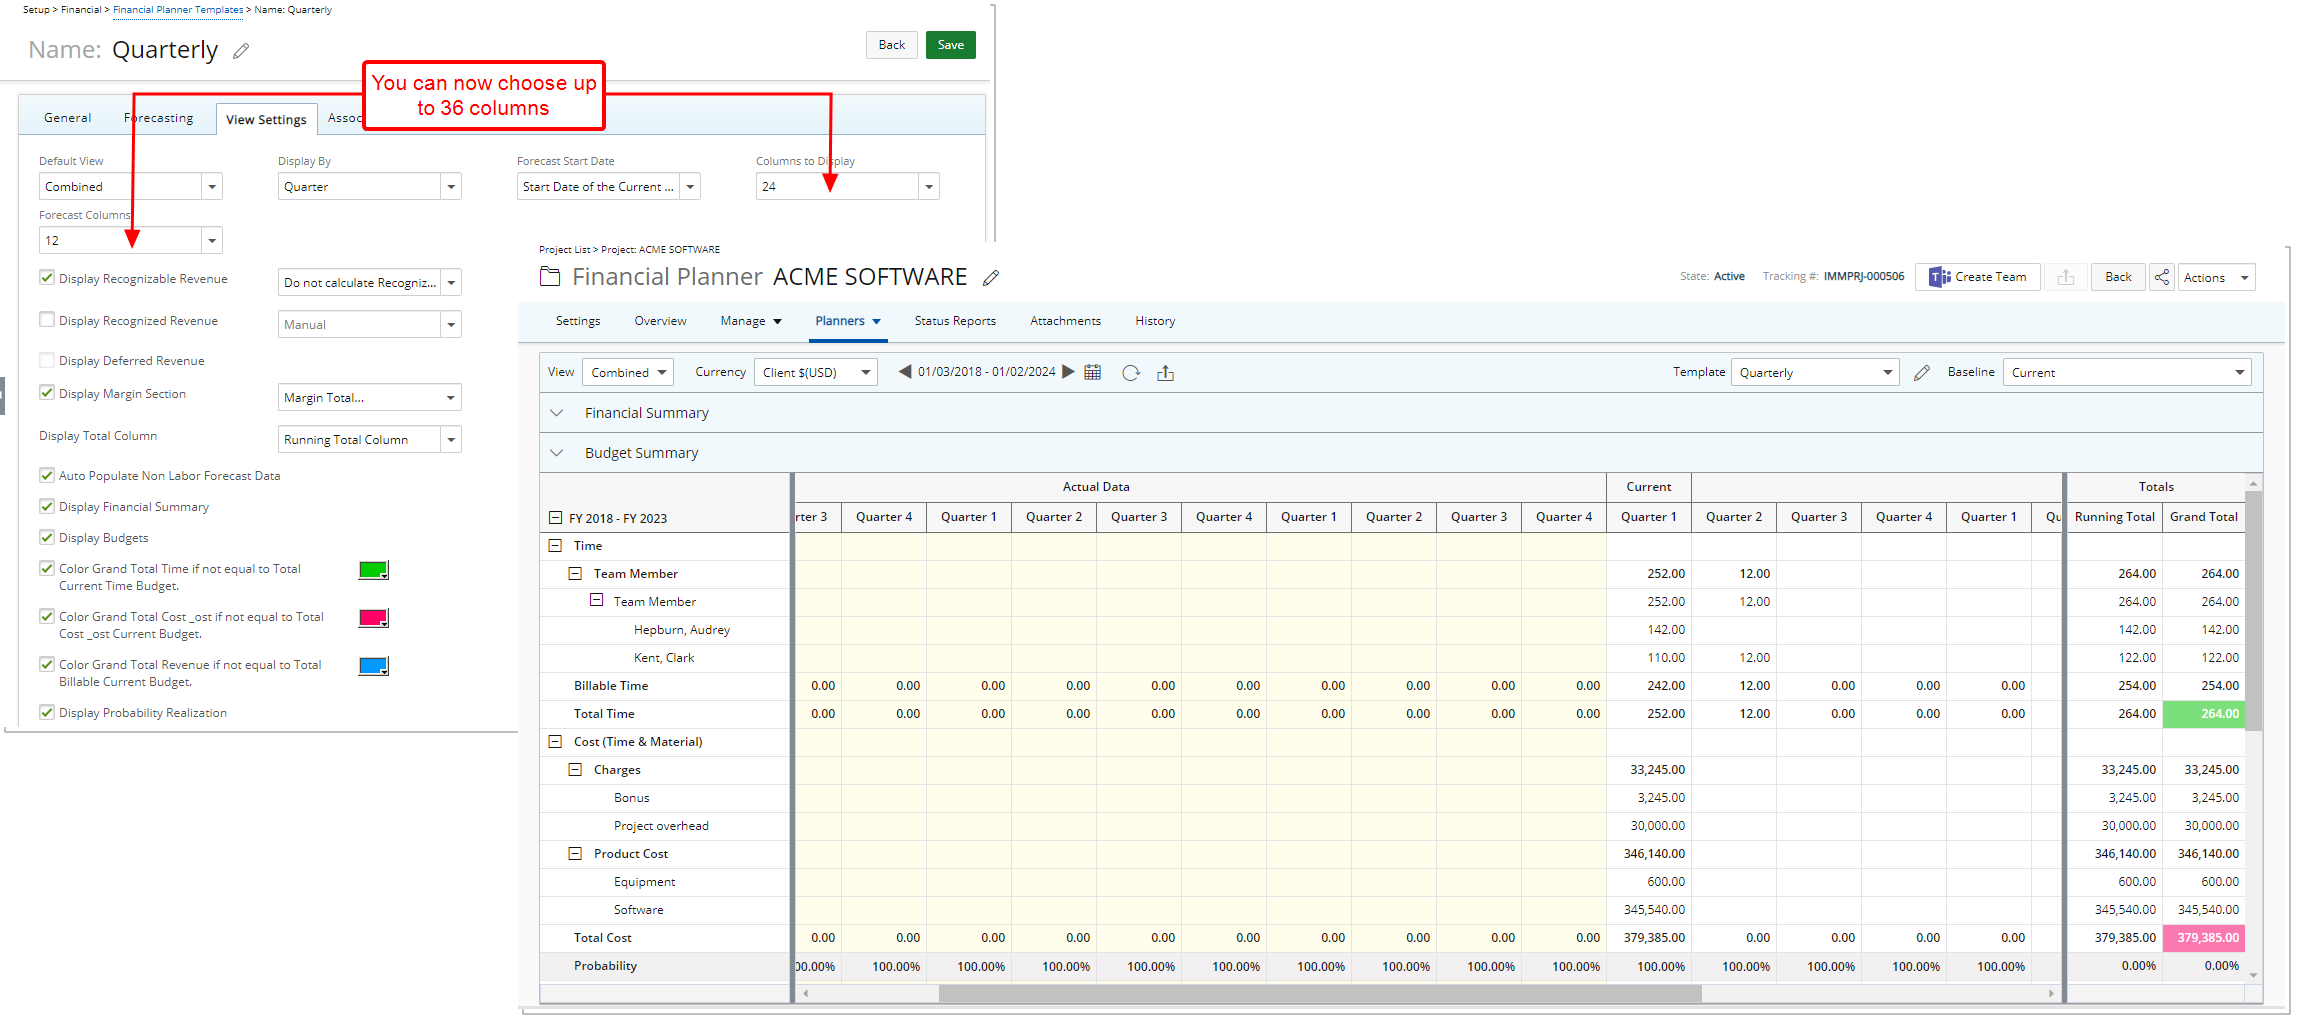
Description: The maximum number of Columns to Display and Forecast Columns to display have been increased from 12 to 36.
Benefit: You can now choose to view more periods within the Financial Planner and have a better insight on your long-term Projects.
For further details refer to:
- Creating a Financial Planner Template
- Financial Planner Template - General tab
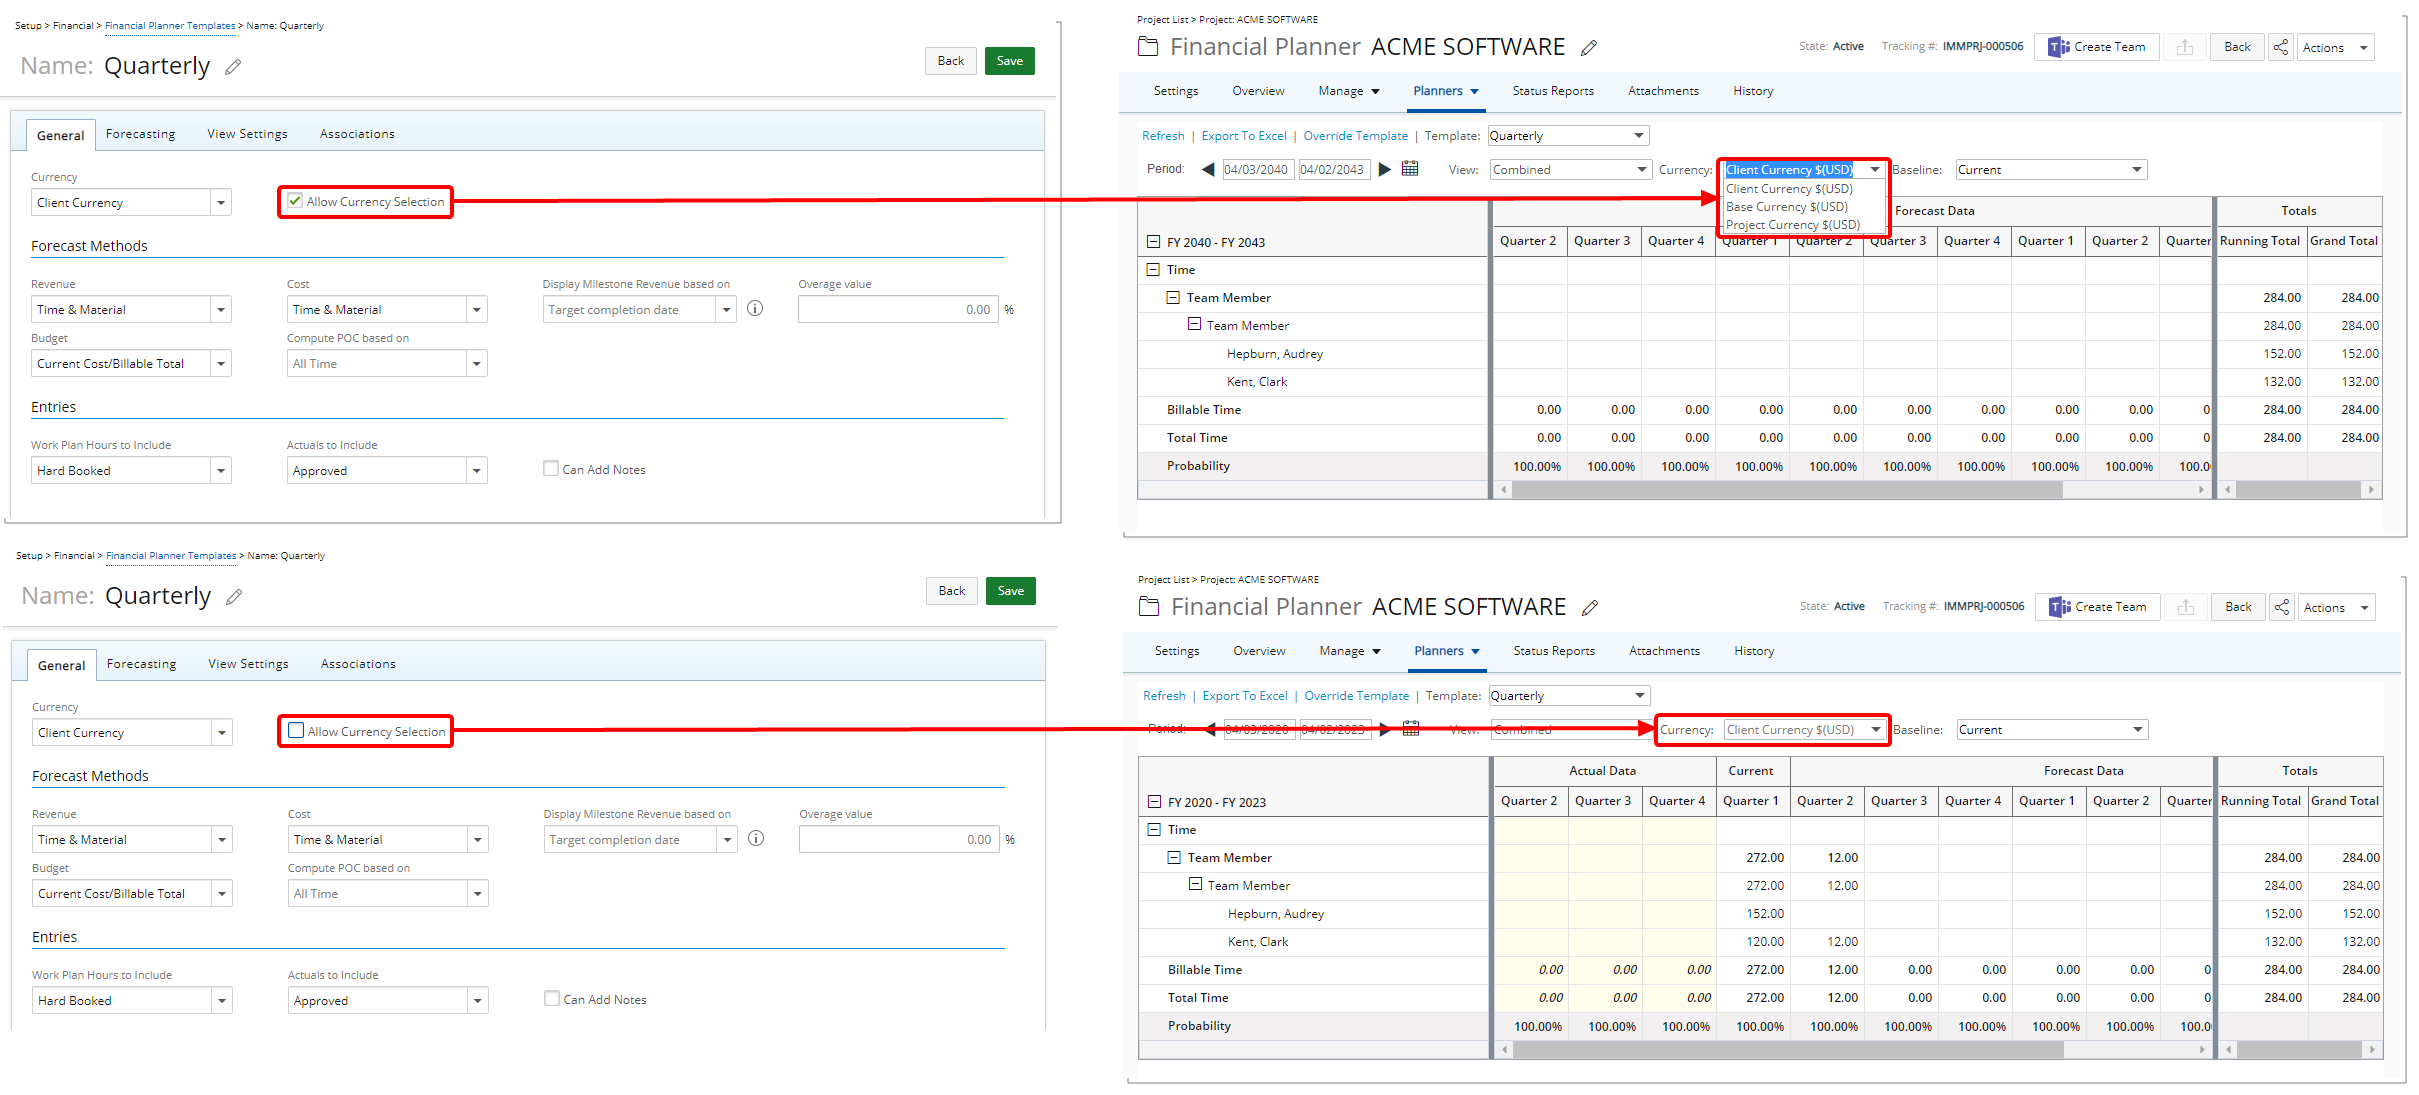
Description: The option to Allow Currency Selection has been added to the Financial Planner Templates as well as when overriding it at the Project Level allowing you to permit users to modify the displayed Currency of the Financial Planner.
Benefit: You can now select the appropriate Currency and disallow users the ability to modify it from the Financial Planner.
Note: By default, the Enable Currency Selection box is selected.
For further details refer to:
- Creating a Financial Planner Template
- Financial Planner Template - General tab
- Choosing a display Currency within the Financial Planner
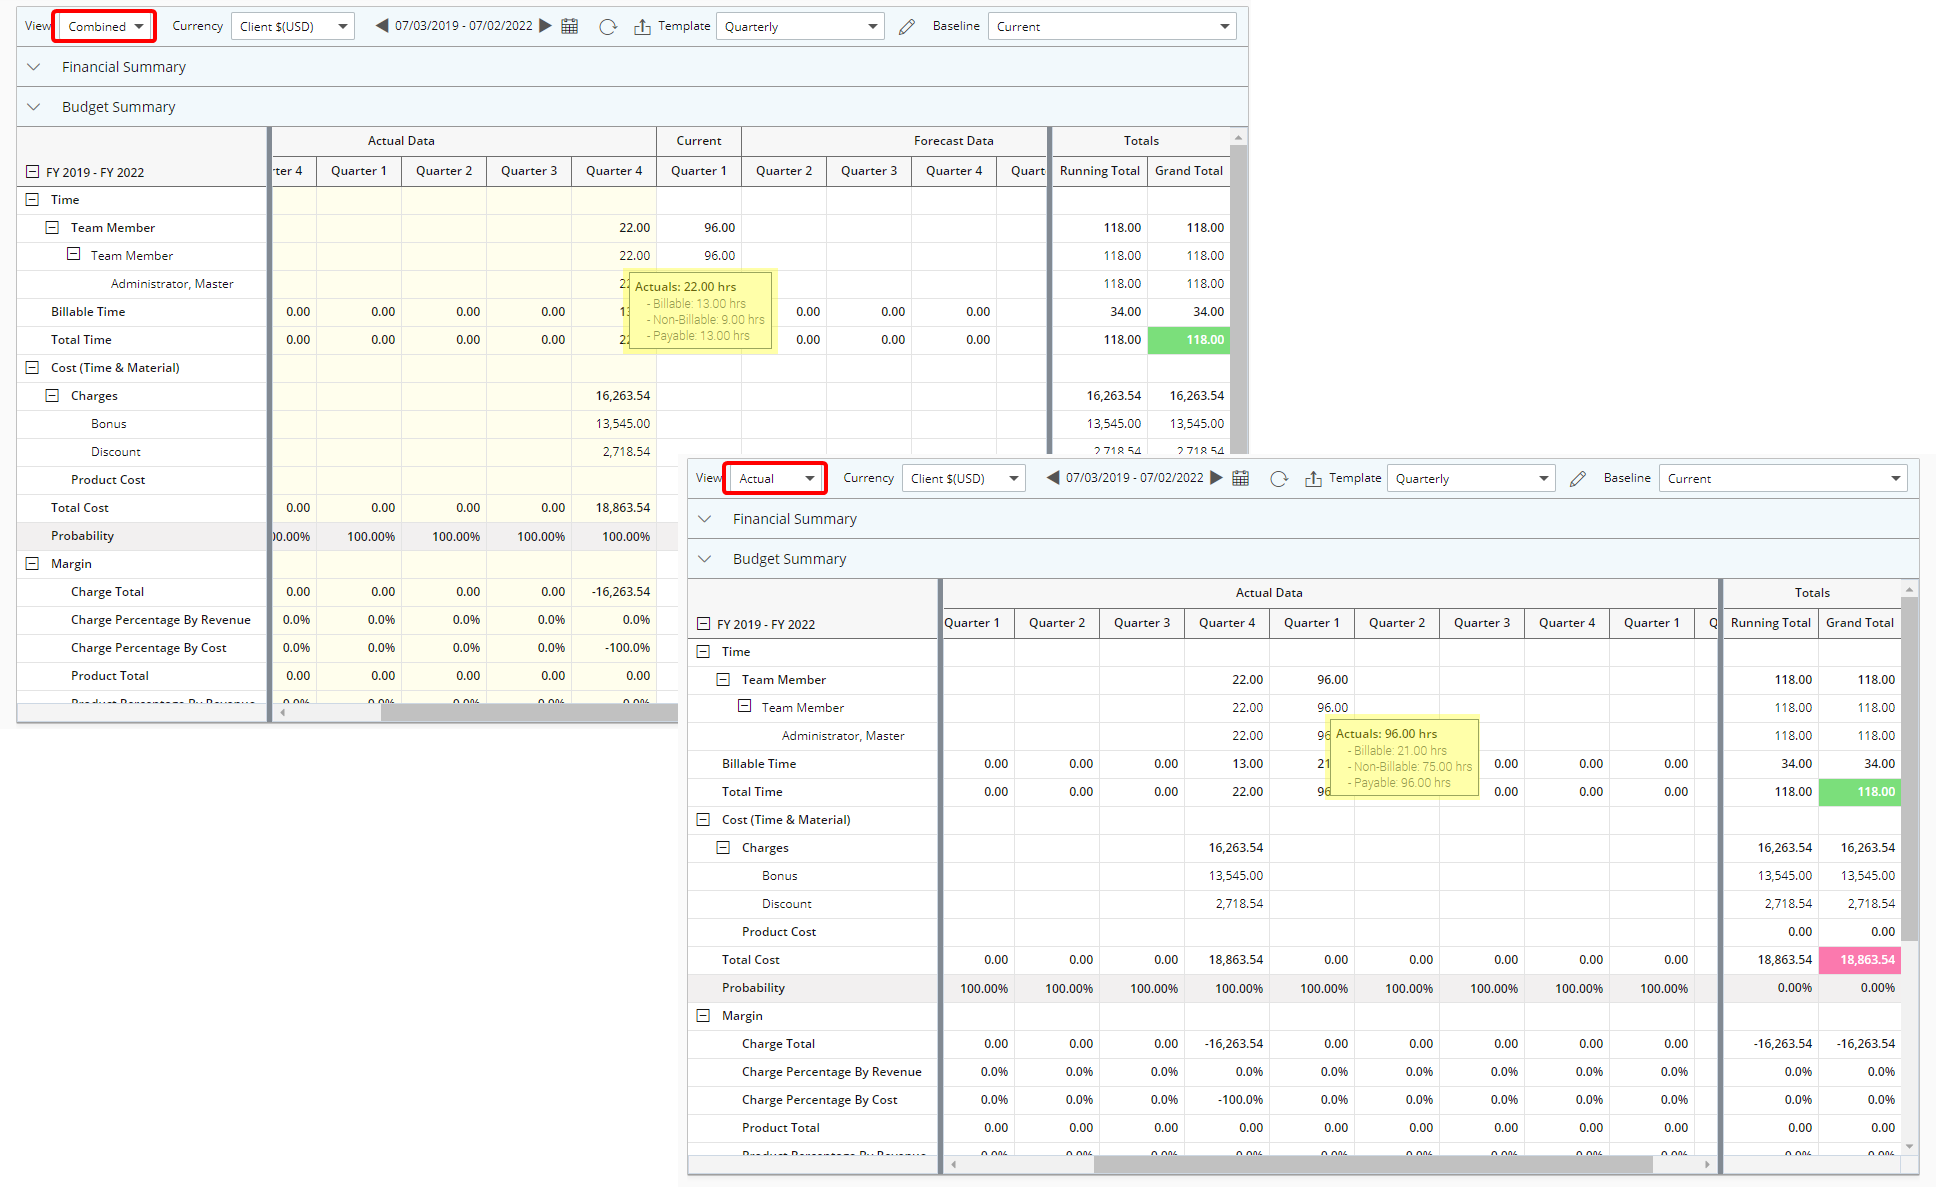
Description: When in Combined or in Actual View, upon hovering over a Time item under an Actual or Current column, the tooltip now displays the Non-Billable Hours.
Benefit: With this addition, the Non-Billable Hours for a period can easily and readily be viewed within the Financial Planner.
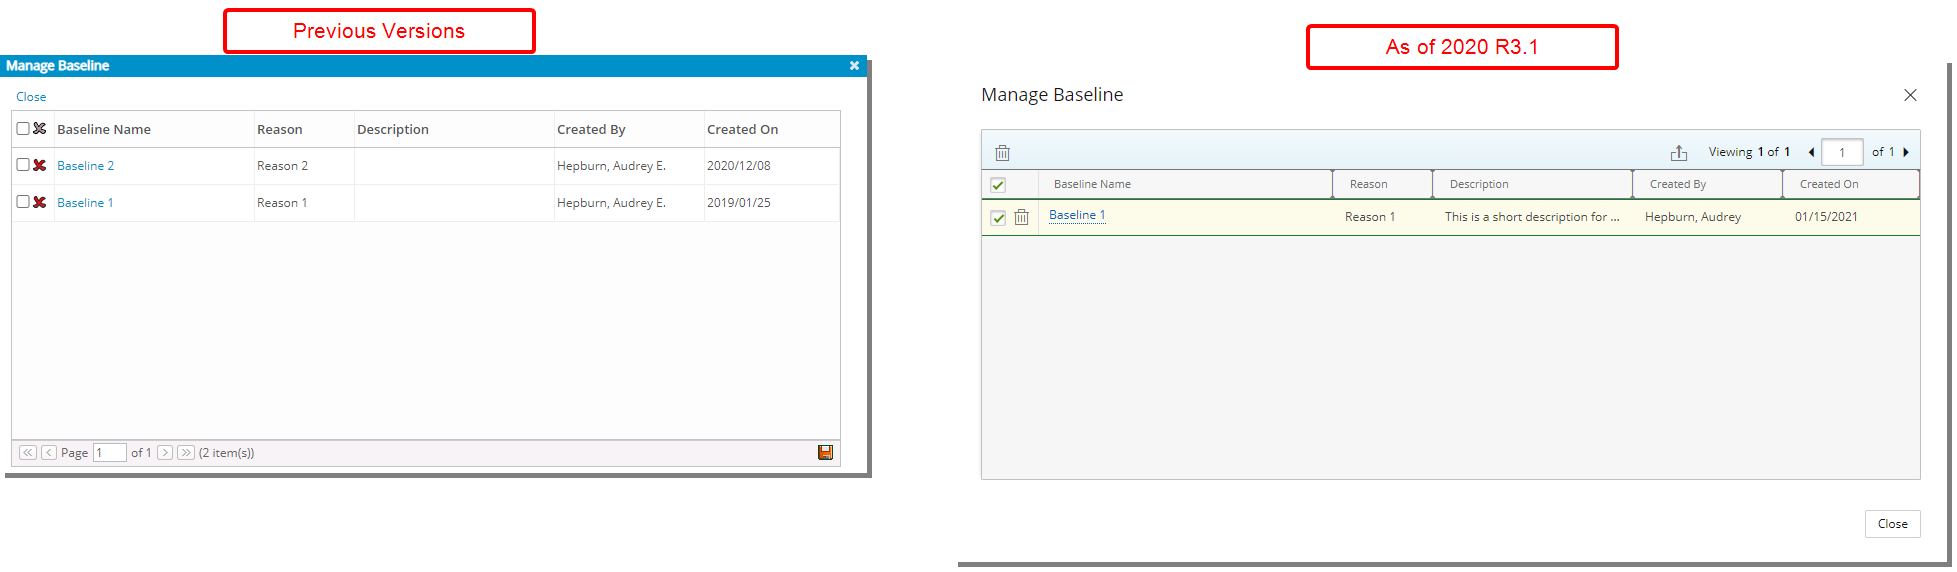
Description: The Manage Baseline dialog box has been redesigned to improve overall user experience and establish consistency across all pages. In addition, the following modifications were made:
- Updated Delete button now denoted by a trash bin.
- Updated and relocated Pagination to the upper right corner.
- Updated and relocated Export to Excel button to the upper right corner.
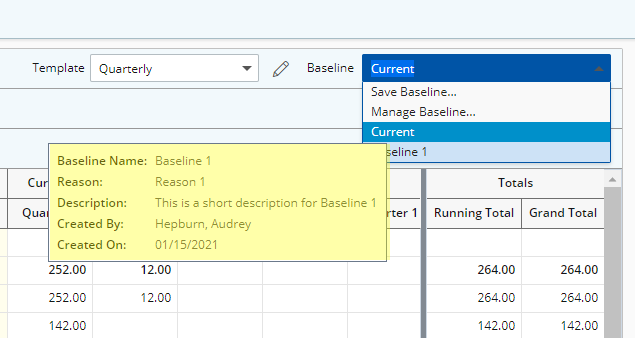
Furthermore, a tooltip has been added when hovering over the Baseline options list, allowing you to view the Baseline Name, Reason, Description, Created By and Created On information, without having to access the Manage Baseline dialog box.
For further details refer to Deleting a Baseline on the Financial Planner.
Integration
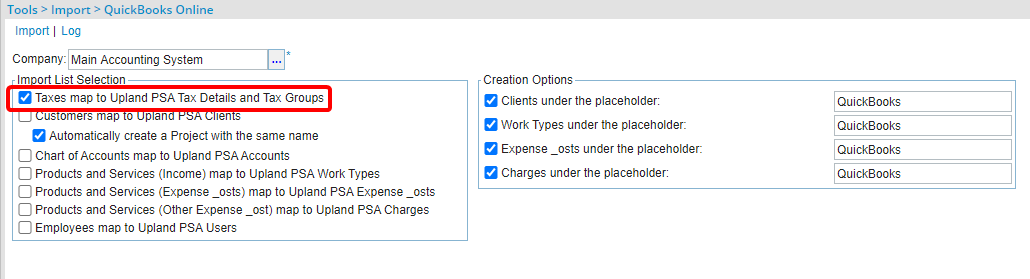
Description: The new option Taxes map to PSA Tax Details and Tax Groups has been added to the Quick Books Online Import (Tools > Import > QuickBooks Online). You can import Taxes from Quickbooks Online by selecting this option, mapping them to imported Clients.
Upon creating Invoices in PSA, you can then export them to Quickbooks Online (For non-US Companies only) where it is mandatory to choose a Tax for each Transaction line. These imported Taxes will be automatically mapped to each transaction line in Quickbooks Online.
Use case: Mark is tasked with setting up the PSA/QuickBooks Online integration so that while exporting Invoices, the imported Taxes can be automatically mapped to each transaction line in Quickbooks Online. He can easily accomplish this task by selecting the Taxes map to PSA Tax Details and Tax Groups option.
Note:
1. When exporting from PSA, you cannot add different Taxes for each Transaction line.
2. When importing taxes from Quickbooks Online, into PSA, two records will be inserted for each imported Tax rate (sales tax and purchase tax).
For further details refer to Importing Taxes from QuickBooks Online and Exporting Taxed Invoices to QuickBooks Online.
Leave Request Manager
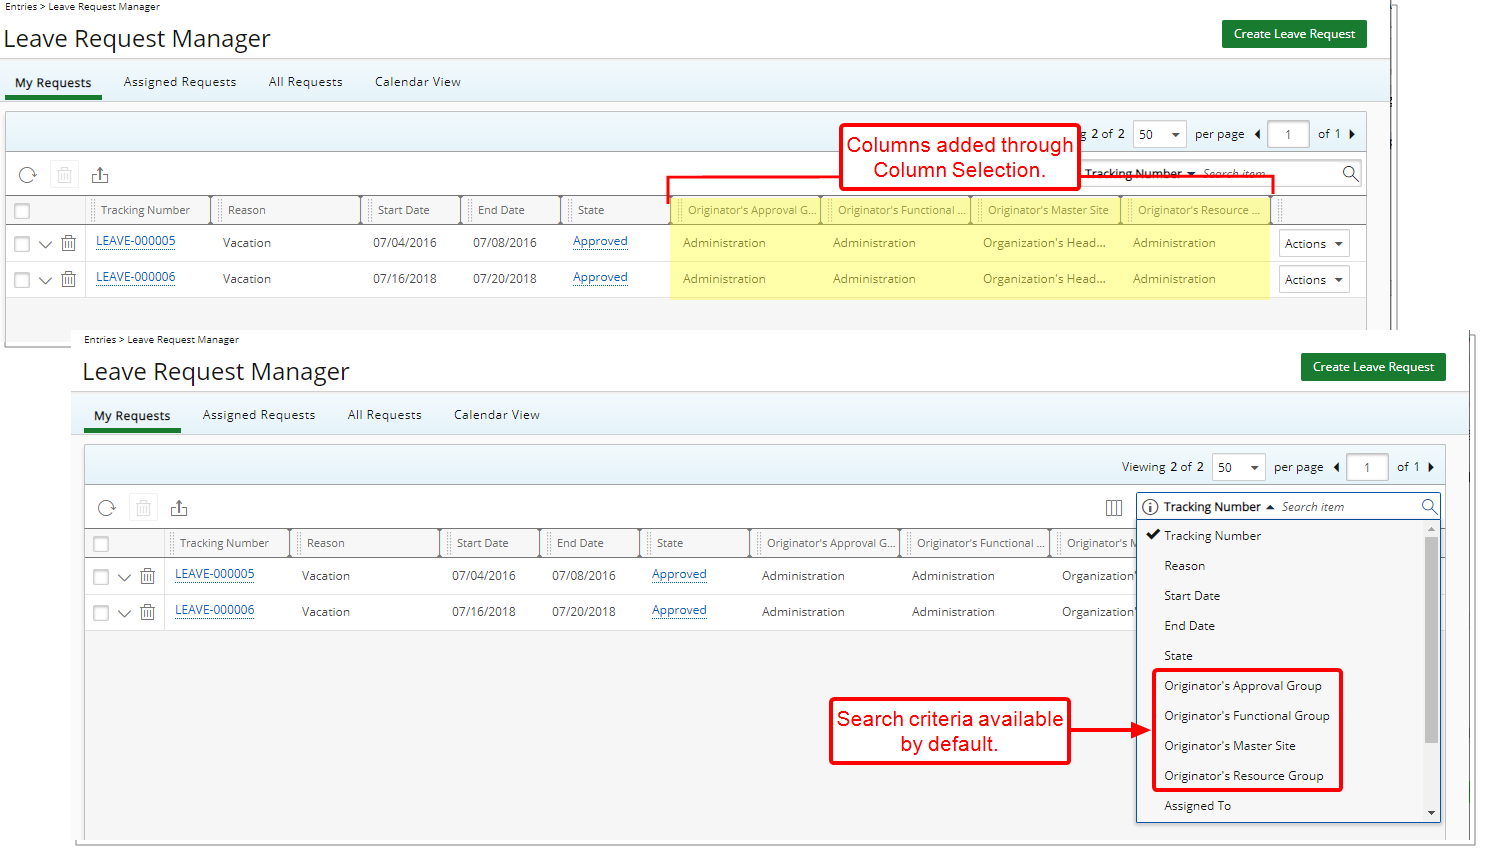
The following two improvements have been made to the Column configuration and Search capability available from the Leave Request Manager’s My Requests, Assigned Requests and All Requests tabs:
- You can now choose to add the Originator's Master Site, Approval Group, Functional Group and Resource Group as Columns.
Note: The new Column Selection options are not displayed by default under the tabs.
- You can now perform searches based on the Originator's Master Site, Approval Group, Functional Group and Resource Group.
Note: By default, the Originator's Master Site, Approval Group, Functional Group and Resource Group Search criteria are available for selection when performing a search under the tabs.
Benefit: The Originator's Master Site, Approval Group, Functional Group and Resource Group can now be readily available as a point of reference as needed.
For further details refer to:
- Adding New Columns on the Leave Request Manager (Entries)
- Column Selection Options | Leave Request Manager
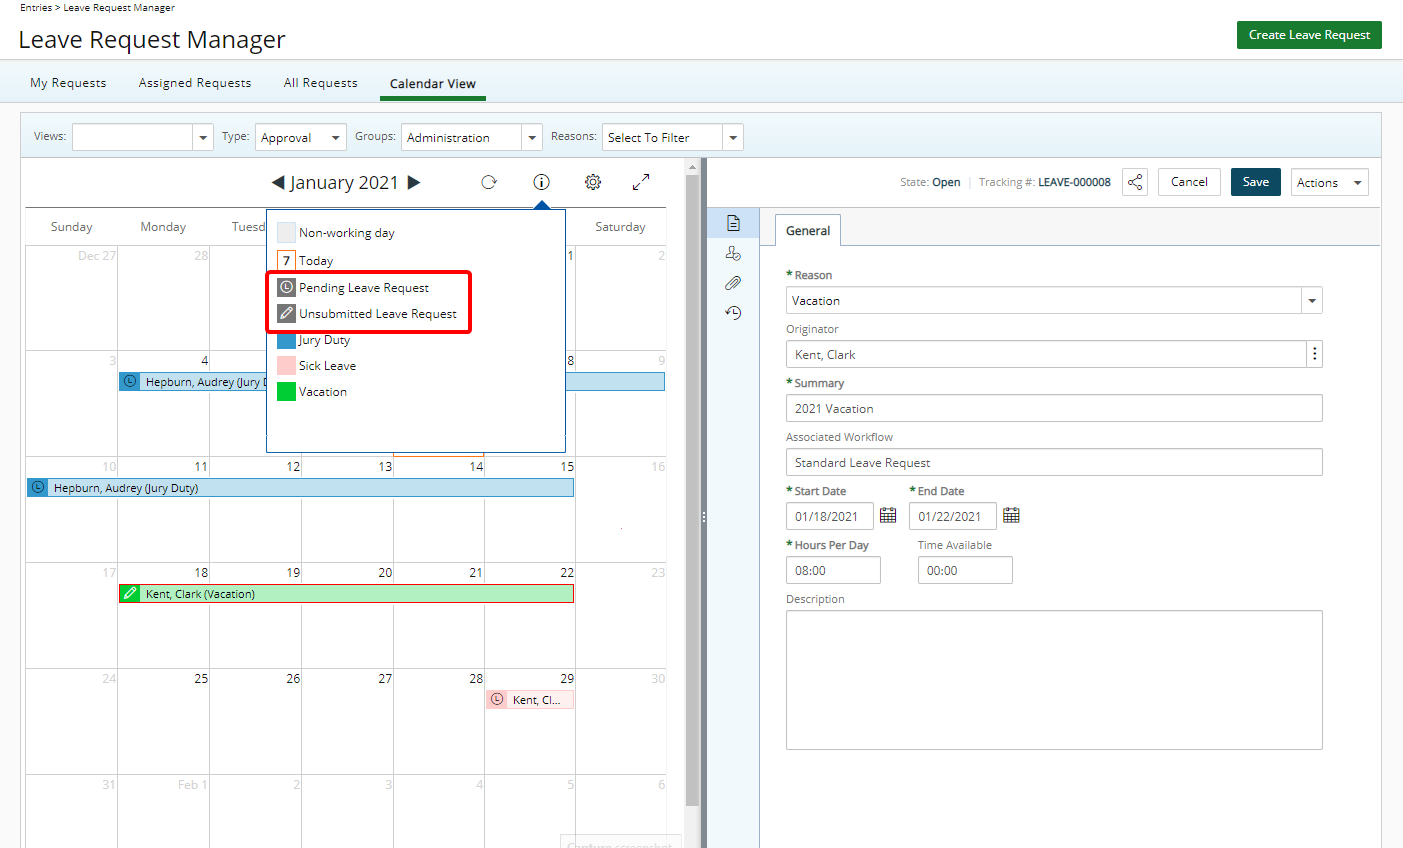
Description: A new icon is now displayed against Leave Request Entries to easily identify the Leave Requests that are pending submission.
Benefit: With this addition there is now a visual cue allowing you to distinguish between Leave Request Entries that are pending approval from those that are pending submission.
Caution: In upgraded environments, the Pending Leave Request icon may not display until the Leave Request Workflow is saved. Once reinitialized, the icon will be displayed for any new Leave Request(s).
Note: The background color of the Leave Request bar and the color of the icons displayed within the Calendar View can be modified for each Leave Time type from Setup > Timesheet > Leave Time.
For further details refer to:
- Available options within the Leave Request Calendar View
- The Group Leave Time Calendar
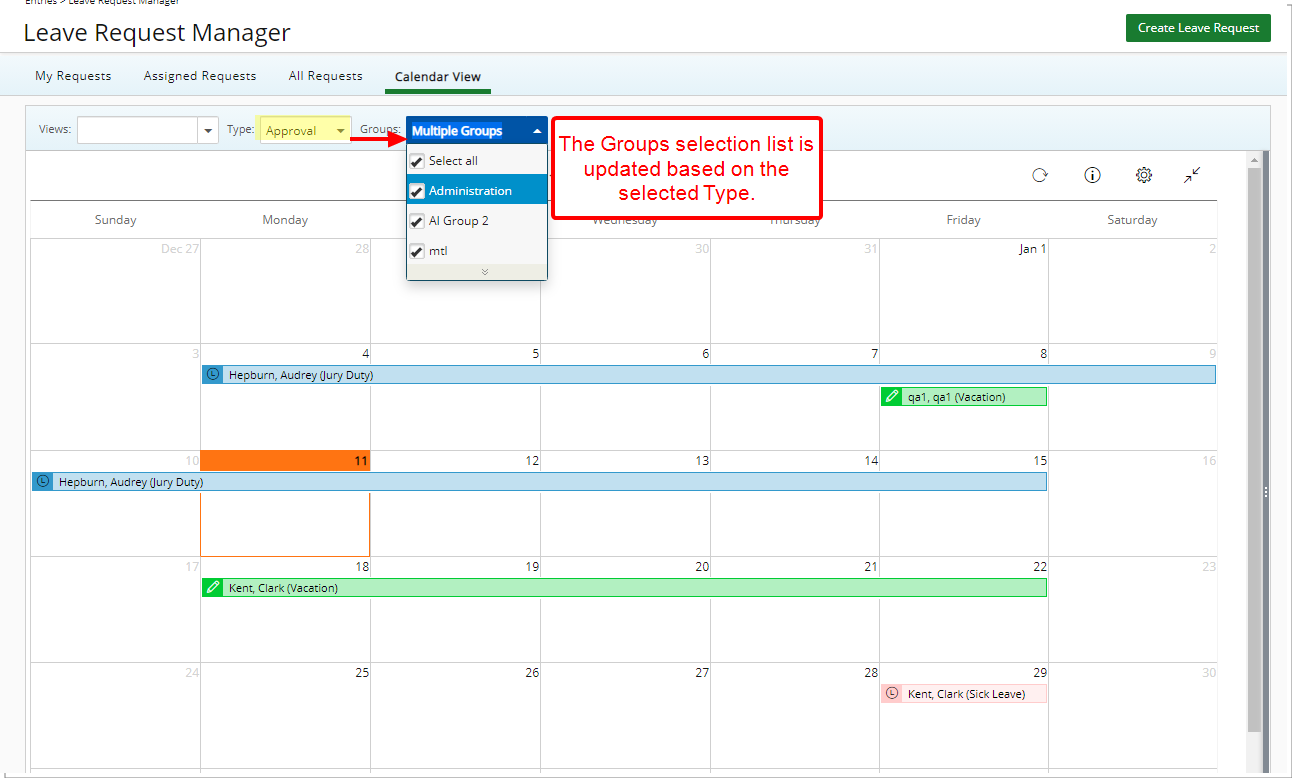
Description: Upon choosing a Group Type from the Calendar View, only the corresponding Groups are now listed within the Groups selection box.
Benefit: With this addition it is now easier to select the appropriate Group belonging to the chosen Group Type.
For further details refer to Available options within the Leave Request Calendar View.
Mobile
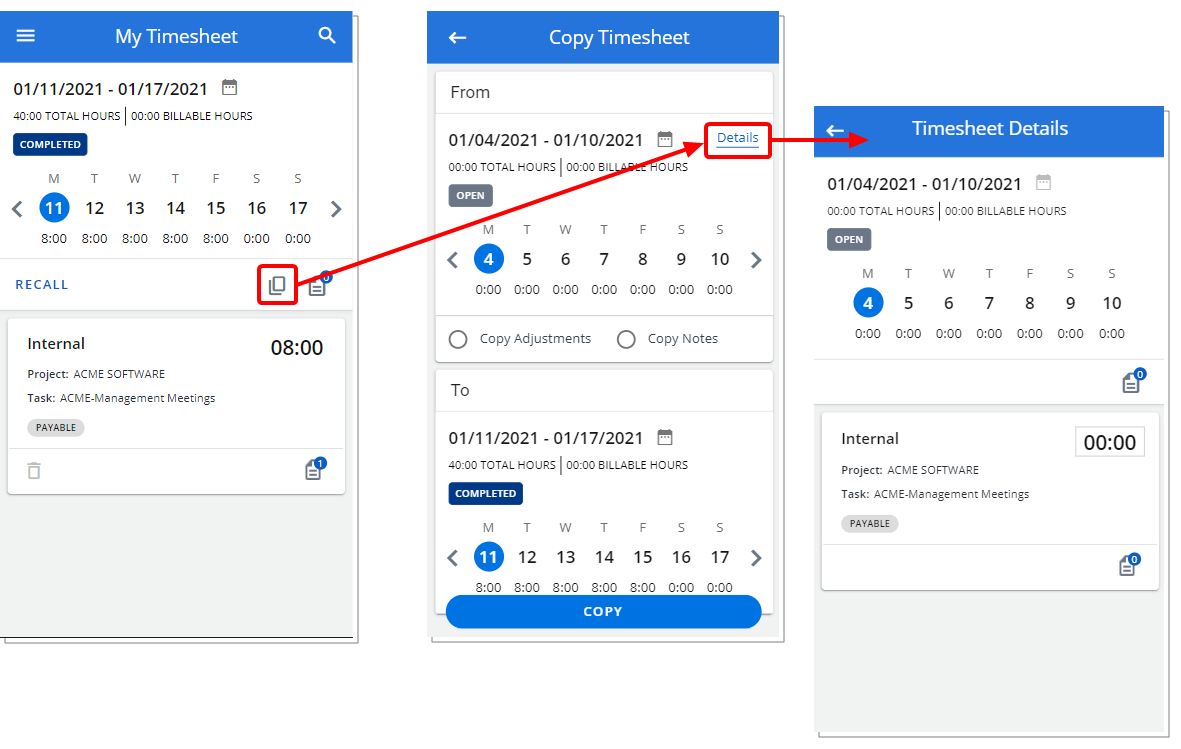
Description: When copying a Timesheet, you can now view the details of the source Timesheet you are copying by clicking the Details link.
Benefit: With this addition you can preview the details of the source Timesheet such as the Project and Tasks/Time Entries before proceeding to copy it.
For further details refer to Copying a Timesheet through PSA Mobile.
Organization Breakdown Structure (OBS)
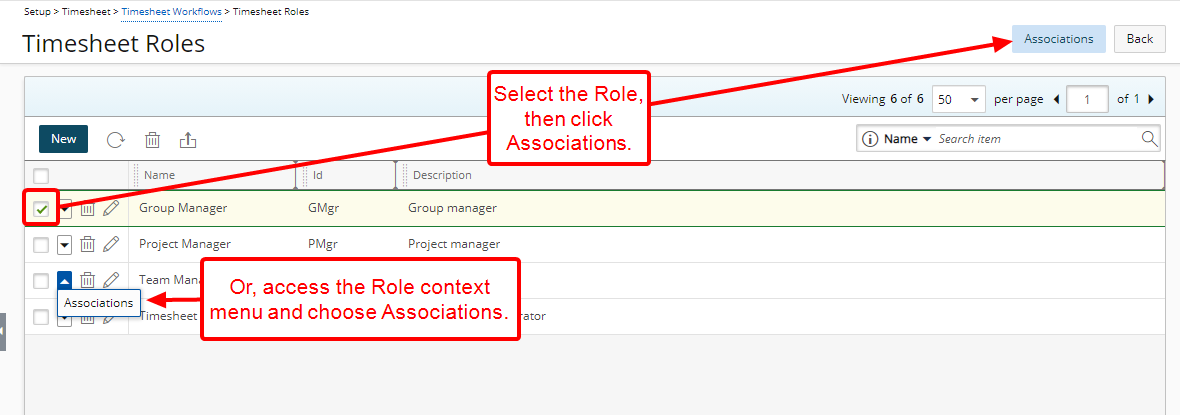
Description: Users can now be associated to a Workflow Role from the corresponding Workflow Role edit page by either:
- Choosing a Role and then clicking the Associations button.
Or - Accessing the Role context menu and then choosing Associations.
Benefit: Allows you to efficiently associate a Role to a User directly from the Workflow Roles edit page without having to navigate to the User profile page.
For further details refer to:
- Creating a Workflow Role
- Associating a Workflow Role to a User
Other

The PSA Logo and Logo icon have been updated to reflect the new Upland branding.
PSA now offers the ability to attach .eml file types throughout the application where Documents can be attached.
For further details refer to Accepted attachment file types in PSA.
Description: The My Entries and Approval pages located under Charges and Products have been updated to improve overall user experience and establish consistency across all pages. In addition to this improvement, the Column Selection capability was also enhanced wherein Associated User Defined Fields and the Description of the Charge Entry can now be added.
The following improvements have been made to Charges > My Entries:
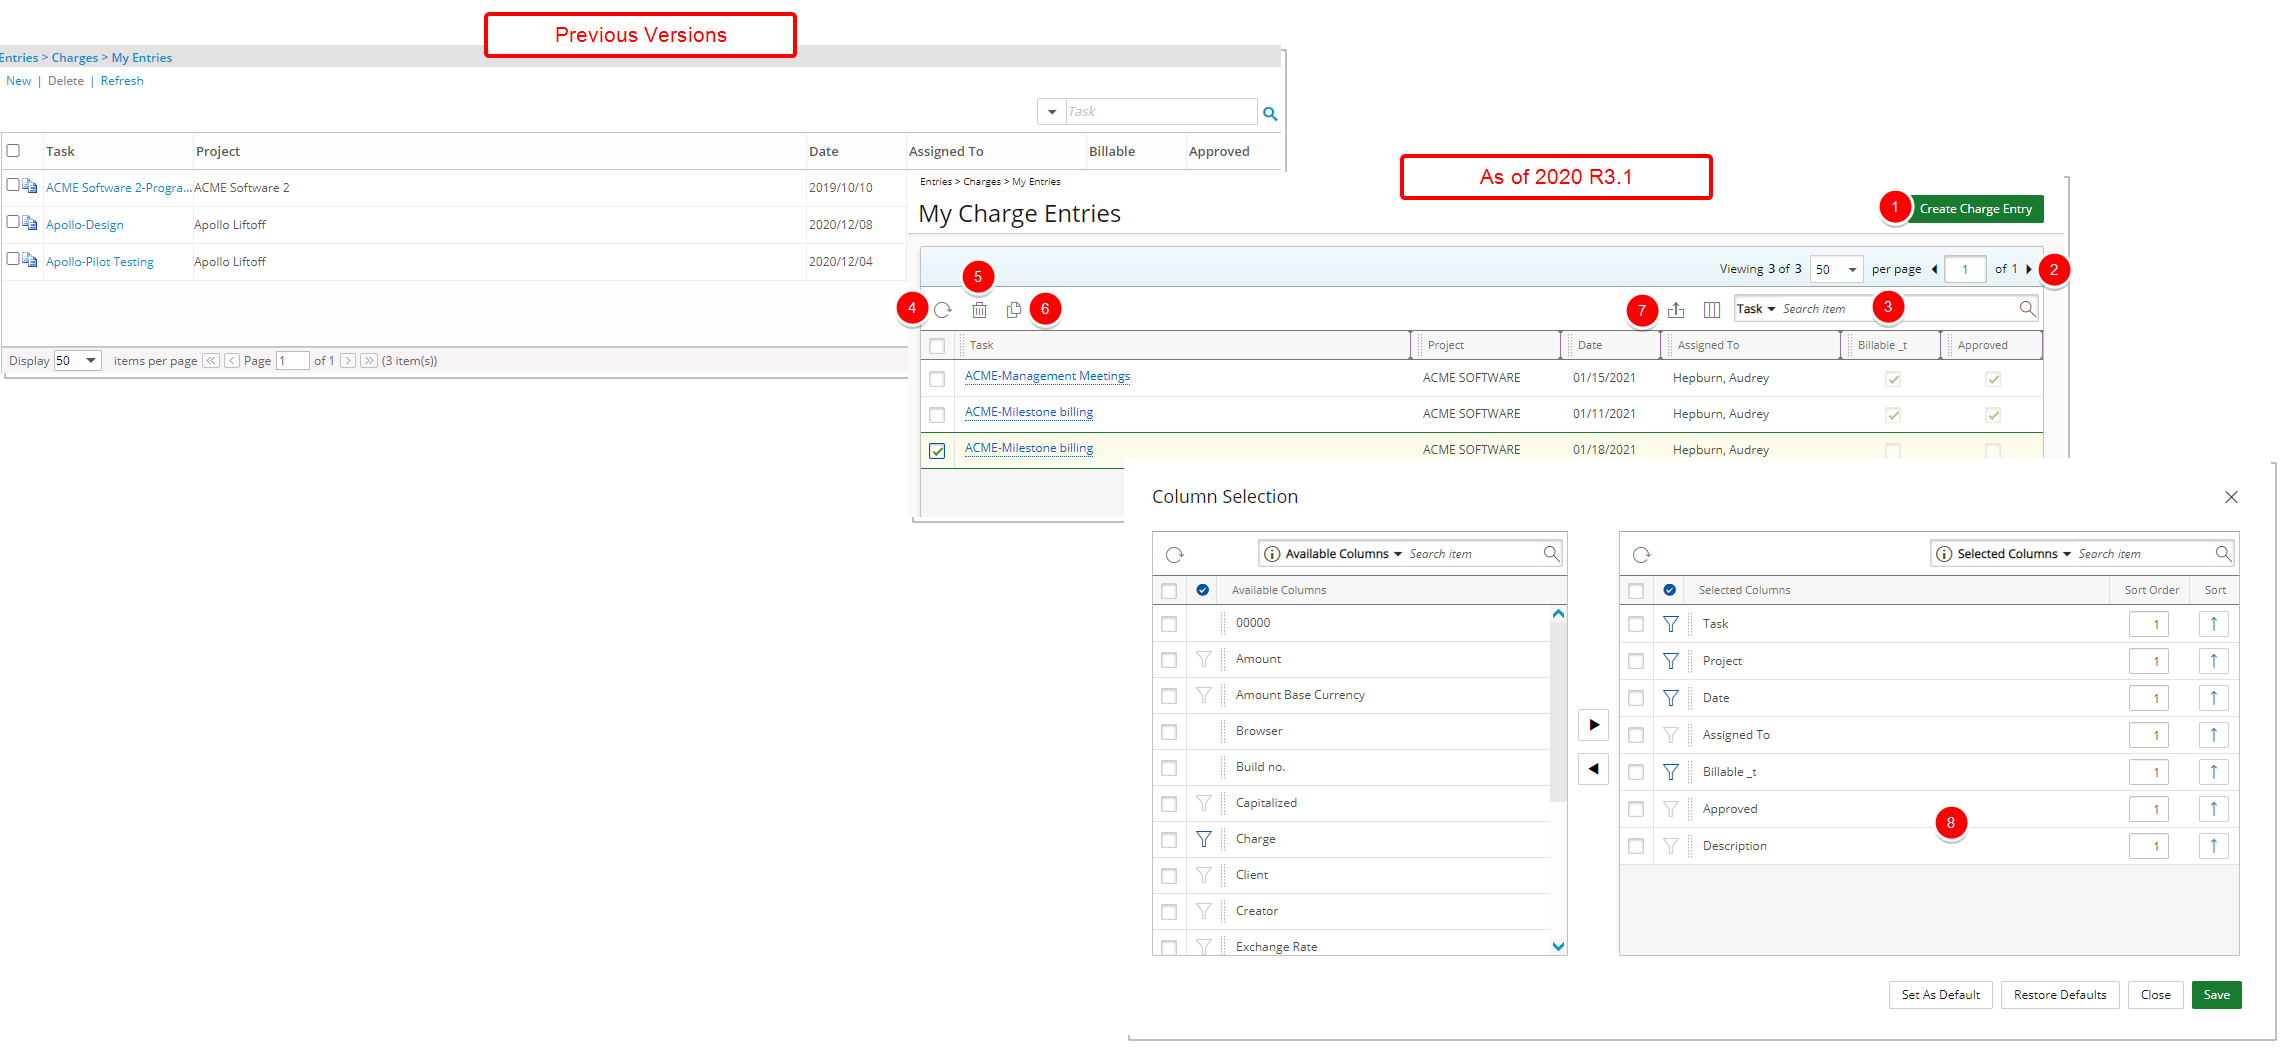
- The New link has been converted to a button that now reads Create Charge Entry and moved to the upper right corner of the page.
- Updated and relocated Pagination to the upper right corner.
- Updated Search box.
- Addition of Refresh button.
- The Delete link is now denoted by a trash bin.
- The Copy button was updated and moved to the header of the table.
- Updated and relocated Export to Excel and Column Selection buttons.
- Improved Column Selection capability wherein Associated User Defined Fields and the Description of the Charge Entry can now be added.
For further details refer to My Charge Entries list page.
The following updates have been made to Charges > Approval:
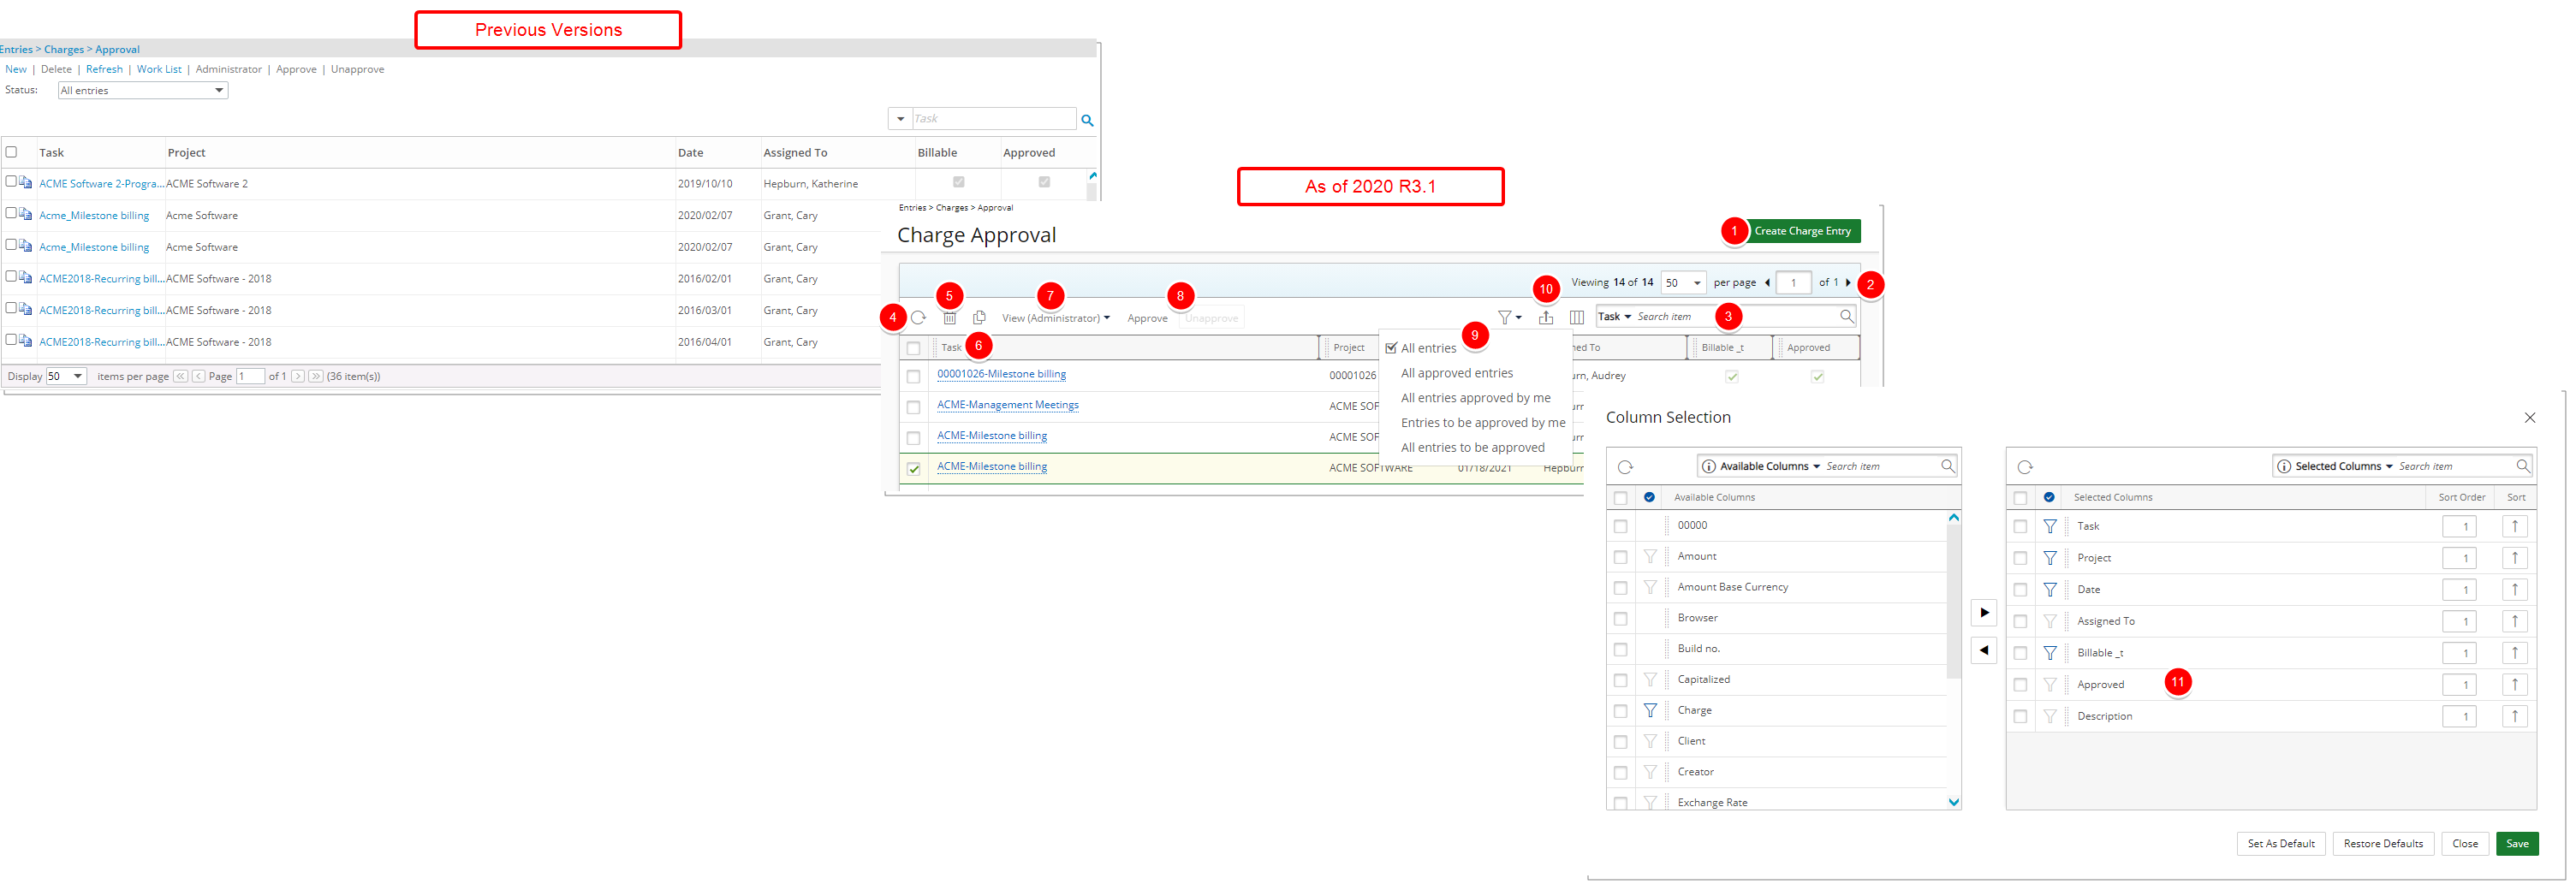
- The New link has been converted to a button that now reads Create Charge Entry and moved to the upper right corner of the page.
- Updated and relocated Pagination to the upper right corner.
- Updated Search box.
- Addition of Refresh button.
- The Delete link is now denoted by a trash bin.
- The Copy button was updated and moved to the header of the table.
- The Administrator and Work List are now located under View.
- Updated and relocated Approve and Unapprove buttons.
- The Status options previously located under the Status list box when in the Administrator View can now be found as Filters.
- Updated and relocated Export to Excel and Column Selection buttons.
- Improved Column Selection capability wherein Associated User Defined Fields and the Description of the Charge Entry can now be added.
For further details refer to Charge Approval list page.
The following updates have been made to Products > My Entries:
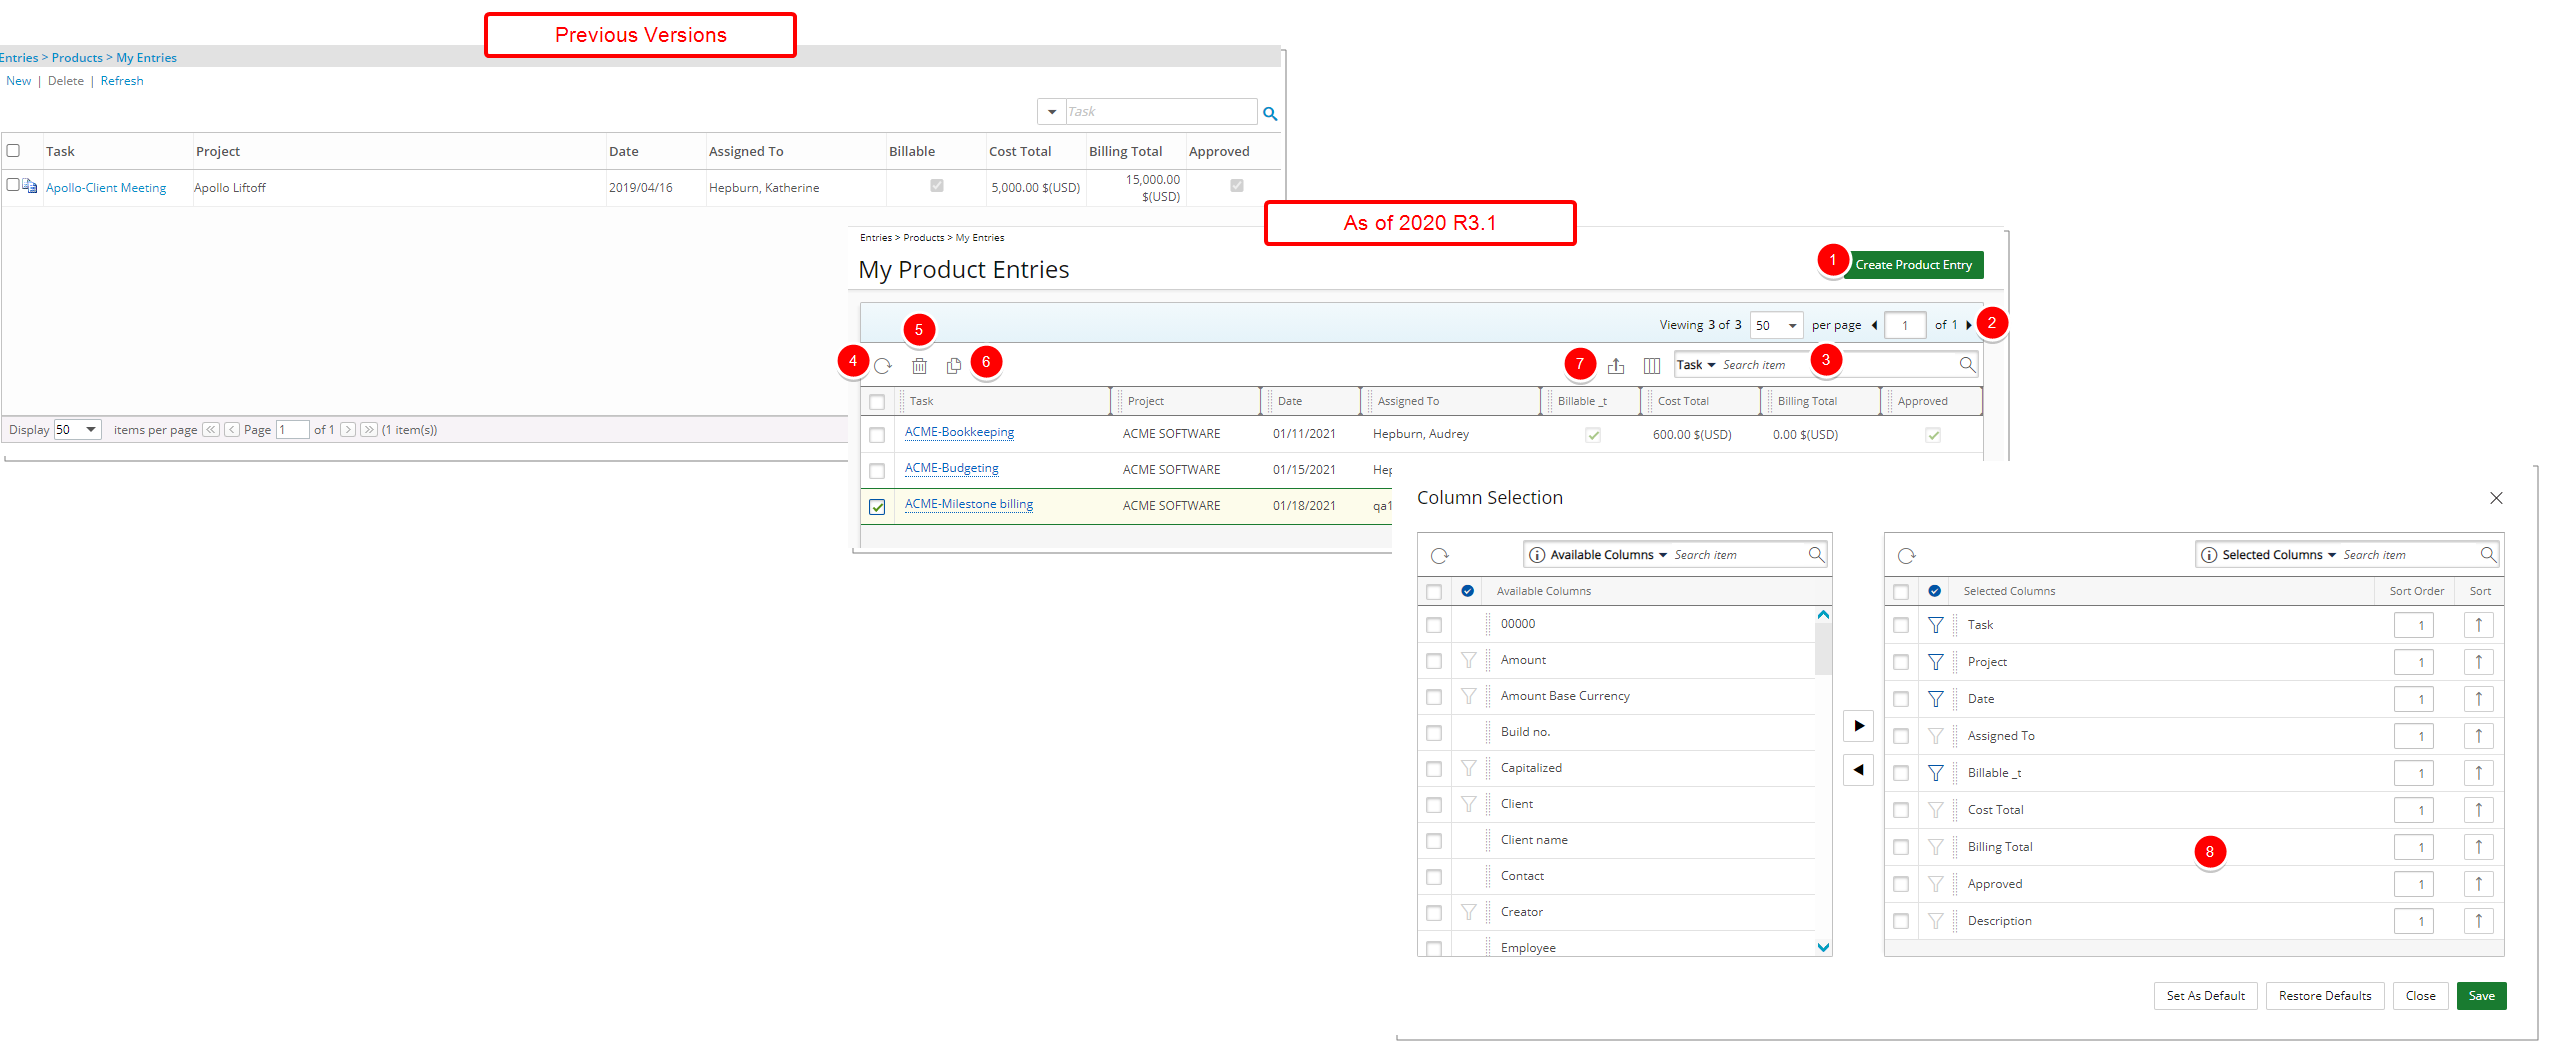
- The New link has been converted to a button that now reads Create Product Entry and moved to the upper right corner of the page.
- Updated and relocated Pagination to the upper right corner.
- Updated Search box.
- Addition of Refresh button.
- The Delete link is now denoted by a trash bin.
- The Copy button was updated and moved to the header of the table.
- Updated and relocated Export to Excel and Column Selection buttons.
- Improved Column Selection capability wherein Associated User Defined Fields and the Description of the Product Entry can now be added.
For further details refer to My Product Entries list page.
The following updates have been made to Products > Approval:
- The New link has been converted to a button that now reads Create Product Entry and moved to the upper right corner of the page.
- Updated and relocated Pagination to the upper right corner.
- Updated Search box.
- Addition of Refresh button.
- The Delete link is now denoted by a trash bin.
- The Copy button was updated and moved to the header of the table.
- The Administrator and Work List are now located under View.
- Updated and relocated Approve and Unapprove buttons.
- The Status options previously located under the Status list box when in the Administrator View can now be found as Filters.
- Updated and relocated Export to Excel and Column Selection buttons.
- Improved Column Selection capability wherein Associated User Defined Fields and the Description of the Product Entry can now be added.
For further details refer to My Product Approval list page.
Program Management

Description: A Filter button is now available within the Associate Projects page whereby you can refine the list of Projects displaying based on any or a combination of Active and/or Suspended state.
Benefit: You can now conveniently filter the list of Projects based on any of aforementioned choices.
Note: By default, the Active Filter option is selected.
For further details refer to Associating Project(s) to a Program.

Description: A See More link has been added to the descriptive tooltips when hovering over the Key Performance Indicators within the Programs Columns Selection dialog box as well as the KPI Columns available from the Programs list page. Clicking the See More link from these tooltips will open the online help article for further details.
Benefit: With this addition Users can readily see the corresponding description and access the online help for further details when necessary.
For further details refer to:
- Out-Of-The-Box Column Selection options | Program List
- Key Performance Indicators in PSA
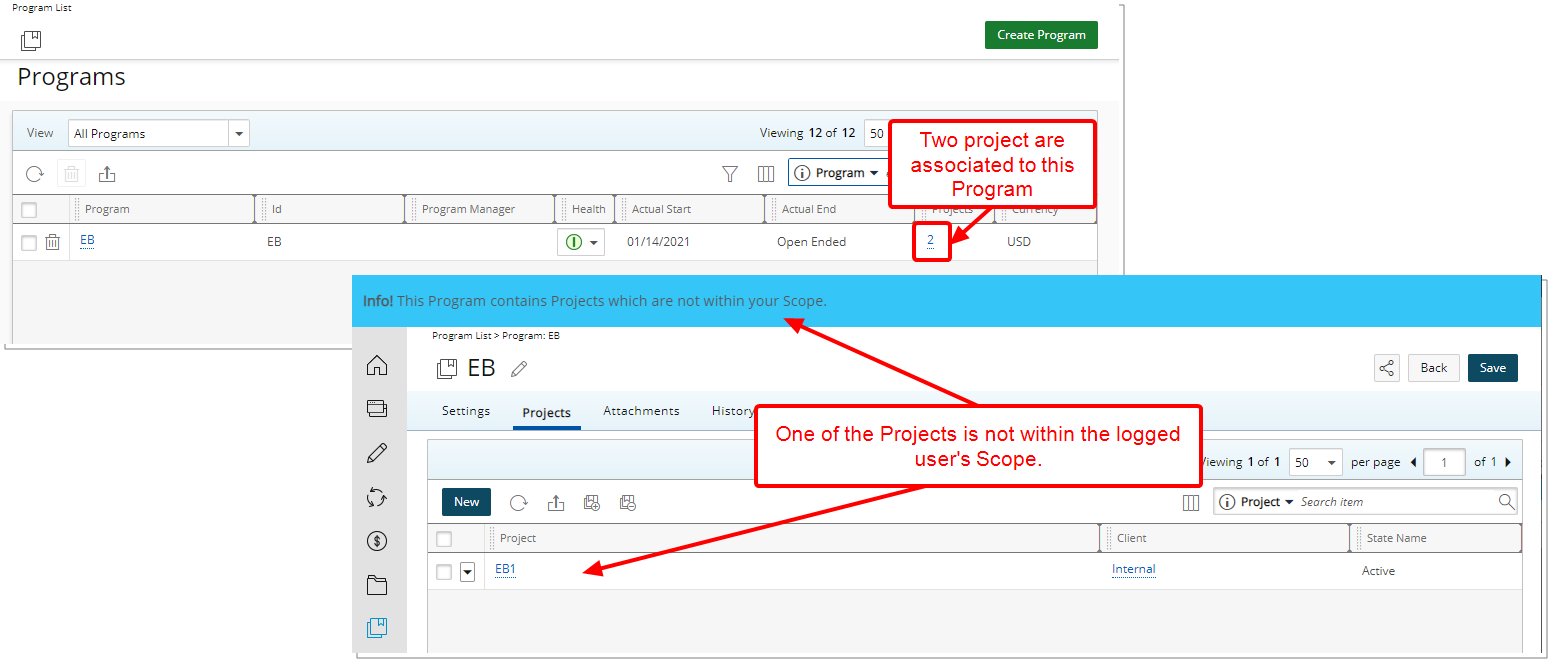
Description: Upon accessing a Program’s Projects tab with Project Associations out of your Scope, an information bar is now displayed informing you that: This Program contains Projects which are not within your Scope.
Benefit: The information bar provides clarification as to why some Projects may not appear within the Projects tab.
For further details refer to Associating Project(s) to a Program.
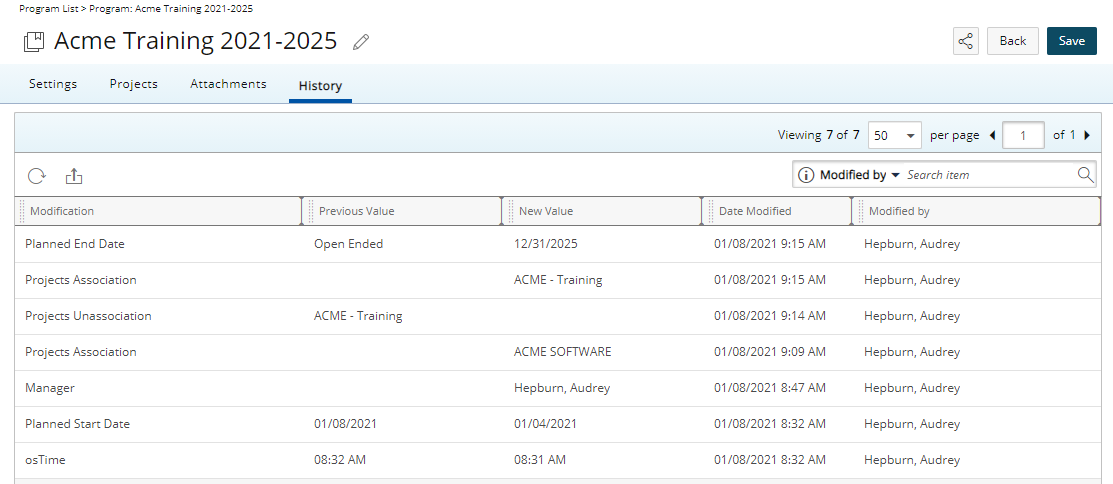
Description: A new History tab is now available within the Program Edit, detailing the changes made to the Program including the Modification, Previous Value, New Value, Date Modified and Modified by, when the new Program Detailed Auditing option (under Setup > Work) within the Audit Trail setup area is turned on.
From the History tab, you can also export the History to Excel, Refresh the list and Search based on Modified by criterion.
For further details refer to:
- Program History tab
- Program Detailed Auditing
Project Management

Description: A new preview button located to the left of the Invoice# within the Invoices tab of the Milestones, Team Members and Invoices section in Project Overview has been added. When clicked, the corresponding Invoice Report is displayed.
Benefit: With this addition, associated Project Invoices can easily and readily be viewed from the Project Overview, by users with the View right to Invoice, eliminating the need to navigate to the Invoice Manager page.
For further details refer to Previewing a Project Invoice Report from the Invoices tab of Project Overview.
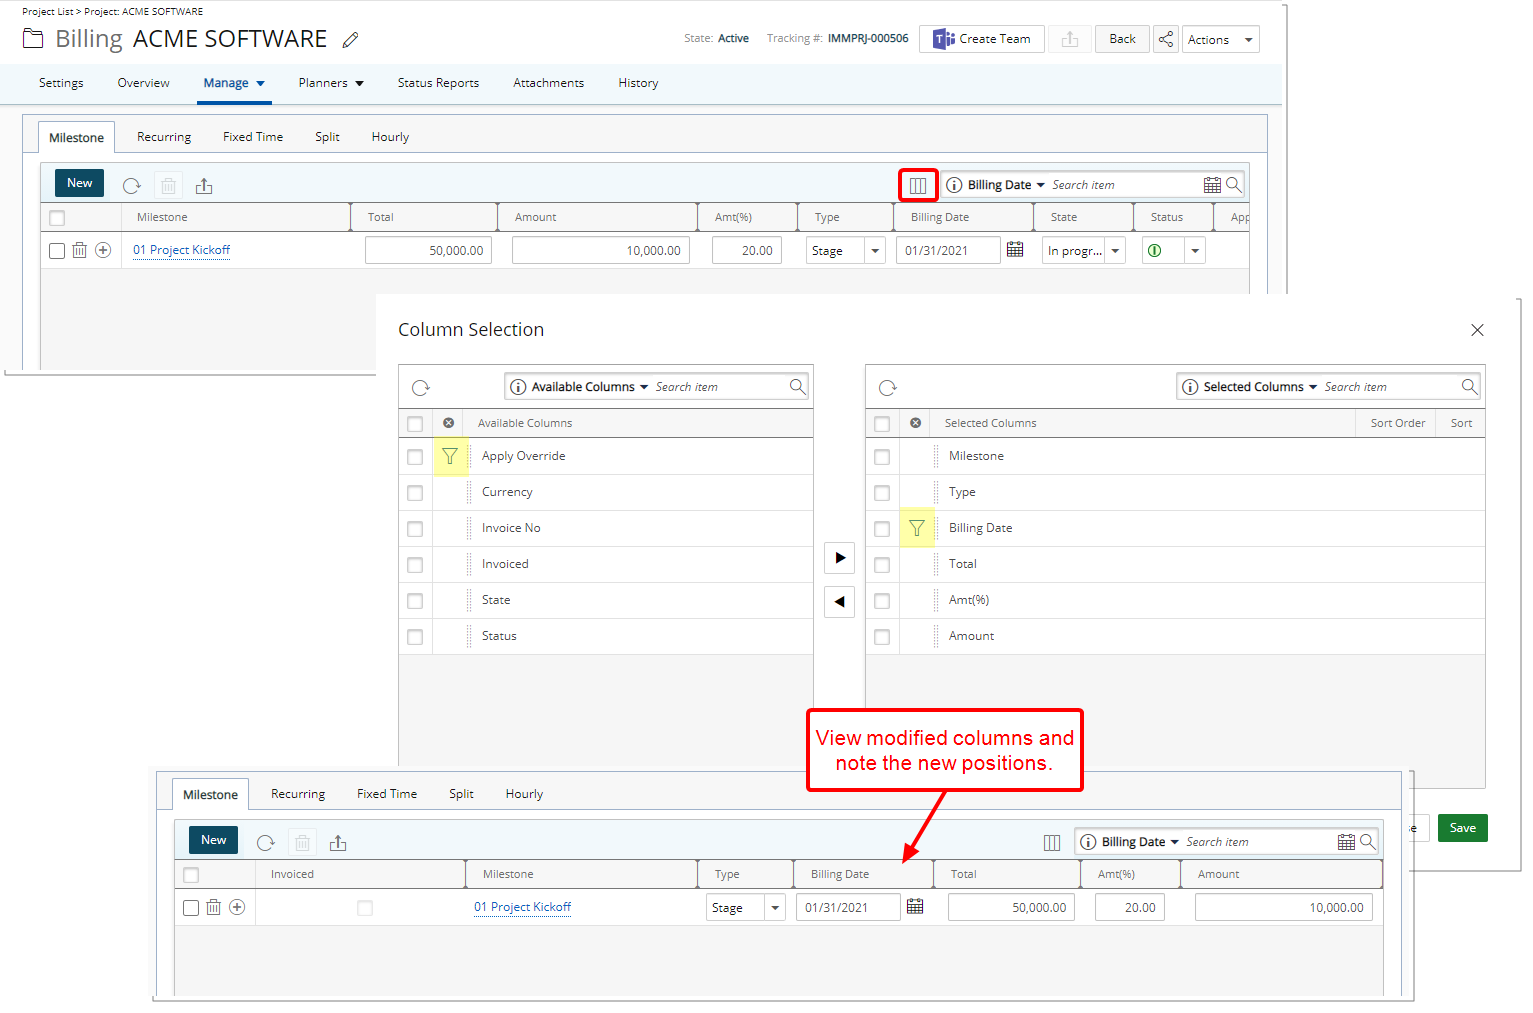
Description: With the addition of the Column Selection button located within the Milestone tab of Project Billing, you can now configure the columns based on your requirements.
The following columns are displayed by default: Milestone, Total, Amount, Amt(%), Type, Billing Date, State, Status, Apply Override, Currency and Invoice No. You can choose to add the Invoiced column.
You can opt to set the Search Filter criteria based on the following two options: Billing Date and Apply Overtime.
Furthermore, the columns order can be modified through the Column Selection dialog box.
Note: The Milestone column cannot be removed and must be displayed within the table. Regardless of the selected Columns, all business rules and calculations function as the way they did prior to this release.
For further details refer to Project Milestone Billing Rule page.
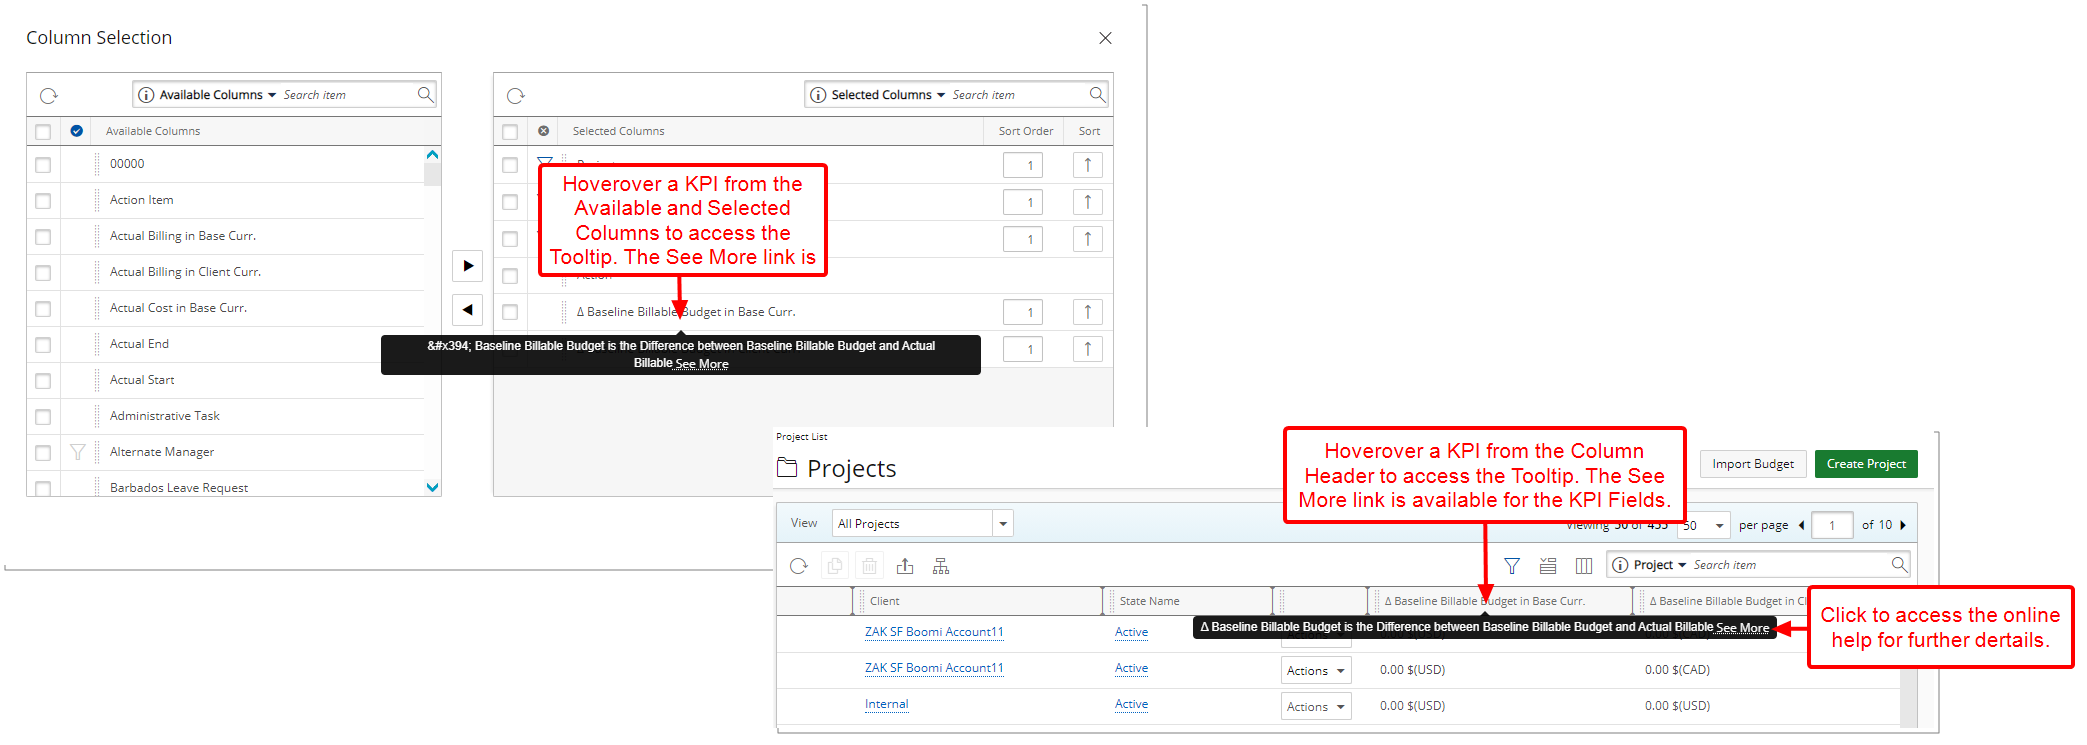
Description: A See More link has been added to the descriptive tooltips when hovering over the Key Performance Indicators within the Project List Columns Selection dialog box as well as the KPI Columns available from the Project List page. Clicking the See More link from these tooltips will open the online help article for further details.
Benefit: With this addition Users can readily see the corresponding description and access the online help for further details when necessary.
For further details refer to:
- Out-Of-The-Box Column Selection options | Project List
- Key Performance Indicators in PSA
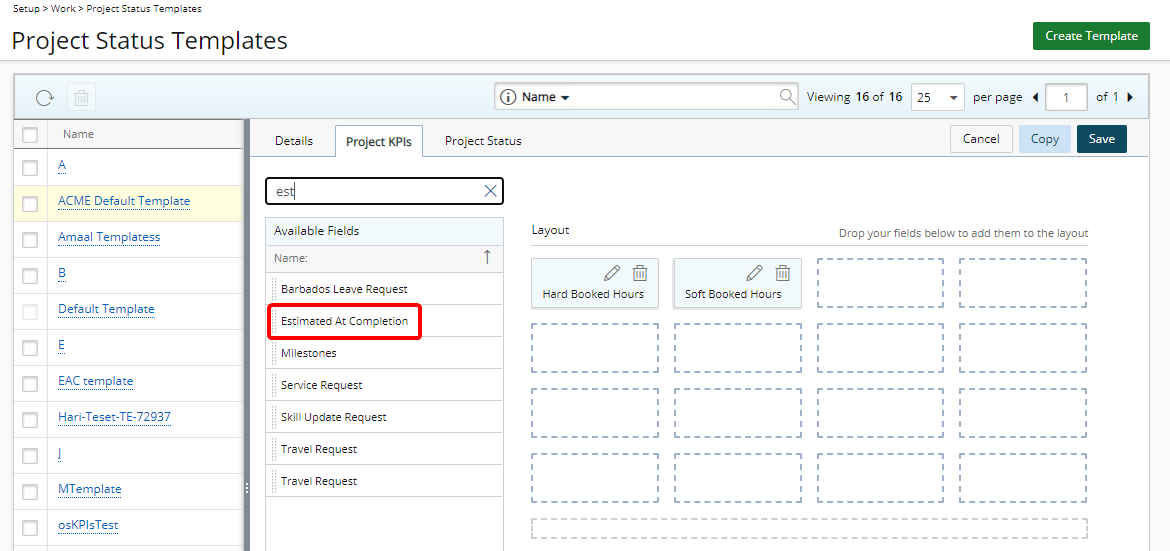
Description: A new Project Estimated at Completion (EAC) option has been added to the Available Fields for Project KPIs.
The Estimated At Completion (EAC) KPI is the total number of hours expected to be spent when the Project is completed.
Note: The origin of the Estimated At Completion (EAC) value is from the Time Category within the Financial Planner. N/A will be displayed for any Projects where the Financial Planner has not been initialized or if the Time Category is not present.
For further details refer to Available Fields from the Project KPIs tab.
Description: The Time values within the Project Budget are now inline with those of the Work Plans and the Financial Planner wherein they now display as decimal format (hh.00) instead of time span format (hh:mm).
Benefit: With this improvement the display Time is now standardized across the Work Plans, Financial Planner and Project Budgets.
Project Status Reporting
Description: A See More link has been added to the descriptive tooltips when hovering over the Key Performance Indicators when associating Project KPIs to a Project Status Report Template as well as the KPI information icon located within the Project Status Report Entry. Clicking the See More link from these tooltips will open the online help article for further details.
Benefit: With this addition Users can readily see the corresponding description and access the online help for further details when necessary.
For further details refer to Available Fields from the Project KPIs tab.
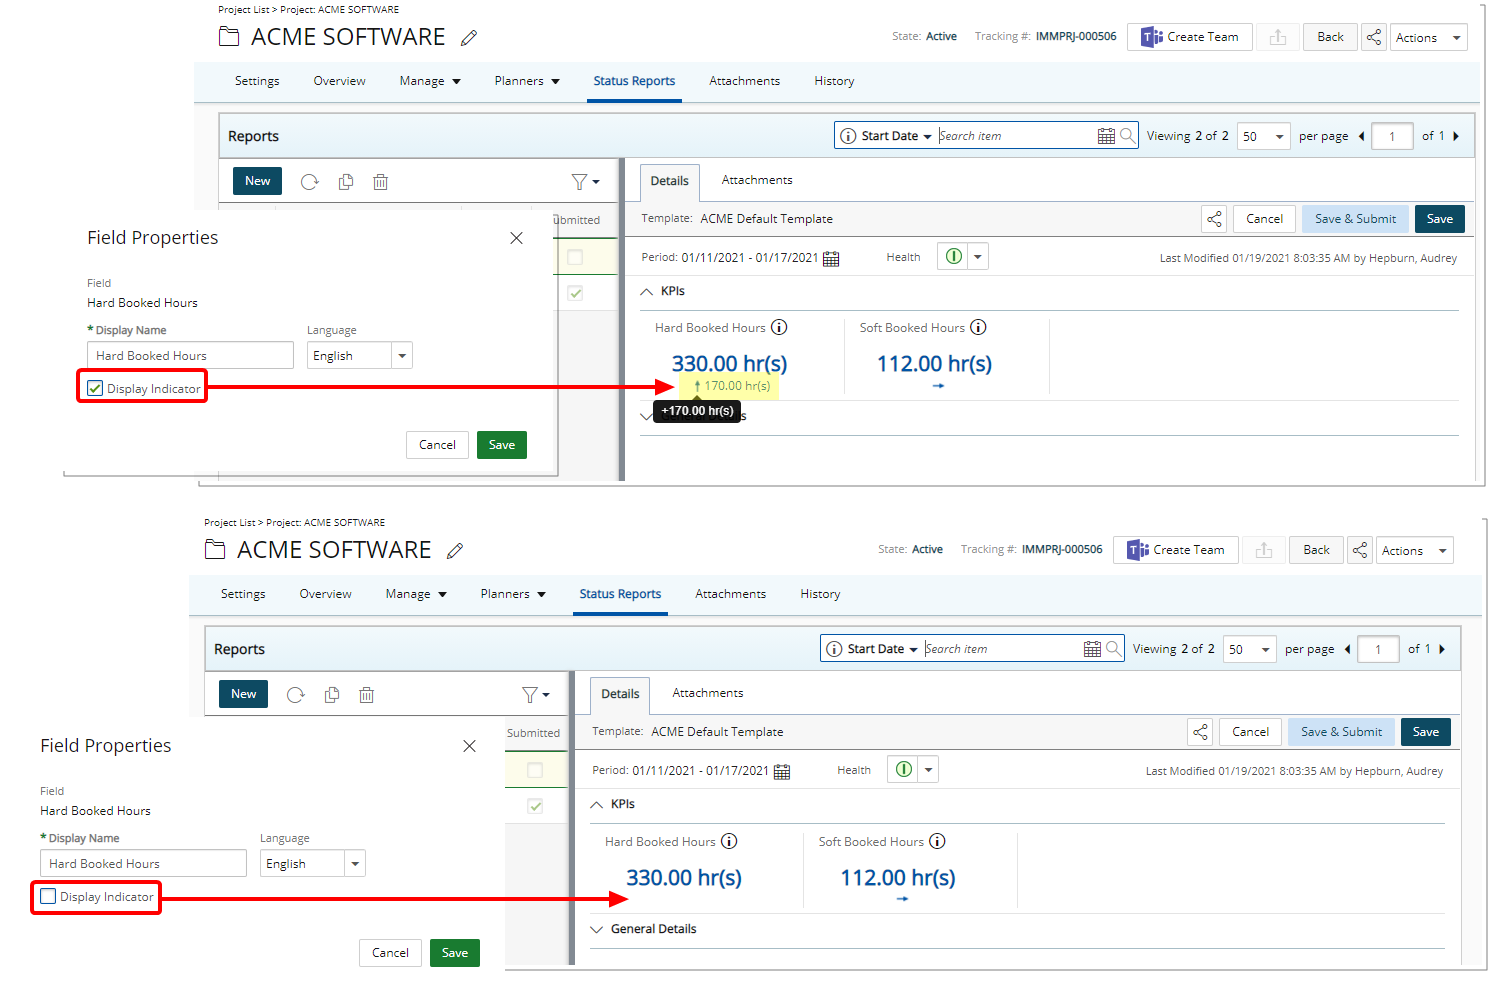
Description: With the addition of the Display Indicator option within the Field Properties dialog box when modifying a Project KPI Field in a Project Status Template, you can now choose to display or hide the visual Indicator and corresponding change value.
Benefit: The addition allows you to choose to either hide or show all KPI Indicators or only selected ones.
Note: The Display Indicator option is selected by default.
For further details refer to Showing/hiding the Project Status Reporting KPI Indicators.
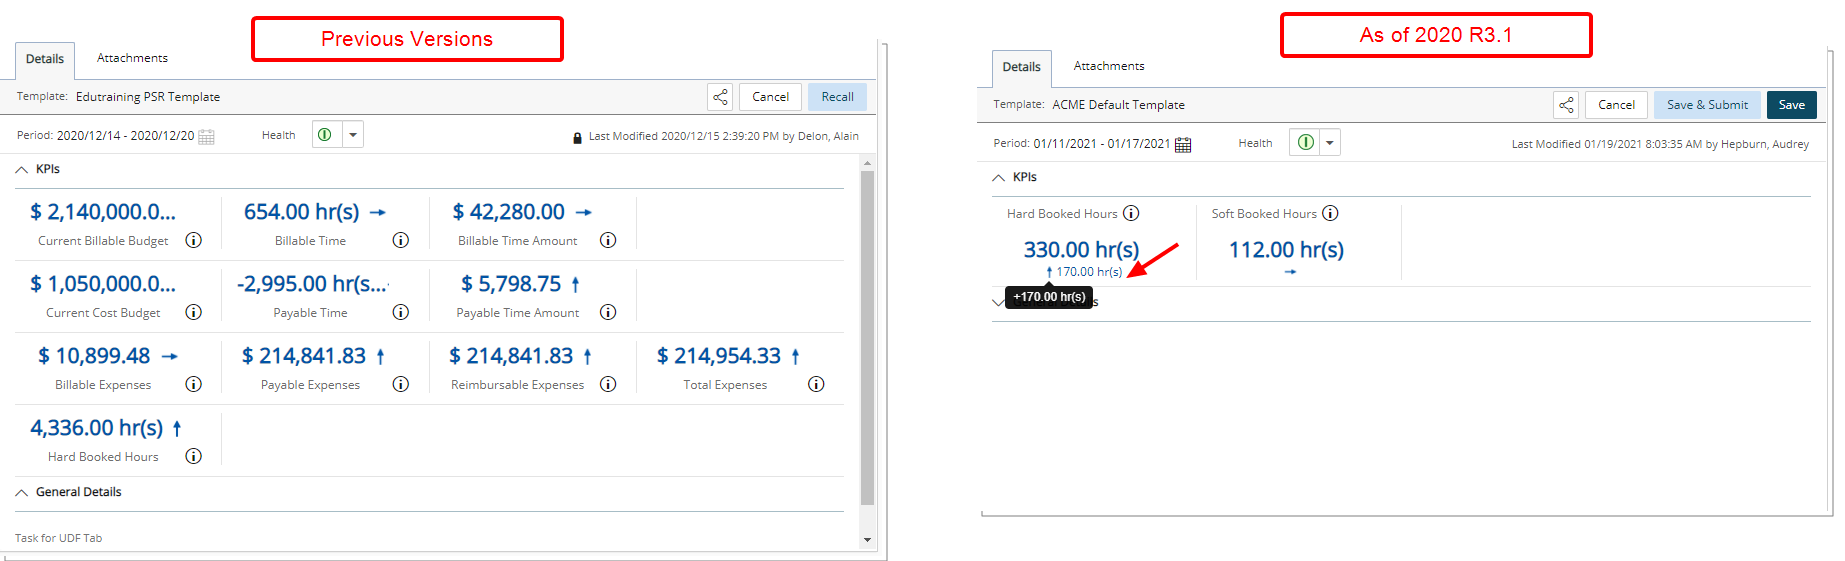
Description: The Project KPIs indicators have been moved below the Fields and now indicate the +/- change upon hovering your mouse over the up or down arrow. Furthermore, the KPI name as well as the information icon were moved above the KPI.
Benefit: Allows you better visibility of the changes in your Project’s KPIs.
For further details refer to Creating a Project Status Entry.
Resource Management
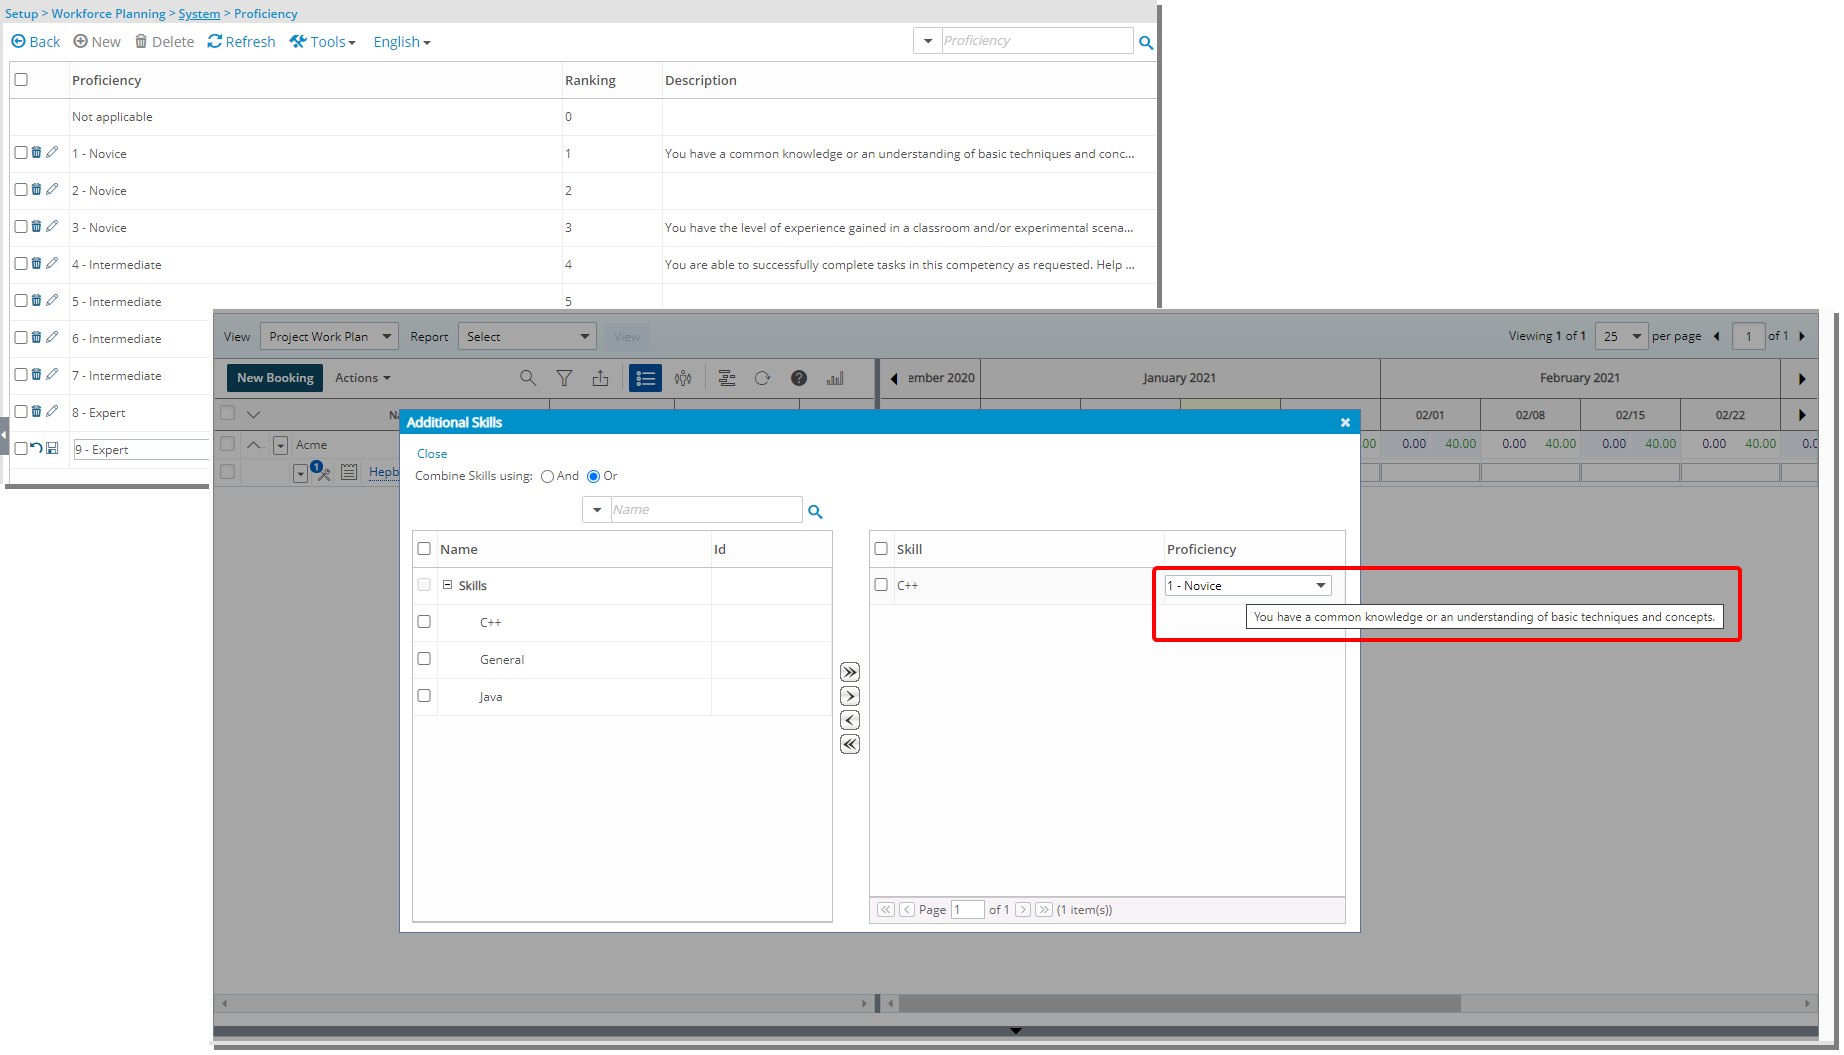
Description: When creating/modifying a Proficiency you now have the option to enter a Description containing a maximum of 512 characters.
The corresponding Description is displayed as a tooltip when hovering over Proficiency list items when adding/modifying Skills to a Booking or Resource Request within the Work Plans.
For further details refer to Adding a new Skill Proficiency.
Description: A new option has been added to the Workforce Planning System page allowing you to turn on the Heat Map by default for all Users or only for any newly created ones.
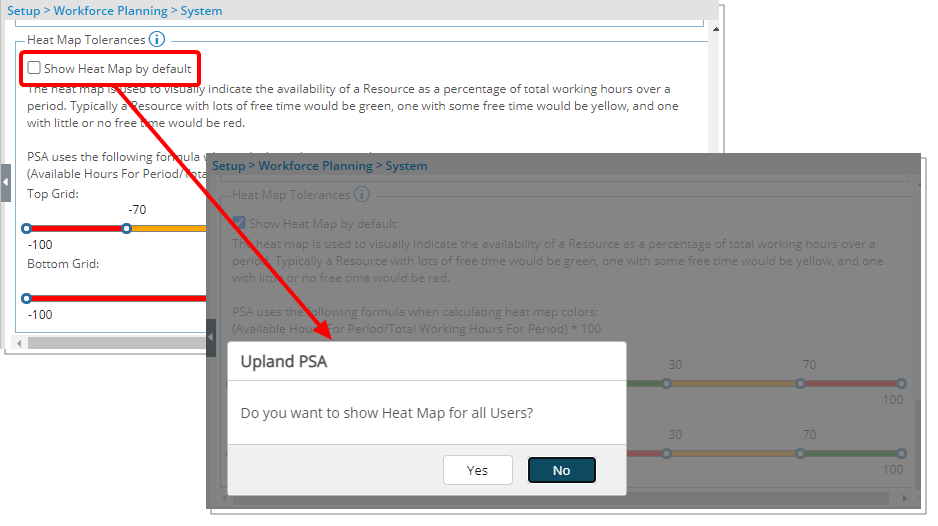
Upon selecting the Show Heat Map by default option, a confirmation box will appear asking you: Do you want to show Heat Map for all Users?
- Selecting Yes will result in the Heat Map to be turned on for all existing and any new Users that will be created in the future.
- Selecting No will result in the Heat Map visibility to remain as is based on the User’s own selection at the Work Plan level. The Heat Map will be turned on for any new Users that will be created in the future.
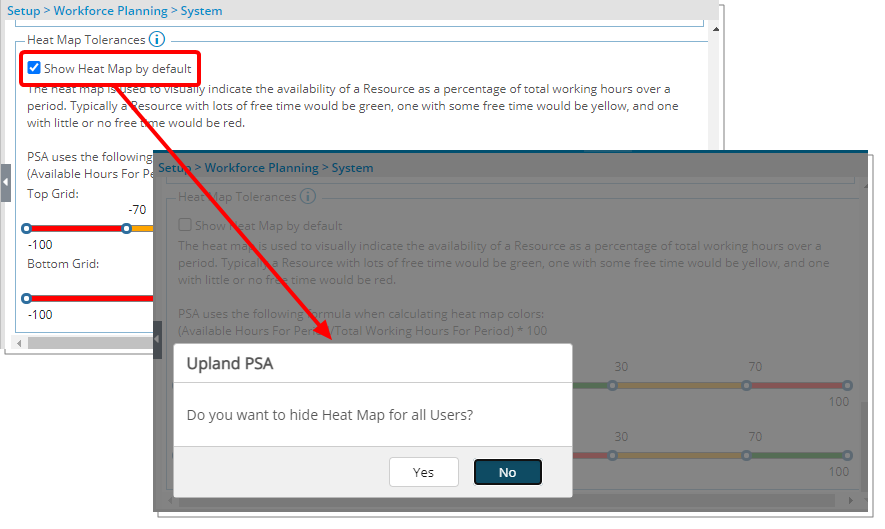
Upon deselecting the Show Heat Map by default option, a confirmation box will appear asking you: Do you want to hide Heat Map for all Users?
- Selecting Yes will result in the Heat Map to be turned off for all existing and any new Users that will be created in the future.
- Selecting No will result in the Heat Map visibility to remain as is based on the User’s own selection at the Work Plan level. The Heat Map will be turned off for any new Users that will be created in the future.
Note: Regardless of the chosen option, Users can turn the Heat Map on or off from their Work Plans at any time.
For further details refer to Show Heat Map by default.
REST API/SDK
Description: Introduction of new Program Management REST API that allows to Create, Update and Delete the Programs.
Benefit: This enables technical clients to build tools for their user base to create, update and delete Programs as well as automate processes.
For further details refer to REST API Capability.
Security
Description: In previous versions, the Security Rights that controlled the Manage Exceptions and Import Transactions buttons, located within the Expense Manager, were the following under Security Profile > Entry > Expense:
- Credit Card transaction
- Import transactions
As of this release, the visibility of these two buttons is now managed by the Credit Card transaction permission only. When selected, both buttons will be made available within the Expense Manager.
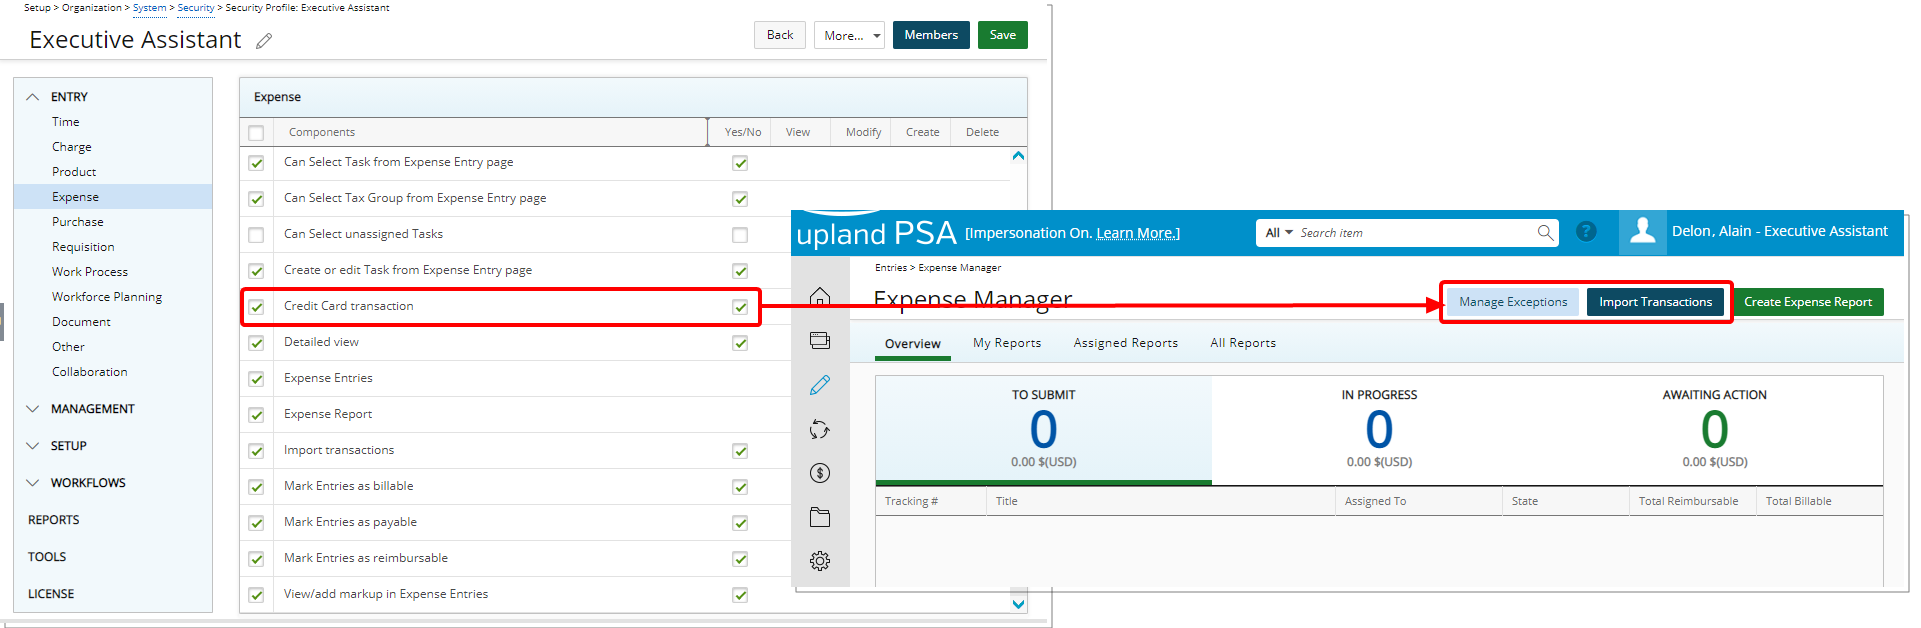
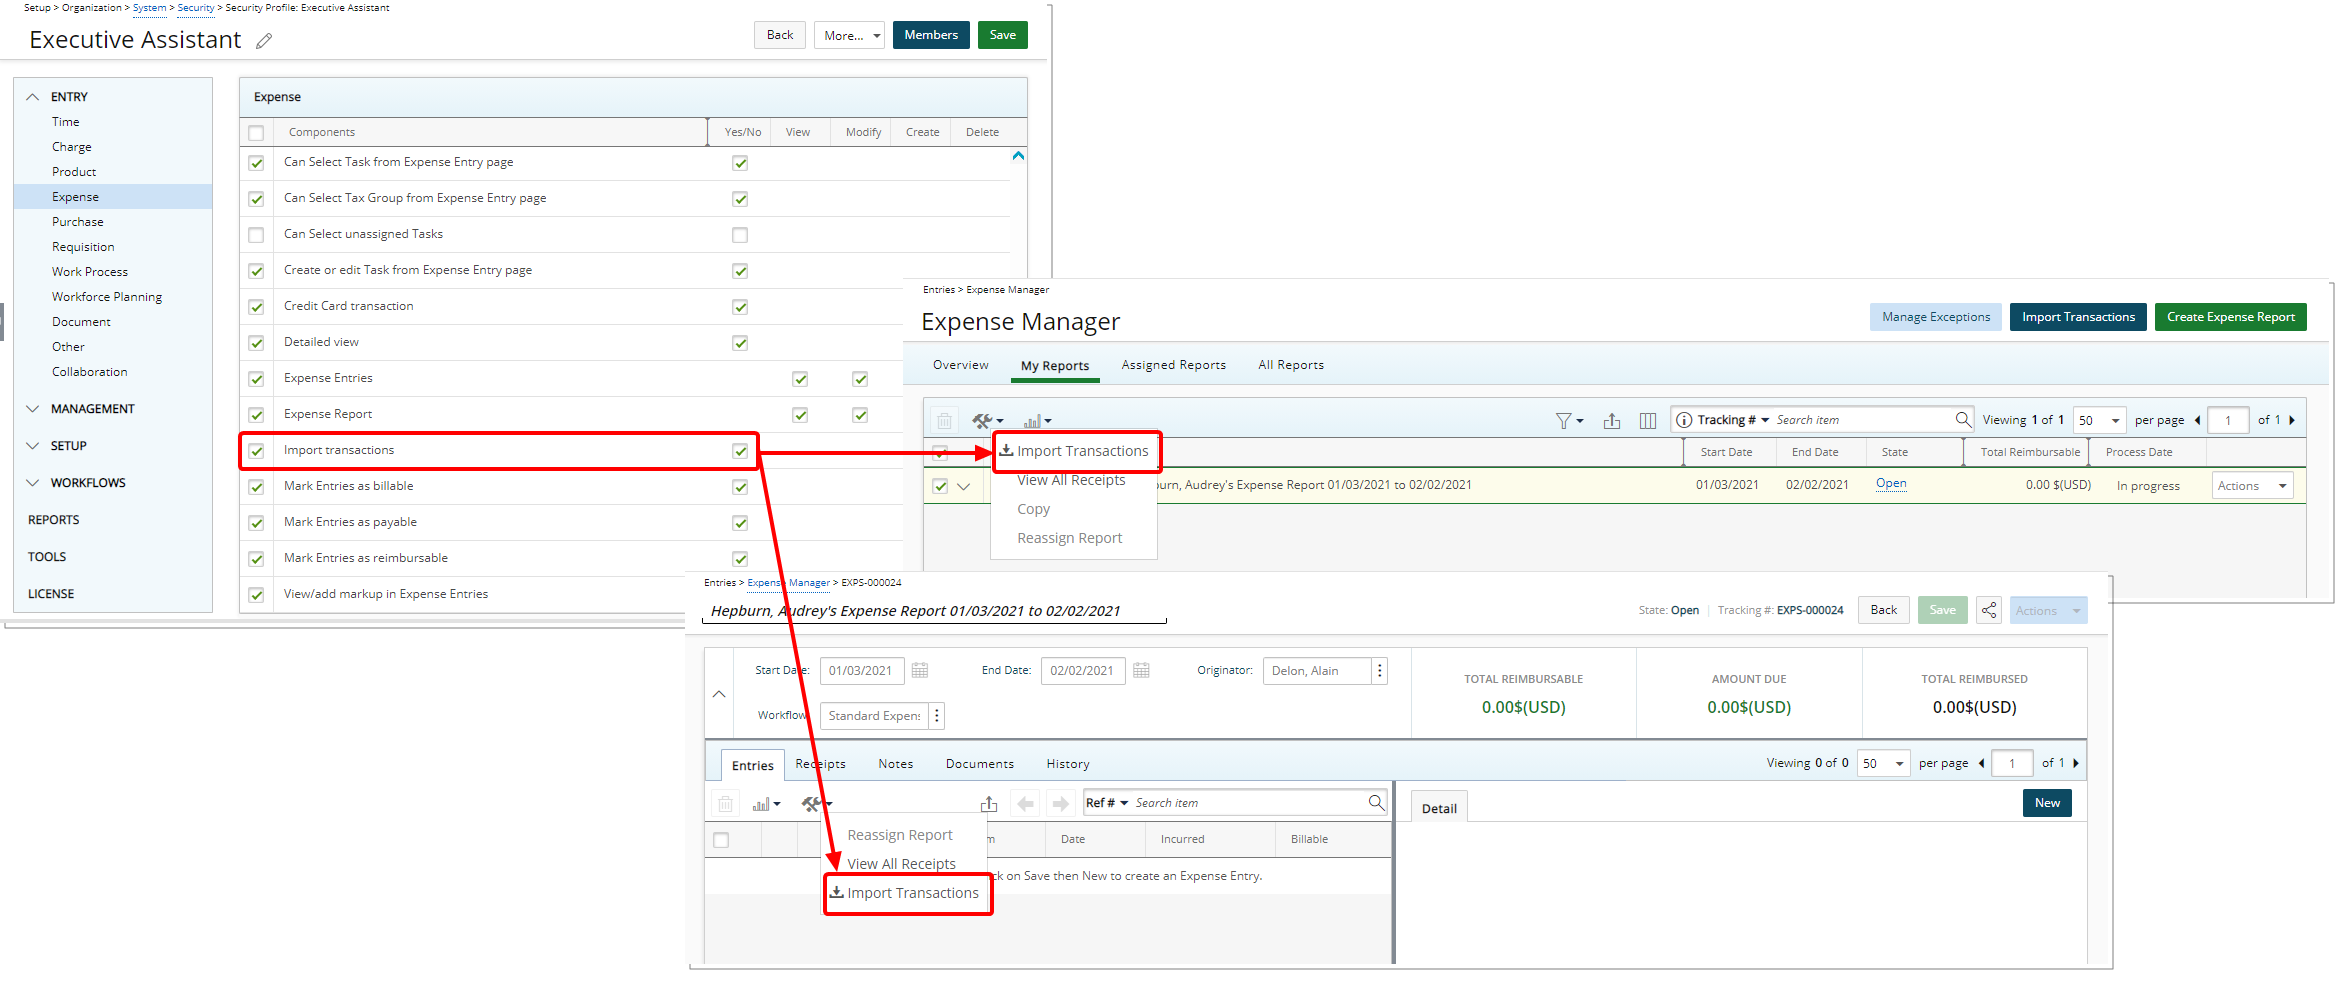
The Import transactions security option now only controls the Import Transactions link located within the Tools context menu accessed from My Reports, Assigned Reports and All Reports tab as well as the Entries tab when editing an Expense Report.
For further details refer to:
- Granting the rights to Credit Card transaction
- Importing transactions using a.csv or .txt file
- Viewing and managing Transaction Exceptions
Timesheet Setup
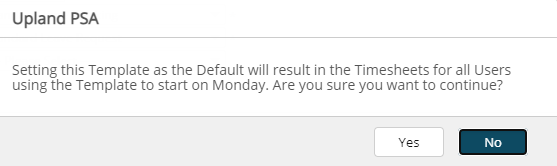
Description: A warning message now displays upon choosing a new Default Timesheet Template if the Start Date falls on a different day of the week than the previous Default Template's start date.
Benefit: The warning message functions as a way of confirming the new start day of the Timesheets for all Users is as expected and gives you the opportunity to modify it if necessary.
For further details refer to Timesheet Template Edit page - General tab.
Upland Analytics
For a summary of the features included in the Upland Analytics 2020 R1.6 release click here. Further details on Upland Analytics can be found in the Upland Analytics help center.
Description: When an Upland Analytics (UA) Dashboard is Shared with a Security Profile or User, it can now be embedded in PSA and viewed directly from the Dashboards (Portals).
The conditions under which a User has visibility to an Upland Analytics Dashboard can be any one of the following:
- The UA Dashboard is created by the logged User
- The UA Dashboard is created by other users and Shared with the Logged User (Security profile, Group or by name) or
- The UA Dashboard is set to Public
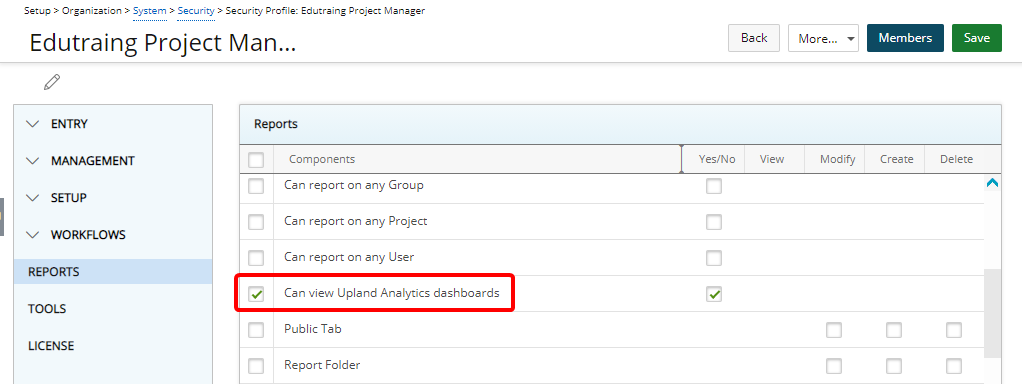
Upon granting the new Can view Upland Analytics Dashboards permission to users under a given Security Profile, located under Reports (Setup > Organization > System > Security) the:
- Dashboard tab will be available for the Users from their own Settings (User Profile Menu).
- Dashboard button will be available from the User Edit page.
- Associated UA Dashboard(s) either at the User level or Security Profile level, can then be accessed through Dashboards (Portals) in PSA.
To associate UA Dashboard(s) for visibility to a User, you can opt for any one of the following:
- As an Administrator, at the system level from the Security Profile: Select the required UA Dashboard(s) from the list of Available Dashboards within the Associations dialog box (Setup > Organization > System > Security Profile > Associations > Upland Analytics Dashboards) and add them to the Selected Dashboards table.
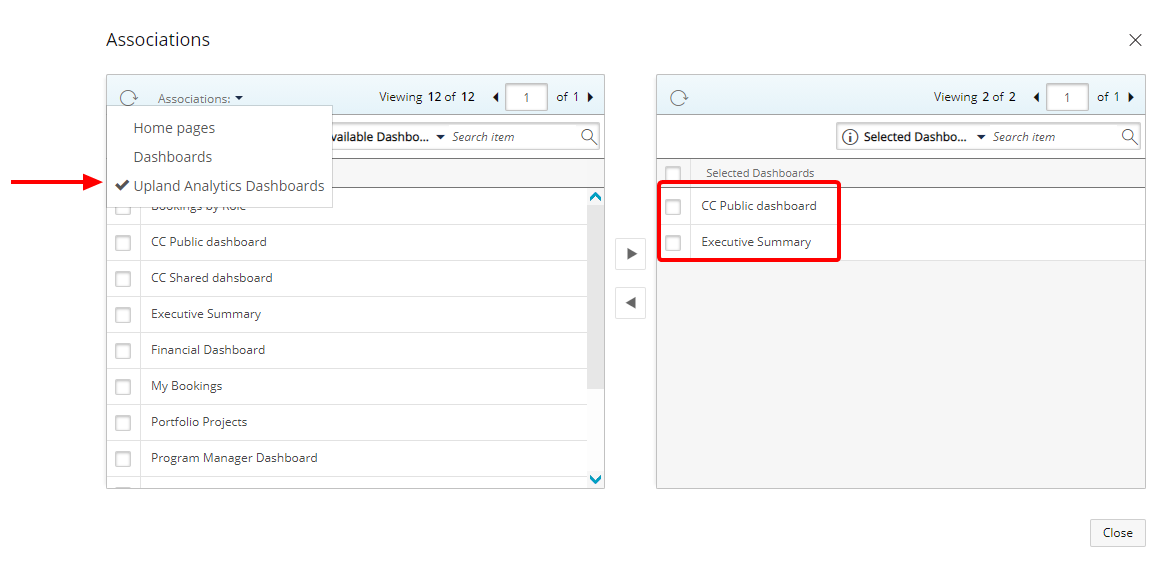
Note:
- All Dashboards that are Shared with the selected Security Profile as well as the Public Dashboards are listed within the Available Dashboards table.
- UA Dashboard(s) associated at the Security Profile level cannot be disassociated at the User level. - As an Administrator, at the User Edit level: Upon accessing the User Edit page (Setup > Organization > Users), click the Dashboard button from the General tab. Select the required UA Dashboard(s) from the list of Available Dashboards and add them to the Selected Dashboards table.

Note:
- The Dashboards that are set as Public as well as Private ones created by or Shared with the given User will be available within the Available Table.
- The already associated Dashboards at the Security Profile level will be listed within the Selected Dashboards table and cannot be disassociated from the User Edit page.
- PSA Dashboards can no longer be associated/disassociated at the User Edit level. - As a User, you can add your own or any UA Dashboard(s) that are shared with you to your PSA Dashboards: Access the new Dashboards tab within your Settings (User Profile Menu) then select the required UA Dashboard(s) from the list of Available Dashboards and add them to the Selected Dashboards table.
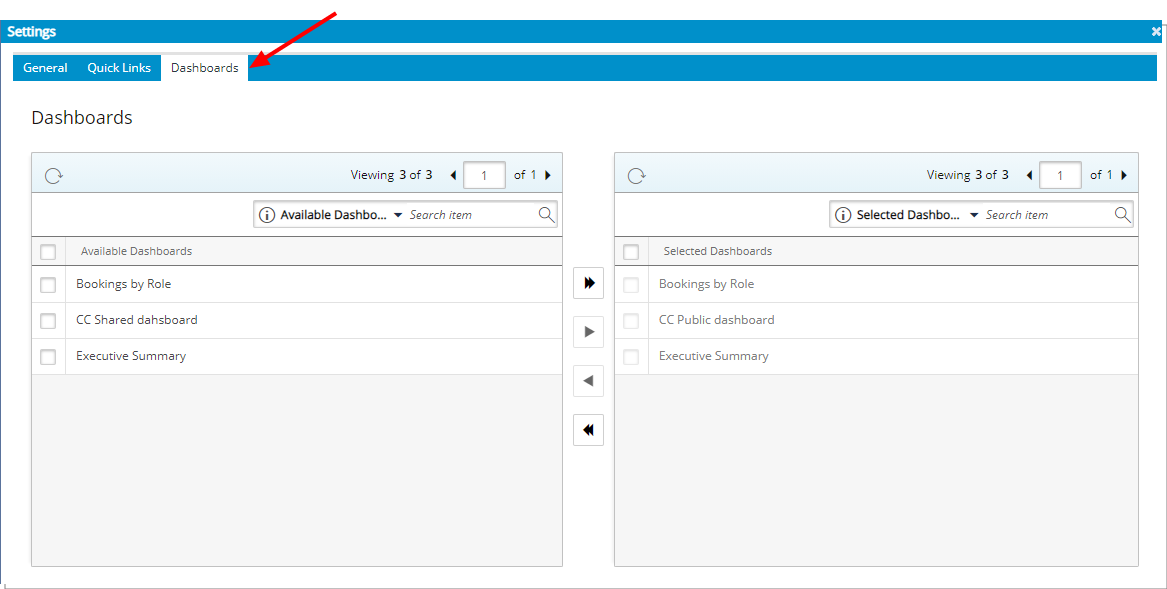
Note:
- The Dashboards that are set as Public as well as Private ones created by or Shared with the Logged in User will be available within the Available Table.
- The already associated Dashboards at the Security Profile level will be listed within the Selected Dashboards table and cannot be disassociated by the Logged in User.
- The already associated Dashboards at the User Edit level will be listed within the Selected Dashboards table and cannot be disassociated by the Logged in User.
These Associated Dashboards can then be viewed by navigating to Portals > Dashboards.
Note:
- By default, the Can view Upland Analytics Dashboards permission is only granted to users under the Administrator Security Profile.
- Upon creating a new Security Profile in PSA you must run the Synchronize Integrations Automation Service (Setup > Organization) to synch the newly created Security Profile as a Role in UA. This is a required step to successfully share and display UA Dashboards in PSA. If the new Security Profile is not synchronized with UA an information message bar will be displayed. For further details on how to synchronize newly created Functional Group(s) and Security Profile(s) with UA Roles click here.
- Upon deleting an associated UA Dashboard, it will be removed automatically from the User/Security Profile Dashboards Association and unavailable from the Portals > Dashboards menu
For further details refer to:
- Embedding Upland Analytics Dashboard(s) in PSA
- Granting the Can view Upland Analytics Dashboards permission
- Association of UA Dashboard(s) for visibility to a User: As an Administrator, at the system level from the Security Profile
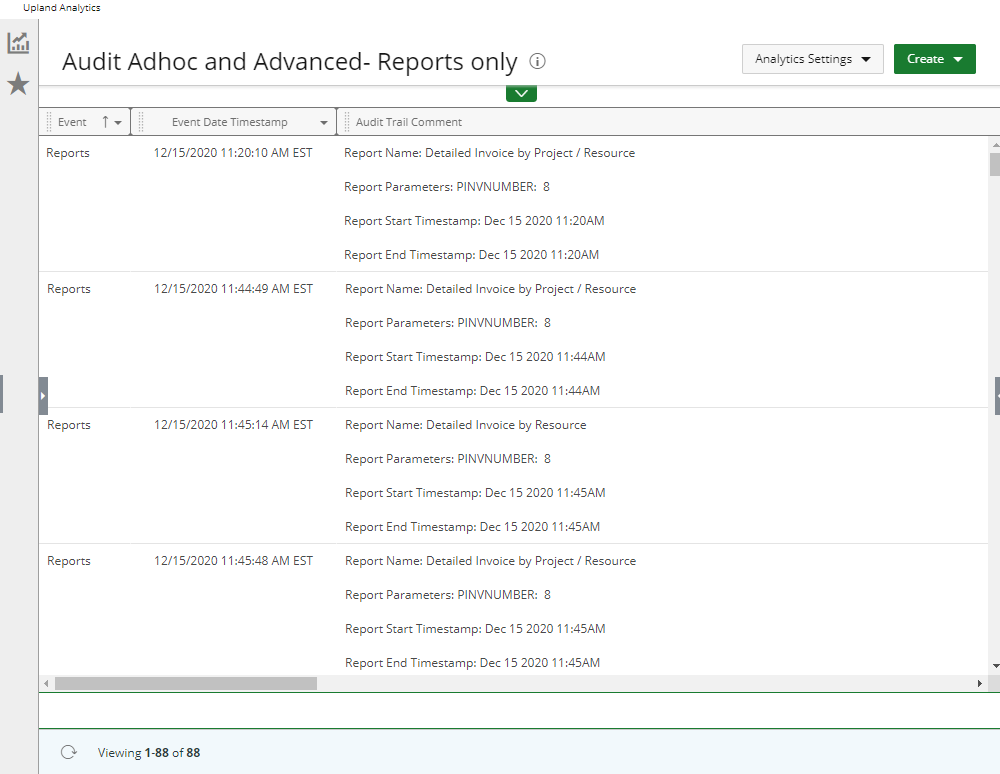
Description: The action of running either an AdHoc Report or an Advanced Report in PSA, can now be reported on through the Audit Trail Data Source in Upland Analytics.
Description: Addition of a new Project Management Data Source with the following Views: Alternate Program Manager, Alternate Project Manager, Base Currency, Client, Client Currency, Program, Program Manager, Project, Project KPIs, Project Attachment, Project Attachment Created by User, Project Attachment Modified by User, Project Currency, Project Manager, Project Notes, Project Notes Created by User and Project Notes Modified by User.
Scoping is available for: All Projects, Available Projects, My Programs and My Projects.
Benefit: With the addition of the new Project Management Data Source, you now have access to more Fields to report on.
For further details refer to the Project Management Data Source and related views.
Description: The following Views have been added to the Timesheet Data Source:
- Alternate Program Manager
- Program
- Program Manager
- Scope - My Programs
For further details refer to the Timesheet Data Source and related views.
Description: The following Views have been added to the Expense Data Source:
- Alternate Program Manager
- Program
- Program Manager
- Scope - My Programs
For further details refer to the Expense Data Source and related views.
User Experience Enhancements
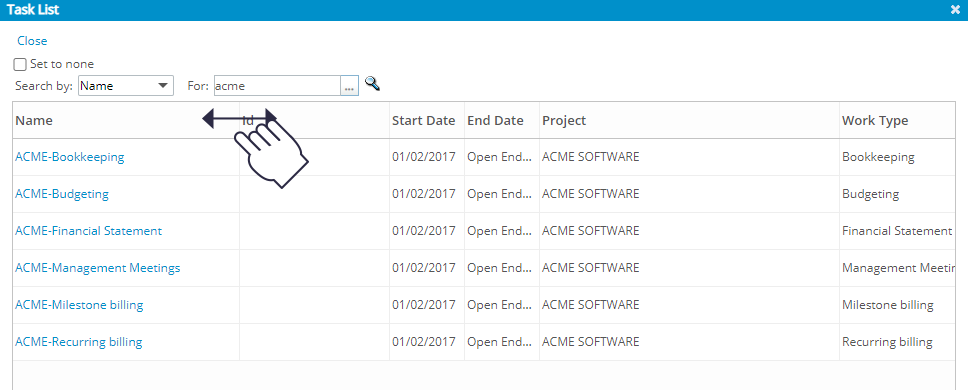
Description: You can now adjust the size of the table columns within the Task List dialog box accessed through browsing for a Task. Simply move your cursor to the column boundary you want to resize. When the cursor becomes a resize cursor, click and drag the column to the desired width.
Benefit: Allows you to dynamically resize column(s), to better fit your content.
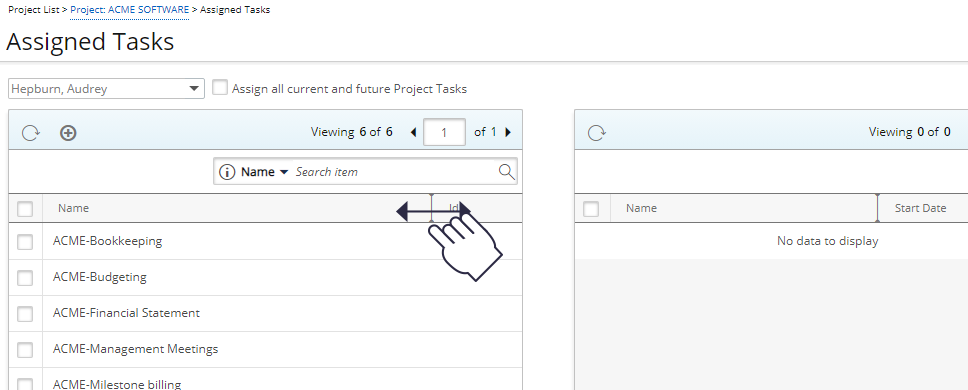
Description: You can now adjust the size of the table columns when assigning Tasks. Simply move your cursor to the column boundary you want to resize. When the cursor becomes a resize cursor, click and drag the column to the desired width.
Note: The adjusted width(s) are remembered and maintained upon revisiting the page.
Benefit: Allows you to dynamically resize column(s), to better fit your content.
Payroll Batches Not Posted list page
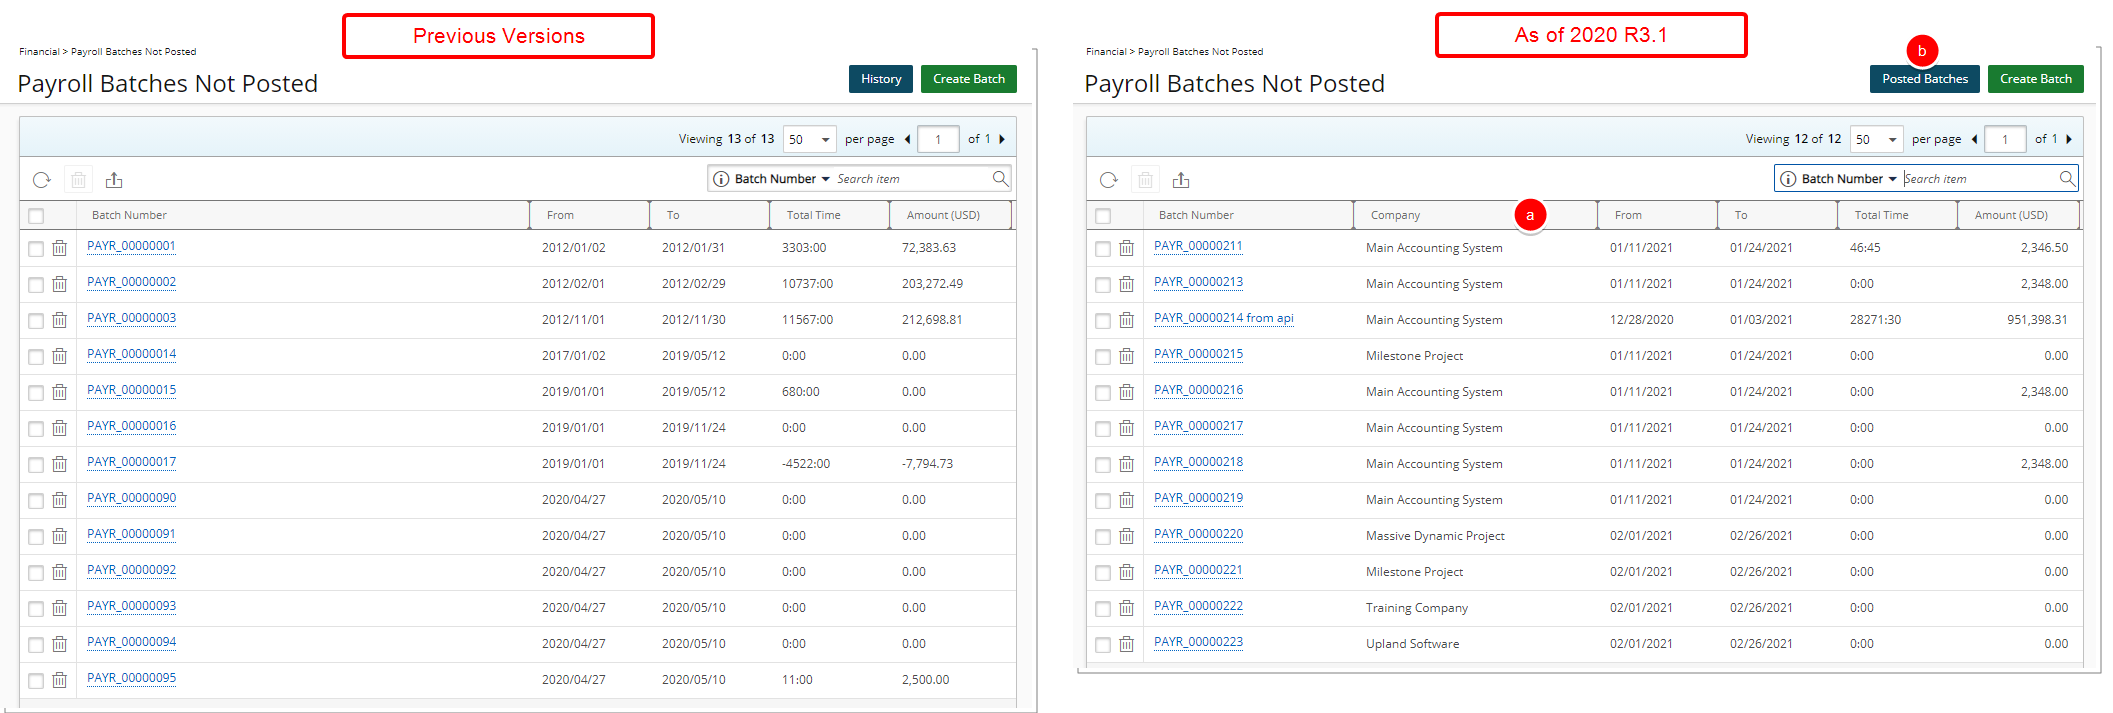
Description: The Payroll Batches Not Posted list page has been updated with the following changes:
- Addition of the Company column.
- Renaming of the History button to Posted Batches.
Payroll Batch edit page
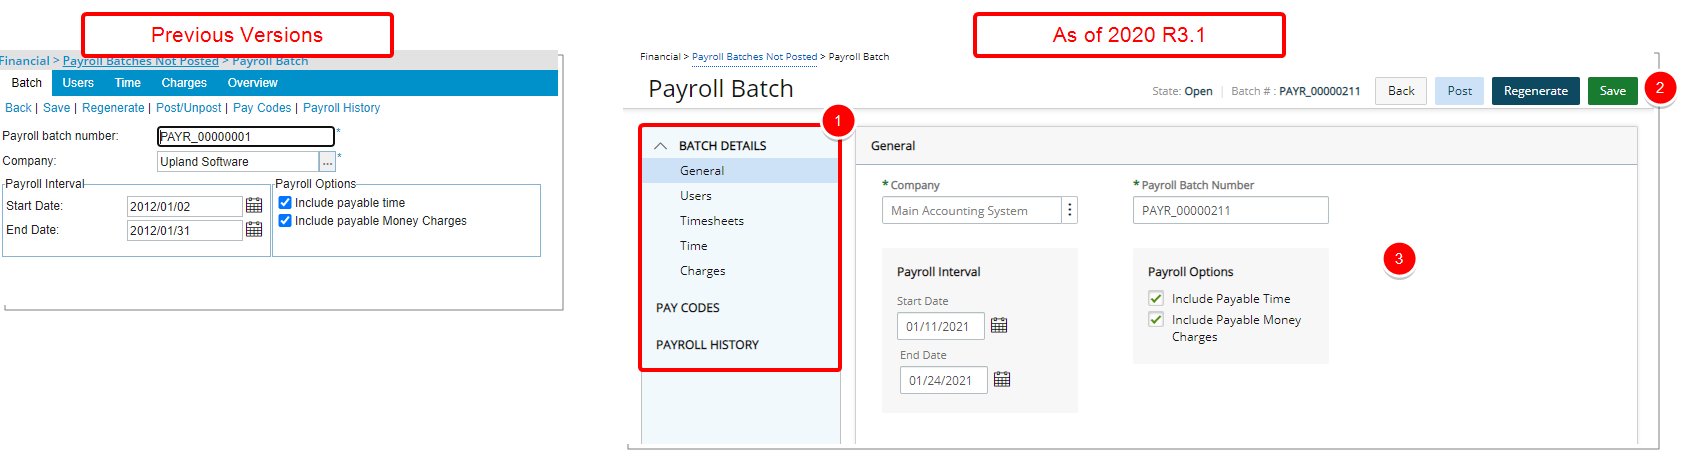
Description: The Payroll Batch edit page (Financial > Payroll Batches Not Posted > Payroll Batch) has been updated for better user experience and establish consistency across all pages. The following are the improvements made:
- Introduction of the side navigation from where you can now access the Batch Details such as General, Users, Timesheets, Time and Charges, the Pay Codes as well as the Payroll History pages.
- The State, Batch # and buttons such as Back, Post, Regenerate and Save are now located on the title bar.
- In addition to the improvement of the overall look and feel of the pages the following enhancements were also made:
- General
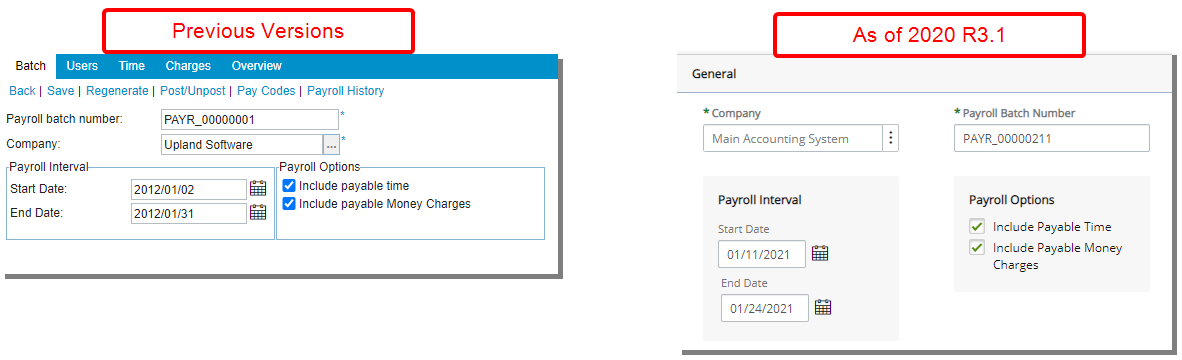
- The Batch tab was renamed to General and is now located under the Batch Details menu option.
- Users

- The option Process all employees who have worked in the payroll cycle was renamed to now read Include all Users.
- Addition of Refresh button and pagination to the upper left corner of the page.
- The improved Search box was moved to the left of the pagination.
- The Last Name and First Name columns were joined into User Name.
- The Search criteria First Name and Last Name were replaced by User Name.
- Time

- The option Include time for all selected employees was renamed to now read Include all Time Entries.
- Addition of Refresh button and pagination to the upper left corner of the page.
- The improved Search box was moved to the left of the pagination.
- The Last Name and First Name columns were joined into User Name.
- The Search criteria First Name and Last Name were replaced by User Name.
- Charges

- The option Include charges for all selected employees was renamed to now read Include all Charges.
- Addition of Refresh button and pagination to the upper left corner of the page.
- The improved Search box was moved to the left of the pagination.
- The Search criteria First Name and Last Name were replaced by User Name.
- The Last Name and First Name columns were joined into User Name.
- Addition of Id column.
- Inline editing is now available for the Charge Amount cell if you are granted the Allow Charge modifications option is chosen within the Payroll Setup page (Setup > Financial > System).
- Pay Codes
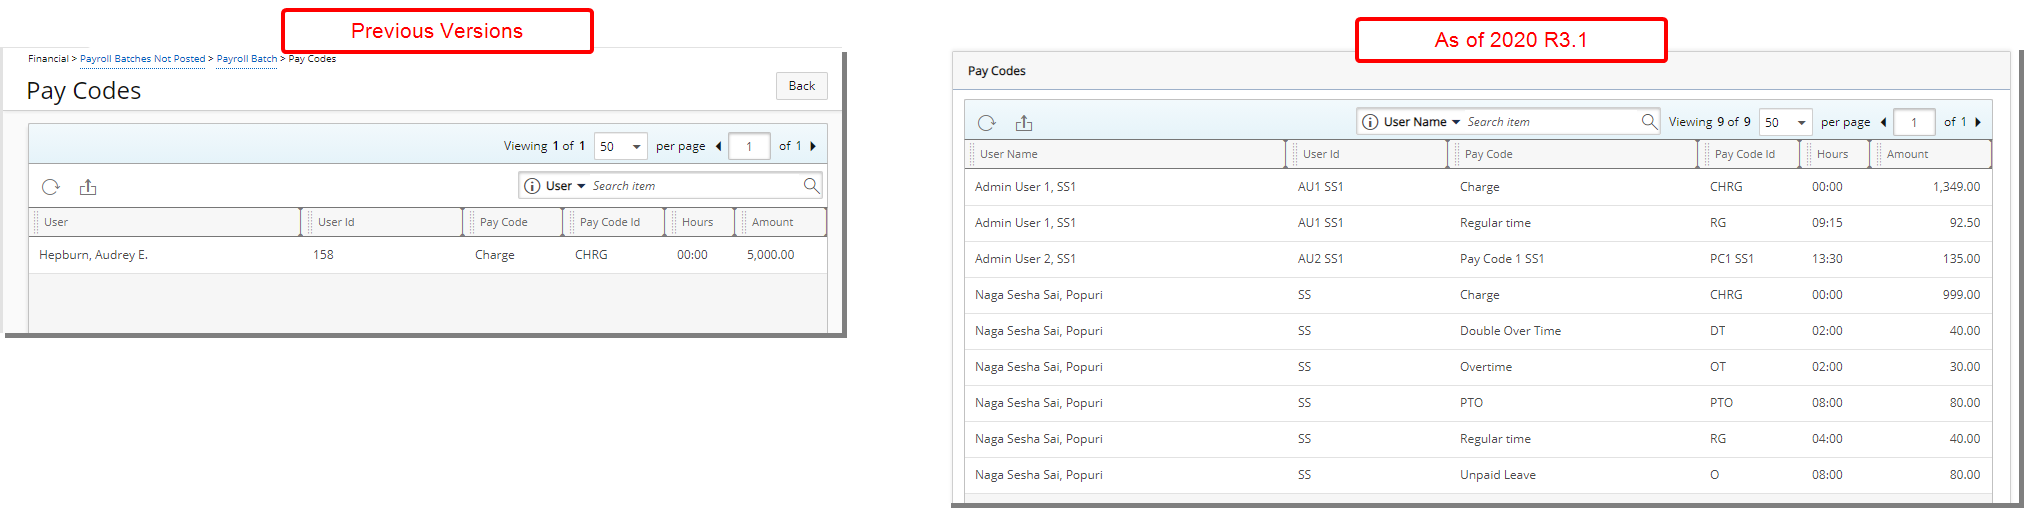
- The Refresh and Export to Excel buttons as well as the Search and Pagination are now displayed in a single row just above the table.
- The User column and search criteria are renamed to now read User Name.
- Payroll History

- The Batch Number column is no longer displayed by default. You can choose to add it from the Column Selection.
- The Search box, Column Selection and Export buttons were moved to the left of the pagination.
- General
For further details refer to:
- Payroll Batches Not Posted page
- Creating a new Payroll Batch
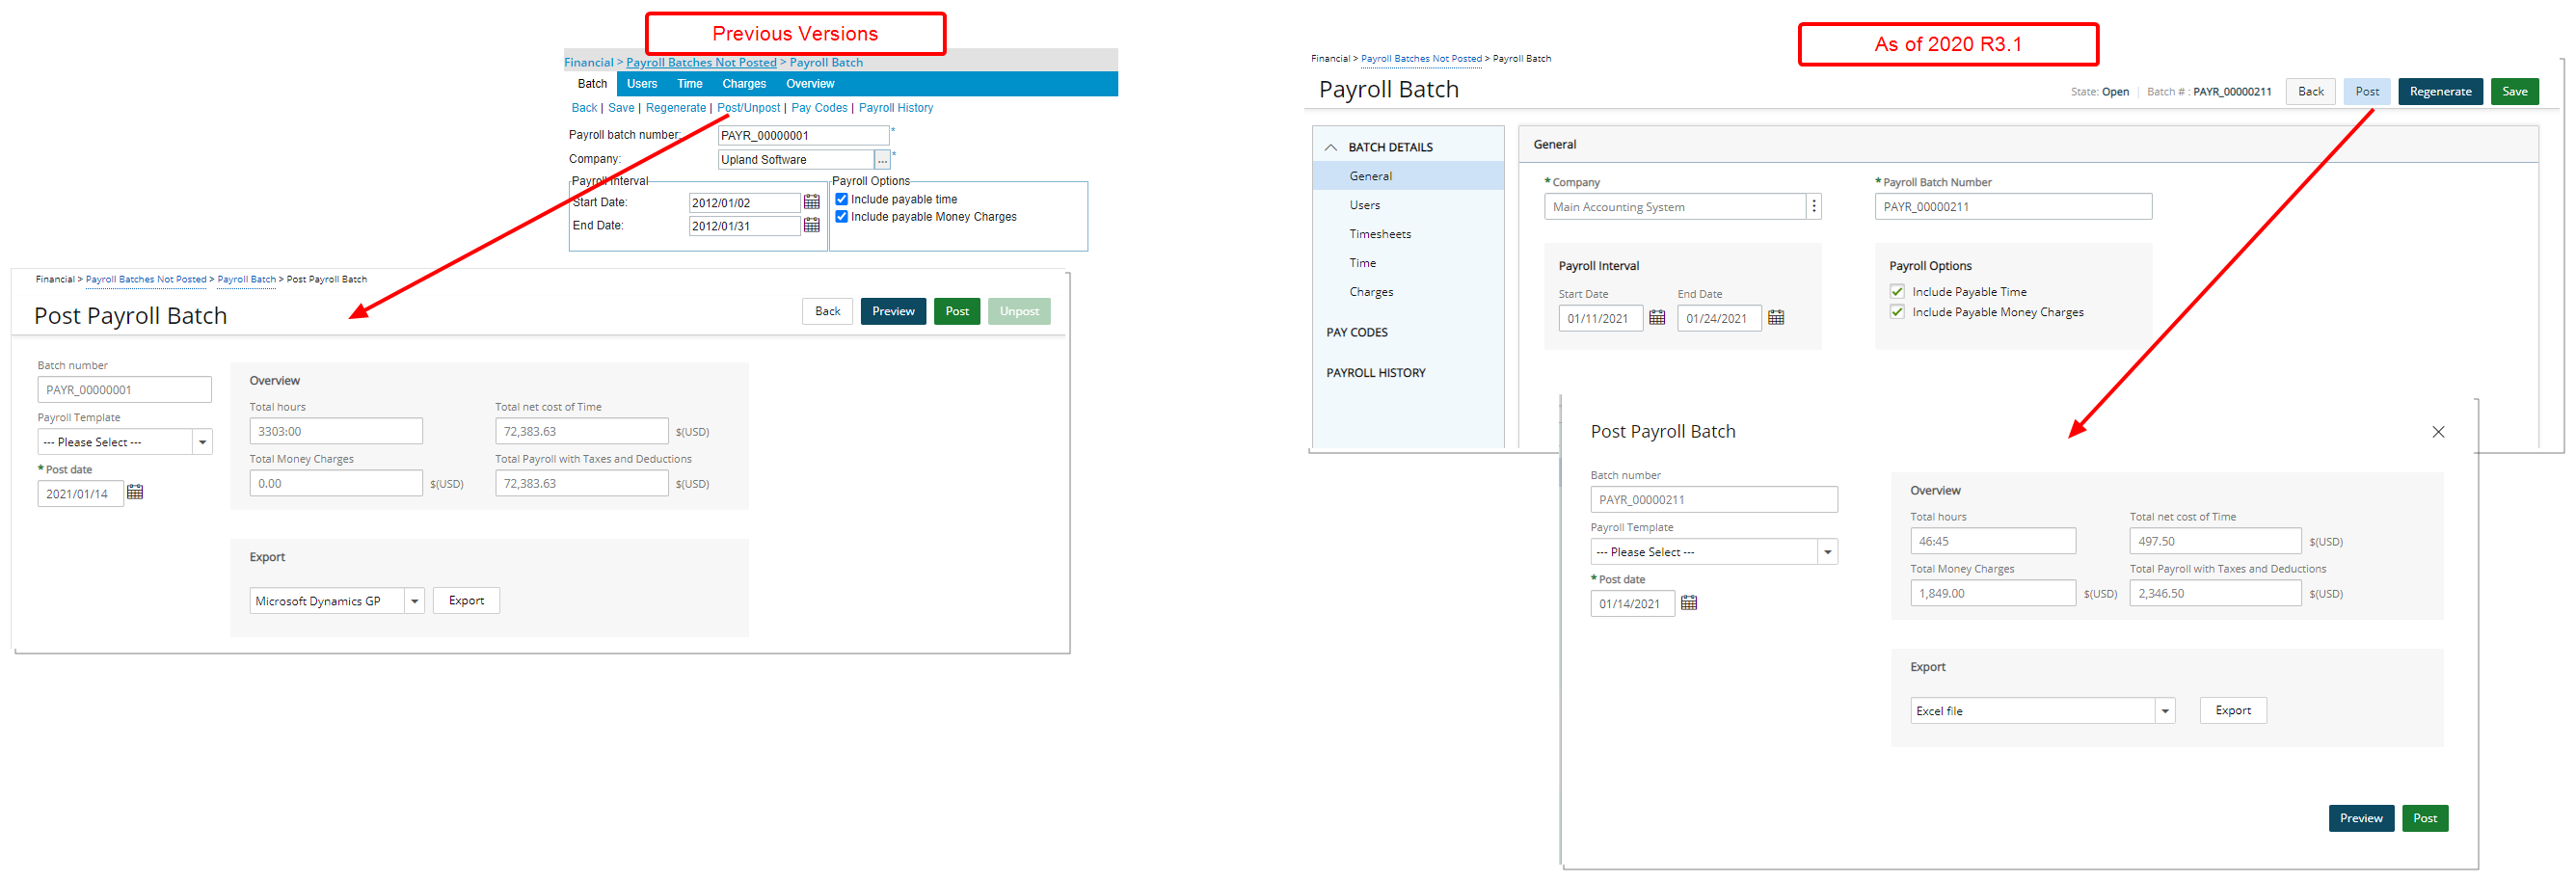
Description: In Previous releases upon clicking the Post/Unpost link, the Post Payroll Batch page would be displayed. As of 2020 R3.1 upon clicking the Post/Unpost button the Post Payroll Batch dialog box is displayed instead.
Benefit: Allows you easily return the to the Payroll Batch just by closing the dialog box.
For further details refer to Posting a Payroll Batch.
Browse for Projects
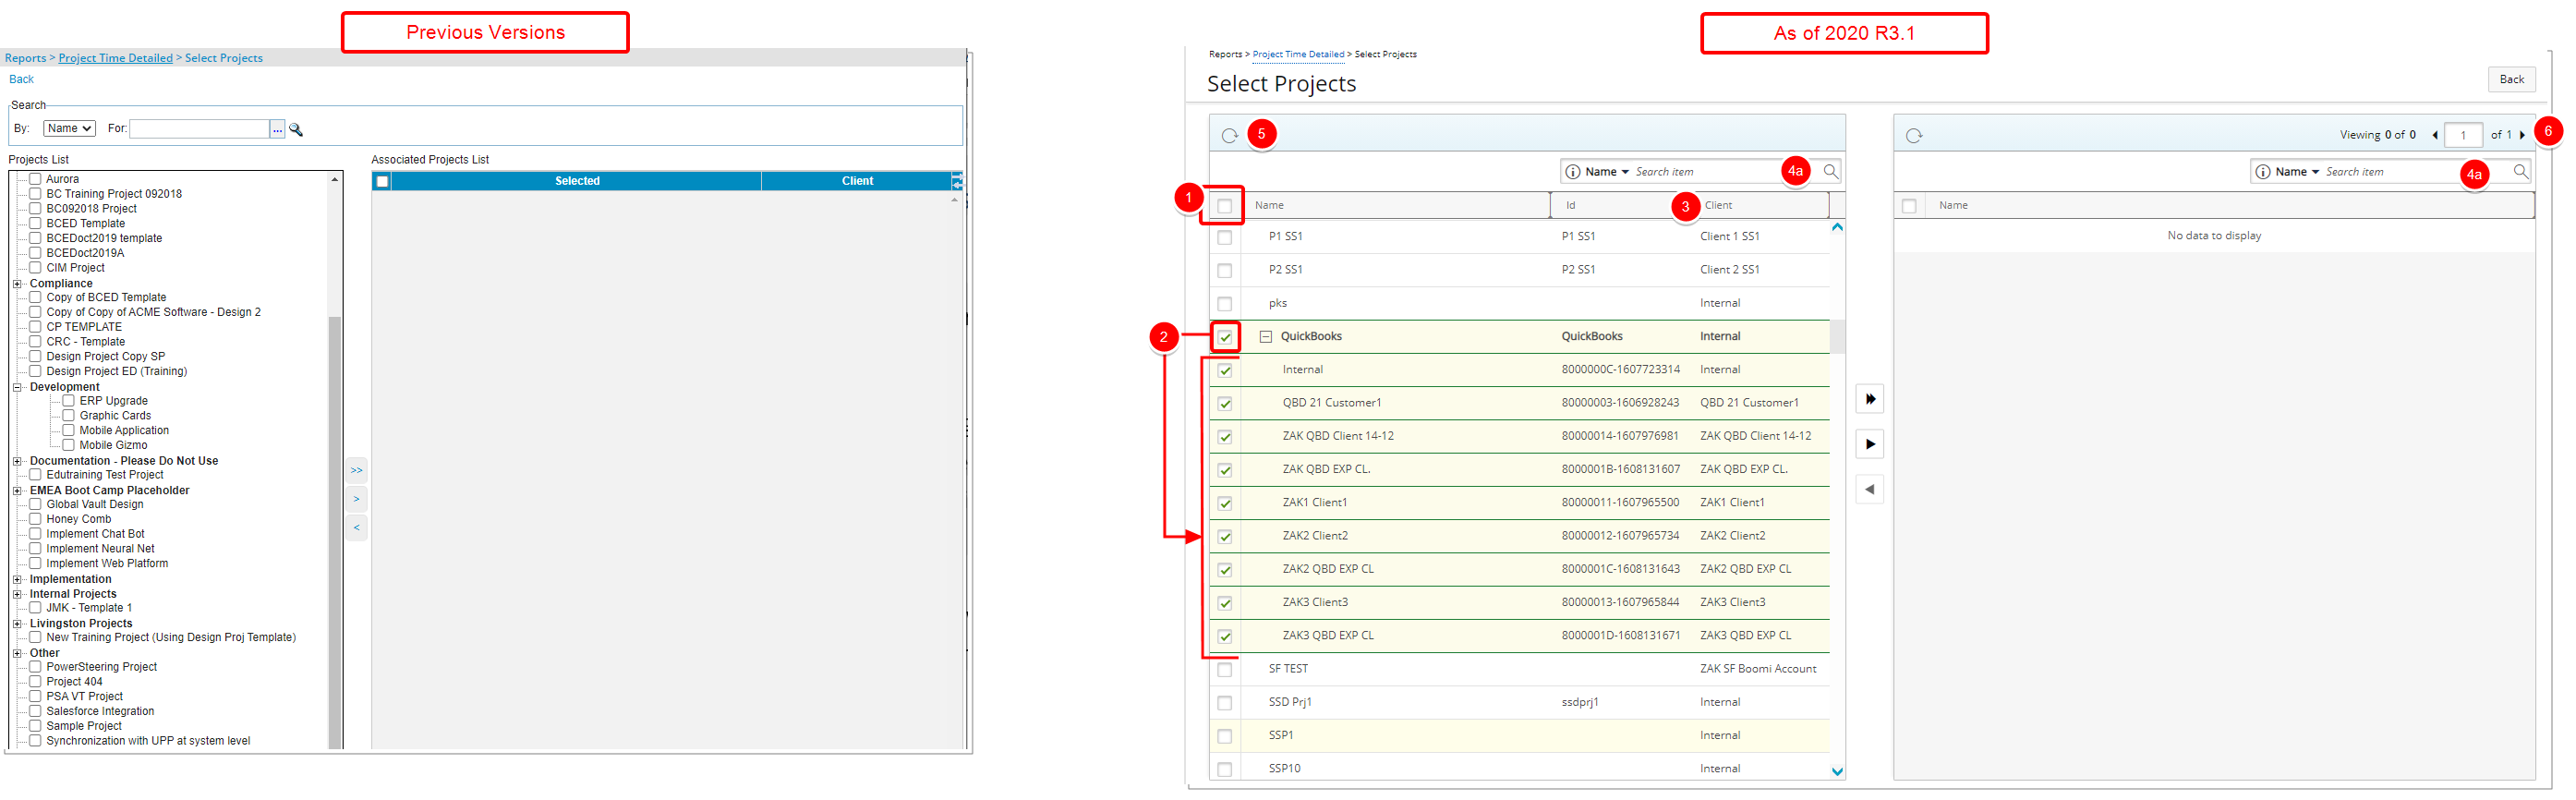
Description: In addition to the improvements made to the overall look and feel of the Select Projects page, accessed when browsing for Projects from the Reports, the following improvements have also been made:
- You can now select all Projects by choosing Select All.
- When selecting a Parent Project, all child items are now also selected by default.
- Addition of the Id and Client columns within the available projects table.
- Improved Search capability:
- In addition to the already available Name, Id and Client search criteria, you can now also search by Manager from within the available projects table.
- The search capability has also been added to the selected projects table, allowing you to search by Project Name.
- Addition of the ability to Refresh the available and selected projects tables.
- Addition of pagination within the selected projects table.
Note: An information banner reading “Maximum number of items loaded. If your item isn’t listed, please search for it.” is displayed if the number of items within the available Projects table exceeds the default 250 limit.
Browse for Users
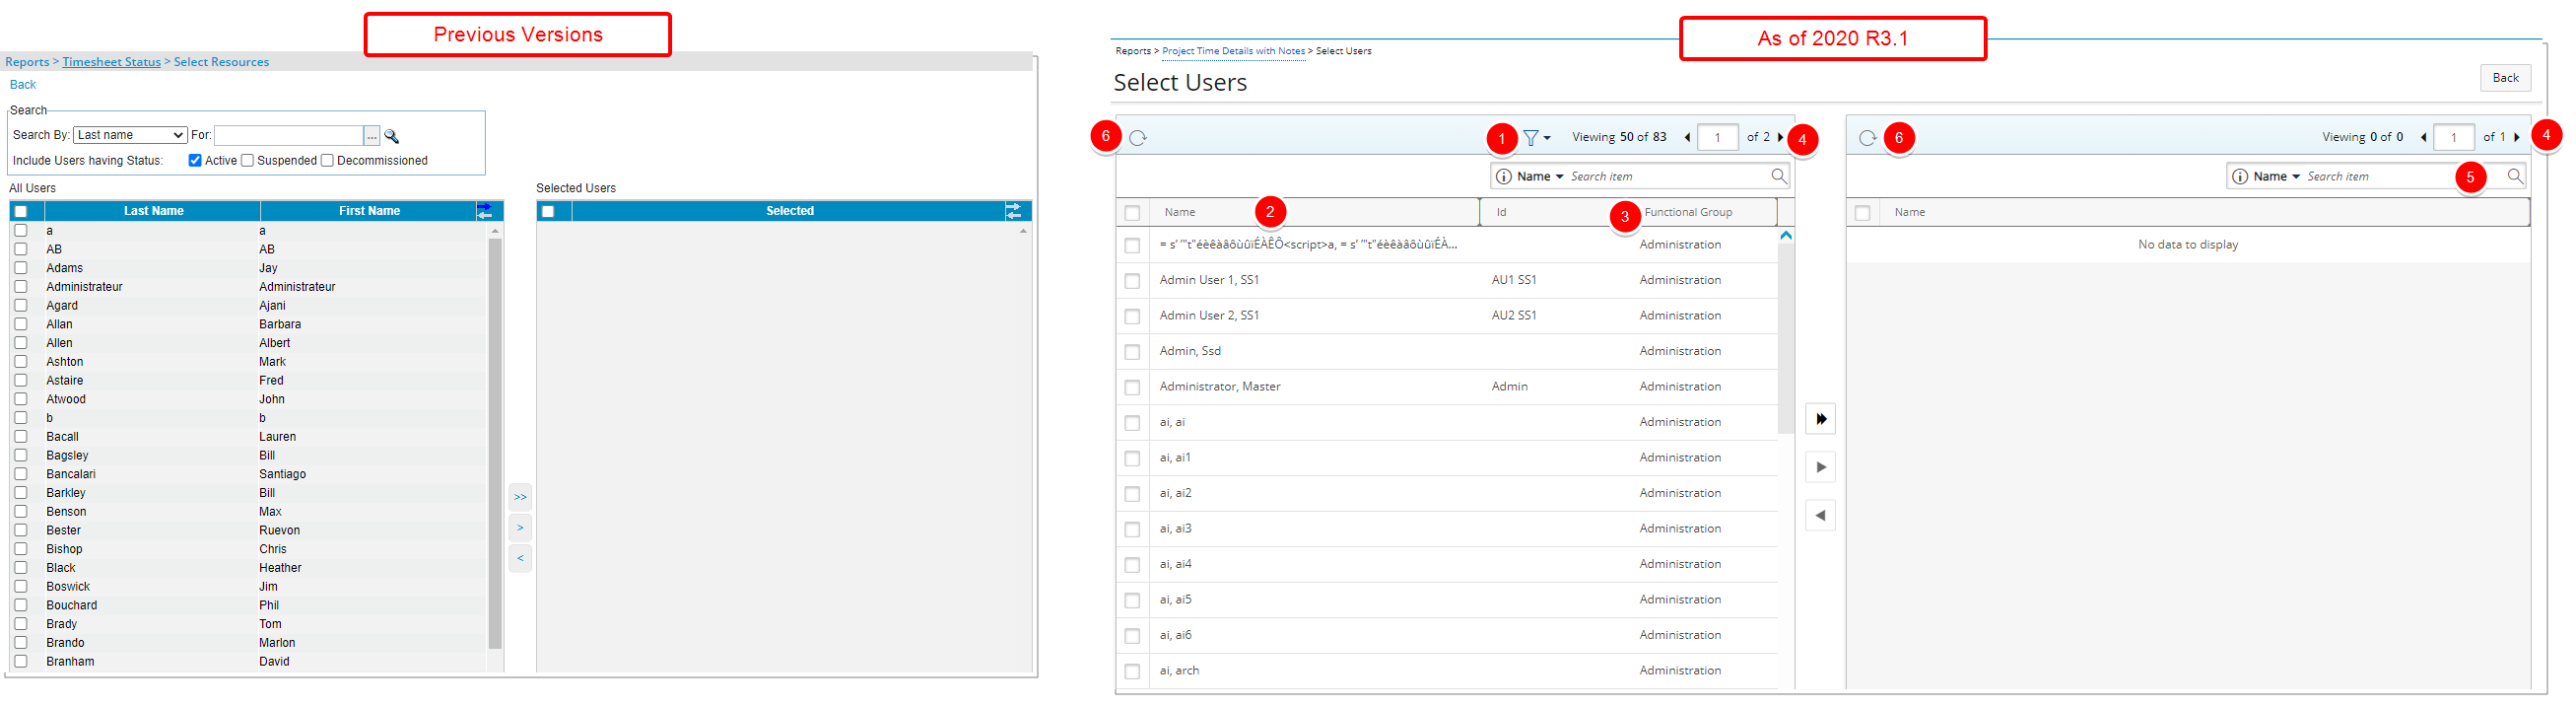
Description: In addition to the improvements made to the overall look and feel of the Select Users page, accessed when browsing for Users from the Reports, the following improvements have also been made:
- The Status filter options are now under the Filter icon.
- The First Name and Last name columns are now merged into the Name Column.
- The Id and Functional Group columns are added to the available table.
- Addition of pagination.
- Addition of search capability within the selected table, wherein now you can search by Name.
- Addition of the option to Refresh the available and/or selected tables.
For further details refer to Applying a filter to a Report.
Work Breakdown Structure (WBS)
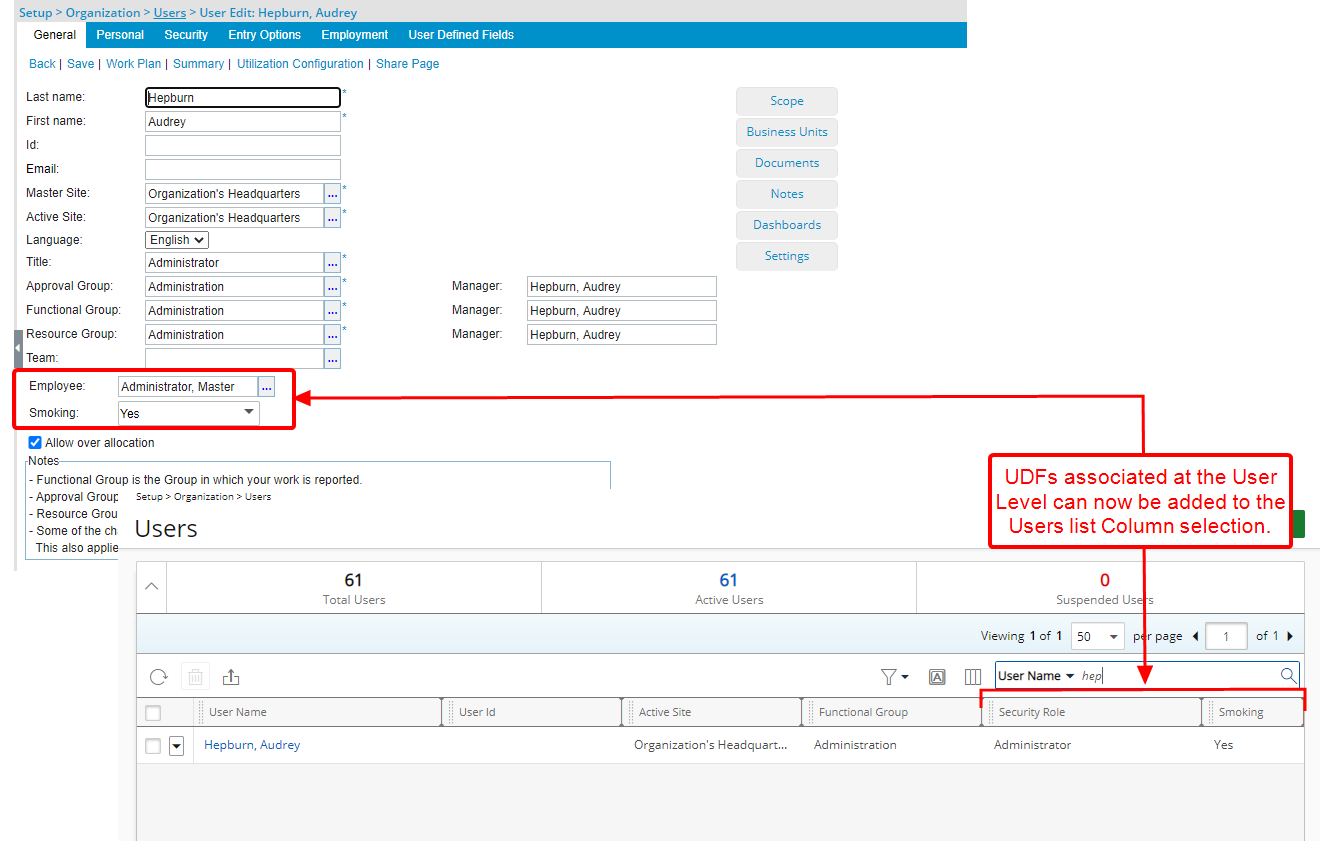
Description: Upon associating UDFs at the User level, you can now select them within the Users List Column Selection.
Benefit: This addition allows you to view the required UDFs information from the Users list without having to open the User Edit page.
For further details refer to Out-Of-The-Box Column Selection options | Users list.
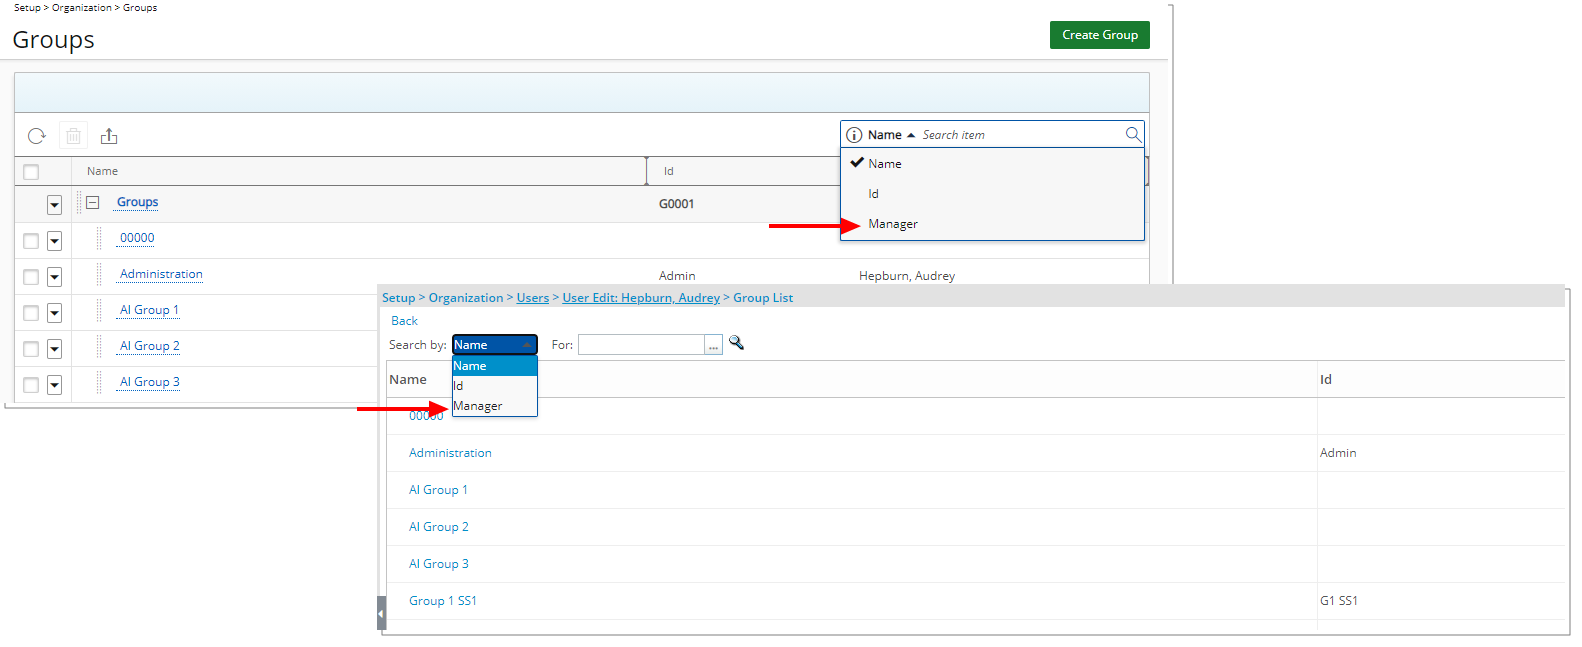
Description: The Manager Search criterion has been added to:
- Setup > Organization > Groups
- Setup > Organization > Users > User Edit > Group List
Benefit: With this addition you can now search for a Group based on the Manager’s Name, which provides a more convenient way of searching for the required Group.
For further details refer to Groups list page.
Deprecated Functionality
The Gender selection box located within the Personal tab of User Edit page has been removed.