PSA 2021 R1.0 - Product Enhancements
Below is a summary of the features included in the PSA 2021 R1.0 release.
- Financial
- Financial Planner
- Integration
- Mobile
- Project Status Reporting
- Project List
- Work Items
- REST API/SDK
- Security
- Timesheet
- User Defined Fields
- Upland Analytics
- User Experience Enhancements
2021.05.17.2021R1.V1.EB
Note: This page could be updated as new information becomes available.
Financial
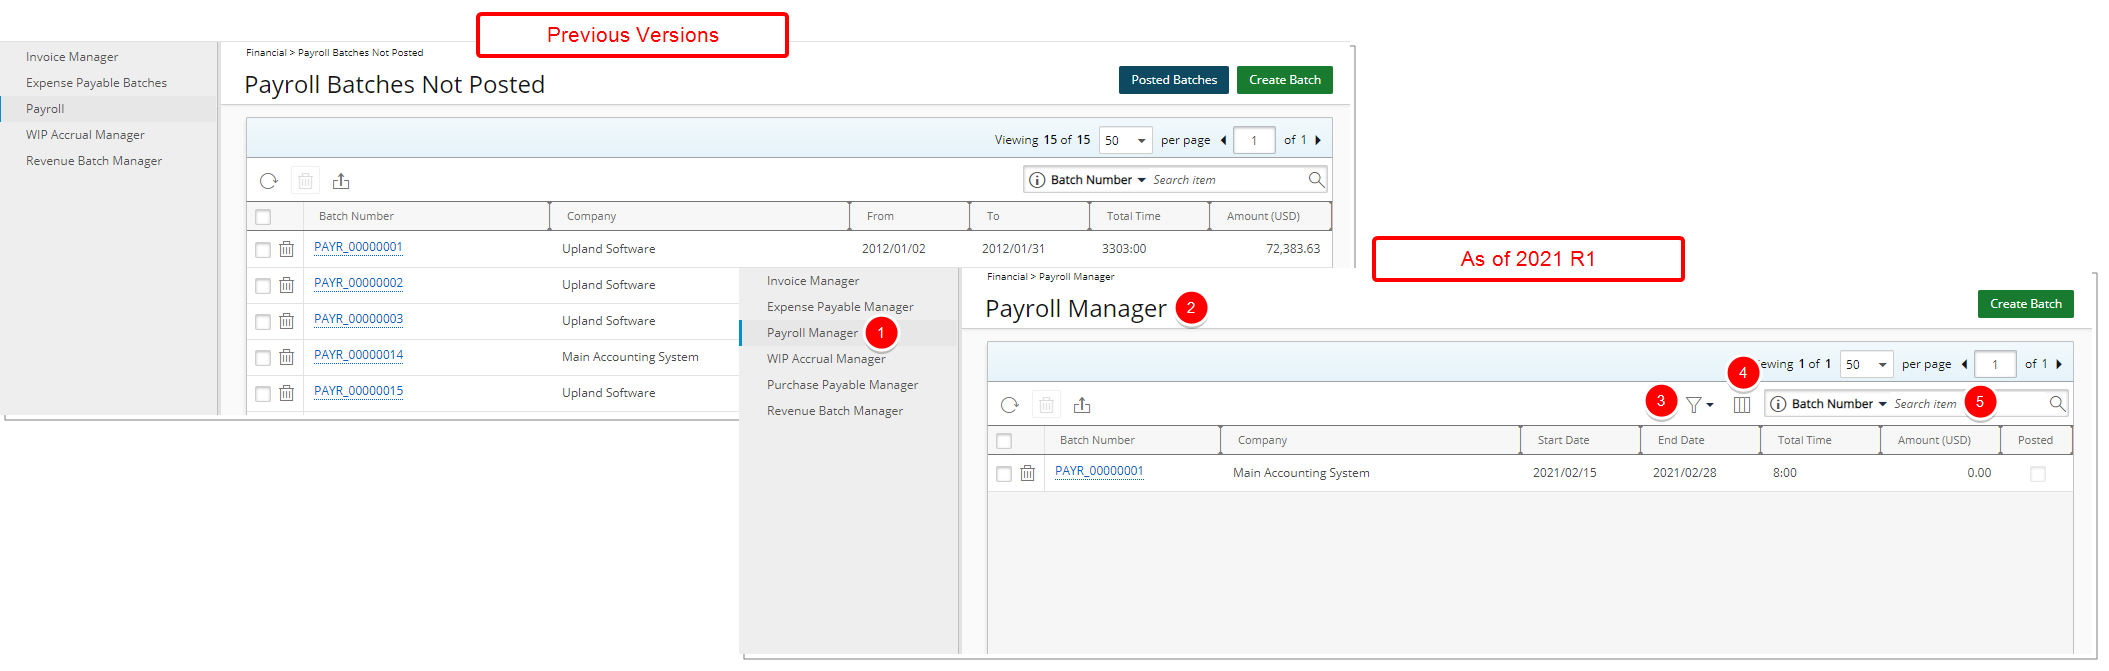
- The Payroll navigation option has been renamed to Payroll Manager.
- Payroll Batches Not Posted has been renamed to Payroll Manager.
- A new Filter option has been added to allow for the filtering of the Payroll Batches based on: Open, Posted, Exported and Not Exported status. As a result of which the Posted Batches button has been removed from the Payroll Manager list page.
- Addition of the Column Selection functionality. The columns that display by default are: Batch Number, Company, Start Date, End Date, Total Time, Total and Posted. In addition, you can choose to include Created Date, Exported, Exported Date and Posted Date columns.
- By default, the available Search criteria are: Batch Number, Company, Start Date and End Date. In addition, you can choose to include: Exported Date and Posted Date Search criteria.
- By default, the sort order of the Payroll Manager list page is based on End Date in descending order.
For further details refer to Managing Payroll and Creating a new Payroll Batch.
In addition, these improvements have been made to the Batch Details pages:
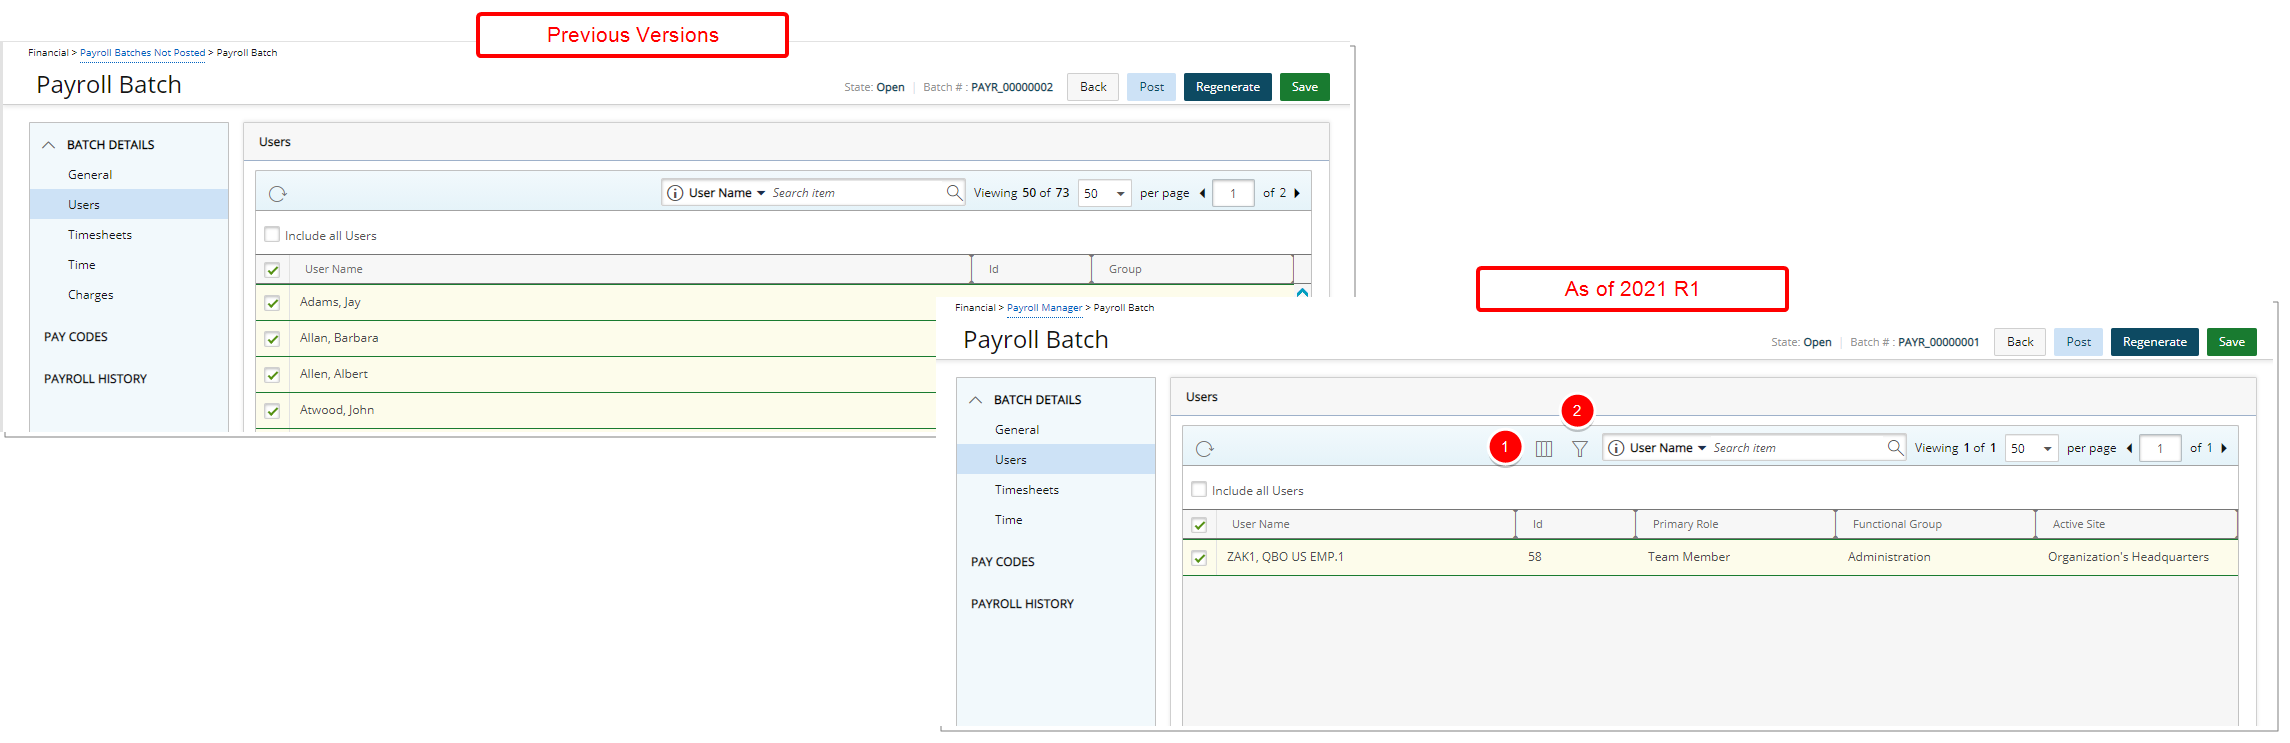
- Addition of Column Selection with the options: User Name, Id, Primary Role, Functional Group and Active Site.
- By default, you can search based on: User Name, Id, Primary Role, Functional Group and Active Site.
- Addition of advanced Filter capability wherein you can filter the Users list based on Active Site, Functional Group, Primary Role and User. When a Filter is applied:
- It is saved and remembered upon your next visit.
- Clicking Regenerate will trigger a confirmation message informing you that the Payroll Batch will be regenerated with the applied Filter and will reset all manual changes.
- When modifying the Payroll Interval or the Payroll Options, a confirmation message is displayed informing you that the Batch will be regenerated, resetting any manual modifications. The previously applied Filter is kept and applied.
Note:
- Any Filter modifications require that the Batch be regenerated.
- You must Unpost a posted Payroll Batch if you wish to modify the applied Filter setting.
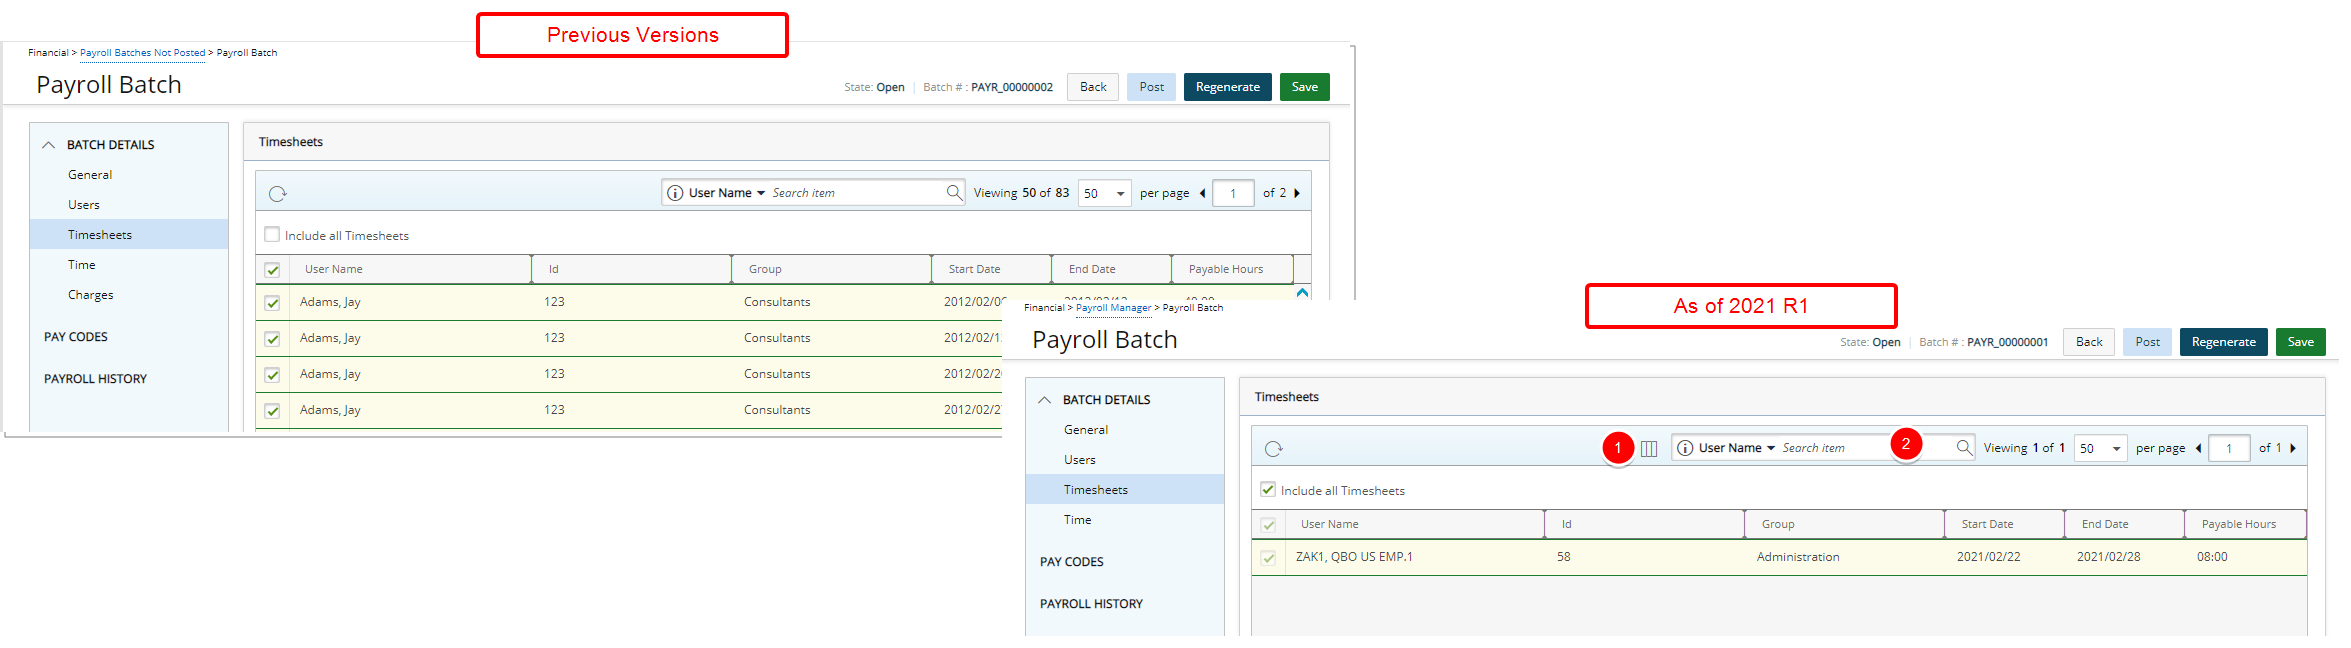
- Addition of Column Selection with these default options: User Name, Id, Group, Start Date, End Date and Payable Hours.
- In addition to the ability to search by User Name, Id and Group, these Search criteria are now also available by default: Start Date and End Date.
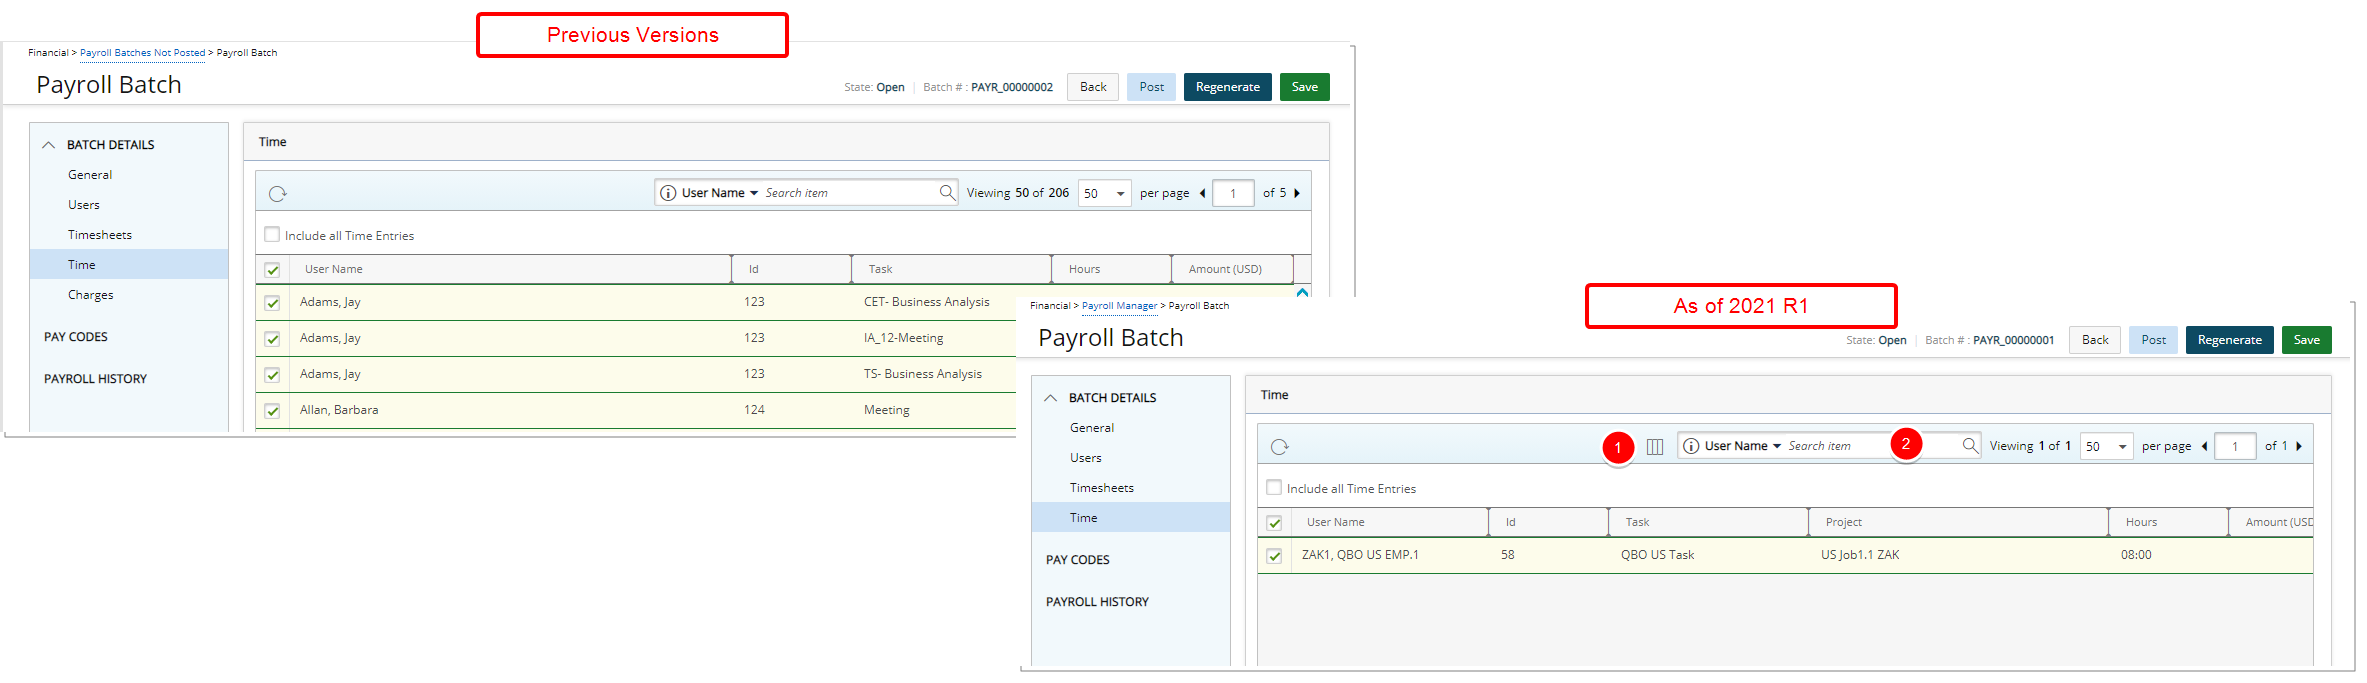
- Addition of Column Selection with these default options: User Name, Id, Task, Project, Hours and Amount.
- In addition to the ability to search by User Name, Id and Task the Project search criterion is now also available by default.
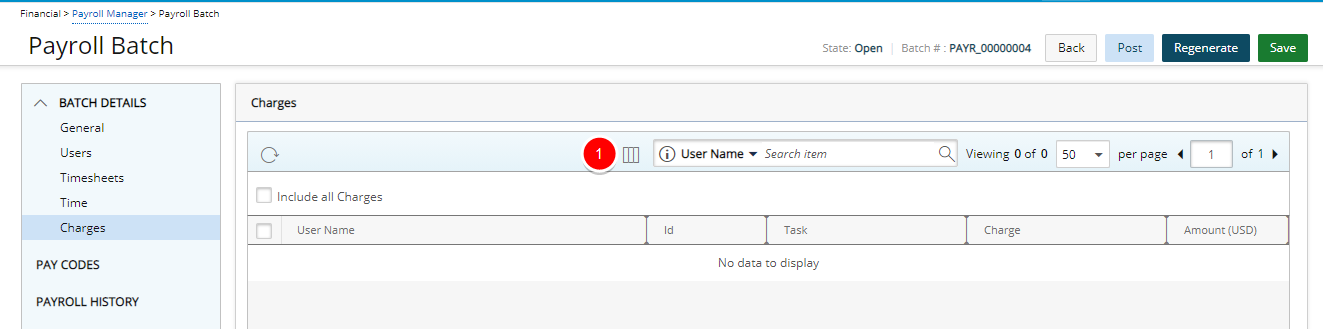
- Addition of Column Selection with these default options: User Name, Id, Task, Charge and Amount.
-
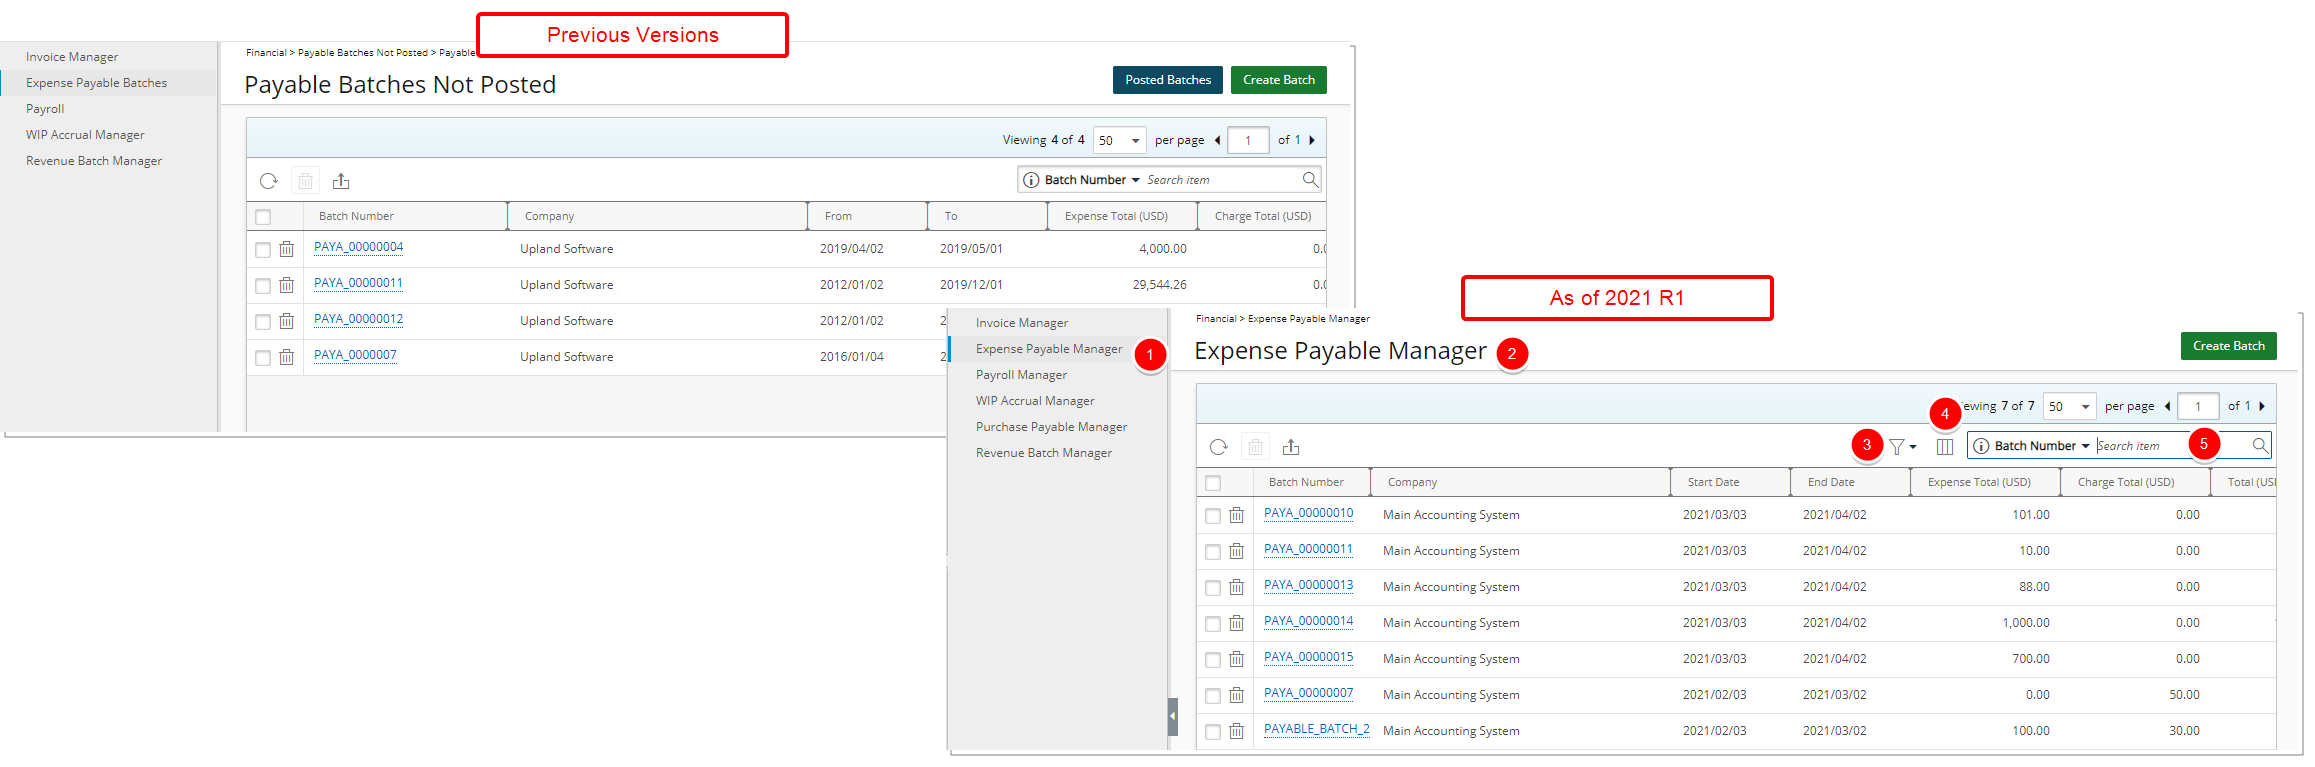
The Expense Payable Batches navigation option has been renamed to Expense Payable Manager.
-
Payable Batches Not Posted has been renamed to Expense Payable Manager.
-
A new Filter option has been added to allow for the filtering of the Expense Payable Batches based on: Open and Posted status. As a result of which the Posted Batches button has been removed.
-
Addition of Column Selection functionality. These columns are displayed by default: Batch Number, Company, Start Date, End Date, Expense Total, Charge Total, Total and Posted. Furthermore, you can choose to include the Created Date and Posted Date columns.
-
By default, you can Search based on Batch Number and Company. In addition, you can choose to include the Posted Date Search criterion.
For further details refer to Expense Payable Manager.
Financial Planner
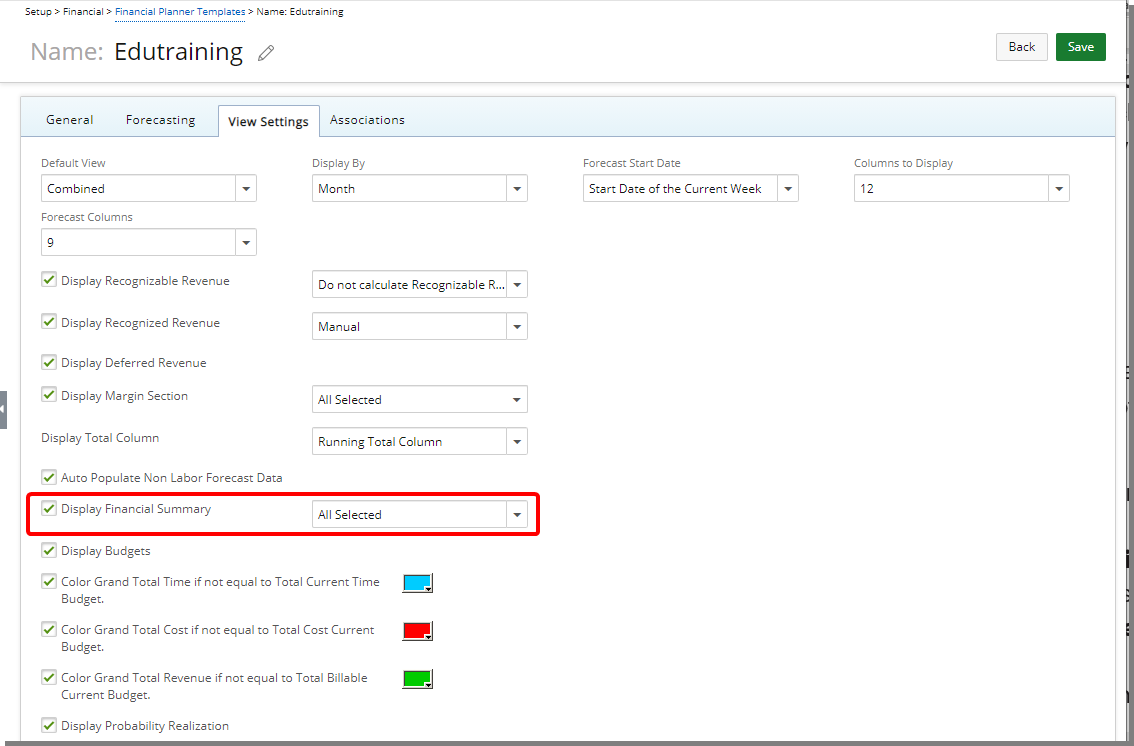
Description: Addition of a selection box where you can choose the information to be displayed within the Financial Summary section. The available options for Display Financial Summary are:
-
Margin Total: Dependent on the selection of Margin Total in the Display Margin Section within View Settings.
-
Margin % by Revenue: Dependent on the selection of Margin Percentage by Revenue in the Display Margin Section within View Settings.
- Margin % by Cost: Dependent on the selection of Margin Percentage by Cost in the Display Margin Section within View Settings.
- Margin Net: Dependent on the selection of Net Margin in the Display Margin Section within View Settings.
- Margin % Net: Dependent on the selection of Net % Margin in the Display Margin Section within View Settings.
- Revenue by Charges: Dependent on the displaying of the Revenue category and Charges sub-category.
- Revenue by Expenses: Dependent on the displaying of the Revenue category and Expenses sub-category.
- Revenue by Roles: Dependent on the displaying of the Revenue category and Roles sub-category.
- Cost by Charges: Dependent on the displaying of the Cost category and Charges sub-category.
- Cost by Expenses: Dependent on the displaying of the Cost category and Expenses sub-category.
- Cost by Roles: Dependent on the displaying of the Cost category and Roles sub-category.
- Cost by Products: Dependent on the displaying of the Cost category and Products sub-category.
- Select All: Choose this option to select all above mentioned criteria.
Benefit: The Financial Summary section is now adjustable, and you can choose to hide the information even if the option is part of the Financial Planner details.
Note: The displaying of the information within the Financial Summary section is directly dependent on the chosen option(s) for the Financial Planner table. As an example, if Expense Cost is not part of the Forecasting, then the Cost by Expenses section will not show within the Financial Summary section even if selected.
For further details refer to Enabling the Financial Summary section to appear within the Financial Planner.
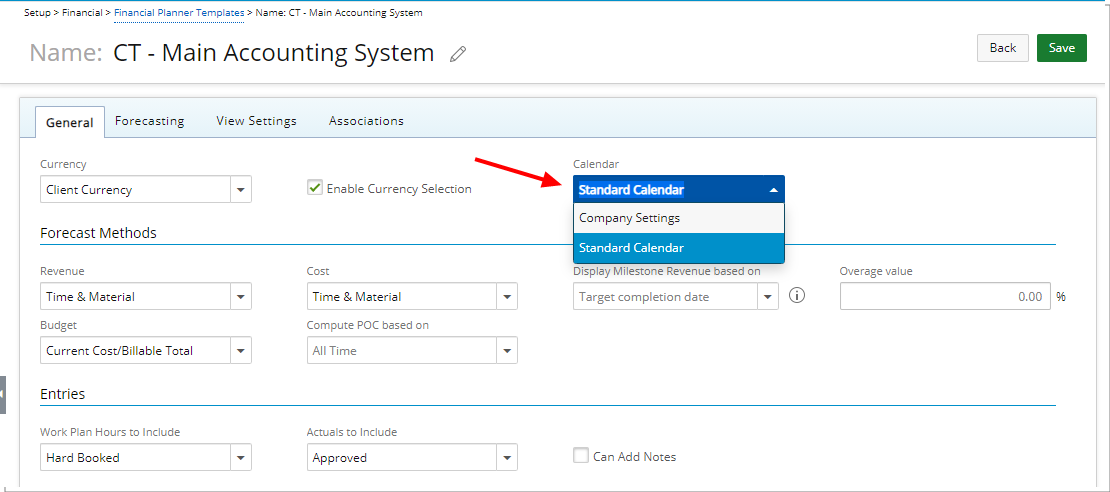
The option Company Settings has been added to the Calendar selection box when creating/modifying a Financial Planner Template (Setup > Financial > Financial Planner Templates). When selected, the chosen Calendar at the Company level will be used.
The precedence for the Calendar setting (highest to lowest) is as follows:
- Template level: The Calendar of the Template associated to the Project (Project List > Project > load Financial Planner > Template).
- Company level: The Calendar of the Company associated to the Project. (Project List > Project > Options tab).
- Client level: The Calendar for the Company associated to the Project’s Client (Setup > Work > Clients > Client > Invoice Options tab).
- System level: The Calendar for the System Default Company (Setup > Financial > System > Defaults).
Note: In a previous release, the ability to choose a Calendar at the Company level (Setup > Financial > System > Accounting System > Company List) was made unavailable. As of this release, this setting has been reinstated and is functioning as expected.
For further details refer to Creating a Financial Planner Template.
Integration
QuickBooks Online
Description: PSA Invoices with Custom Tax rates can now be exported to QuickBooks Online for US Companies.
Mapping of Client Tax Group to QuickBooks Customer when importing to PSA:
- When a Customer in QuickBooks is associated to a Taxable Tax Code, the Sales tax Group of respective Client in PSA = Sales tax Item which is associated to Customer Tax Code.
- When a Customer in QuickBooks is NOT associated to a Tax Code (i.e, the tax code of respective customer is blank), the Sales tax Group of respective Client in PSA = Sales tax Item associated to default QuickBooks Tax Code.
- When a Customer in QuickBooks is associated to a Non_Taxable Tax Code (Exempt), the Sales tax Group of respective Client in PSA = Default Non Taxable Tax code (determined in QuickBooks).
When Exporting an Invoice from PSA to a QuickBooks US company, the tax code and Total Tax Calculation depend on:
- When the Sales Tax group of the imported Client is not overridden in PSA, the calculated Taxes in both systems are the same.
- When the Sales Tax group of the imported Client is overridden in PSA & set to a Sales tax Group which is mapped from QuickBooks, the calculated Taxes in both systems are the same.
- When the Sales Tax group of the imported Client is overridden in PSA & set to a Sales tax Group which is NOT mapped from QuickBooks, then the Total invoiced amount in QuickBooks is different from that of the Total invoiced amount in PSA.
- When the Sales Tax group of the imported Client = Exempt tax code, the tax code of Transaction item in QuickBooks Invoice = Exempt tax code and Total tax = 0
Note: If Automated Tax setting is enabled in QuickBooks Online and the Client has a Default Tax or Custom Tax, QuickBooks Online will override the Exported Tax with the Automated one (Location-Based).
For further details refer to Importing Taxes from QuickBooks Online and Exporting Taxed Invoices to QuickBooks Online | US Companies.
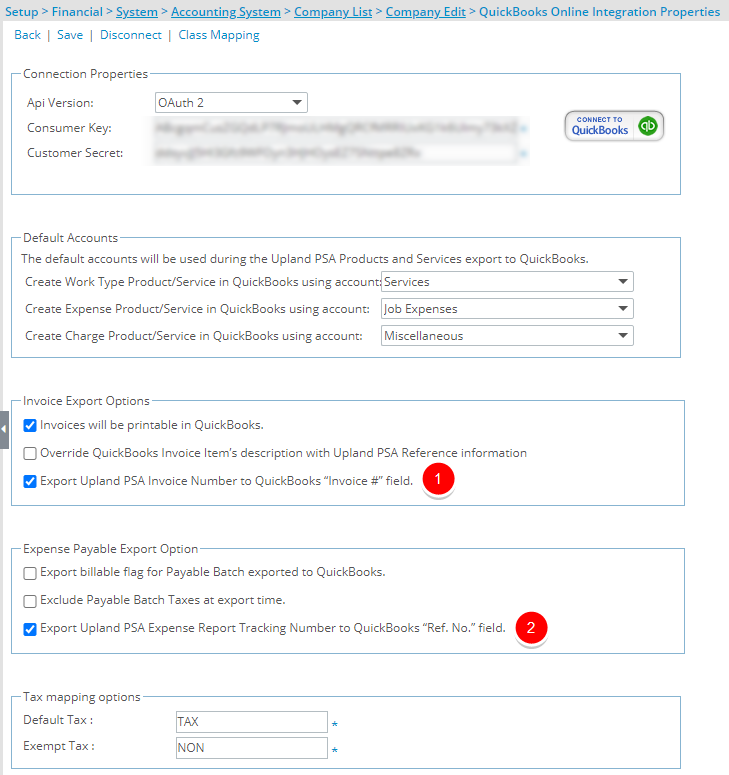
Description: The following two options have been added to the QuickBooks Online Integration Properties page:
-
Export PSA Invoice Number to QuickBooks “Invoice #” field located within the Invoice Export Options section. When selected, upon exporting an Invoice/Invoice Batch to QuickBooks Online, the PSA Invoice Number is exported and displayed as the QuickBooks Invoice #. If the option is not selected, the PSA Invoice Number will not be exported and the QuickBooks Invoice # will be set by QuickBooks.
-
Export PSA Expense Report Tracking Number to QuickBooks “Ref. No.” field located within the Expense Payable Export Option section. When selected, upon exporting an PSA Expense Payable Batch, the corresponding Expense Report Tracking Number(s) is exported and displayed as the QuickBooks Ref. No.
Use case: Adrian is tasked with setting up the PSA/QuickBooks Online integration so that while exporting Invoices and Expense Payable Batch, corresponding PSA PSA Invoice and Expense Report Tracking Numbers are displayed in QuickBooks as Invoice # and Ref. No. respectively. He can easily accomplish this task by selecting the Export PSA Invoice Number to QuickBooks “Invoice #” field and Export PSA Expense Report Tracking Number to QuickBooks “Ref. No.” field options.
For further details refer to Setting up the connection between PSA and QuickBooks Online.
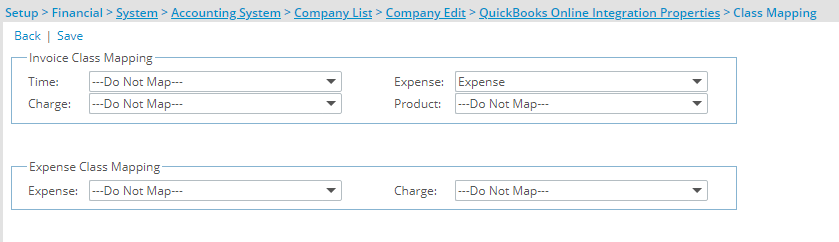
Description: From the newly added Class Mapping page accessed through the QuickBooks Online Integration Properties (Setup > Financial > System > Accounting System > Company List > Company Edit) you can now choose to map:
-
QuickBooks Online Invoice Class with PSA Time, Charge, Expense and Product.
-
QuickBooks Online Expense Class with PSA Expense and Charge.
Note: The imported Classes are saved in the PSA database and are not available on the user interface.
For further details refer to Importing/Exporting Classes.
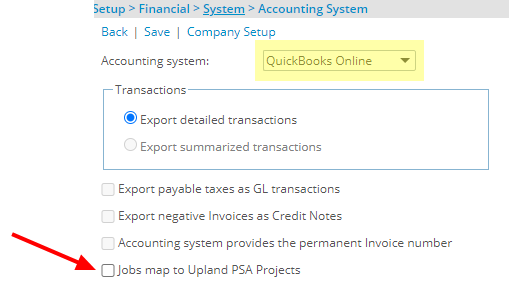
Description: The new option Jobs Map to PSA Projects has been added to the Accounting System page(Setup > Financial > System). You can import Jobs from Quickbooks Online and automatically create PSA Projects upon importing.
The Jobs Map to PSA Projects option is available upon selecting Quickbooks Online as the Accounting system and is not selected by default.
For further details refer to Importing Jobs and mapping them to PSA Projects.
Mobile
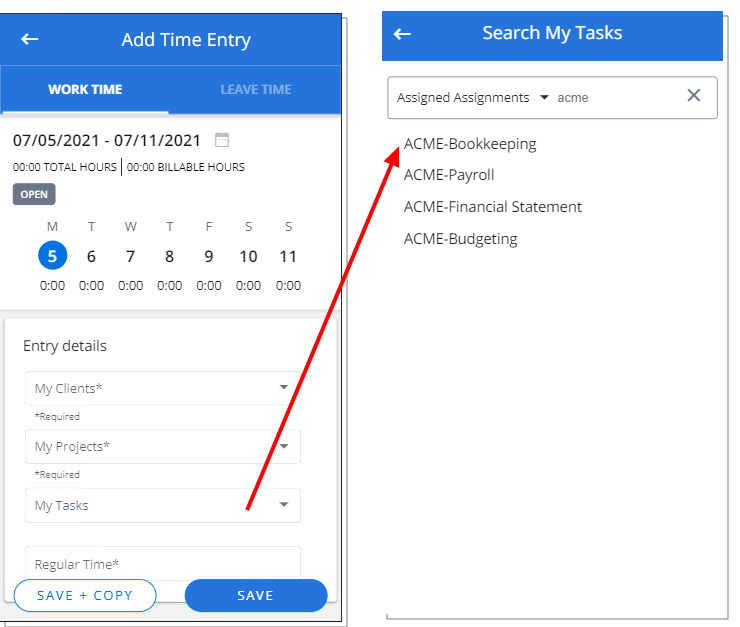
Description: When the option Include Project Team data is selected for an associated Timesheet Template, Mobile Users belonging to a Project Team can easily search for un-assigned Clients/Projects/Tasks as follows:
- With the My Clients Field selected, the Timesheet owners will be able to search for Clients for which they have assignments and those Clients whose Projects they are a Team member of.
- With the My Projects Field selected, the Timesheet owners will be able to search for Projects for which they have assignments but also those Projects they are a Team member of.
When this Field is preceded by My Client, it will be filtered to show only the Projects of that Client. - With the My Tasks Field selected, the Timesheet owners will be able to search for Tasks for which they have assignments and those Tasks of those Projects they are a Team member of.
When this field is preceded by My Client, My Project or My Work Type Field(s), it will be filtered based on the selected values for those Fields.
Benefit: With this addition, users belonging to a Project Team can now easily search for Clients/Projects/Tasks.
Project Status Reporting
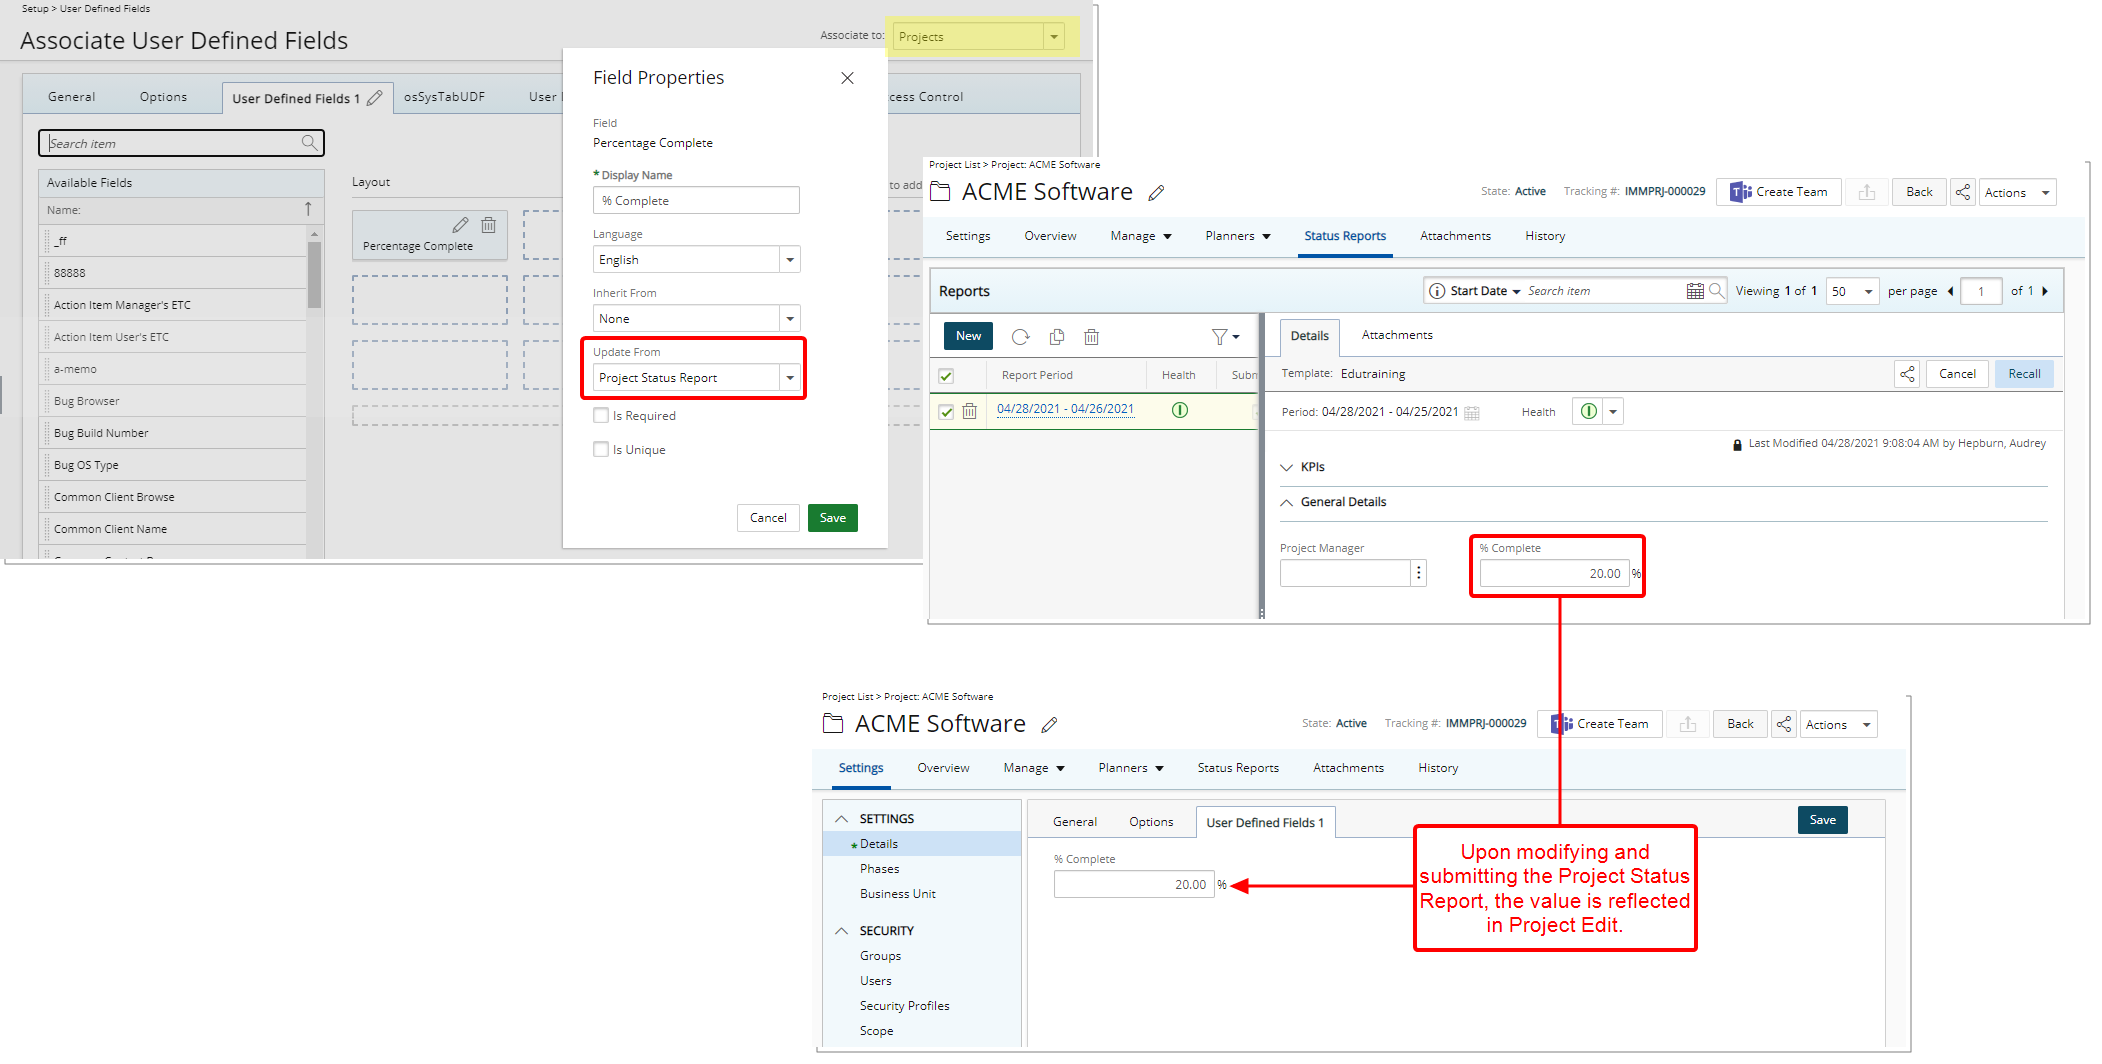
Description: User Defined Fields associated both to the Project Status Report and Project can now inherit their set values from the Project Status Report to the latter.
The Update From option located within the Field Properties dialog box when modifying a User Defined Field with prior Project association, allows you to choose if the field should be updated with the set values from a submitted Project Status Report.
For further details refer to Configuring a User Defined Field associated both to the Project and Project Status Report to update it's value from the submitted Project Status Report.
With the addition of the Currency option within the Field Properties dialog box when modifying an amount-based Project KPI Field in a Project Status Template, you can now choose to display the amounts in either Base, Project Cost, or Client Billing Currency.
| Field Name | Available Currencies | ||
|---|---|---|---|
| Base | Project Cost | Client Billing | |
| Actual Billable |

|
|
|
| Actual Cost |
|
|
|
| Actual Non-Billable |
|
|
|
| Baseline Billable Budget |
|
|
|
| Baseline Cost Budget |
|
|
|
| Baseline Non-Billable Budget |
|
|
|
| Billable Charges |
|
|
|
| Billable Expenses |
|
|
|
| Billable Products |
|
|
|
| Billable Time Amount |
|
|
|
| Current Billable Budget |
|
|
|
| Current Cost Budget |
|
|
|
| Current Non-Billable Budget |
|
|
|
| Payable Charges |
|
|
|
| Payable Expenses |
|
|
|
| Payable Products |
|
|
|
| Payable Time Amount |
|
|
|
| Prepaid Amount |
|
|
|
| Recognized PO Amount |
|
|
|
| Reimbursable Expenses |
|
||
| Remaining PO Amount |
|
|
|
| Total Charges |
|
||
| Total Expenses |
|
||
| Total Invoiced |
|
|
|
| Total PO Amount |
|
|
|
| Total PO Consumed Amount |
|
|
|
| Δ Baseline Billable Budget |
|
|
|
| Δ Baseline Cost Budget |
|
|
|
| Δ Baseline Non-Billable Budget |
|
|
|
| Δ Current Billable Budget |
|
|
|
| Δ Current Cost Budget |
|
|
|
| Δ Current Non-Billable Budget |
|
|
|
For further details refer to Setting the displayed Currency of the amount-based Fields within the Project Status Templates.
The following KPIs have been added to the Project KPIs tab within the Project Status Templates:
| Field Name | Definition |
|---|---|
| Billable Hard Booked Hours |
Billable Hard Booked Hours is the Sum of all Billable Hard Booked Hours on the Project. |
| Billable Soft Booked Hours | Billable Soft Booked Hours is the Sum of all Billable Soft Booked Hours on the Project. |
| Non-Billable Hard Booked Hours |
Non-Billable Hard Booked Hours is the Sum of all Non-Billable Hard Booked Hours on the Project. |
| Non-Billable Soft Booked Hours |
Non-Billable Soft Booked Hours is the Sum of all Non-Billable Soft Booked Hours on the Project. |
Furthermore, the following KPIs related to the Financial Planner are now also available from the Project Status Templates. The availability of these financial indicators enables you to observe your Project performance.
Based on your Financial Planner View these Fields are available:
- Margin Grand Total for Combined View
- Margin Grand Total for Actual View
- Margin Grand Total for Forecast View
- Margin Running Total for Combined View
- Margin Running Total for Actual View
- Margin Running Total for Forecast View
- Margin Total Actual for Combined View
- Margin Total Actual for Actual View
- Margin Total Actual for Forecast View
- Margin % by Revenue Grand Total for Combined View
- Margin % by Revenue Grand Total for Actual View
- Margin % by Revenue Grand Total for Forecast View
- Margin % by Revenue Running Total for Combined View
- Margin % by Revenue Running Total for Actual View
- Margin % by Revenue Running Total for Forecast View
- Margin % by Revenue Total Actual for Combined View
- Margin % by Revenue Total Actual for Actual View
- Margin % by Revenue Total Actual for Forecast View
- Margin % by Cost Grand Total for Combined View
- Margin % by Cost Grand Total for Actual View
- Margin % by Cost Grand Total for Forecast View
- Margin % by Cost Running Total for Combined View
- Margin % by Cost Running Total for Actual View
- Margin % by Cost Running Total for Forecast View
- Margin % by Cost Total Actual for Combined View
- Margin % by Cost Total Actual for Actual View
- Margin % by Cost Total Actual for Forecast View
- Net Margin Grand Total for Combined View
- Net Margin Grand Total for Actual View
- Net Margin Grand Total for Forecast View
- Net Margin Running Total for Combined View
- Net Margin Running for Actual View
- Net Margin Running Total for Forecast View
- Net Margin Total Actual for Combined View
- Net Margin Total Actual for Actual View
- Net Margin Total Actual for Forecast View
- Net Margin % Grand Total for Combined View
- Net Margin % Grand for Actual View
- Net Margin % Grand Total for Forecast View
- Net Margin % Running Total for Combined View
- Net Margin % Running Total for Actual View
- Net Margin % Running Total for Forecast View
- Net Margin % Total Actual for Combined View
- Net Margin % Total Actual for Actual View
- Net Margin % Total Actual for Forecast View
Note:
- The displaying of these values is dependent on the chosen options within the Financial Planner Template associated to the Project.
- Financial Planner must be initialized.
For further details refer to Available Fields from the Project KPIs tab.
Project List
The following KPIs have been added to the Project List column selection:
| Field Name | Definition |
|---|---|
| Billable Hard Booked Hours |
Billable Hard Booked Hours is the Sum of all Billable Hard Booked Hours on the Project. |
| Billable Soft Booked Hours | Billable Soft Booked Hours is the Sum of all Billable Soft Booked Hours on the Project. |
| Non-Billable Hard Booked Hours |
Non-Billable Hard Booked Hours is the Sum of all Non-Billable Hard Booked Hours on the Project. |
| Non-Billable Soft Booked Hours |
Non-Billable Soft Booked Hours is the Sum of all Non-Billable Soft Booked Hours on the Project. |
For further details refer to Out-Of-The-Box Column Selection options | Project List.
Work Items
Addition of Work Items as part of Project Management
With the addition of the new Work Items, it is now possible to create and manage Issues, Risks and Action Items for Projects improving collaboration among Project Team members.
Moreover, this addition makes for a more effective management of these supporting components from Project Edit compared to them being accessed from the Work Processes area.
Note: The legacy Issues, Risks and Action Items under Work Processes are still available. However, it is recommended that you use the new Work Items going forward.
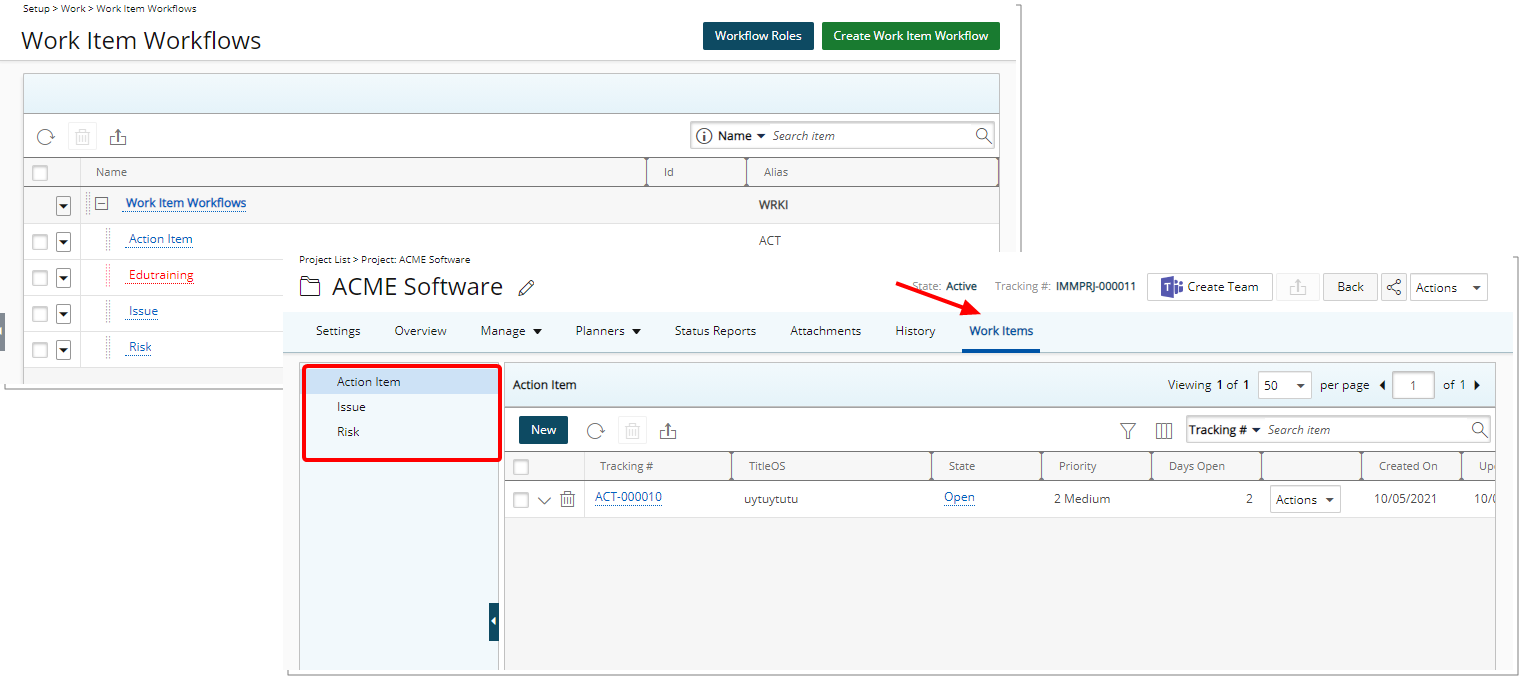
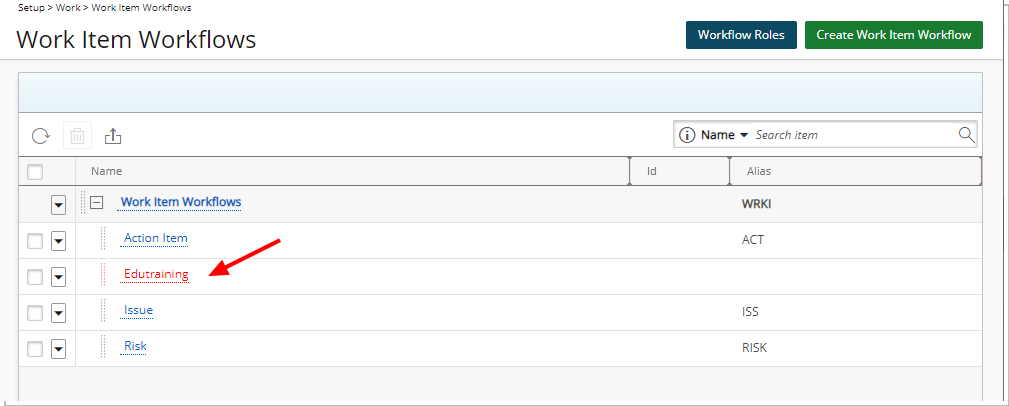
Addition of Work Item Workflows under Setup > Work where you can Create Work Item Workflows, manage existing ones and configure the Workflow Roles. Each Workflow created, drives, supports and represents a Work Item that will then be accessible from the left pane of the Project Edit Work Items tab.
The following out-of-the-box and configurable Work Item Workflows are available:
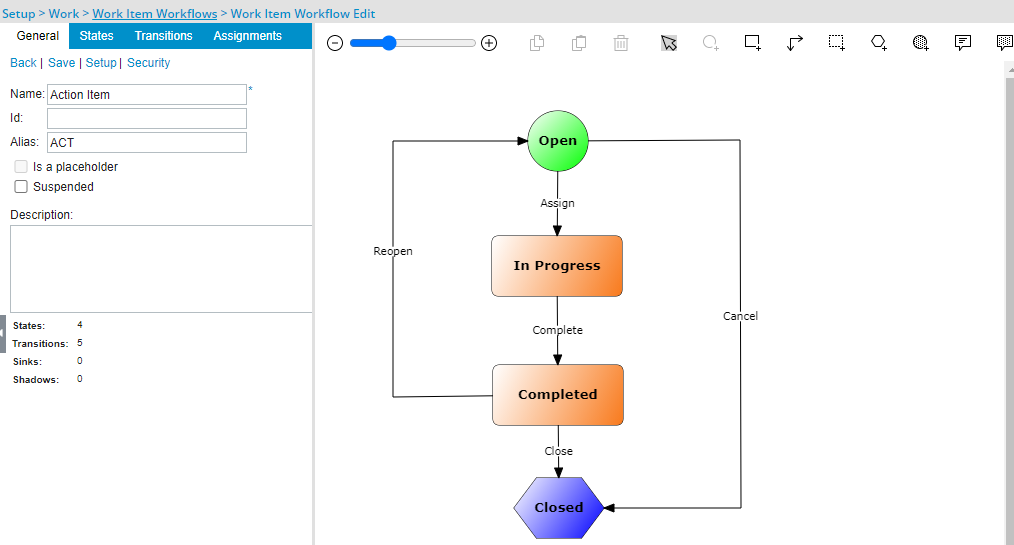
The standard out-of-the-box Action Item Workflow has the following States, State Attributes, and respective Assignments.
| State | Attribute | Assignment |
|---|---|---|
| Open | Initial | Creator, Originator, Project Manager |
| In Progress | None | Creator, Originator, Project Manager, Project Team Members |
| Completed | Completed | Creator, Originator, Project Manager, Project Team Members |
| Closed | Read Only, Final |
For further details refer to Out-of-the-box Action Item Workflow
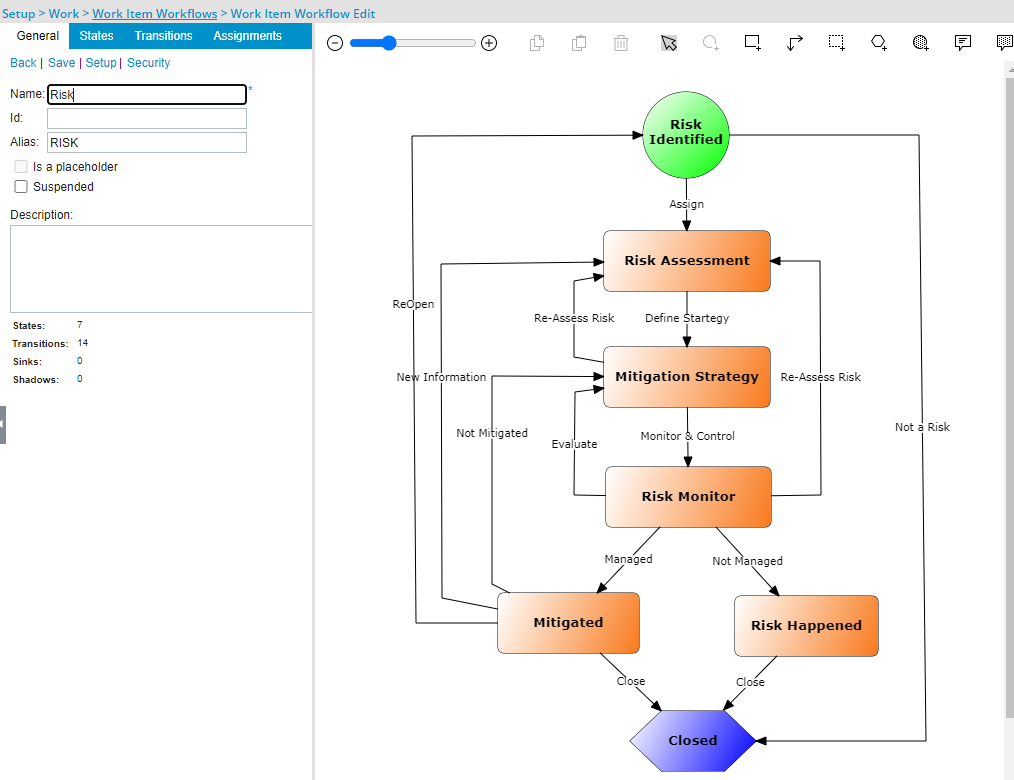
The standard out-of-the-box Risk Workflow has the following States, State Attributes, and respective Assignments.
| State | Attribute | Assignment |
|---|---|---|
| Risk Identified | Initial | Creator, Originator, Project Manager |
| Risk Assessment | None | Creator, Originator, Project Manager, Project Team Members |
| Mitigation Strategy | None | Creator, Originator, Project Manager, Project Team Members |
| Risk Monitor | None | Creator, Originator, Project Manager, Project Team Members |
| Mitigated | Completed | Creator, Originator, Project Manager, Project Team Members |
| Risk Happened | Completed | Creator, Originator, Project Manager, Project Team Members |
| Closed | Final, Read Only |
For further details refer to Out-of-the-box Risk Workflow
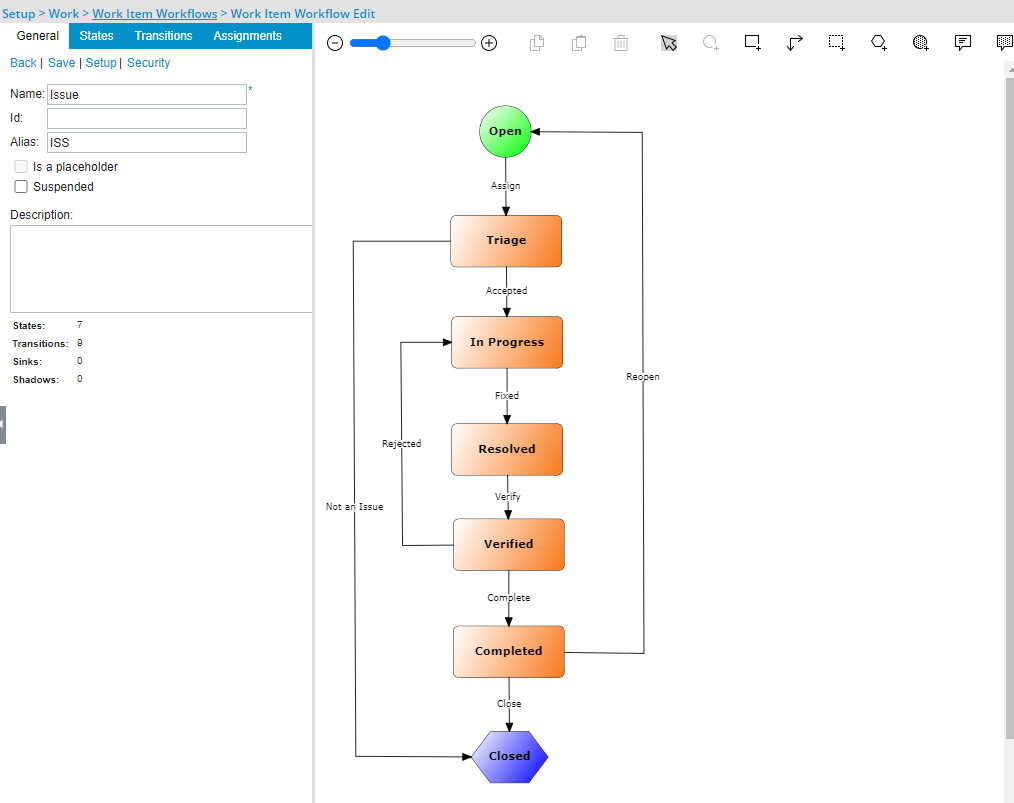
The standard out-of-the-box Issue Workflow has the following States, State Attributes, and respective Assignments.
| State | Attribute | Assignment |
|---|---|---|
| Open | Initial | Creator, Originator, Project Manager, Project Team Members |
| Triage | None | Creator, Originator, Project Manager |
| In Progress | None | Creator, Originator, Project Manager, Project Team Members |
| Resolved | None | Creator, Originator, Project Manager, Project Team Members |
| Verified | None | Creator, Originator, Project Manager, Project Team Members |
| Completed | Approved, Completed | Creator, Originator, Project Manager, Project Team Members |
| Closed | Final, Read Only |
For further details refer to Out-of-the-box Issue Workflow
The creation and management of the Work Item Workflows is like other workflows in PSA.
From the General tab of the Workflow Edit page, you can define the general parameters. The States and Transitions can be set up from the graphical interface on the right. Once a Work Item Workflow is saved you can then access the Setup and Security pages.
From the Setup page you can define the Layout of the Workflow Item Entry page by selecting either the out-of-the-box Fields (light grey background color) or any available User Defined Fields (light blue background color) and dragging them to the desired position on the right pane.

From the Work Item Security dialog box, you can easily manage and grant the View/Modify/Create/Delete/Assign Rights to a Security Profile.
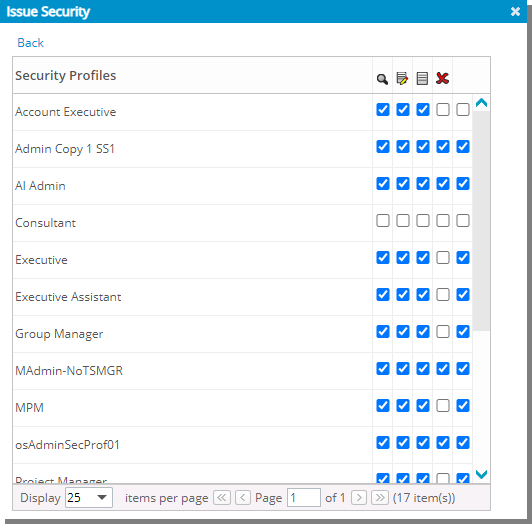
Note: The Next State Assignment Only right is not available from the Security dialog box.
For further details refer to Work Item Workflows
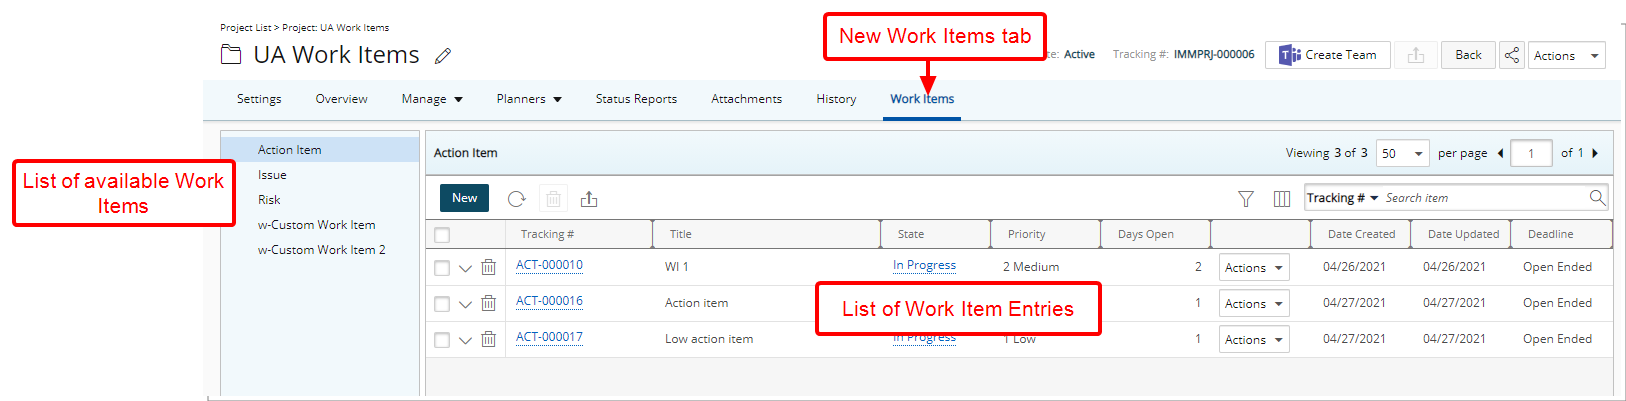
The Work Items can be accessed from the new Work Items tab when editing a Project. The list of available Work Items can be found on the left navigation pane. Upon selecting a Work Item, the right pane will be refreshed and lists the corresponding Work Item Entries.
From the List page you can:
- Create a New Work Item Entry.
- Refresh the page.
- Delete selected Work Item Entries.
- Export all items to Excel. If the exported columns include Calculated Fields with applied color indicators, the respective colors will be reflected in the corresponding cell background in Excel.
- In addition to any User Defined Fields or regular Fields associated to the Work Item, by default, you can apply a Filter based on:
- Action Item: Assigned To, Created By, Created On, Updated On, Days Open, Deadline, Priority, State, Title and Tracking#.
- Issue: Assigned To, Created By, Created On, Updated On, Days Open, Deadline, Priority, Severity, State, Title and Tracking#.
- Risk: Assigned To, Created By, Created On, Updated On, Days Open, Deadline, Impact Score, Impacted Deliverables, Mitigation Strategy, Priority, Probability, Severity, State, Title and Tracking#.
- Access the Column Selection. By default, these columns are displayed for each out-of-the-box Work Item:
- Action Item: Tracking #, Title, State, Priority, Days Open, Action, Created On, Updated On and Deadline. In addition to any User Defined Fields associated to the Action Item Workflow, you can choose to add: Assigned To, Created By, Health and Severity.
- Issue: Tracking #, Title, State, Priority, Severity, Days Open, Action, Assigned To, Created On and Date Modified. In addition to any User Defined Fields associated to the Issue Workflow, you can choose to add: Impact Score and Updated On.
- Risk: Tracking #, Title, State, Priority, Probability, Severity, Impact Score, Days Open, Action Created On and Updated On. In addition to any User Defined Fields associated to the Risk Workflow, you can choose to add: Assigned To, Created By, Deadline, Impacted Deliverables and Mitigation Strategy.
- Search for an Item. By default, the available search criteria for all out-of-the-box Work Items are: Tracking #, Title, State, Deadline and Created By.
- Pagination: To facilitate easy navigation across pages.
- Sorting is available by clicking on the column header.
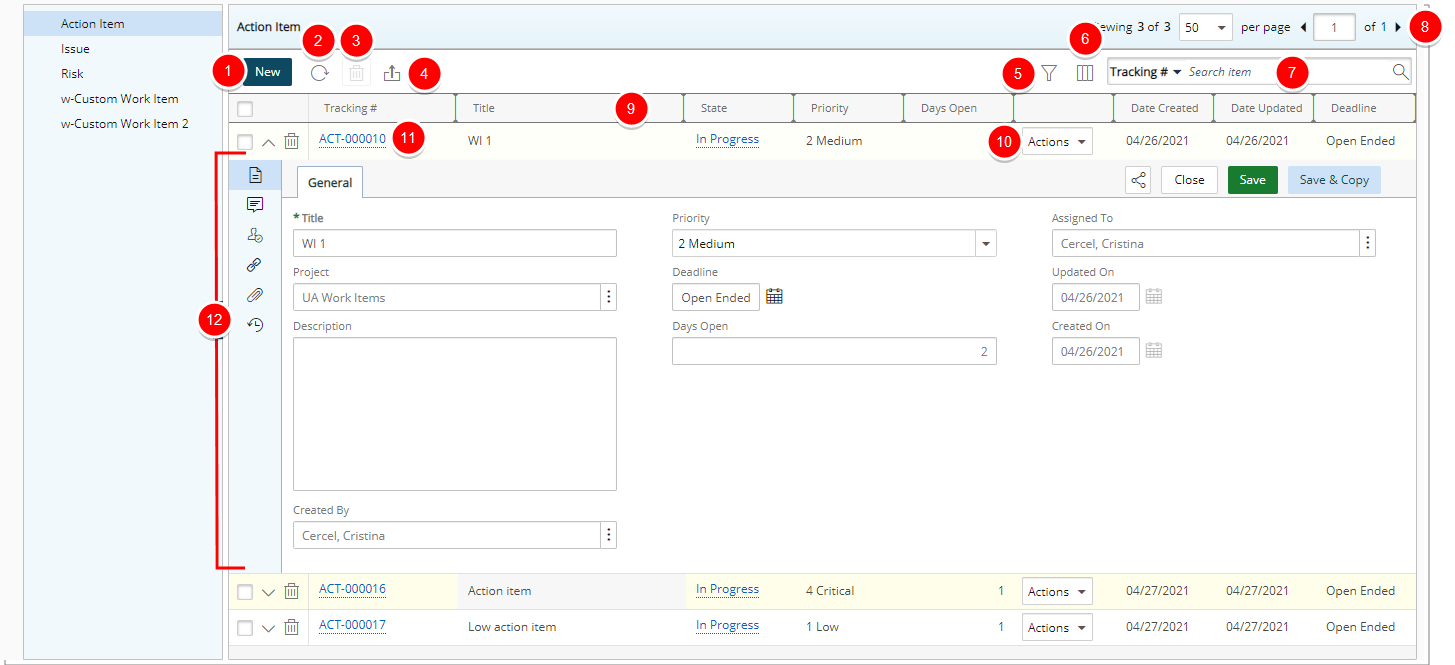
- Easily Action on the Entry.
- Clicking the Tracking Number will allow you to access the Work Item edit page where you can Modify, Action or Share the Entry with a colleague:
- From the General tab you can modify the General Work Item Entry options.
- From the Comments tab you can create or manage Comments.
- You can easily manage the State Assignments from the Assignments tab.
- From the Linked Items tab you can link existing or new Work Item Entries.
- From the Attachments tab, you can create or manage Notes as well as Documents and Links.
- From the History tab, you can access and view the detailed History.
- Expanding an Entry line item will allow you to Modify, Action or Share the Entry directly from the list page without the need to navigate away from it.
Note: In order for a Sharee to view a Work Item Entry, they must be granted the View permission to the Work Item.
- Inline editing is available for:
- Priority, Severity and Probability - Click the required cell and select an option from the list.
- Title - Click the required Title cell to modify it. When finished, click close (x) to cancel or the check mark () to save your changes.
Note: As a visual indicator, the background color of the editable items will change to white upon hovering over them.
For further details refer to the Work Item Entries section of the online help ceneter.
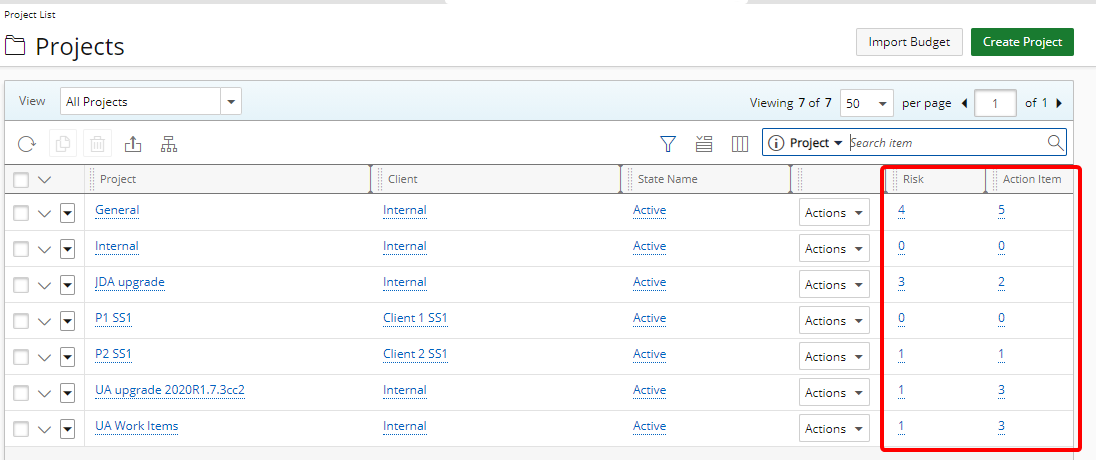
Description: The Work Item count Fields can be added to the:
-
Column selections: in Project, Project Program Association and Project Overview Summary section
-
Project KPIs: Project Status Reporting Templates
This allows you to conveniently view the number of Entries per Work Item at a glance. Clicking on the count link will take you directly to the corresponding Work Item List page where you can view and/or action on the Item(s). These new Fields are: Action Item, Issue and Risk.
Note: The ability to access and/view Work Items upon clicking the count link is managed by the Work Item Workflows permissions.
The legacy Work Process Fields have been renamed to include the WP as the prefix. The list of renamed Fields are:
| Prior to 2021 R1 | As of 2021 R1 | Description |
|---|---|---|
| Action Item | WP Action Item | This is the number of Action Item(s) created against the Project. Links to the Action Item list page. |
| Administrative Task | WP Administrative Task | This is the number of Administrative Task(s) created against the Project. Links to the Administrative Task list page. |
| Bug | WP Bug | This is the number of Bug(s) created against the Project. Links to the Bug list page. |
| Incident | WP Incident | This is the number of Incident(s) created against the Project. Links to the Incidents list page. |
| Issue | WP Issue | This is the number of Issue(s) created against the Project. Links to the Issues list page. |
| Pre-billing Approval | WP Pre-billing Approval | This is the number of Pre-billing Approval(s) created against the Project. Links to the Pre-billing Approval list page. |
| Project Survey | WP Project Survey | This is the number of Project Survey(s) created against the Project. Links to the Project Survey list page. |
| Risk | WP Risk | This is the number of Risk(s) created against the Project. Links to the Risks list page. |
| Scope Change | WP Scope Change | This is the number of Scope Change(s) created against the Project. Links to the Scope Changes list page. |
| Service Request | WP Service Request | This is the number of Service Request(s) created against the Project. Links to the Service Requests list page |
| Skill Update Request | WP Skill Update Request | This is the number of Skill Update Request(s) created against the Project. Links to the Skill Update Request list page. |
| Travel Request | WP Travel Request | This is the number of Travel Request(s) created against the Project. Links to the Travel Request list page. |
For further details refer to:
- Out-Of-The-Box Column Selection options | Project List
- Out-Of-The-Box Column Selection options - Program Projects tab
- Available Fields when Creating a Summary Layout
- Available Fields from the Project KPIs tab
The security and access control permissions of the Work Items can be managed through:
The Work Items tab can be Hidden or Locked based on the Tab Security setting under Setup > Organization > System > Security > Security Profile.
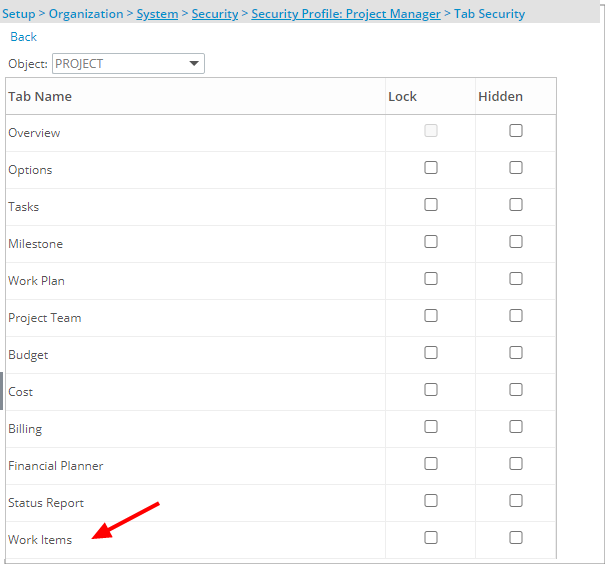
- When the Hidden option is turned on for a Security Profile, the Work Items tab from Project Edit will be hidden.
- When the Lock option is turned on for a Security Profile, associated Users can only view the Work Items.
For further details refer to Setting the access rights to Project tabs.
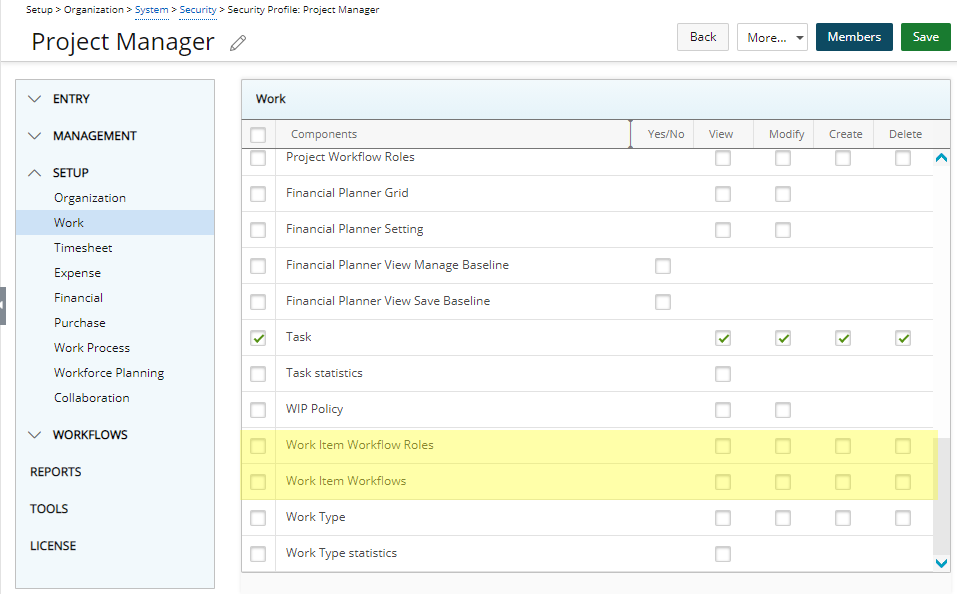
Work Item Workflow Roles and Work Item Workflows security permissions with View/Modify/Create/Delete rights can be granted from the Setup > Work menu of a Security Profile edit page. These permissions allow users (typically system Administrators) to create and manage the Work Item Workflows.
For further details refer to Allowing Users to create/manage Work Item Workflows.
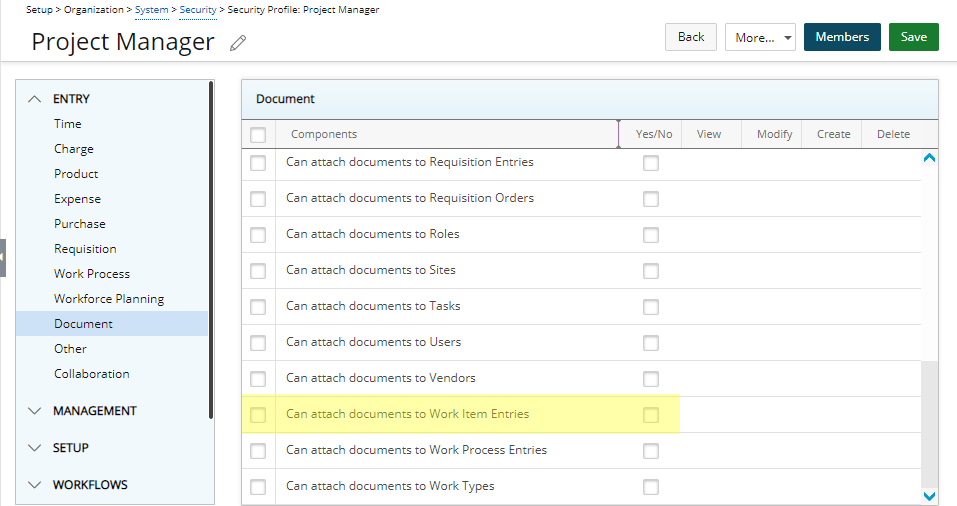
Can attach documents to Work Item Entries security permission with Yes/No rights can be granted from the Entry > Document menu of a Security Profile edit page. This permission allows users to create and manage attached Documents and Links.
For further details refer to:
- Allowing Users to attach Documents to Work Item Entries
- Allowing Users to create/manage Work Item Workflow Roles
Work Items Workflows security permission with View, Modify, Create, Delete, Next state assignment only and Assign rights can be granted from the Workflows menu of a Security Profile edit page (Workflows > Work Item Workflows). These permissions allow users to create and manage the Work Item Entries.
For further details refer to Allowing Users to create/manage Work Item Entries.
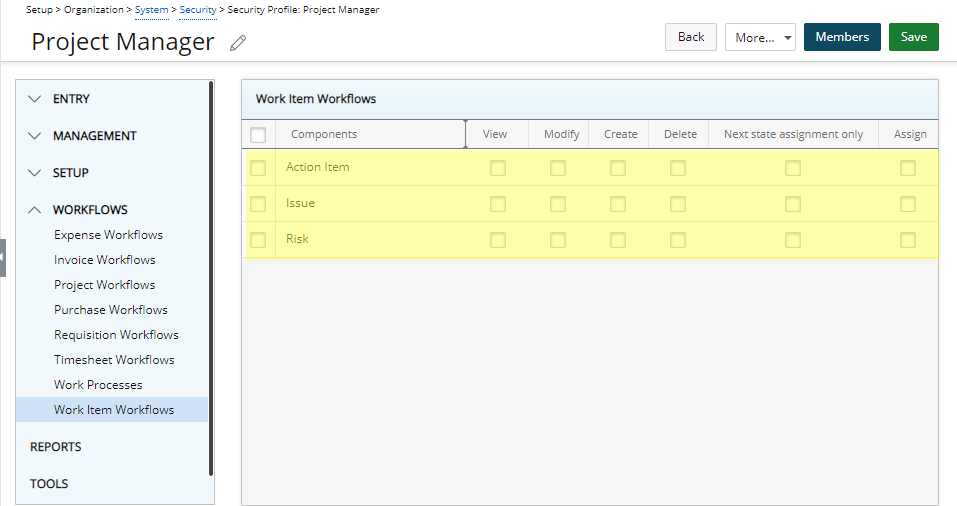
Note: By default, the Work Items Workflows rights are granted to the Administrator security profile only.
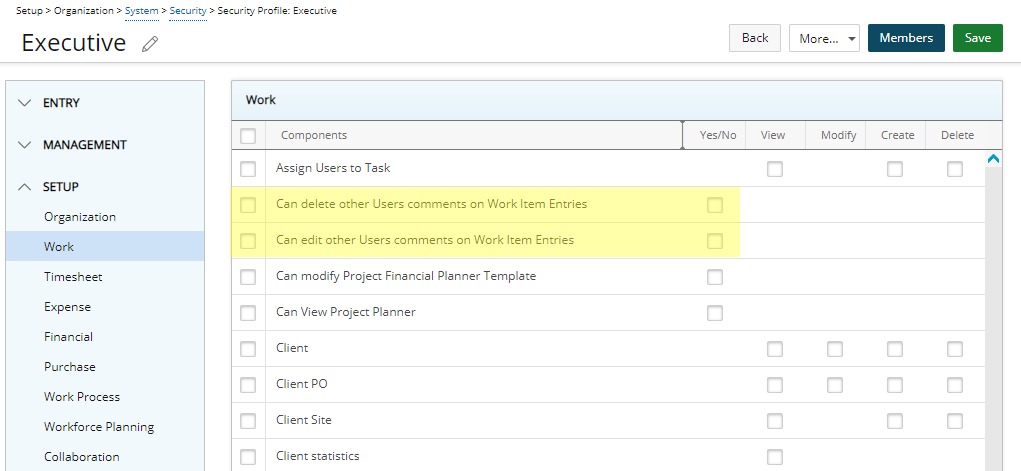
Can delete other Users’ comments on Work Item Entries and Can edit other Users’ comments on Work Item Entries security permissions with Yes/No rights can be granted from the Setup > Work menu of a Security Profile edit page. These permissions allow users to delete and/or modify other Users’ comments.
For further details, refer to Allowing Users to delete/edit other Users’ comments on Work Item Entries.
Upon upgrading to 2021 R1, Security Profiles with existing Work Process permissions will be granted the corresponding Work Items permissions according to the table:
| Users with these legacy Work Process Security Permissions | Will be granted these corresponding Work Item Security Permissions |
|---|---|
| Entry > Work Process > Work List (View/Modify/Create/Delete) | Tab Security > Work items (Lock/Hidden) |
| Entry > Document > Can attach documents to Work Process Entries (Yes/No) |
Entry > Document > Can attach documents to Work Items Entries (Yes/No) |
| Setup > Work Process > Work Processes (View/Modify Create/Delete) |
Setup > Work > Work Items Workflows (View/Modify Create/Delete) |
| (Administrator only)
Setup > Work > Can delete other Users comments on Work Item Entries |
|
| (Administrator Only)
Setup > Work > Can edit other Users comments on Work Item Entries |
|
| Workflows > Work Processes > Risk (View/Modify/Create/Delete/Take ownership/Next state assignment only/Assign/Admin) |
Workflows > Work Items Workflows > Risk (View/Modify/Create/Delete/ Next state assignment only/Assign) |
| Workflows > Work Processes > Issue (View/Modify/Create/Delete/Take ownership/Next state assignment only/Assign/Admin) |
Workflows > Work Items Workflows > Issue (View/Modify/Create/Delete/ Next state assignment only/Assign) |
| Workflows > Work Processes > Action Item (View/Modify/Create/Delete/Take ownership/Next state assignment only/Assign/Admin) |
Workflows > Work Items Workflows > Action Item (View/Modify/Create/Delete/ Next state assignment only/Assign) |
| Users with these legacy Workflow Roles (Risk, Issue, Action Item) | Will be granted these corresponding Work Item Workflow Roles (Risk, Issue, Action Item) |
|---|---|
| Setup > Work Processes > Workflow Roles | Setup > Work > Work Item Workflows > Workflow Roles |
Note: The legacy Issues, Risks and Action Items under Work Processes are still available. However, it is recommended that you use the new Work Items going forward.
Description: New Audit Trail options have been added under the Setup > Work menu of the Audit Trail (Setup > Organization > System > Security > Audit Setup) allowing you to track changes made to the Work Items and Work Item Workflows.
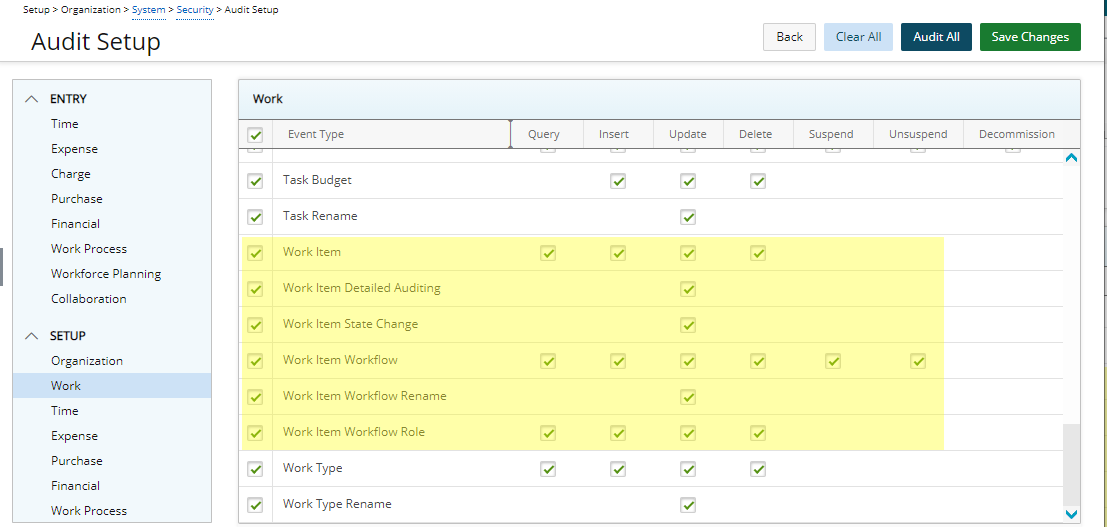
The following options are available:
- Work Item: Query, Insert, Update, Delete
- Work Item Detailed Auditing: Update
- Work Item State Change: Update
- Work Item Workflow: Query, Insert, Update, Delete, Suspend, Unsuspend
- Work Item Workflow Rename: Update
- Work Item Workflow Role: Query, Insert, Update, Delete
Furthermore, when the Work Item Detailed Auditing option, available under Setup > Work within the Audit Trail settings is turned on, changes made to the Work Items can be tracked and available on the History page to indicate what, when and by whom it was made, including the Linking/Unlinking, Creating and Copying of Linked items.
Note: The Deletion of Linked Item(s) such as an Issue associated to a Risk, is only tracked within the Audit Trail and is not displayed within the History tab.
For further details refer to
- Auditing of changes made to Work Item Entries
- Auditing of changes made to Work Item Workflows
- Auditing of changes made to Work Item Workflow Role
- Work Item Detailed Auditing
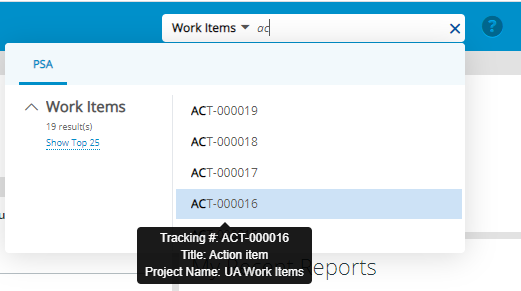
Description: You can now perform searches based on Work Items by Title and Tracking ID.
The top 5 search results are grouped by category and ordered by date descending for each line item. You can expand the search results to show up to a maximum of 25 per category.
Hovering over each search result line item triggers a tool tip detailing the Tracking #, Work Item title, and Project Name.
Benefit: The Global Search capability enables you to efficiently perform searches on Work Items based on full or partial entries.
For further details refer to Global Search Logic.
The following new System Tables have been added to accommodate the managing of the out-of-the-box Fields within the Work Items:
- Work Item Priority (Low, Medium, High, Critical, Blocking)
- Work Item Probability (Rare, Unlikely, Possible, Likely, Almost Certain)
- Work Item Severity (Insignificant, Minor, Moderate, Major, Catastrophic)
The out-of-the-box Impact Score User Defined Field is available Within the Risk Work Items and is calculated as [Probability] x [Severity]
Note: Decimal scores are rounded to the nearest integer value.
You can choose to Suspend Work Item Workflows from the Edit page (Setup > Work >
Work Item Workflows). When Suspended:
- The Work Item will not be available from the Project Edit if there are no corresponding active Work Item Entries.
- Where there are active Work Item Entries, the Work Item will remain visible and accessible. However, no new Work Item Entries can be created against it.
Note: Suspended Work Item Workflows appear in red.
For further details refer to Suspending Work Item Workflows
REST API/SDK
- With this release, security was modified on these version 1 endpoints: ExpenseEntries, ExpenseItemDetails and Timesheet wherein the View permissions are now enforced on all GET endpoints according to the corresponding User’s Security Profile.
- The Security for Time Entries API was modified wherein:
- The View permissions are now enforced.
- Get All: Will only return all Time Entries if the logged user has the Timesheet Administrator Role. Otherwise, only the Time Entries for the logged User will be returned.
- Get By Id: The Time Entry is returned if the user is either a Timesheet Administrator, has access to the related Project or the Time Entry belongs to the logged User.
- New endpoints are now available to View all Time Entries for a specific Project or Task.
- Scoping Rules are now enforced on the Project Team.
- api/v2/TimeEntries/Project/[projectId] : GET all time entries if user has the related project access.
- api/v2/TimeEntries/Task/[taskId] : GET all time entries if user has the related project access.
Caution: It is highly encouraged to use a Security Profile with Administrative privileges when working with the API. However, if you need to use a less privileged Security Profile, please ensure that all required View permissions are granted.
Description: A new endpoint for XML-based custom queries api/v2/query/XML?name=CUST_TEST_SP_XML_PARAM is now available.
This new endpoint receives a single query string parameter representing the customs stored procedure to be called with the request payload being an xml value containing parameters and values for the procedure.
Security

Description: Addition of Can modify Project Financial Planner Template Security permissions to Setup > Organization > System > Security > Security Profile > Setup > Work with Yes/No access right.
Benefit: Allows controlling of the ability to select a different Financial Planner Template at the Project level.
For further details refer to Allowing Users to select a different Financial Planner Template at the Project level.
Description: The following two Security permissions have been added to Setup > Organization > System > Security > Security Profile > Setup > Financial with View, Modify, Create, Delete access right options:
- Cost Rule Rate Entry grants permissions to Cost Rule Rate Entries.
- Billing Rule Rate Entry grants permissions to Billing Rule Rate Entries.
Note:
- A User without the Create permission to Billing/Cost Rule Rate Entry and with the Create permission to Billing/Cost Rules, can create rules of type Recurring Rate or Cost Plus, which will then result in the automatic creation of Cost/Billing Rule Entries.
- Upon upgrading to 2021 R1 existing security profiles with the View/Modify/Create/Delete rights to Billing/Cost Rules will have the corresponding rights enabled for the new Billing/Cost Rule Rate Entry Security Component.
- The Billing/Cost Rule Rate Entry Security Component will be turned on for the out-of-the-box Administrator and Executive Assistant Security Profiles.
For further details refer to Cost/Billing Rate Entry Security permissions.
Timesheet
Timesheet Manager

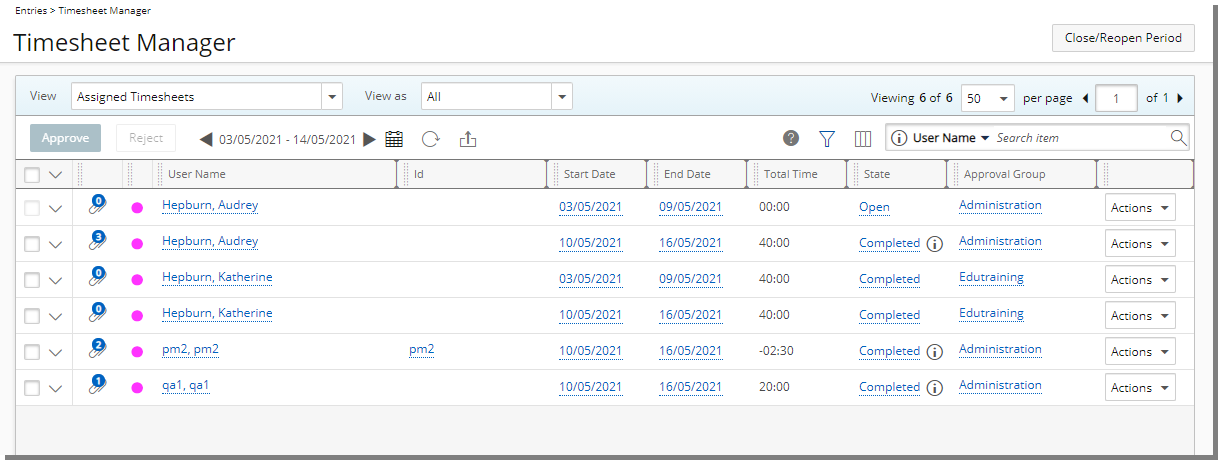
Description: The Timesheet Manager has been redesigned with the following chages:
- The spacing, colors and fonts of the Timesheet Manager list have been enhanced.
- The Approve and Reject links have been converted to buttons and are now located just below the View.
- The Refresh link has been converted to a button and relocated to the left of the Period picker.
- Updated and relocated Search box.
- The Close/Reopen Period link has been converted to a button and relocated to the top right corner of the page.
- You can now adjust the size and reposition the columns.
- Addition of Pagination to the upper right corner.
Benefit: With these modifications, the look and feel are further improved, as well in keeping with the UplandOne mindset, wherein the layout of various elements within the page supports the unified experience across Upland products. Consequently, the user experience is further elevated.
For further details refer to Accessing Timesheets for Viewing, Reviewing and/or Approval.
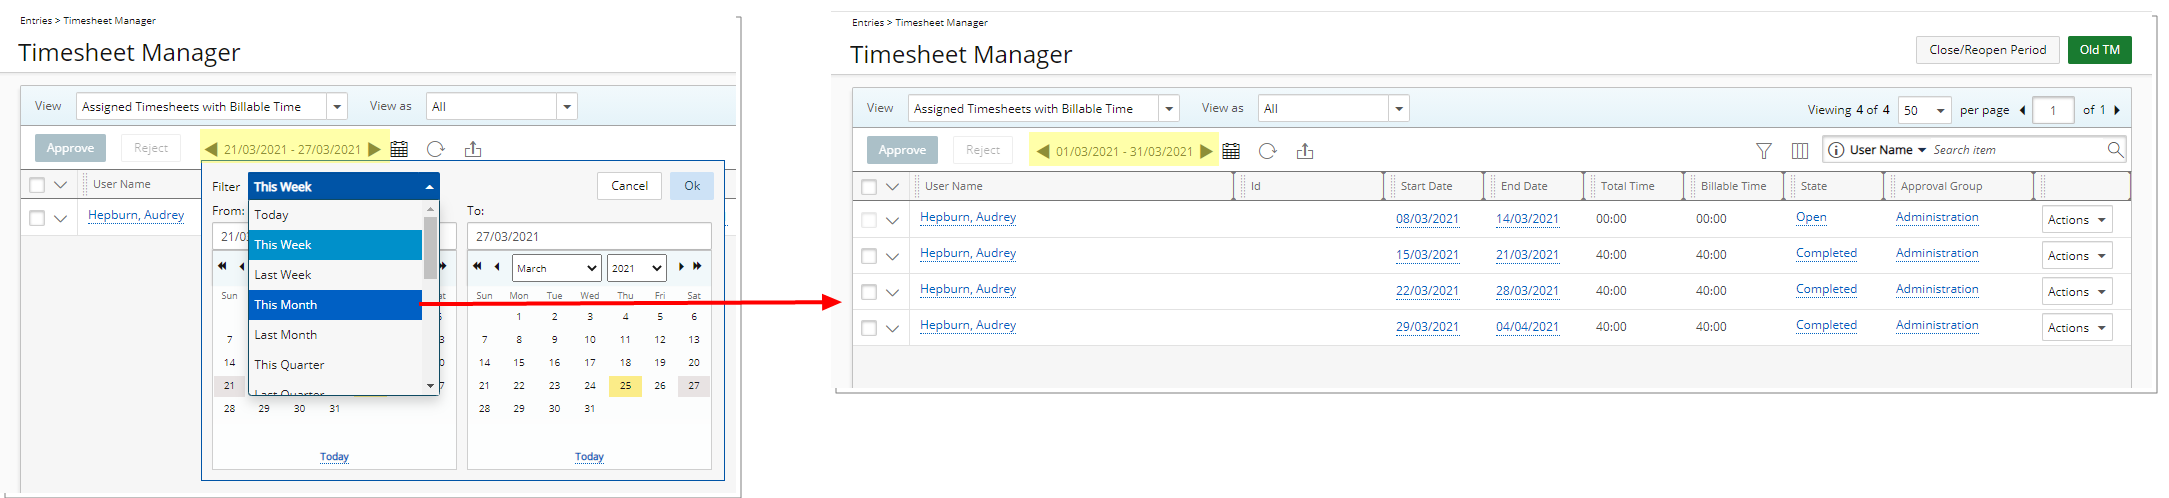
The To and From Date Pickers have been combined into one period picker.
In addition to the ability to select a Custom Period Start and End dates, you can choose to apply one of the following Filters: Today, This Week, Last Week, This Month, Last Month, This Quarter, Last Quarter, This Year, Last Year, Year To Date, This Fiscal Month, Last Fiscal Month, Fiscal Quarter, This Fiscal Year, Last Fiscal Year and Fiscal Year to Date.
The Views can now be accessed and managed through the View selection box.
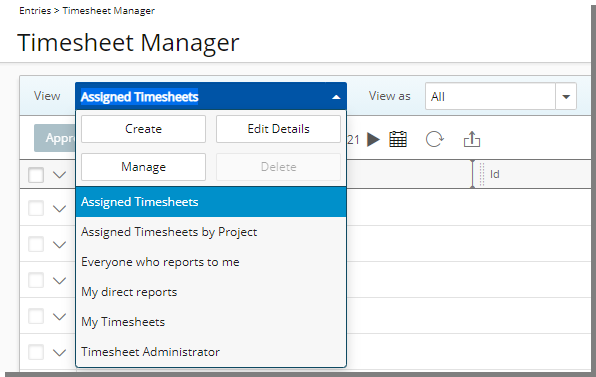
The out-of-the-box Views are: Assigned Timesheets, Assigned Timesheets by Project, Everyone who reports to me, My direct reports and My Timesheets.
Note: Hovering over a selected View name will trigger a tool tip detailing the View Description.
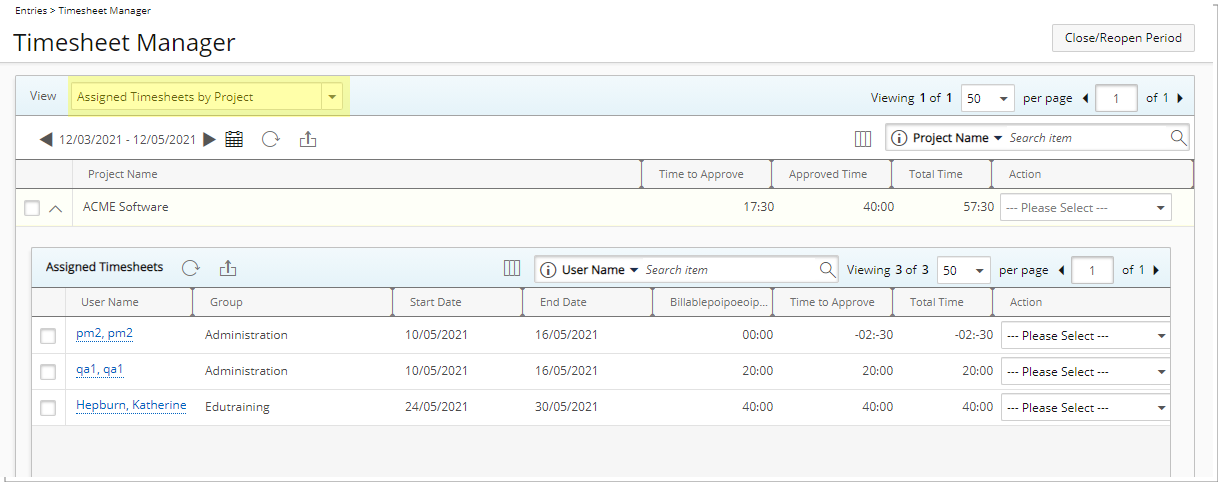
A new Assigned Timesheets by Project out-of-the-box View has been added, providing a list of all Timesheets, grouped by Project which are assigned to you as the Project Manager.
In cases where a Manager has not been assigned to a Project, the Approval Group Manager of the User who submitted the Timesheet will be able to access and action on the assigned Timesheets through the Assigned Timesheets by Project View.
Note: In cases where the:
- Project Manager is set as Out Of Office in PSA, their Alternate Project Manager will be assigned to the State.
- Group’s Approval Manager is set as Out Of Office in PSA, their Group’s Approval Alternate Manager will be assigned to the State.
For further details refer to Assigned Timesheets by Project View.
Improvements have been made to the Assigned Timesheet View wherein the displayed list of Timesheets include only the total Time entered against Project Tasks that the logged in User is assigned to action on.
By default, the list is sorted by Start Date in ascending order.
For further details refer to Timesheet Manager page | Available Views.
The management and design of the Views have been improved.
For further details refer to:
- Timesheet Manager View Settings
- Creating Custom Timesheet Manager Views
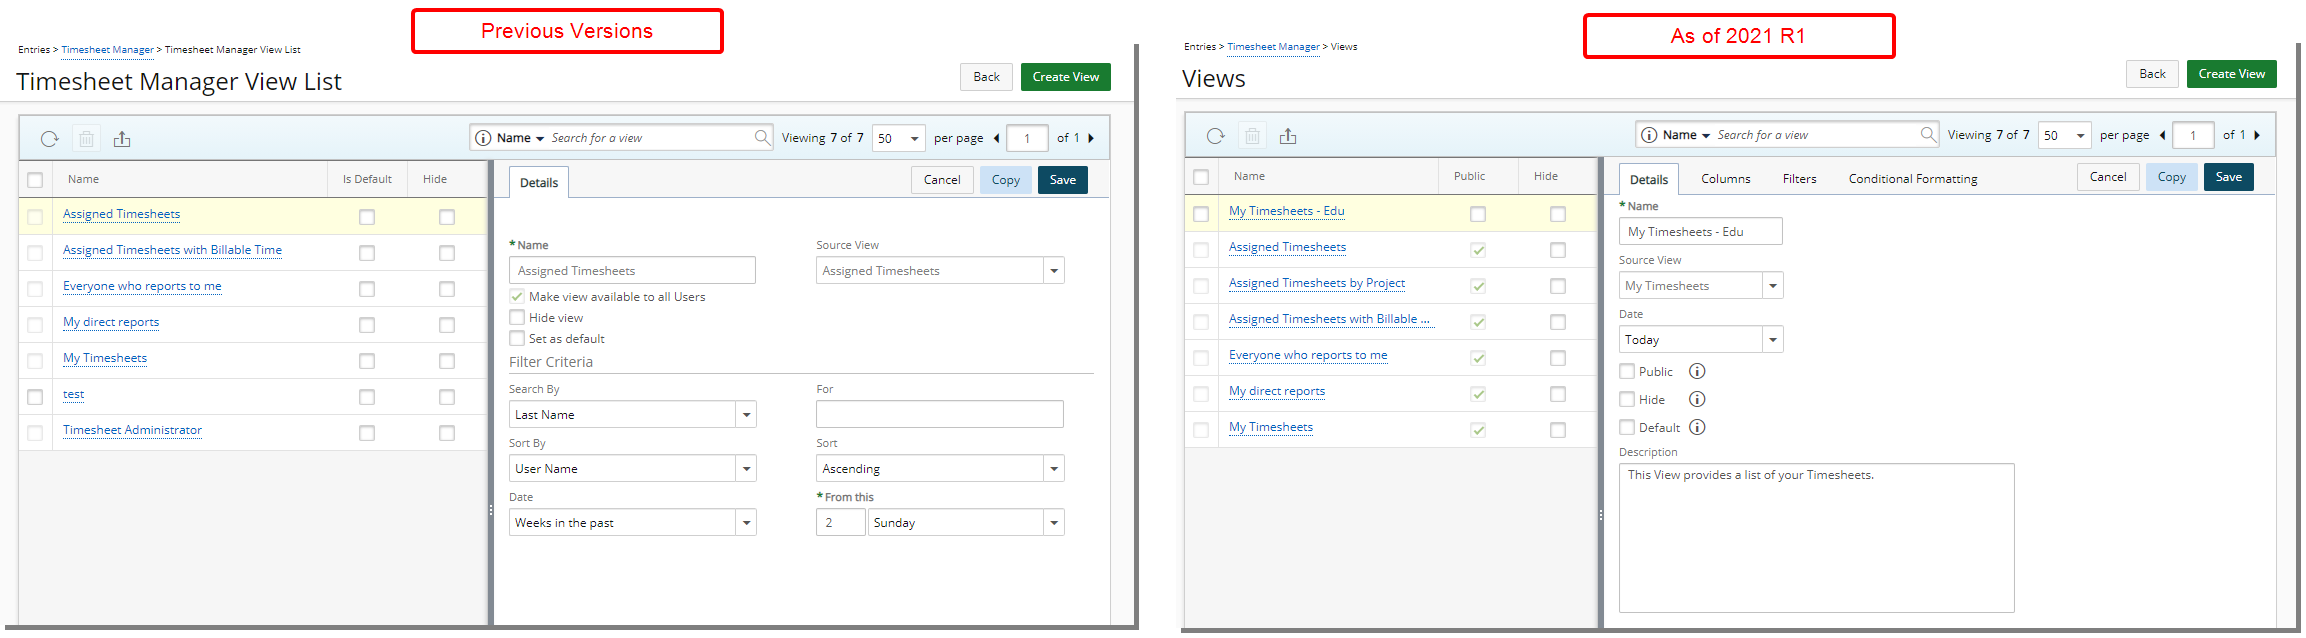
The Details tab has been redesigned as follows:
- Repositioned and resized Name and Source View selection boxes.
- Addition of the Date selection box.
- The Make view available to all Users, Hide view and Set as default options have been renamed to now read Public, Hide and Default respectively. Furthermore, upon hovering over the newly added information icon a tooltip is now displayed.
- The Filter criteria section has been removed from the Details tab. Filters can now be set from the Filters tab.
Note: Modifications made to the Hide and Default options will be applied to the logged in User only.
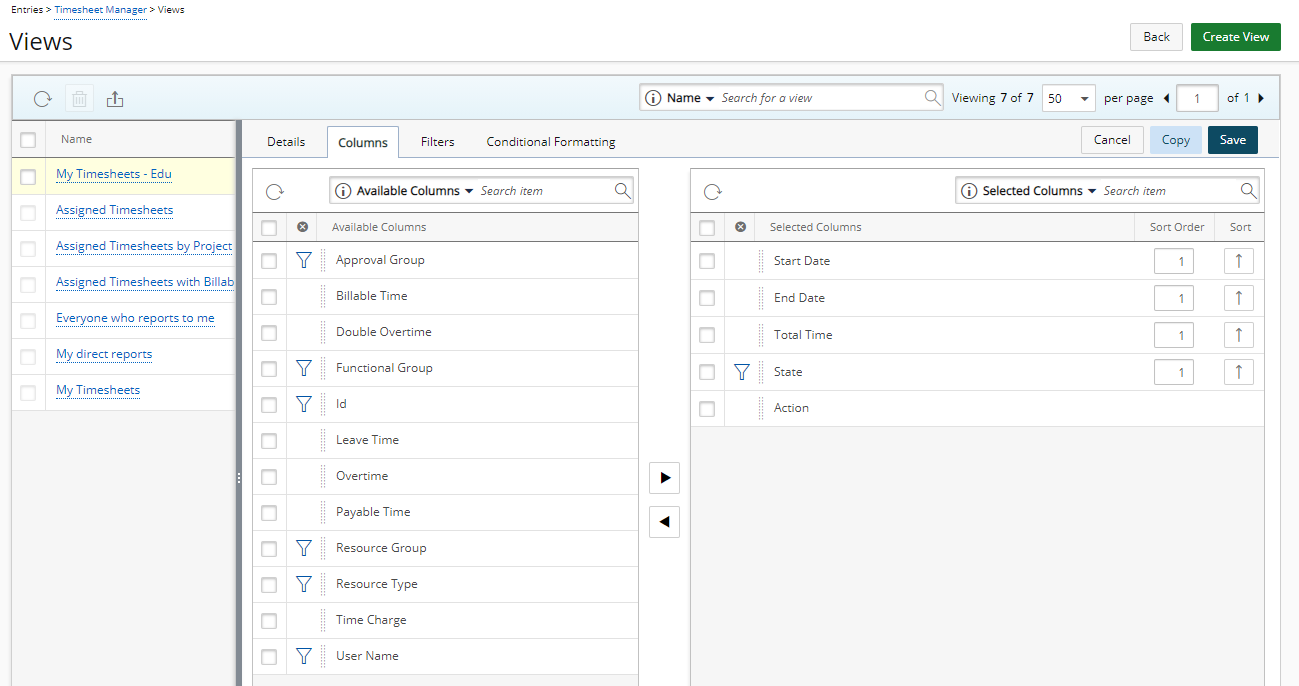
From the Columns tab you can define the default Column Selection of the View.
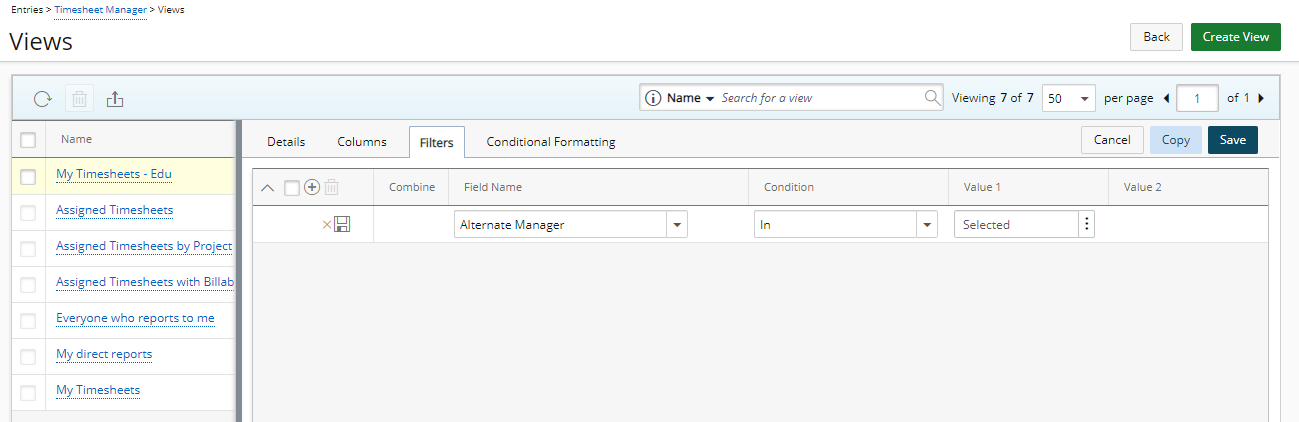
From the Filters tab you can define the default Filter setting relative to the View. The available options are: Alternate Manager, Billable Time, Client Name, Double Overtime, Is Billable, Is Payable, Overtime, Payable Time, Period Status, Project Code, Project Id, Project Manager, Project Name, Project Portfolio, State, Task Id, Task Name, Task Work Type, Time Charge, Total Time, User Active Site, User Approval Group, User Functional Group, User Functional Group Manager, User Id, User Master Site, User Name, User Resource Group, User Resource Group Manager, User Resource Type and User Title criteria.
Note: The Filters tab is unavailable for the out-of-the-box Assigned Timesheets by Project View.
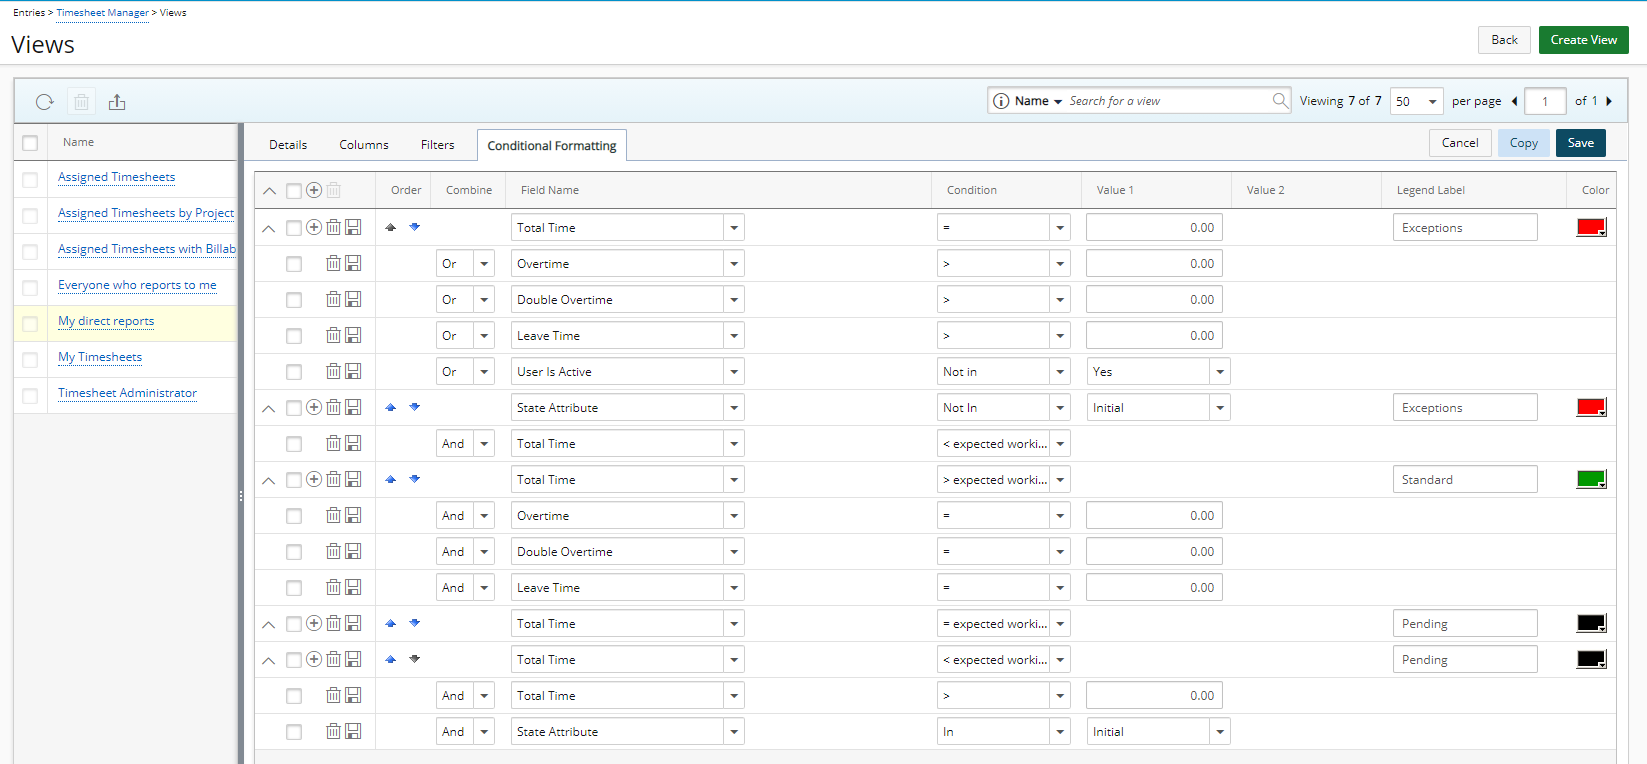
From the Conditional Formatting tab you can select the Fields to define the conditional expression and then choose the format. When the Conditional Expression is true, the defined conditional formatting is applied. The available Field options are: Billable Time, Double Overtime, Leave Time, Overtime, Payable Time, State Attribute, State Name, Total Time and User is active.
Based on the chosen Fields, you can select the required logical operations from the Conditions and select/enter Values to create or modify an existing conditional format.
Note: The Conditional Formatting tab is not available for the out-of-the-box Assigned Timesheets by Project View.
These defined conditional colors are visible from the Timesheet Manager page. Upon exporting the list, the colors/legend are also present in the exported cells.
Clicking the information icon allows you to view the Legend Labels entered when defining these conditional formats.
The out-of the-box Views have predefined out-of-the-box conditional formatting which can be modified based on your requirements.
When creating or copying a View the conditional formatting of the source View is copied.
Upon upgrading to 2021 R1 all private Views will have corresponding conditional formatting logic based on their Source Views.
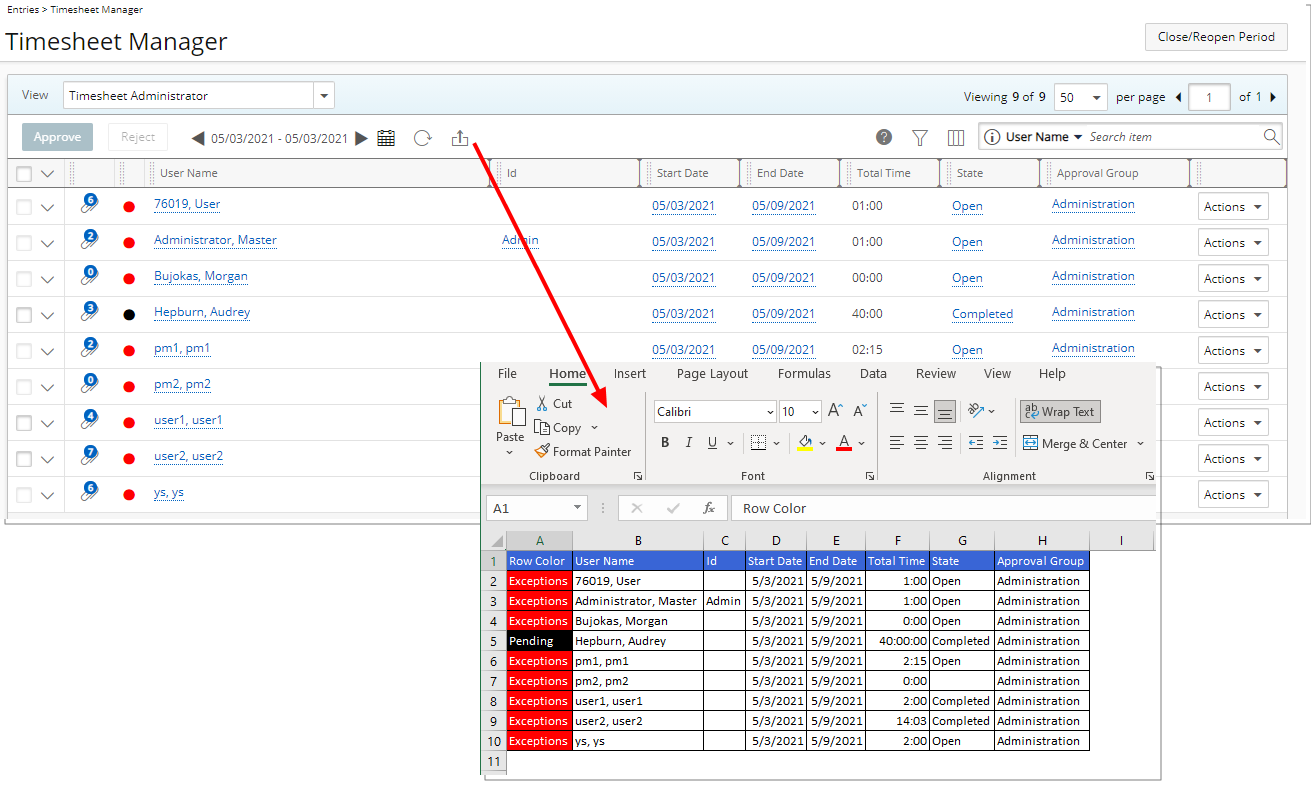
Description: A new Export to Excel option has been added to the Timesheet Manager page allowing you to export the list which retains the color format as well as the legend information.
Benefit: With this new option, it is now possible to export the Timesheet list to Excel.
For further details refer to Exporting the Timesheet Manager list.
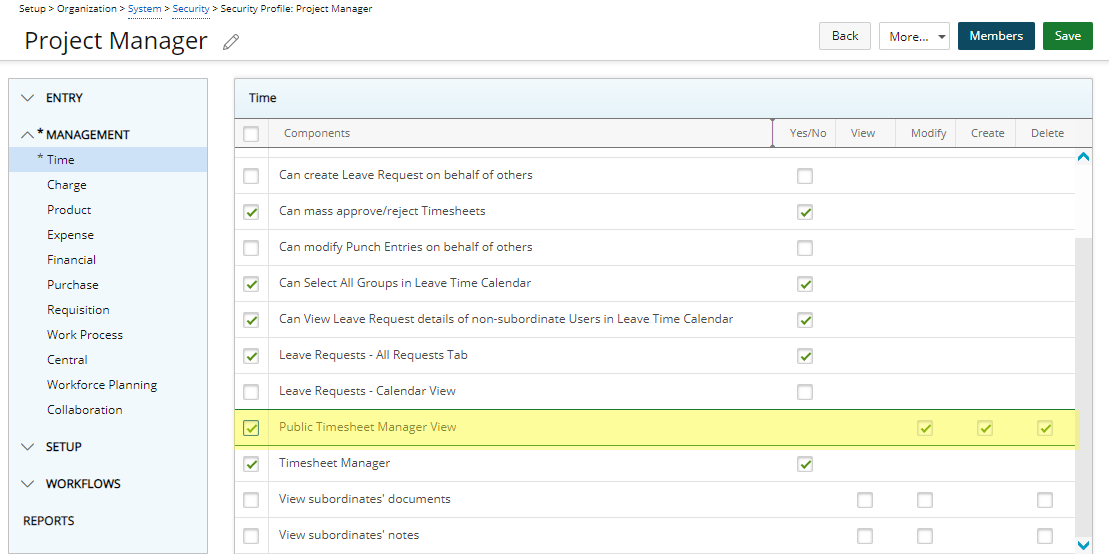
Description: The new Public Timesheet Manager View permission has been added under Management > Time with Modify, Create and Delete rights allowing you to grant the required rights to Modify/Create/Delete Public Timesheet Manager Views.
The Hide and Default setting of a Timesheet Manager View only impacts the logged Users’ View. All other changes will impact all Users with the Public Timesheet Manager View permission.
Upon saving a Public view, a message is displayed informing you that the modifications will be applied to all Users who have access to this Public View with an option to continue or cancel the process.
Upon upgrading to 2021 R1, any customized Views will be available as Private Views with the following naming convention: Username + the name of the View.
For further details refer to Granting the Public Timesheet Manager View rights.
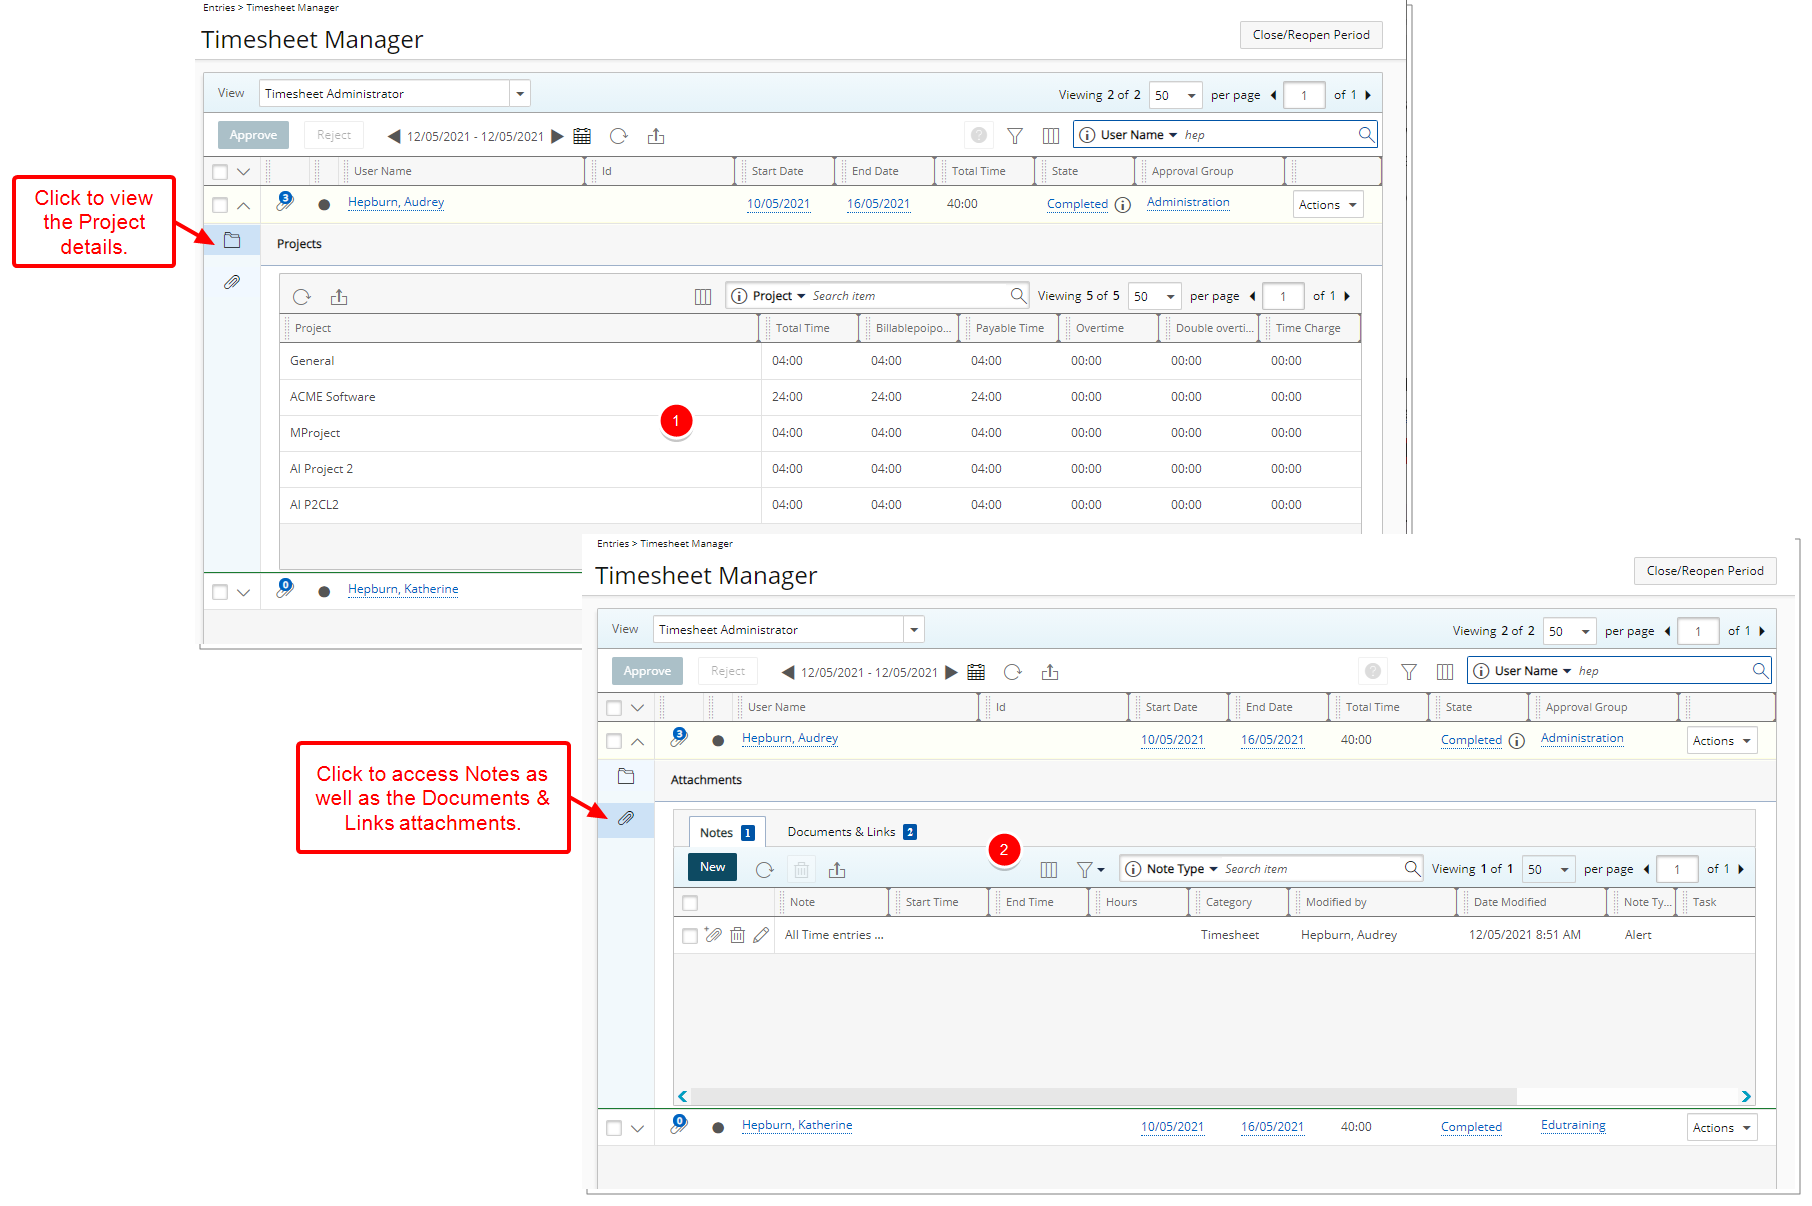
Description: With the addition of the Timesheet drawer you can now access and view:
- The Project details of the time entry directly from the Timesheet manager without having to navigate away from it.
- Timesheet Notes as well as Documents & Links.
For further details refer to:
- Attaching a Document to a Timesheet
- Entering Notes on a Timesheet
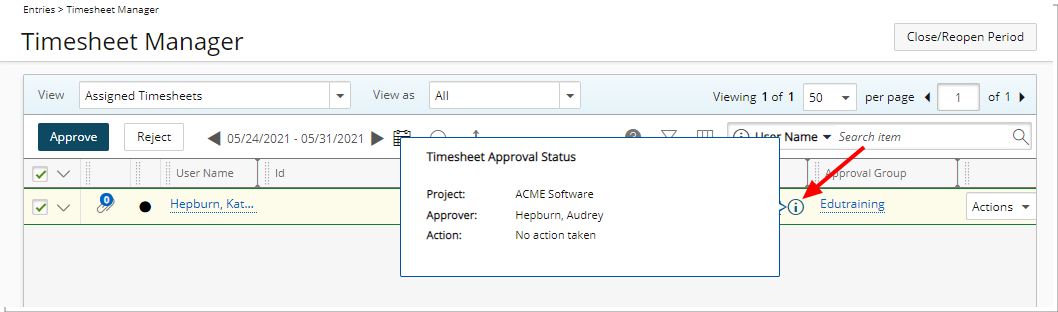
Description: An icon is now visible to indicate that detailed Timesheet Approval Status information is available when a Timesheet is in an Approval State assigned to the Project Manager or Portfolio Manager.
The following information is available upon hovering over the details icon.
- Project name
- Approver
- Action
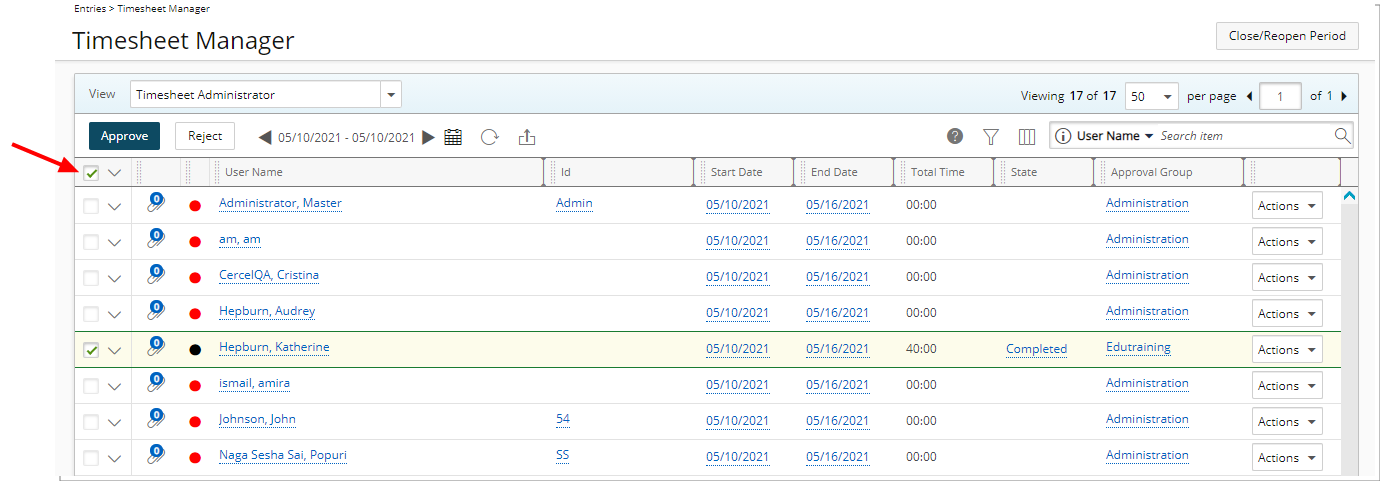
Description: As of this release only Timesheets in the Completed State are selected upon clicking select all in the header. Contrary to previous versions wherein all listed Timesheets were being selected.
Note: The Approve and Reject buttons remain dimmed until a Completed Timesheet is selected.
Furthermore, when the rejection/approval process fails due to a business rule or workflow State error, an error message is displayed informing you that no transition is available to process the action. These timesheets are sent to a workflow error state wherein only the Master Administrator is able to access through the Faulted Timesheets Template View.
For further details refer to:
- Approving Timesheets through Timesheet Manager
- Rejecting Timesheets through Timesheet Manager
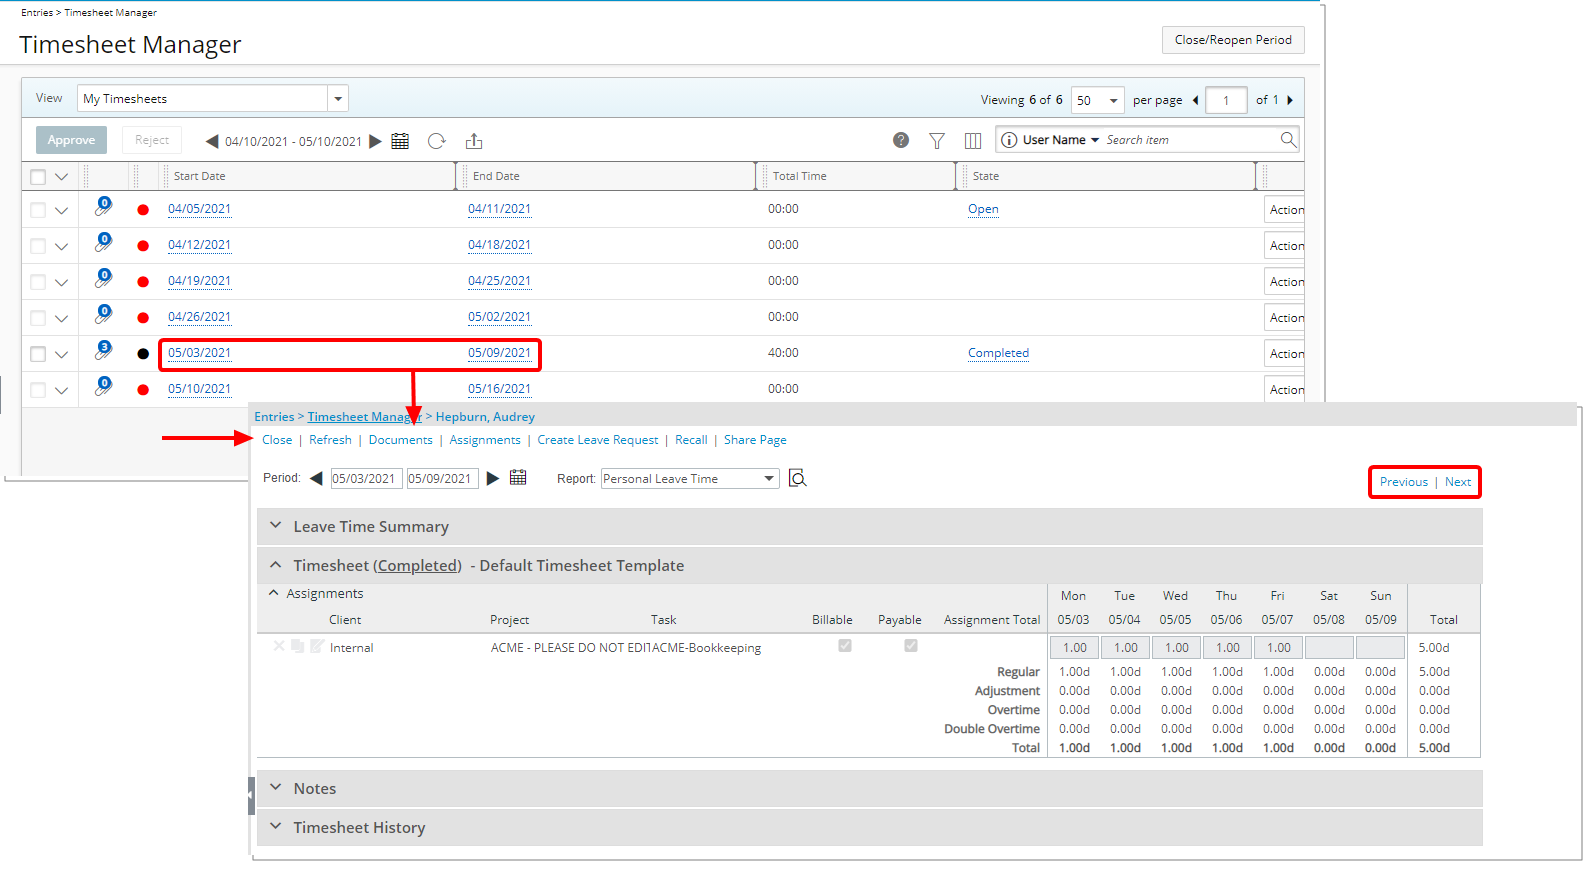
Description: When clicking to view an assigned Timesheet, the Timesheet page now opens.
Furthermore, the Previous and Next arrows located on the tab bar in previous releases has been converted to links.
For further details refer to Navigating through the list of assigned Timesheets.
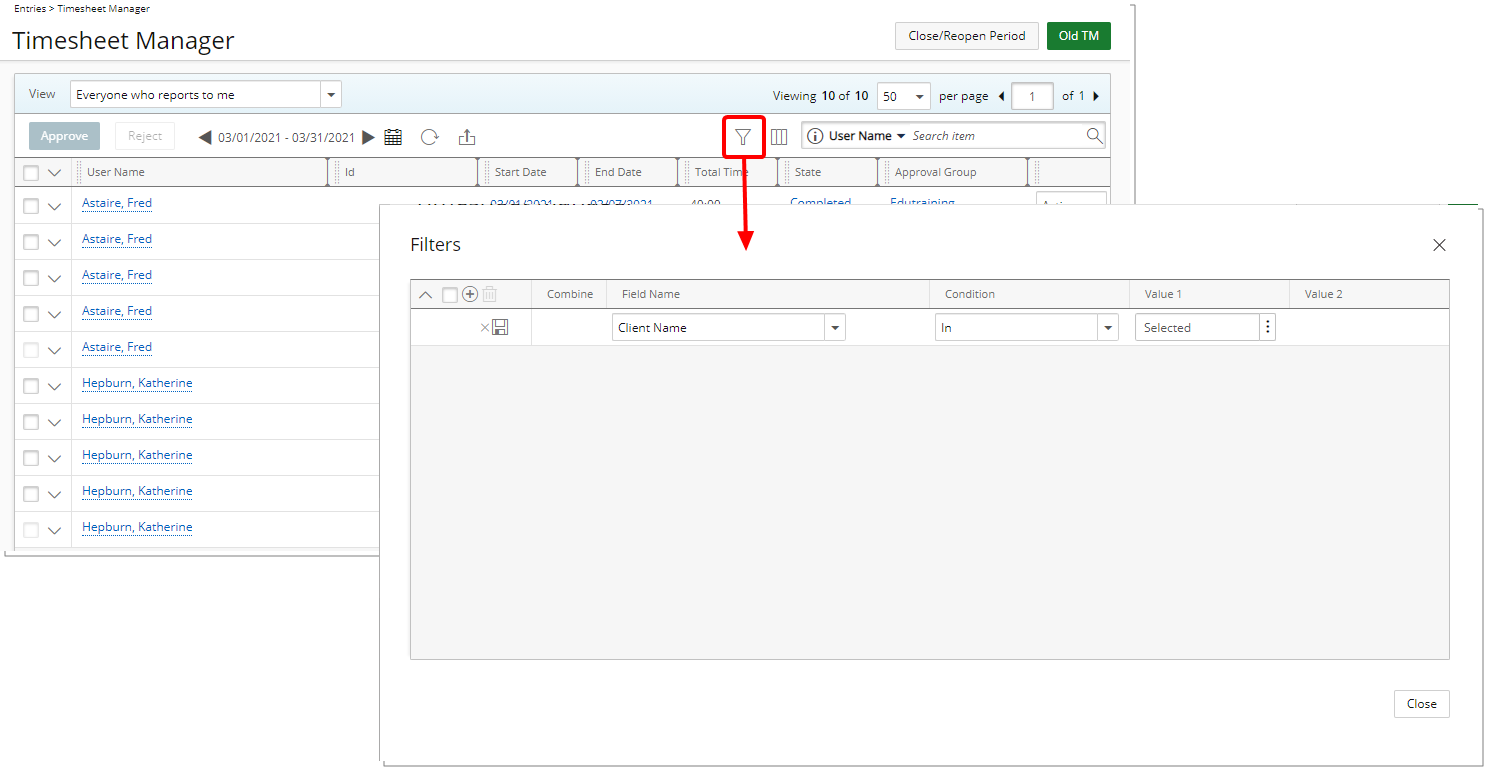
Addition of on-page filter criteria allows you to filter the Timesheet list based on: Alternate Manager, Billable Time, Client Name, Double Overtime, Is Billable, Is Payable, Overtime, Payable Time, Period Status, Project Code, Project Id, Project Manager, Project Name, Project Portfolio, State, Task Id, Task Name, Task Work Type, Time Charge, Total Time, User Active Site, User Approval Group, User Functional Group, User Functional Group Manager, User Id, User Master Site, User Name, User Resource Group, User Resource Group Manager, User Resource Type and User Title.
For further details refer to Applying a Filter to the Timesheet Manager list.
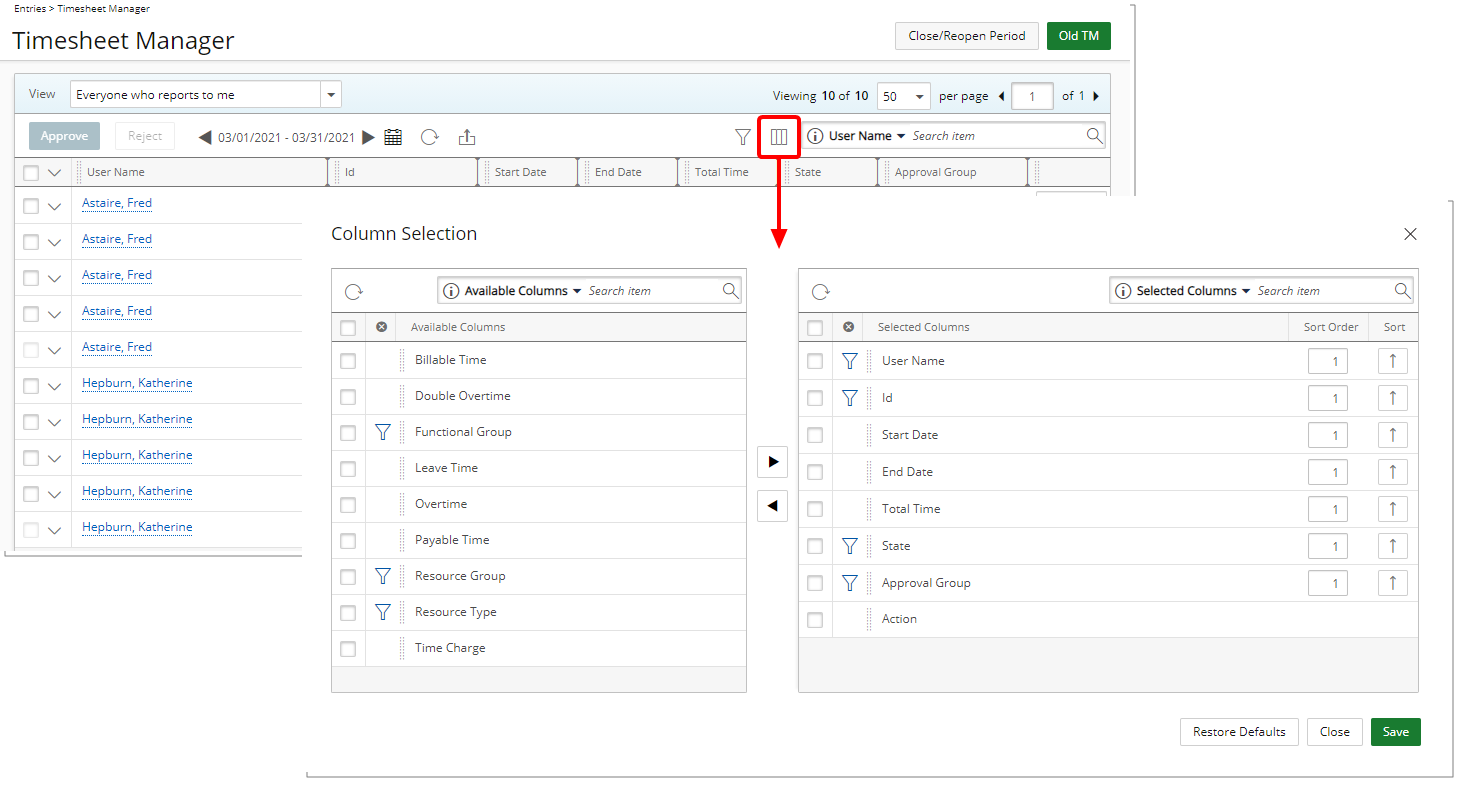
With the addition of the Column Selection button located within the Timesheet Manager, you can now configure the columns based on your requirements.
The following columns are displayed by default for the out-of-the-box Views:
- Assigned Timesheet View: User Name, Id, Start Date, End Date, Total Time, State, Approval Group and Action. You can opt to add these columns through the Columns Selection: Billable Time, Double Overtime, Functional Group, Leave Time, Overtime, Payable Time, Resource Group, Resource Type and Time Charge. Furthermore, by default you can search based on User Name, Id, State and Approval Group.
- Assigned Timesheets by Project View: Project Name, Time to Approve, Approved Time, Total Time and Action. You can opt to add these columns through the Columns Selection: Billable Approved Time, Billable Time to Approve, Billable Total Time, End Date, Project Code, Project Id and Start Date. Furthermore, by default you can search based on Project Code, Project Name and Project Id.
- Everyone who reports to me View: User Name, Id, Start Date, End Date, Total Time, State, Approval Group and Action. You can opt to add these columns through the Columns Selection: Billable Time, Double Overtime, Functional Group, Leave Time, Overtime, Payable Time, Resource Group, Resource Type, and Time Charge. Furthermore, by default you can search based on User Name, Id, State and Approval Group.
- My Direct Reports View: User Name, Id, Start Date, End Date, Total Time, State, Approval Group and Action. You can opt to add these columns through the Columns Selection: Billable Time, Double Overtime, Functional Group, Leave Time, Overtime, Payable Time, Resource Group, Resource Type, and Time Charge. Furthermore, by default you can search based on User Name, Id, State and Approval Group.
- My Timesheets View: Start Date, End Date, Total Time, State and Action. You can opt to add these columns through the Columns Selection: Approval Group, Billable Time, Double Overtime, Functional Group, Id, Leave Time, Overtime, Payable Time, Resource Group, Resource Type, Time Charge and User Name. Furthermore, by default you can search based on User Name and State.
The columns order can be modified through the Column Selection dialog box or from the Timesheet Manager table.
With the addition of Column Selection and the ability to customize Views, the Assigned Timesheet with Billable Time View is no longer available. Therefore, upon upgrading:
- Any customized Views based on this Source View will be mapped to the Assigned Timesheet View instead, wherein the Billable Time column will be shown by default.
- The Assigned Timesheet View will be set as the Default where the Assigned Timesheet with Billable Time was set as the default.
Timesheet Entry
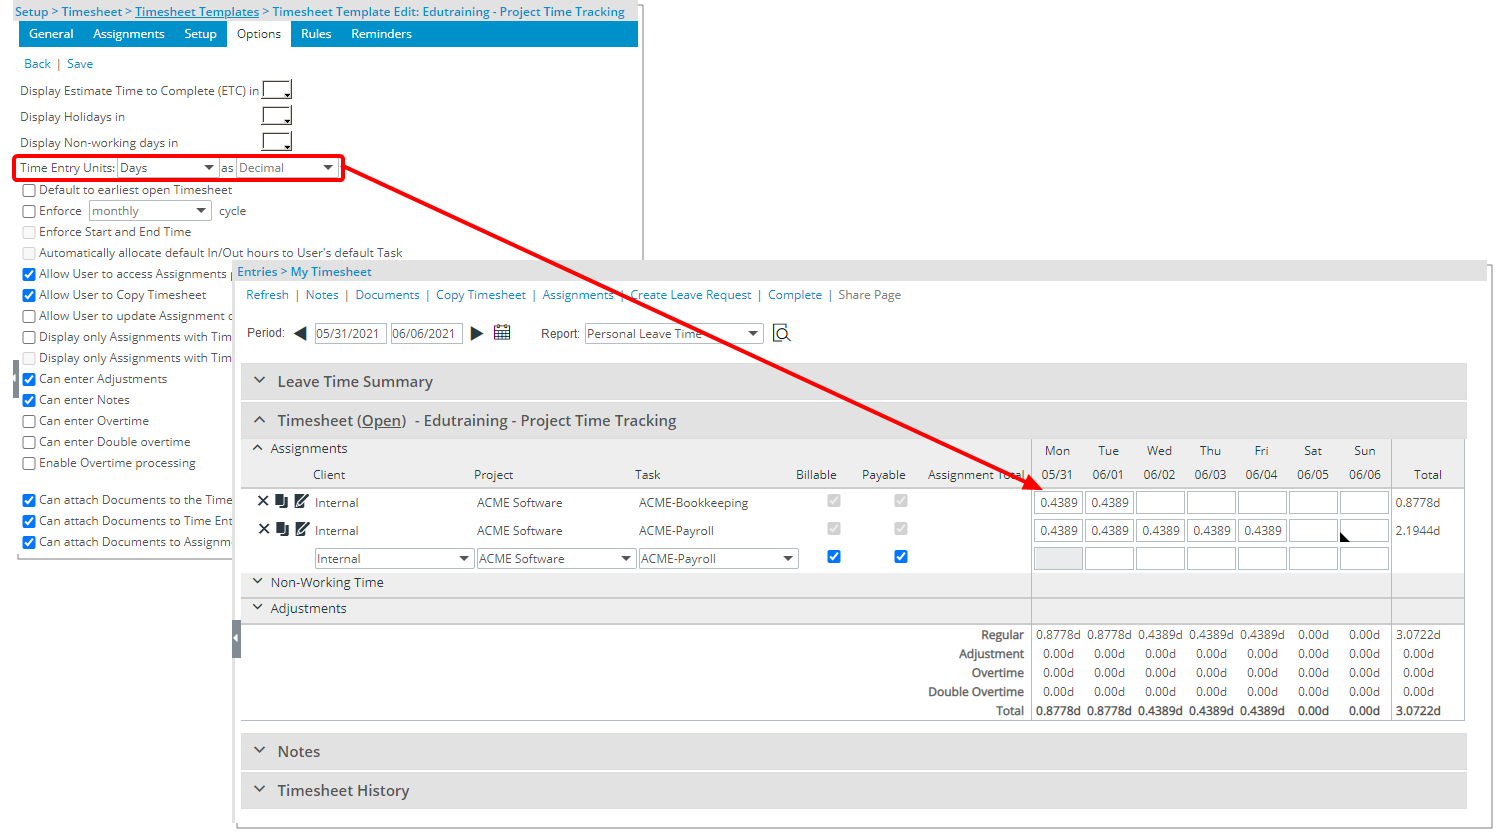
Description: Where the Time Entry Unit is set to Days in Decimal format for a given Timesheet Template, the time entry value can now capture up to four decimal places.
Use case: Audrey can now accurately enter 0.4375 for the 3.5 hours of consulting work she did for her client.
For further details refer to Timesheet Template Edit page - Options tab.
The option Enforce Start and End Time is now available through Timesheet Templates Options tab. With this addition you can now allow users to specify the Start and End Time of having worked on a Task.
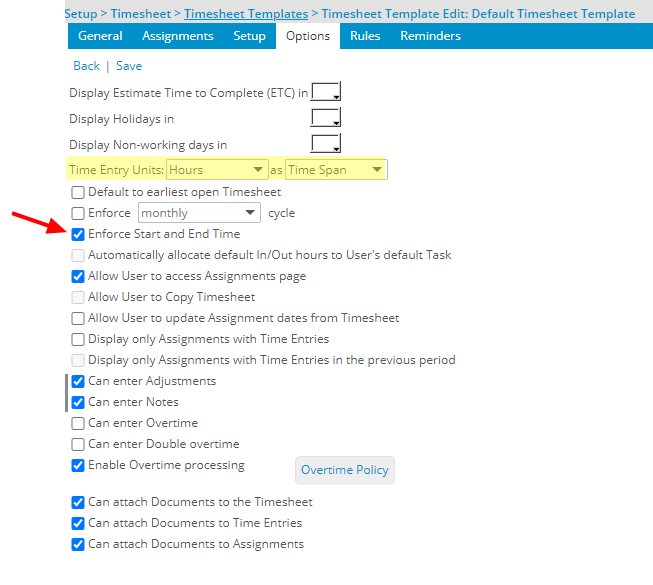
The Enforce Start and End Time setting is turned off by default. To enable it, the Time Entry Units option must be set to Hours in Time Span format. You can then define the available Time span increment, within the Rules tab of the Timesheet Template Edit page.
You now also have the option to Enforce Hourly Notes. When enabled, users can enter an Hourly Entry Note for each Start/End time. These Hourly Note Types are then visible through the Notes section of the Timesheet.
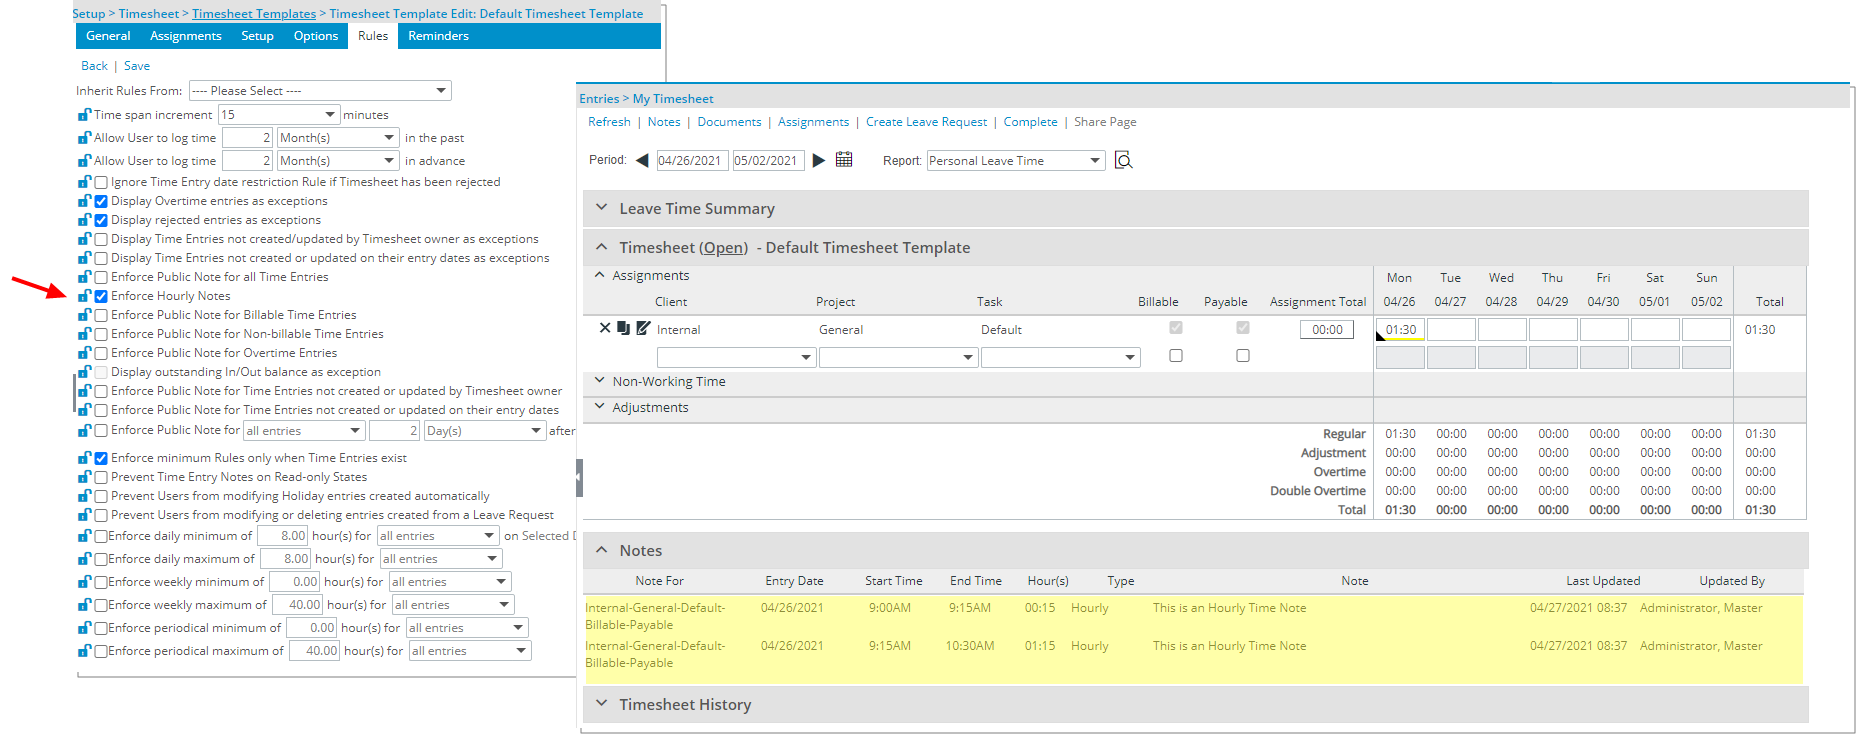
When the Enforce Start and End Time is turned on, the Entry Times dialog box displays wherein the Start/End Time can be selected and corresponding Notes entered (where applicable). Upon saving, the Total Hours are calculated and displayed in the corresponding Time Entry box.
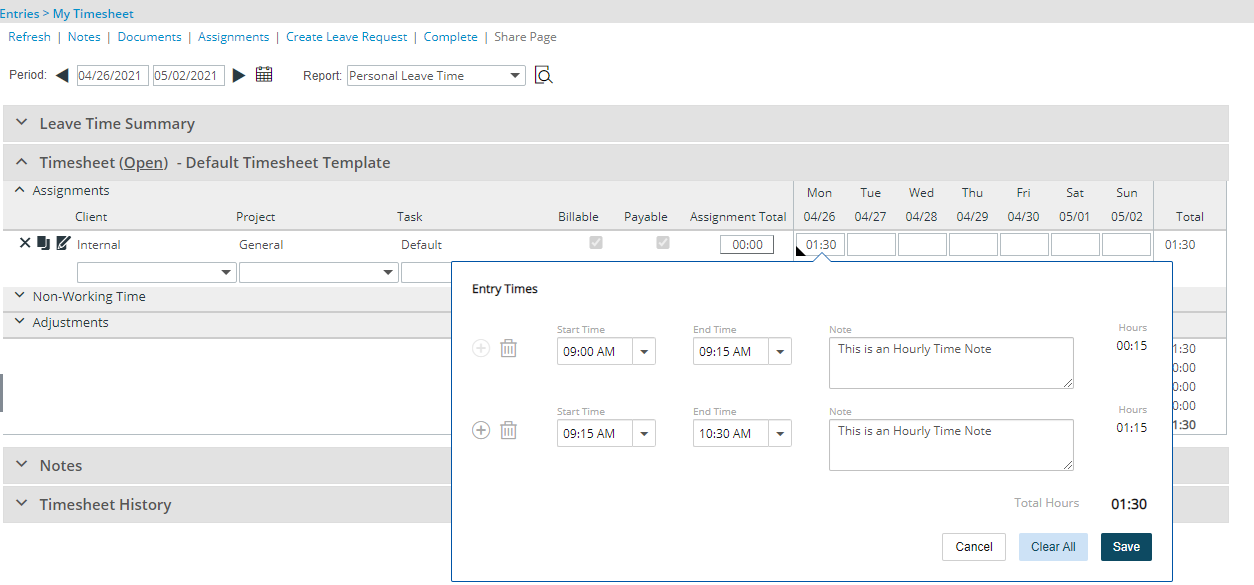
Note: The Enforce Start and End Time setting is mutually exclusive with the In/Out Timesheet capability.
For further details refer to:
- The Enforce Start and End Time setting
- Entering Regular Time (Start/End Time)
User Defined Fields
Description: Edit Field User Defined Fields of Type Single Select and of Type Integer, Number, Timespan, Currency and Percentage now support calculations.
Calculated User Defined Fields can be associated to the Work Item Workflows.
Note: For the Type Selection User Defined Fields, the numeric value of the ID is used for the calculations.
For further details refer to Calculated User Defined Fields.
Upland Analytics
The newly added out-of-the-box My Projects Work Items Dashboard (Upland Analytics > Dashboard & Reports > Work Items Project Manager) allows Project Managers to have insight on their Project Work Items (Work Item Entries associated to a Project for which they are the named Project Manager) and to access them quickly.
For further details refer to Upland Analytics Out-of-the-Box My Projects Work Items Dashboard and Reports.
The newly added out-of-the-box Project Team Work Items Dashboard (Upland Analytics > Dashboard & Reports > Project Team) allows you to have insight on Project Team Work Items (Project Work Item Entries for which the Project Team members are assigned) and to access them quickly.
For further details refer to Upland Analytics Out-of-the-Box Project Team Work Items Dashboard and Reports.
Description: The KPI EAC (Estimate At Completion) Field has been added to the Project Status Report Entry Data Source and can be found within the Project Status Report Entry KPIs View.
Benefit: You can now report on the Estimate At Completion KPI.
Note: The displaying of the Estimate At Completion KPI within the Upland Analytics Report is dependent on:
- The existence of the Time category (Hours) within the Financial Planner Template associated to the Project.
- Financial Planner must be initialized.
For further details refer to Project Status Report Entry Data Source and related views.
The following Fields have been added to the Project View:
- Project Actual End
- Project Actual End Month
- Project Actual End Month Year
- Project Actual End Quarter
- Project Actual End Quarter Year
- Project Actual End Week
- Project Actual End Year
- Project Actual Start
- Project Actual Start Month
- Project Actual Start Month Year
- Project Actual Start Quarter
- Project Actual Start Quarter Year
- Project Actual Start Week
- Project Actual Start Year
The Project View is available from the following Data Sources: Assignment Budget, Client Purchase Order, Cost & Billing Rule Association, Enhanced Resource Request, Financial, Financial Planner, Financial Planner Combined, In/Out Timesheet, Invoice, Invoice Entry Details, Milestone Task Association, Money Charge, Product, Program Management, Project Budget, Project Entry Details, Project Management, Project Planning, Project Scheduling, Project Status Report Entry, Resource Bookings, Resource Request, Revenue Batch, Task Budget, Task Scheduling, Timesheet, WIP, Work, Work Item Entry and Work Process Entry. For further details refer to individual articles which are listed in this article: Upland Analytics Data Sources / views.
The User Out of the Office Field has been added to the User View within the Work and Organization Data Sources.
For further details refer to:
- Work Data Source and related views
- Organization Data Source and related views
The new Hourly Timesheet Entry View has been added to the Timesheet Data Source allowing you to report on these Fields:
- Hourly Timesheet Entry End Time
- Hourly Timesheet Entry Hours
- Hourly Timesheet Entry Note
- Hourly Timesheet Entry Start Time
For further details refer to Timesheet Data Source and related views.
Addition of a new Work Item Entry Data Source with these Views: Client, Linked Work Item, Linked Work Item Added by User, Project, Task, Work Item Attachment, Work Item Attachment Created by User, Work Item Attachment Modified by User, Work Item Entry, Work Item Notes, Work Item Notes Created by User, Work Item Notes Modified by User, Work Item Workflow History and Work Item Workflow History Modified by User.
Scoping is available for: All Projects, Available Projects, My Projects, Work Item Project Team and My Work Item Assignment.
Benefit: With the addition of the new Work Item Entry Data Source, you now have access to report on Project Work Items.
For further details refer to Work Item Entry Data Source and related views.
Addition of the following Fields to the Invoice Details view:
- Invoice Regular Svcs Amount w o Adjustment in Base Curr
- Invoice Regular Svcs Amount w o Adjustment in Client Curr
- Invoice Regular Svcs Amount w o Adjustment in Company Curr
Note: The value of these Fields is calculated based on the Regular Hours before Adjustments.
Furthermore, the Invoice Regular Svcs Amount in Client Curr calculation is now based on: The total of the Invoice Regular Svcs Amount + Invoice Overtime Amount in Base Curr + Invoice Double Overtime Amount in Base Curr.
For further details refer to Invoice Data Source and related views.
User Experience Enhancements
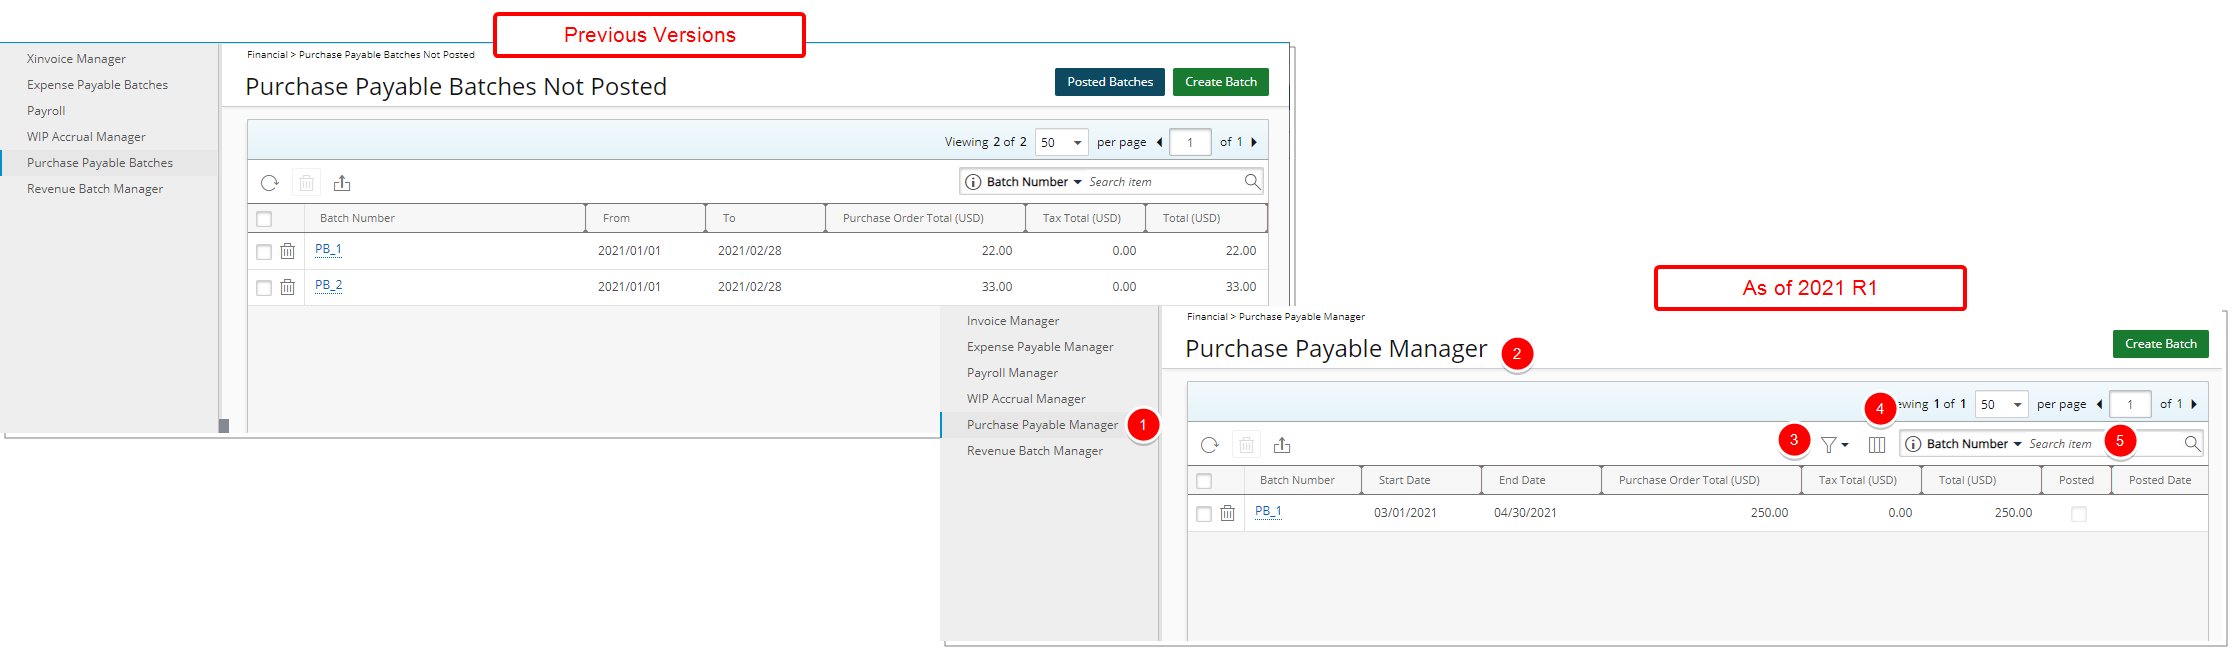
- The Purchase Payable Batches navigation option has been renamed to Purchase Payable Manager.
- Purchase Payable Batches Not Posted has been renamed to Purchase Payable Manager.
- A new Filter option has been added to allow for the filtering of the Purchase Payable Batches based on: Open and Posted status. As a result of which the Posted Batches button has been removed.
- Addition of Column Selection functionality wherein the columns displayed by default are: Batch Number, Start Date, End Date, Purchase Order Total, Tax Total, Total, Posted, Posted Date and Created Date.
- By default, you can search for Batch Number. In addition, you can choose to include the Posted Date Search criterion.
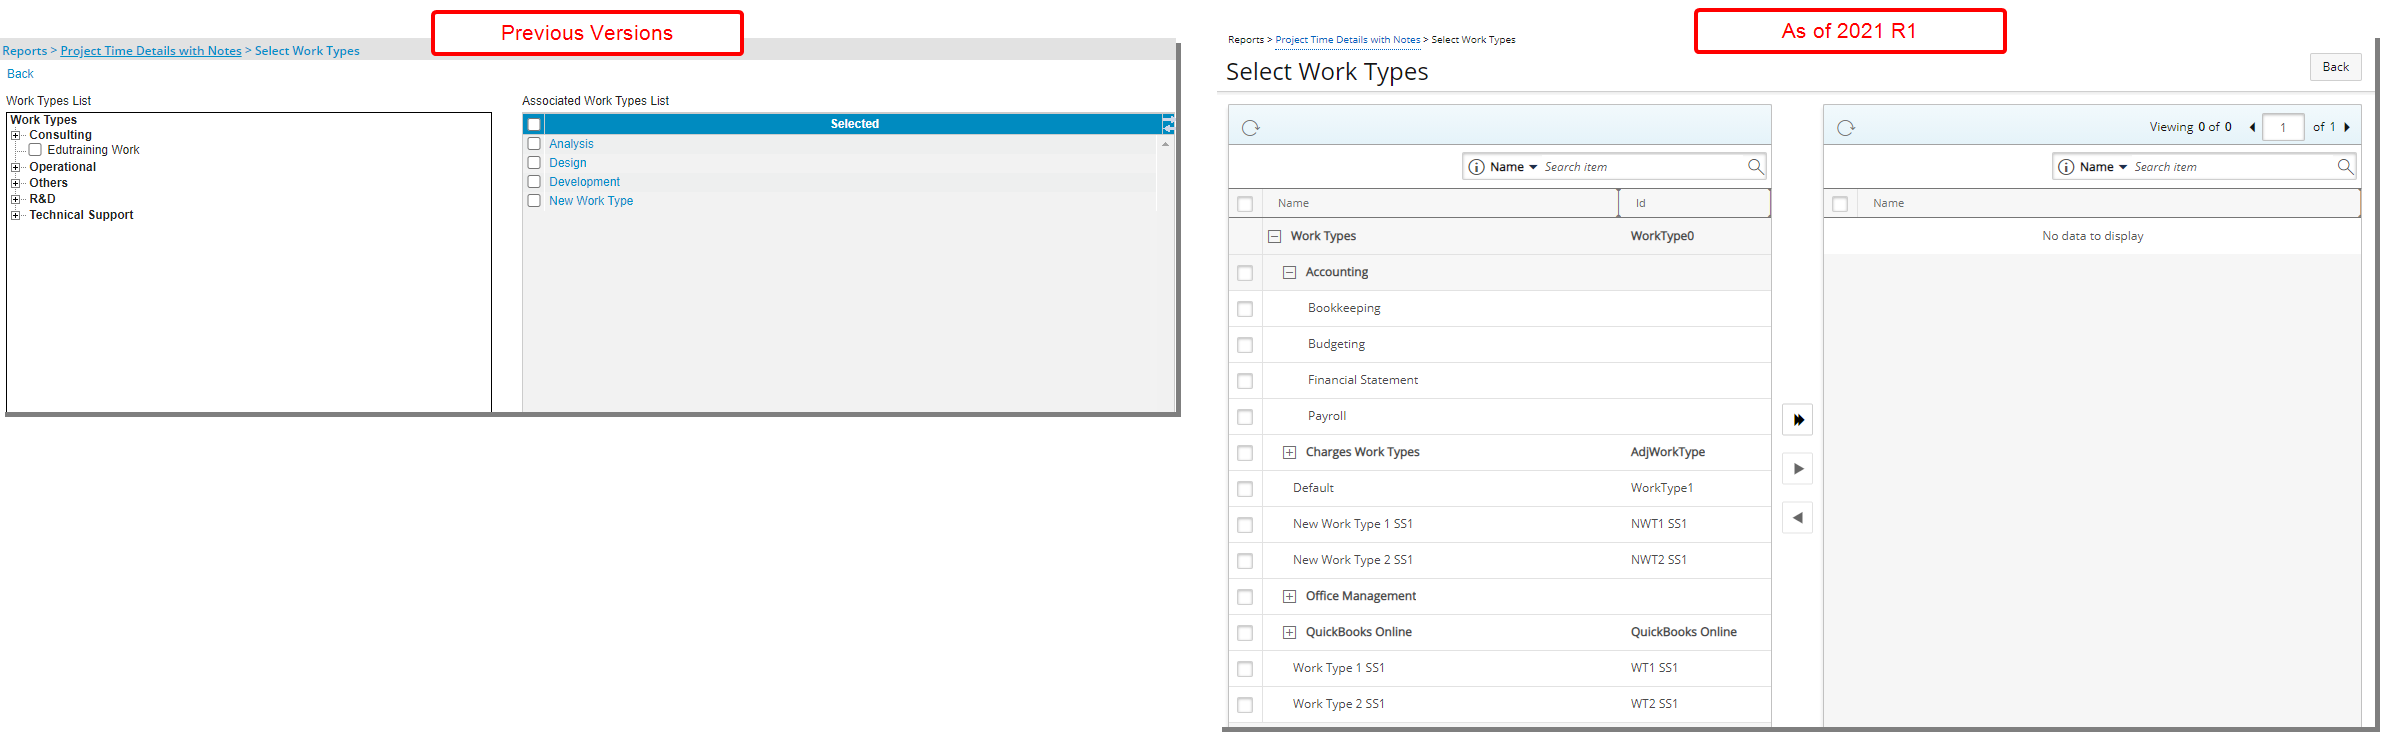
Description: In addition to the improvements made to the overall look and feel of the Select Work Types page, accessed when browsing for Work Types from the Reports, these improvements have also been made:
- When selecting a Parent Work Type, all child items are now also selected by default.
- Addition of the Id column within the available work types table.
- Addition of Search capability wherein you can search by:
- Name and Id within the available work types table.
- Name within the selected work types table.
- Addition of the ability to Refresh the available and selected work types tables.
- Addition of pagination within the selected work types table.
For further details refer to Applying a filter to a Report.
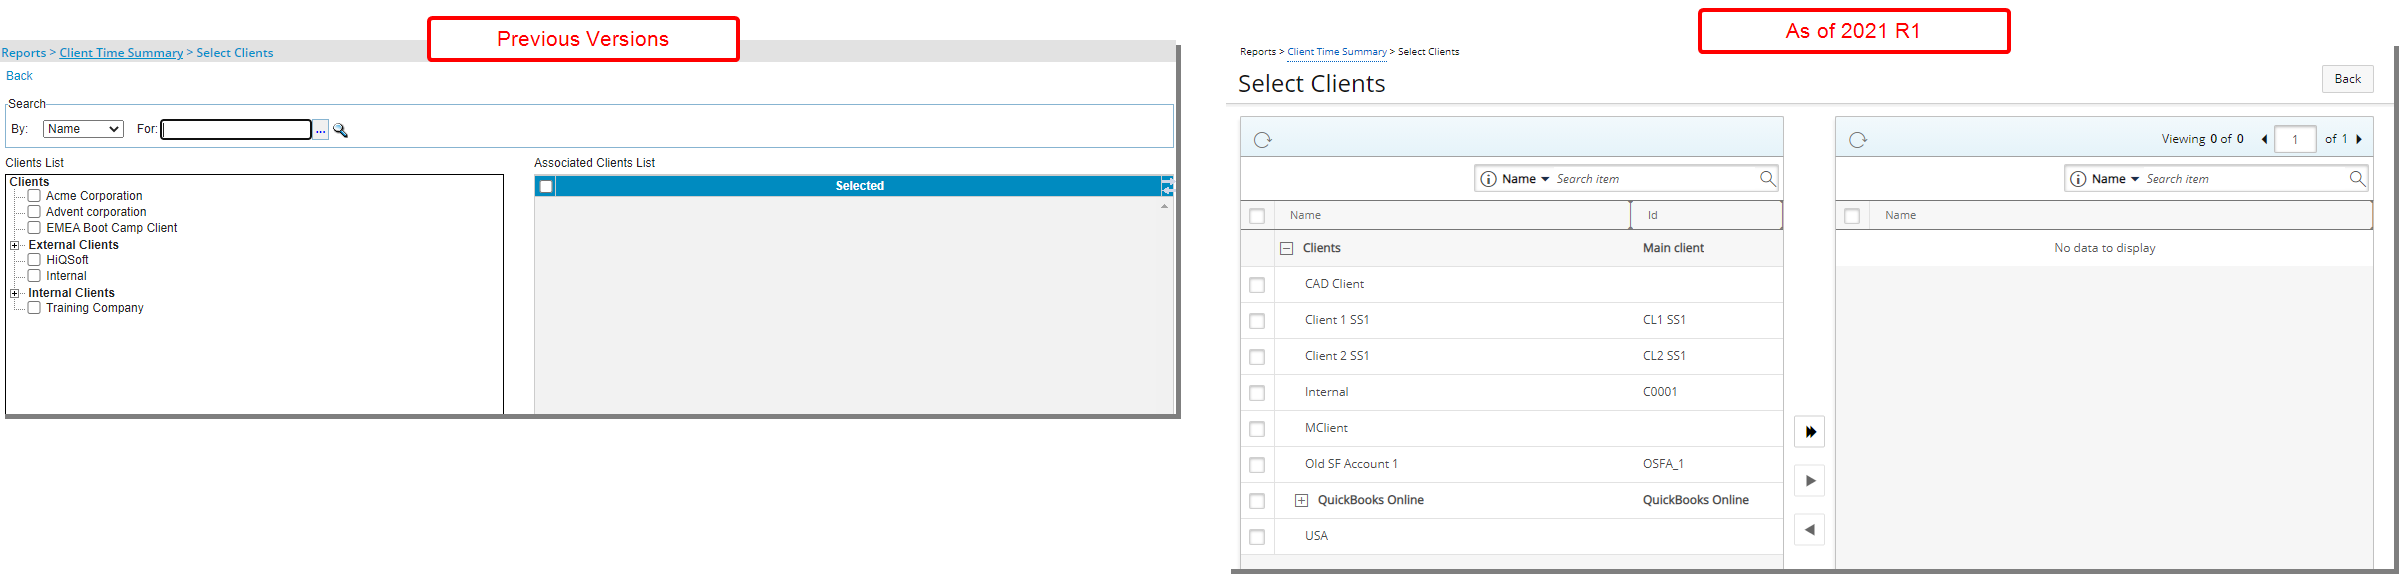
Description: In addition to the improvements made to the overall look and feel of the Select Clients page, accessed when browsing for Clients from the Reports, these improvements have also been made:
- When selecting a Parent Client, all child items are now also selected by default.
- Addition of the Id column within the available clients table.
- Addition of Search capability within the selected clients table wherein you can now search by Name.
- Addition of the ability to Refresh the available and selected clients tables.
- Addition of pagination within the selected clients table
For further details refer to Applying a filter to a Report.
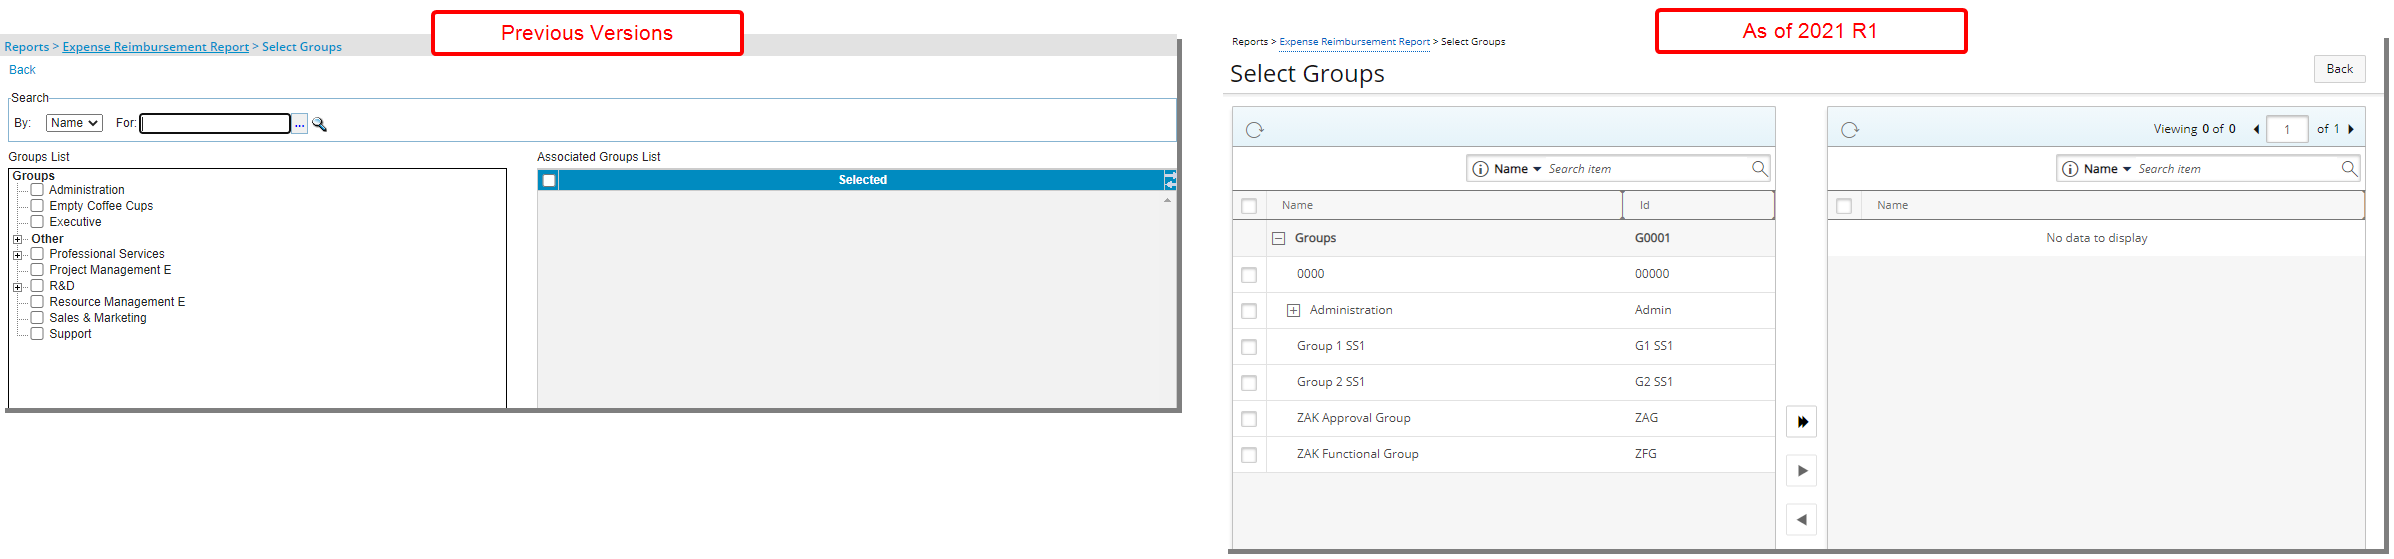
Description: In addition to the improvements made to the overall look and feel of the Select Groups page, accessed when browsing for Groups from the Reports, these improvements have also been made:
- When selecting a Parent Group, all child items are now also selected by default.
- Addition of the Id column within the available groups table.
- Addition of Search capability within the selected groups table, wherein now you can search by Name.
- Addition of the ability to Refresh the available and selected groups tables.
- Addition of pagination within the selected groups table.
For further details refer to Applying a filter to a Report.
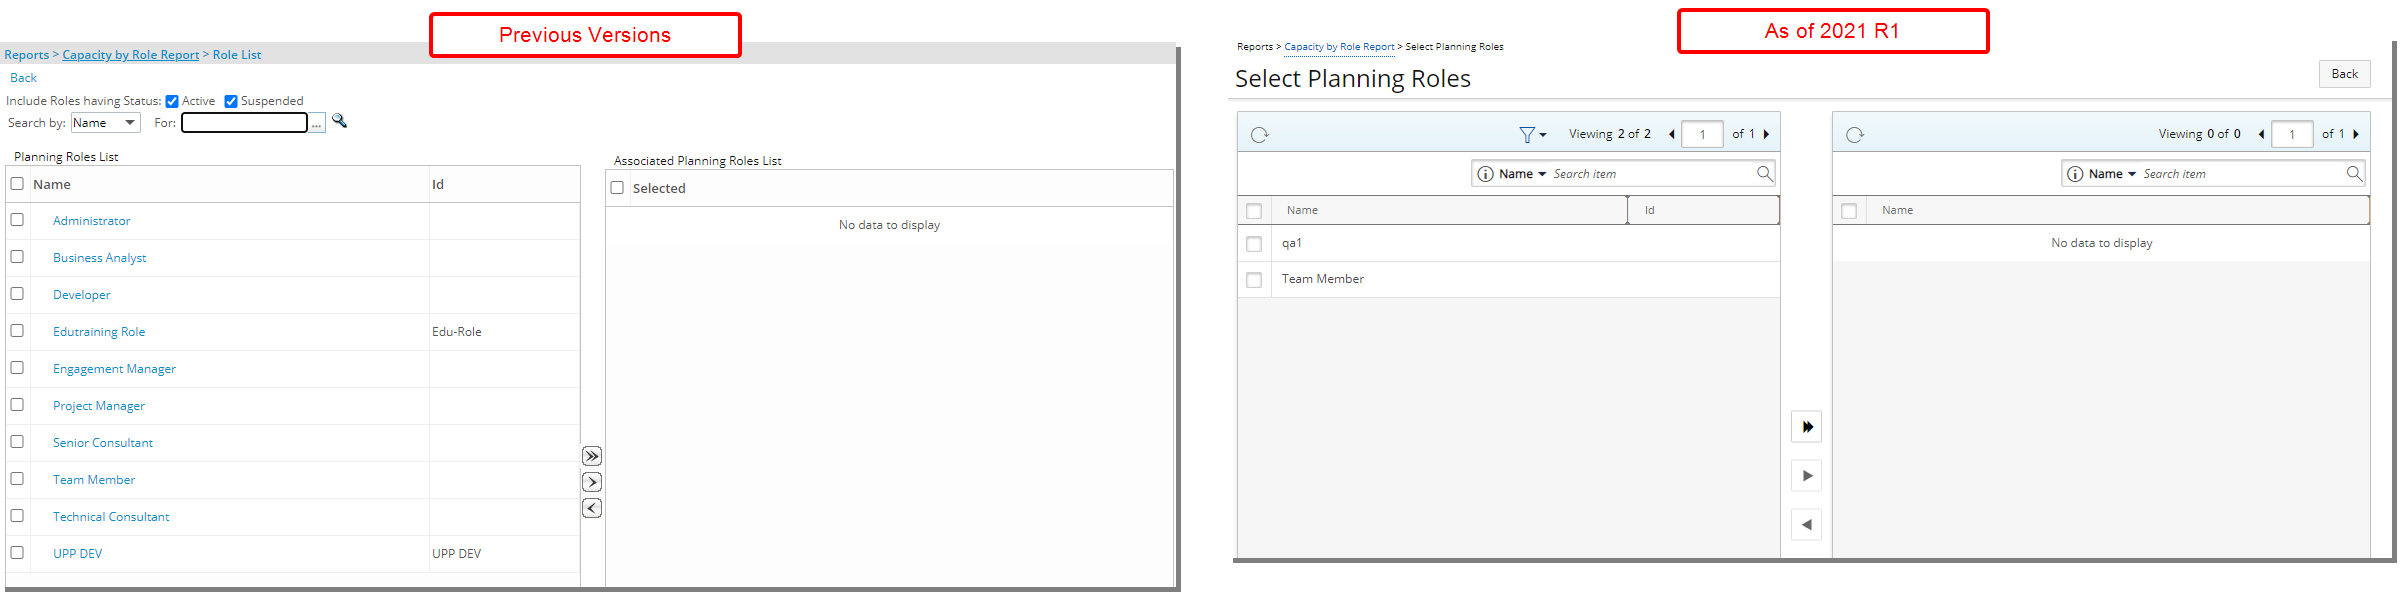
Description: In addition to the improvements made to the overall look and feel of the Select Planning Roles page, accessed when browsing for Roles from the Reports, these improvements have also been made:
- The Status filter options are now under the Filter icon.
- Addition of Search capability within the selected roles table, wherein now you can search by Name.
- Addition of the ability to Refresh the available and selected roles tables.
- Addition of pagination within the selected roles table.
For further details refer to Applying a filter to a Report.