PSA 2021 R1.1 - Product Enhancements
Below is a summary of the features included in the PSA 2021 R1.1 release.
- Customer Portal
- Expense
- Financial
- Financial Planner
- General
- Mobile
- Reporting
- Timesheet
- Upland Analytics
- User Defined Fields
- Work Breakdown Structure (WBS)
- Work Item Manager
- Work Item Entry
- User Experience Enhancements
2021.07.23.2021R1.1.V2.EB
Note: This page could be updated as new information becomes available.
Customer Portal
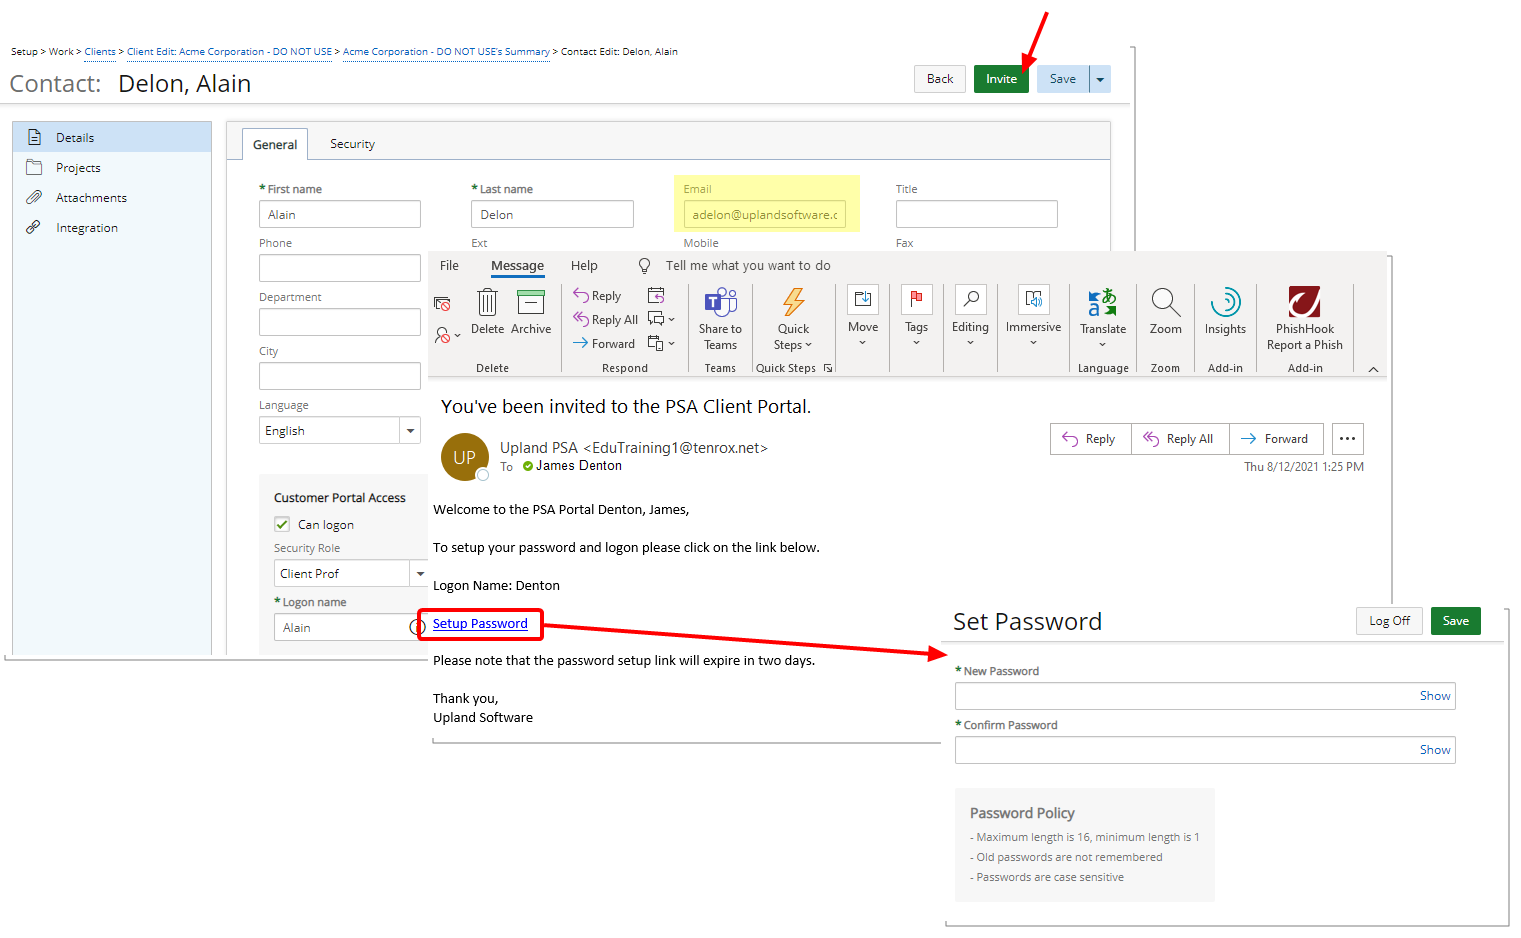
Description: Improvements have been made to the password setup process of a Client Contact. You can now Invite a Client Contact to set up their own password.
Upon clicking the newly added Invite button an invitation is sent to the Client Contact email address containing a link to allow them to set their password.
Note: The invitation link expires within 48 hours.
Client Contacts can set their password by clicking the Setup Password link located within the email. Upon accessing the Set Password page and saving their new password, they are then logged into the PSA Customer Portal. Their Client Contact Logon Name can easily be changed from the Profile Settings page.
Note: The Client Contact Logon Name must be unique.
Any subsequent logins must be from your PSA login page at: https://clientname.tenrox.net where clientname is specific to your organization.
For further details refer to:
- Creating a Client Contact
- Accessing the Customer Portal
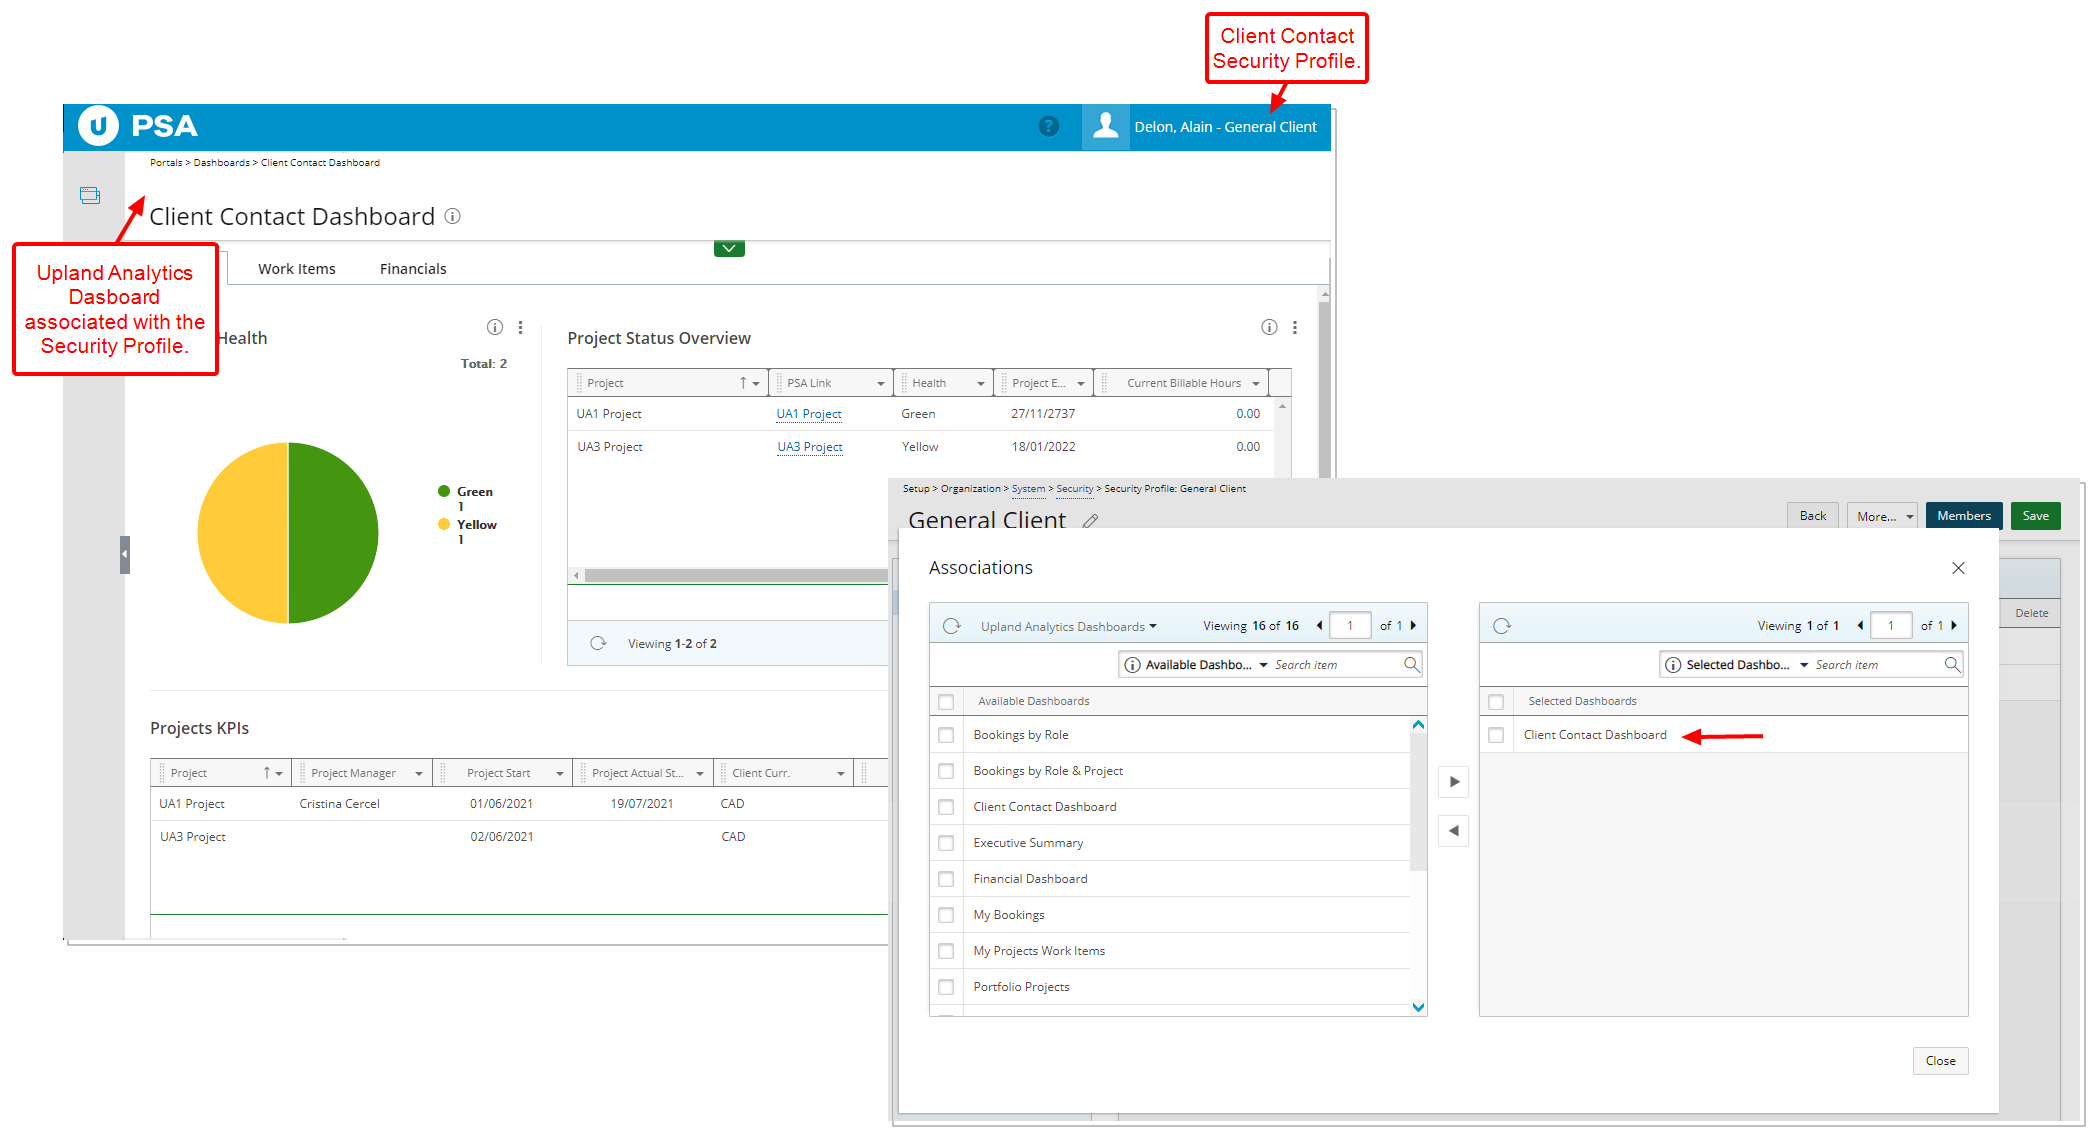
Description: Upon the Client Contact logging into the PSA Customer Portal, they will have access to view the associated Upland Analytics Dashboard(s).
Note: The associated Dashboards are listed in alphabetical order within the left hand side navigation. The First listed Dashboard is displayed by default upon login.
For further details refer to Granting Client Contacts access rights to Upland Analytics.
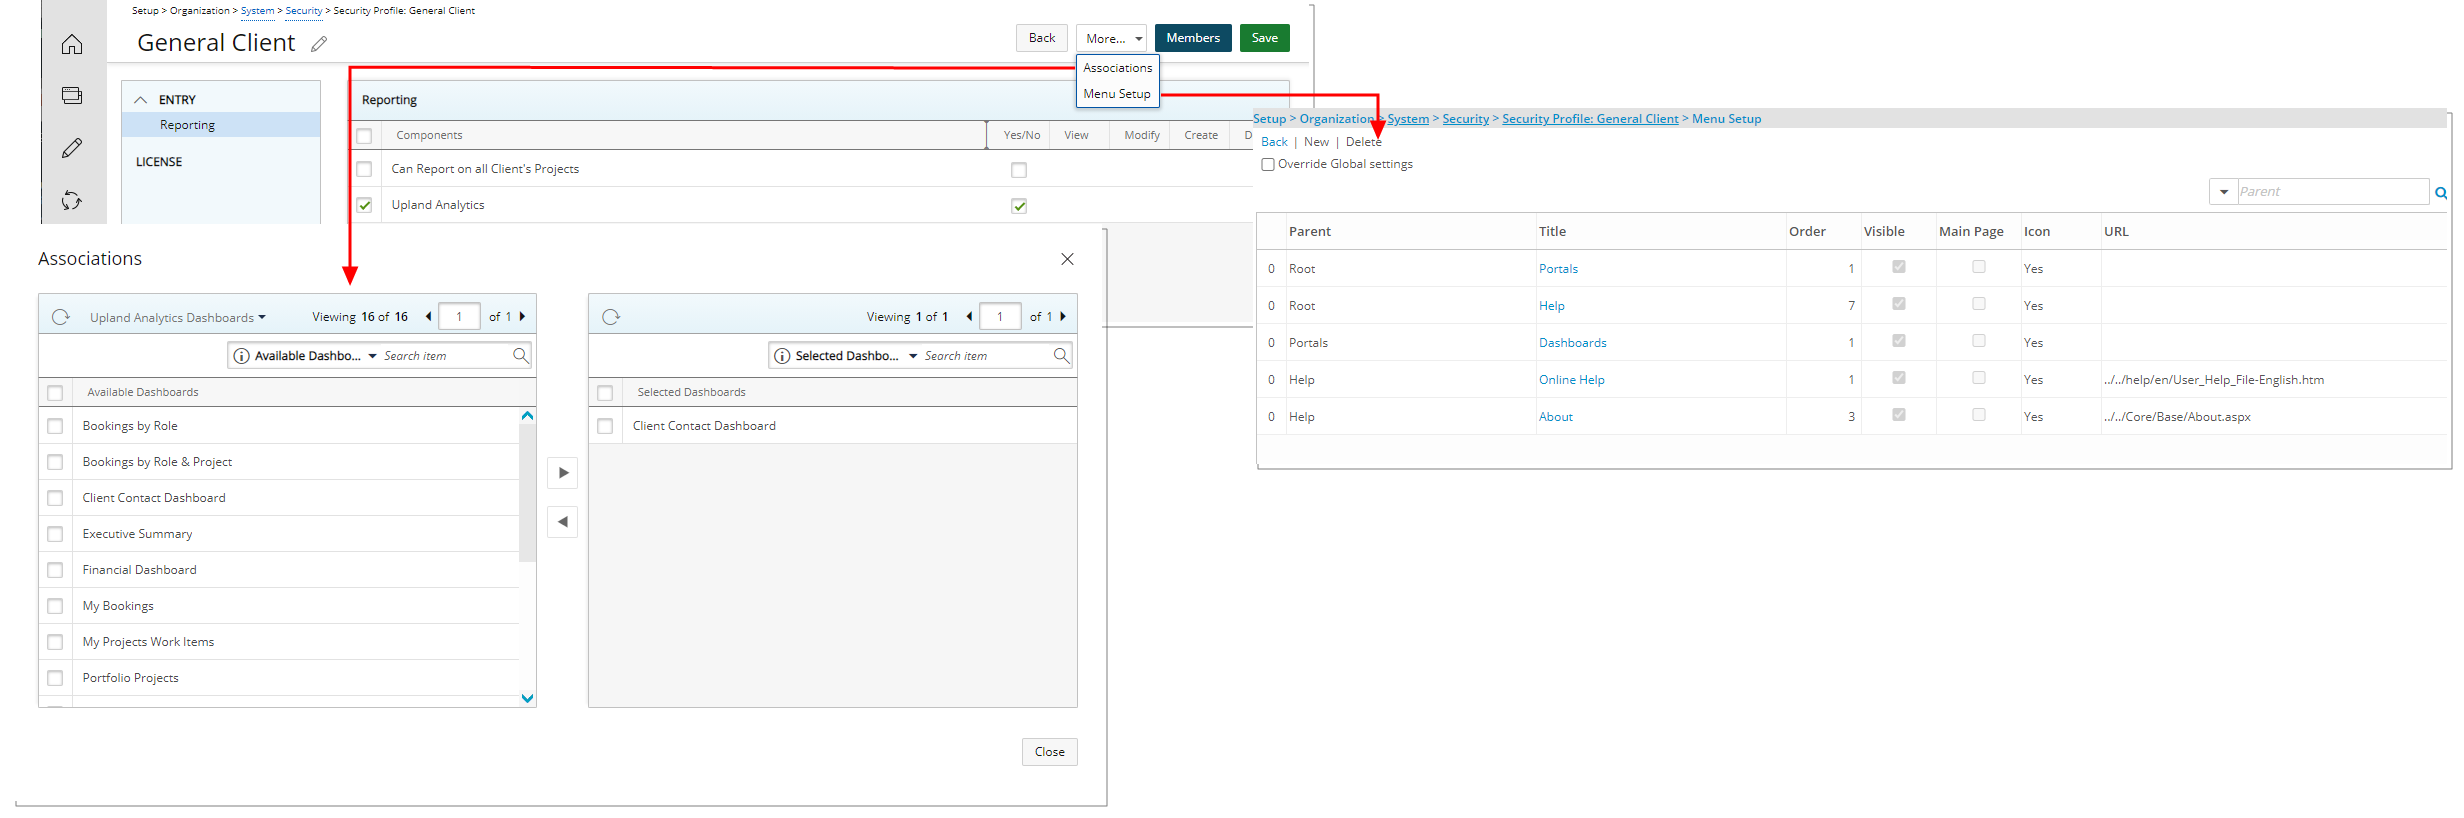
Description: Modifications have been made to the Client Security Profile to support the accessing of the Customer Portal:
Addition of the More… context menu from where you can:
- Access the Associations dialog box and associate existing shared Upland Analytics Dashboard(s) with the Client Security Profile
- Access the Menu Setup where you can overwrite the default Menu.

Furthermore, the following redundant Security Profile Permissions under Setup > Organization > System > Security > Client have been removed:
- Entries (under Entry > Work Process)
- Work List (under Entry > Work Process)
- Work Process (under License)
- All Work Processes (under Workflows)
For further details refer to Client Security Profile.
Expense
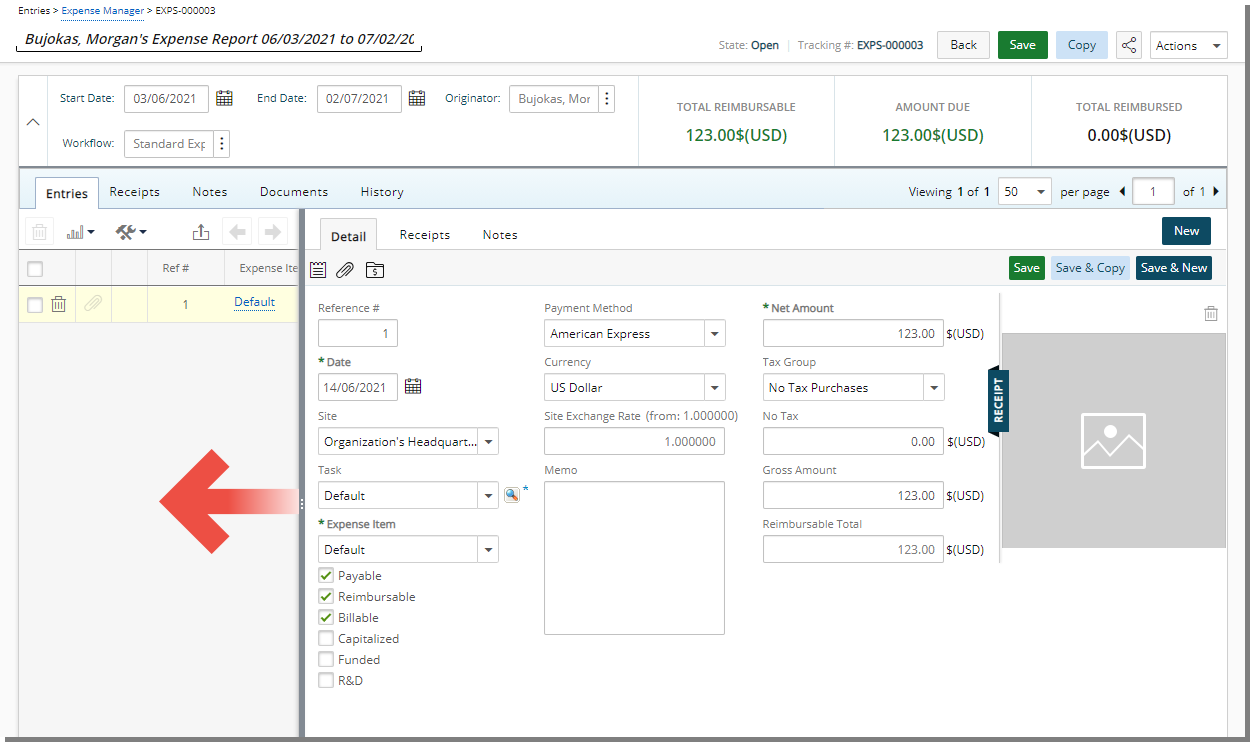
Description: The separator bar can now be adjusted to accommodate a larger right panel area.
Modifications to the width of the right panel within the Expense Report are retained per User/Browser until changed.
Benefit: Allows you to dynamically resize the panels, to better fit your content.
Note:
- Minimizing the left panel will result in the search box to be hidden from view. To access the search bar, the left panel must have a wider width.
- The size of the left panel can only be a maximum of 33% of the browser width.
For further details refer to Adding an Expense Entry under a newly created Expense Report.
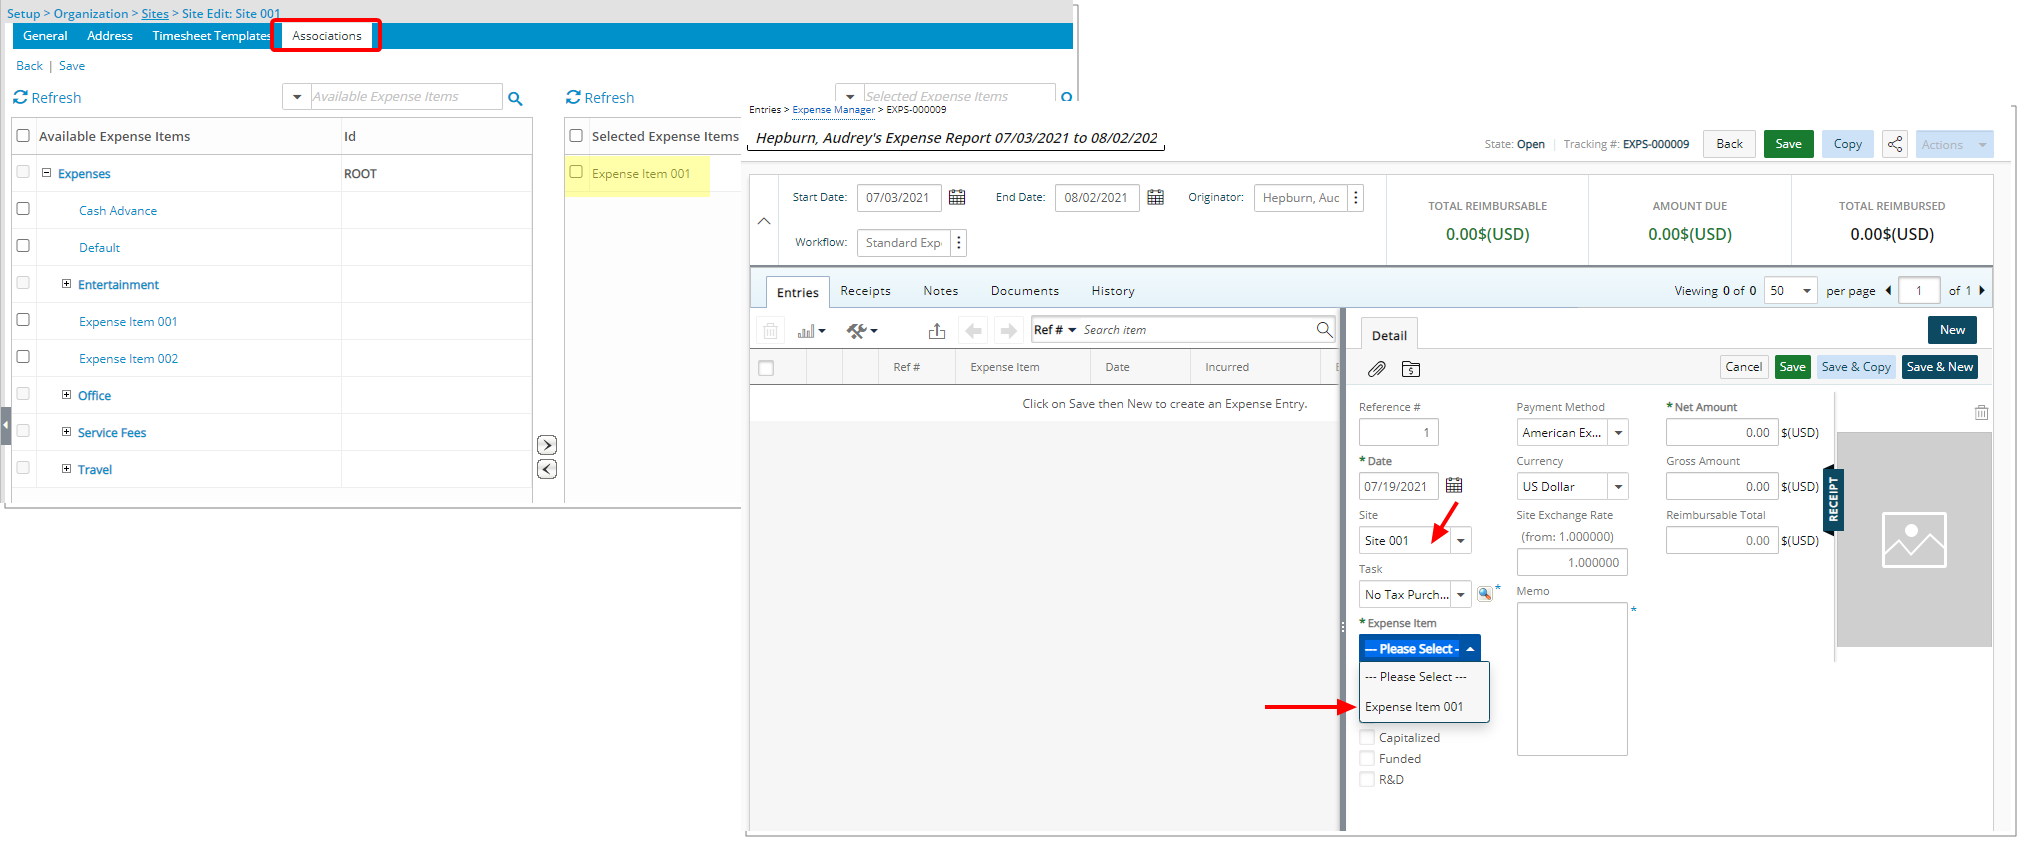
Description: Expense Item(s) can now be associated to Site(s), in one of the following ways, allowing users to only be able to select the Expense Item(s) that are associated with their Site when creating an expense Report:
- You can associate multiple Expense Items to a Site from the newly added Associations tab located within the Site Edit page (Setup > Organization > Sites) by simply selecting the required Expense Items from the Available Expense Items table and moving them to the Selected Expense Items on the right.
- Furthermore, an Expense Item can also be associated to multiple Sites from the Expense Item Edit page by clicking the newly added Sites button (Setup > Expense > Expense Items).
When the required association is created, upon creating an Expense Report and choosing the Site only the associated Expense Items will be available to the User..
Note: If there are no Expense Items associated for a Site, then all Expense Items will be available to the User when creating an Expense Report.
The precedence for the Expense Item(s) (highest to lowest) is as follows:
- Task Budget Restriction: Project edit > Planners > Budget > Project > Task or Setup > Work > Tasks > Task Edit > Budget
- Project Budget Restriction: Project edit > Planners > Budget > Project
- Site restriction: Setup > Organization > Sites
For further details refer to:
- Associating a Site to an Expense Item
- Associating Expense Item(s) to a Site
Financial
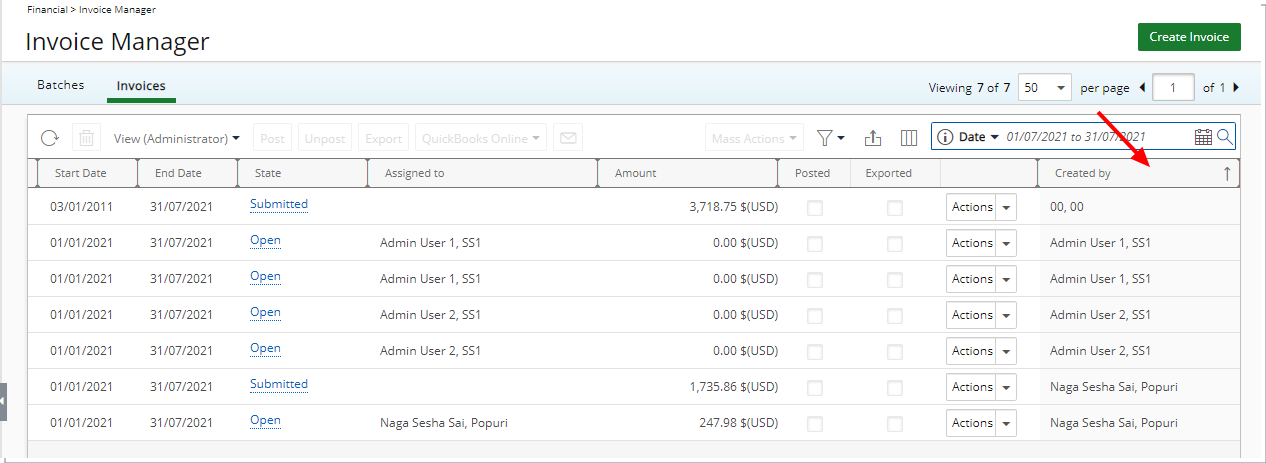
Description: You can now sort the Invoices and Batches based on the Created By column either by ascending or descending order.
Benefit: With this addition you can easily identify the Invoices and Batches based on their creator’s name.
For further details refer to Working with Invoice Manager.
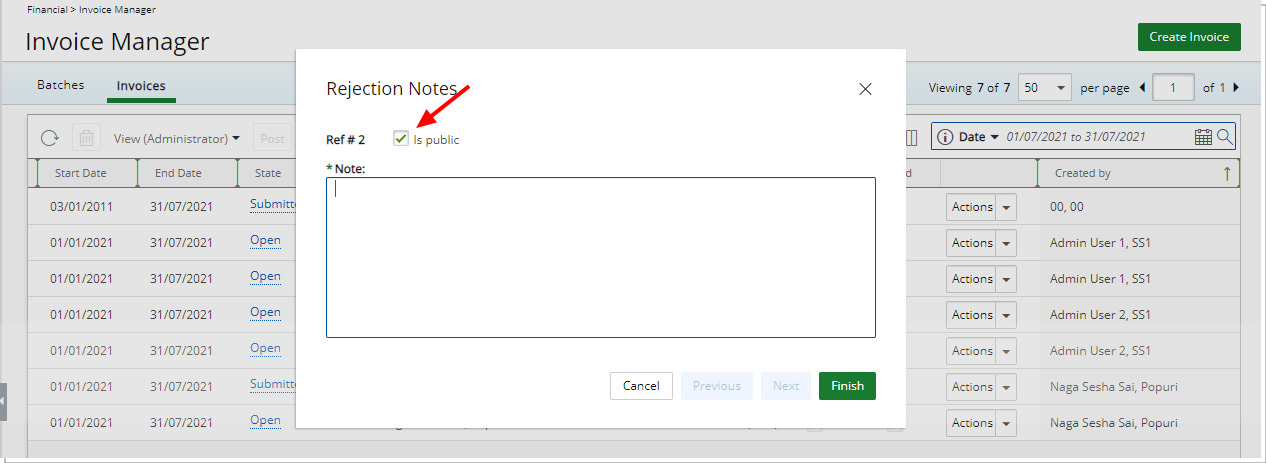
Description: When rejecting an Invoice, the Rejection Note is now public by default. If required, you can clear the Is Public selection box from the Rejection Notes dialog box.
For further details refer to Rejecting an Invoice.
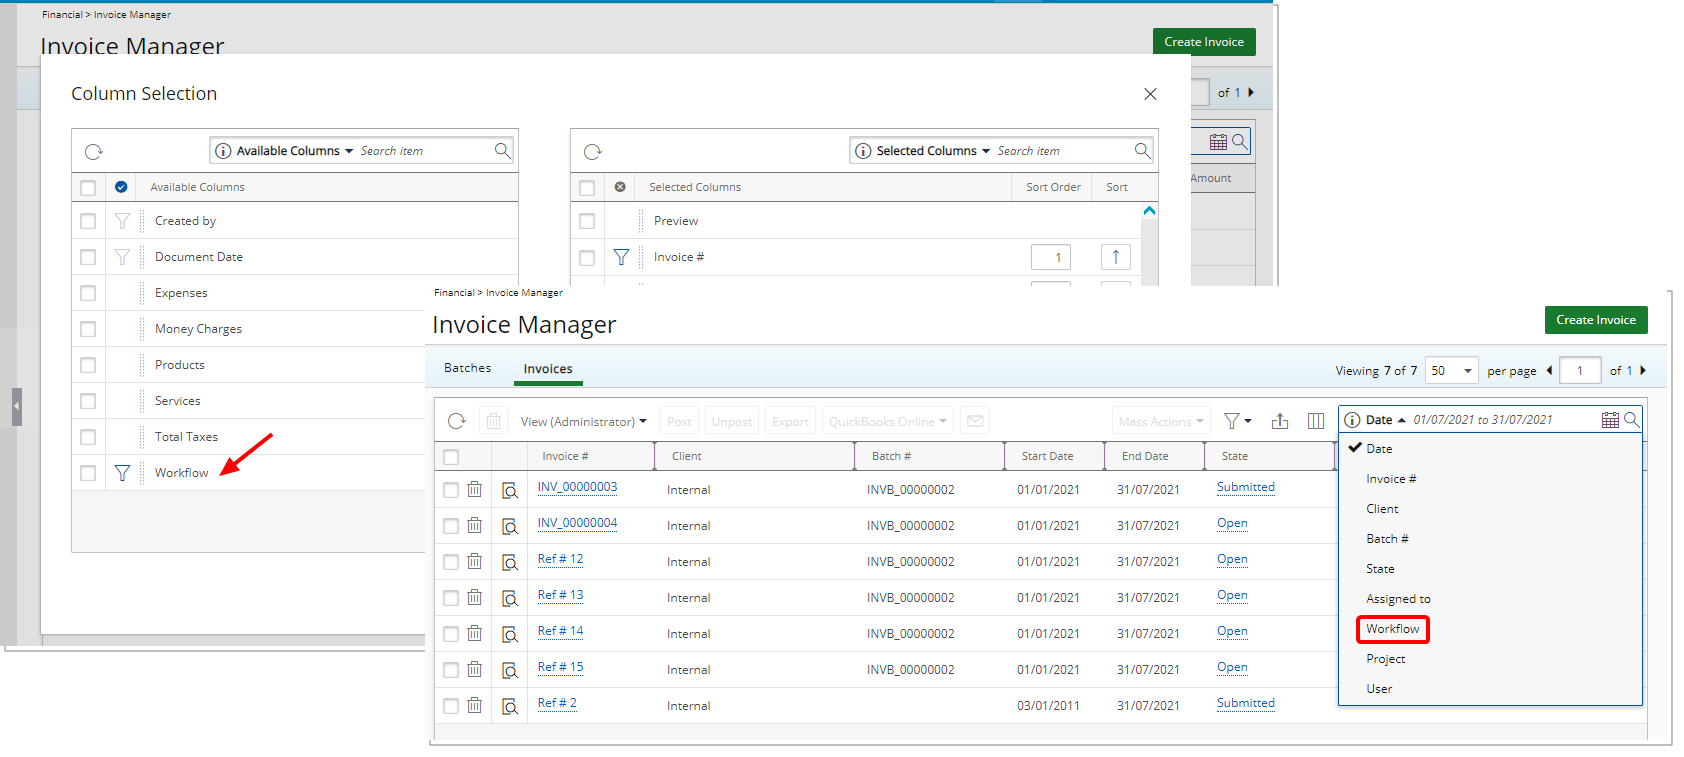
Description: You can now choose to add the Workflow as a column within the Invoice Manager. Furthermore, the Workflow search criterion is now available by default.
Benefit: The Workflow can now be readily available as a point of reference as needed.
For further details refer to Working with Invoice Manager.
Financial Planner
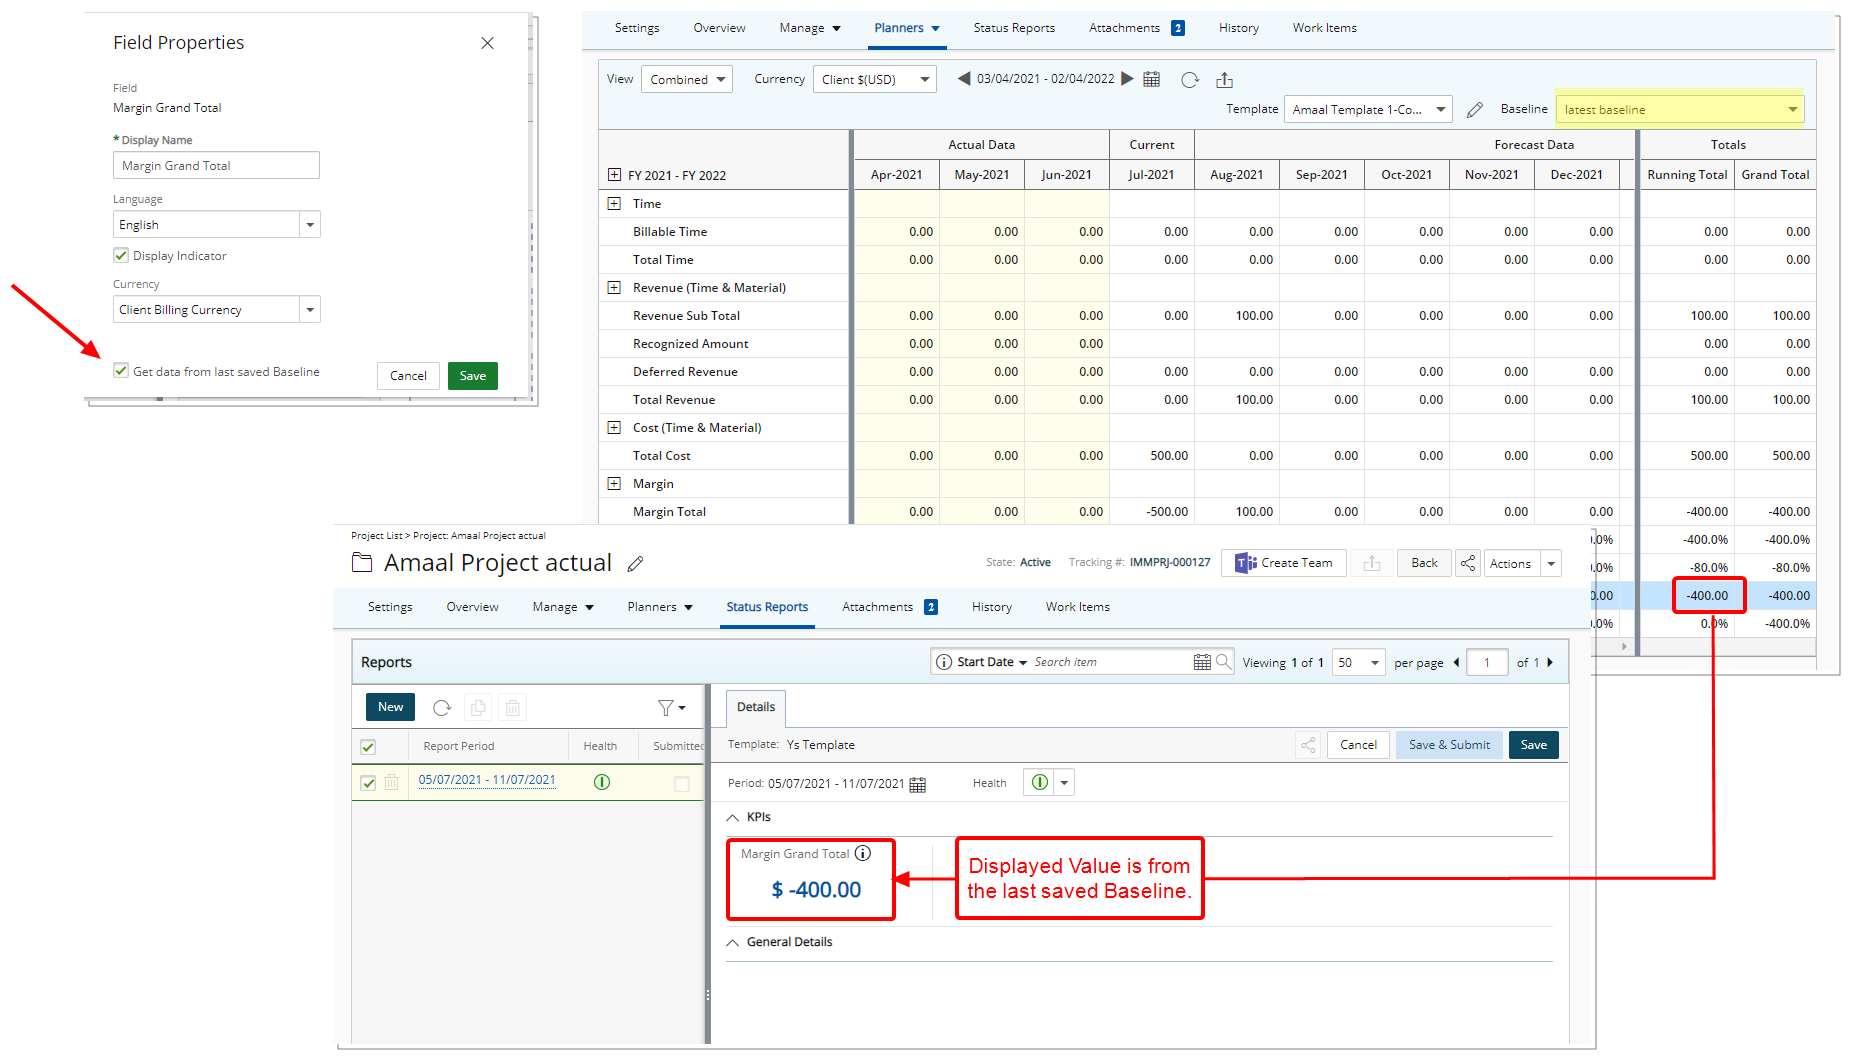
Description: The option Get data from last saved Baseline now available for any Financial Planner KPIs associated to a Project Status Report Template, allows you to have insight on Financial Planner related KPIs based on the last saved Baseline.
For further details refer to Configuring a Financial Planner KPI associated to the Project Status Report to get data from last saved Baseline.
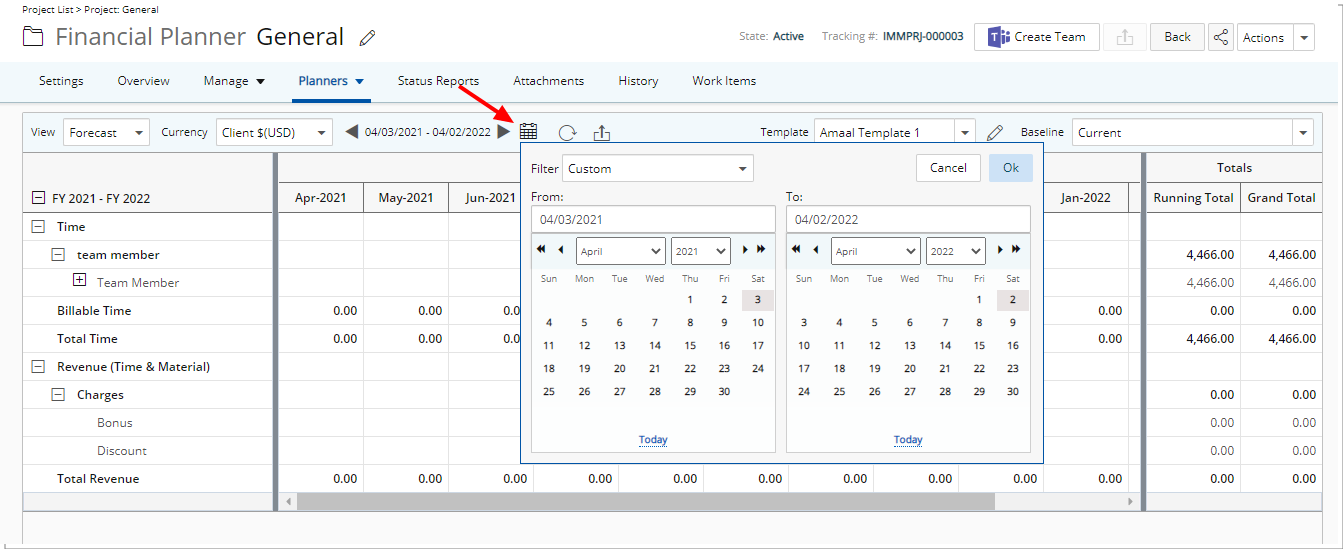
Description: The Financial Planner can now be rendered based on your selected date range. To accommodate this new functionality, the date picker within the Financial Planner has been enhanced wherein you can now select a From and To date or select one of the predefined available date Filters. The Start and End dates will be adjusted to fall within the chosen Calendar Period associated to the Template, for a maximum of 36 periods.
Benefit: This improvement allows you to choose the date range while running the Financial Planner without the need to modify the associated Template.
For further details refer to Choosing a date range while running the Financial Planner.
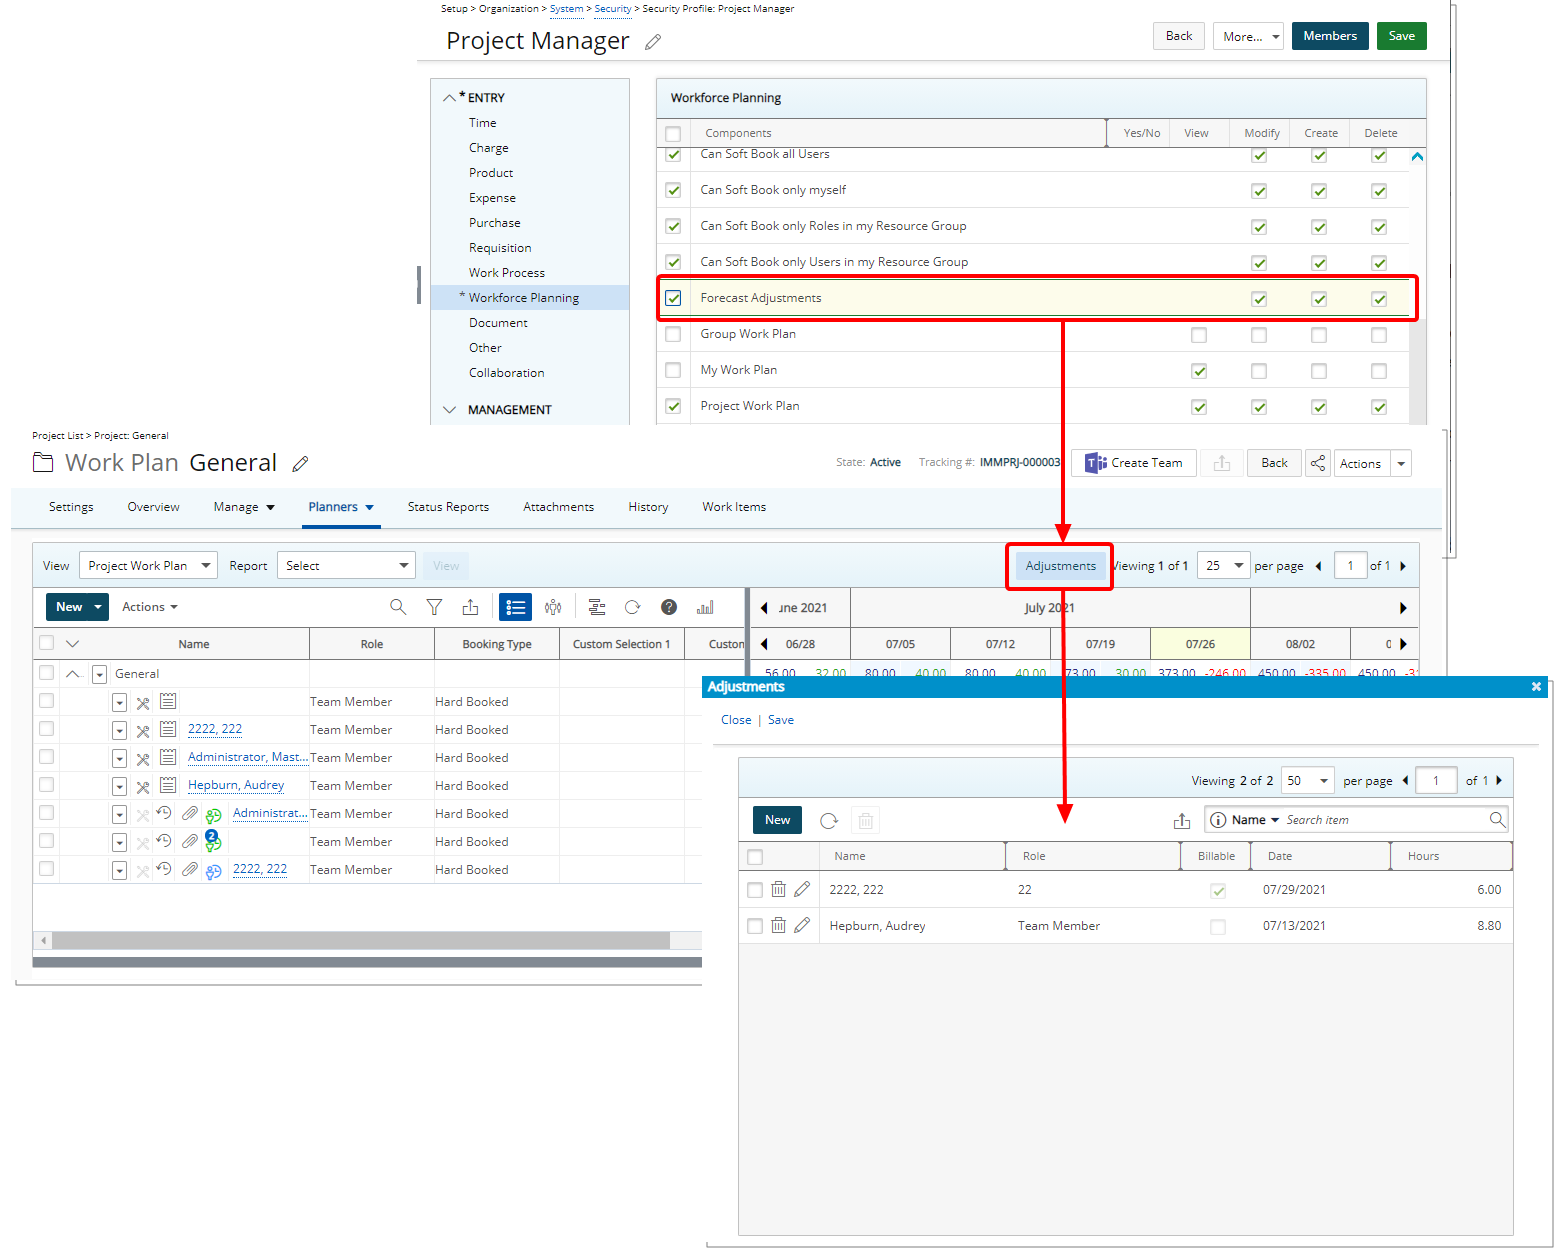
Description: With the addition of the Adjustments button located within the Work Plans, users with the Forecast Adjustments permission, defined for the Security Profile under which the User falls (Setup > Organization > System > Security), can now enter negative or positive adjustments.
Benefit: This enables you to make adjustments to a closed period on the Financial Planner specifically the periods that are already deemed as Actual values and not Forecast values.
Note: In this release, any adjustments are saved in the database and accessible/manageable through the Forecast Adjustments dialog box only.
For further details refer to:
- Granting the right to Forecast Adjustments
- Entering and managing Adjustments through the Project Work Plan
General
Description: The maximum allowed number of characters when entering information into the following fields has been increased:
| Field Name | Allowed number of characters with spaces |
|---|---|
| Group ID (Setup > Organization > Groups > Group Edit General tab) | 128 |
| Client Name (Setup > Work > Clients > Client Edit General tab) | 256 |
| Contact Address (Setup > Work > Clients > Client Edit > Contact List > Contact Edit) | 256 |
| Contact Email (Setup > Work > Clients > Client Edit > Contact List > Contact Edit) | 4000 |
| Group Name (Setup > Organization > Groups > Group Edit General tab) | 256 |
| Team Name (Setup > Organization > Teams > Team Edit General tab) | 256 |
| Project Description (Project List > Project Edit General tab) | 4000 |
| PO Description (Setup > Work > Clients > Client Edit > PO Edit) | 4000 |
| Link URL Attachments (Documents & links where available) | 512 |
| Charge Item Name (Setup > Financial > Charges > Charge Edit) | 256 |
| Expense Item Name (Setup > Expense > Expense Items > Expense Item Edit) | 256 |
| Logon name (Setup > Organization > Users > User Edit, Security tab) | 256 |
Benefit: The increase in the number of allowed characters permits users to add more information when need be.
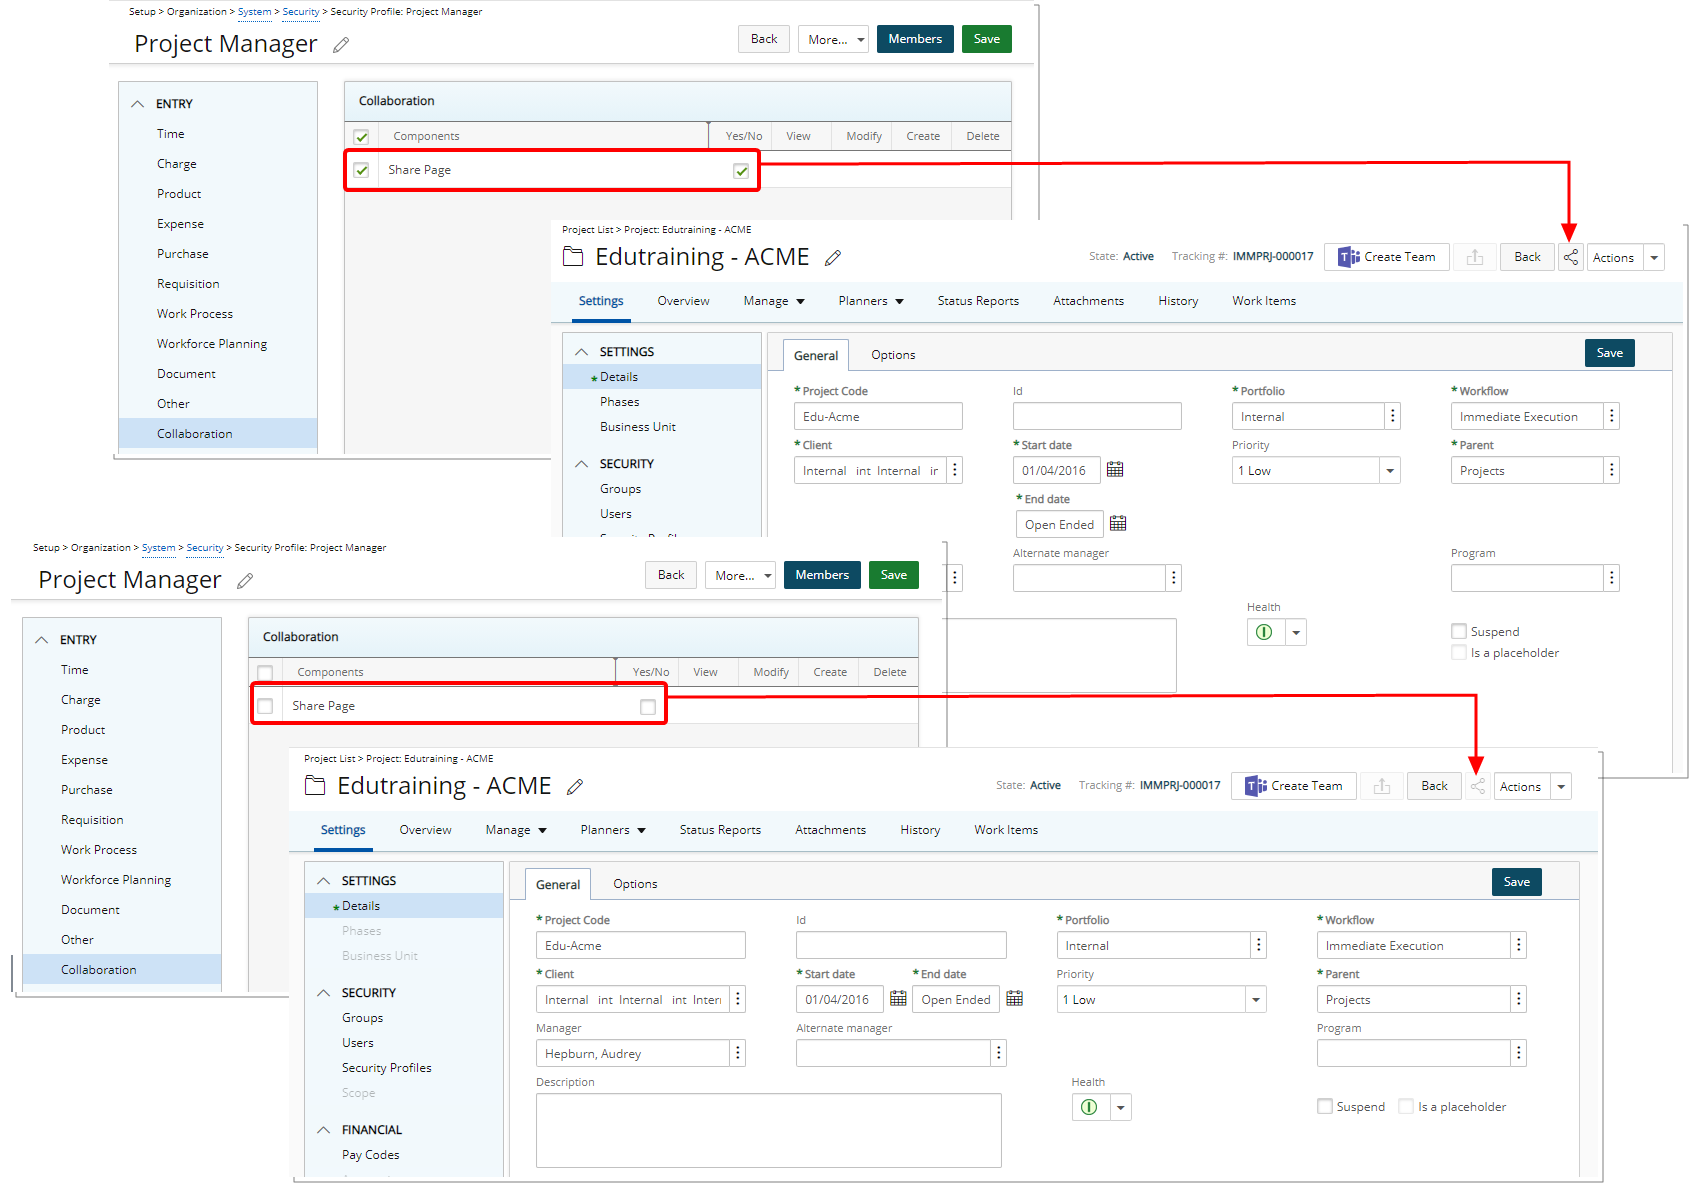
Description: The new Share Page security permission with Yes/No rights can be granted from the Entry > Collaboration menu of a Security Profile edit page. This permission allows users to Share any of the applicable PSA pages.
Benefit: If required, you can now bar users from sharing PSA pages.
Note: By default, the Share Page security permission is turned on for all Security Profiles.
For further details refer to Granting the right to Share PSA pages.
Mobile
Description: The Timesheet Template name is now displayed within the following screens when using the mobile app:
- Assigned Timesheets
- My Timesheets
- Add Time Entry
- Copy Timesheet
Benefit: The Timesheet Template name is now readily available through the mobile app.
For further details refer to the PSA Mobile guide.
Description: When the Billable Field is not included within the Show Project Time section of a User’s Timesheet Template, then it will no longer be visible on following mobile screens:
- Timesheets tab of Home page
- My Timesheet
- My Timesheets
- Assigned Timesheets
For further details refer to the PSA Mobile guide.
Description: Users without the Billable License, will no longer see the Billable information displayed from the following screens:
- Timesheets tab of Home page
- My Timesheet
- My Timesheets
- Assigned Timesheets
For further details refer to the PSA Mobile guide.
Reporting
As of this release, Ad Hoc reporting including all existing Ad Hoc Reports will no longer be accessible.
However, if you absolutely require some additional time to access your Ad Hoc Reports, please contact PSA Support.
Timesheet
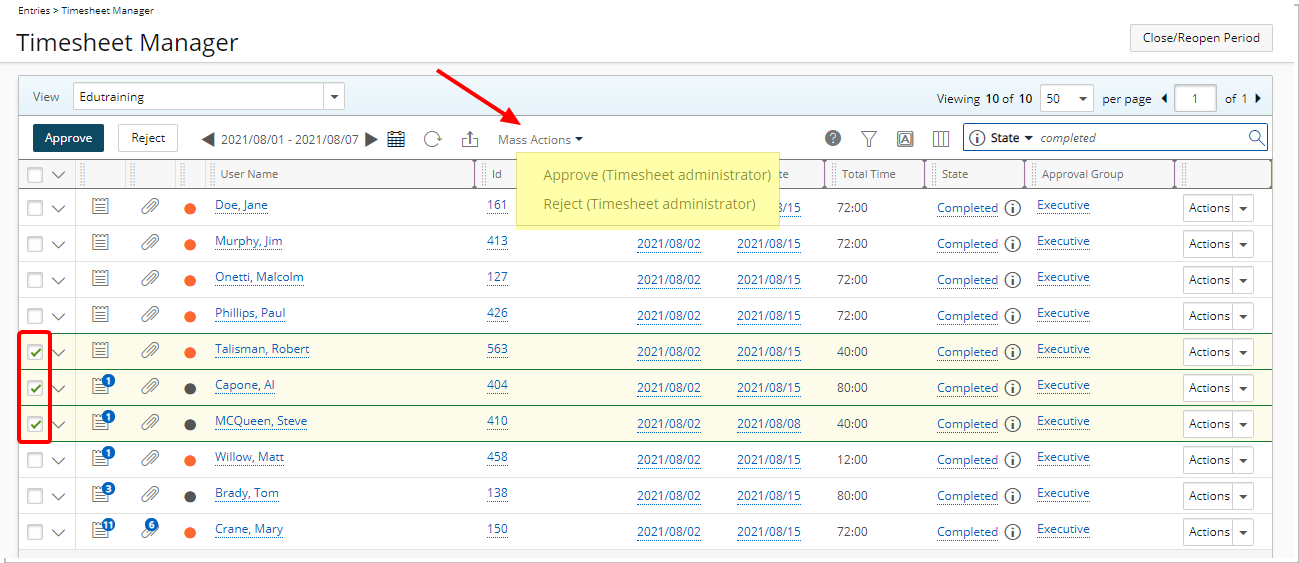
Description: You can now perform Mass Actions on Timesheets having the same Timesheet State and Timesheet Workflow versions.
Upon clicking the Mass Action button, and selecting the available transition, a corresponding message or dialog box displays prompting any required action(s).
Furthermore, the Security permission Can mass approve/reject Timesheets was renamed to Can Mass Action Timesheets.
Note: The Mass Action button will be dimmed for users without the Can change Timesheet State before reviewing permission.
For further details refer to Performing Mass Actions on Timesheets.
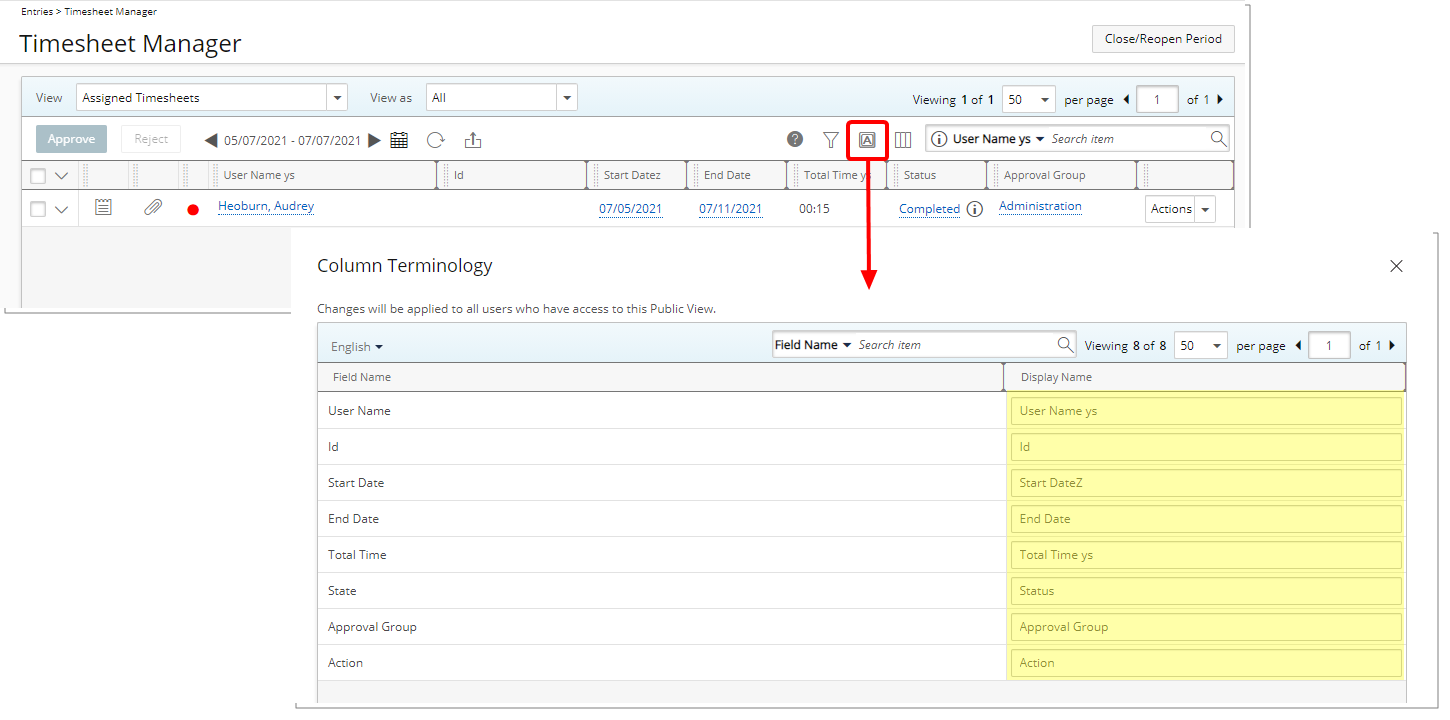
Description: With the addition of the Column Terminology button located within the Timesheet Manager, users with the Modify permission to the Public Timesheet Manager View, defined for the Security Profile under which the User falls (Setup > Organization > System > Security), can now configure the Preferred Name for a Public View.
Benefit: This enables you to customize the column names based on your organizational needs.
Note: Any modifications made to the Column Terminology are also reflected within the expanded rows under each Timesheet Manager View.
For further details refer to Modifying the Timesheet Manager Column Terminology.
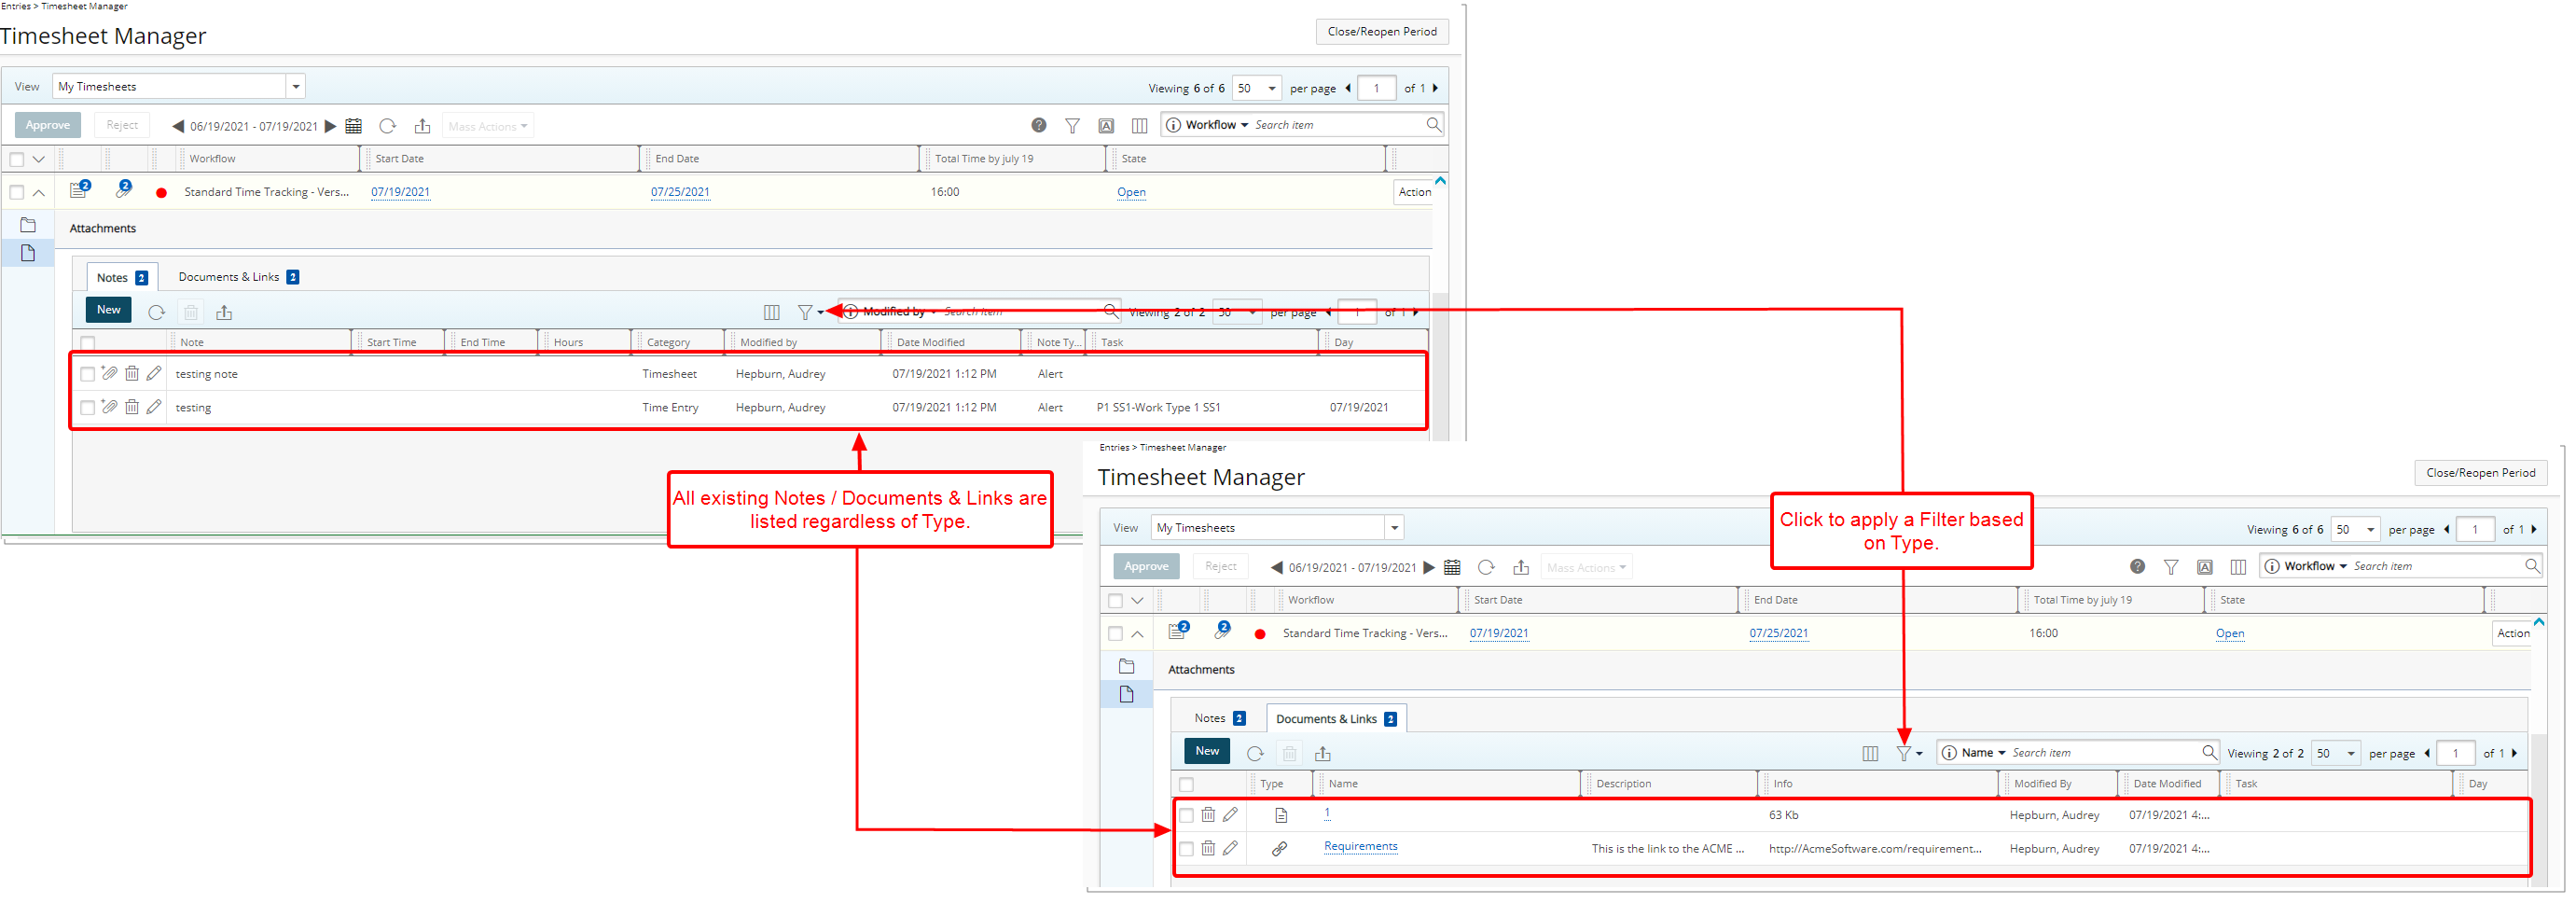
Description: Improvements have been made to the management of Attachments (Notes and Documents & Links) within the Timesheet Manager page.
In previous releases, the Attachments counter visible within the Timesheet Manager page showed the total number of all associated Note categories as well as any Documents & Links attachments.
As of this release:
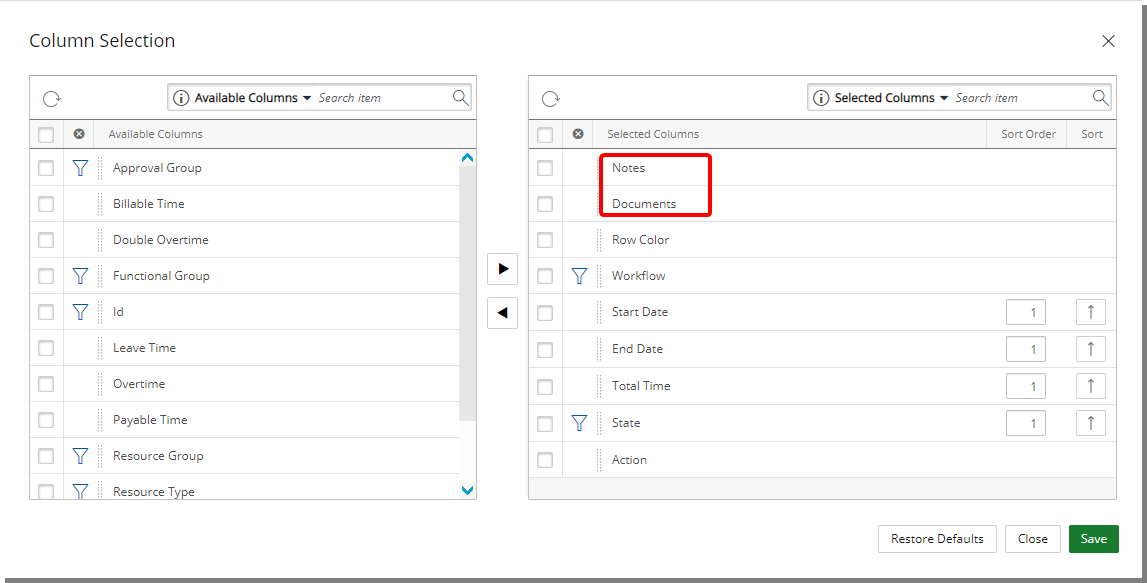
- Documents and Notes counters within the Timesheet Manager table have been separated.
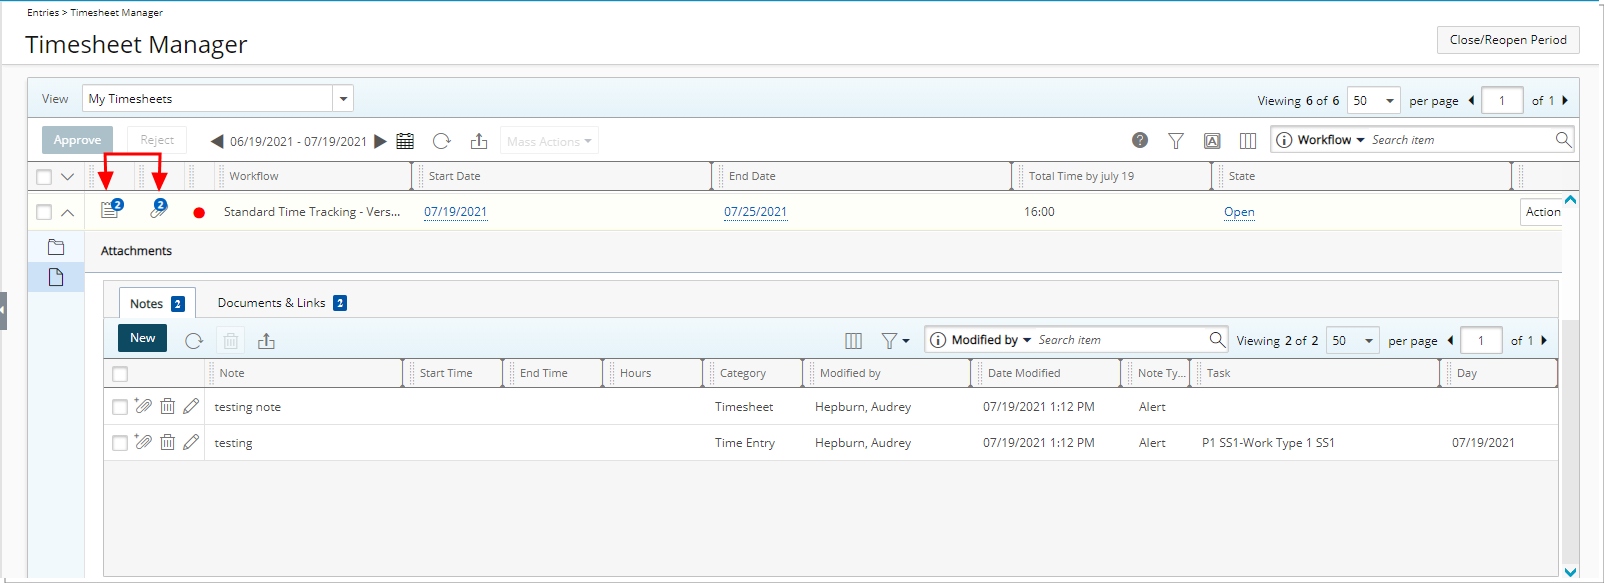
- You can choose to add/remove the Documents and Notes columns from the Column Selection.
- The Attachments tab has been updated to list all existing Notes / Documents & Links by default regardless of Type (Timesheet, Time Entries, Assignments, Tasks etc…). You can select to apply a Filter based on the Type from the Filter context menu.
For further details refer to
- Attaching a Document to a Timesheet
- Entering Notes on a Timesheet
- Timesheet Manager Drawer | Filtering the Notes / Documents & Links
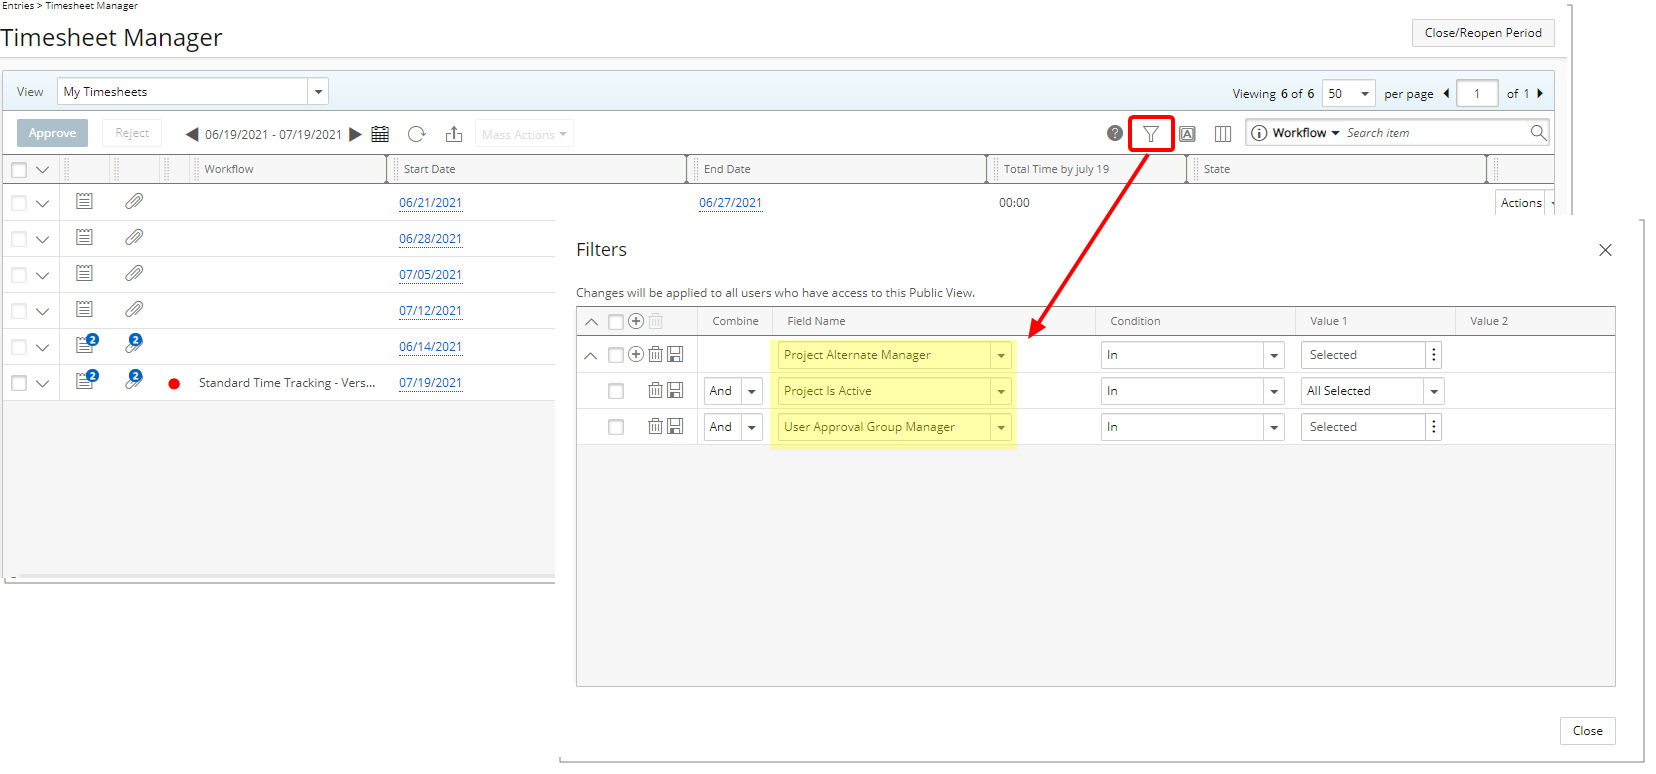
Description: The following options are now available when creating Filters within the Timesheet Manager page:
- Project Is Active
- User Approval Group Manager
- Project Alternate Manager
For further details refer to:
- Timesheet Manager page | Available Views
- Applying a Filter to the Timesheet Manager list
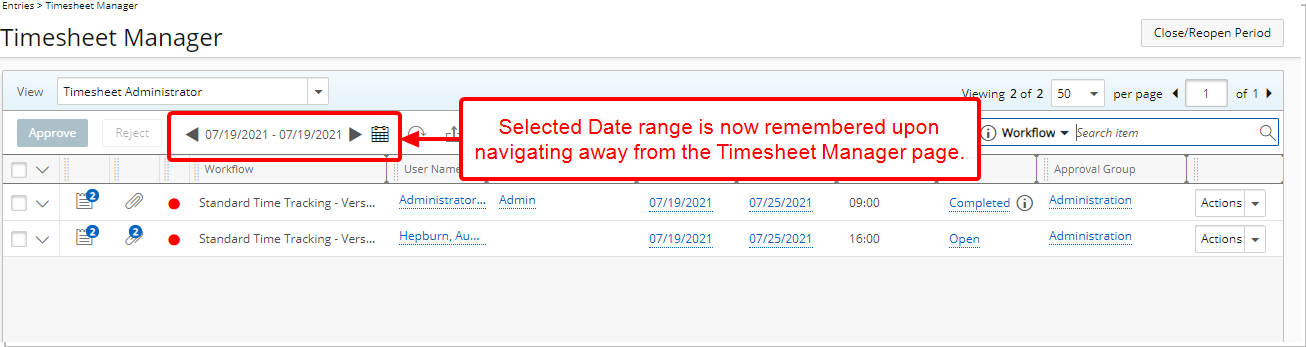
Description: Upon navigating to the Timesheet Manager page, the list of displayed Timesheets is based on the default Date range for your chosen View. Upon choosing a different Date range, your selection will now be remembered for this View and loaded upon subsequent visits to the page for the duration of your current session.
Note: The chosen Date range will not be retained if you log off, close your browser window or duplicate the browser tab.
For further details refer to:
- Timesheet Manager page | Available Views
Description: In previous releases the calculation for the Expected Working Hours field was as follows:
- For a Semi-monthly Period type: Hours per day x 15
- For a Monthly Period type: Hours per day x 30 or 31 depending on the month
As of this release the calculations for this field have been modified as follows:
- For a Semi-monthly or Monthly Period type: Hours per day * the number of working days in the period (excluding any Saturdays and Sundays)
Note: Holidays are not considered and have no effect on the calculations.
For further details refer to
- Creating Custom Timesheet Manager Views
- Conditional Formatting on the Timesheet Manager List Explained
- Timesheet Manager View Settings
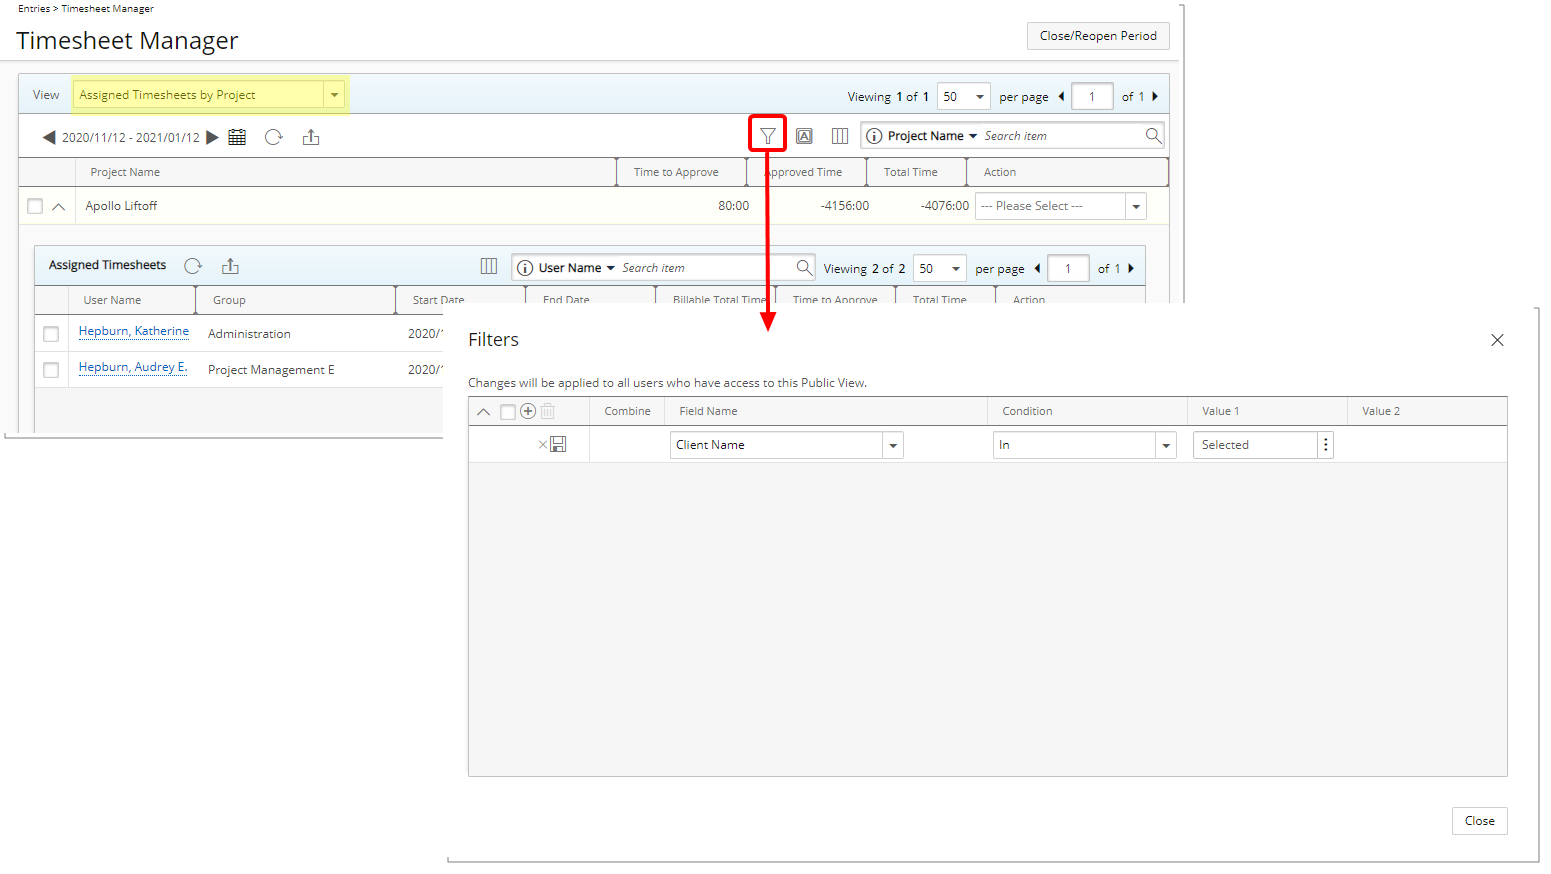
Description: From the Assigned Timesheet by Project View you can now click the Filter button and filter the list based on the following available options: Billable Time, Client Name, Double Overtime, Is Billable, Is Payable, Overtime, Payable Time, Period Status, Project Alternate Manager, Project Code, Project Id, Project Is Active, Project Manager, Project Name, Project Portfolio, State Attribute, Task Id, Task Name, Task Work Type, Time Charge, Total Time, User Active Site, User Approval Group, User Approval Group Manager, User Functional Group, User Functional Group Manager, User Id, User Master Site, User Name, User Resource Group, User Resource Group Manager, User Resource Type and User Title.
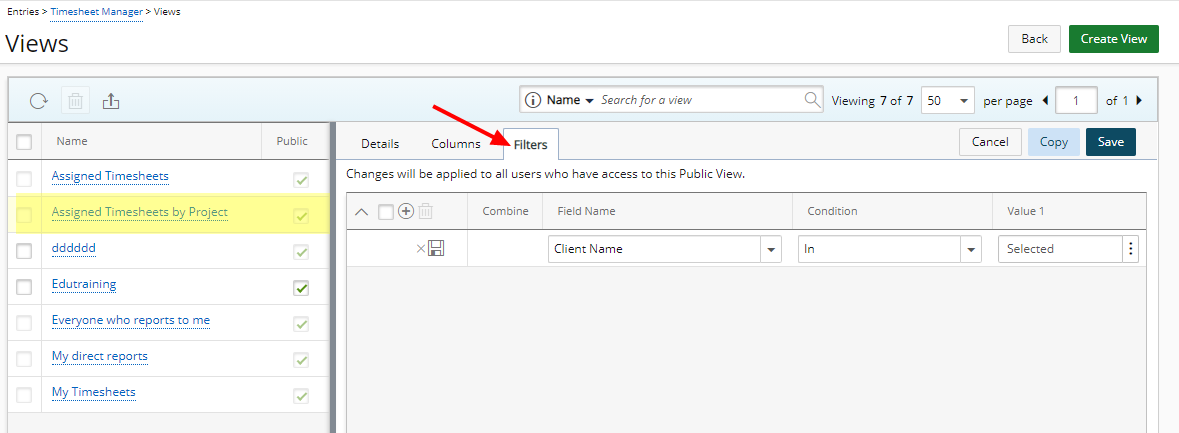
Furthermore, the Filter tab is now also available when modifying the View. Users with the Modify right to Public Timesheet Manager View permission can now define a default Filter setting relative to this View.
For further details refer to Assigned Timesheets by Project View.
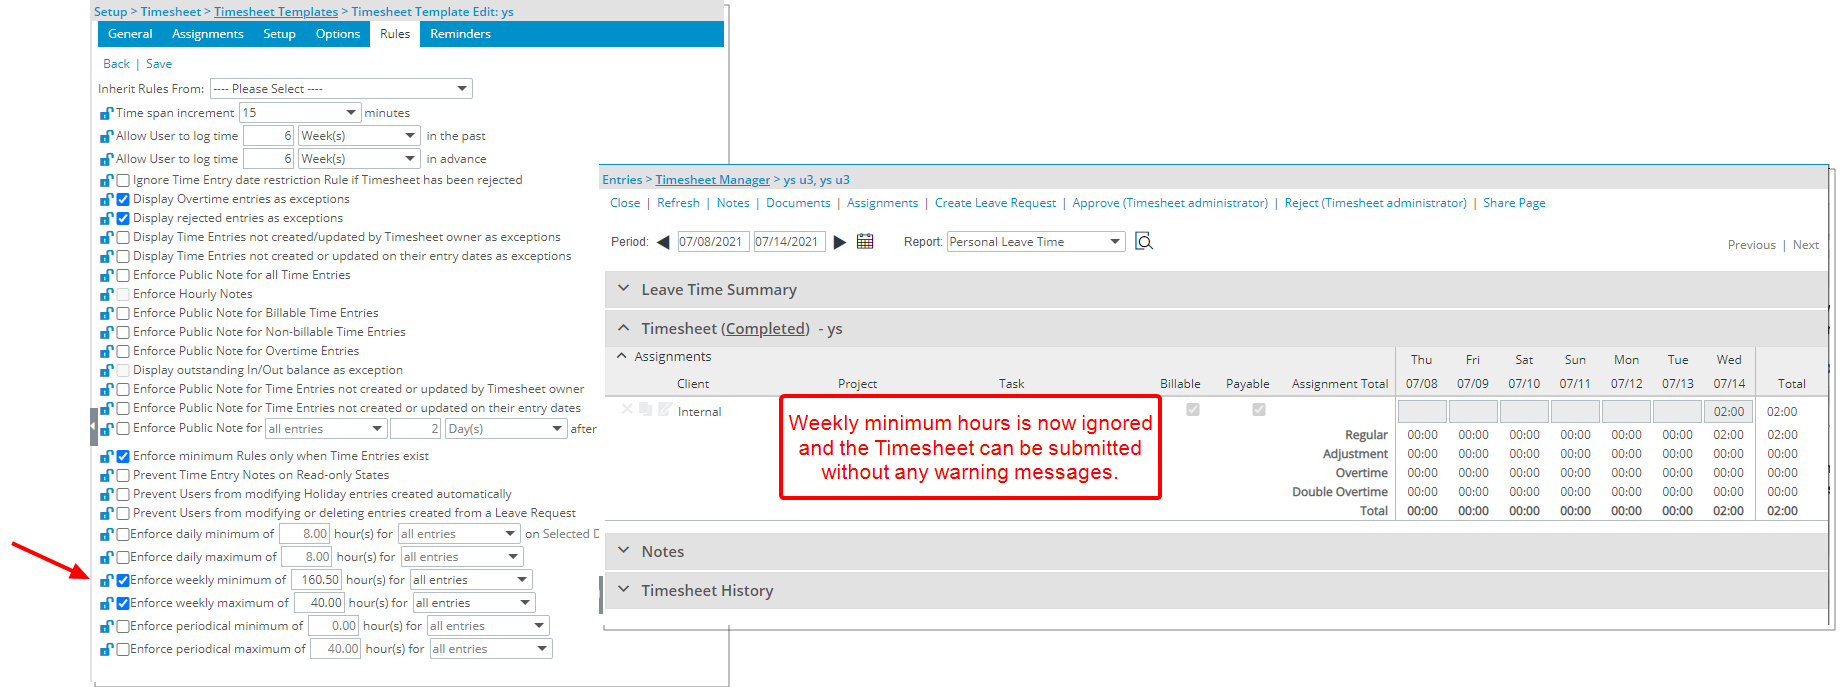
Description: When the User Hire or Termination dates fall within a given Timesheet Period, the periodically minimum hours defined in the Timesheet Template Rules tab is now ignored and no warning message is displayed.
Note: This setting is applicable for both PSA mobile and web.
For further details refer to Timesheet Template Edit page - Rules tab.
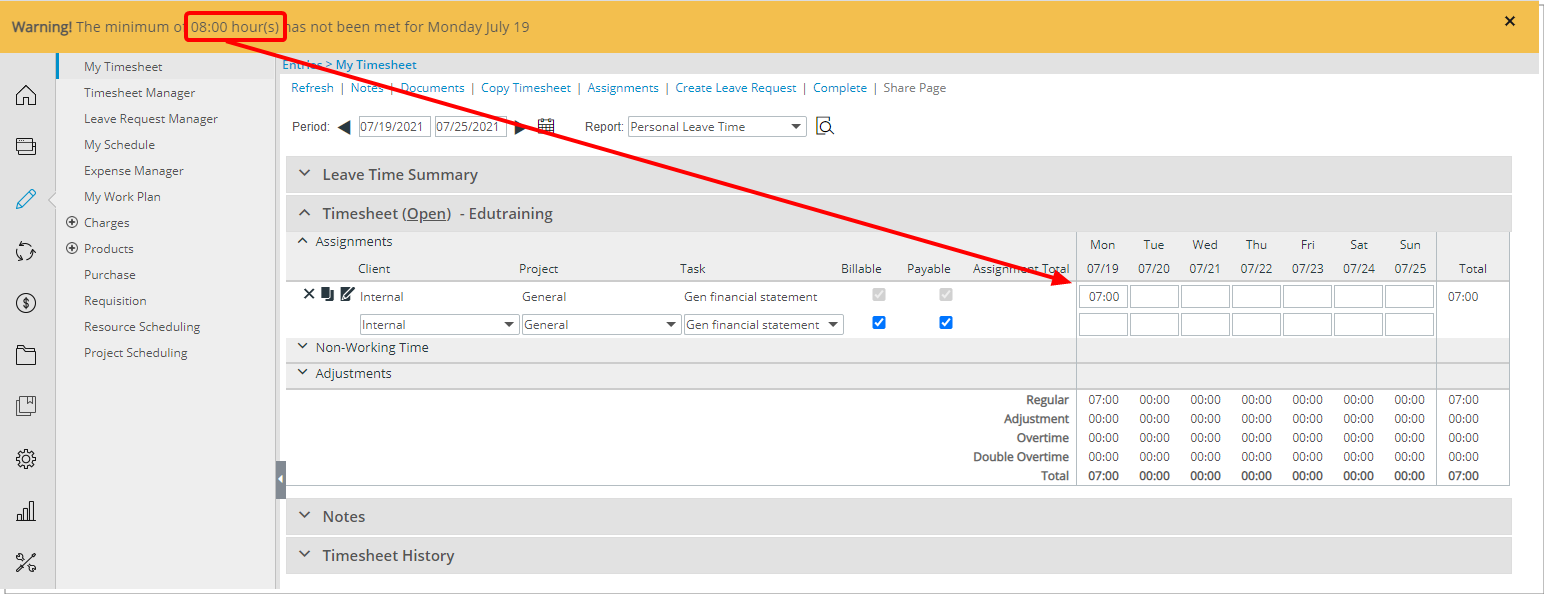
Description: The warning messages that display upon validation of the min/max Rules set for a Timesheet template now display the number of hours in the same format as the one defined for the Time Entry Units.
Note: This setting is applicable for both PSA mobile and web.
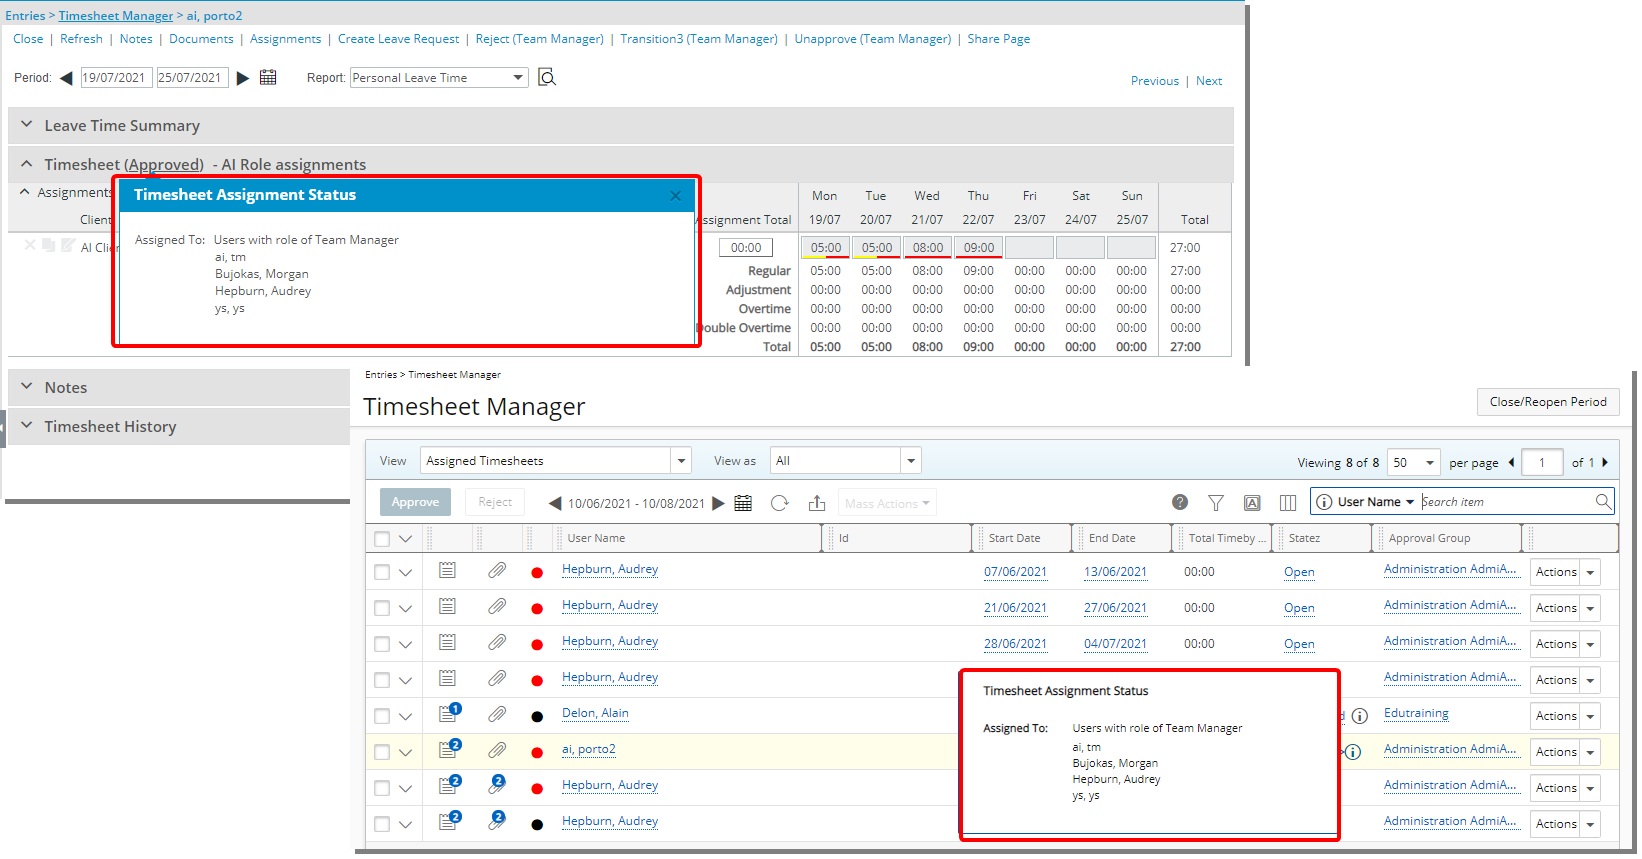
Description: The detailed Timesheet Assignment Status information can be accessed upon hovering your mouse over a completed State name from My Timesheet or the information icon from Timesheet Manager pages. When the State is not assigned to a Project or Portfolio Manager the you can view the Assigned To information.
Benefit: Users can now easily access and view who the Timesheet is Assigned to directly from My Timesheet and Timesheet Manager.
For further details refer to Completing or submitting My Timesheet.
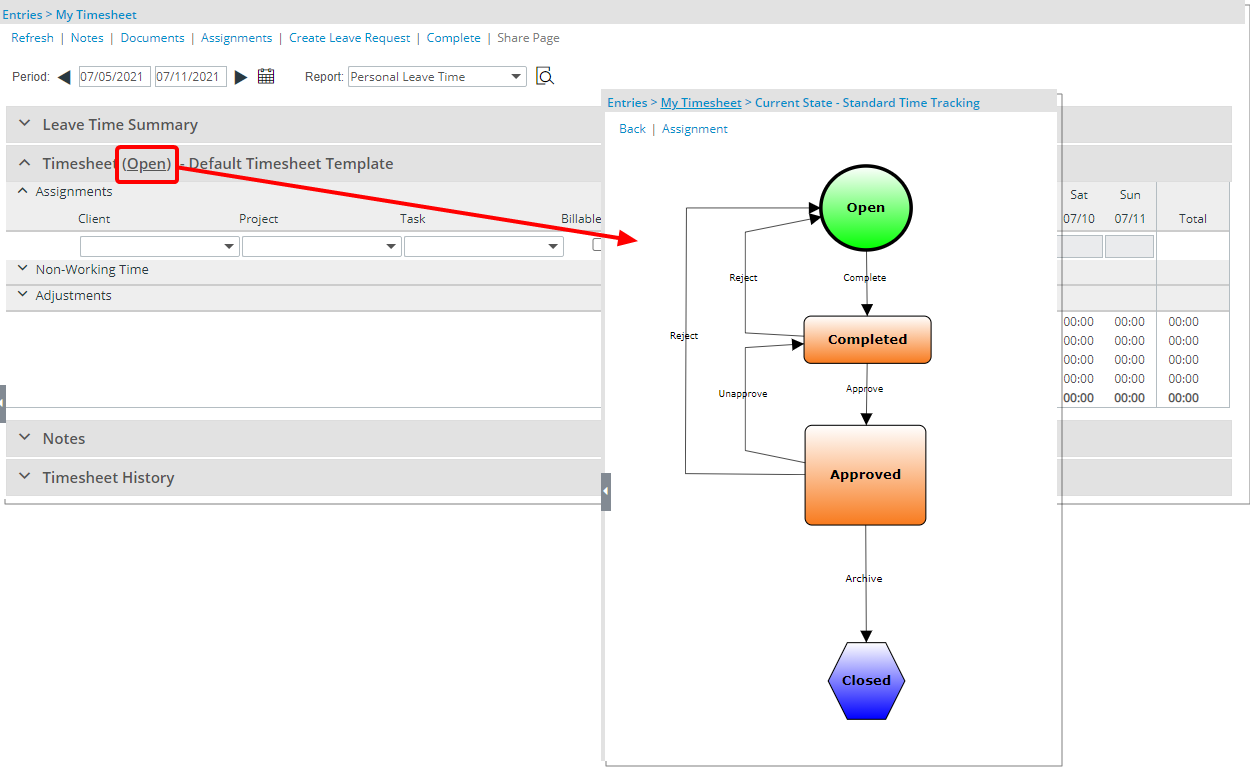
Description: In previous releases, the Timesheet State Assignments was accessed upon clicking the State name from My Timesheet. As of this release a visual representation of the Timesheet Workflow will be displayed so as to easily view the process and the assignments. You can then choose to access the Timesheet State Assignments page by clicking the Assignment link.
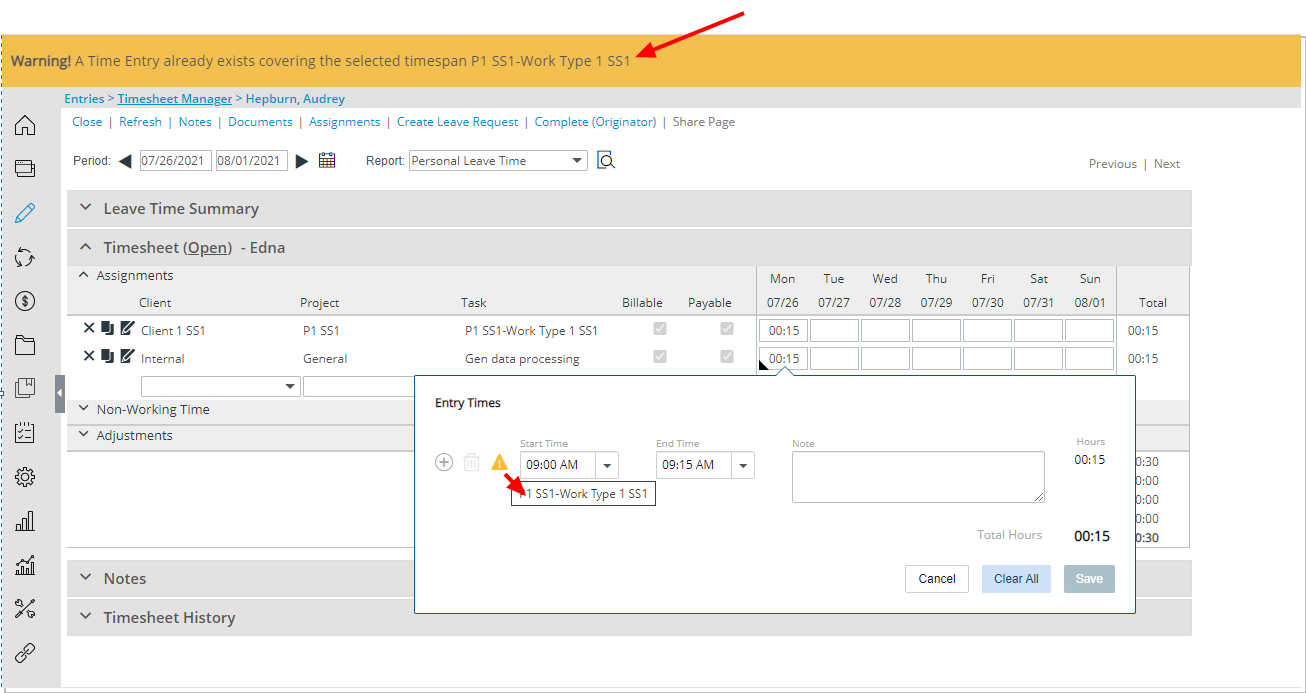
Description: You can now hover over the warning icon which is displayed against a row having conflicting Time Entries for a Timesheet Template using the Start and End Time functionality to view the details of the conflict.
A warning message bar is also displayed informing you of the conflict.
Benefit: With this addition, you can quickly access the necessary information to correct any conflicting entries.
For further details refer to Entering Regular Time (Start/End Time).
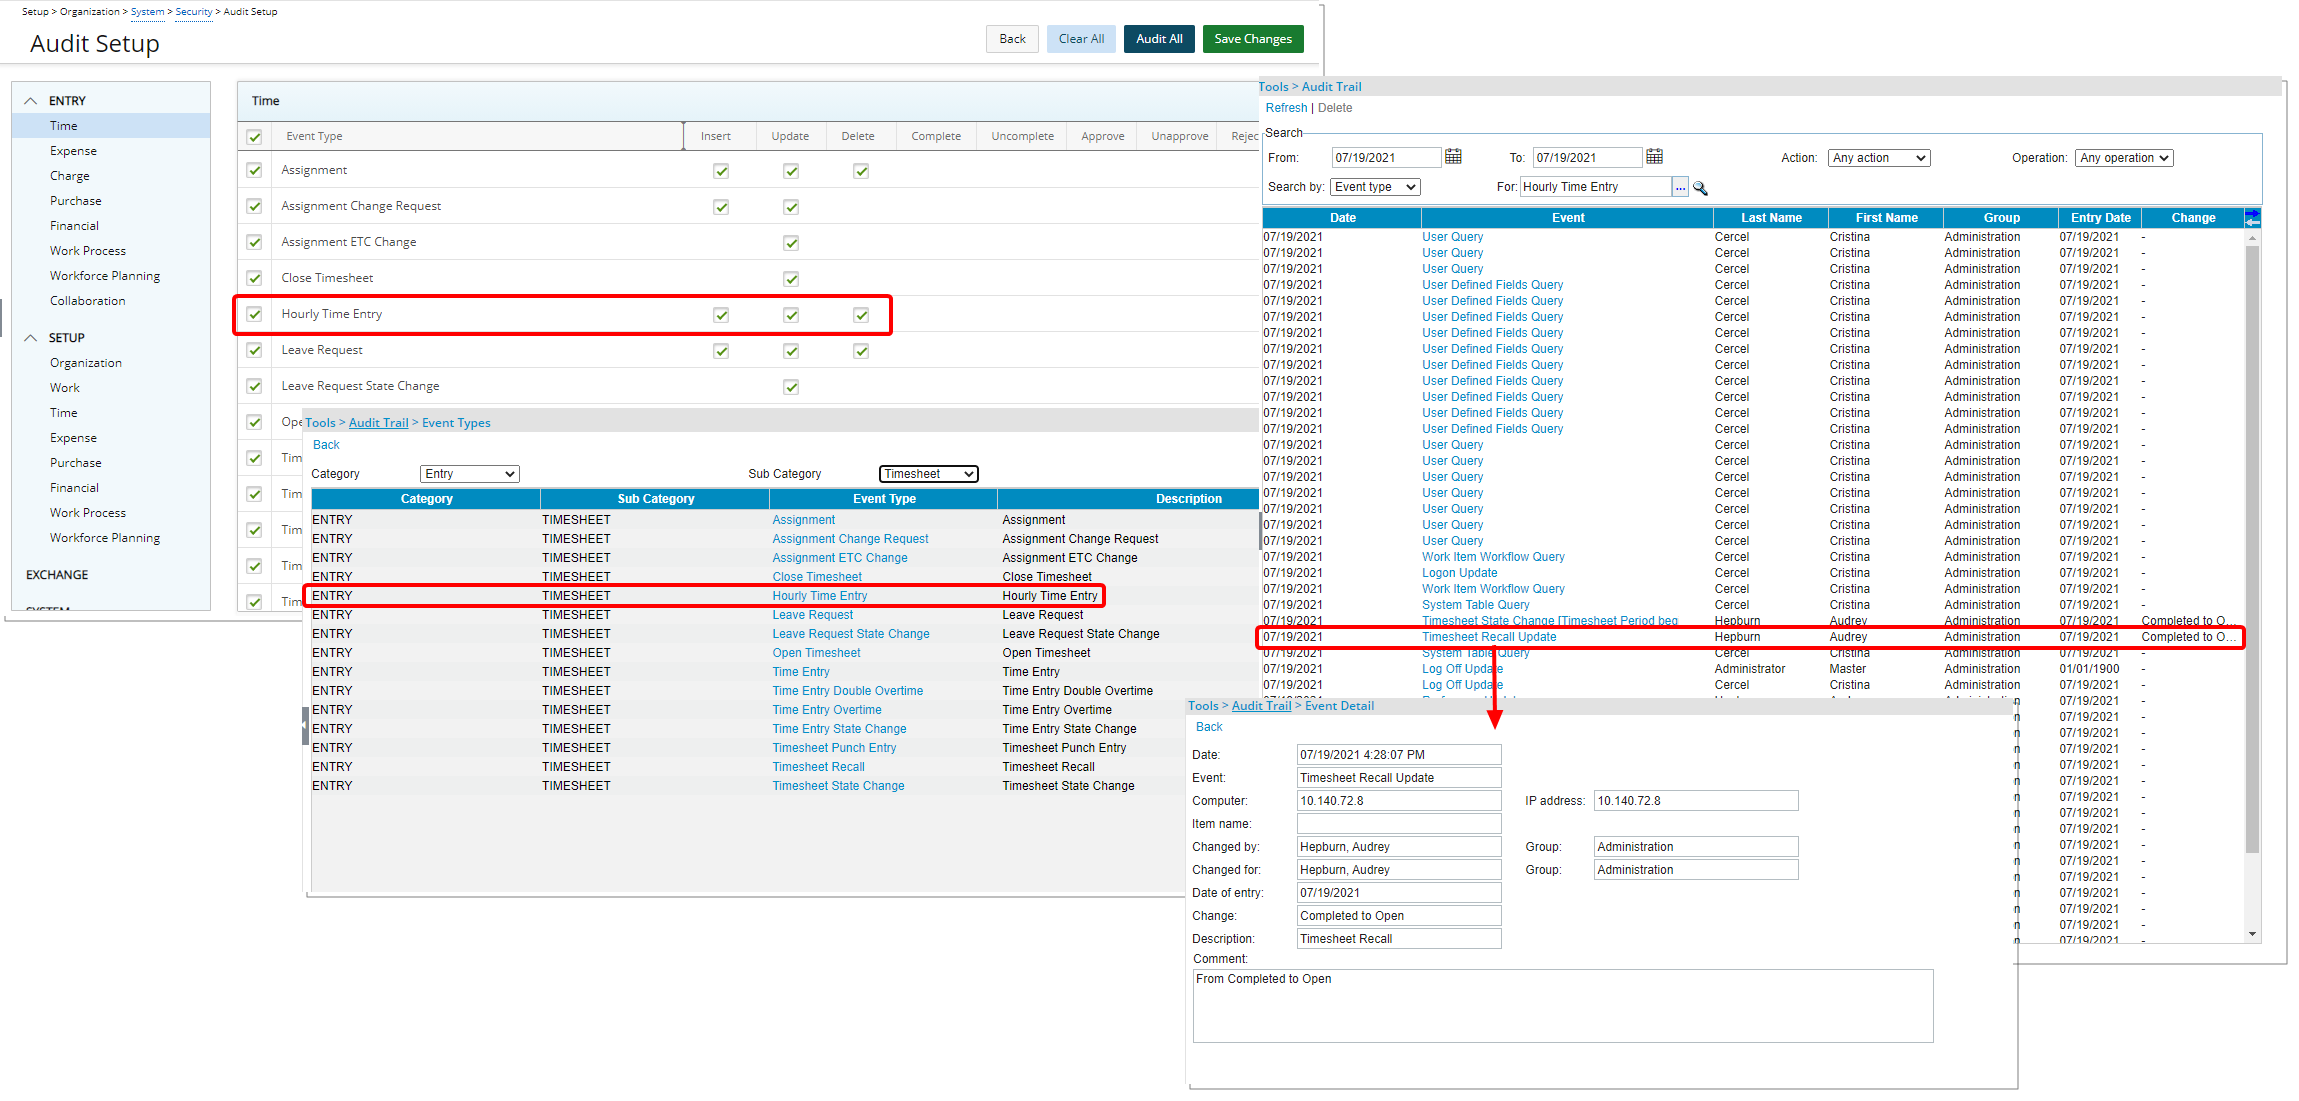
Description: A new Hourly Time Entry Audit Trail Event Type option has been added under the Entry > Time menu of the Audit Trail (Setup > Organization > System > Security) allowing you to track the creation, modification, and deletion of Start/End Time Entries.
Benefit: Creation, modification, and deletion of Start/End Time Entries can now be tracked to indicate when the action was made, by whom, and details of the action(s).
Note: When deleting an Hourly Time Entry, the Task Name is not displayed within the Event name. However, you can view this information within the Comment box of the Event Detail.
For further details refer to Auditing of changes made to Start/End Time Entries.
Upland Analytics
The current version of PSA release includes Upland Analytics 2021 R1 and highlights many powerful new enhancements as well as improvements to the user experience.
For more information on the latest version of Upland Analytics visit the Upland Analytics help center.
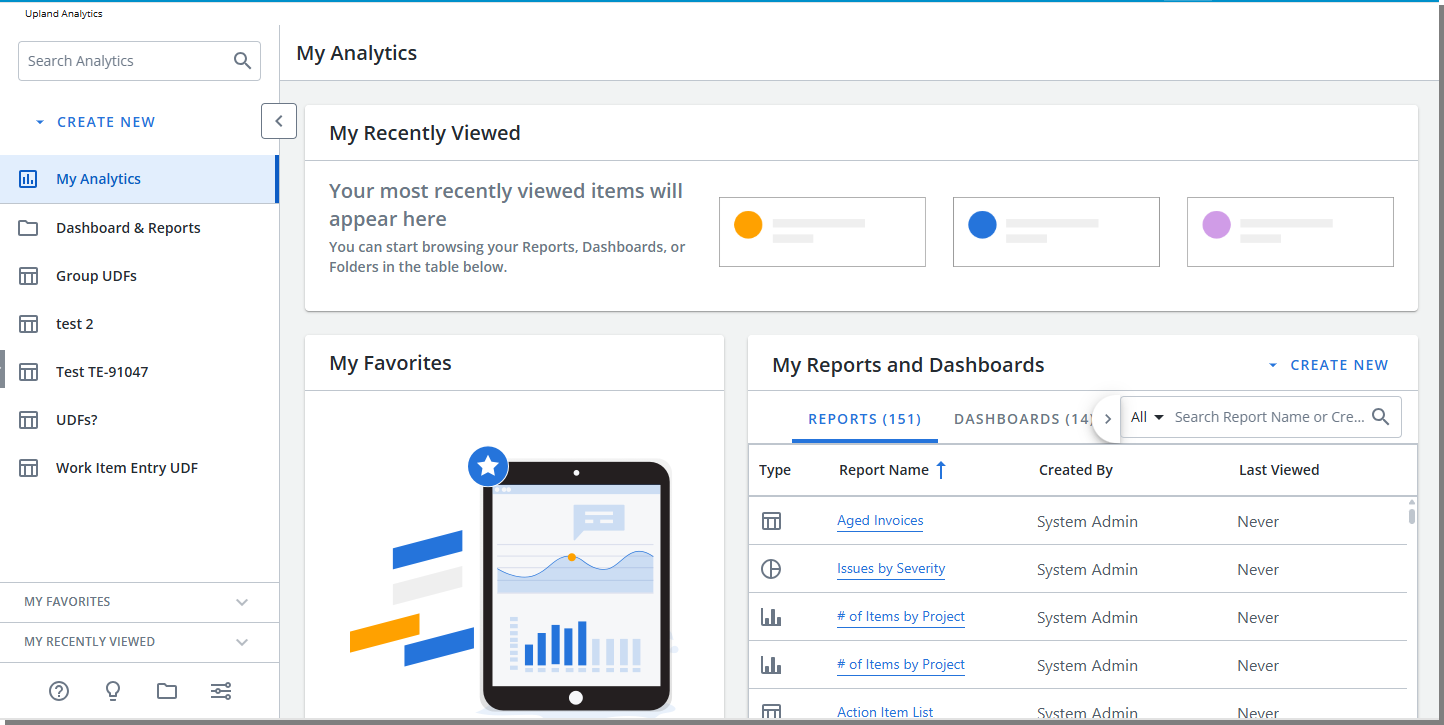
Description: Upon accessing the new version of Upland Analytics, you can now choose to continue with the Analytics Classic or switch to the New Analytics.
For further details refer to Accessing Upland Analytics.
Description: Improved the performance of the following Upland Analytics Views:
- Financial Summary (Financial Data Source)
- Project KPIs (Project Management Data Source)
- Expense Entry Basic (Expense Data Source)
- Security Access Rights (Organization Data Source)
- Invoice Details (Invoice Data Source)
- Program KPIs (Program Management Data Source)
- Project Allocation Summary (Project Scheduling Data Source)
- Resource Utilization Summary (User Scheduling Data Source)
- WIP Project Policy (WIP Data Source)
- Task Allocation Summary (Task Scheduling Data Source)
- Timesheet Summary (Timesheet Data Source)
Description: The following Views are now available from the Work Item Entry Data Source:
- Portfolio
- Portfolio Manager
- Scope - Client Contacts
- Scope - My Portfolios
- Work Item Comment
- Work Item Comment Created By User
- Work Item Comment Modified By User
For Further details refer to Work Item Entry Data Source and related views.
Description: The following View is now available from the Project Management Data Source:
- Scope - Client Contacts
For Further details refer to Project Management Data Source and related views.
Description: The Changed Item Name field now displays the Work Item Entry Tracking number.
for further details refer to Audit Trail Data Source and related views.
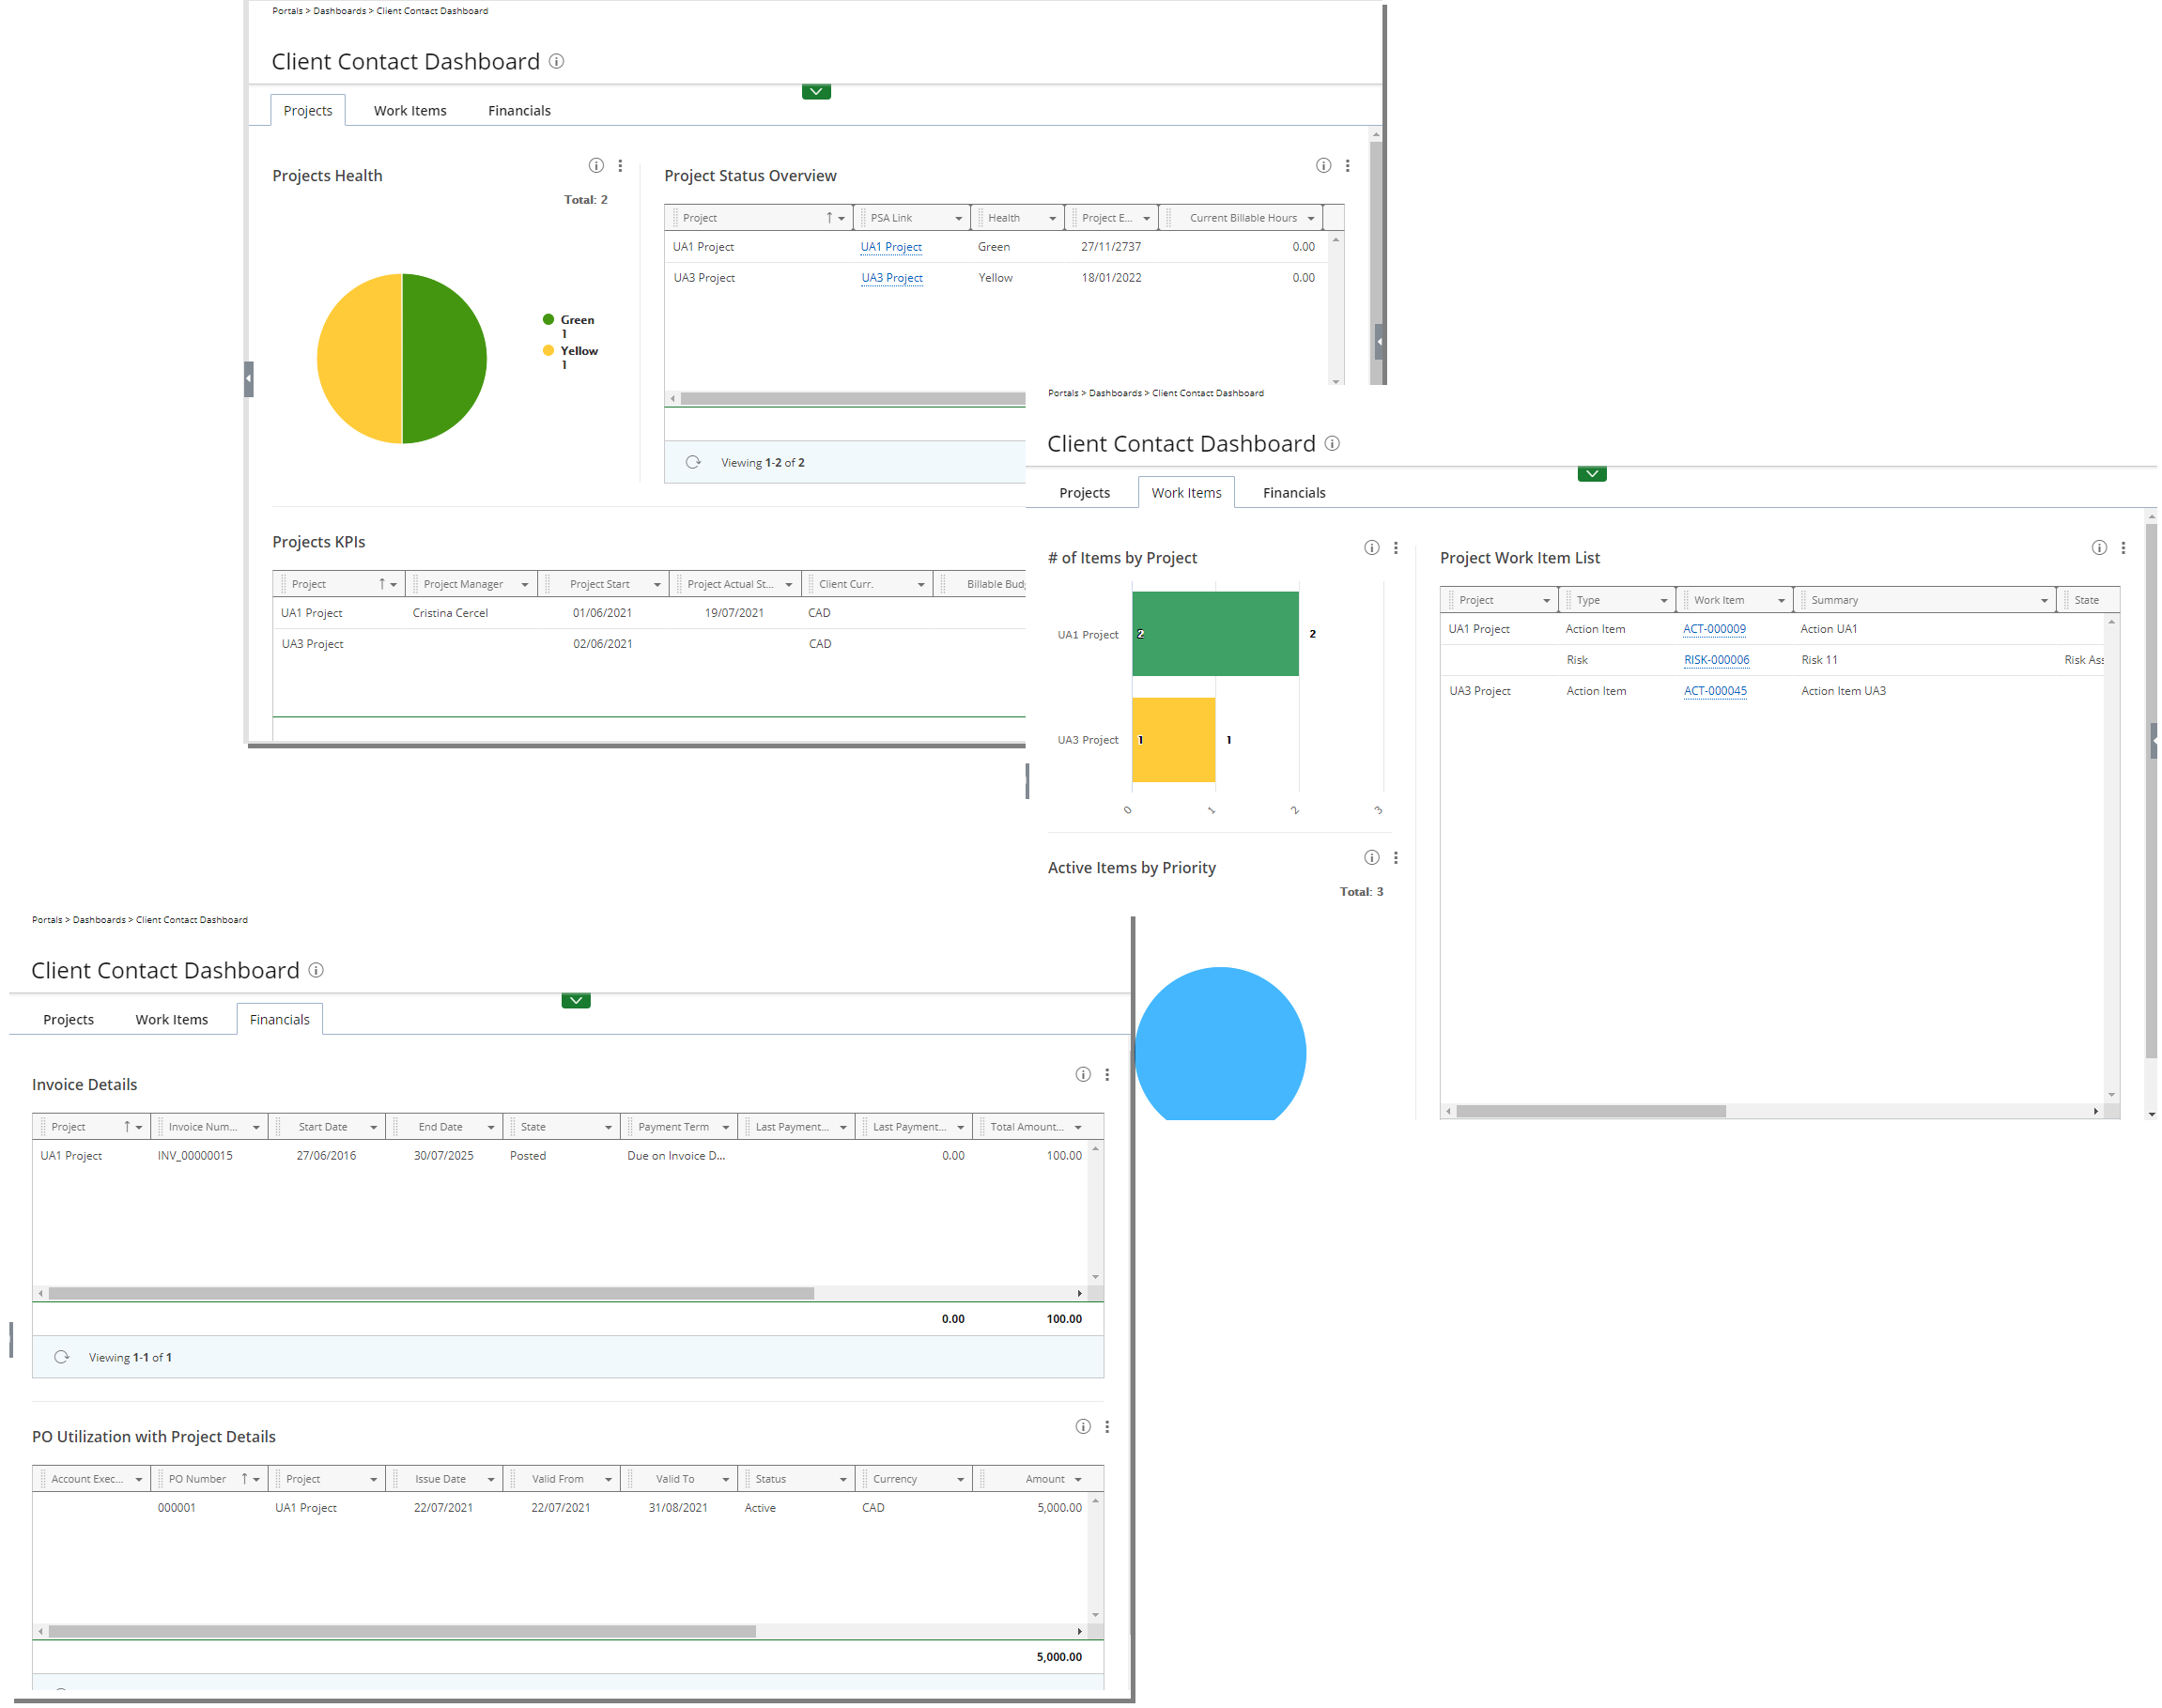
Description: The newly added out-of-the-box Client Contact Dashboard allows Client Contacts to have insight on their Projects.
User Defined Fields
In addition to the Work Items, Calculated User Defined Fields can now be associated to the following areas:
- Charges
- Client Contacts
- Groups
- Leave Request
- Milestones
- Roles
- Portfolios
- Products
- Programs
- Projects
- Tasks
- Work Types
For further details refer to Calculated User Defined Fields.
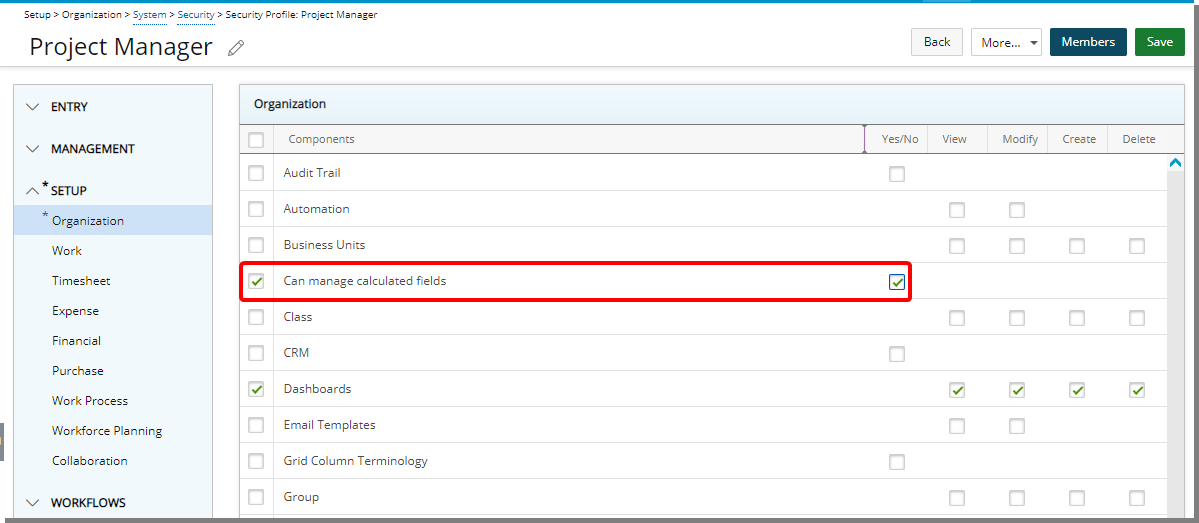
Description: Users with the Can manage calculated fields permission, defined for the Security Profile under which the User falls (Setup > Organization > System > Security), can now perform the following actions on Calculated User Defined Fields:
- Recalculate
- Select/deselect the Is calculated selection box
Upon modifying and saving the Formula for a Calculated User Defined Field, the Recalculate Values icon is then visible against the User Defined Field within the Layout tab. Upon clicking the Recalculate Values icon and confirming that you wish to recalculate the outdated values, a confirmation message is displayed which reads “Recalculate outdated values?” Upon clicking “Yes” the recalculation operation is run.
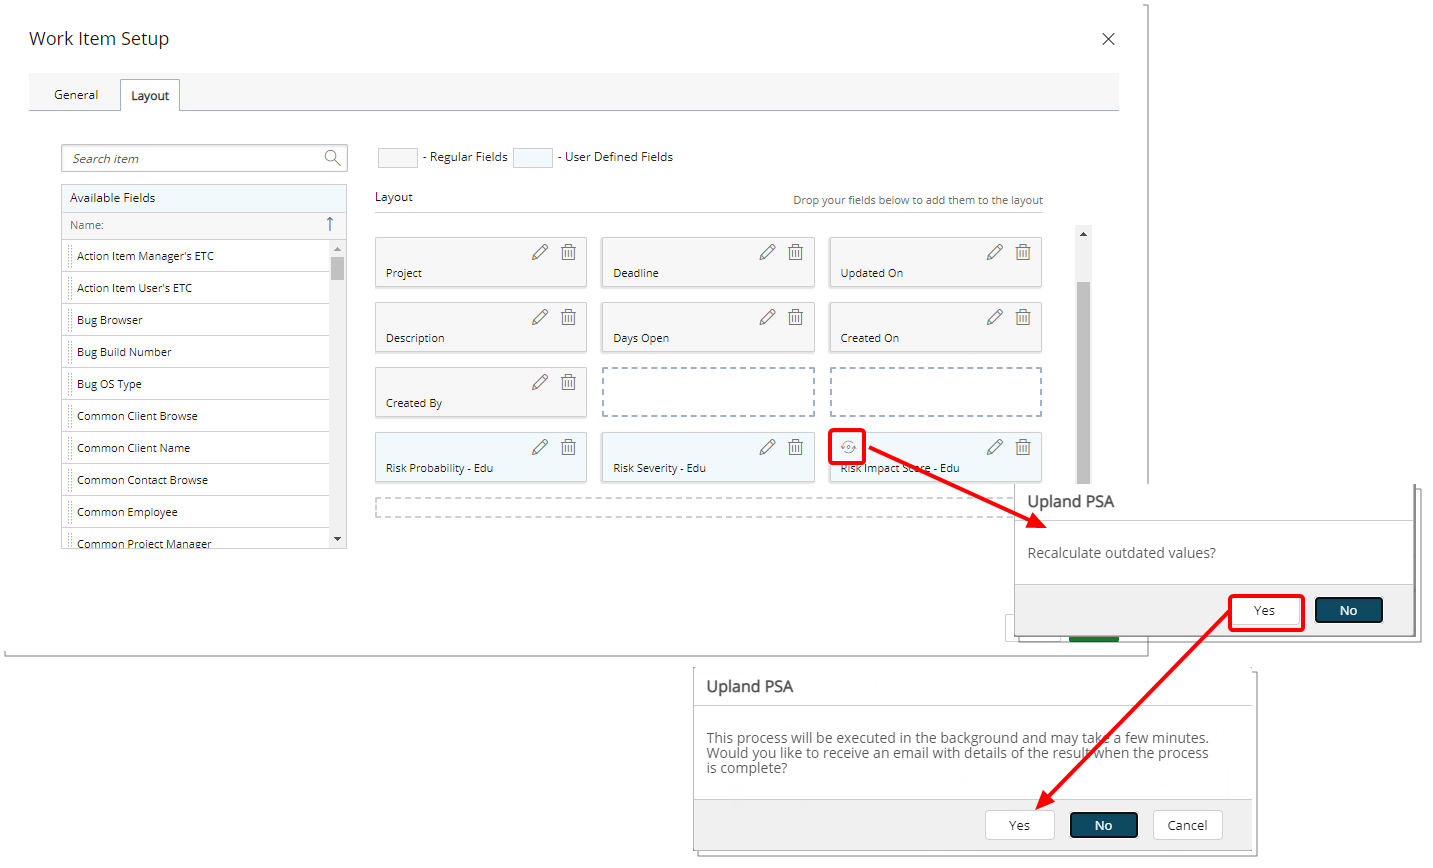
Note: If the operation is successful, the Recalculate Values icon will be available for selection upon modifying the Formula.
For further details refer to:
- Granting the right to Manage Calculated User Defined Fields.
- Modifying a Formula and Recalculating the values of Calculated User Defined Fields.
Work Breakdown Structure (WBS)
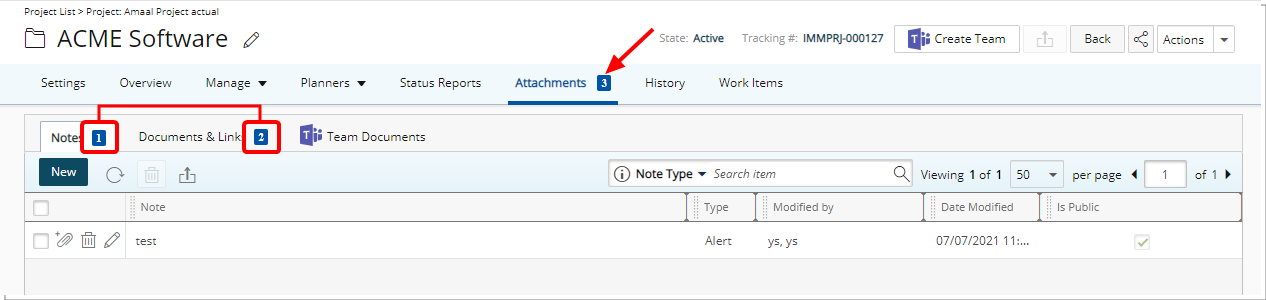
Description: The total number of attachments (Notes, Documents & Links) is now readily visible on the Attachments tab.
Benefit: This addition enables you to immediately see the number of attachments without having to navigate to the Attachments tab.
For further details refer to:
- Adding Note(s) & Note Attachment(s) to Project(s)
-
Accessing the Project Attachments Tab
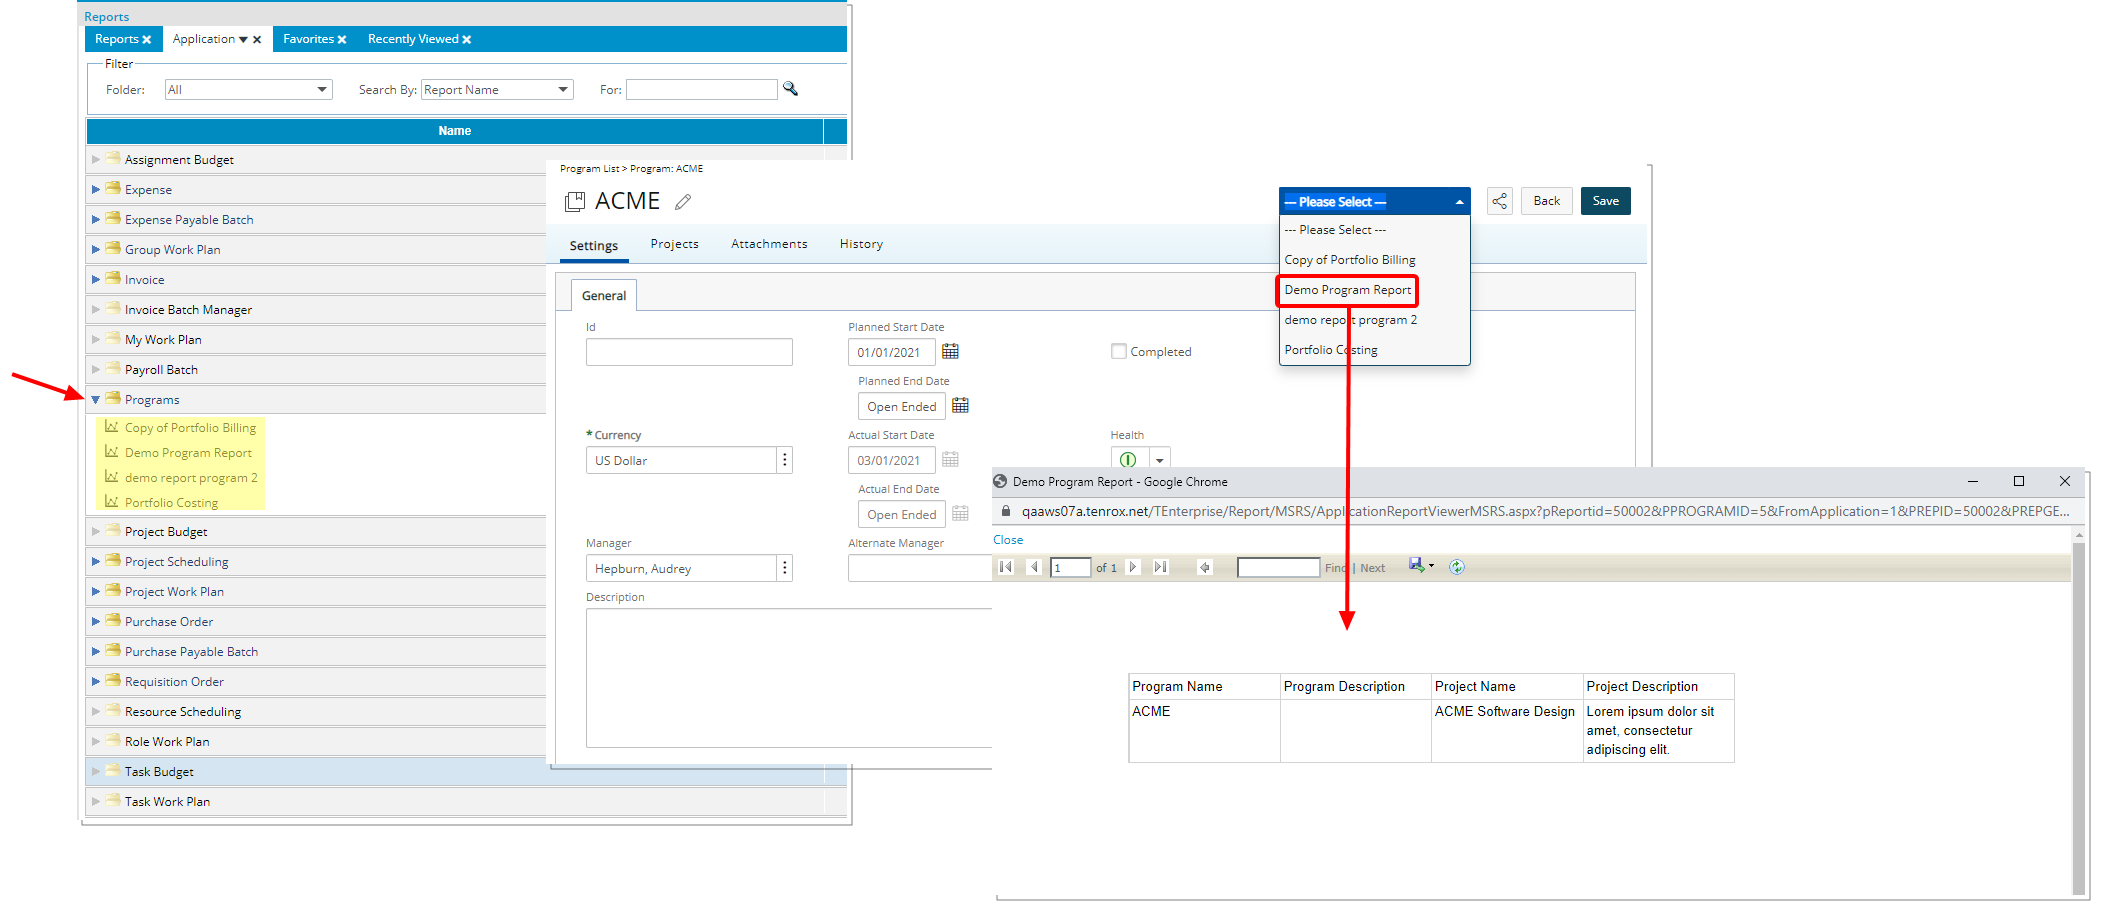
Description: A new Programs folder has been added to the Application tab. Any RDLC Report that is created/copied/moved under this folder are then available from the Program Edit page.
For further details refer to:
- Application tab
- Creating a new Program
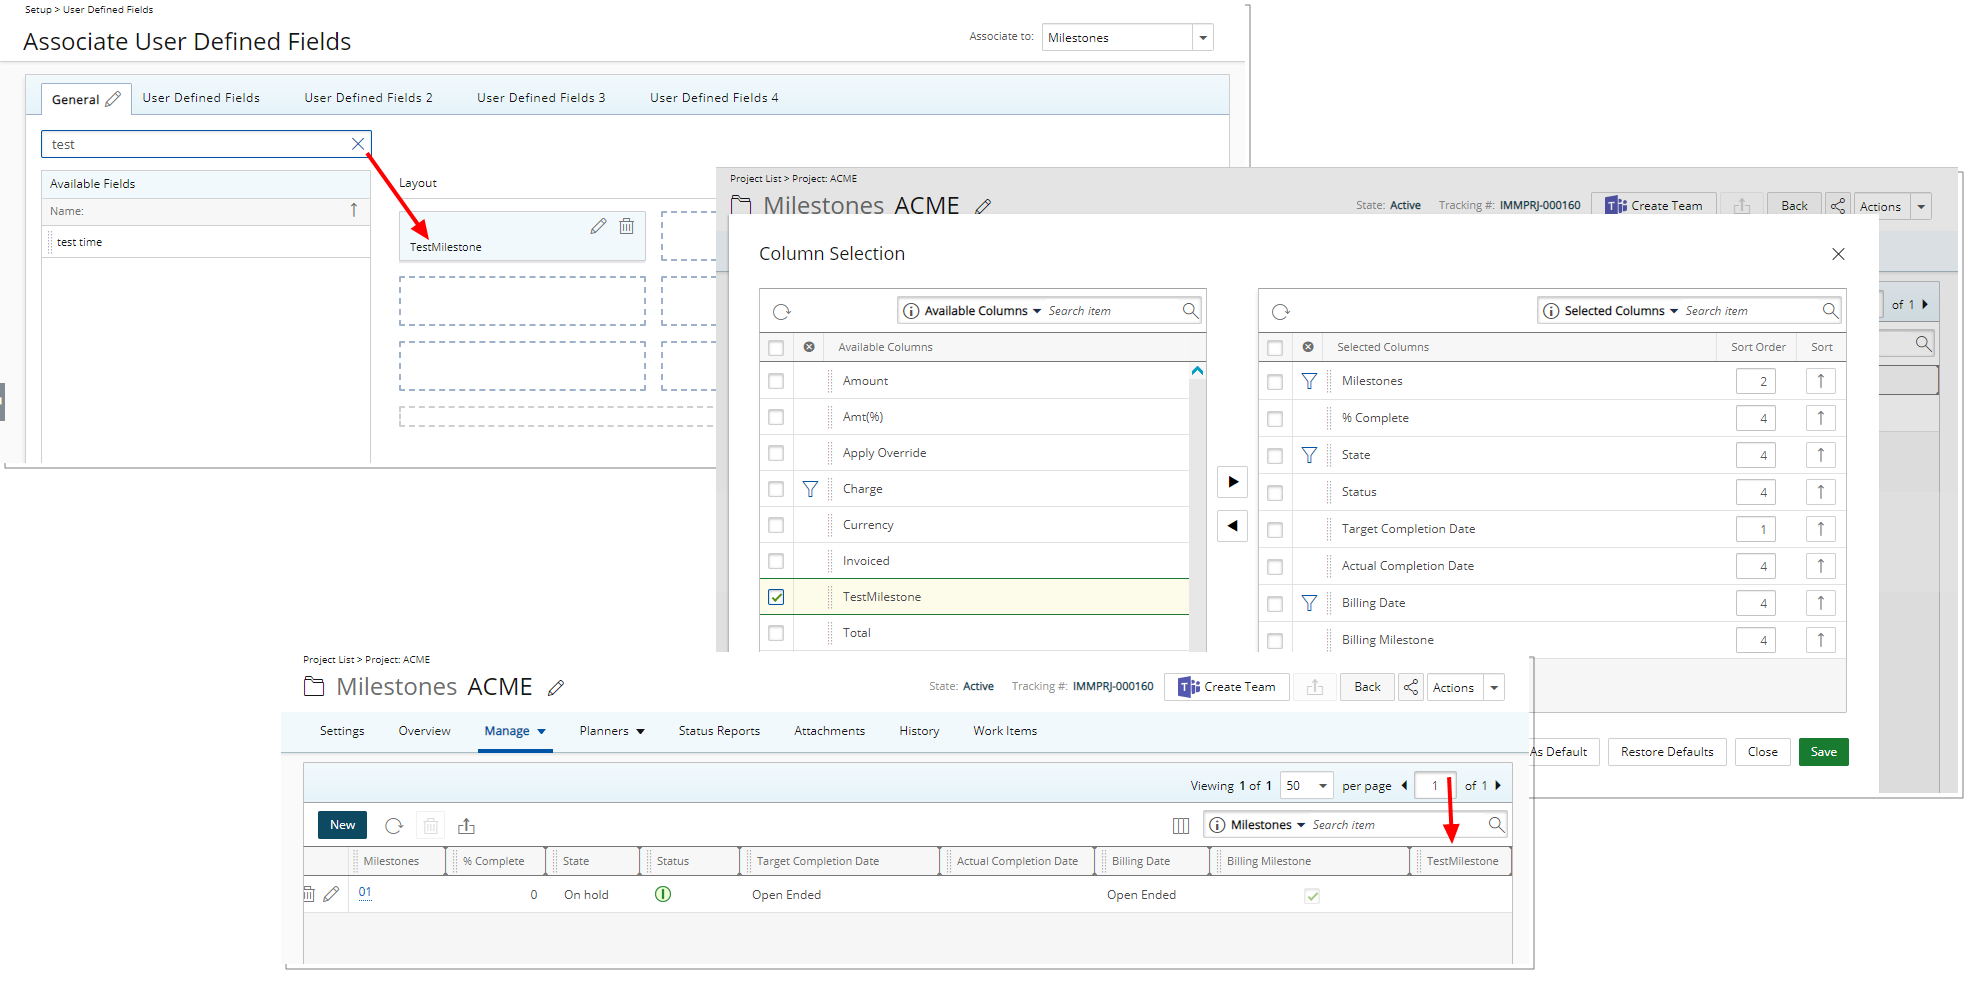
Description: User Defined Fields associated to Milestones can now be included to show as columns within the Project Milestones page through the Column Selection.
Benefit: This improvement allows you to have easier visibility to the associated User Defined Fields through the Project Milestones list page.
For further details refer to Project Milestones list page.
Work Item Manager
This release introduces the Work Item Manager page in PSA. This new dedicated area, accessed through the Entries menu, allows you to manage, create and associate Work Item Entries.
With this introduction, the following additions have been made:
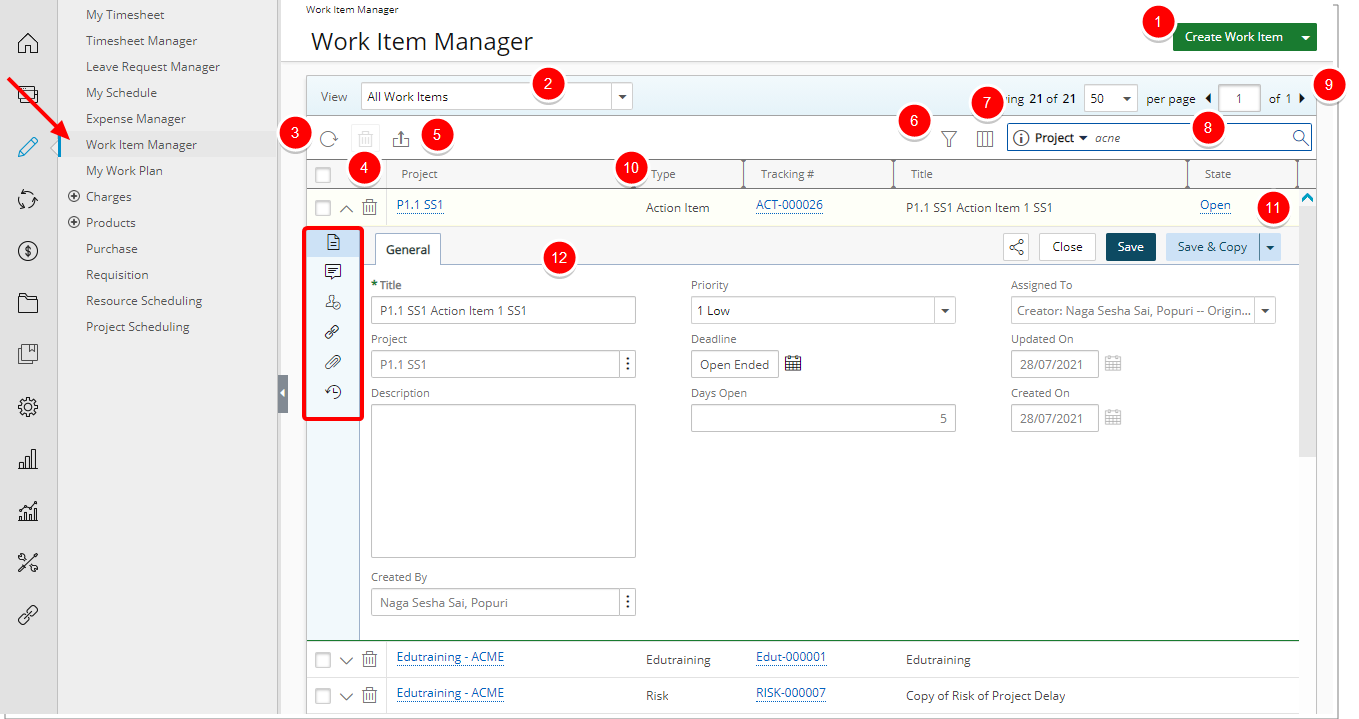
The new page lists the Work Item Entries with their associated Project, Type, Tracking #, Title, State and the corresponding number of Days Open. By default, the list is sorted by last modified Work Item Entry date.
From the List you can:
- Create a new Work Item Entry. Upon clicking the Create Work Item button, you will access a list of Work Item Types. Selecting the Type will open the appropriate page to create a new Work Item Entry. Note that the Project field is mandatory.
- Access the Views.
- Refresh the page.
- Delete Selected Work Item Entries.
- Export the list to Excel.
- Apply a Filter. In addition to any User Defined Fields associated to the Work Item, by default, you can apply a Filter based on: Assigned To, Created By, Created On, Days Open, Deadline, Impact Score, Impacted Deliverables, Mitigation Strategy, Priority, Probability, Project, Severity, State, Title, Tracking#, Type and Updated On.
- Access and modify the Column Selection. In addition to any User Defined Fields associated to the Work Item, by default, these columns are displayed for:
- All Work Items, Assigned Work Items, My Available Work Items and My Work Items Views: Project, Type, Tracking #, Title, State, Priority, Days Open, Actions, Assigned To. You can choose to add: Created By, Created On, Deadline, Impact Score, Impacted Deliverables, Mitigation Strategy, Probability, Severity and Updated On.
- Work Items by Portfolio and Work Items by Project Views: Project, Client, State, Priority and Health.
- Search for a Work Item Entry. By default, the following criteria are available for all out-of-the-box Views: Project, Type, Tracking #, Title, Stats and Created By.
- Pagination is available at the top right corner to facilitate easy navigation across pages.
- Sorting is available by clicking on the column header.
- Easily Action on an Entry.
- Clicking the drawer Expand button allows you to access the corresponding Work Item Entry tabs:
- From the General tab you can modify the General Work Item Entry information.
- From the Comments tab you can create or manage Comments.
- You can easily manage the State and Direct Assignments from the Assignments tab.
- From the Linked Items tab you can link to existing or newly created Work Item Entries.
- From the Attachments tab, you can create or manage Notes as well as Documents & Links.
- From the History tab, you can access and view the detailed History.
For further details refer to Work Item Manager.
The available out-of-the-box Views can be accessed and managed through the View selection box.
All Work Items View: This View provides a list of all Work Items, including those assigned to you which are associated to Projects that are not within your Scope.
Assigned Work Items View: This View provides a list of Work Items which are assigned to you to action on, including those for Projects not within your Scope.
My Available Projects Work Items View: This View provides a list of Work Items for Projects where you are the named Project Manager, Alternate Project Manager or a Project Team Member.
My Work Items View: This View provides a list of Work Items for which you are the Creator or Originator.
Work Items by Portfolio View: This View provides a list of all Work Items belonging to the selected Portfolio, grouped by Project.
Work Items by Project View: This View provides a list of all Work Items, grouped by Project.
Note: By default, the Work Item Entries are sorted by last modified date in descending order for all Views with the exception of the Work Items by Project View and the Work Items by Portfolio View which are sorted in alphabetical order.
For further details refer to Work Item Manager Views.
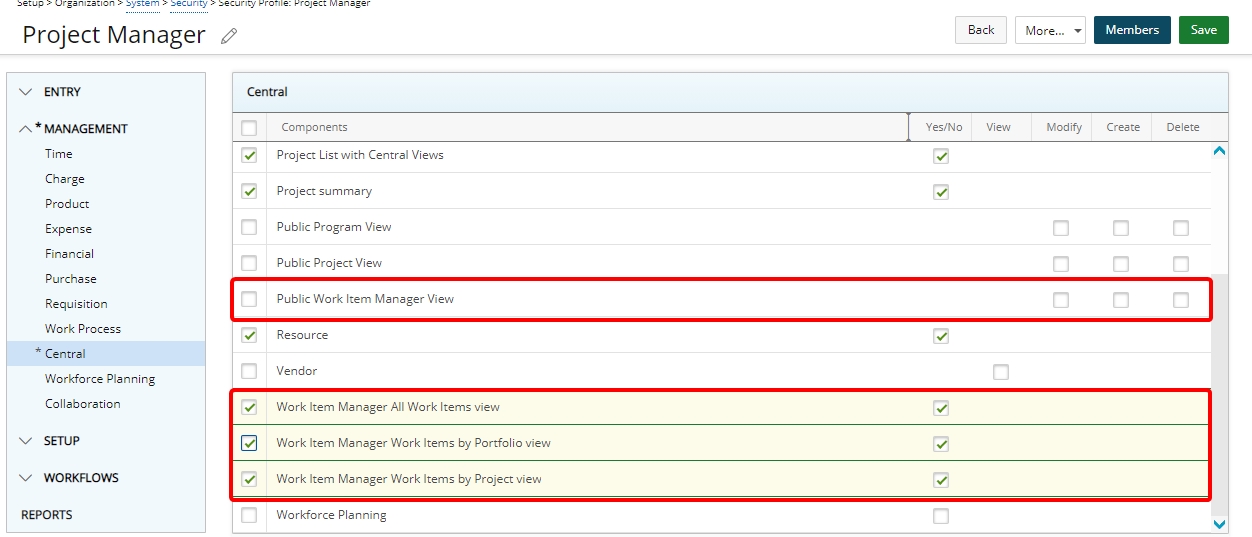
Description: The following Security permissions have been added to grant or bar access to the newly created Work Item Manager Views (Setup > Organization > System > Security > Security Profile > Management > Central).
- Work Item Manager All Work Items view grants the right to the All Work Items View.
- Work Item Manager Work Items by Portfolio view grants the right to the Work Items by Portfolio View.
- Work Item Manager Work Items by Project view grants the right to the Work Items by Project View.
Moreover, the Public Work Item Manager View permission has also been added to allow users to Modify/Create/Delete Work Item Manager Views that are set as Public.
Note: The Assigned Work Items, My Available Projects Work Items and My Work Items Views are available by default to all Users.
For further details refer to:
- Granting the Public Work Item Manager View rights
- Granting access rights to the Work Item Manager All Work Items View
- Granting access rights to the Work Item Manager Work Items by Portfolio View
- Granting the right to the Work Item Manager Work Items by Project View
Work Item Entry
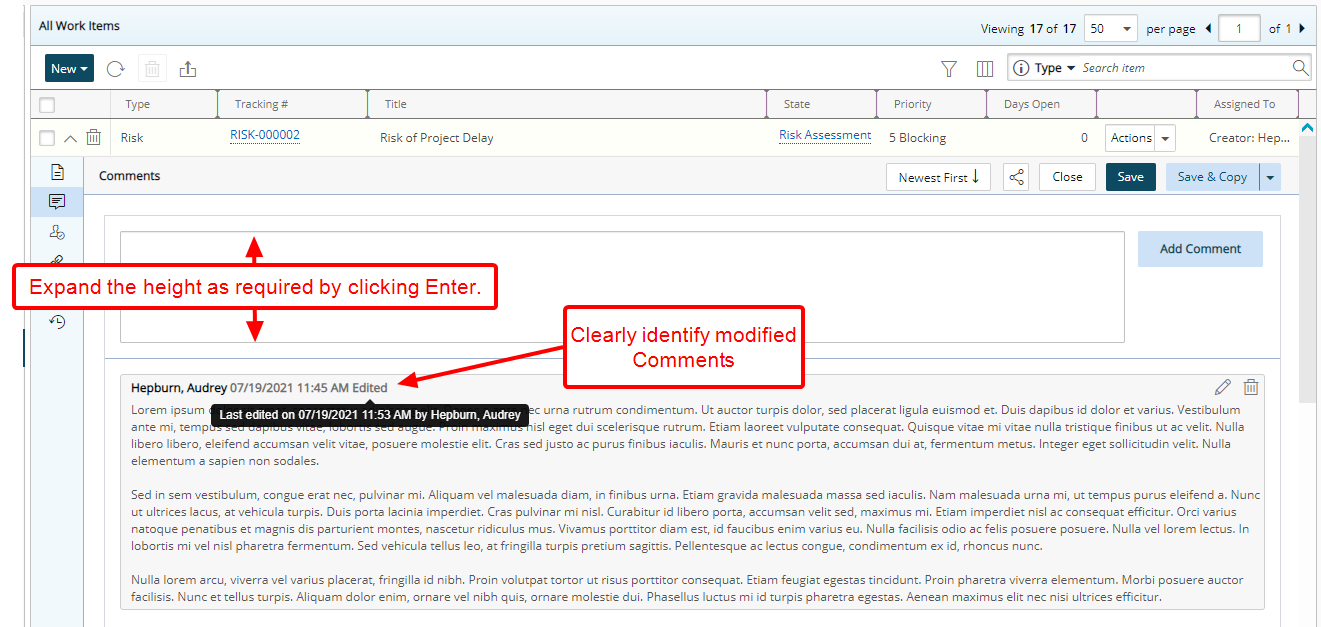
Description: In addition to the improvements made to the overall look and feel of the Comment box, these improvements have also been made:
- Upon clicking an empty Comment box the height now automatically expands to five lines. Moreover, as you type beyond the five lines it will continue to expand as necessary.
- Modified comments now clearly indicate as having been Edited. Furthermore, upon hovering the mouse over the Edited flag, a tool tip displays the last modification, specifically the date/time stamp and who made the update.
Note: You can use the Ctrl+Enter keys to add and save the comment.
For further details refer to Project Work Item Entry - Comments tab.
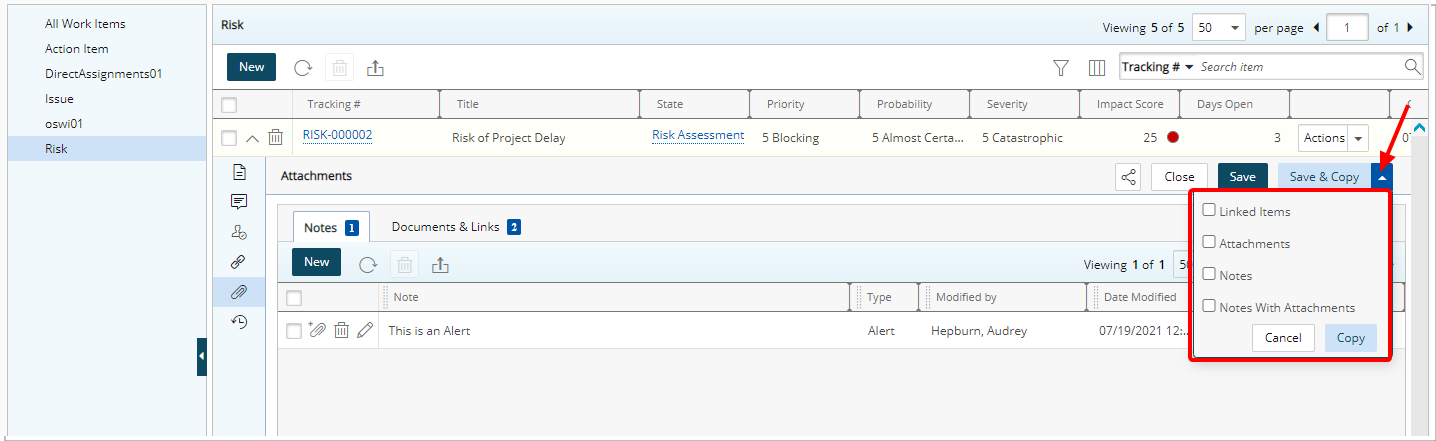
Description: When copying a Work Item Entry, you can now choose to copy Linked Items/Attachments/Notes and/or Notes With Attachments from the Save & Copy context menu.
Benefit: With this addition, Work Item Entries can now be easily duplicated with one click, powering up user productivity.
For further details refer to Save & Copy | Project Work Item Entries.
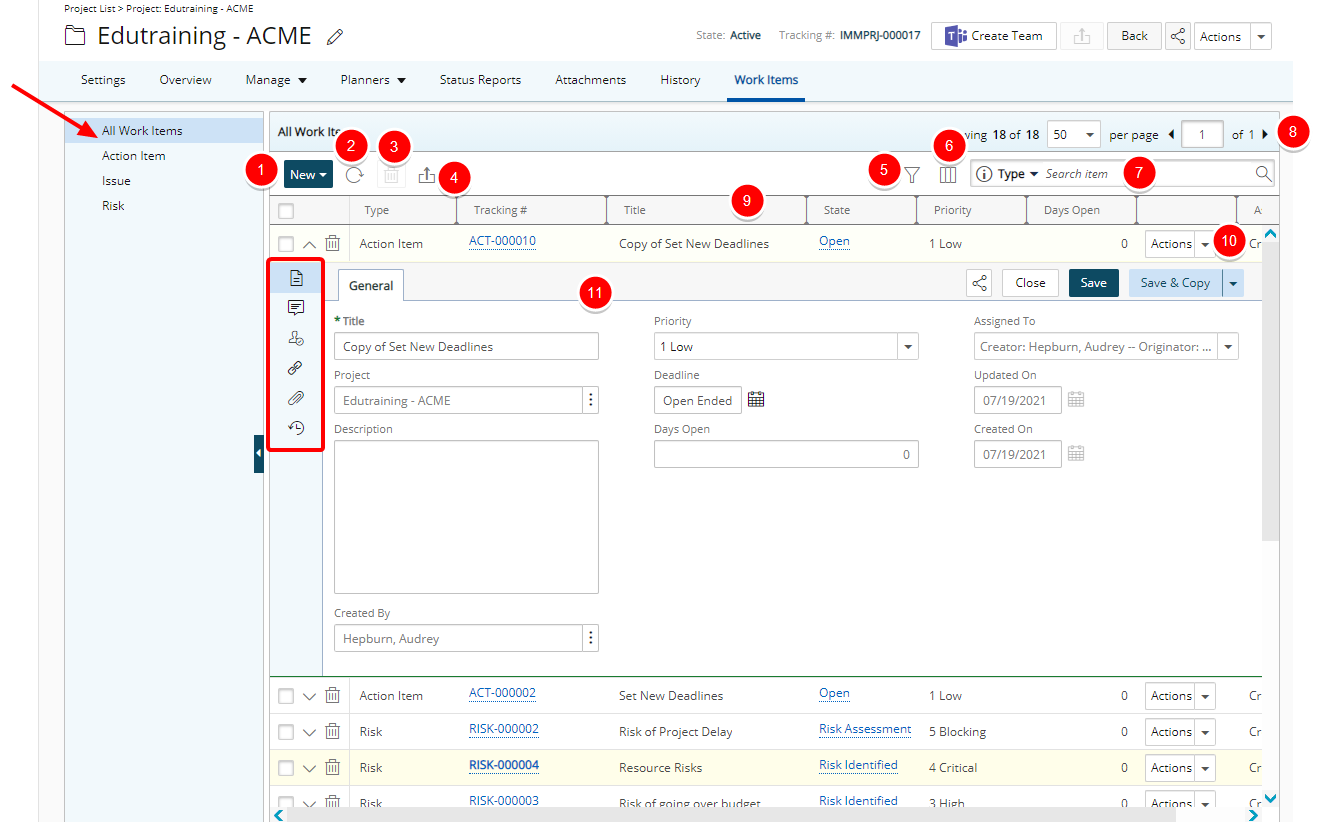
When navigating to the Work Items tab from Project Edit, the new All Work Items tab is now displayed by default. You can choose a different Work Item Entry Type from the navigation menu on the left.
- Upon clicking the New button, you will access a list of Work Item Types. Selecting the Type will open the appropriate page to create a new Work Item Entry. Note that the Project field is mandatory.
- Refresh the page.
- Delete selected Work Item Entries.
- Export the list to Excel.
- Apply a Filter. In addition to any User Defined Fields associated to the Work Item, by default, you can apply a Filter based on: Assigned To, Created By, Created On, Days Open, Deadline, Impact Score, Impacted Deliverables, Mitigation Strategy, Priority, Probability, Project, Severity, State, Title, Tracking#, Type and Updated On.
- Access and modify the Column Selection. In addition to any User Defined Fields associated to the Work Item, by default, these columns are displayed: Type, Tracking #, Title, State, Priority, Days Open, Actions and Assigned To. You can choose to include the following columns from the Columns Selection: Created By, Created On, Deadline, Impact Score, Impacted Deliverables, Mitigation Strategy and Updated On.
- You can choose to Search the list based on the following Search criteria: Type, Tracking #, Title, State, Assigned To and Created By.
- Pagination is available in the top right corner to facilitate easy navigation across pages.
- Sorting is available by clicking on the column header.
- Easily Action on an Entry.
- Clicking the drawer Expand button allows you to access the corresponding Work Item Entry tabs:
- From the General tab you can modify the General Work Item Entry information.
- From the Comments tab you can create or manage Comments.
- You can easily manage the State Assignments from the Assignments tab.
- From the Linked Items tab you can link to existing or newly created Work Item Entries.
- From the Attachments tab, you can create or manage Notes as well as Documents & Links.
- From the History tab, you can access and view the detailed History.
For further details refer to Project Work Items page.
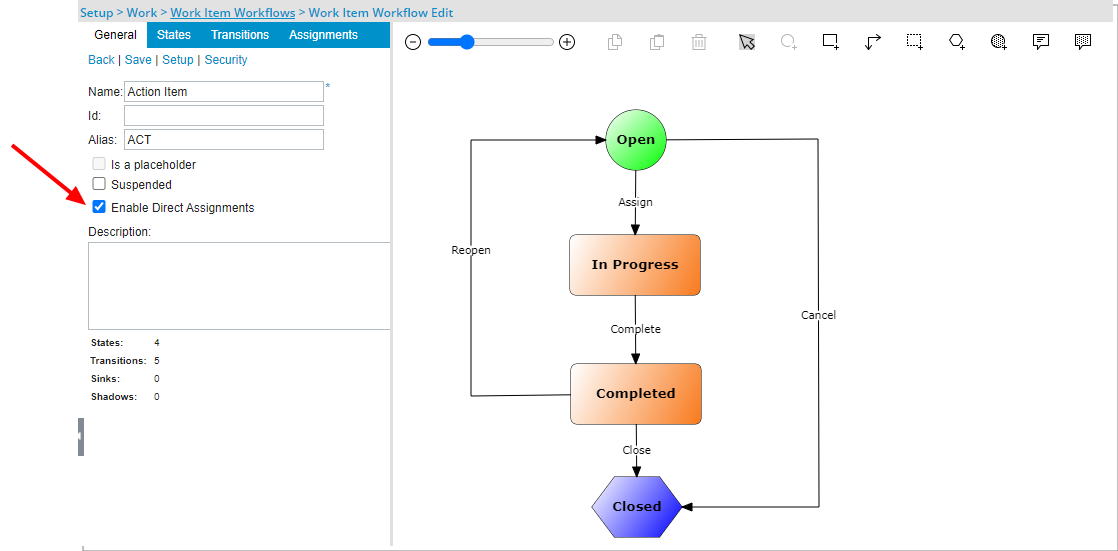
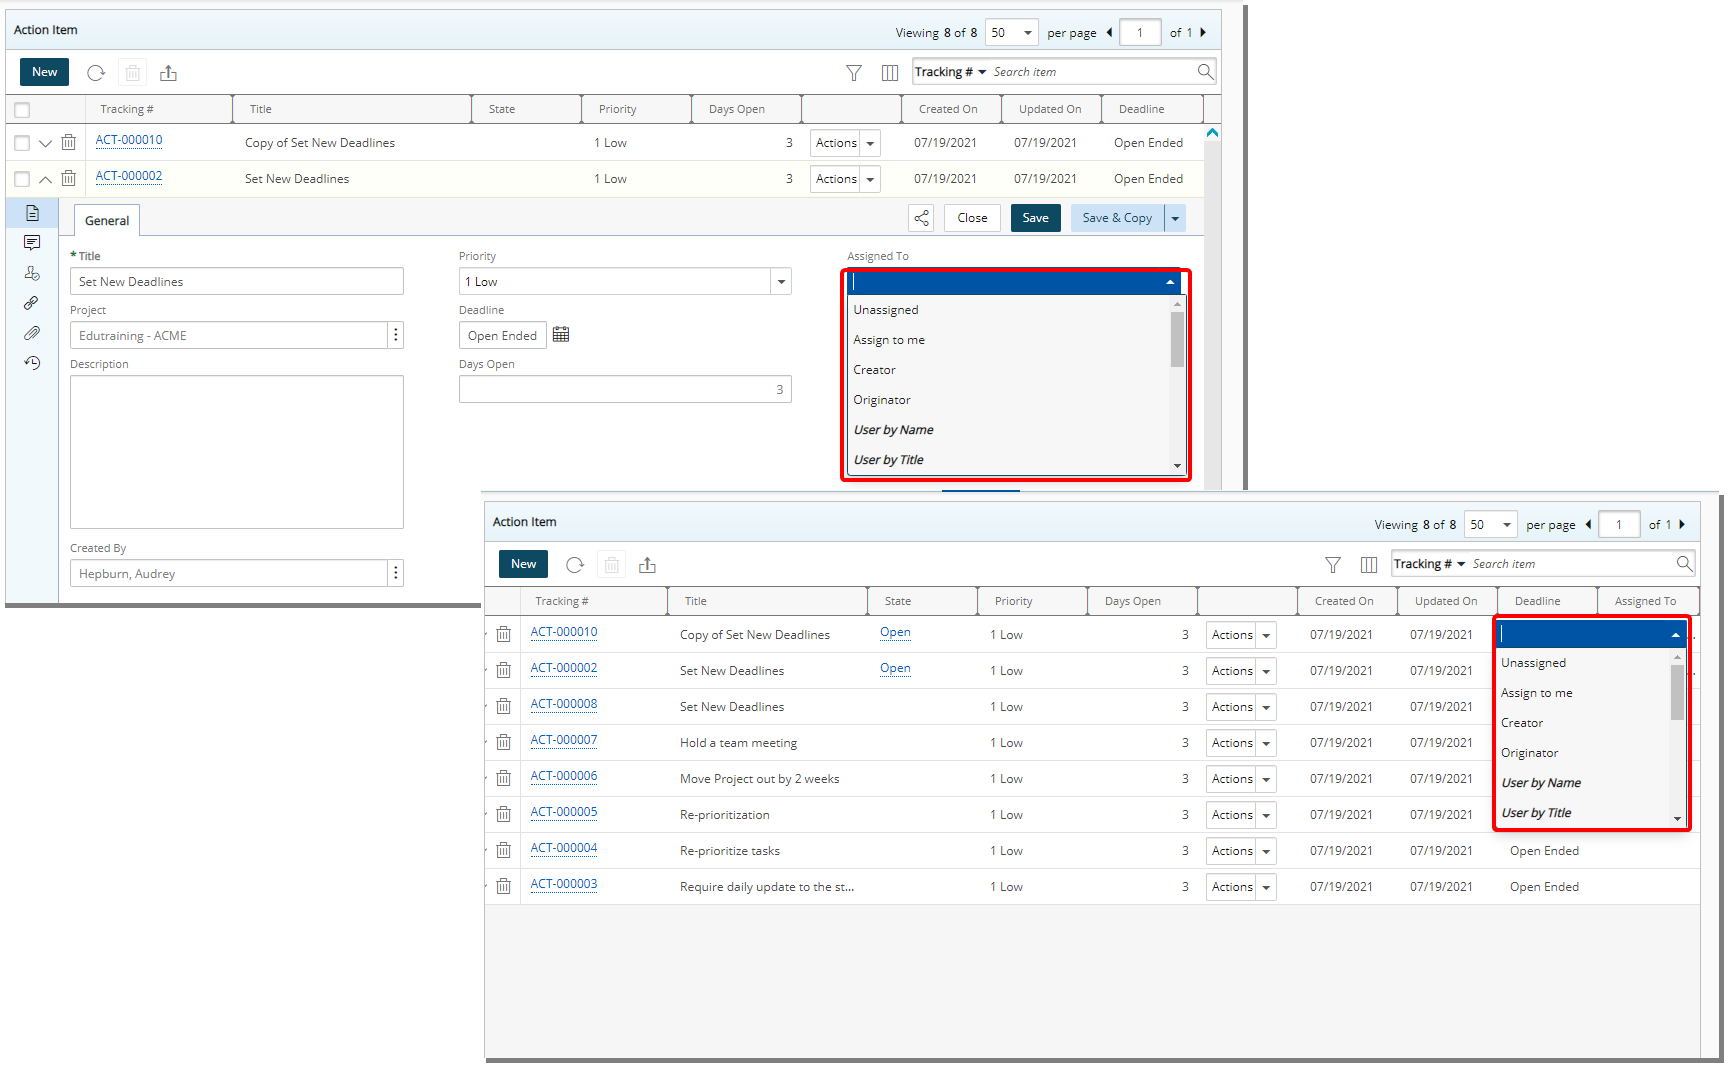
Description: The option Enable Direct Assignments is now available from Work Item Workflows.
When selected, users with the Assign permission to the Workflow can easily assign the State to: Assign to me, Unassigned, Creator, Originator, Project Manager, Group Manager, User by Title, User by Name, User by Workflow Role, Team, Project Team members, Creator’s Approval Manager, Originator’s Approval Manager, Creator’s Functional Manager or Originator’s Functional Manager.
For further details refer to:
- Direct Assignment
-
Working with Direct Assignment
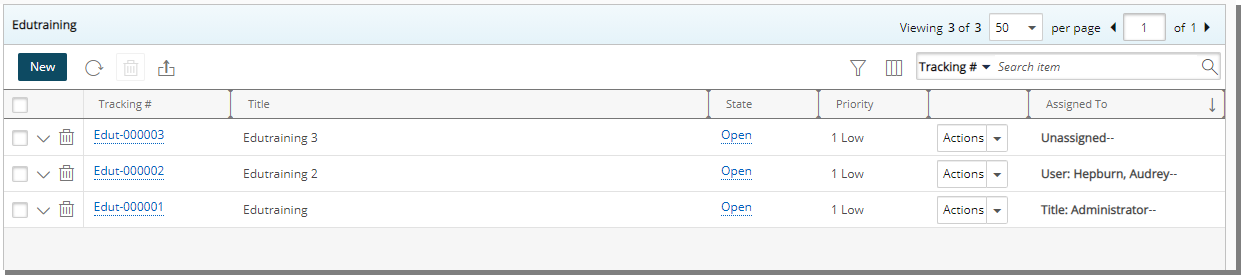
Description: All Work Item Entries’ direct and Workflow State Assignments are now displayed for the Assigned To column. Allowing you to view the current assignments without the need to navigate to the Assignments Tab.
Note:
- If a single user is assigned to the assignment Rule the User Name is listed under the column.
- Unassigning a Direct Assignment will not override the default Workflow Assignment.
- Direct Assignments are displayed in bold font.
User Experience Enhancements
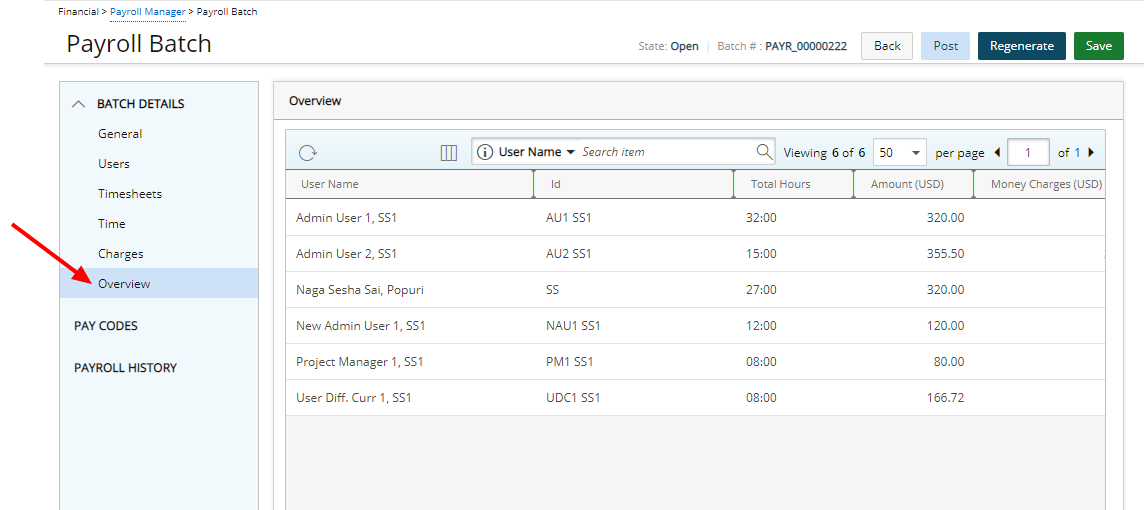
Description: The Overview tab has been added to the Payroll Batch edit page allowing you to quickly have insight on your Payroll Batch.
This displays a read-only information and any modifications made to the Users, Timesheets, Time and Charges tabs will be reflected here.
The columns displayed by default are: User Name, Id, Total Hours, Amount and Charges. From the Column Selection you can choose to add the following columns: Active Site, Functional Group and Primary Role.
By default, you can search by User Name, Id, Primary Role, Functional Group and Active Site.
For further details refer to Creating a new Payroll Batch.