PSA 2022 R1.0 - Product Enhancements
Below is a summary of the features included in PSA 2022 R1.0.
- Financial Planner
- Help menu
- Integration
- Notifications
- My Timesheet
- Timesheet Templates
- Timesheet Workflows
- Upland Analytics
- User Defined Fields
- User Settings
- Deprecated/unsupported Functionality
Click here to watch the PSA 2022 R1.0 feature summary video.
2022.01.20.2022R1.0.V1.EB
Note: This page may be updated as new information becomes available. Visit regularly for the latest updates.
Financial Planner
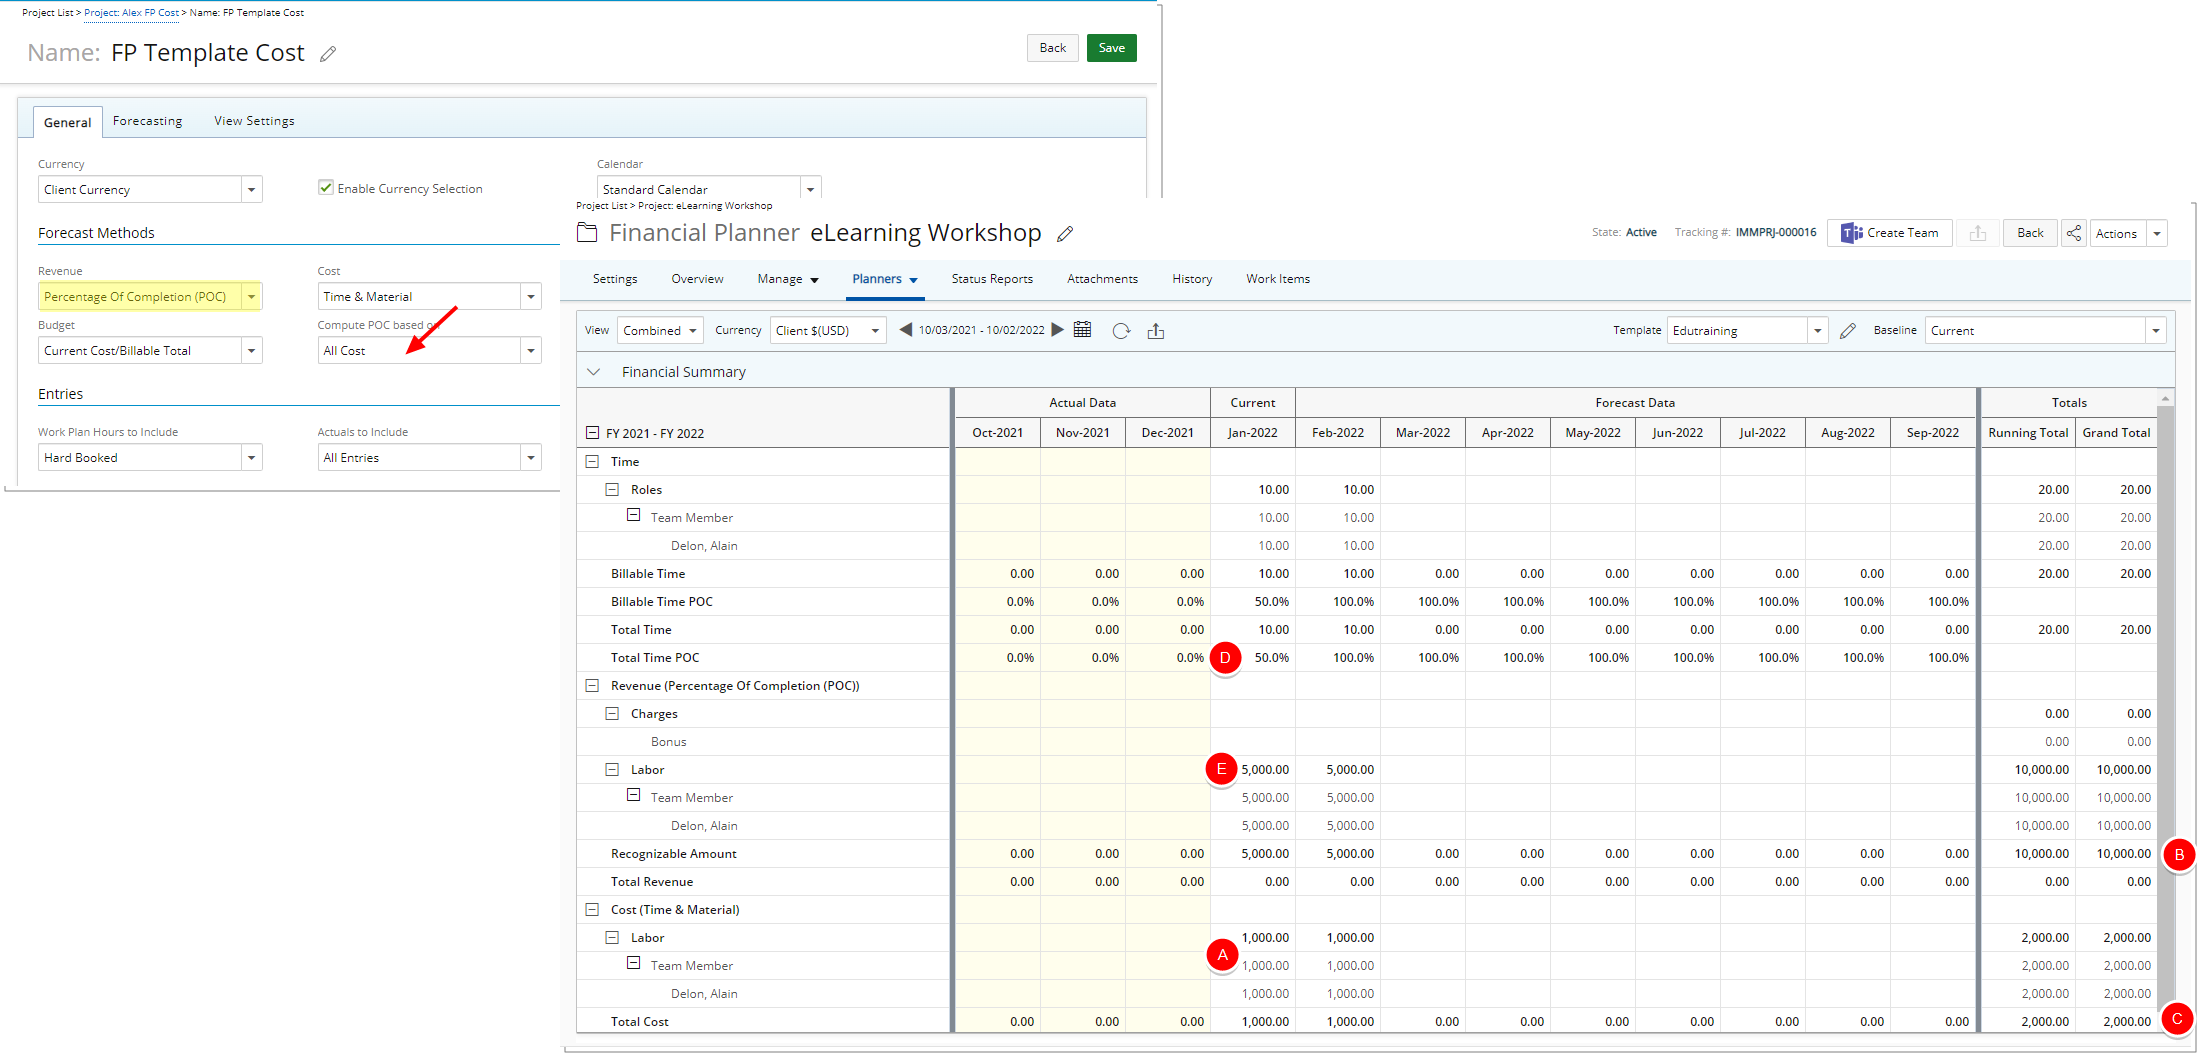
Description: You now have the option to calculate the Revenue Percentage Of Completion based on All Cost. When All Cost is selected for the Compute POC based on option, the cost for the period is divided by the total cost of the Project to obtain a percentage for that period. This percentage is then multiplied by the Total Revenue (Labor + non-Labor Revenue) to calculate the Revenue per period.
As an Example:
- Current Cost= 1,000$
- Billable Total= 10,000 $
- Total cost: 2,000$
- Cost per Period=1,000$
- %Cost: Cost per Period for (A)/Total Cost) = 50%
- $10,000 (Billable Total) x 50%= 5,000 (Revenue per period)
This calculation is applied to:
- All Views (Actual, Forecast, Combined)
- All Periods, regardless of whether they are Forecast, Current, or Actual.
Benefit: You can now recognize revenue based on amount of Cost consumed during a period as opposed to the Total Cost of the Project.
Note: If a Milestone is excluded from Invoicing, the Charge will not be displayed in Financial Planner.
For further details refer to Setting the Revenue/Cost Percentage Of Completion based on All Cost.

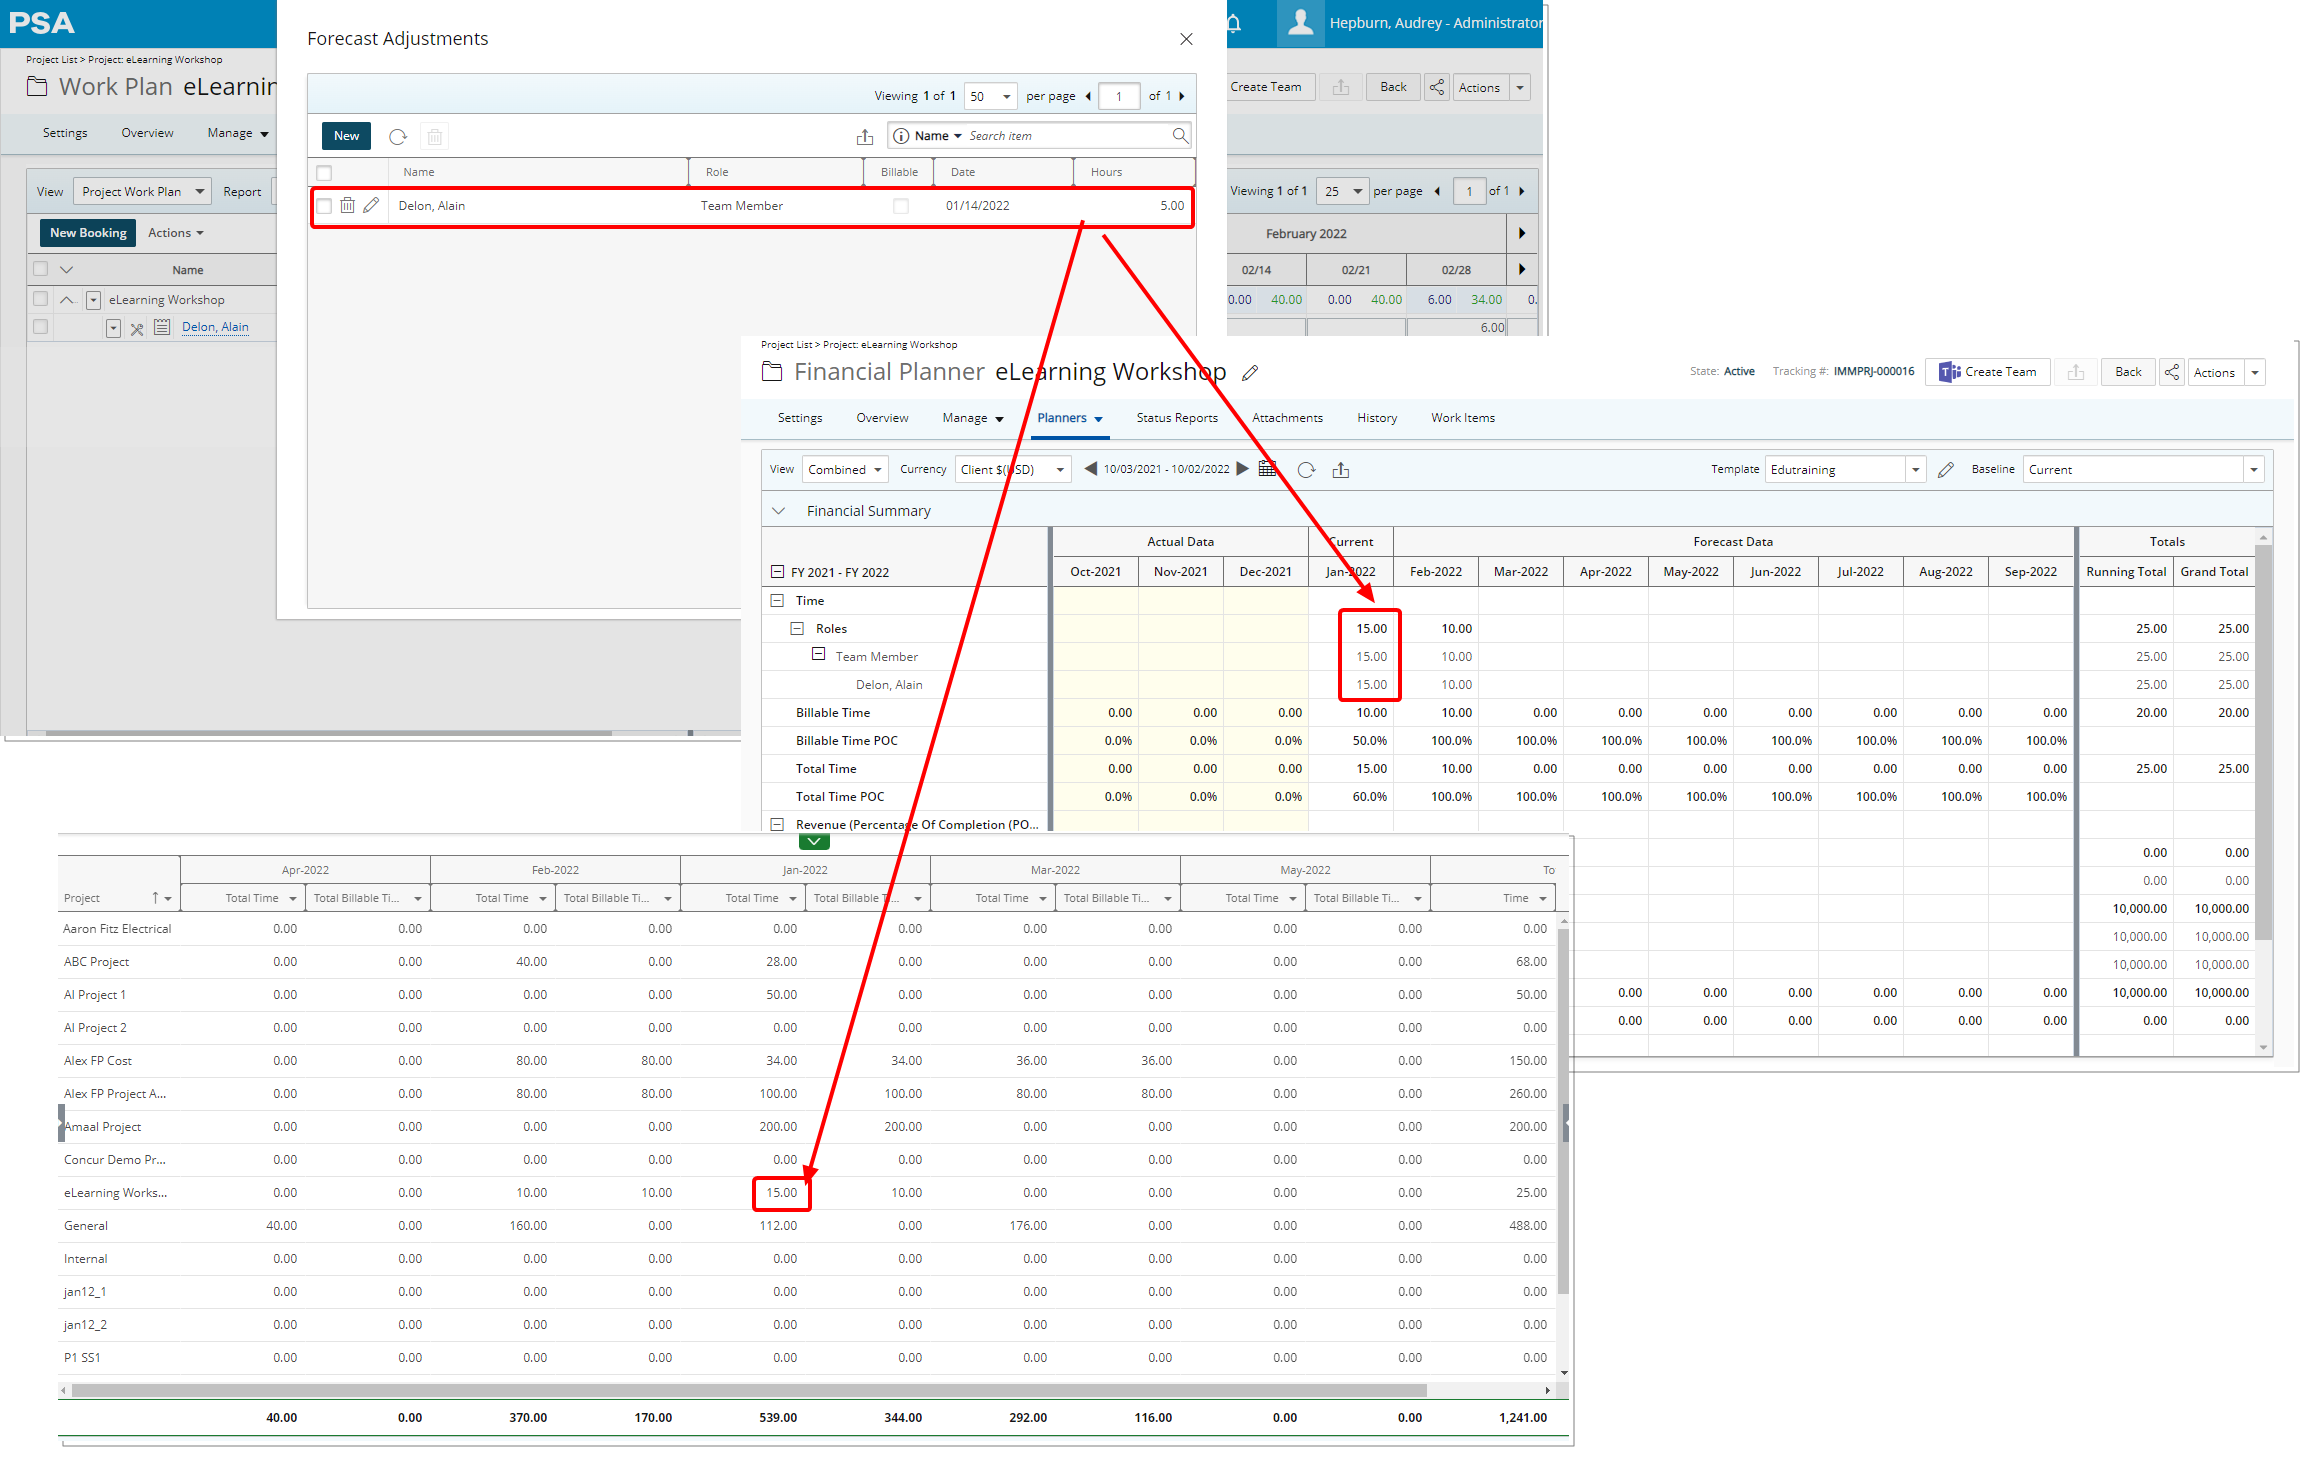
Description: In a previous release, any adjustments entered through the Work Plan was only saved in the database and accessible/manageable through the Forecast Adjustments dialog box. As of this release, the adjustments entered through the Work Plan are now reflected in the Financial Planner.
Benefit: This enables you to make adjustments to a closed period on the Financial Planner (specifically the periods that are already deemed as Actual values and not Forecast values) and now be able to actually see this Adjustment on the Financial Planner.
Note: The adjustments entered through the Work Plan are now also reflected in Upland Analytics reports through the Financial Planner and Financial Planner Combined Data Sources.
For further details refer to Entering and managing Adjustments through the Project Work Plan.
Help Menu
The help sidebar accessed through the Help menu, is a single point of access for self-service and customer support directly within PSA. It provides enhanced support by delivering the following features in one seamless experience:
- Help Center: Search and browse the PSA Help Center.
- Community: Search and browse Support Knowledge content.
- Contact Support: Ability to submit a support ticket.
Click the Help icon (?) in PSA header and then click Help, to open the new help sidebar. From here, search by keyword(s) and phrase(s) to find articles from both the Help Center and Community — all in one place.
As a result of this addition the Online Help and PSA Community links have been removed from the Help menu.
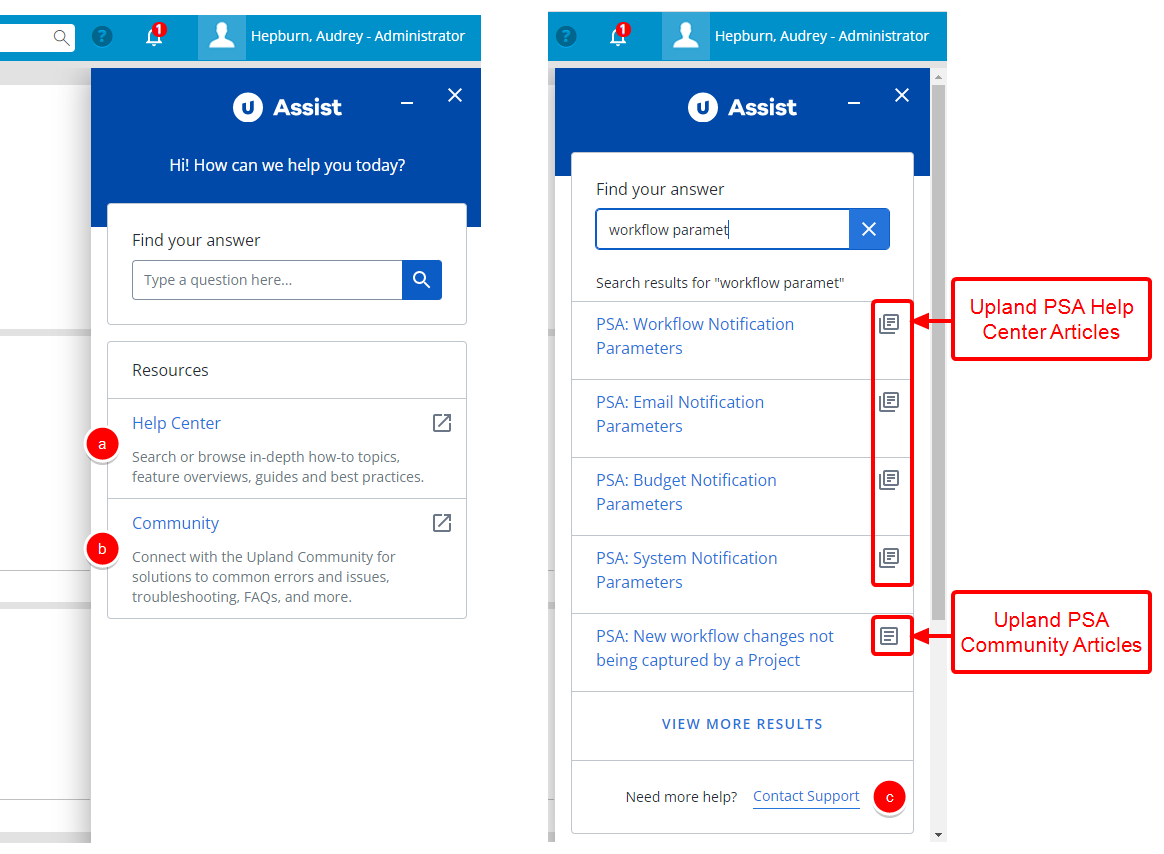
Note: The Help sidebar is not available in IE11. For the best experience, please update your browser.
For further details refer to Using the Help sidebar.
Integration
On February 1st, 2022, SAP will discontinue all support for OAuth 1.0. After which, applications will no longer be allowed to make API calls using OAuth 1.0. Upon upgrading to PSA 2022 R1.0 your SAP Concur integration will automatically be upgraded to OAuth 2.0.
As of this release it will no longer be necessary to provide a Username and Password in PSA, instead, the connection will be made through the Concur Website via the PSA app.
For further details refer to Setting up the connection between PSA and SAP Concur.
Notifications
Announcement Notifications
You can now announce Notifications which will be displayed in a popup window when users click on the notification banner upon login.
Benefit: You can effectively send notifications to inform all PSA Users of events, updates as well as important or critical information. Users can quickly see these upon logging to the PSA application.
Example: The PSA administrator Allen wants to inform the employees of their company that a maintenance is scheduled on a Friday evening and that service might be interrupted. He can quickly create an Announcement Notification and send it to all users. Users will receive the blue banner upon login and can view the details of the Notification directly from PSA.
Note: You will receive Announcement Notifications regardless of the Notification option being selected or not from the General tab of your User Settings page.
To support this functionality the following additions/improvements have been made:
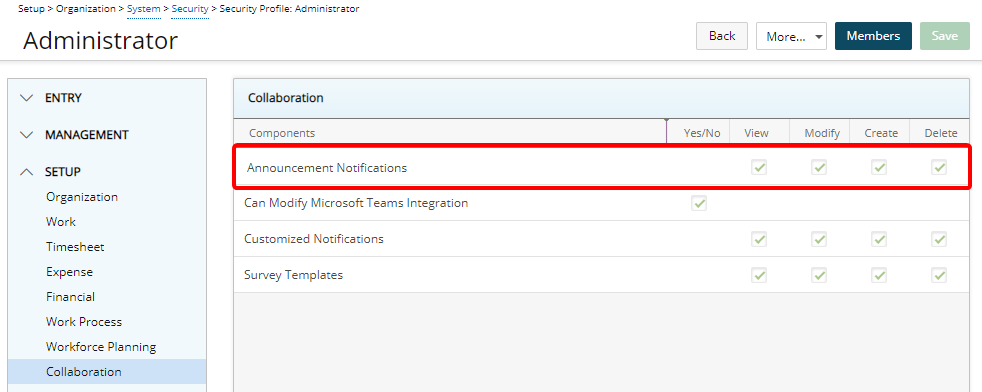
A new Announcement Notifications security permission with View/Modify/Create/Delete rights can be granted from the Setup > Collaboration menu of a Security Profile edit page. These permissions allow users to create and manage the Announcement Notifications.
For further details refer to Granting the right to Announcement Notifications.
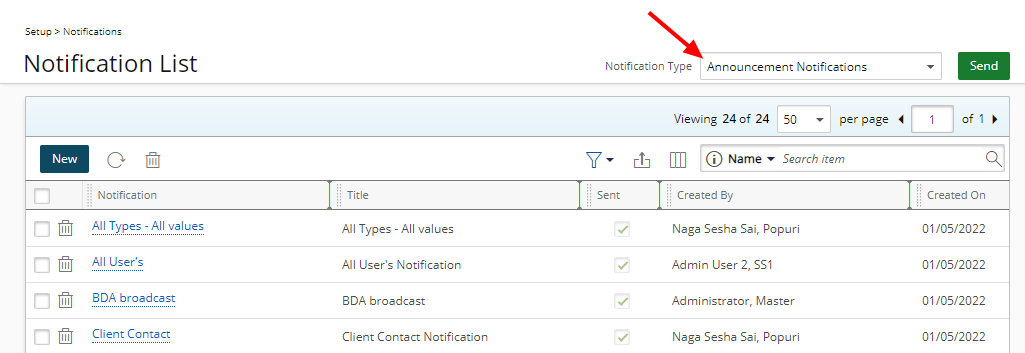
To create and manage Announcement Notifications based on your security permission, you can access the newly added Announcement Notifications list page from Setup > Notifications.
By default, the page lists all Announcement Notifications in alphabetical order. You can:
- Create New Notifications.
- Refresh the list.
- Manage and Delete existing ones.
- Filter the page based on Sent/Not Sent criteria.
- Export the list to Excel.
- The following columns are displayed by default: Notification, Title, Sent, Created By, Created On and Date Sent. You can choose to add the Valid Until column from the Column Selection.
- Search for Notifications based on Name and Title.
- Pagination is available at the top right corner to facilitate easy navigation across pages.
- Send selected Announcement Notification(s).
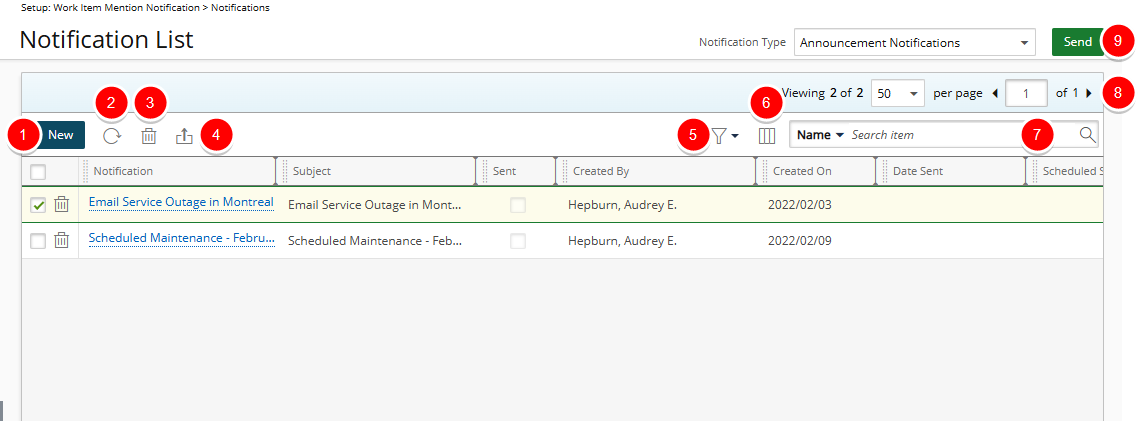
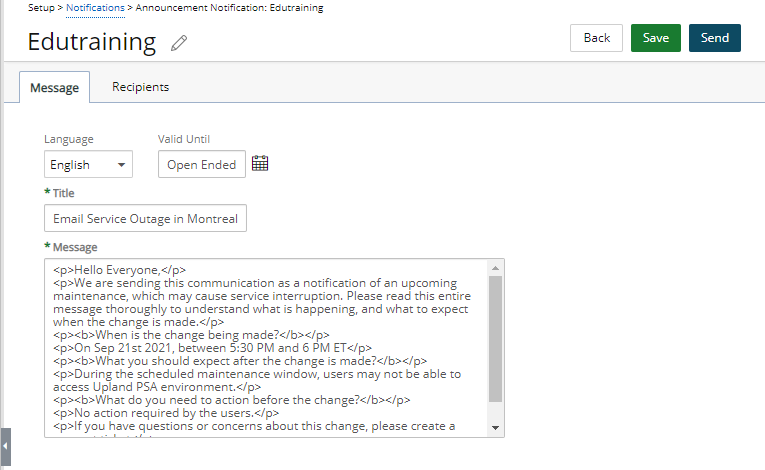
When creating/managing Announcement Notifications, you can choose a Valid Until date. When this date is reached, the Notification will no longer be displayed within My Notifications page or the Notifications panel.
The Message body can be formatted using basic HTML tags for paragraphs, headings, links, and text formatting such as bold and italics. As an example: To include a hyperlink, you must use the HTML anchor element <a> such as <a href="http://www.yourlink.com">Access yourlink.com</a>.
Note: Copy/pasted content is converted to plain text in a Notification.
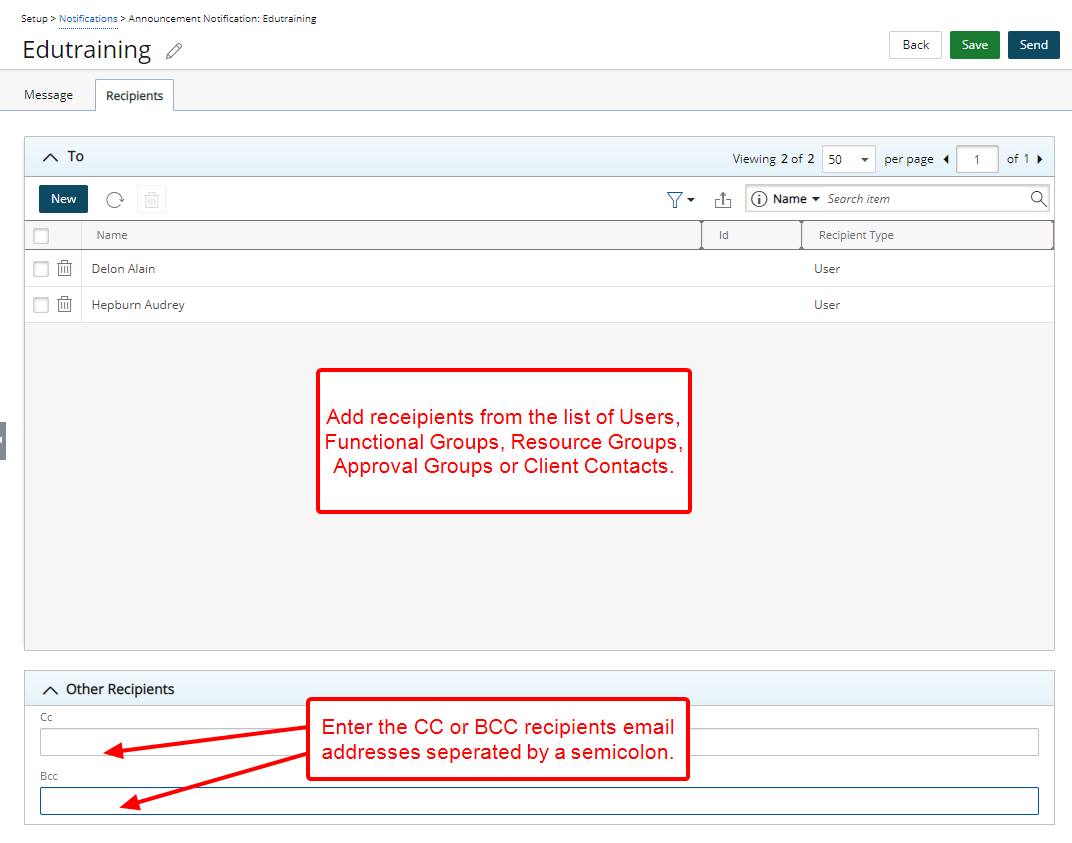
From the Recipients tab, you can choose to have the Notification announced To selected User(s), Functional Group(s), Approval Group(s), Resource Group(s), or Client Contact(s). Furthermore, you can Cc/Bcc it to an email address(es).
For further details refer to:
- Announcement Notifications
- Announcement Notification List page
- Creating an Announcement Notification
- Supported HTML tags in the Message body of Announcement Notifications
- Modifying an Announcement Notification
- Deleting an Announcement Notification

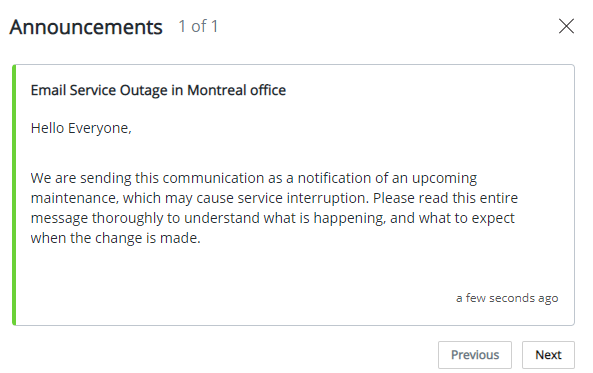
When an Announcement Notification is received, a blue notification bar will display indicating the number of newly delivered or yet to be viewed notifications. Upon clicking this banner, the Announcements pop up will be displayed.
Note: Clicking the Close [x] button will close the banner for the duration of your current session. The notification banner will be displayed again upon your next login or if the page is refreshed until either:
- All Announcements popup window(s) are viewed.
- The Notifications panel is accessed.
- The Valid Until date is reached.
The Announcements popup window allows you to view and navigate through notifications by using the Previous/Next buttons. Clicking the [x] will close the corresponding popup window.
These notifications will also appear within the Notifications panel. They are distinguished from other Notifications by a green indicator that is displayed on their left border. Furthermore, they can also be accessed through the newly added My Notifications page.
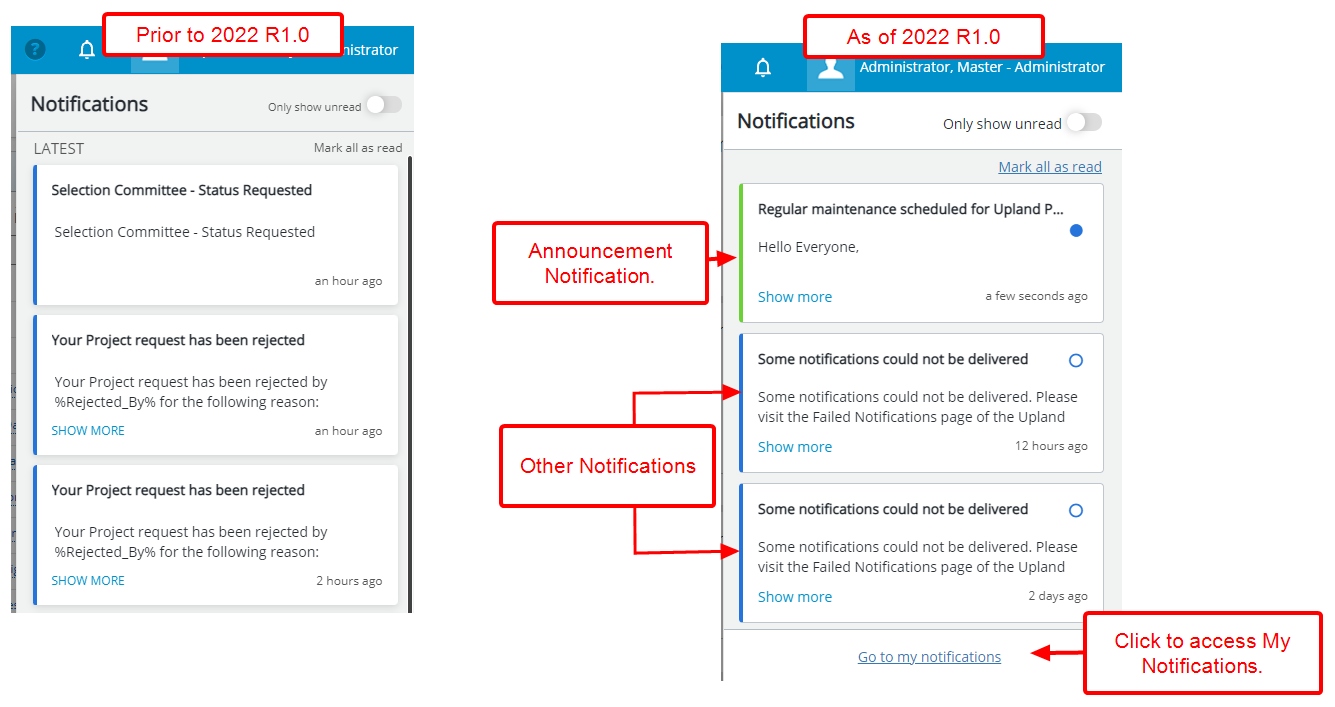
Note that the interface of the Notifications panel has undergone minor UI changes for a more improved user experience including:
- The background color of the title bar was changed to white.
- The Mark as read button is now solid blue.
- Mark All as read link is now blue.
- And the word LATEST has been removed.
For further details refer to Notifications panel.
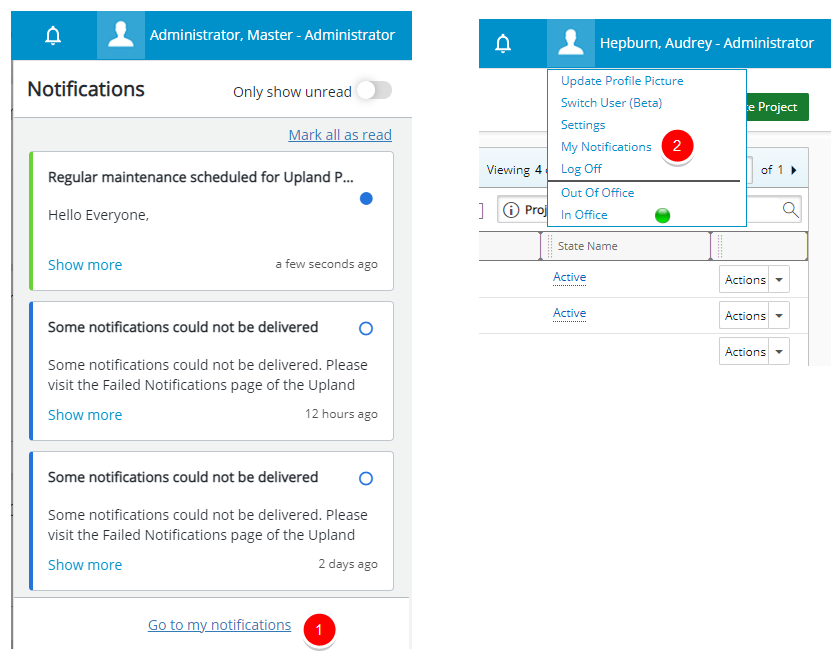
My Notifications
From My Notifications list you can view and manage all Notifications. The items that display directly impact you. This could be a notification of a rejected Timesheet, an Announcement Notification, an assignment, a reminder to complete your Timesheet(s) or a newly created Expense Report awaiting your approval, among others.
The page can be accessed either by:
- Clicking Go to my notifications located at the bottom of the Notifications panel.
OR - Clicking My Notifications from the User Profile menu.
From My Notifications you can:
- View the Details of the Notification.
- Mark as Read/Unread.
- Refresh the list.
- Delete items.
- Export the list to Excel.
- Filter the list based on Read/Unread Notifications and/or Announcements.
- Mark selected items as Read/Unread.
- By default, the following columns are displayed: Subject, Date Received, Read and Type. You can choose to remove/add columns from the Column Selection.
- Search for items based on Subject or Message and Date Received.
- Pagination is available at the top right corner to facilitate easy navigation across multiple pages.
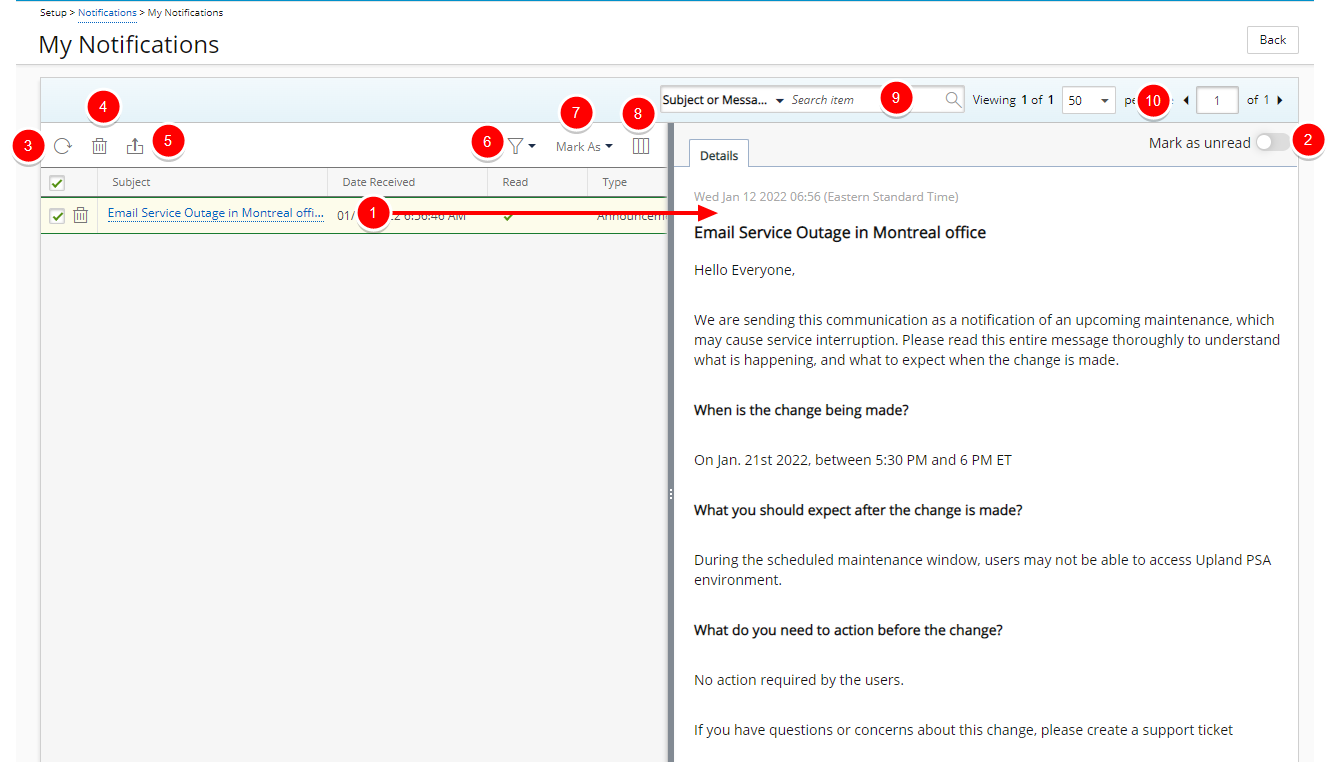
For further details refer to:
- My Notifications
- Announcement Notifications
- Deleting a Notification I received
- Filtering My Notifications list
My Timesheet
The initiative to redesign My Timesheet is aimed to address client feedback as well as incorporate newer technology.
The improvements made to the My Timesheet module are being released iteratively. Therefore, as a first release of this improved module, the new My Timesheet will only be available through your Sandbox/Implementation environments. The new Timesheet and all its related improvements will not be part of the 2022 R1.0 Production upgrade. This will allow you to familiarize yourself with the new interface and at the same time allow us to gather your valuable feedback and improve the module further.
To further assist you in this transition, the PSA Help Center will maintain all articles related to the legacy Timesheet. These articles can be accessed from: Using My Timesheet | Legacy Timesheet.
New articles pertaining to the revamped My Timesheet are now available by following this link: Using My Timesheet.
To allow Users access to the new and improved My Timesheet in your Sandbox/Implementation environments, you must add them to the New Timesheet list. To do so, navigate to the Timesheet Templates page (Setup>Timesheet), from the Tools context menu click New Timesheet then click the Add User button. For further details refer to Adding users to the New Timesheet list.
Users included in the list will have access to the improved Timesheet simply by navigating to Entries > My Timesheet. For further details refer to Accessing My Timesheet
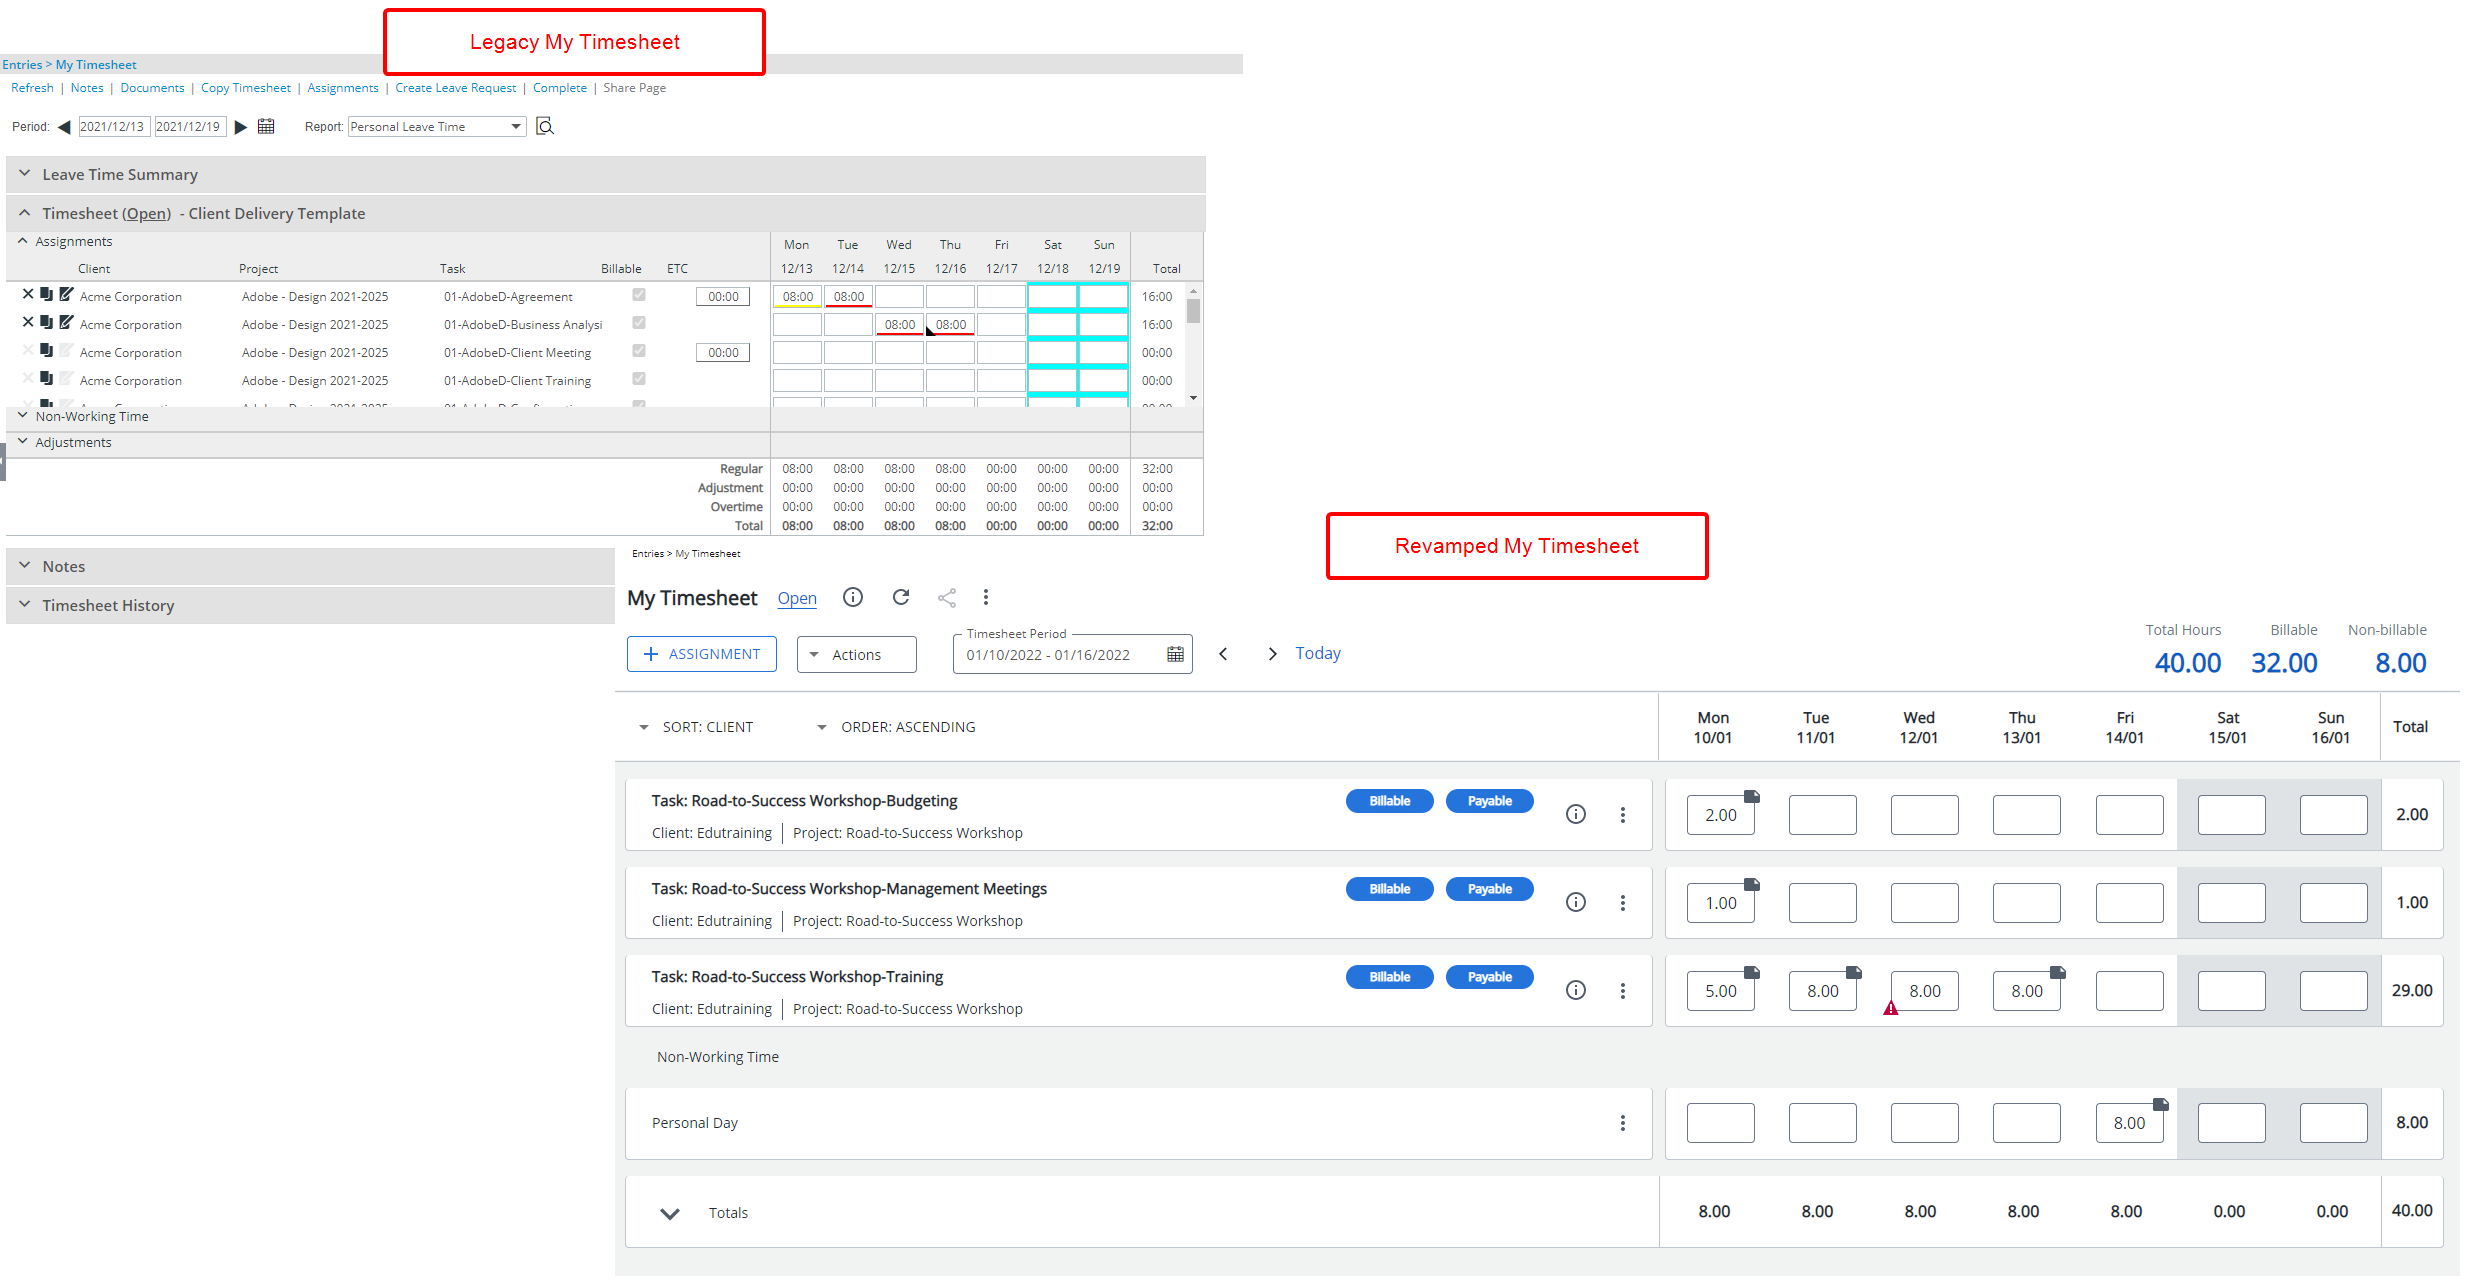
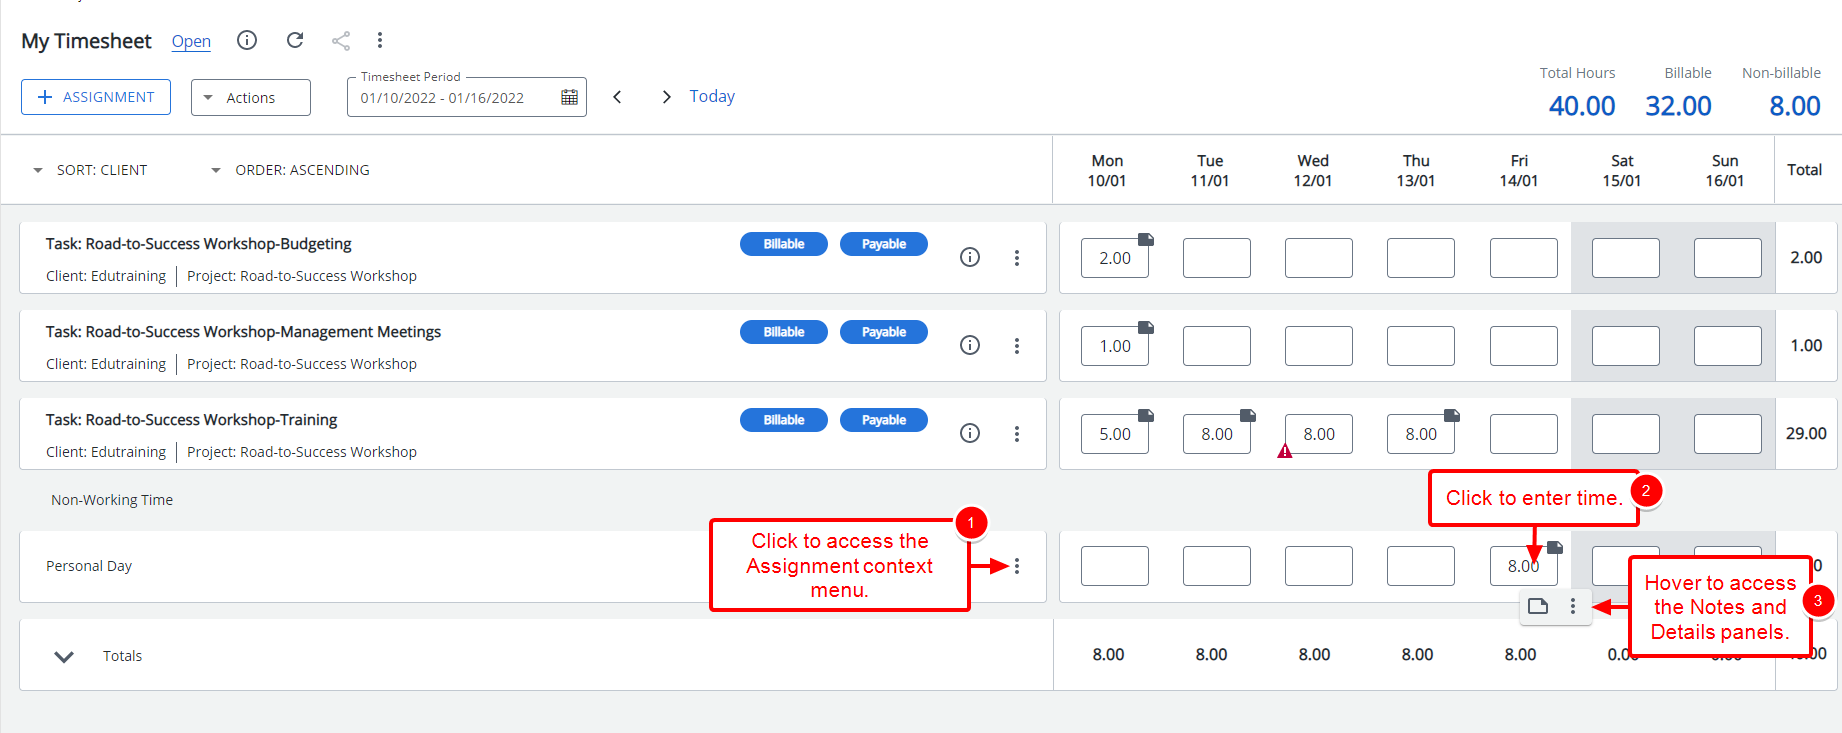
Upon accessing the new and improved Timesheet, note that this redesign provides a cleaner and simpler My Timesheet, significantly improving the user experience. It combines the new UplandOne look with all the necessary functionalities to enter your time easily and quickly.
The changes, improvements and deprecated/unsupported features are further detailed below:

- From the top left corner of your page, you can view the State in which your Timesheet is currently at. You can click this link to access a visual representation of the Timesheet Workflow and corresponding States/Assignments.
- Hovering over the Information icon
 next to it will trigger a tooltip allowing you to see the Timesheet Template name.
 - You can use the Refresh
 button to refresh the page.
 - Click the Share this page
 button to share your Timesheet with another user.
 - Click the ellipsis
 to access the Timesheet context menu from where you can:
- Assign Tasks
- Copy Timesheet
- Create Leave Request
- View Leave Time Summary
- Click the +Assignment button to access the New Assignment dialog box where you can pick new Assignments.
- From the Actions selection list you can choose to transition your Timesheet to the next State.
- Choose your Timesheet Period by clicking the calendar icon located next to the date or click the right/left arrows to navigate to the next/previous periods. Alternatively, you can click Today to navigate to the current period.
- On the top right corner of My Timesheet, you can readily view the Total Hours, Billable, and Non-billable.
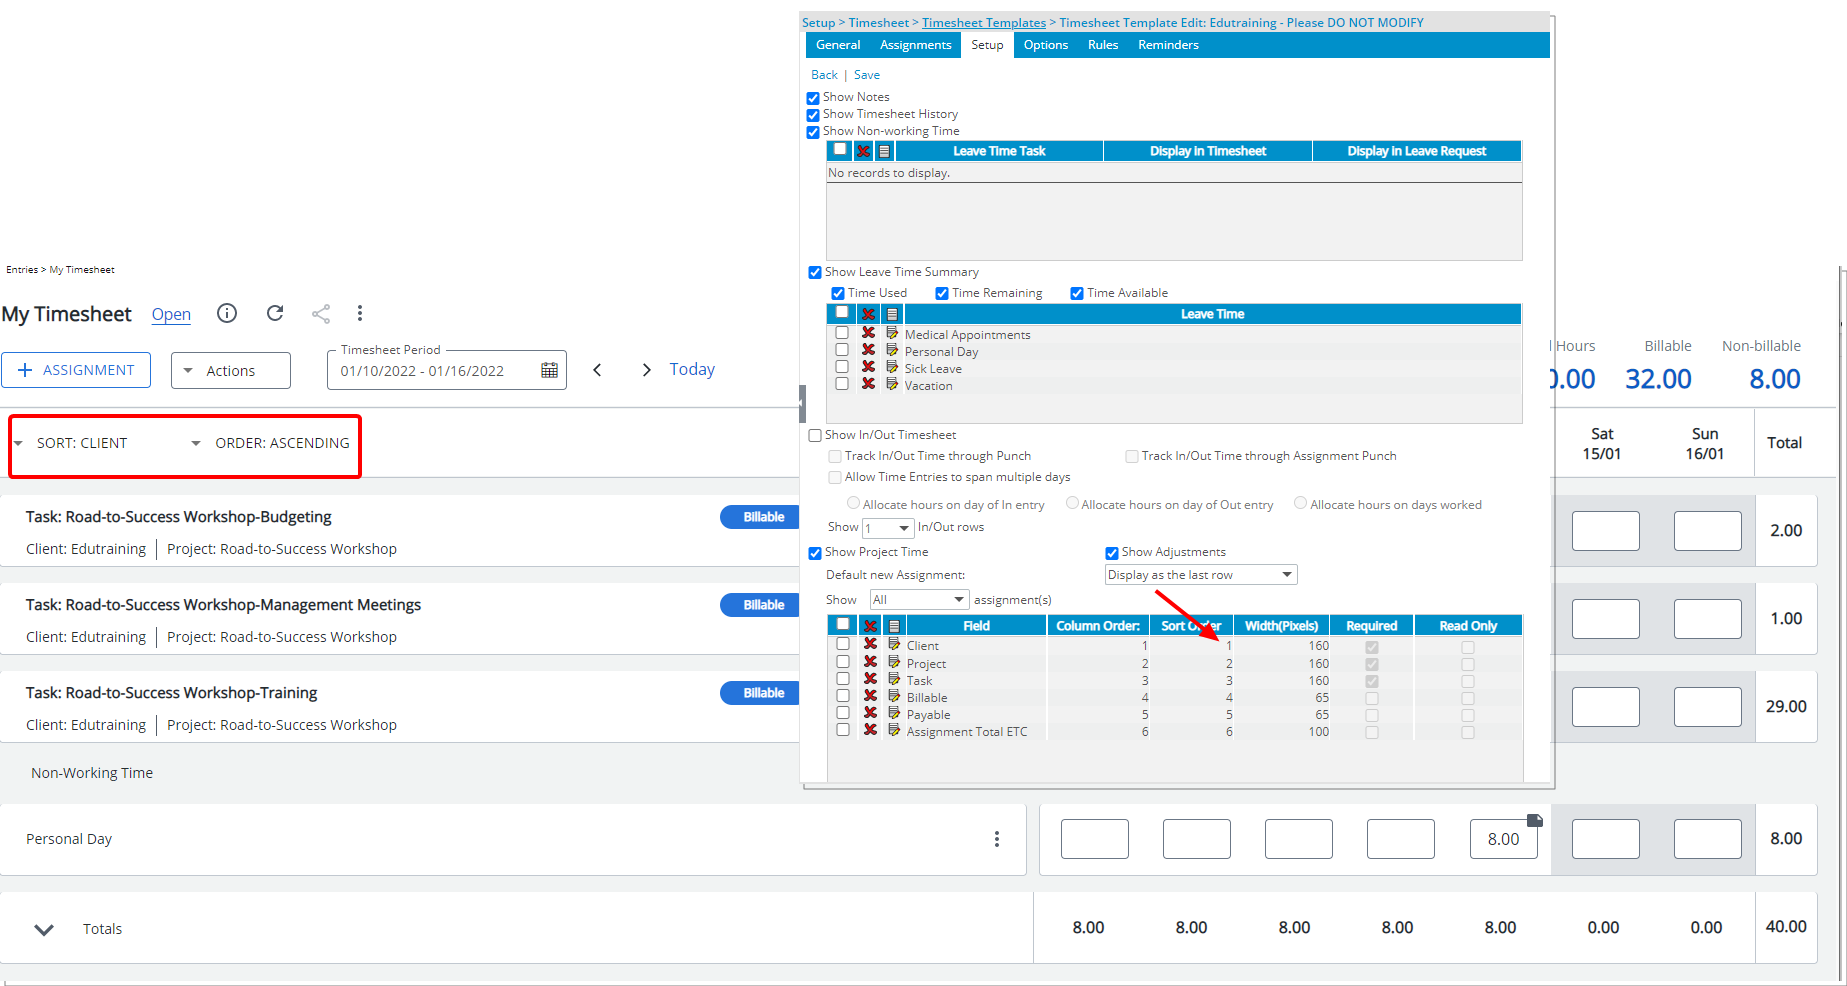
By default, your Assignments are listed based on the Sort Order defined in your Timesheet Template, you can now choose to overwrite this order based on your preference and the Fields available to you such as Client, Project and Task in Ascending or Descending order.
Each Assignment row has a left (Assignment) and right panel (Time Entry details).
- From the Assignment panel, you can readily see the Assignment Heading (as defined within the Setup tab of the Timesheet Template). Below the Heading you will see the assignment Information such as: Client, Project, and Business Unit as defined in the Timesheet Template.
- The Assignment Attributes such as Billable are justified to the right and formatted in a capsule. When an Attribute is applicable, the background color of the capsule is blue, otherwise it is white.
- Hovering over the Information icon will trigger a tooltip allowing you to see the respective Assignment Information such as: Client, Project, Task, Billable and Payable as defined in your Timesheet Template.
- Click the ellipsis to access the Assignment context menu, from where you can choose to:
- Edit: Clicking this option will open the Edit Assignment dialog box where you can modify the details of your Assignment.
- Copy: Clicking this option will open the Copy Assignment dialog box where you can create a copy of your Assignment.
- Details: Clicking this option will open the Assignment Details panel where you can view the details of your assignment
- Delete: Clicking this option will delete all Time Entries made against the Assignment.
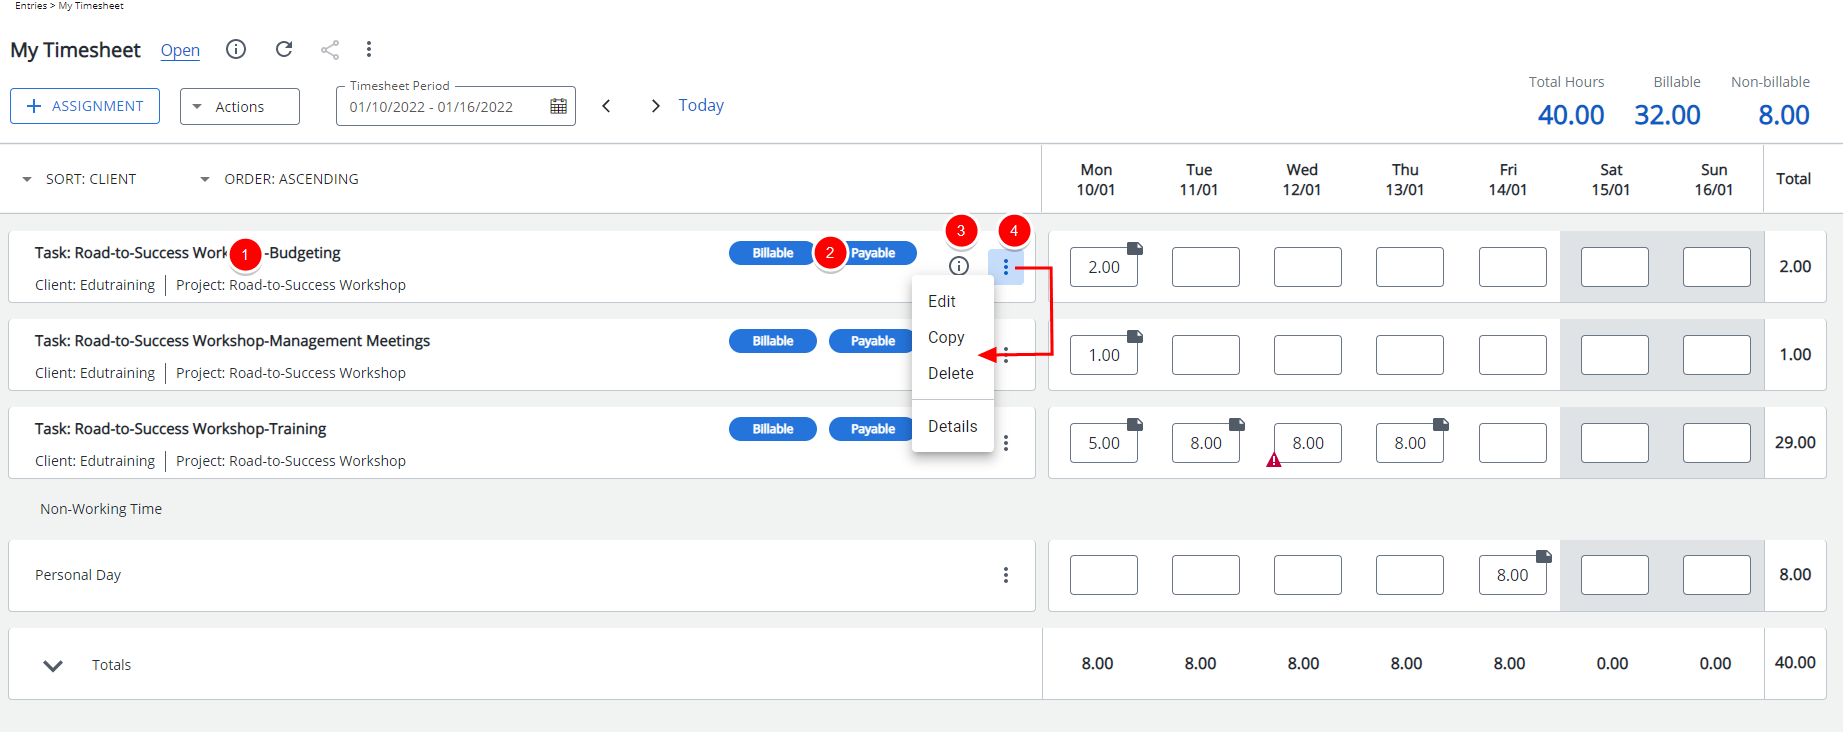
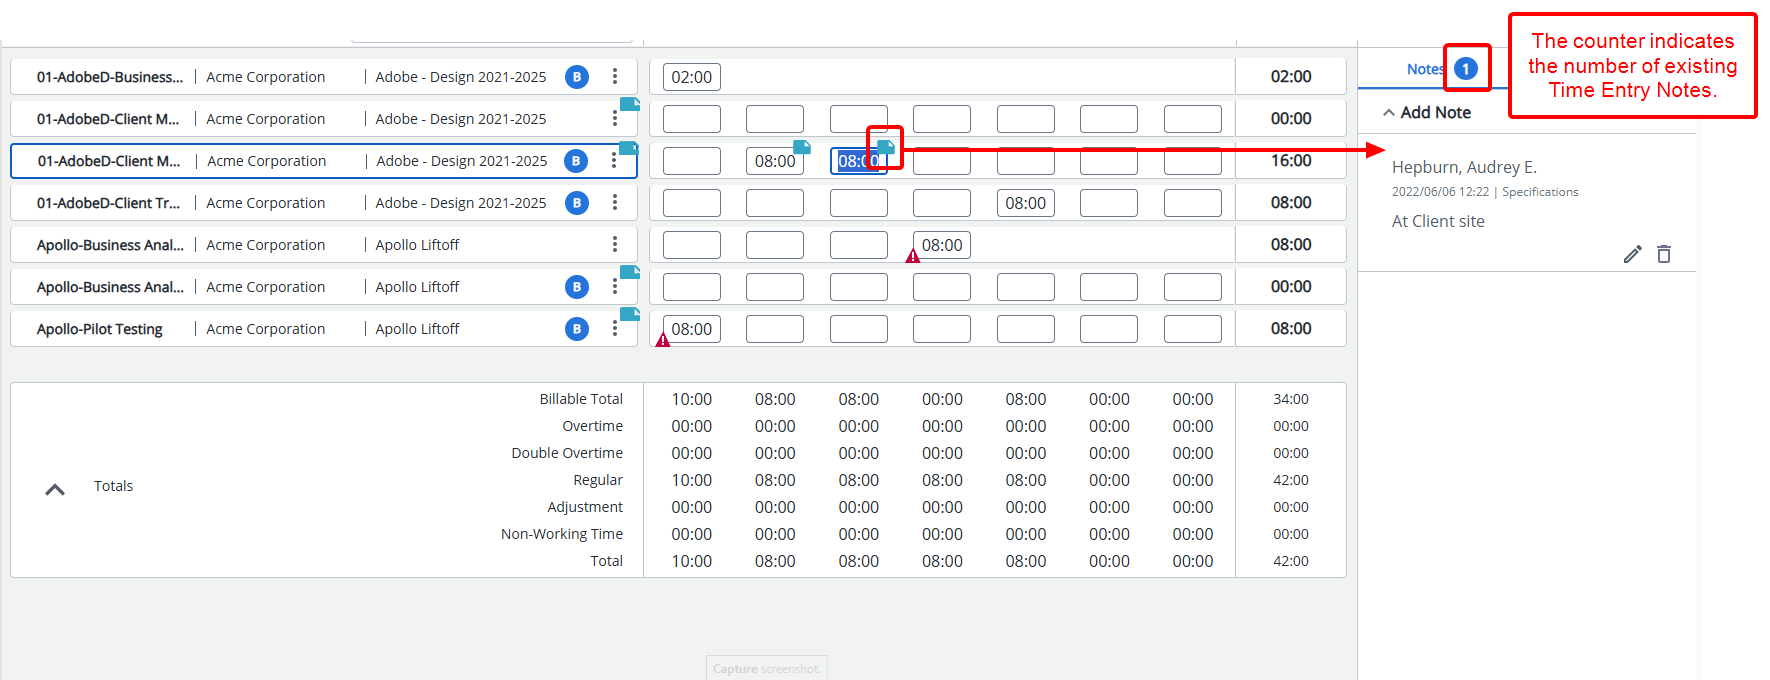
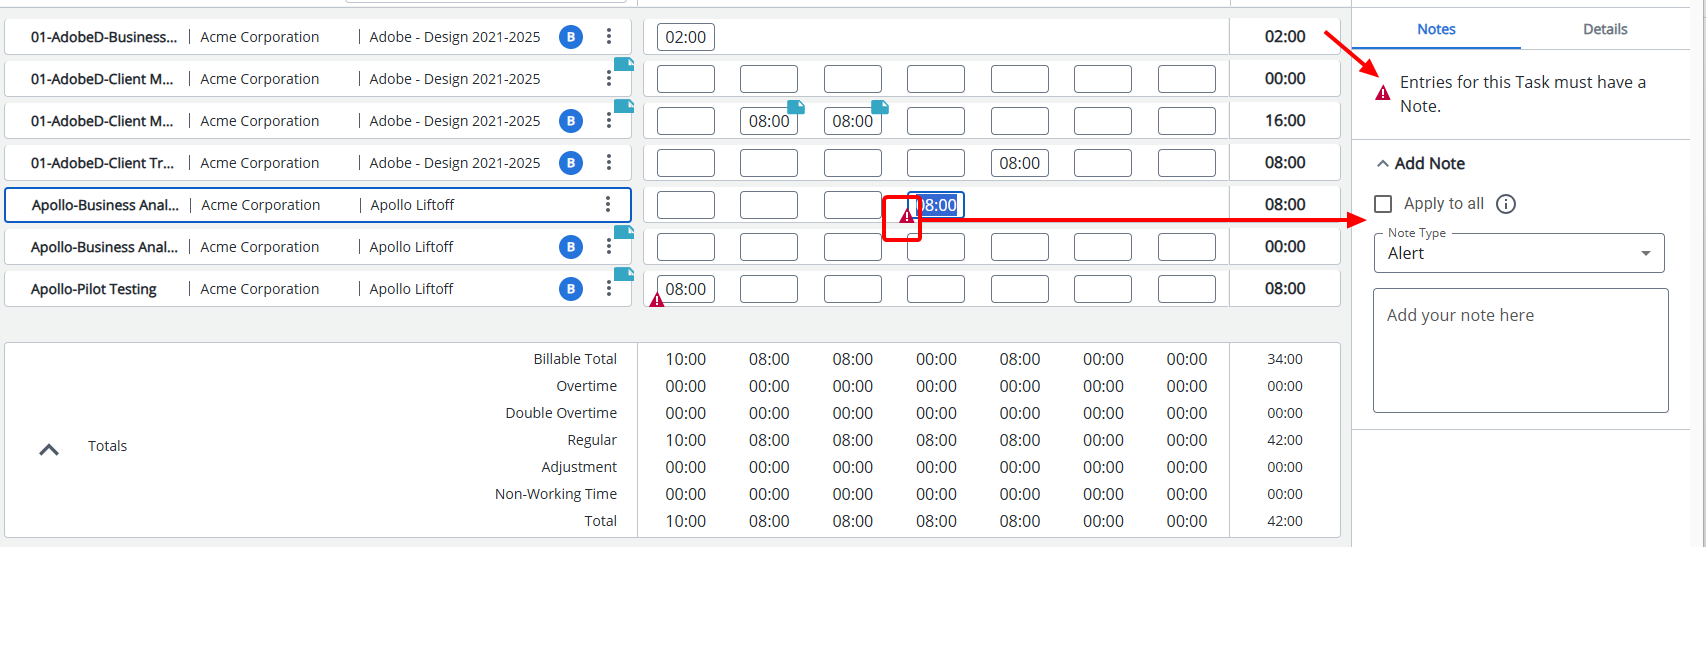
You will notice that various icons may be present on a given Time Entry cell. These icons mark:
- The Time Entry Notes: A solid grey note icon
 located on the top right corner of the Time Entry cell. Clicking this icon will open the Time Entry Notes panel.
- Any Exceptions (based on your Timesheet Template settings) that might be activated upon entering your Time: Clicking these icons will open the Time Entry Details panel where you can view the exceptions and take the proper action.
For further details refer to:
- Available options through My Timesheet
- Accessing and viewing the Leave Time Summary
- Timesheet Assignments
- Picking an Assignment
- Sorting my Assignments
- Modifying an Assignment
- Copying an Assignment
- Accessing and viewing the Assignment Details panel
- Time Entry
- Entering Regular Time
- Accessing and viewing the Time Entry Details panel
- Deleting Time Entries
- Completing or submitting your Timesheet
- Recalling a Submitted Timesheet
- Creating a Leave Request through My Timesheet
Non-Working Time (TE-41825)
The Non-Working Time assignments are grouped and listed below your regular Assignments.
- Click the ellipsis to access the Assignment context menu, from where you can choose to Delete all Time Entries made against the Assignment.
- From the Time Entry panel, you can readily click a Time Entry cell corresponding to the required day to enter your non-working time.
- Hovering your mouse over a Time Entry cell triggers the context menu:
- Click Notes
 to access the Time Entry Notes panel.
 - Click the ellipsis to access the Time Entry context menu from where you have the option view the Time Entry Details panel.
- Click Notes
For further details refer to Entering Non-Working Time
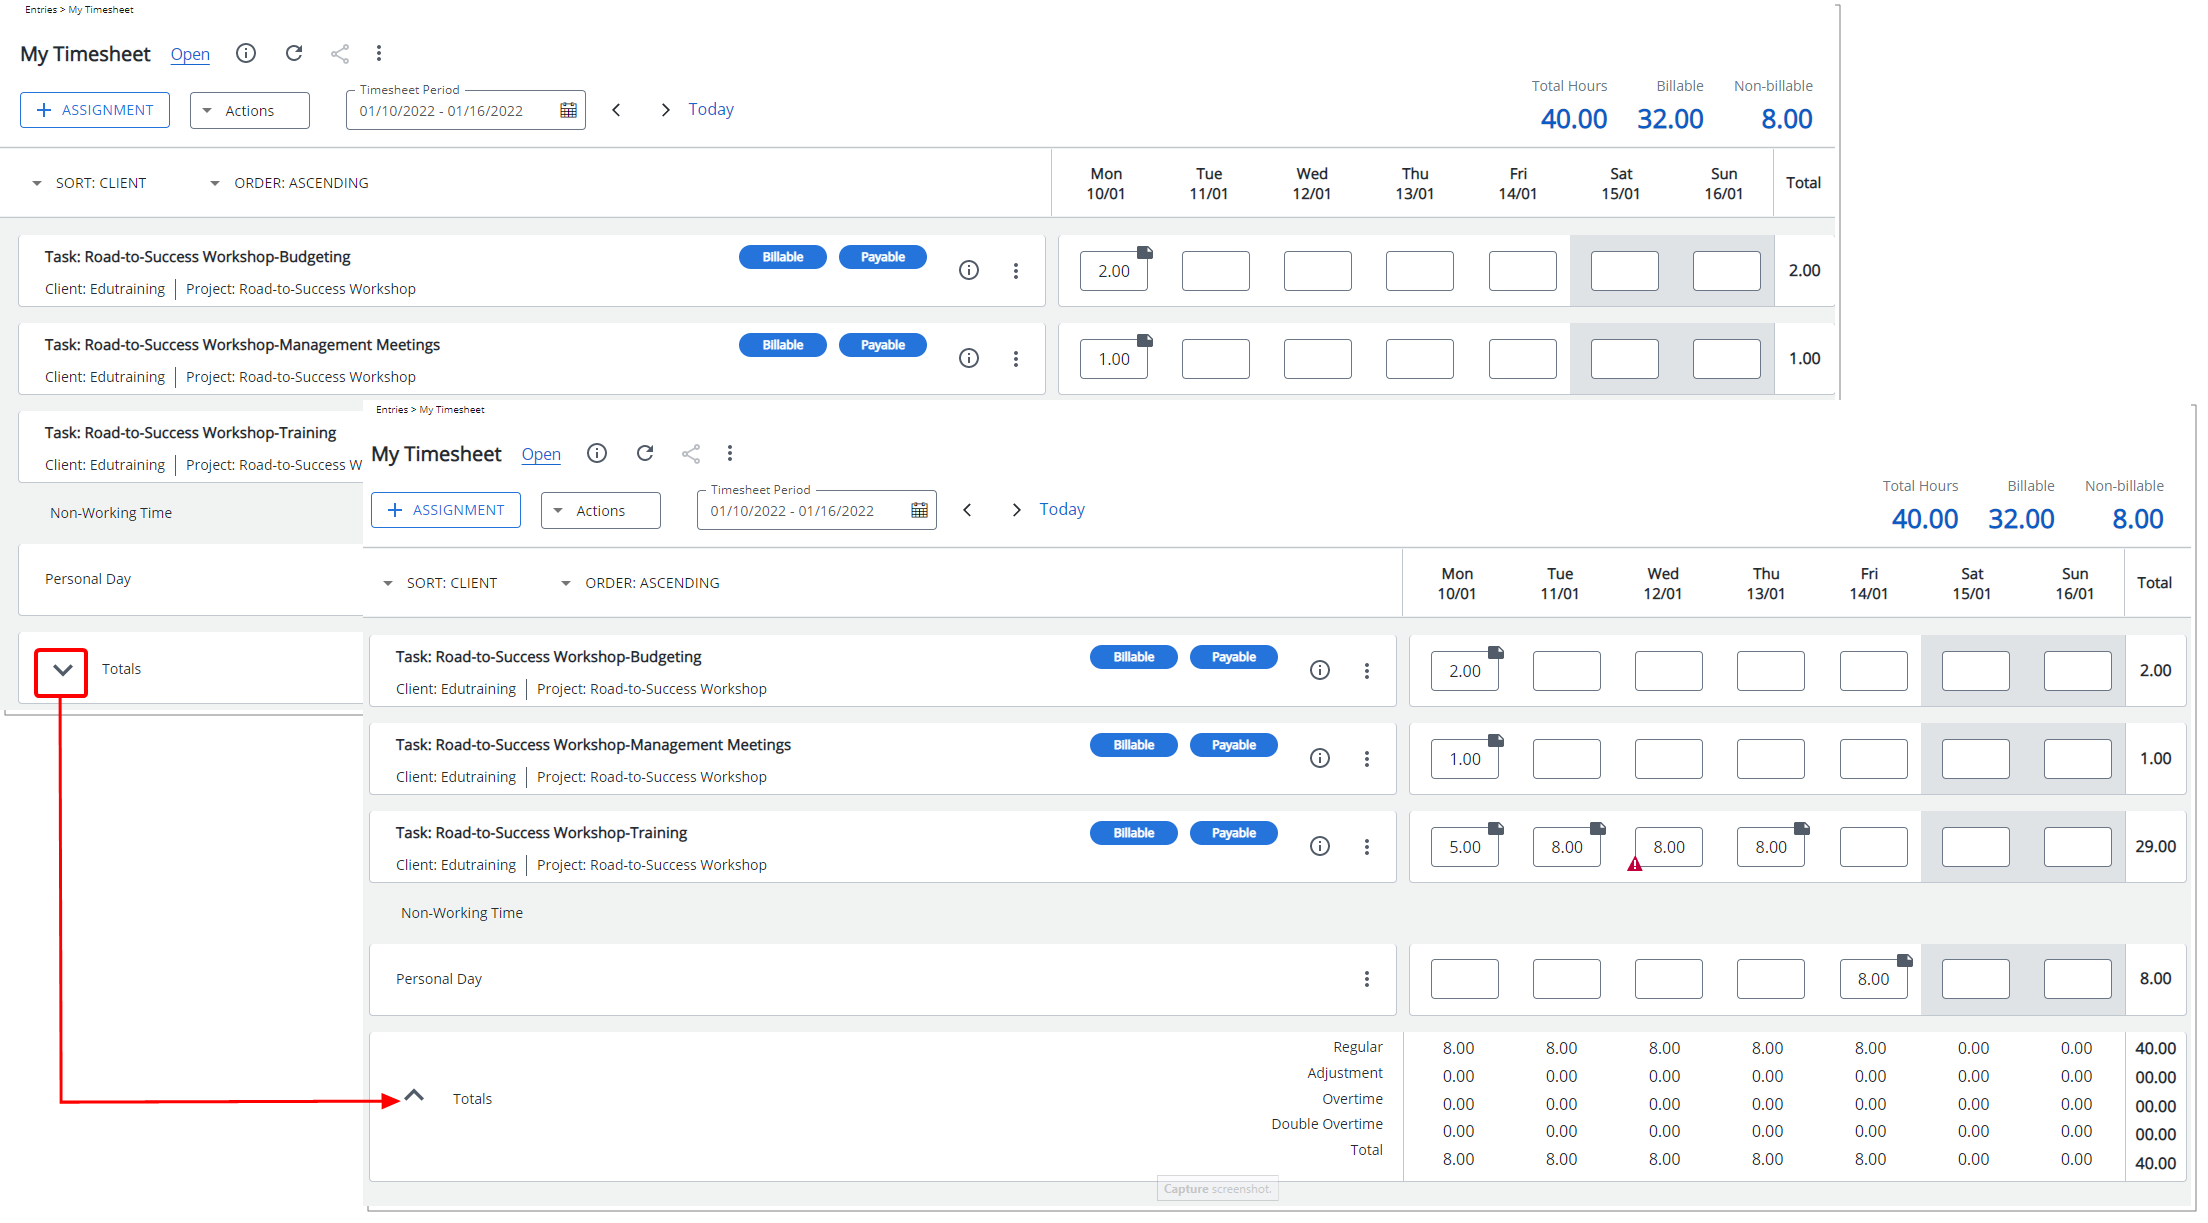
Expanding the Totals section allows you to view the Regular Time/Overtime/Double overtime and/or Adjustments Total values as set within the Show Totals section of the Timesheet Template.
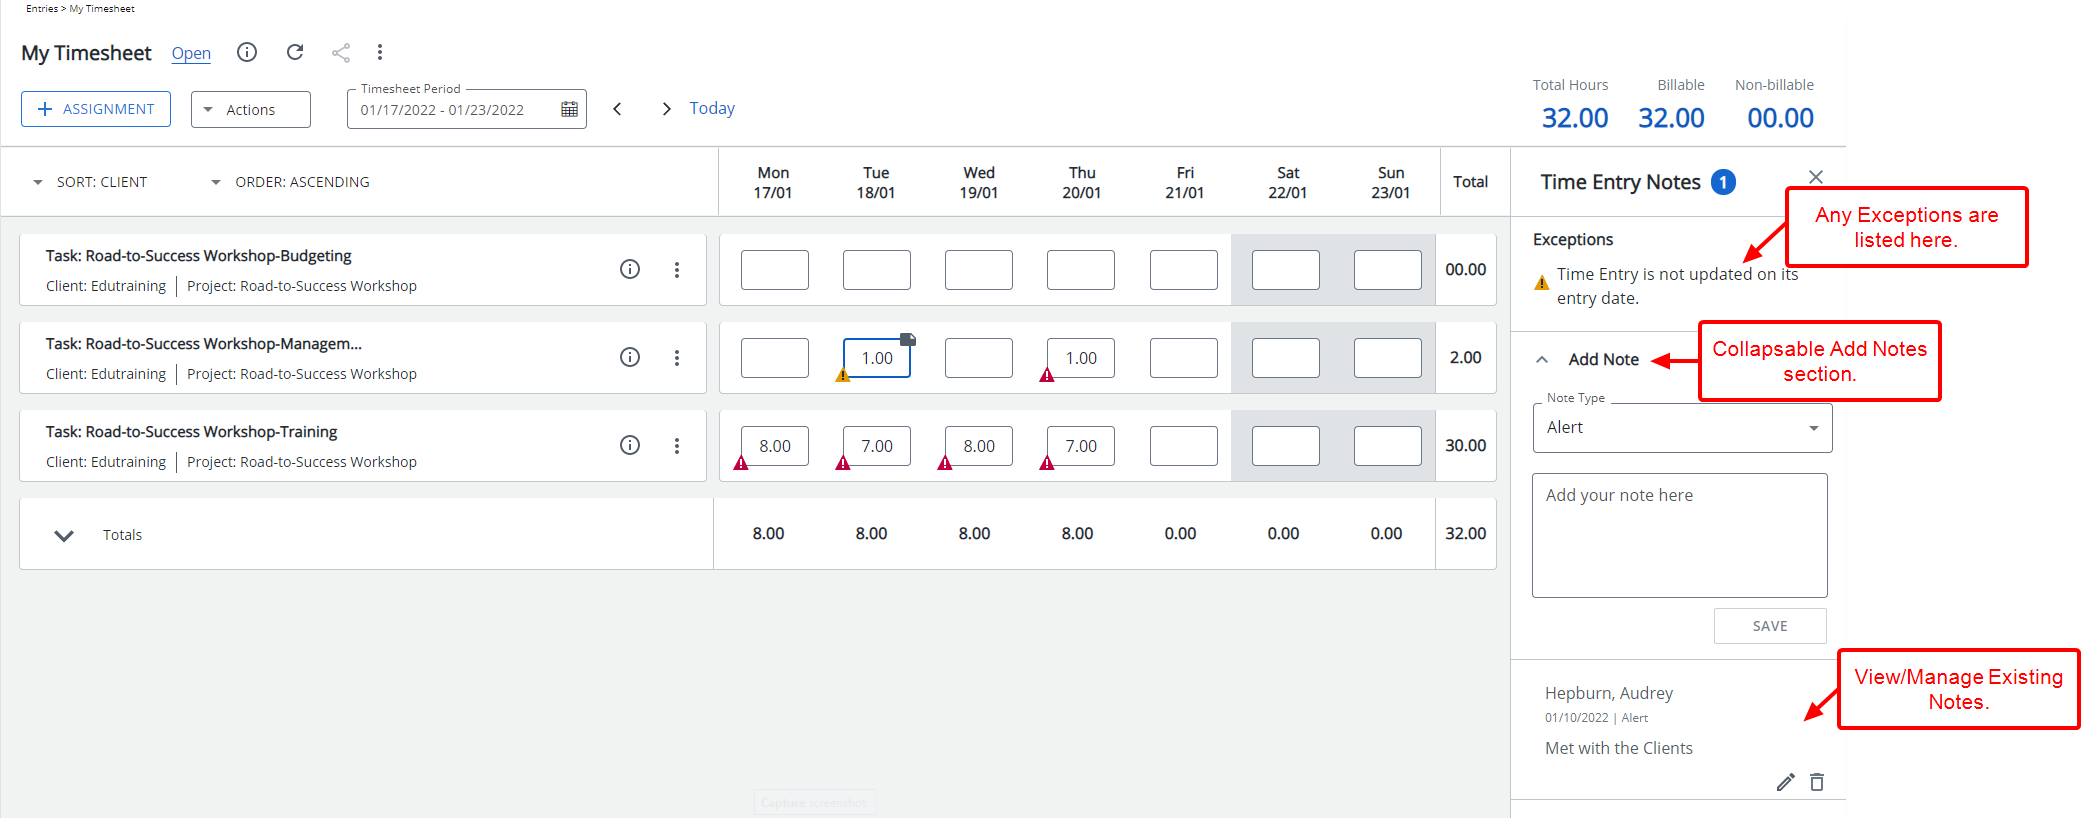
Improvements have been made to the Time Entry Notes entered and viewed from My Timesheet. In all cases, Notes are now created and managed from the respective Notes panels accessed through the following avenues:
- Hovering your mouse over a Time Entry cell, then clicking the Notes button.
- If a Time Entry Note already exists, you will see a solid grey note icon located on the top right corner of the Time Entry cell. Clicking this icon will open the Time Entry Notes panel.
Upon the panel displaying, any Exceptions are listed above the Note box and any existing notes are listed below the Add Note section.
From the Add Notes section, you can select a Note Type and then add your Note. Upon clicking Save, notice a counter appearing to the right of the title in brackets which indicates the number of entered Notes.
Existing Notes are listed at the bottom of the panel and are each visually separated by a line. You can collapse the Add Notes section to view them.
For further details refer to Time Entry Notes.
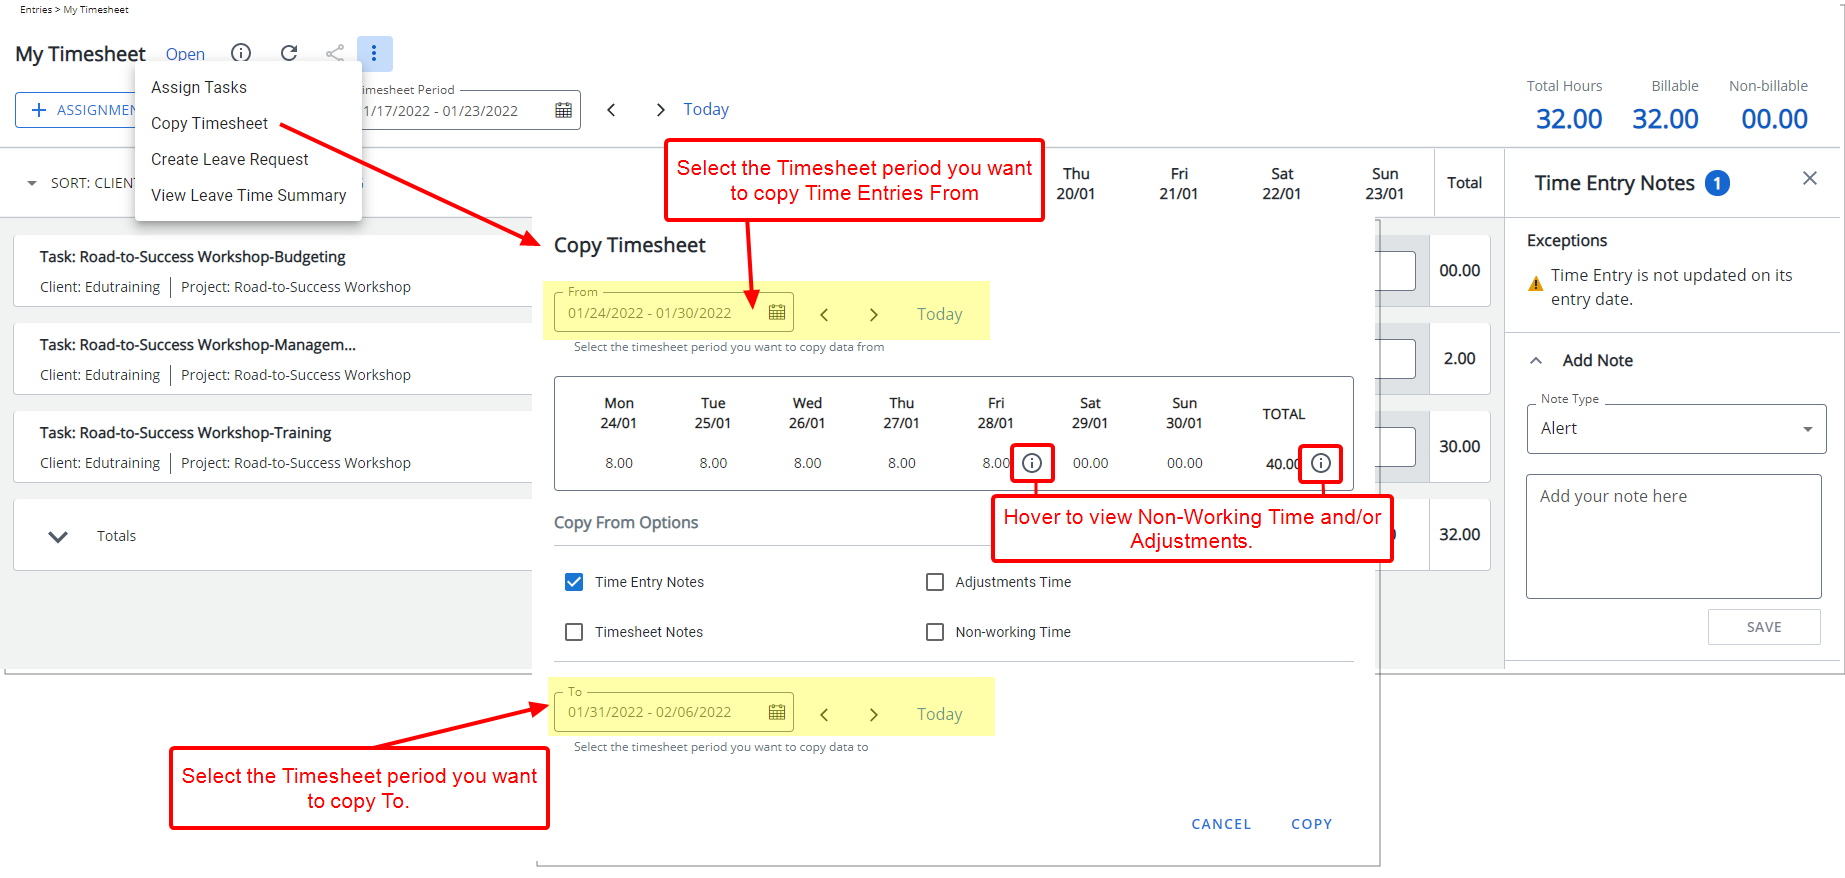
The interface and process of copying a Timesheet has been modified to improve user experience.
From the Copy Timesheet dialog box, select the Timesheet period you want to copy Time Entries From. Then choose if you wish to also copy the Time Entry Notes, Adjustments, Timesheet Notes and/or Non-working Time.
Note that the information icon is present against Time Entries with Non-Working Time or Adjustments. A tool tip containing additional information is displayed upon hovering over the icon(s).
Then select the Timesheet period you want to copy Time Entries To. Upon copying the Timesheet note that the dialog box will close, a green success banner will be displayed, and you will be taken to the copy destination period.
Note:
- By default, the source period is set to the period from where you clicked the Copy Timesheet link, and the destination period is set to current period.
- The source and destination periods cannot be the same.
For further details refer to Copying Timesheet.
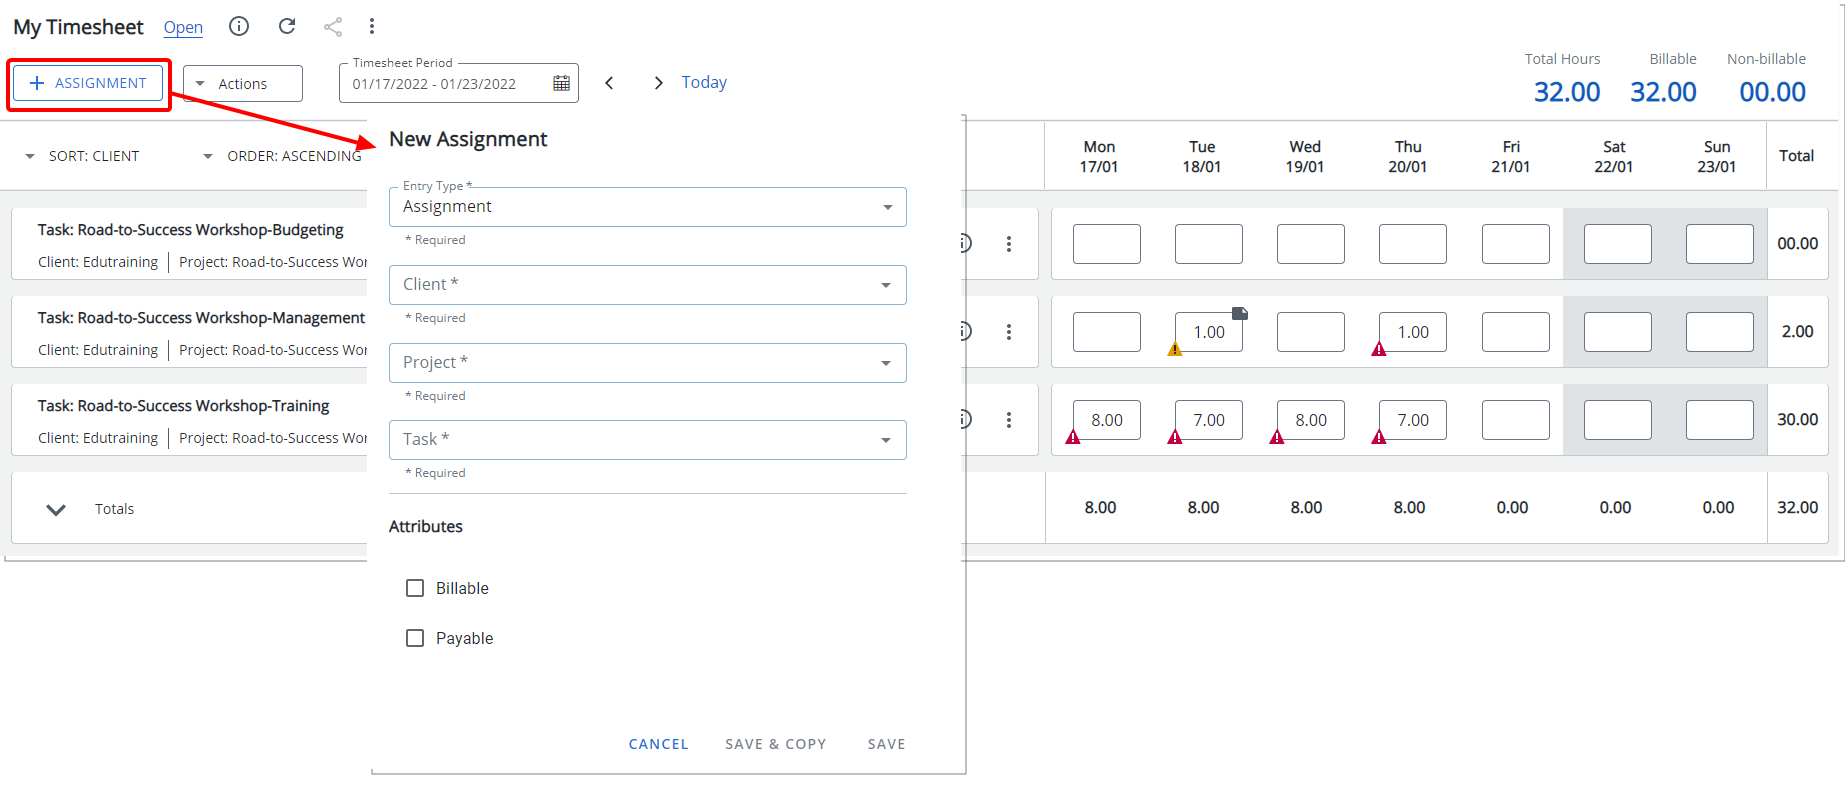
The New Assignment dialog box is displayed upon clicking the +Assignment button from My Timesheet where you can select the Entry Type such as Assignment, Adjustment or Non-Working Time and the required entry details based on the Timesheet Template to pick a New Assignment.
For further details refer to:
- Timesheet Assignments
- Picking an Assignment
- Sorting my Assignments
- Modifying an Assignment
- Copying an Assignment
- Accessing and viewing the Assignment Details panel
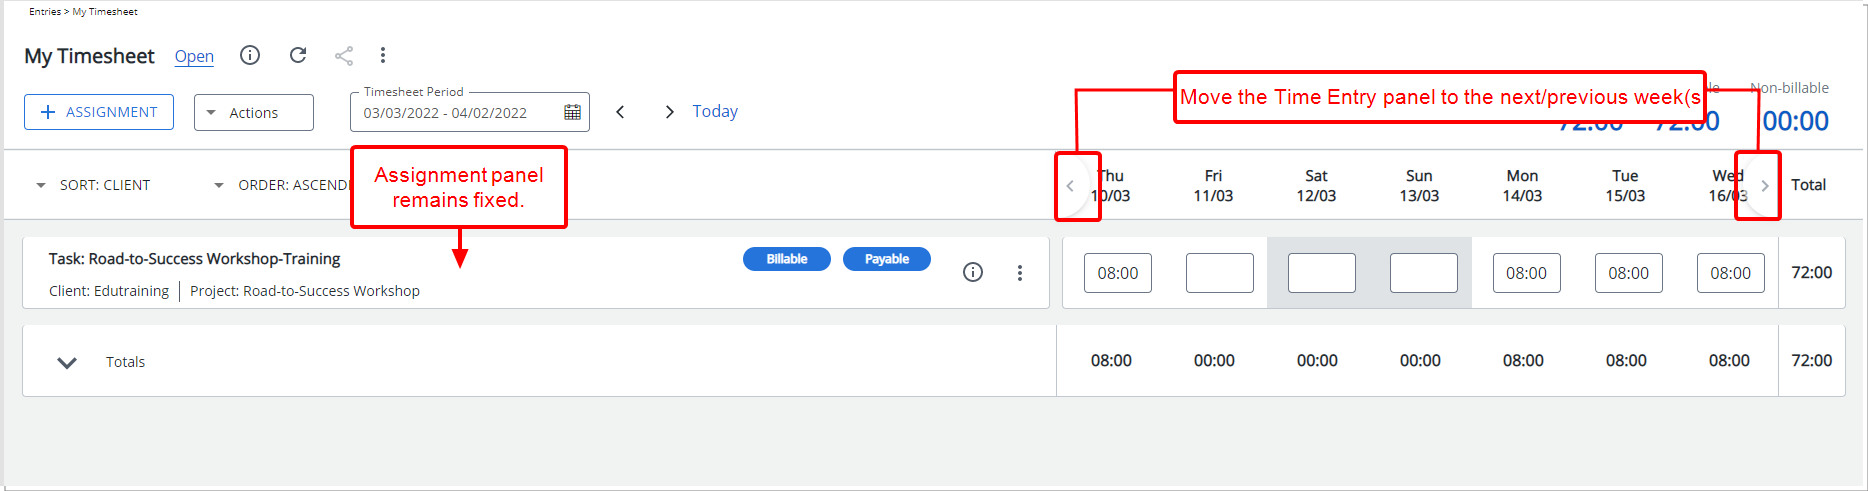
Description: Addition of navigational buttons to allow you to move the Time Entry panel to the next/previous week(s) for Bi-Weekly, Semi Monthly and Monthly Timesheet Template Period types while keeping the Assignment panel fixed.
Benefit: The Next and Previous buttons eliminate the need to use the scroll bar, improving user experience.
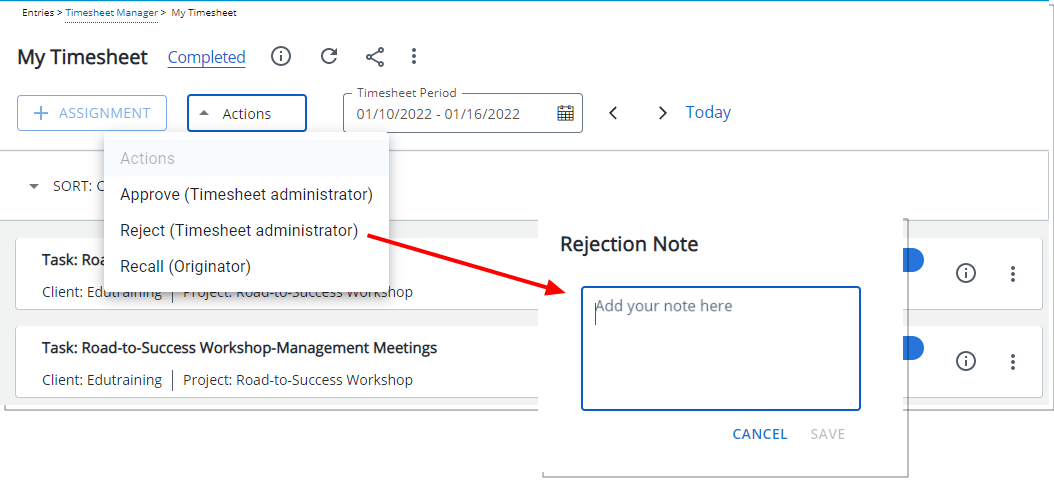
Description: The Rejection Note dialog box accessed through My Timesheet has been redesigned to improve overall user experience and establish consistency across all pages.
Furthermore, both the Type and Public options have been deprecated when rejecting a Timesheet through the My Timesheet page.
Benefit: With these overall modifications, the look and feel are further improved, as well in keeping with the UplandOne mindset, wherein the layout of various elements within the page support the unified experience across Upland products. Consequently, the user experience is further elevated.
For further details refer to Rejecting a Timesheet through the User's Timesheet Page.
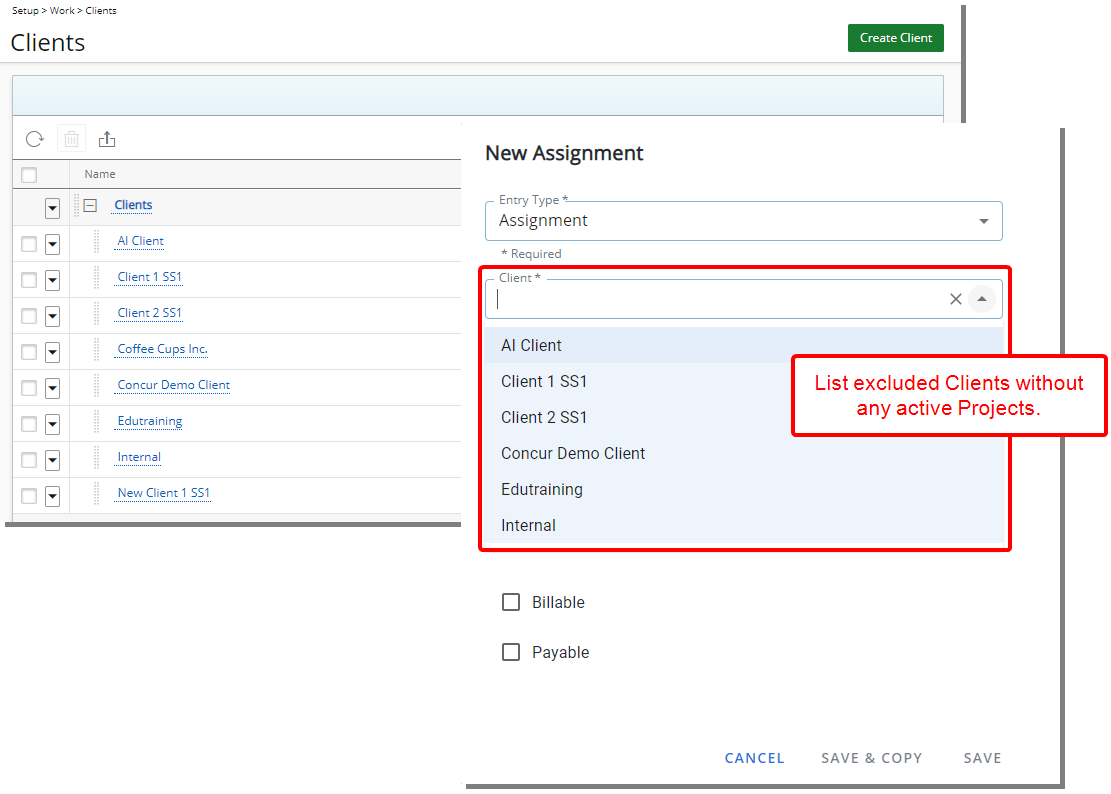
Description: The Client selection box has been improved to exclude Clients without any active Projects from the list.
Benefit: This displays an uncluttered list allowing you to efficiently select the required Client.
Note: This improvement applies to the legacy and new My Timesheet.
For further details refer to:
- Timesheet Assignments
- Picking an Assignment
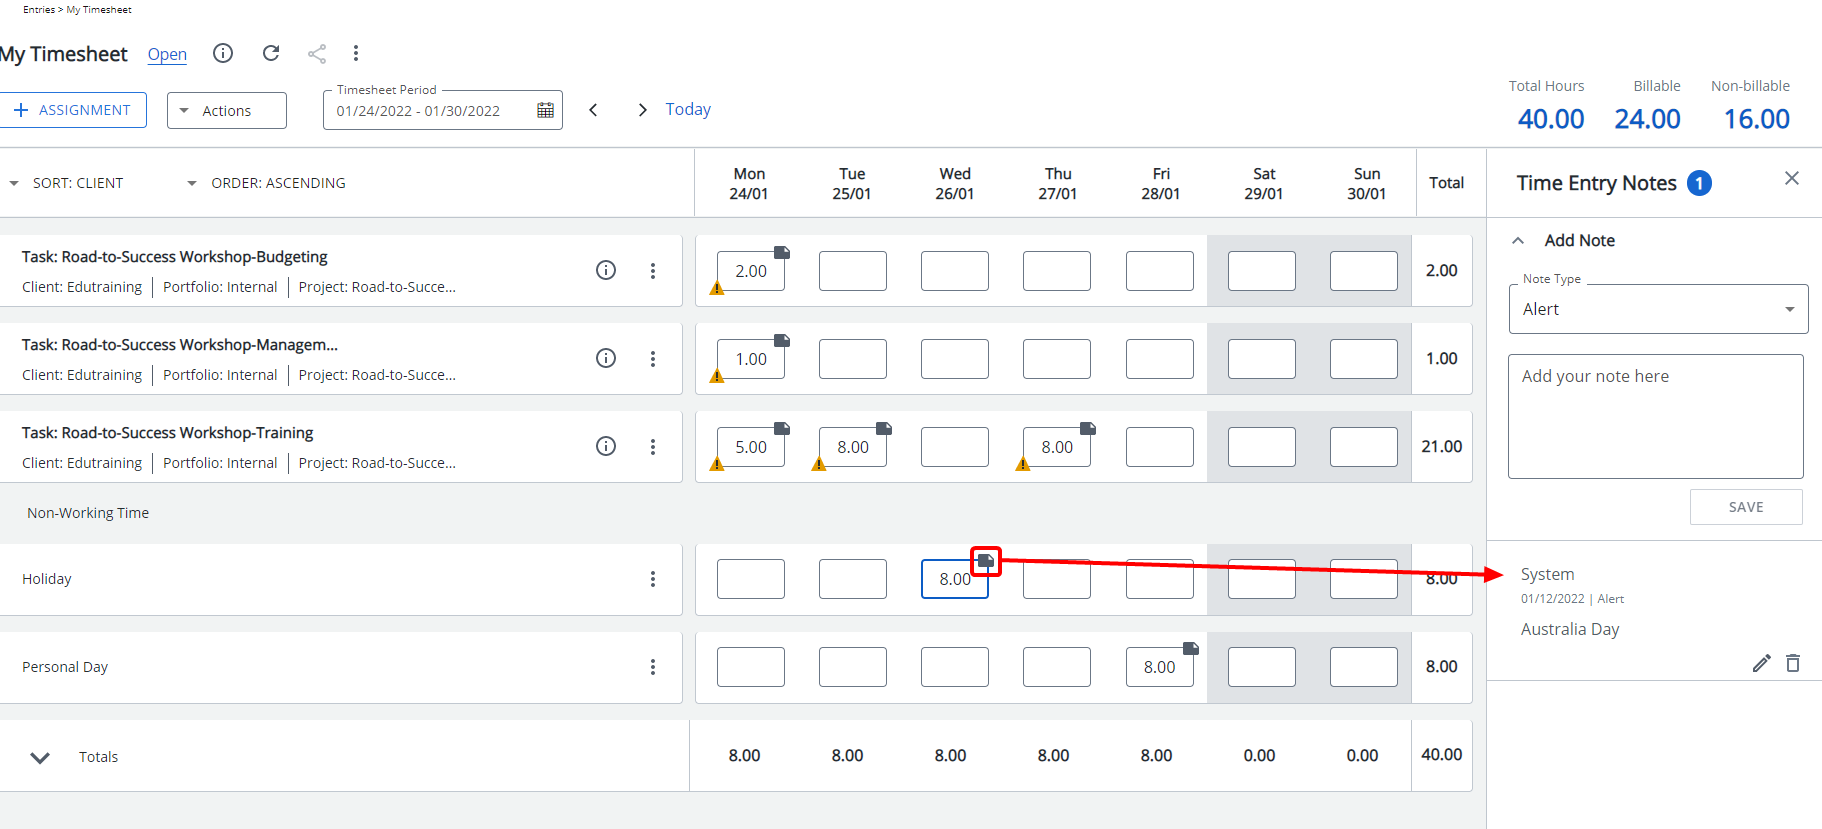
Description: A Note is now automatically added to Holiday Time Entries created through the Holidays Automation Service process. The Note displays the Name of the Holiday created by “System”.
Benefit: With this addition users can easily see the name of the Holiday for these types of Non-Working Time Entries.
Note: This improvement applies to the legacy and new My Timesheet.
For further details refer to Time Entry Notes.
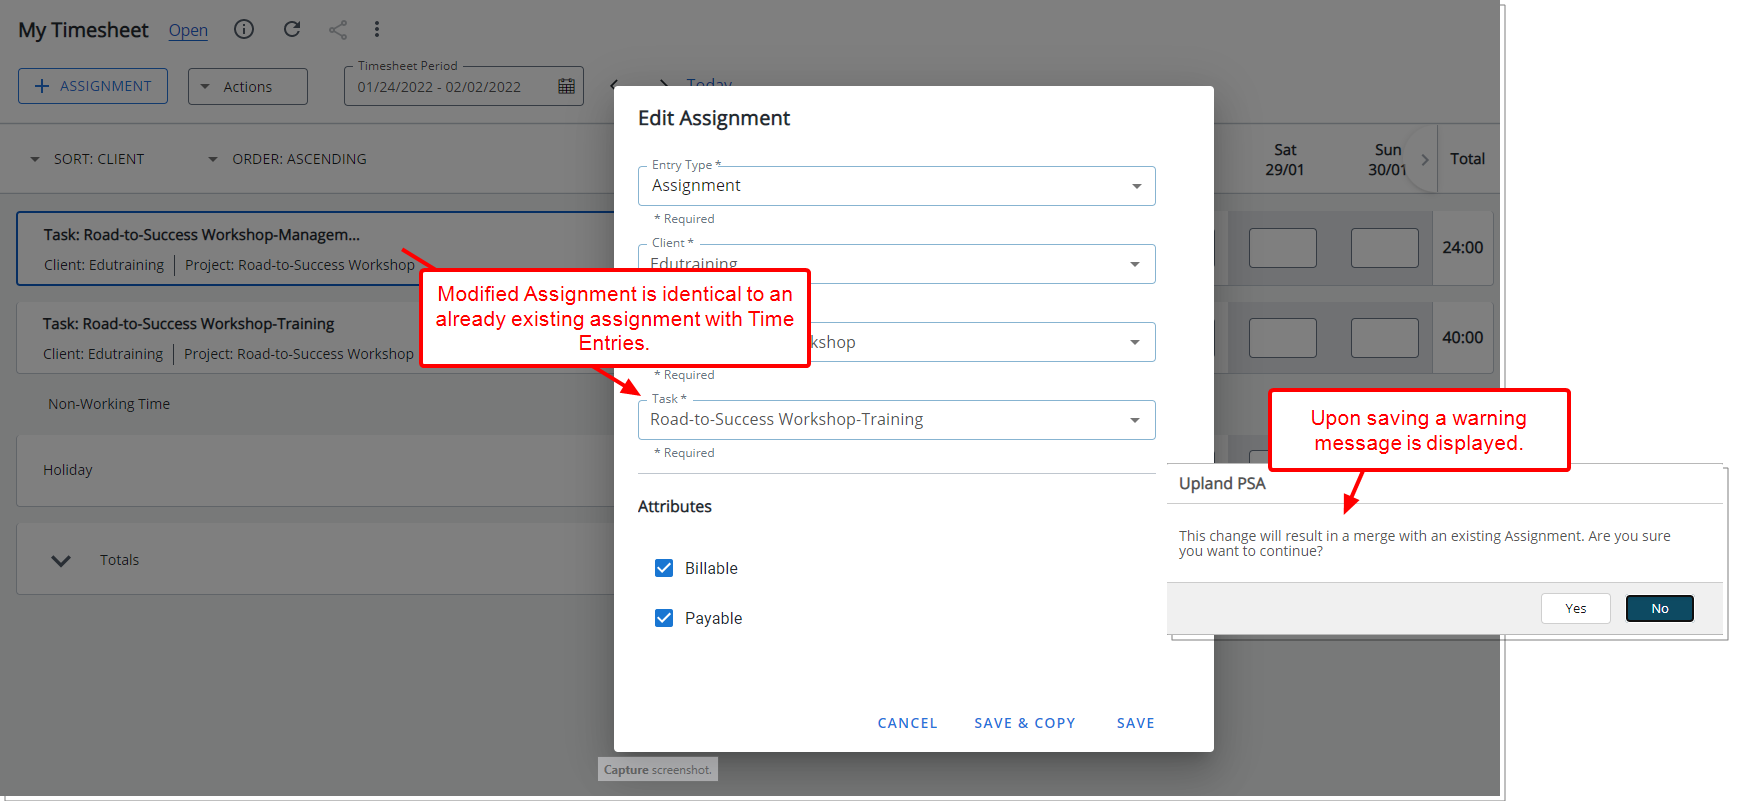
Description: A warning message is now displayed when creating an Assignment that is identical to an already existing Assignment with Time Entries, allowing you to choose to merge the two assignments or to further modify the attributes to create a distinct one.
Benefit: This improvement allows you to modify the Assignment attributes accordingly so as to avoid accidental merges of Time Entries.
Note: This improvement applies to the legacy and new My Timesheet.
For further details refer to:
- Modifying an Assignment
- Copying an Assignment
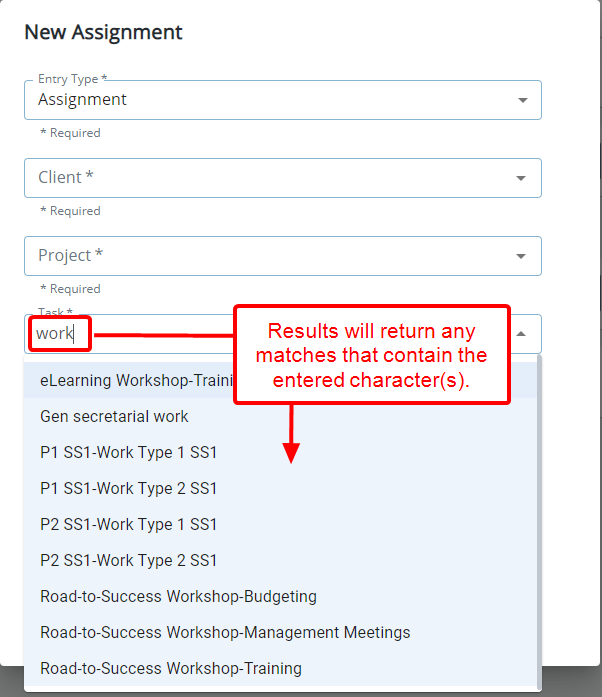
Description: The search capability when picking/modifying Assignments is now based on the "Contains In" logic, whereby results will return any matches that contain the entered character(s).
Benefit: You can now efficiently perform searches on items, such as Client, Project or Tasks, based on full or partial entries.
Note: This improvement applies to the legacy and new My Timesheet.
For further details refer to:
- Timesheet Assignments
- Picking an Assignment
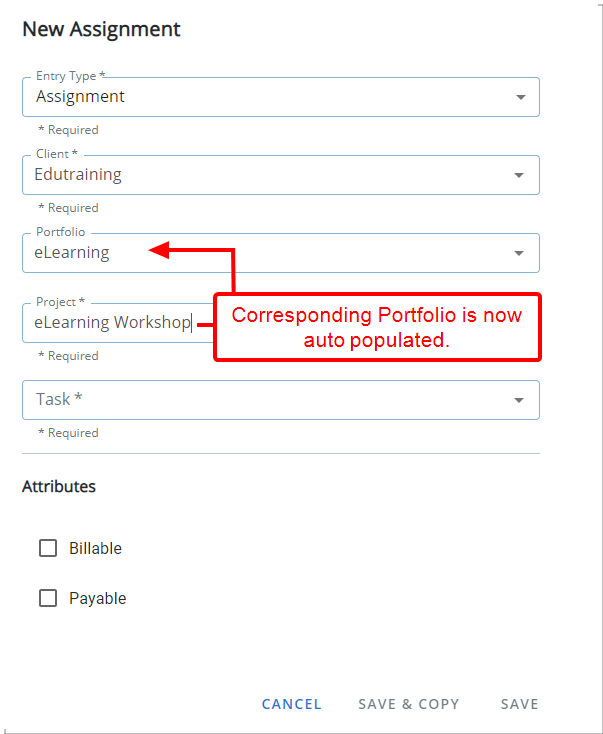
Description: Upon selecting a Project, the corresponding Portfolio is now auto populated when picking a New Assignment.
Benefit: You can now pick Assignments more efficiently without significant click-through.
Note: This improvement applies to the legacy and new My Timesheet.
For further details refer to:
- Timesheet Assignments
- Picking an Assignment
The following features are not available for this first release of the improved My Timesheet and will be available in our next iteration of this module.
- The Assignment Details will be available within the Timesheet approval status tooltip (TE-78827)
- Ability to access and view the Timesheet History page (TE-79736).
Note: The Show Timesheet History option will remain available within the Setup tab of the Timesheet Template edit page; however, it will have no effect for this first release.
- Ability to create and manage Timesheet Notes (TE-79369).
Note: The Show Notes option will remain available within the Setup tab of the Timesheet Template edit page; however, it will have no effect for this first release.
- Ability to view/create and manage Timesheet Documents (TE-79739)
- Ability to View Reports (TE-79737)
- Ability to create and manage Timesheet Assignment Notes (TE-79743)
- Ability to Approve/Reject Time Entries (TE-79750, TE-79749)
- Ability to create Overtime/Double-overtime Entries (TE-79752)
- Ability to add Banked Overtime (TE-79759)
- Ability to enter/modify ETC (TE-80130)
- Addition of the ability to sort the Assignments based on multiple levels (TE-80830)
- Ability to enter Time by using the Start/End Time functionality
- Ability to enter Time using Timesheet Punch
- The background colors chosen from:
- Setup tab, under Show Selected Days section
- Options tab:
- Display Estimate Time to Complete (ETC) in
- Display Holidays in
- Display Non-working days in
You can no longer create Assignment or Entry level Documents such as:
- Time Entry Documents
- Assignment Documents
- Attendance Documents
- Hourly Documents
The Back link has been deprecated from My Timesheet. The browser Back button can be used instead.
Time Entry and Rejection Notes no longer have a Public option. Therefore, all Notes are now by default set as Public.
The following Timesheet Template settings will no longer be supported in the New Timesheet. These settings remain in the interface to support the legacy Timesheet.
- Setup tab:
- Default new Assignment
- Show [X] of assignments
- From the Add Project Time Field dialog box: Sort Order, Width and Populate list when Timesheet is accessed settings.
Timesheet Templates
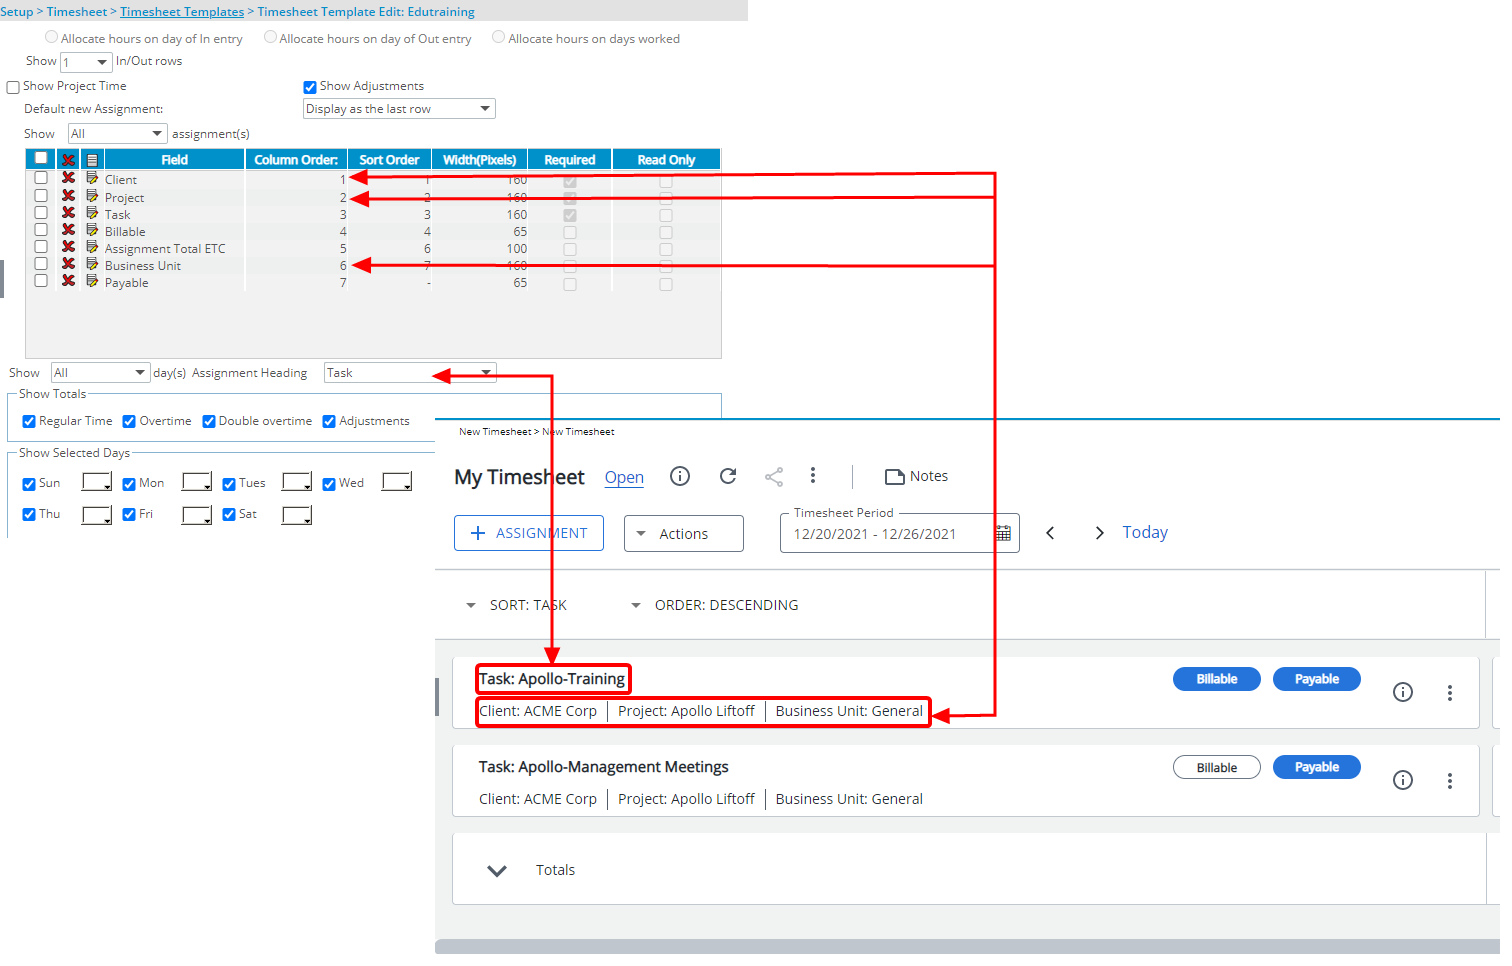
Description: The Assignment Heading option has been added to the Setup tab of the Timesheet Template where you can define the information that will be displayed on the first row of the Assignment panel within My Timesheet page.
Benefit: This addition allows you the flexibility to choose the information you wish displayed in the as the Assignment Heading.
Note: By default, Task is selected.
For further details refer to Setting up the Assignment Header.
Timesheet Workflows
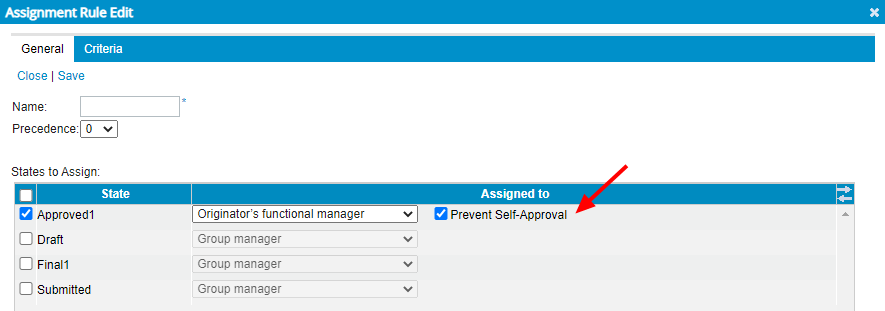
Description: A new workflow assignment option to Prevent Self-Approval has been added to Timesheet Workflows. When selected, a functional group manager’s Timesheet will be assigned to their group approval manager. In cases where their group approval manager is set as Out Of Office in PSA, the group approval alternate manager will be assigned to the State.
Benefit: This enhancement ensures that the Functional Group manager and the organization maintain integrity and compliance.
For further details refer to Preventing Originator’s Functional manager from approving their own Timesheet.
Upland Analytics
Description: Adjustments entered through the Work plan are now reflected in Upland Analytics reports through the Financial Planner and Financial Planner Combined Data Sources.
Benefit: This information is now readily available through Upland Analytics.
For further details refer to:
- The Financial Planner Data Source and related views
- The Financial Planner Combined Data Source and related views
Description: Improvements have been made to the Synchronize Integrations Automation Service whereupon removing a User’s Upland Analytics (Upland Analytics Read Only or Upland Analytics Read Write) permission will result in the removal of the User from Upland Analytics database when the Service is run.
The reports created by this User will continue to be available for other Users accessing Upland Analytics (Provided they have the permission to do so).
Note: If a user is removed from the database by mistake and then added again, they will no longer be able to access previous Subscriptions and shared Folders/Reports.
For further details refer to Granting Read and Write access to Upland Analytics.
Description: The following Views are now available through the Organization Data Source:
User Workflow Role Associations View allowing you to report on the following Fields:
- User Workflow Role
- User Workflow Role Association
User Company View allowing you to report on the following Fields:
- User Company
- User Company Currency
- User Company Id
User Team View allowing you to report on the following Fields:
- User Team
- User Team Id
- User Team Is Active
- User Team Leader (Last Name, First Name)
Approval Group Approvers View allowing you to report on the following Fields:
- First Name
- Last Name
- User Name
Functional Group Approvers View allowing you to report on the following Fields:
- First Name
- Last Name
- User Name
Resource Group Approvers View allowing you to report on the following Fields:
- First Name
- Last Name
- User Name
Benefit: With the addition of these new Views, you now have access to more Fields to report on.
For further details refer to The Organization Data Source and related views.
Description: The User Associated Calendar View with the following Fields has been added to the Organization and User Scheduling Data Sources:
- User Calendar
- User Calendar Association Start Date
- User Calendar Association End Date
- User Calendar is Current
Benefit: With the addition of the new View, you now have better visibility on a User’s Calendar.
For further details refer to:
- The Organization Data Source and related views
- The User Scheduling Data Source and related views
Description: The User Out of the Office Field has been added to the Organization and Work Data Sources and can be found within the User View.
Benefit: You can now report on the Out of the Office status of a User.
Note: You can manually add the User Out of the Office Field to all Data Sources that contain the User View by updating the Schema in Upland Analytics.
For further details refer to:
- The Organization Data Source and related views
- The Work Data Source and related views
Description: The following Views are now available through the Work Data Source:
- User Company View allowing you to report on the following Fields:
- User Company
- User Company Currency
- User Company Id
- Project Security Access View allowing you to report on the following Fields:
- Project Security First Name
- Project Security Last Name
- Project Security User Name
Benefit: With the addition of these new Views, you now have access to more Fields to report on.
For further details refer to The Work Data Source and related views.
Description: The following Views are now available from the User Scheduling and Project Scheduling Data Sources:
- User Target Utilization
- Group Target Utilization
Benefit: You can now report on the User or Group Target Utilization.
For further details refer to:
- The User Scheduling Data Source and related views
- The Project Scheduling Data Source and related views
Description: The following Views are now available from the Timesheet Data Source:
- Master Site (Master Site and Master Site Id Fields)
- Active Site (Active Site and Active Site Id Fields)
Benefit: You can now report on the Master and/or Active Site Name/Id of a User’s Timesheet.
For further details refer to The Timesheet Data Source and related views.
Description: The Time Entry Note Type Field has been added to the Timesheet Data Source and can be found within the Time Entry Basic View.
Benefit: You can now report on the Time Entry Note Type.
For further details refer to The Timesheet Data Source and related views.
Description: The Milestone Charge Item Name Field has been added to the Milestone Task Association Data Source and can be found within the Milestone View.
Benefit: You can now report on the project Milestone Charge Item Name even if the milestone is not completed.
Note: You can manually add the Milestone Charge Item Name Field to all Data Sources that contain the Milestone View by updating the Schema in Upland Analytics.
For further details refer to The Milestone Task Association Data Source and related views.
Description:
- The Expense Report Receipt Count Field has been added to the Expense Data Source and can be found within the Expense Report Summary View.
For further details refer to The Expense Data Source and related views. - The Timesheet Document Count Field has been added to the Timesheet Data Source and can be found within the Timesheet Summary View.
For further details refer to The Timesheet Data Source and related views.Note: You can manually add the Timesheet Document Count Field to all Data Sources that contain the Timesheet Summary View by updating the Schema in Upland Analytics.
Benefit: You can now report the number of Expense Report Receipts and Timesheet Document attachments through Upland Analytics.
Description: The following Views are now available from the Invoice Data Source:
- Invoice Notes
- Invoice Notes Created By User
- Invoice Notes Modified By User
Benefit: You can now report on the Invoice Notes.
For further details refer to The Invoice Data Source and related views.
Description: The Client Contact View with the following Fields has been added to the Work Data Source:
- Client Contact (Last Name, First Name)
- Client Contact Can Logon
- Client Contact Email
- Client Contact Is Approval
- Client Contact Is Billing
- Client Contact Is Work Processes
- Client Contact Title
- Client Contact Mobile
- Client Contact City
- Client Contact Country
Benefit: With the addition of the new View, you now have better visibility on Client Contacts.
For further details refer to The Work Data Source and related views.
Description: The following Views are now available from the Project Scheduling Data Source under the Project Allocation Summary View:
- Project Allocation Note
- Project Allocation Note Type
Benefit: You can now report on Project Allocation Notes.
For further details refer to The Project Scheduling Data Source and related views.
Description: New Fields are now available through the Expense Data Source and are available under the:
- Expense Entry Basic View:
- Expense Entry Payable Amount in Client Curr
- Expense Entry Non Billable Amount in Client Curr
- Expense Report Summary View:
- Expense Report Payable Amount in Client Curr
- Expense Report Non Billable Amount in Client Curr
Benefit: You can now report on the Expense Entry/Report Payable/Non-Billable Amounts in Client Currency.
For further details refer to The Expense Data Source and related views.
Description: New Fields are now available through the Financial Planner Combined Data Source and are available under the:
- Financial Planner Combined Detail View:
- Total Expense Cost Amount In Base Curr
- Total Expense Cost Amount In Client Curr
- Total Expense Cost Amount In Project Curr
- Financial Planner Combined Summary View:
- Total Actual Expense Cost Amount In Base Curr
- Total Actual Expense Cost Amount In Client Curr
- Total Actual Expense Cost Amount In Project Curr
- Grand Total Expense Cost Amount In Base Curr
- Grand Total Expense Cost Amount In Client Curr
- Grand Total Expense Cost Amount In Project Curr
Benefit: You can now report on the Expense Cost Amount in Base, Client or Project Currencies.
For further details refer to The Financial Planner Combined Data Source and related views.
User Defined Fields
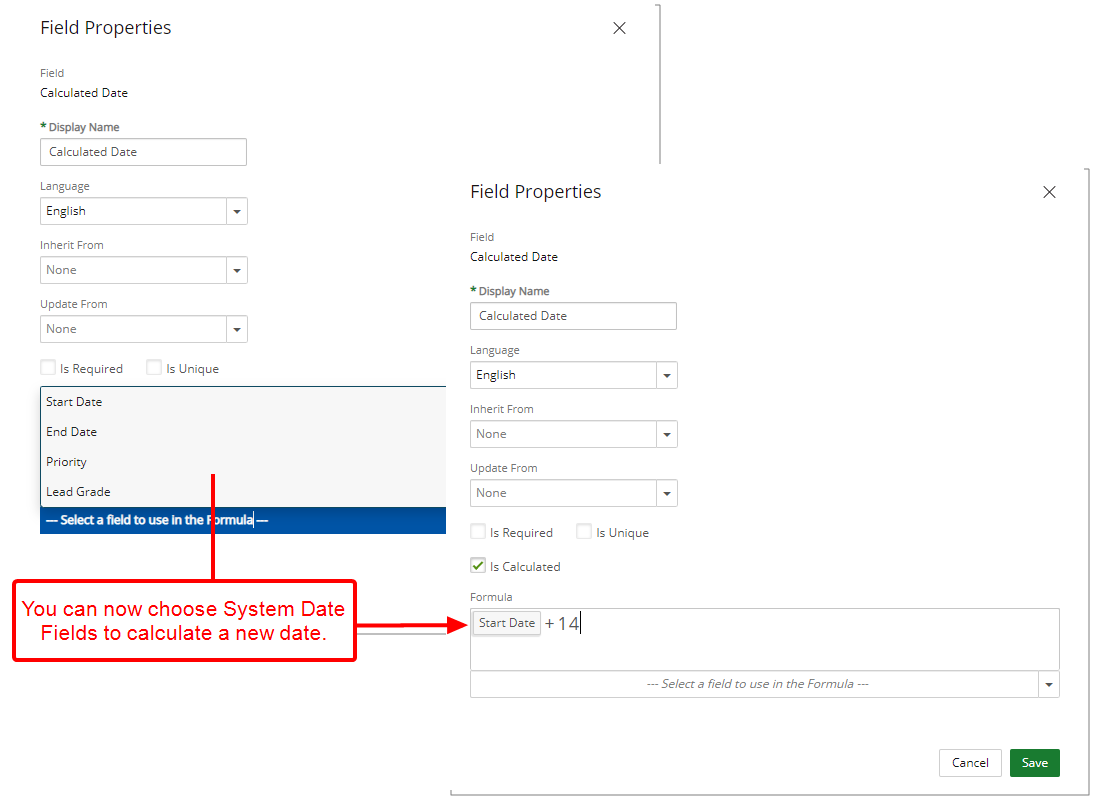
Description: User Defined Fields of Type Edit Field of Date type now support addition and subtraction calculations to calculate a new date with System Date Fields such as Project Start Date.
Benefit: The applicability of Calculated User Defined Fields has been expanded to now allow use of System Date Fields as part of your calculation.
Note: You can use calculated User Defined Field of type Integer or Number with the subtraction operator only.
For further details refer to Calculated User Defined Fields based on Date Field.
User Settings
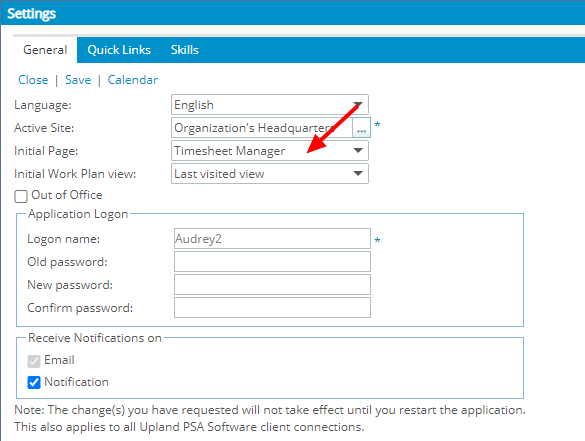
Description: From the General tab of User Profile Settings, you can now choose to display the Timesheet Manager page as your Initial Page to be displayed upon logging into the PSA application.
Benefit: With this addition, you can now quickly and easily view and Action on Time Entries against your Projects without the need to first navigate to the Timesheet Manager page.
For further details refer to:
- User Settings
- Choosing a specific Home page to display upon logging in
Deprecated/unsupported Functionality
As of this release the Timesheet Approval by Projects Home page will no longer be available.
The option to select this Home page has been removed from the Initial Page list, accessed through the General tab of User Settings.
Note: The Assigned Timesheets by Project View of the Timesheet Manager page replaces the Timesheet Approval by Projects Home page. You can select the Timesheet Manager as your Initial Page with a Default View set to Assigned Timesheets by Project.