PSA 2022 R2.0 - Product Enhancements
Below is a summary of the features included in PSA 2022 R2.0
- Audit Trail
- Automation
- Expense
- Global Search
- Import (Excel)
- Mobile
- Notifications
- Project Status Reporting
- Resource Management
- REST API/SDK
- Timesheet
- Timesheet Templates
- Timesheet Workflows
- User Defined Fields
- Upland Analytics
- Work Breakdown Structure (WBS)
- General
- Deprecated/Unsupported Functionality
Click here to watch the PSA 2022 R2.0 feature summary video.
2022.10.11.2022R2.0.V1.EB
Note: This page could be updated as new information becomes available.
Audit Trail
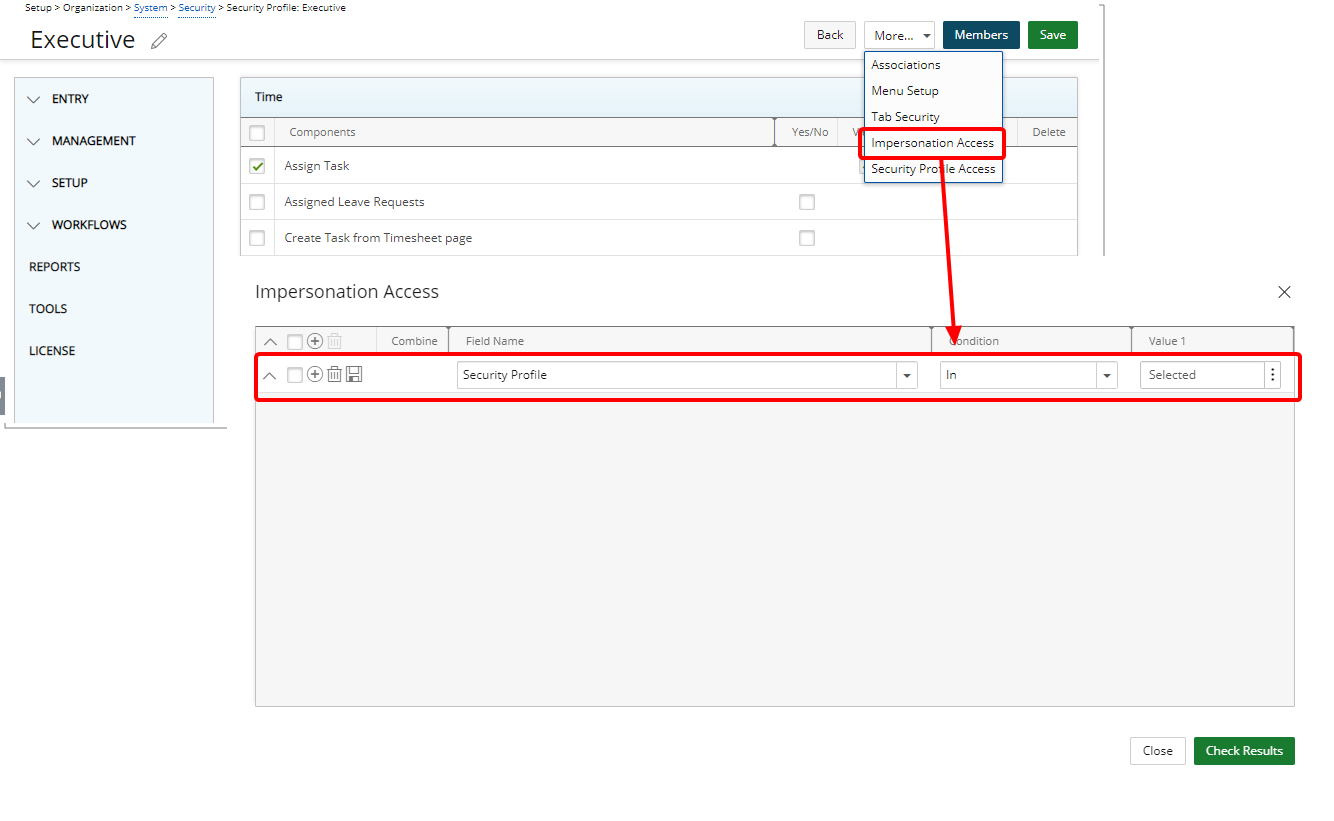
Description: The new Impersonation Access option is now available through the More… context menu of a User Security Profile. You can choose the Approval Group, Functional Group, Master Site, Security Profile and User that current User Security Profile can impersonate.
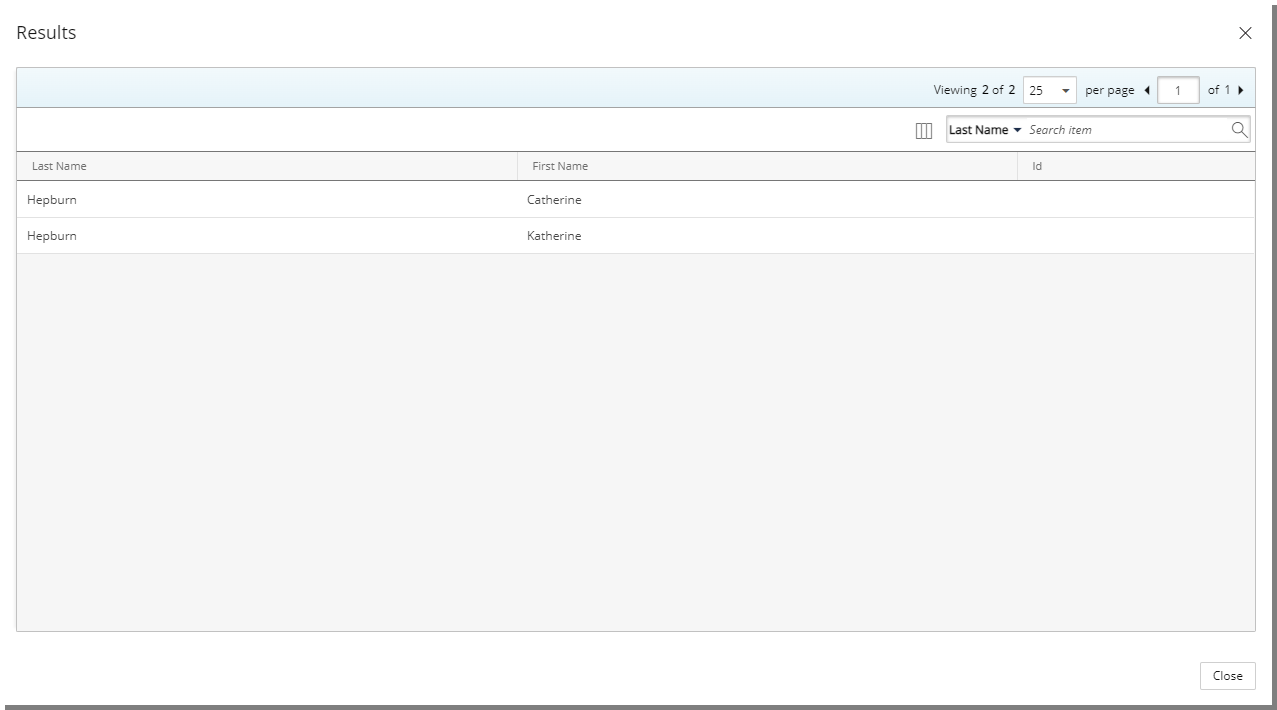
Upon saving, you can then verify the results of your selection(s) by clicking the Check Results button. The page lists the Users meeting the selected criteria. From the results page you can search the list based on Last Name, First Name and Id.
By default, the following columns are displayed: Last Name, First Name and Id. You can choose to include the Active Site, Functional Group, Resource Type and Security Profile columns.
Benefit: With this addition you now have a granular control over the Impersonate feature.
Use case: Adam the administrator is tasked to give the Executive Security Profile the right to impersonate Users within the Project Manager Security Profile. He can now easily accomplish this task by giving the Account Manager Security Profile the right to Impersonate the Project Manager Security Profile from the Impersonation Access dialog box.
Fur further details refer to:
- Using Impersonation
- Limiting a Security Profiles' impersonation right
Description: Two new Event Types are now available from the Audit Trail:
- Impersonation Start
- Impersonation End
Furthermore, you can view all the actions that were made by impersonating another user. The name of the User Impersonating is displayed within the newly added Impersonated By column.
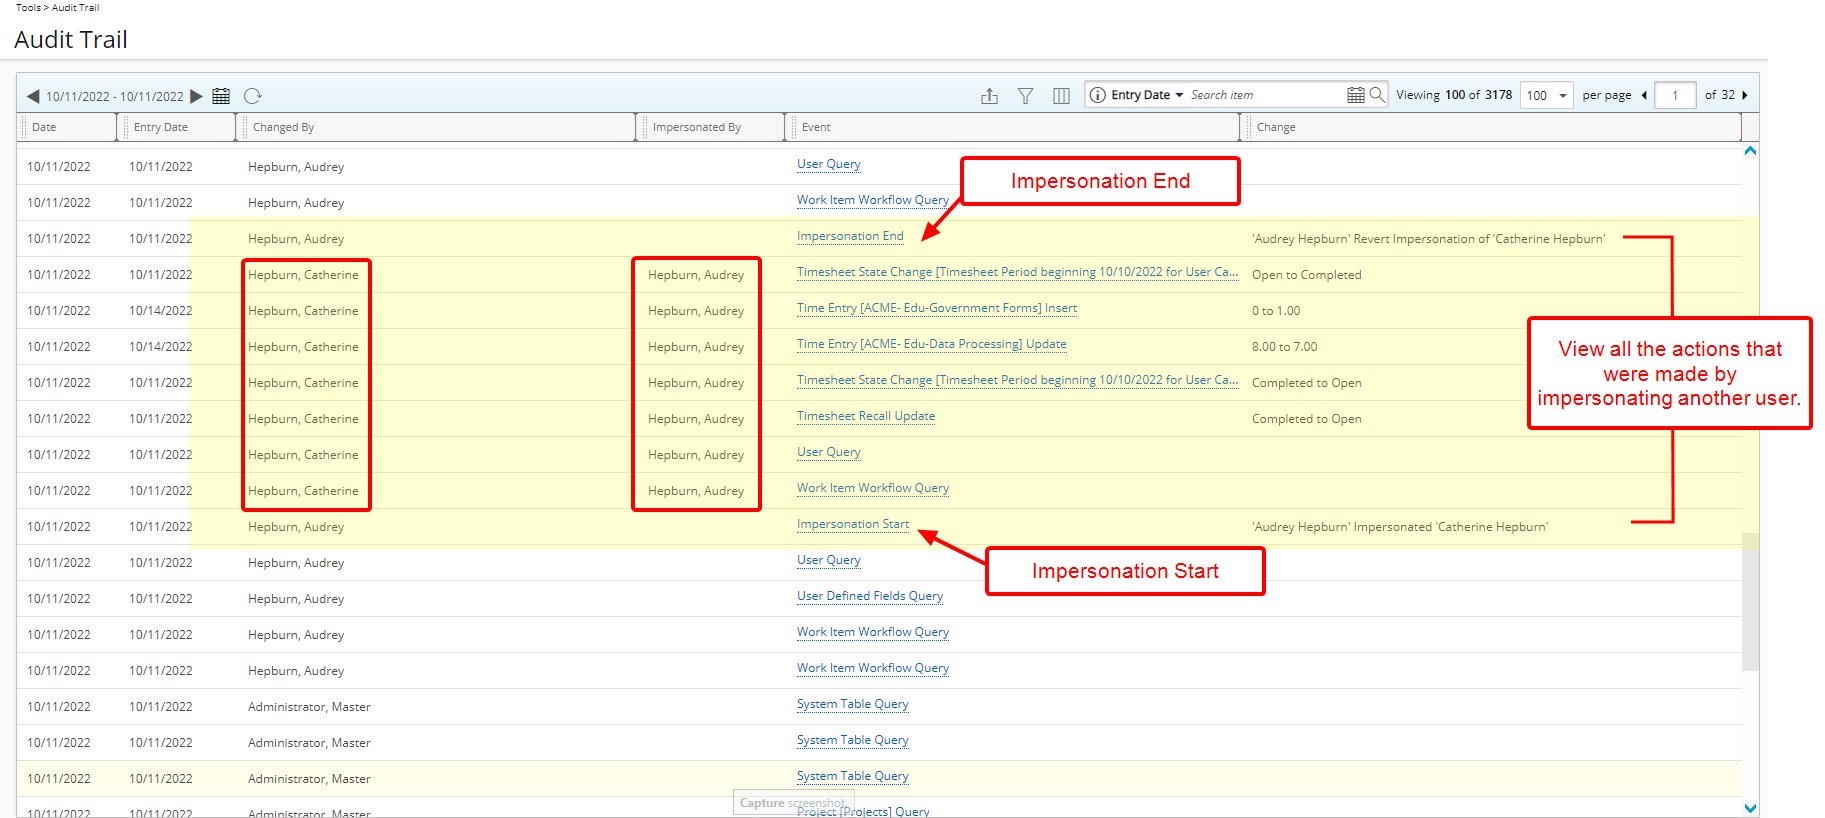
Note: Impersonation is audited by default.
Benefit: Previous values of any changed properties made while Impersonating a User can be viewed/verified, should a question/concern arise as a result.
Use case: Thomas, the system administrator, is tasked to verify what changes were made by Audrey while impersonating Catherine. He can now navigate to the Audit Trial (Tools) and view any modifications made by Audrey while impersonating Catherine. The Impersonation Start and End Event mark the beginning and ending of the impersonation. Any actions that were made by Audrey are listed in detail.
For further details refer to Impersonation Start/End - Auditing
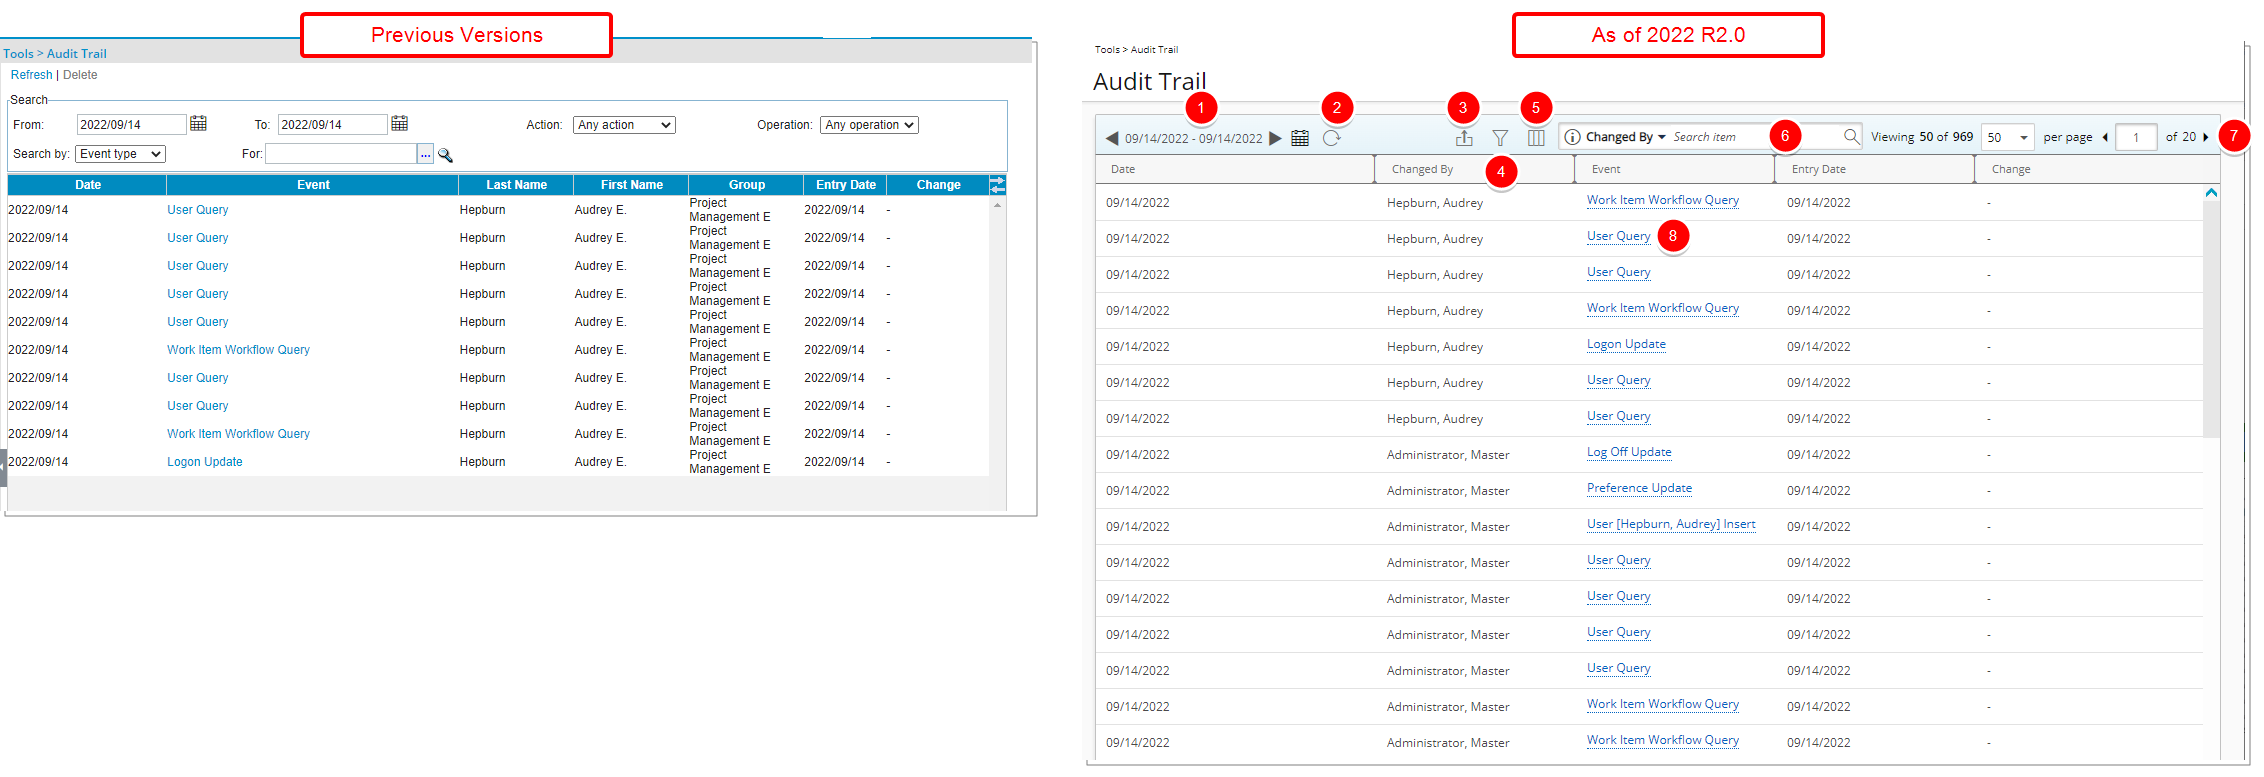
Description: The user interface of the Audit Trail list page (Tools > Audit Trail) has been improved for better user experience and consistency with the other updates that have been made thus far.
The following enhancements have also been made:
- The To and From date pickers are now combined into one. Upon clicking the calendar button, you can then choose a date range.
- The Refresh link is now a button.
- You can now Export the list to Excel.
- Advanced filtering based on the following Fields is now available: Action, Change, Changed By, Changed For, Date, Entry Date, Event Type, Impersonated By, Item Name and Operation.
- Addition of Column Selection capability: By default, the following columns are displayed: Date, Changed By, Event, Entry Date, Change and Impersonated By.
- Addition of “contains in” logic Search capabilities, with the following available search criteria: Changed By, Event Type, Entry Date, Change and Impersonated By.
- Pagination is available at the top right corner to facilitate easy navigation across multiple pages.
- Clicking on any Event, now opens the Event Details dialog box.
For further details refer to Audit Trail events
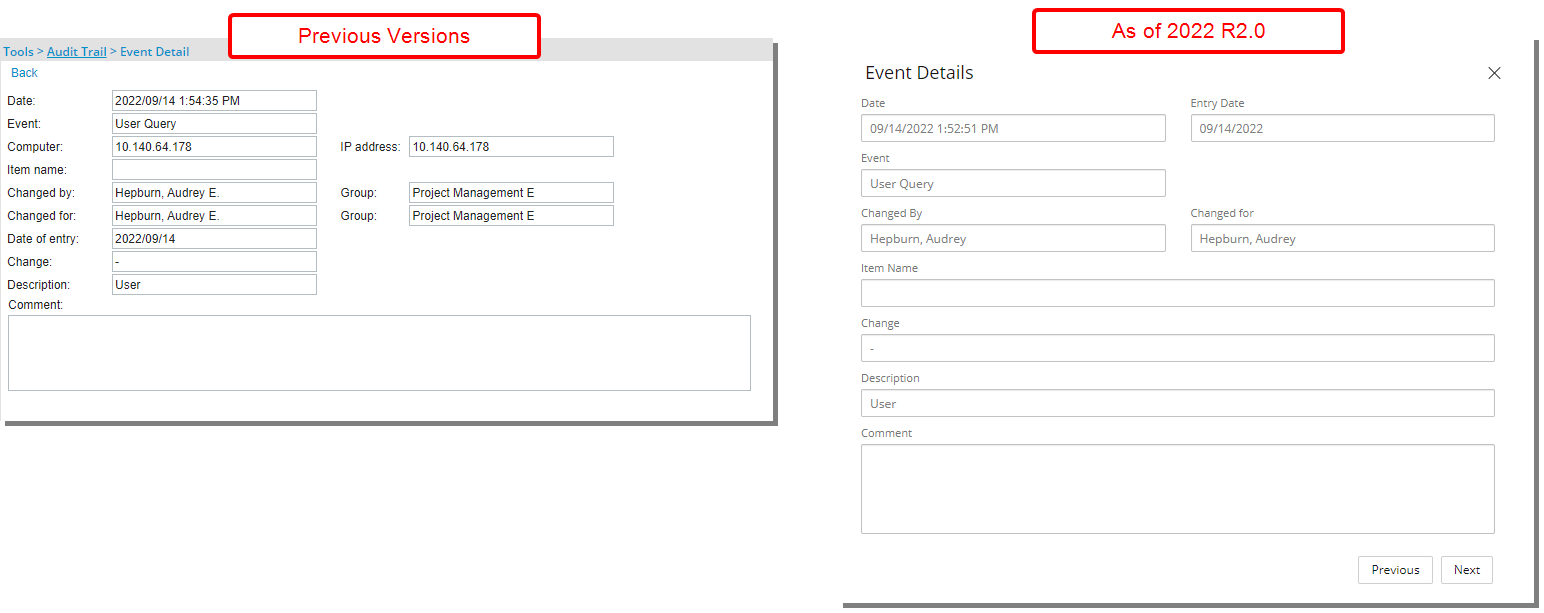
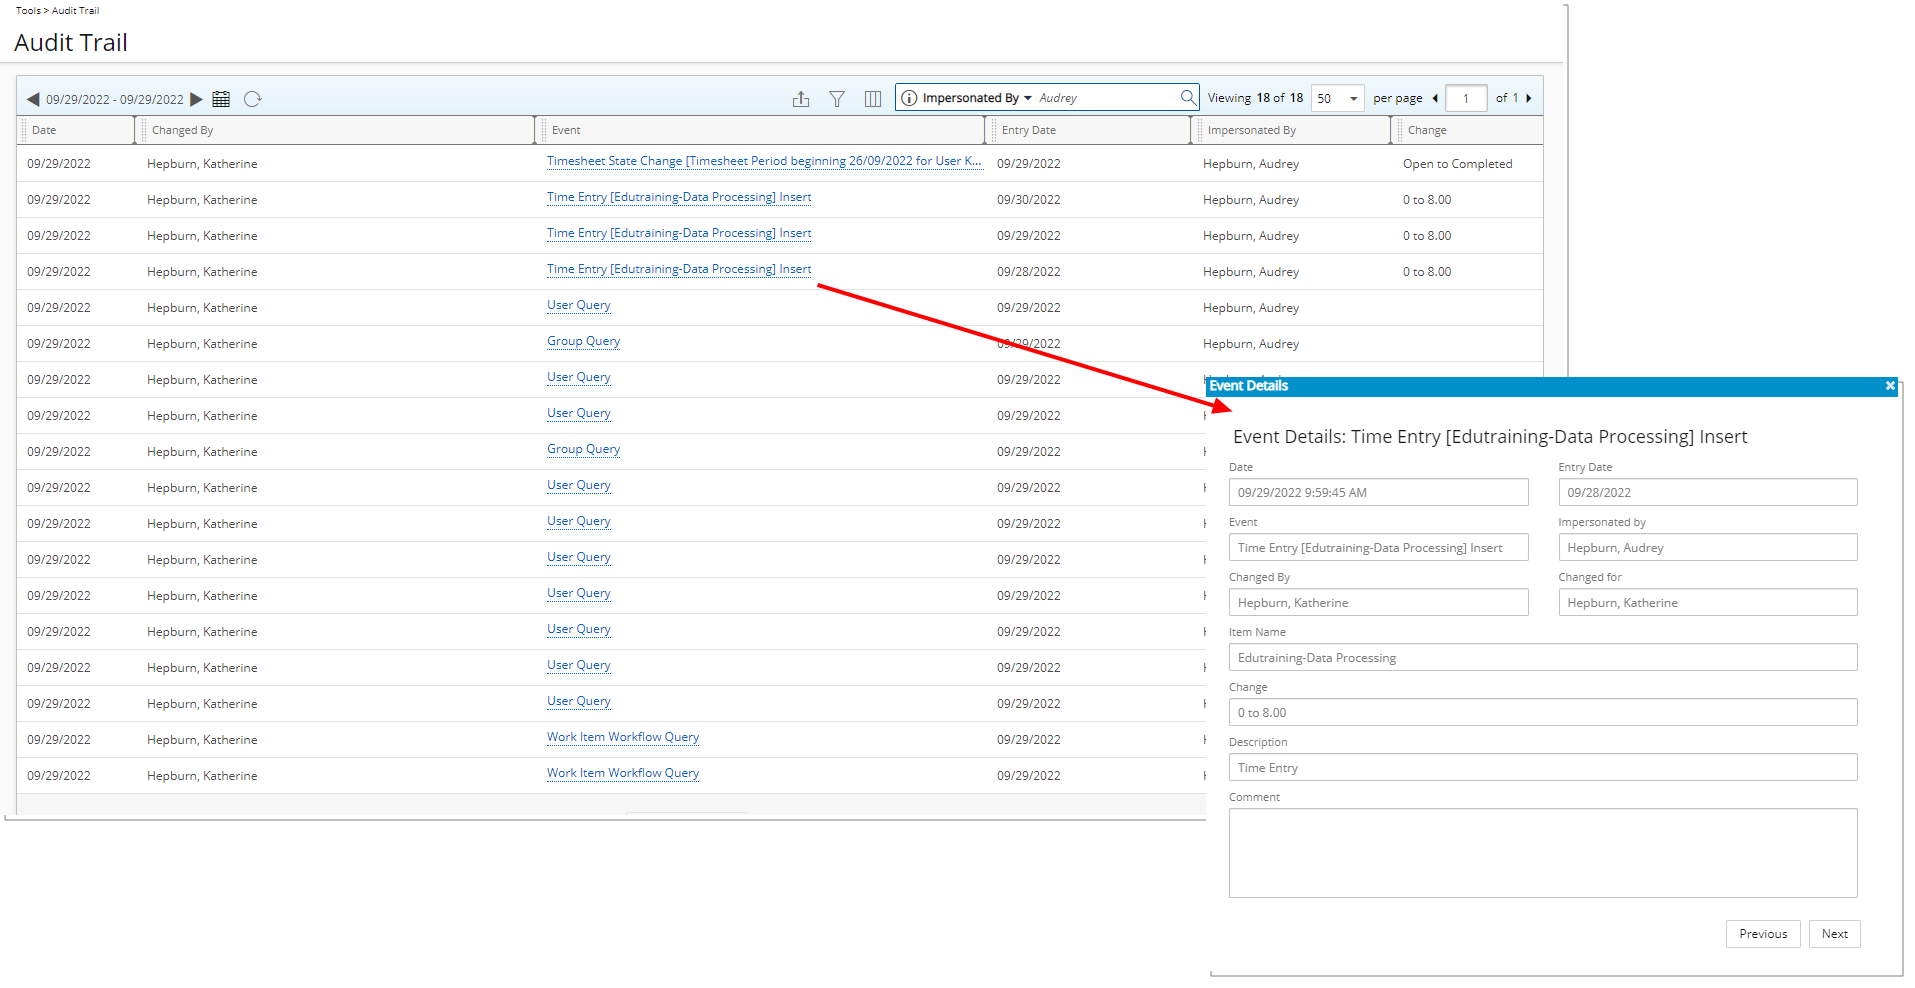
Description: In addition to the improvements made to the overall look and feel of the Audit Trail Event Details page, accessed when viewing the details of an Audit Trail Event, these improvements have also been made:
- Date of Entry has been renamed to Entry Date.
- The Computer, IP address, Changed by Group and Changed for Group have been deprecated and are no longer available as of this release.
- You can use the Previous and Next buttons to navigate between the listed Events directly from the Event Details dialog box.
Benefit: With these modifications, the look and feel are further improved, as well in keeping with the UplandOne mindset, wherein the layout of various elements within the page supports the unified experience across Upland products. Consequently, the user experience is further elevated.
For further details refer to Audit Trail Event Details
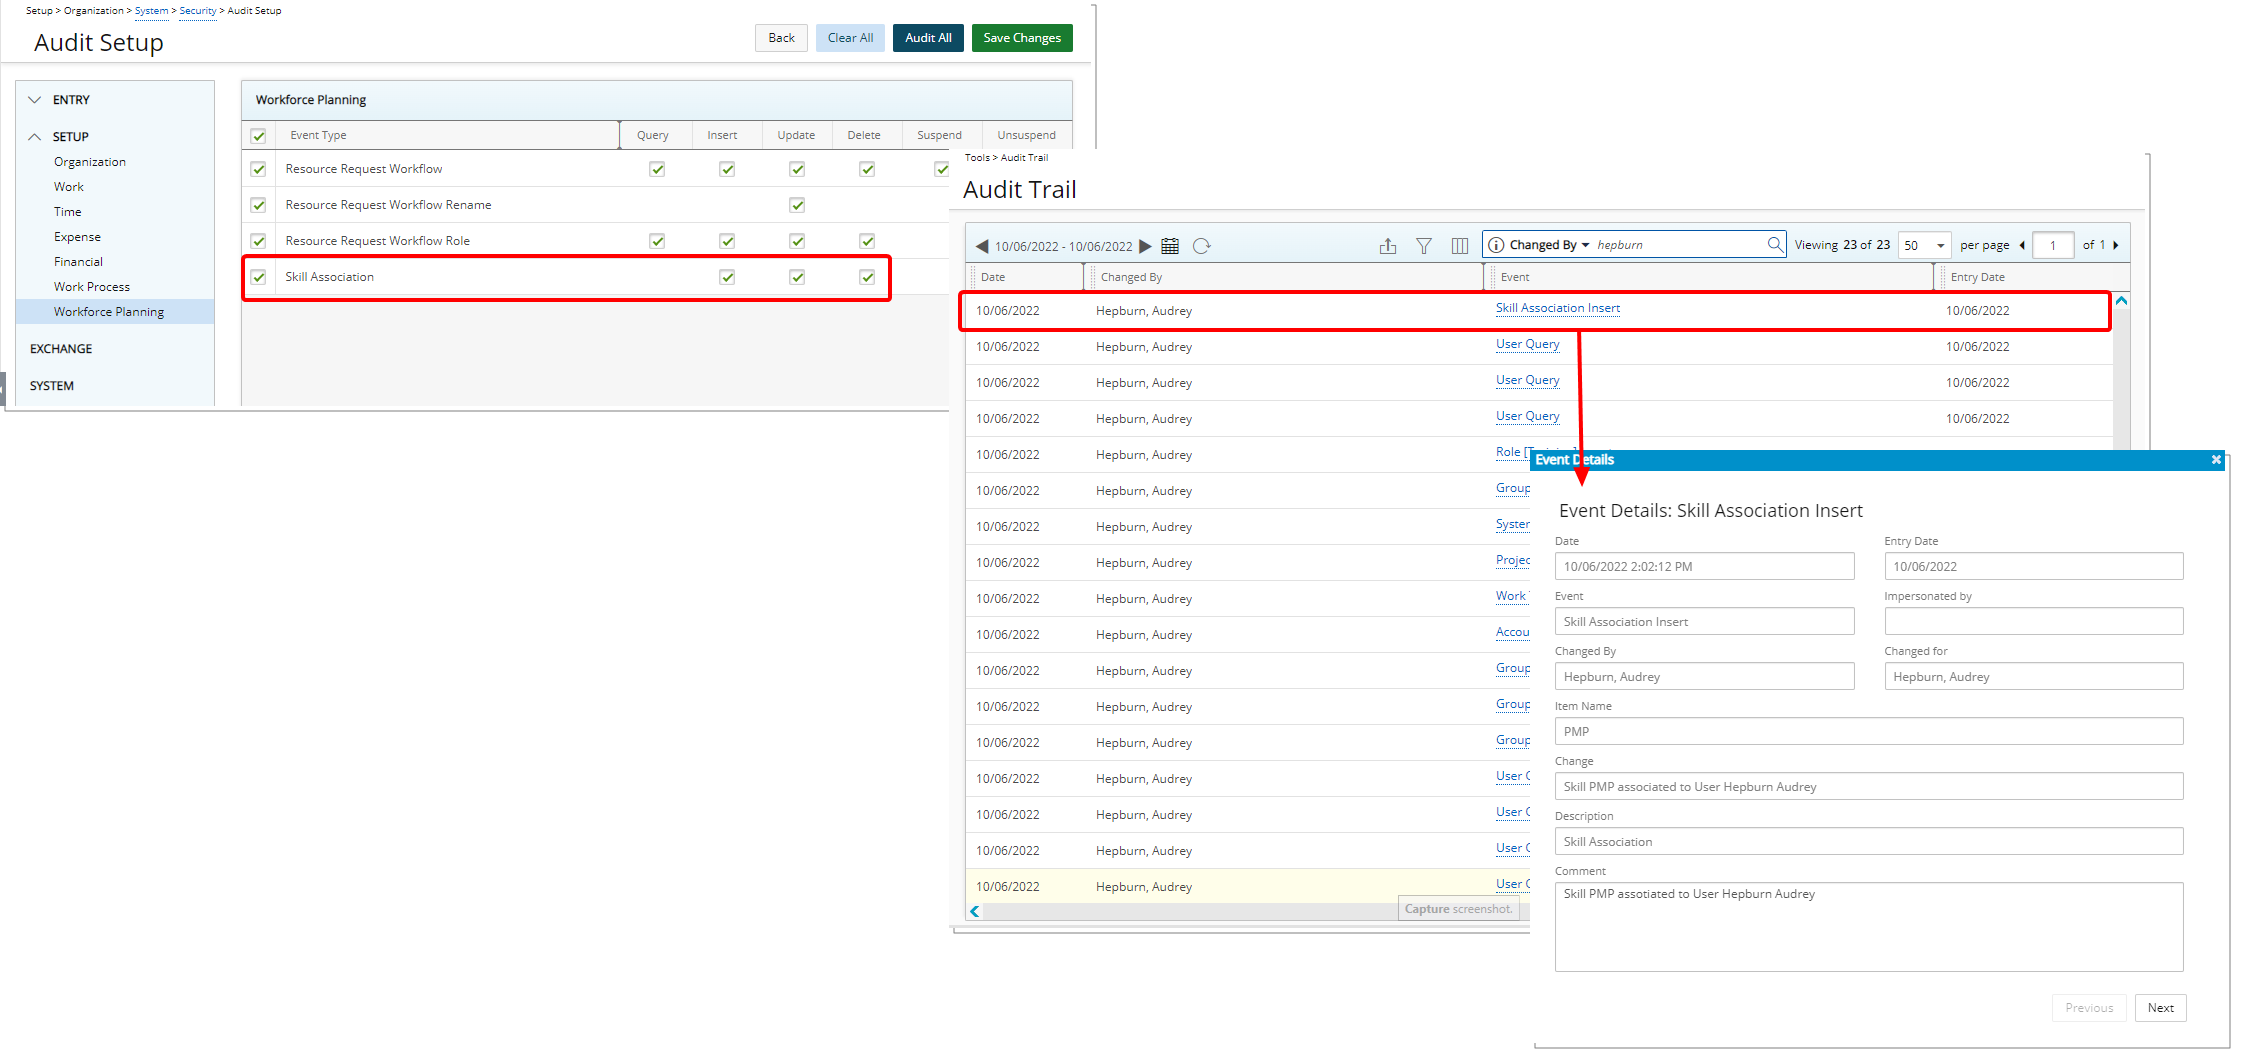
Description: The new Skill Associations option is now available under Setup > Workforce Planning menu of the Audit Trail (Setup > Organization > System > Security > Audit Setup).
The following options are available: Insert, Update, Delete.
Benefit: This addition allows you to track changes made to the Skill Associations.
For further details refer to Auditing Skill Association
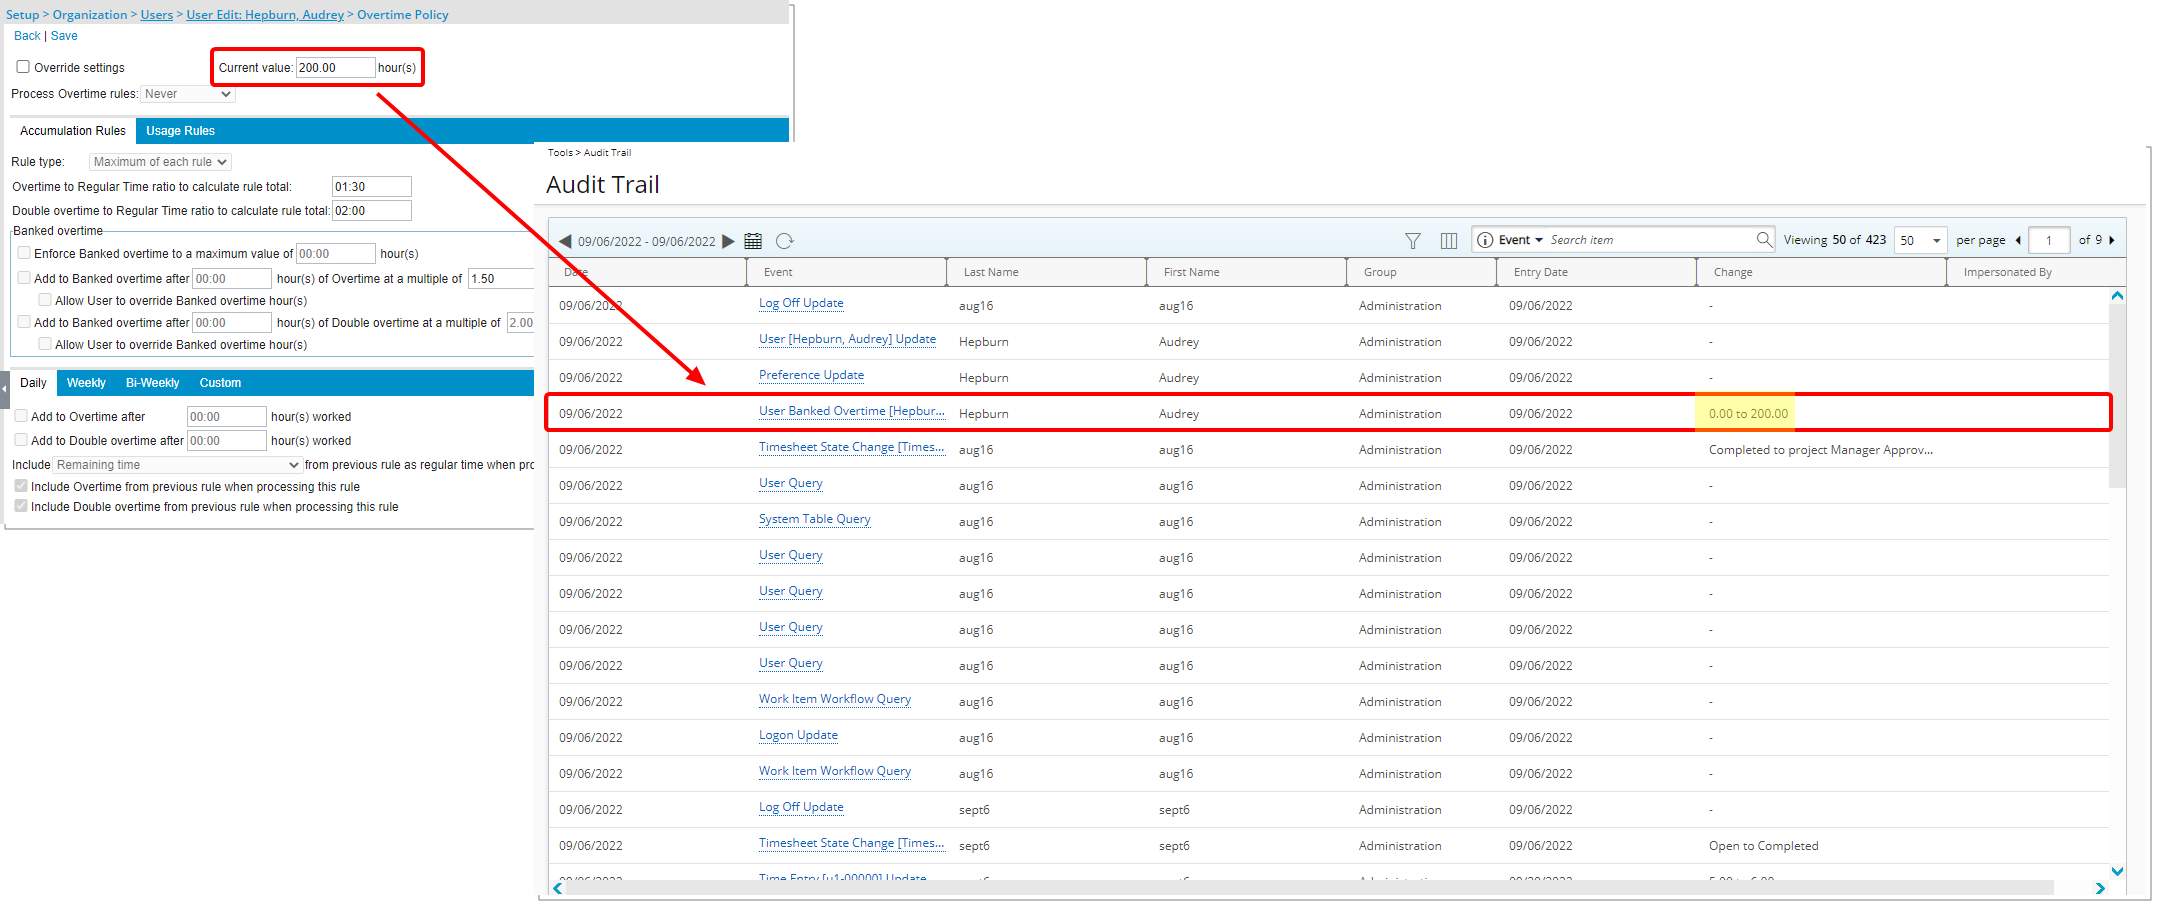
Description: The auditing of the User Banked Overtime located under the Setup > Organization menu of the Audit Trail (Setup > Organization > System > Security > Audit Setup) has been improved. The date, old value and new value of modifications made to the banked overtime Current value setting (Setup > Organization > Users > User Edit > Entry Options tab > Overtime Policy) are now tracked.
From the Audit Trail you can view it under User Banked Overtime [User Last name, First name] Update.
Benefit: With this improvement, any modifications to the Current value can be tracked.
For further details refer to Auditing of changes made to User Banked Overtime
Automation
The Automation Processing Options and the Service edit pages have undergone User Interface (UI) and User Experience (UX) improvements, all intended to further enhance and update the overall look and elevate the user's experience. The upgraded interface, buttons, column selection, tabs and search all fall in line with the enhanced Upland standards.
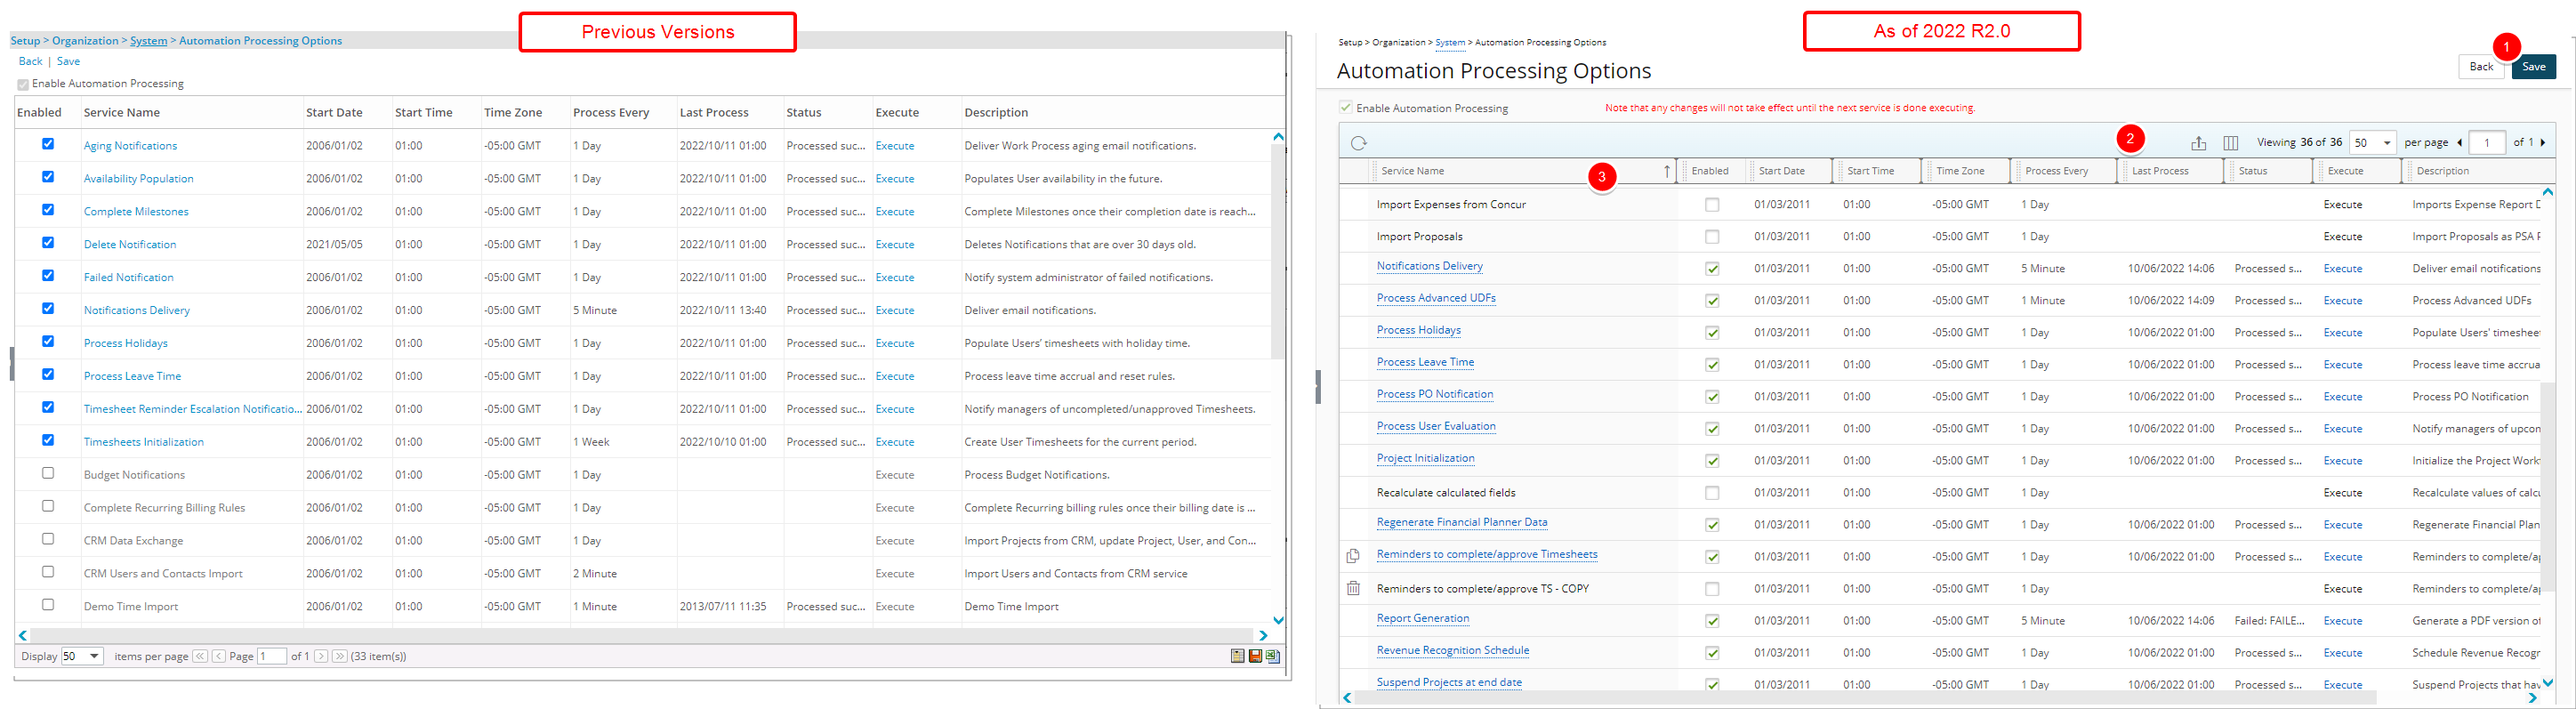
The Automation Processing Options page has been redesigned to improve overall user experience and establish consistency across all pages.
Furthermore, the following modifications have also been made:
- The Back and Save links are converted to buttons and moved to the top right corner of the page.
- The Export to Excel, Column Selection and Pagination are moved above the table.
- From the table header:
- You can easily sort the columns by ascending or descending order simply by clicking a column header. Note that an arrow indicates the descending (
 ) or ascending (
 ) order applied to the column.
 - You can now dynamically resize column(s), to your preferred width. Simply move your cursor to the column boundary
 you want to resize. When the cursor becomes a resize cursor, click and drag the column accordingly.
 - Click
 and move a column to the desired position.
- You can easily sort the columns by ascending or descending order simply by clicking a column header. Note that an arrow indicates the descending (
For further details refer to Automation Setup (OBS)
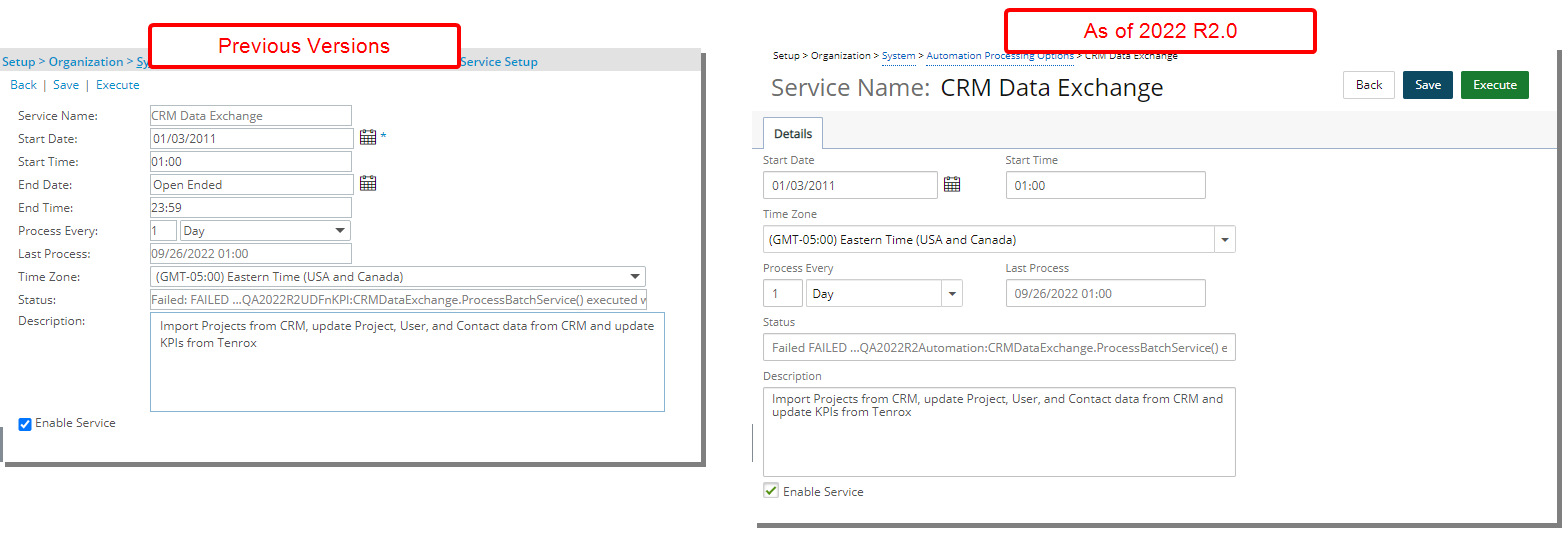
Description: The Automation Processing Service Edit page has been redesigned to improve overall user experience and establish consistency across all pages.
Furthermore, the following modifications have also been made:
- The Service Name has been moved to the page header
- The End Date and End Time are no longer available
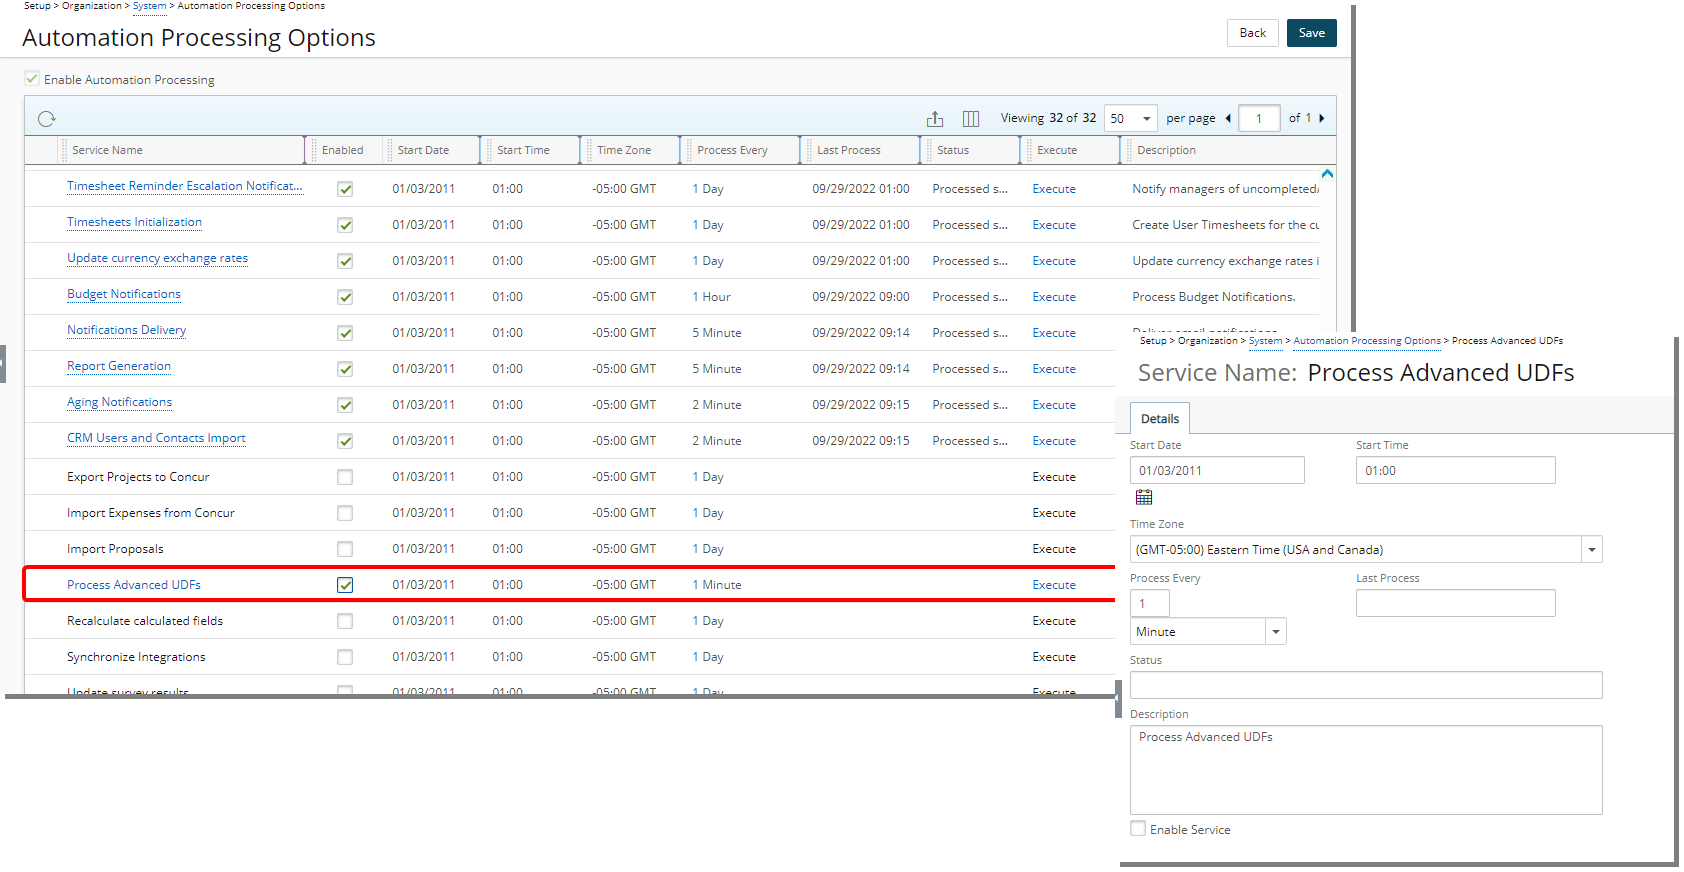
Description: The newly added Process Advanced UDFs Automation Service (Setup > Organization) is disabled by default. You can enable it to process the Advanced User Defined Fields.
For further details refer to Process Advanced UDFs Automation Service.
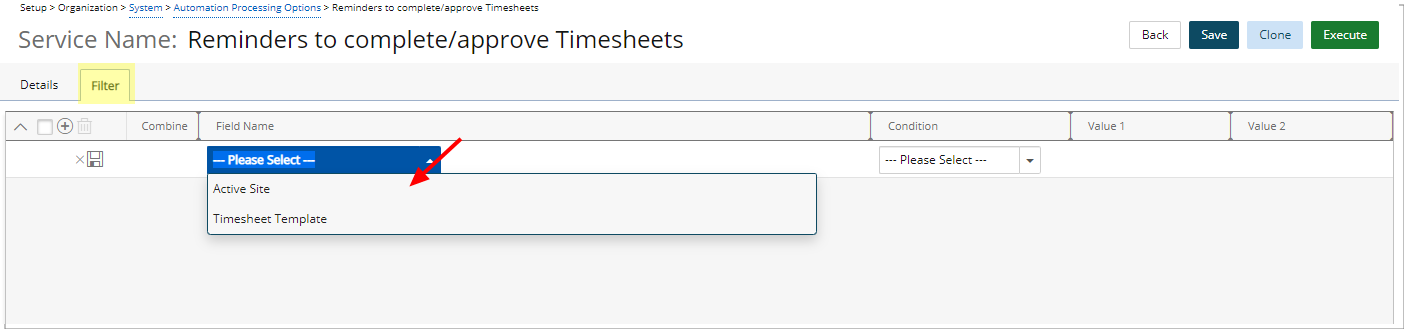
Description: From the newly added Filter tab, available through the Reminders to complete/approve Timesheets Automation Service edit page you can now set filters based on the required Active Site or Timesheet Template.
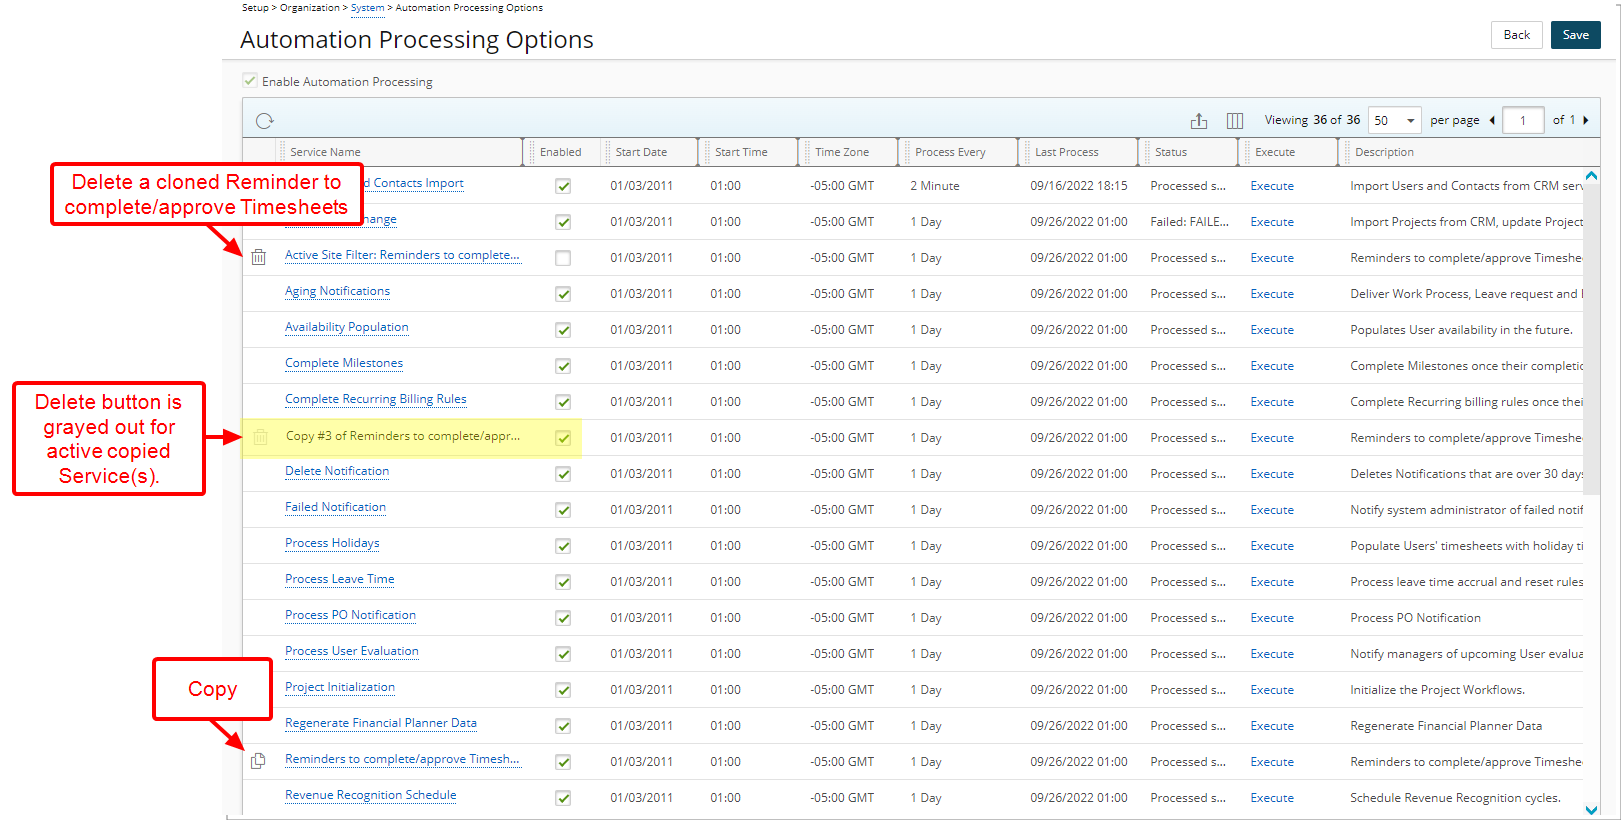
Furthermore, you can now clone the Reminders to complete/approve Timesheets Automation Service and set Filters based on your organizational needs.
Note:
- Only a copy of a Reminders to complete/approve Timesheets Automation Service can be deleted.
- You must disable the Service before deleting it.
- A logged User is shown the Service Name in their language and can only update that of their language. This allows you to have a distinct Service Name in French and English.
For further details refer to Reminders to complete/approve Timesheets Automation Service
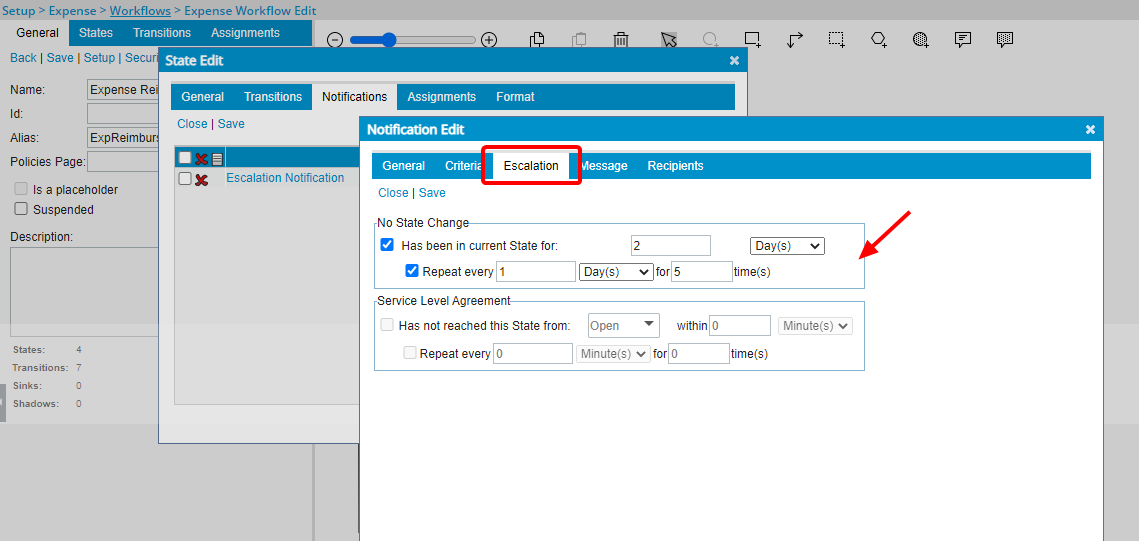
Description: A new Escalation tab is now available from the Expense Report Workflow State edit page where you can define custom criteria for aging Notifications.
You can define either one of the following escalations based on:
No State Change:
- Select Has been in current State for <x> <Minute(s)/Hour(s)/Day(s)/Week(s)/Month(s)> to define the length of time that an Expense Report must be in the current State before the Notification(s) are sent
- Then choose Repeat every <x> <Minute(s)/Hour(s)/Day(s)/Week(s)/Month(s)> for <x> time(s) to define the frequency of the notification(s)
Service Level Agreement:
- Choose Has not reached this State from: <all state names except current state> within <x> <Minute(s)/Hour(s)/Day(s)/Week(s)/Month(s)> to define the length of time that the Expense Report must have reached the State before the notification(s) are sent
- Then select Repeat every <x> <Minute(s)/Hour(s)/Day(s)/Week(s)/Month(s)> for <x> time(s) to define the frequency of the notifications
Benefit: Selected Users will receive Notifications when the custom-defined period has elapsed so that they action upon an aging Expense Report.
Use case: The system administrator Audrey is tasked to configure PSA so that aging notifications are sent to the approval manager when an Expense Report is in a submitted state for more than two days. She can now navigate to the Escalation tab of the Expense Report Workflow State edit page, select Has been in current State for 2 Days, then define the frequency of the notification(s).
For further details refer to Setting up Expense Workflow Notifications
Expense

Description: The Payable Batch# option is now available through the Column Selection of My Reports, Assigned Reports and All Reports tabs within the Expense Manager where you can choose to have this column displayed on the table and include it as a Search criterion.
Benefit: With this addition, you can now easily view and search for the Expense Payable Batch # from the Expense Manager.
For further details refer to Expense Manager
Global Search
Description: The functionality of searching for Projects or Programs through the Global Search has been improved to only list the items which you have permissions to view.
As an example, if you can see a project on your Projects list page, then you can search for that project in Global Search. If for a specific reason, you cannot view a project on your Projects list page, then it will not be searchable through Global Search. The same concept applies to Programs.
For further details refer to Global Search
Import (Excel)
Description: In previous releases the Excel Import was only functioning when using the IE browser. As of this release the Excel Import now works in any of the PSA Supported Browsers.
Benefit: This enhancement eliminates the requirement to use the IE Browser when working with the Excel Import functionality, thus improving user experience.
Note: The result of each import process is saved as a separate unique Excel file downloaded upon the completion of the process. This differs from the previous versions where IE natively accessed and wrote the results to the same Excel file.
Mobile
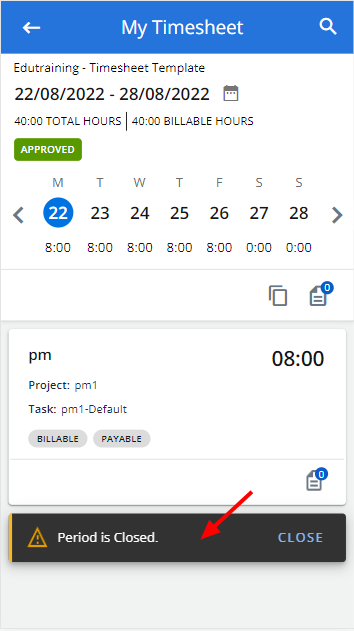
Description: Upon accessing My Timesheet (for a closed period) a message is now displayed accordingly to inform you that the Timesheet period is Closed.
Benefit: This improvement allows you to quickly identify that the period has been closed.
Notifications
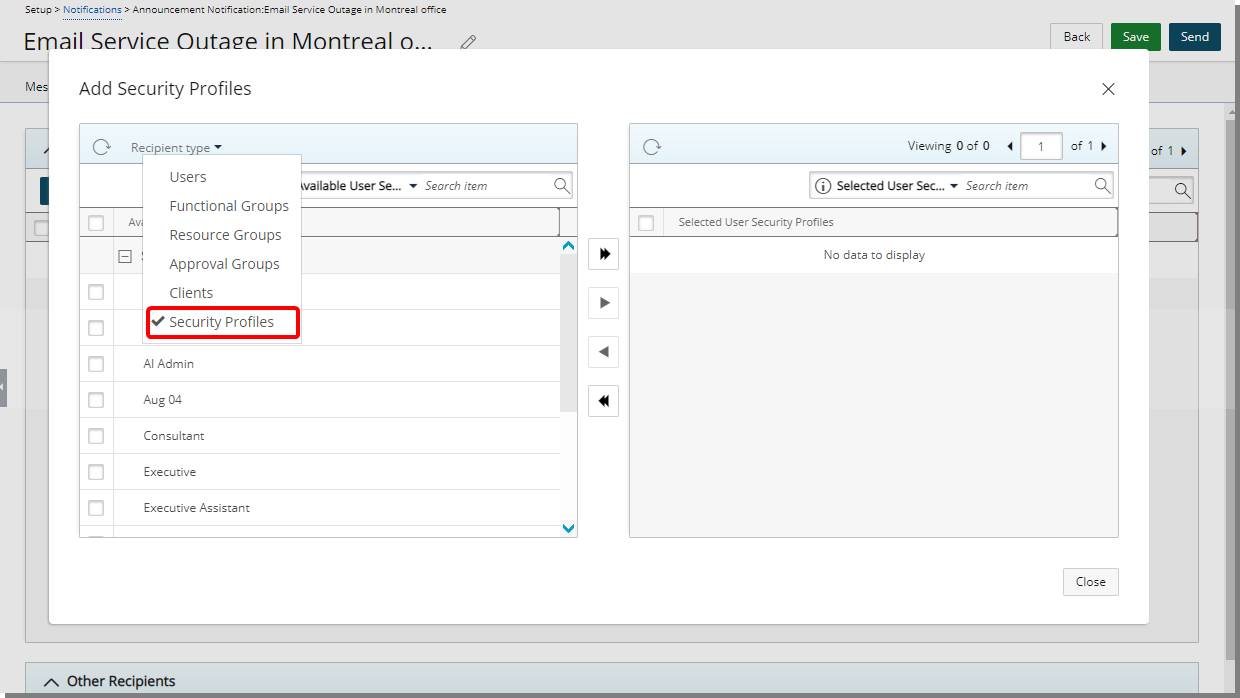
Description: The Security Profiles Recipient Type is now available from the Recipients tab when creating/modifying Announcement Notifications. Upon selecting Security Profiles Recipient Type, you can then select the required Security Profiles you wish to send the Announcement Notification to.
Furthermore, the Add/Remove all recipients buttons are now also available. You can now click the Add all/Remove all button to move all listed recipients within the available/selected recipients table to the selected/available recipients table respectively.
Note: The Add all/Remove all recipients button is unavailable for selection, if at least one recipient is selected within the available/selected table respectively.
Benefit: You can now send an Announcement Notification to specific Security Profile(s).
For further details refer to Announcement Notifications
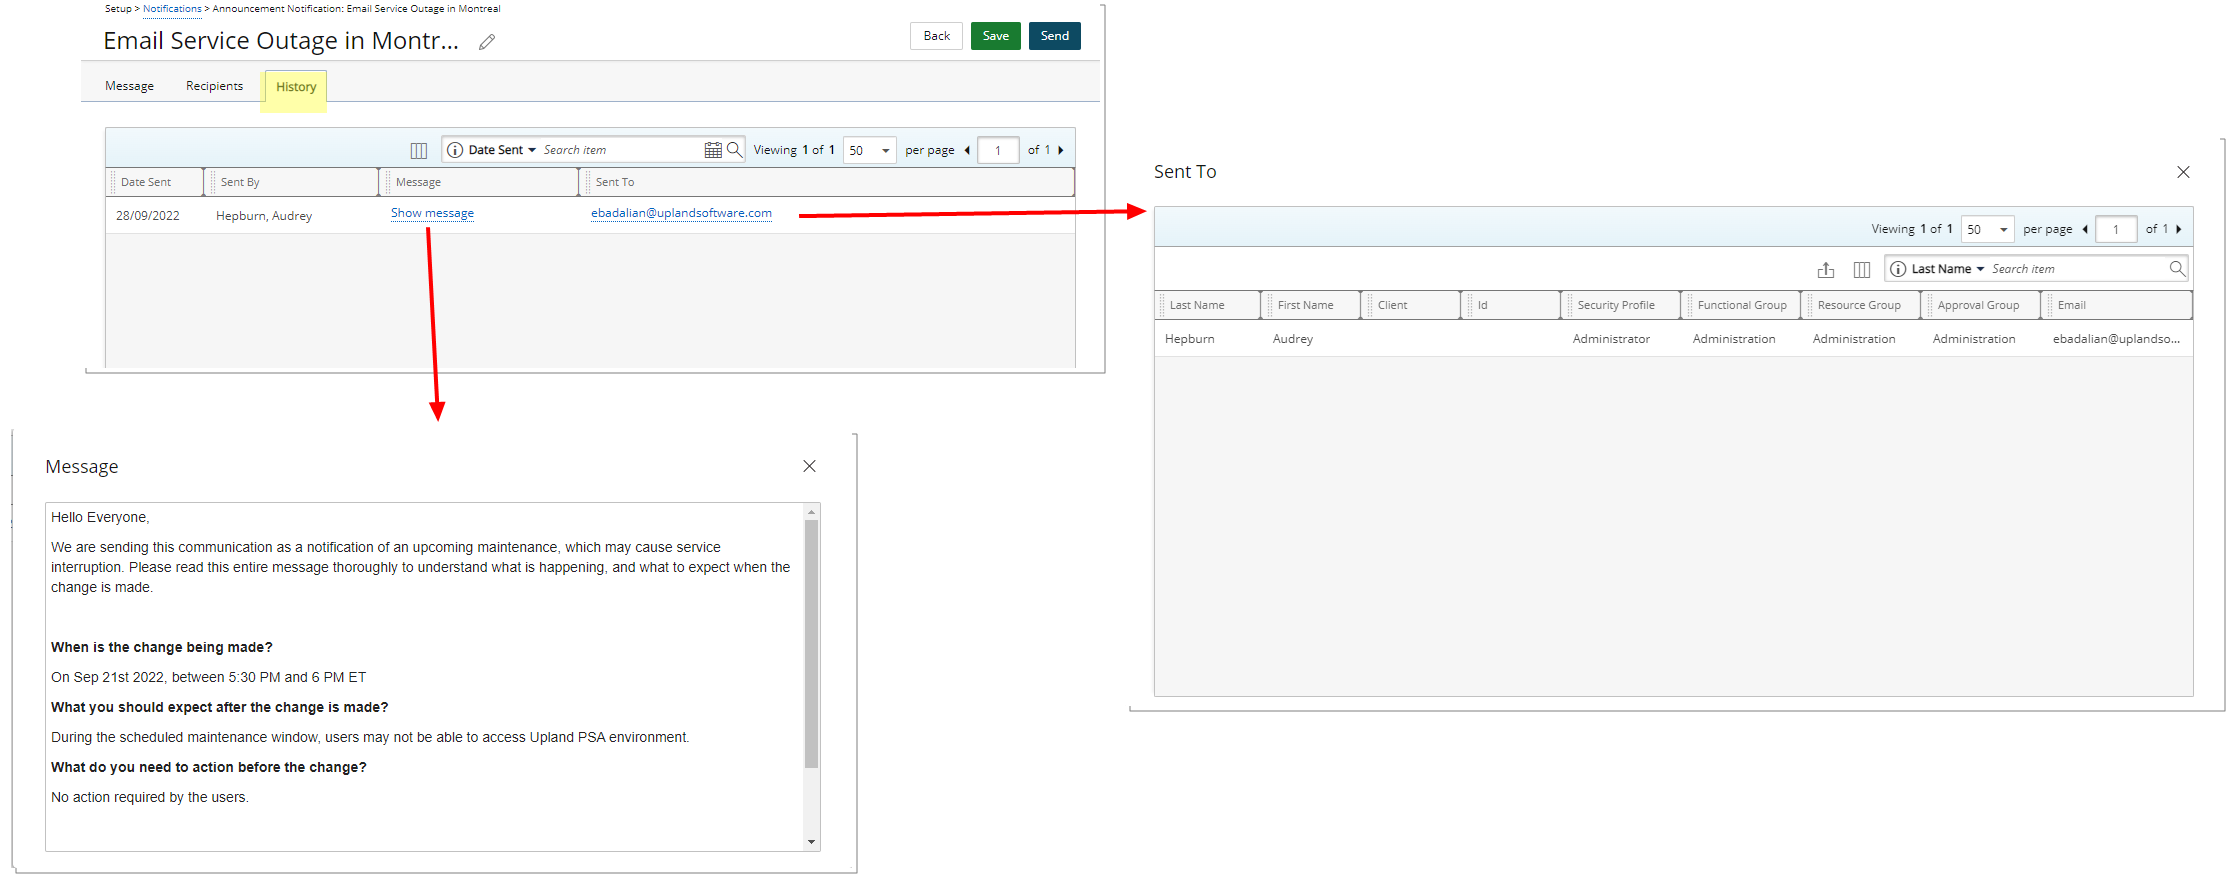
Description: A new History tab is now available within the Announcement Notifications Edit page, detailing the following information: Date Sent, Sent By, Message and Sent To.
You can search for items based on Date Sent, Sent By and Sent To Search criteria. Pagination is available at the top right corner to facilitate easy navigation across pages.
You can conveniently view the Message by clicking the Show message and access the Sent To dialog box by clicking the Show More link and view the details of the Recipient(s).
- For User, Security Profile, Functional Group, Resource Group, or Approval Group Recipient Types, you will see the Users’ Last Name, First Name, Id, Security Profile, Functional Group, Resource Group, Approval Group and Email.
- For Client Recipient Type, you will see the Client Contact’s Last Name, First Name and Email as well as the Client’s Name and Id.
- Export the list to Excel
- Search based on Last Name, First Name, Client, Id, Security Profile, Functional Group, Resource Group, Approval Group and Email criteria.
- By default, the following columns are displayed: Last Name, First Name, Client, Id, Security Profile, Functional Group, Resource Group, Approval Group and Email. You can choose to remove any of these options from the Column Selection.
Benefit: From the History tab, you can access and view the detailed History of sent Announcement Notifications should a question/concern arise.
For further details refer to Announcement Notifications History tab
Project Status Reporting
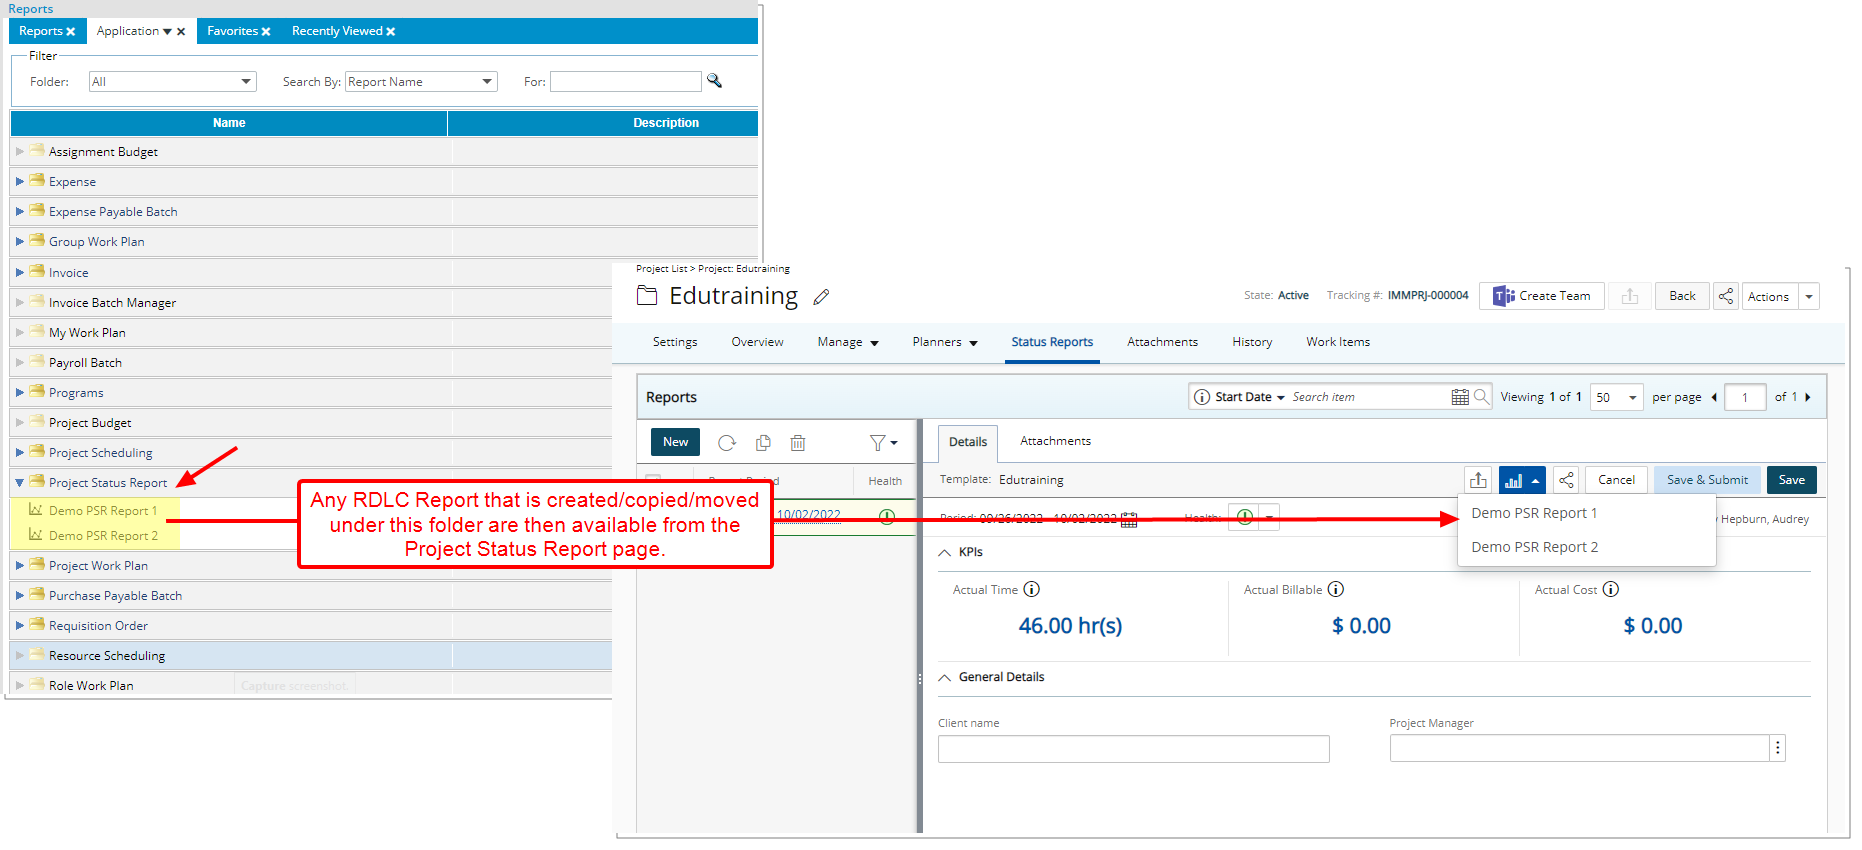
Description: A new Project Status Report folder has been added to the Application tab. Any RDLC Report(s) created/copied/moved under this folder are then available from the Project Status Report page when a specific entry is selected.
Benefit: You can now conveniently preview Application reports from the Project Status Report page.
For further details refer to:
- Application tab
- Available options from the Project Status Reports page
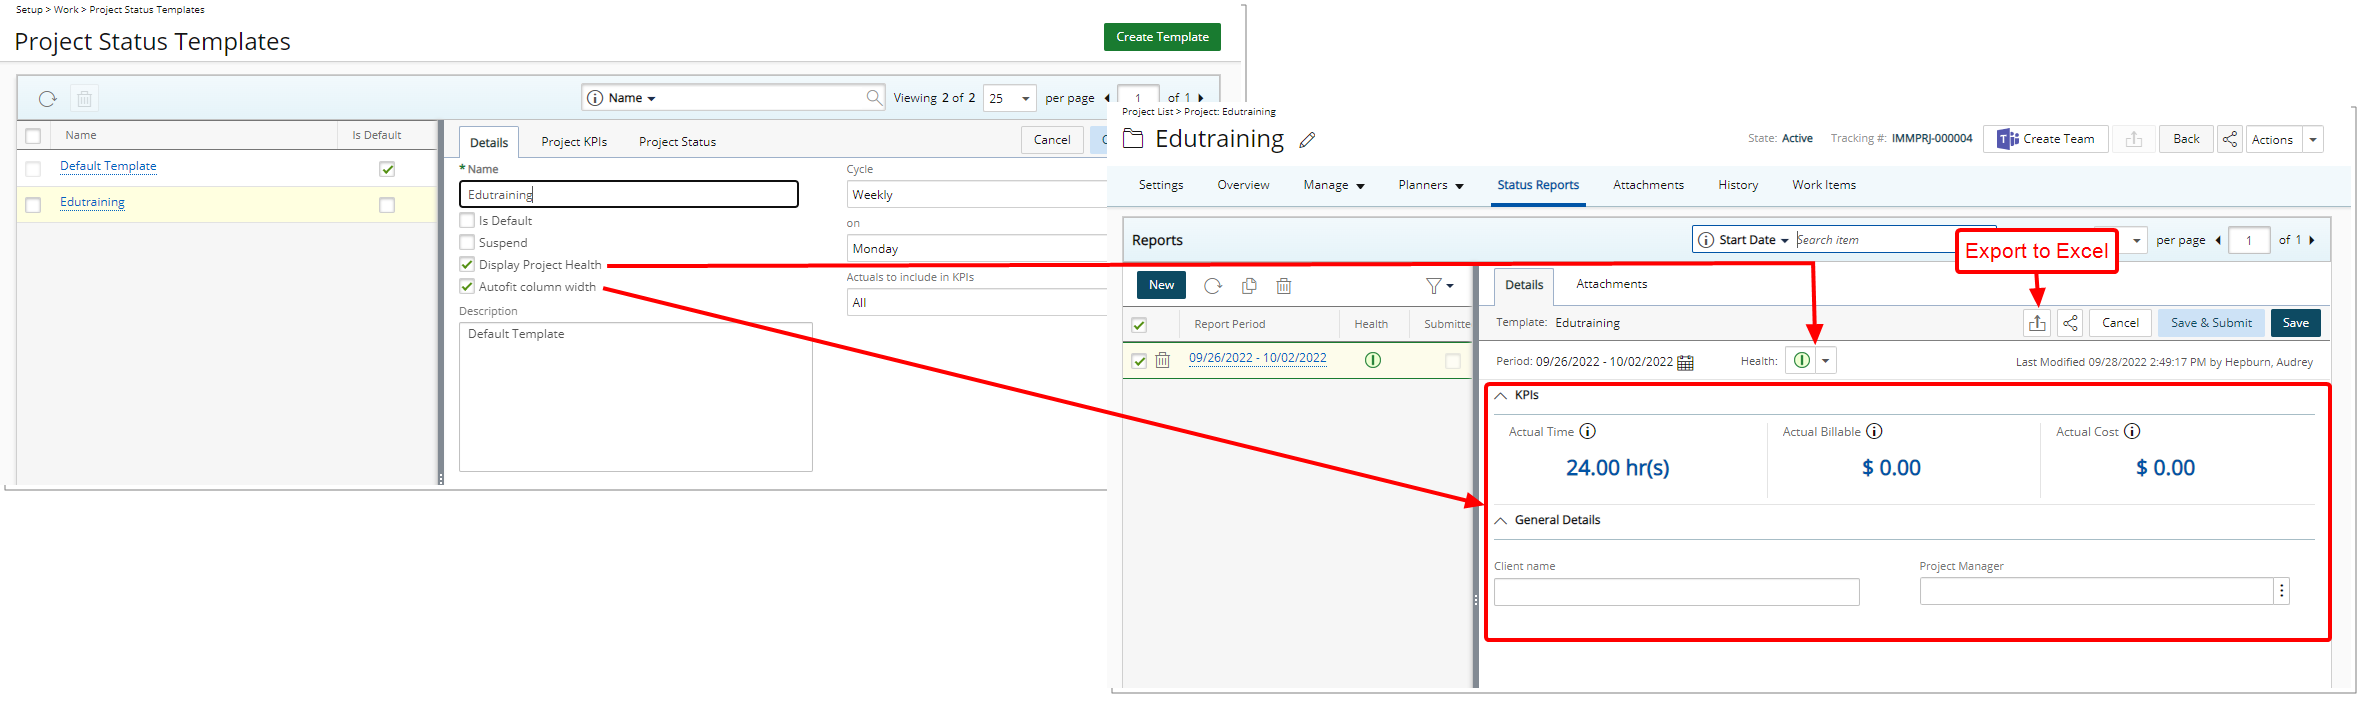
Description: The following options are now available from the Project Status Templates:
- Display Project Health: When selected the Project Health indicator is available on the associated Project Status Report page. The option is enabled by default.
- Autofit column width: When selected, all fields visible within the KPI’s and General Details sections will expand to occupy the full width of the allocated space when viewing the associated Project Status Report.
Furthermore, you can now Export the selected Project Status Report to Excel.
For further details refer to:
- Creating a Project Status Template
- Available options from the Project Status Reports page
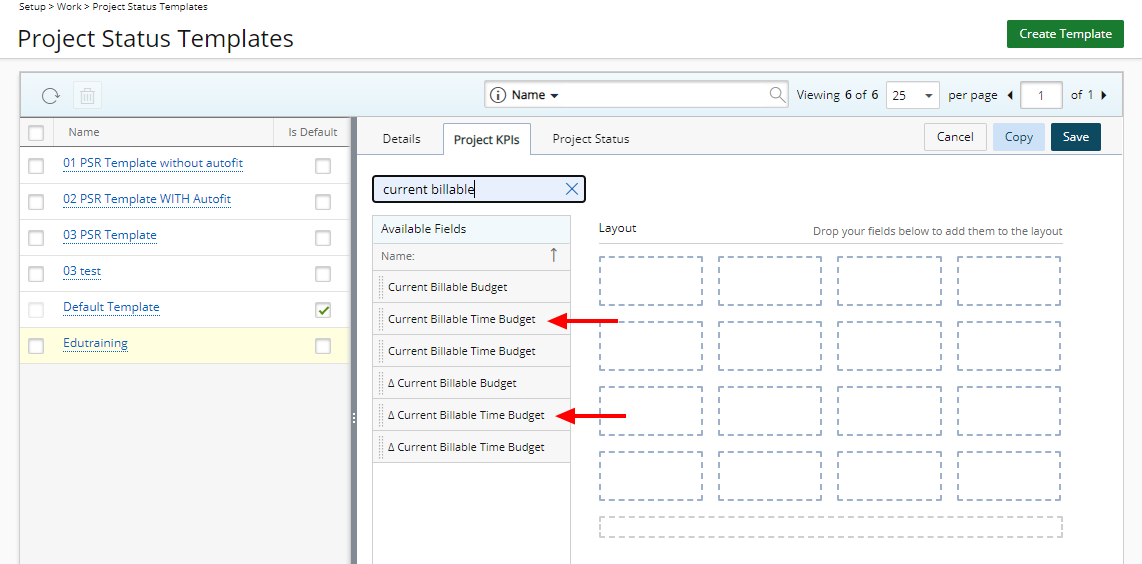
Description: The following two new KPIs are now available through the Project Status Templates (Setup > Work):
- Current Billable Time Budget: The sum of Current Billable Time Budgets of the Project.
- ∆ Current Billable Time Budget: The Difference between Current Billable Time Budget and Actual Billable Time.
Benefit: You now have visibility on the Current Billable Time Budget and ∆ Current Billable Time Budget from Project Status Reports.
For further details refer to Available Fields from the Project KPIs tab
Resource Management
Description: Improvements have been made to prevent you from:
- Creating Adjustments that fall outside of the Project Start and End dates.
- Creating Adjustments that exceed the total Hard booked hours for the defined resource in the project.
Furthermore, when creating a new Adjustment, the Billable option is now selected by default.
For further details refer to Entering and managing Adjustments through the Project Work Plan
Description: The user interface of the Skills list and Skills Edit pages have been improved for better user experience and consistency throughout the application.
Benefit: With these overall modifications, the look and feel are further improved, as well in keeping with the UplandOne mindset, wherein the layout of various elements within the page support the unified experience across Upland products. Consequently, the user experience is further elevated.
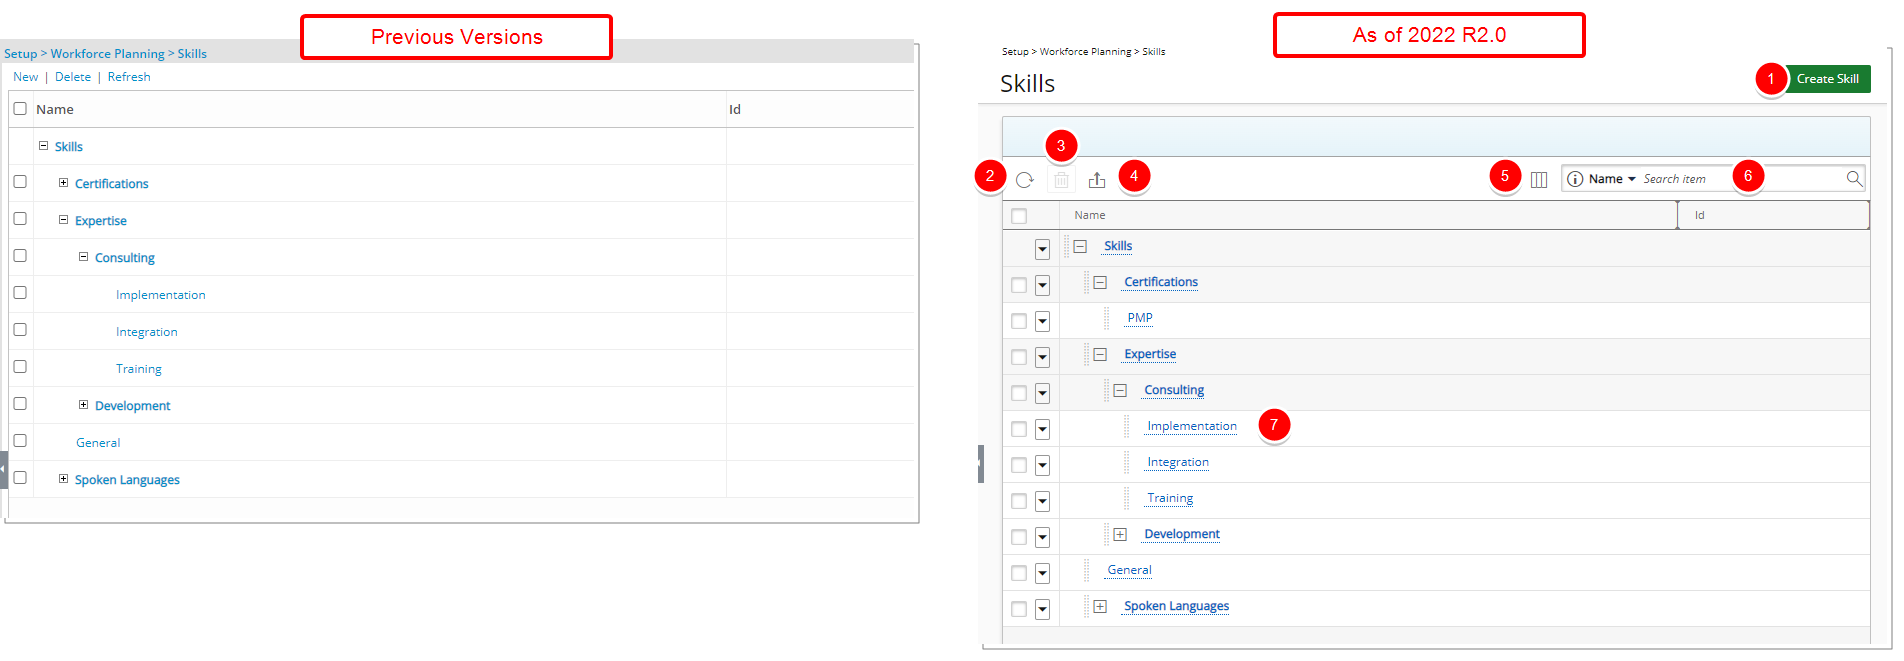
Description: In addition to the interface updates, the following enhancements have also been made:
- The New link which now reads Create Skill has been converted to a button and relocated to the top right corner of the page.
- The Refresh link has been converted to a button and relocated to the table header.
- The Delete link has been converted to a button and relocated to the table header.
- Addition of the Export to Excel button: Click to export the list of Skills to Excel.
- Addition of the Column Selection capability: By default, the following columns are displayed: Name, Id, Parent and Description.
- Addition of Search capability: By default, you can search Skills based on Name or Id. You can choose to include the Parent column as a search criterion from Column Selection.
- To move a skill to a different parent placeholder, simply drag and drop it into the new position.
For further details refer to Skills Setup
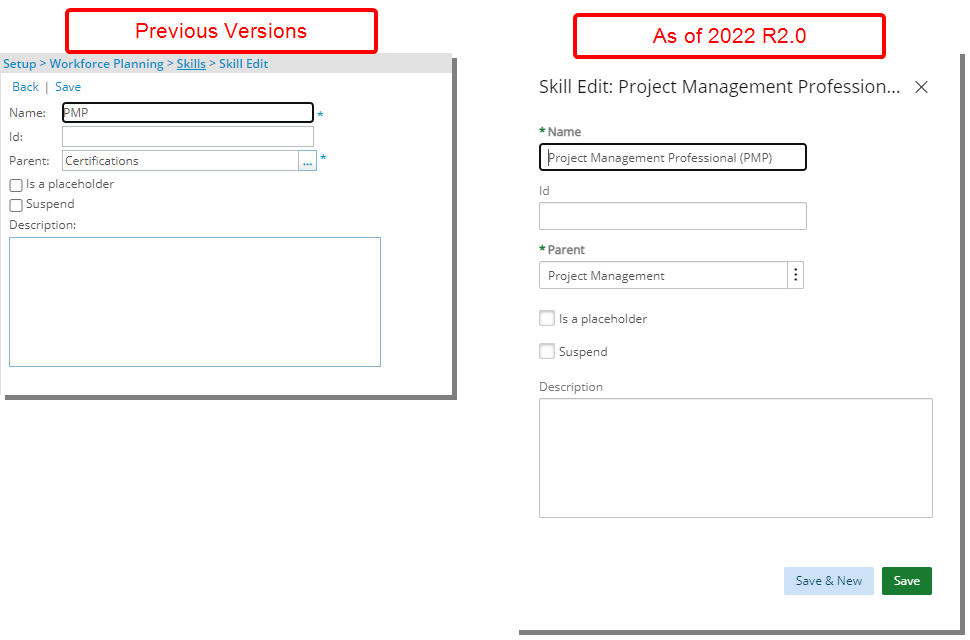
Description: In addition to the interface updates, the following enhancements have also been made:
- A dialog box is now used when creating or modifying a Skill.
- The spacing, colors, positioning and fonts of the Skill Edit page have been enhanced.
- You can now either Save the Skill and exit the dialog box or click the Save & New button to save the Skill and create a new one.
For further details refer to Editing a Skill
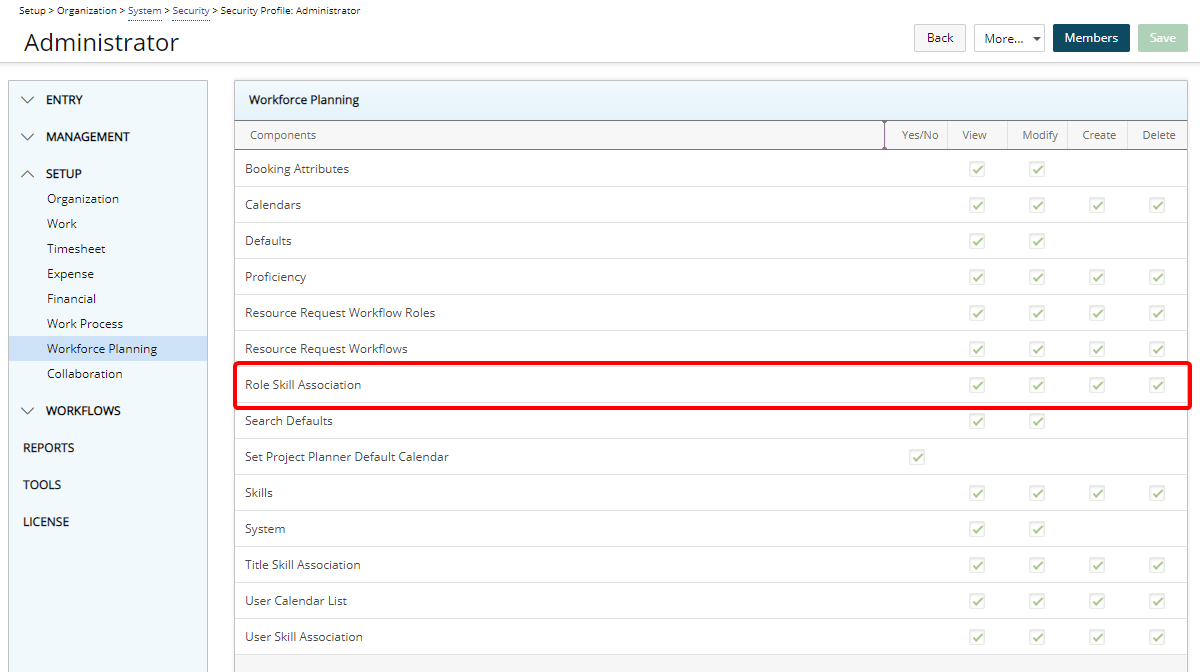
Description: Users with the Create right to the new Role Skill Association permission (Setup > Workforce Planning), defined for the Security Profile under which the User falls (Setup > Organization > System > Security), can now associate Skills to Roles from the Roles Edit page.
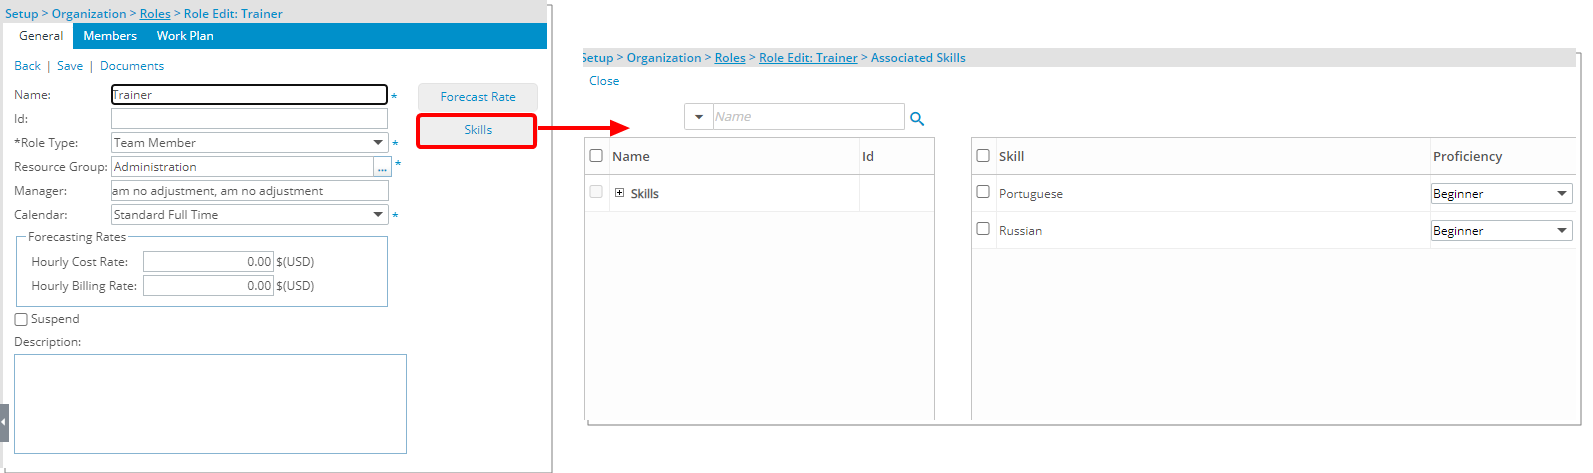
Upon selecting the available Skills from the left column and adding them to the selected column on the right you can then choose the Proficiency.
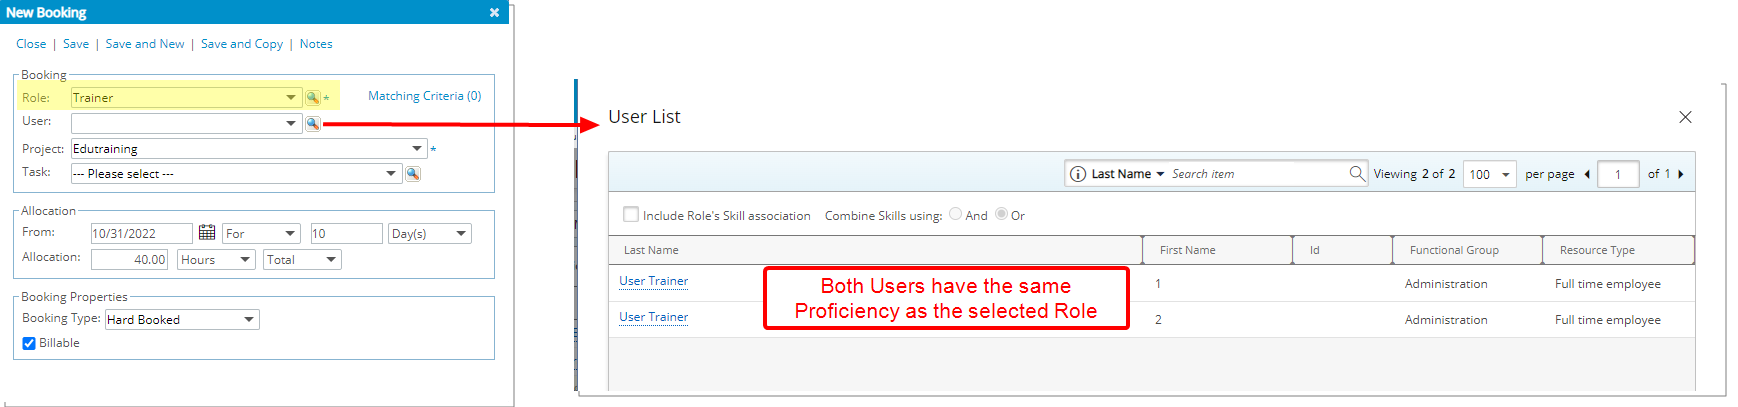
When creating a Role based Booking, upon searching for Users the returned user list will be filtered based on mutual Roles and Skills associated to both the User and Role based on the Include Role’s Skill Association by Combining Skills using either And/Or options.
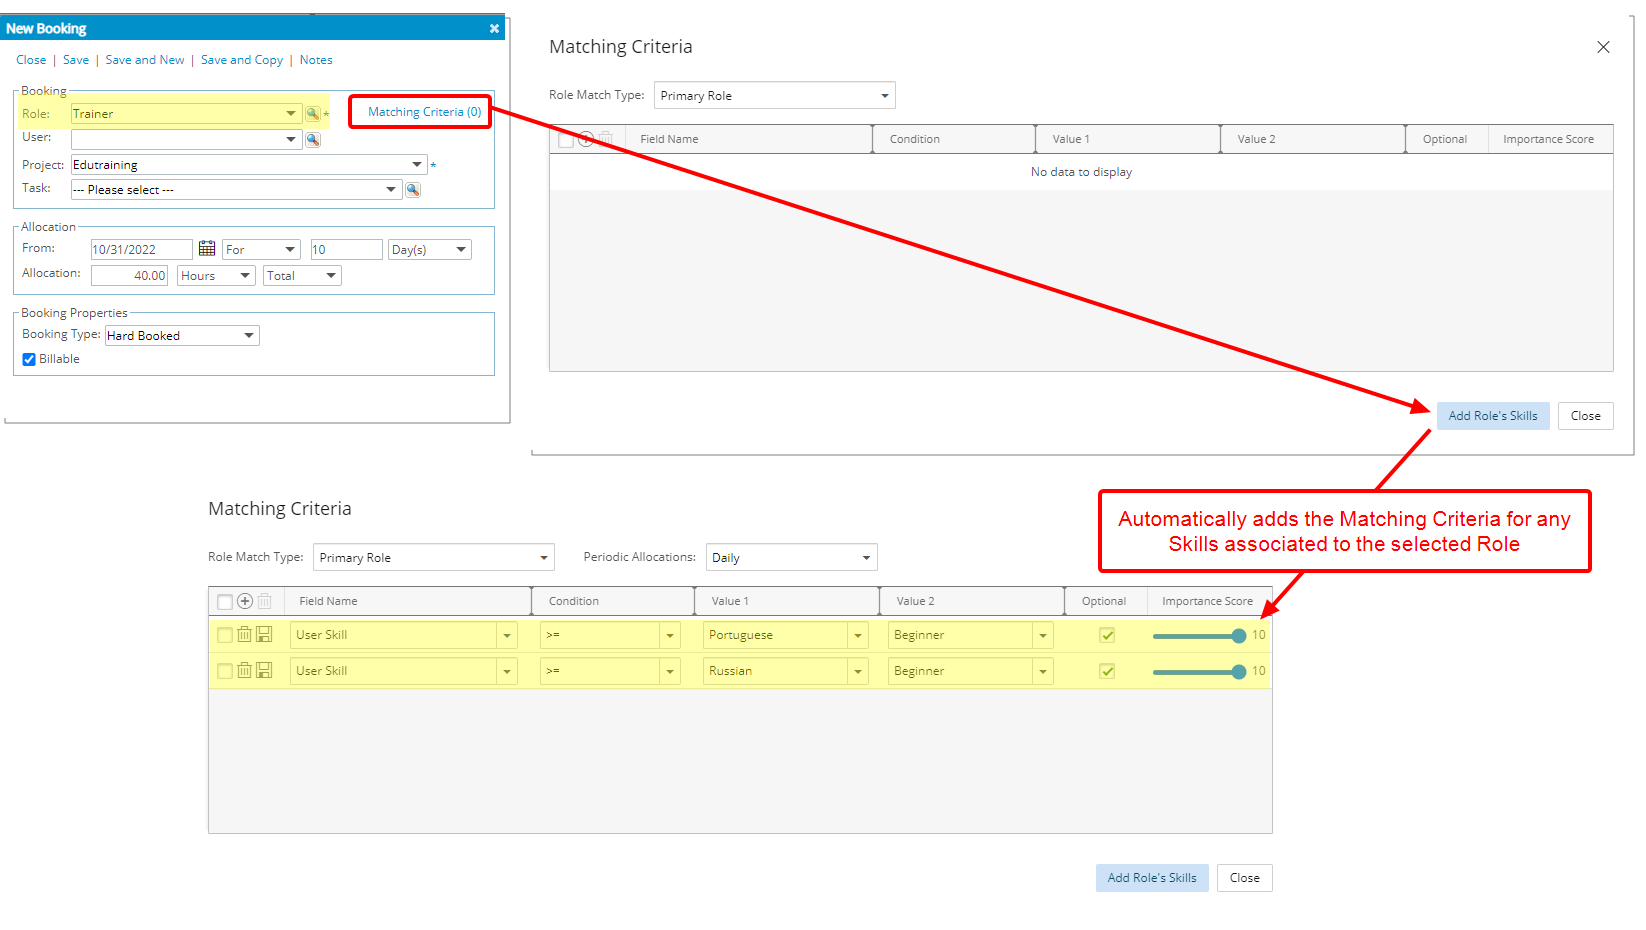
Furthermore, from the Matching Criteria dialog box, you can also click the Add Role's Skills button, which will automatically add any Skills associated to the selected Role as Matching Criteria.
Note: If the Role has no Skill Associations, then the Include Role’s Skill Association selection and the Add Role's Skills button will be unavailable.
Benefit: When creating a Role based Booking, you can now filter the User list based on mutual Skill association.
For further details refer to:
- Configuring Roles (OBS)
- Associating Skills to Roles
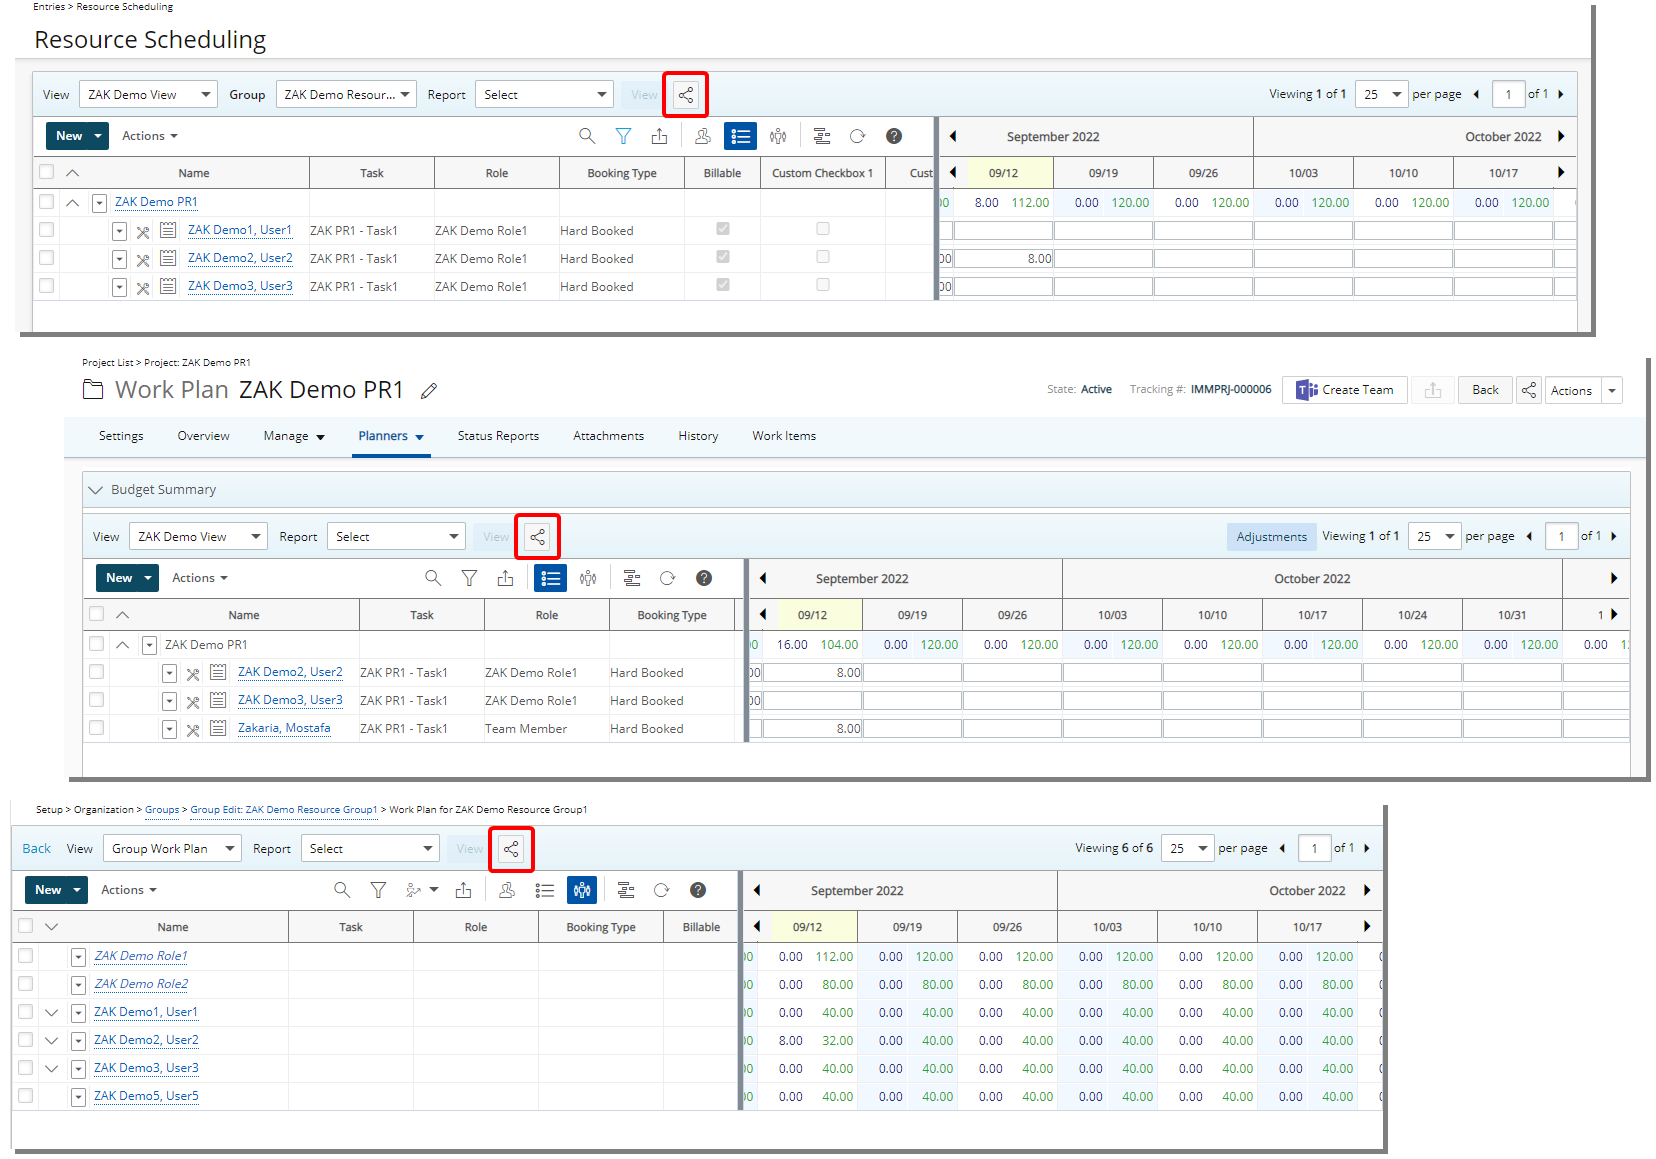
Description: With the addition of a Share Page button, it is now possible to reference the Project, Group, User, and Role Work Plans directly. Simply select Share Page and click Copy. The URL will be copied and can then be shared with colleagues who can access it directly upon logging into PSA.
Benefit: You can now easily copy the URL of a Project, Group, User, or Role Work Plans and create a direct link and share it with your colleagues.
For further details refer to Sharing Pages
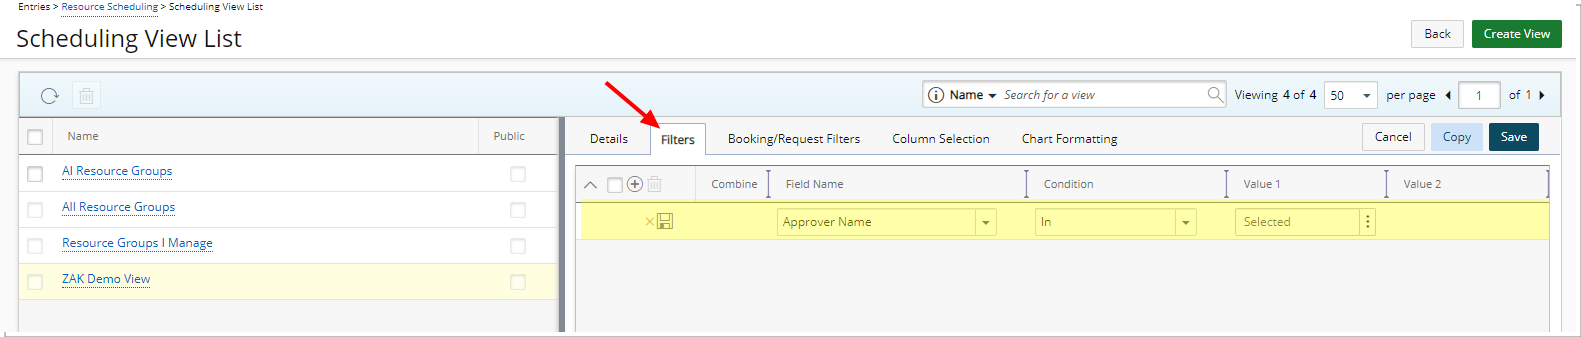
Description: A new Filter tab is now also available when creating/modifying Views within Resource Scheduling. Users with the Modify right to Public Work Plan Views permission can now define a default Filter setting relative to the Groups in a Resource Scheduling View.
In addition to any User Defined Fields associated to Groups, the available Filter criteria are Approver Id, Approver Name, Business Unit, Default Task, Group Alternate Manager, Id, Manager, Name, Parent, Role Id, Role Name, User Id, User Name and Work Types.
Benefit: You can now conveniently filter the available Groups in Resource Scheduling page based on any of aforementioned choices, allowing you to easily find the required item(s).
For further details refer to Applying a Filter to the Resource Scheduling Groups
The following two new settings are now available through the Workforce Planning System page:
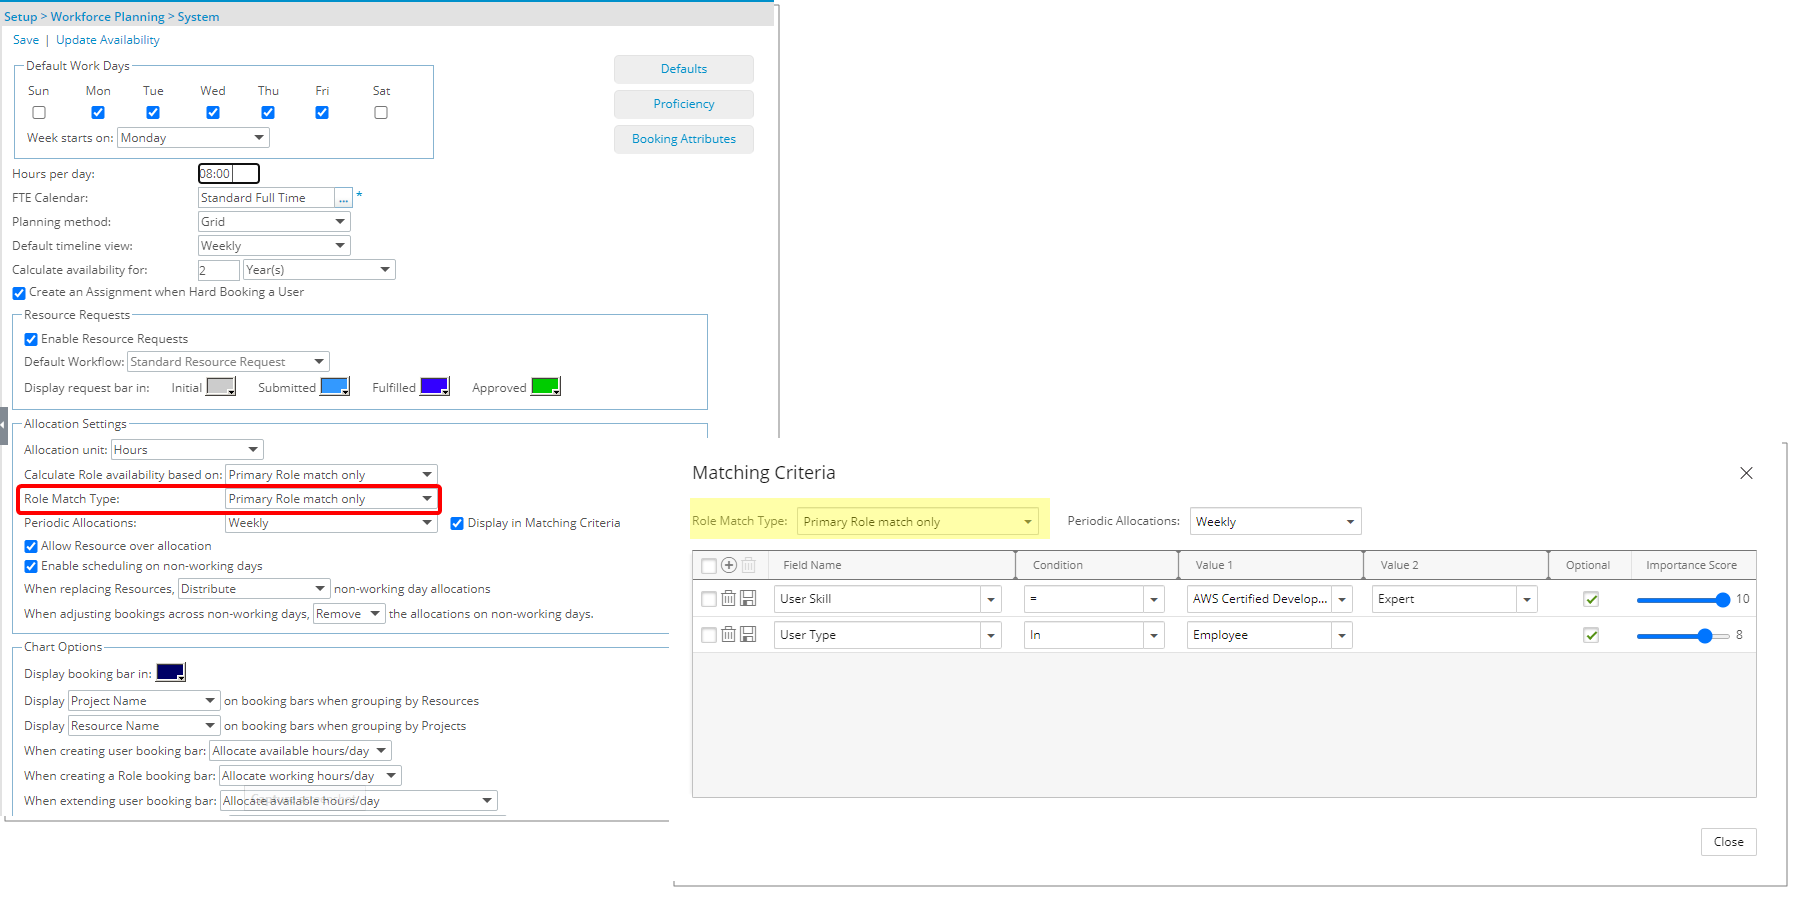
Description: In past releases, the role matching was based on Primary Role/Primary & Alternate Role match. As of this release you can choose to match based on Primary Role, Primary & Alternate Role or Ignore Role options.
- When Primary Role is selected, the system will return only resources that have the requested Role as the Primary Role upon matching a booking.
- When Primary & Alternate Role the system will return only resources that have the requested Role as the Primary Role or Alternate Role upon matching a booking.
- When Ignore Role is selected, the system will ignore the User’s Role upon matching a booking.
Note:
- Primary Role is selected by default.
- When modifying this option, your selection will apply to future bookings only.
- The Role Filter Type selected within the Matching Criteria dialog box will override the system default selection.
For further details refer to
- Finding Matches to replace a Role based Booking
- Calculation of the Matching Score
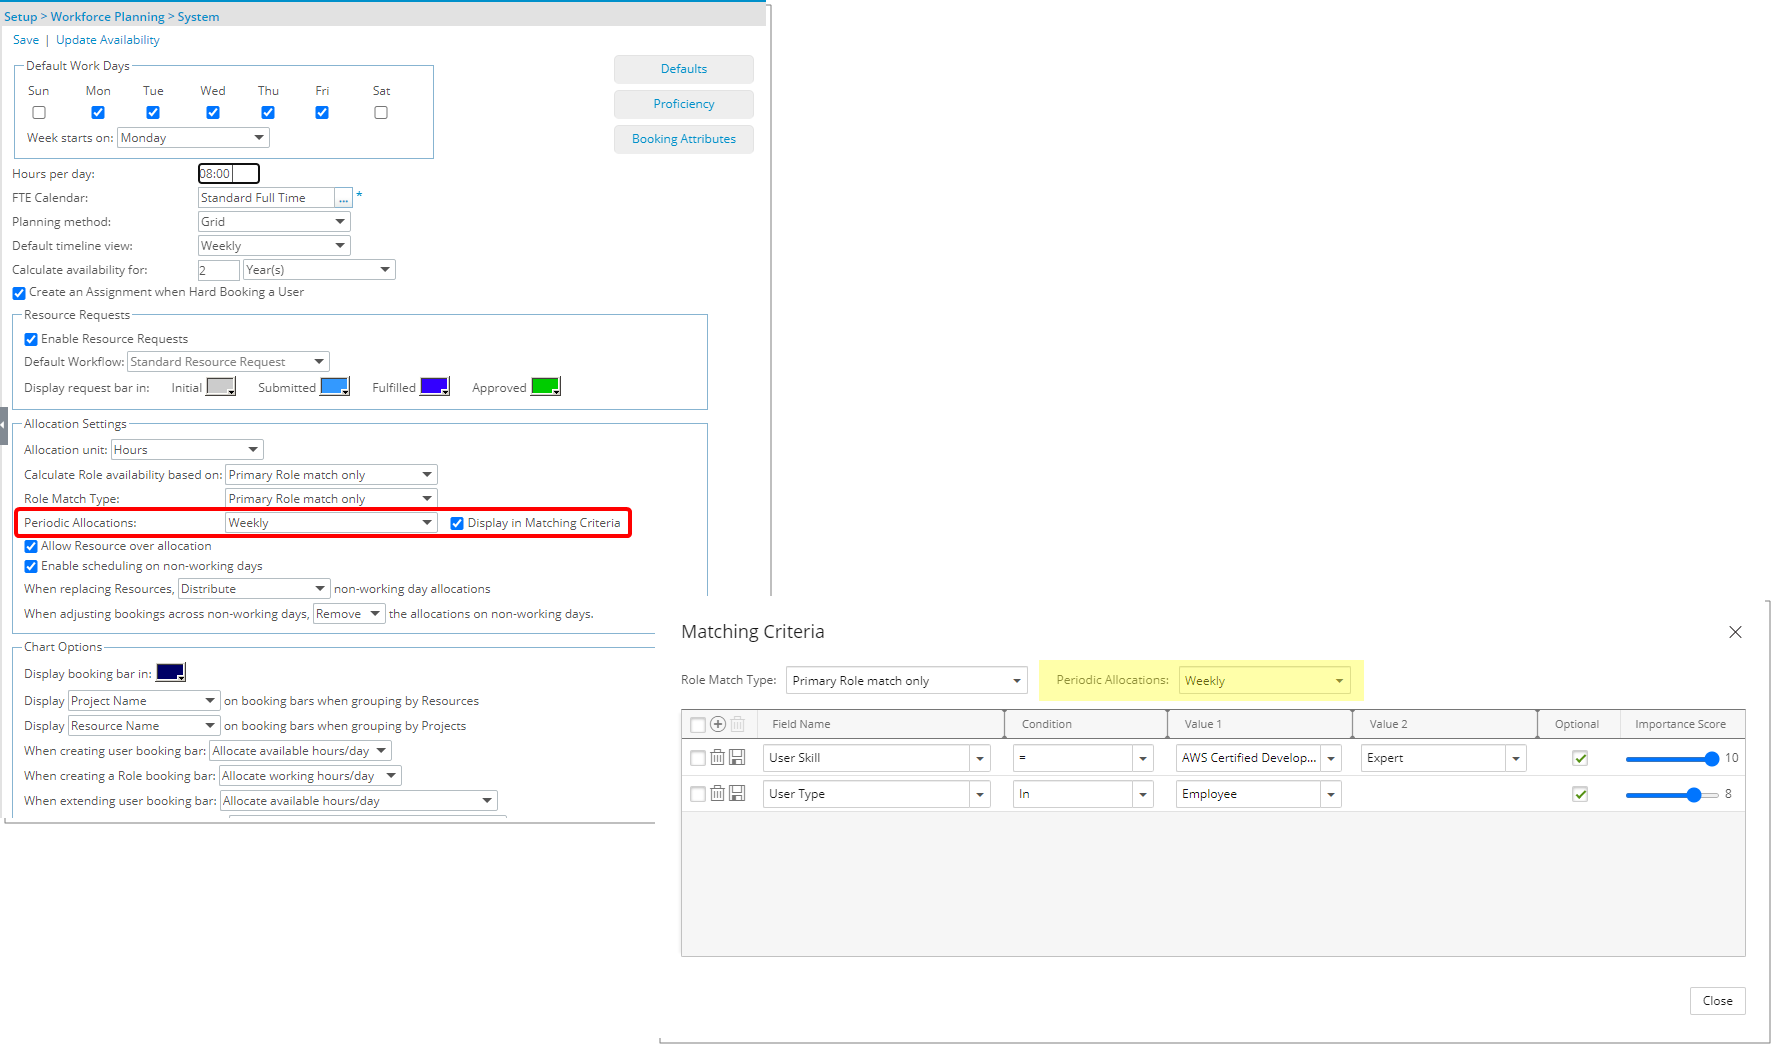
Description: In past releases, by default the Periodic Allocation was based on daily allocations. As of this release you can now set the default Periodic Allocations through the Workforce Planning System page. This will allow you to base the availability on:
- Daily
- Weekly
- Monthly
- Work Plan View
Furthermore, upon selecting the Display in Matching Criteria, you will be able to override the Periodic Allocations set at the system level from the Matching Criteria dialog box when creating bookings.
Note:
- Daily is selected by default.
- When modifying this option, your selection will apply to future bookings only.
- The Periodic Allocations selected within the Matching Criteria dialog box will override the system default selection.
For further details refer to:
- Finding Matches to replace a Role based Booking
- Searching for Matches to replace a booked Resource or Role
- Setting Matching Criteria while adding a new Booking
Description: In this release improvements have been made to the Find Match feature within the Work Plans to now find matched resources based on the Work Plan period being used (Daily, Weekly and Monthly). Upon using the Find Match feature, the system will show available Users based on the selected view (Daily, Weekly and Monthly) instead of the Daily view as in past releases.
Note: The Work Plan period must match the Periodic Allocation setting.
Benefit: The matching availability percentage is now calculated based on the chosen Periodic Allocation option.
For further details refer to:
- Finding Matches to replace a Role based Booking
- Searching for Matches to replace a booked Resource or Role
- Setting Matching Criteria while adding a new Booking
Description: When creating or modifying a Booking, you can now define the Matching Criteria, which replaces the Additional Skills page as of this release, through the following Work Plans:
- Resource Scheduling (Entries)
- Project Scheduling Work Plan (Entries)
- Project Work Plan (Project List > Project Edit > Planners Or Project List > Context Menu)
- Group Work Plan (Setup > Organization > Groups > Group Edit)
- User Work Plan (Setup > Organization > Users > User Edit)
- Role Work Plan (Setup > Organization > Roles > Role Edit)
- My Work Plan (Entries)
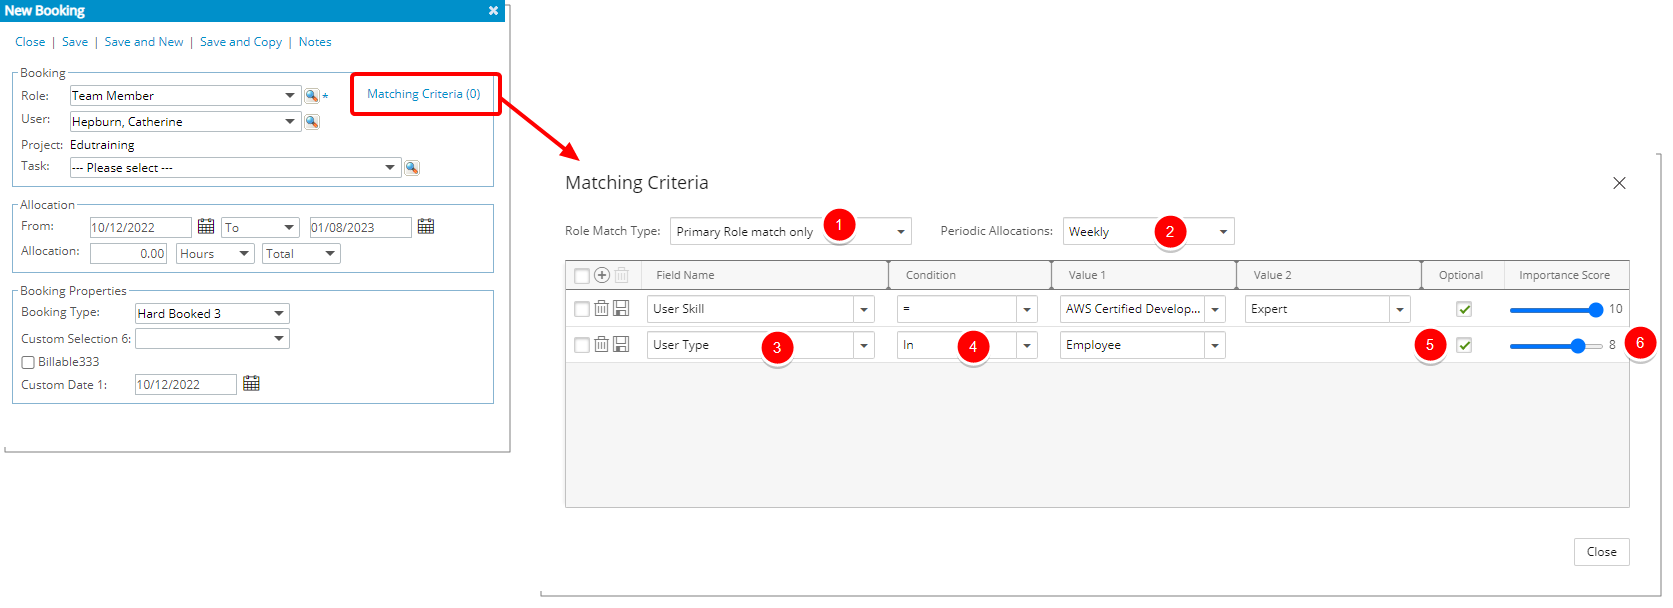
From the Matching Criteria page:
- Select the Role Match Type from the following available options:
- Primary Role match only: The system will return only resources that have the requested Role as the Primary Role upon matching a booking.
- Primary and alternate Role match: The system will return only resources that have the requested Role as the Primary Role or Alternate Role upon matching a booking.
- Ignore Role: The system will ignore the User’s Role upon matching a booking.
- The Periodic Allocations options will be available to you if the Display in Matching Criteria, is selected at the Workforce Planning System level. Otherwise the system default settings are used.
- Click the Add
 button to define the required Matching Criteria. In addition to any User Defined Fields associated to Users, you can choose to create matching criteria based on the following Fields: Alternate Role, Company Name, Group Alternate Manager, Group Id, Group Manager, Group Name, Primary Role, Role Manager, Role Name, Role Resource Group, Role Type, User Active Site, User Approval Group, User Business Unit, User Email, User Functional Group, User Hire Date, User Id, User Master Site, User Name, User Resource Type, User Security Role, User Skill, User Team, User Title and User Type.
 - Choose the Condition and respective Value(s).
- Select the Optional selection box if the defined criteria should be an optional one.
- The Importance Score slider allows you to define the importance of the defined matching criteria on a scale of 1 to 10 (1 is lowest and 10 is highest).
- Upon closing the window, you can then select Find Matches.
Note: The Matching Score will always be 100 if:
- The Matching Criteria is empty
- The Matching Criteria only has required attributes (Optional is not selected)
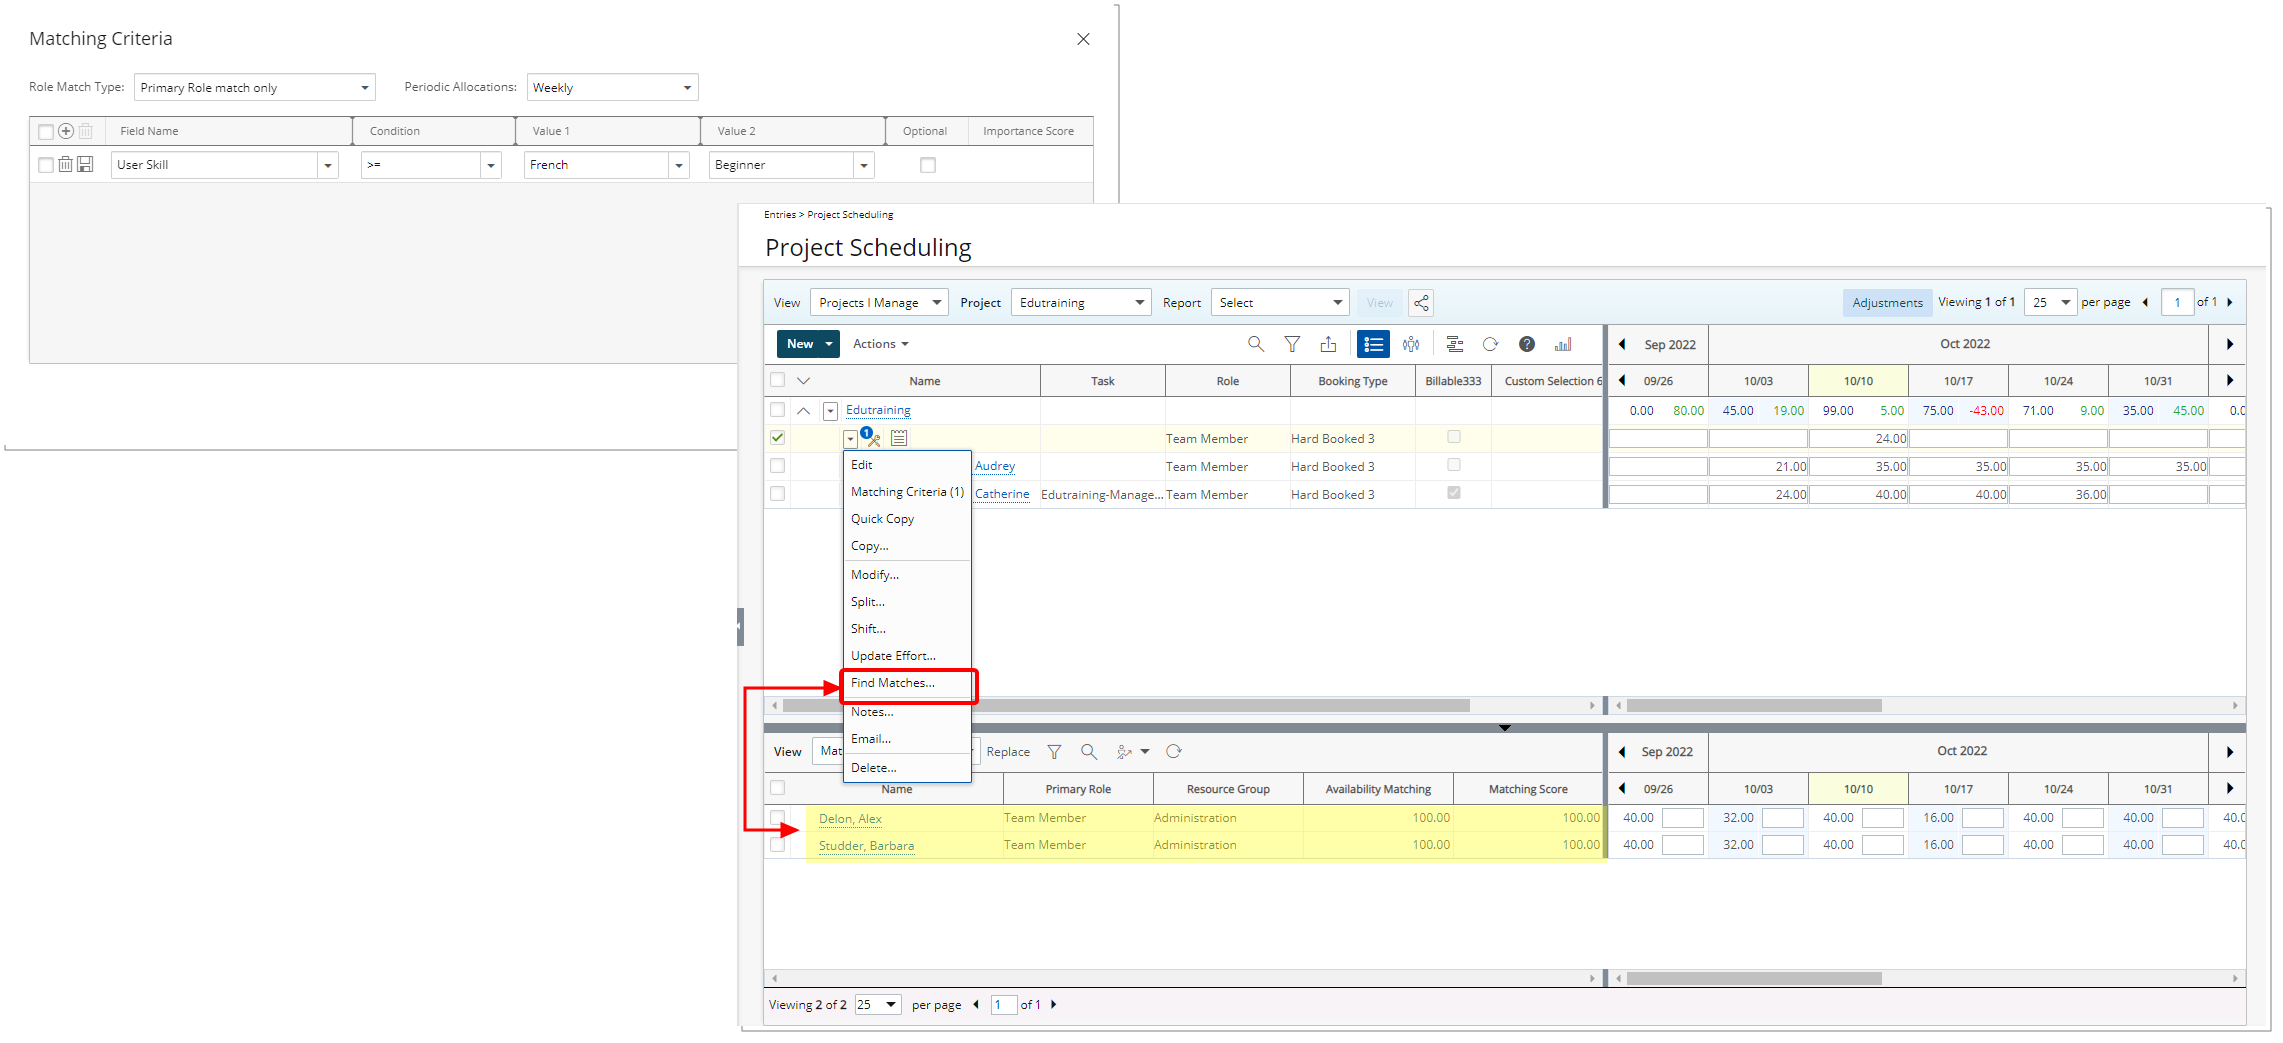
Example 1:
The following options are selected as Matching Criteria:
- Field: “User Skill”
- Condition: “>=“
- Value 1: “French“
- Value 2: “Beginner“
Upon clicking Find Matches, only users having “French“ Skill with Proficiency level “Beginner“ or above will be displayed within the Matching results.
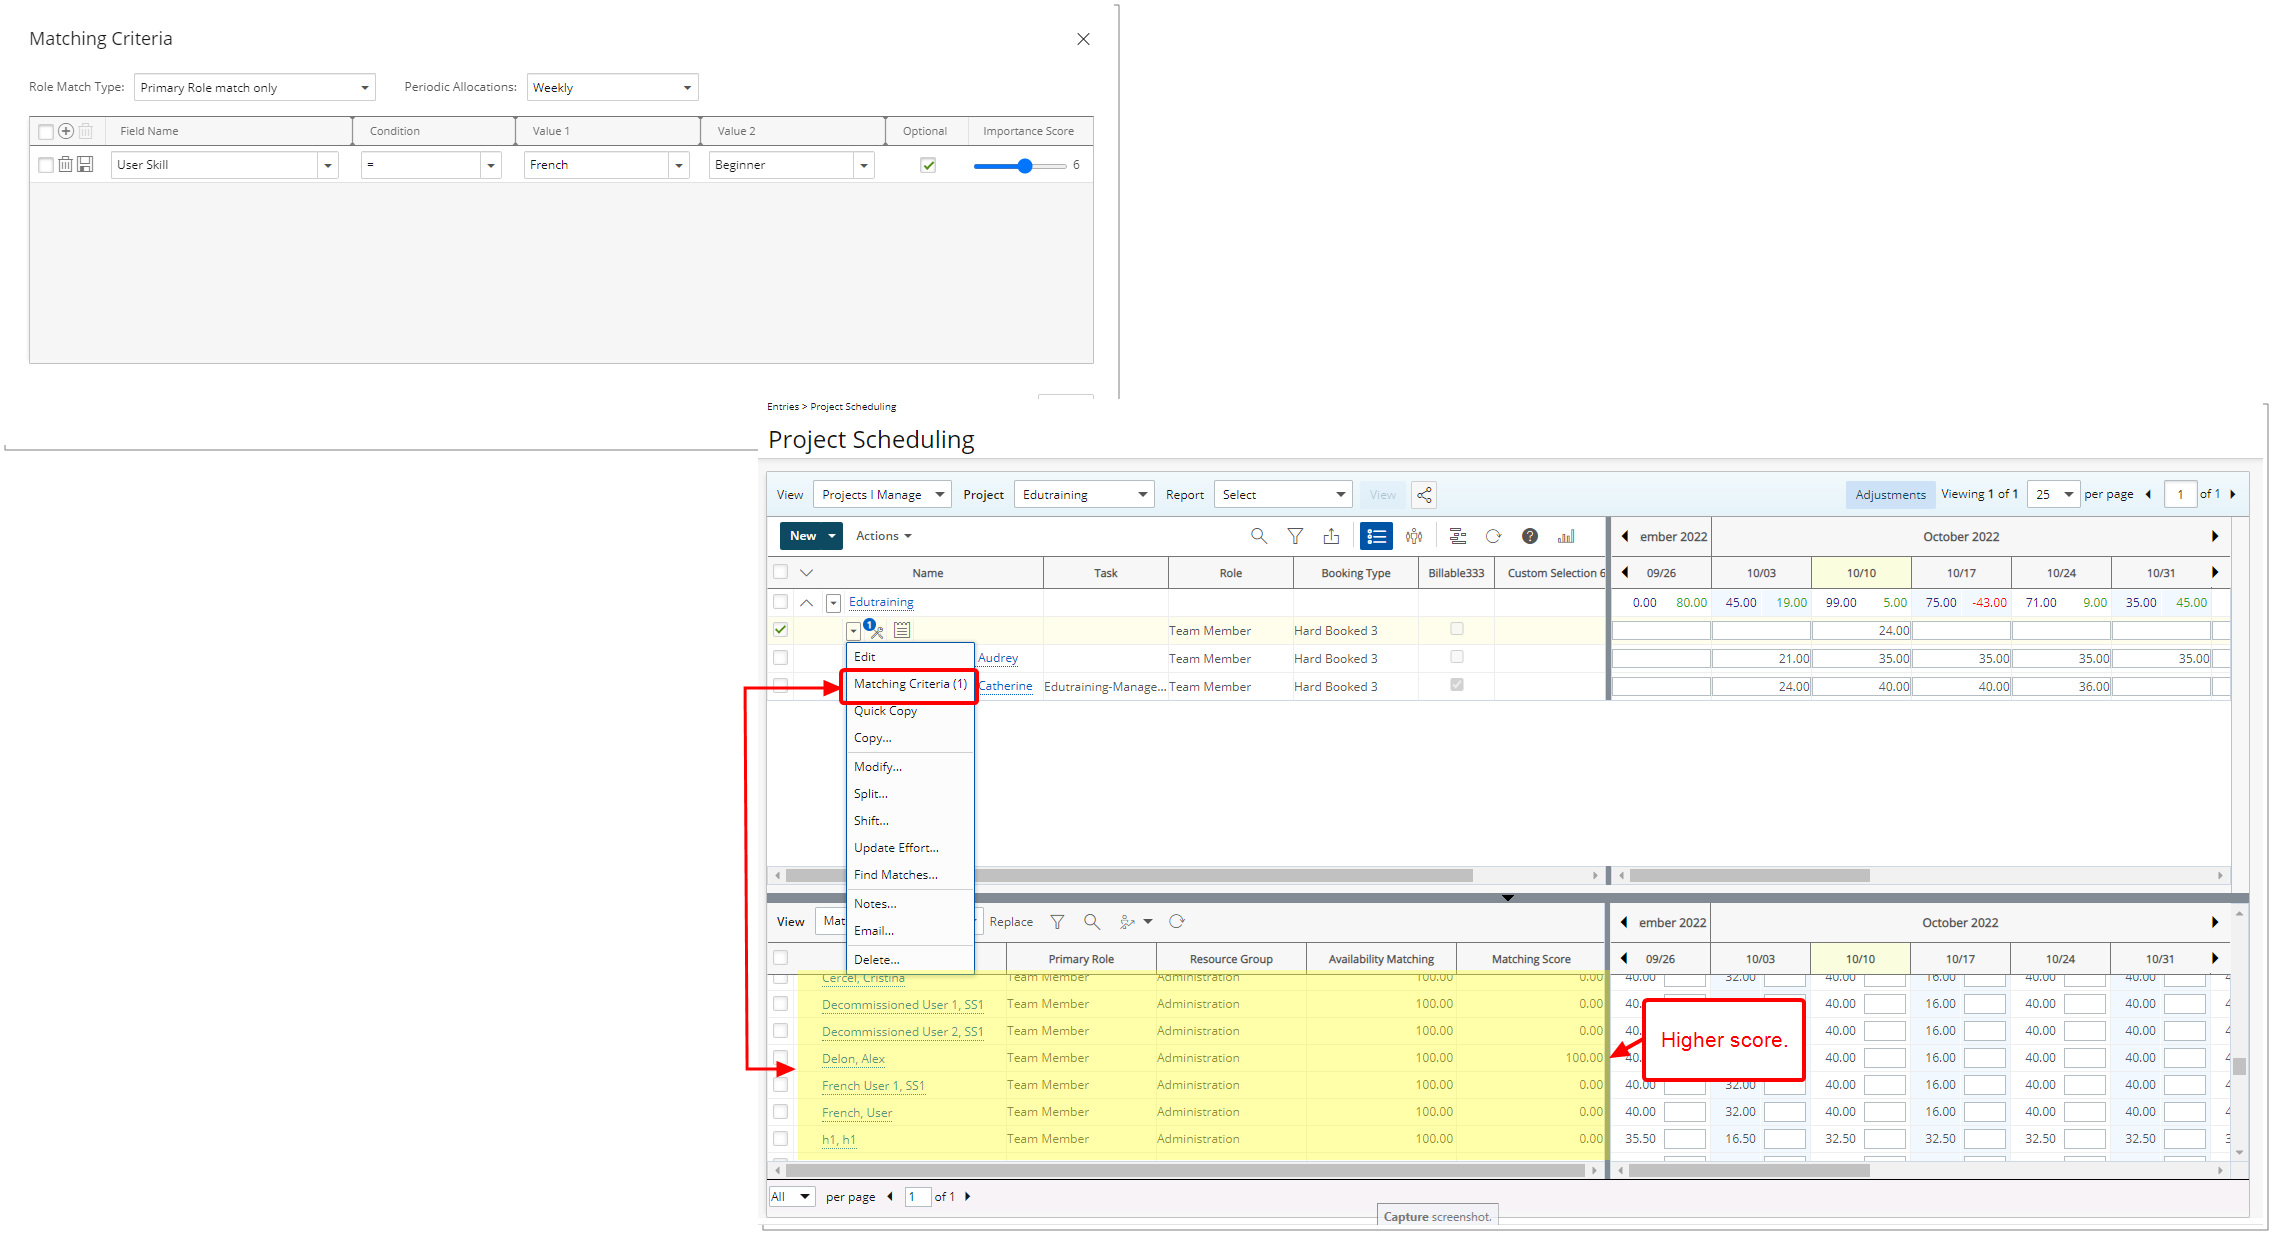
Example 2:
The following options are selected as matching criteria:
- Field: “User Skill”
- Condition: “=“
- Value 1: “French“
- Value 2: “Beginner“
- The Optional box is selected. Then choose the importance level from 1 to 10.
Upon clicking Find Matches, all users along with users having “French“ Skill with Proficiency level “Beginner“ will be displayed in the Matching results, but users with French Skill and Proficiency level “Beginner“ only, will have a higher Matching score.
As a result of this improvements, the Advanced button located within the bottom section of the Work Plans has been deprecated.
For further details refer to
- Finding Matches to replace a Role based Booking
- Calculation of the Matching Score
Description: Upon clicking Find Matches, the system will search for the available matches based on your criteria. The Matching Score is calculated as:
Importance Score value / Total of the Importance Score values * 100
As an example, we are going to create the following two Matching Criteria where:
- We are looking for an AWS Certified Developer Associate. With Expert Proficiency. This will be an Optional setting where the Importance Score is equal to 10.
- And we are looking for an Employee User Type. This will be an Optional setting where the Importance Score is equal to 8.
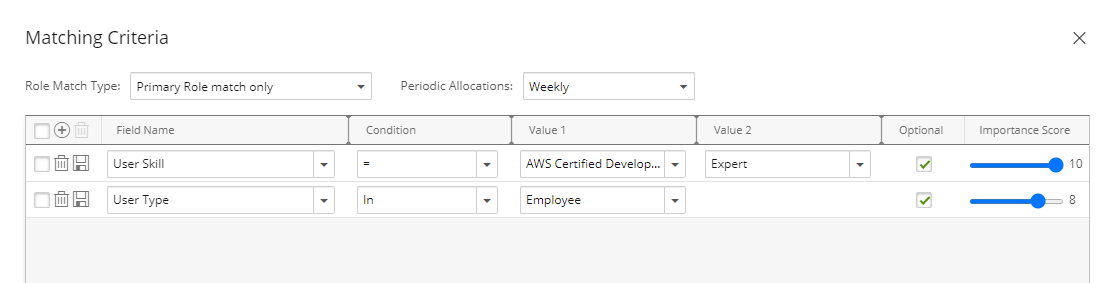
Upon saving and clicking Find Matches, the bottom grid will refresh showing us the Matching Resources.
Note: The Matching Criteria is a combination of all defined matching rows (AND operator).
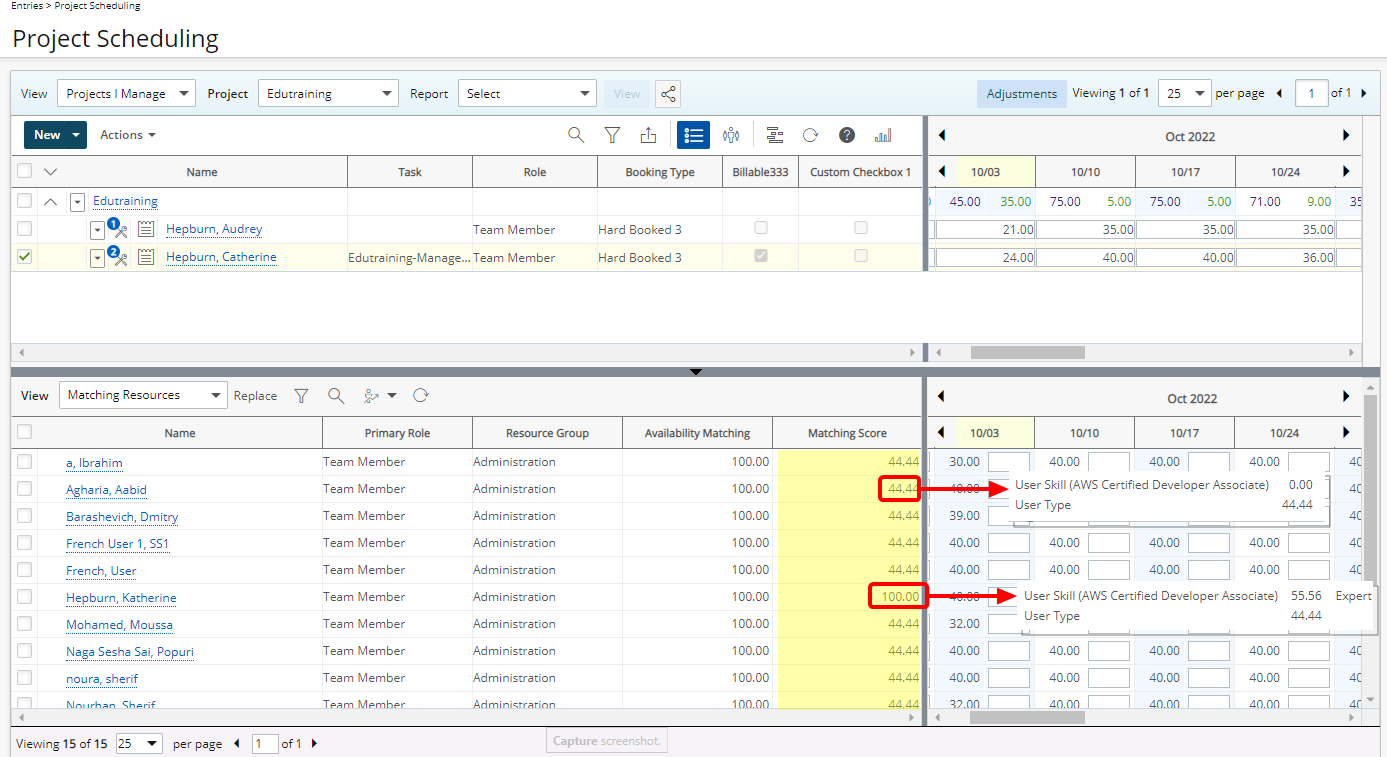
When hovering over a Matching Score within the Matching Resources View, you will see the Skill name and User Proficiency. As well as the score which in our example is calculated as follows for:
- AWS Certified Developer Associate User Skill: (10/18)x100= 55.5556
- User Type: (8/18)x100=44.4444
For further details refer to
- Finding Matches to replace a Role based Booking
- Calculation of the Matching Score
Description: When editing a Booking to replace a Resource, the redistribution will be made based on the selected Periodic Allocation for the Booking and it will replace all Booking Allocations including the ones outside of the View period.
Description: The following improvements have been made when displaying a Project Work Plan:
- When a Project Start/End dates are in the future, the Start date of the Project Work Plan View will automatically default to the Project Start date.
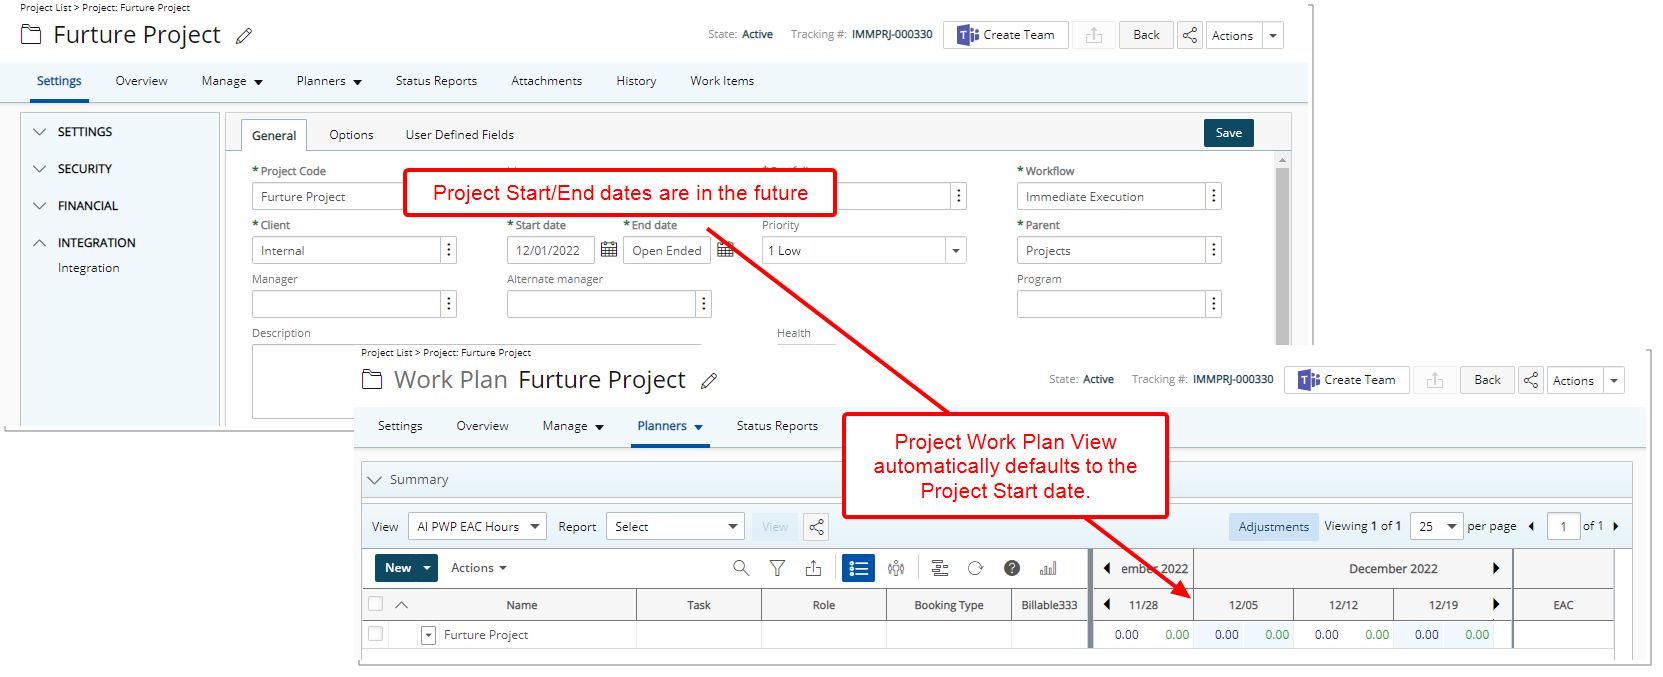
- When a Project Start/End dates are in the past, the Start date of the Project Work Plan View will automatically default to the Project End date.
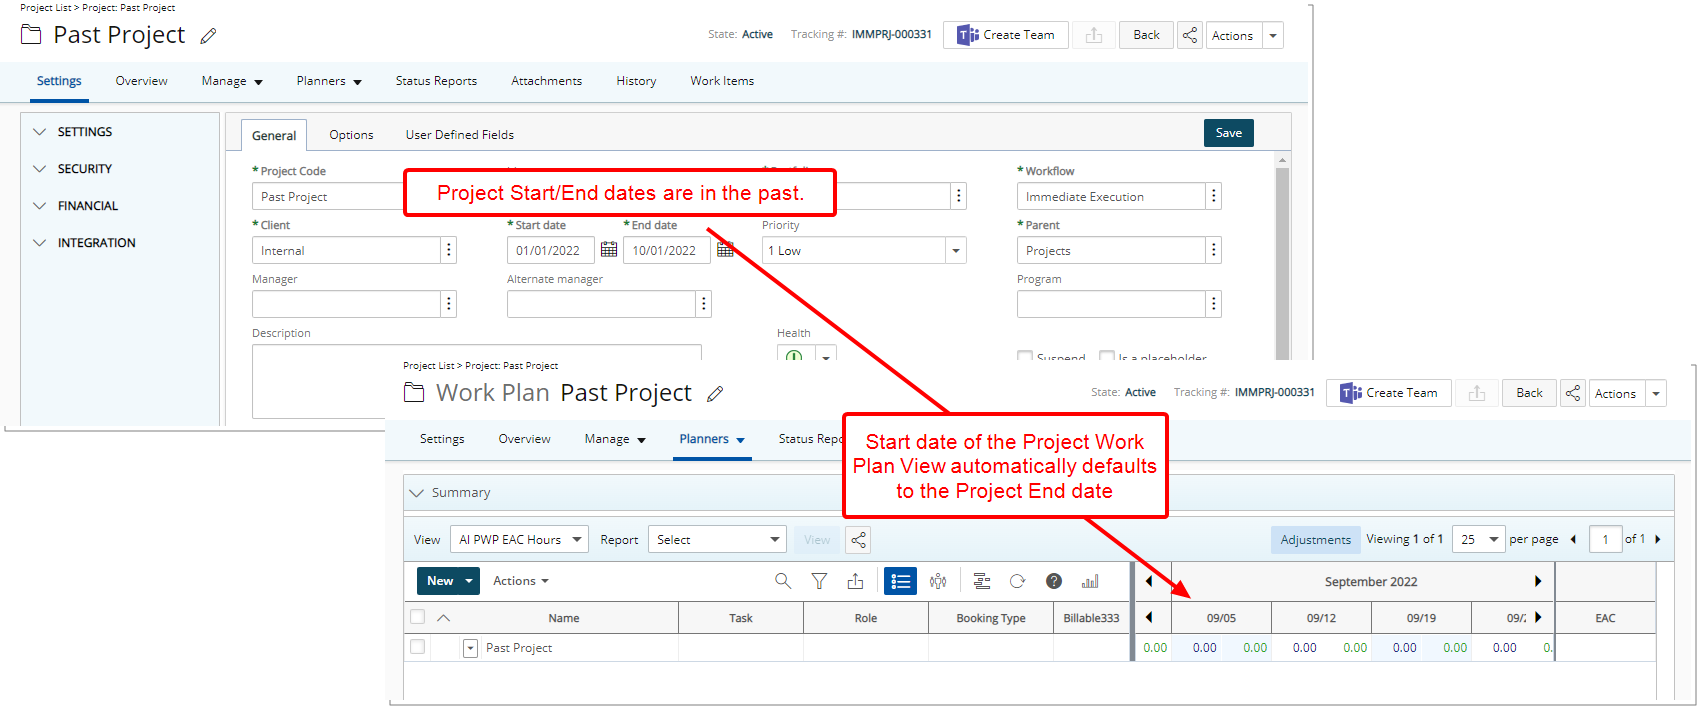
Note: The Timeline start option located within the Details tab of a Work Plan View edit page is used only when the Project is In Progress.
Benefit: This improvement, eliminates the need to manually move to the required period in your Project Work Plan for projects that are not in progress.
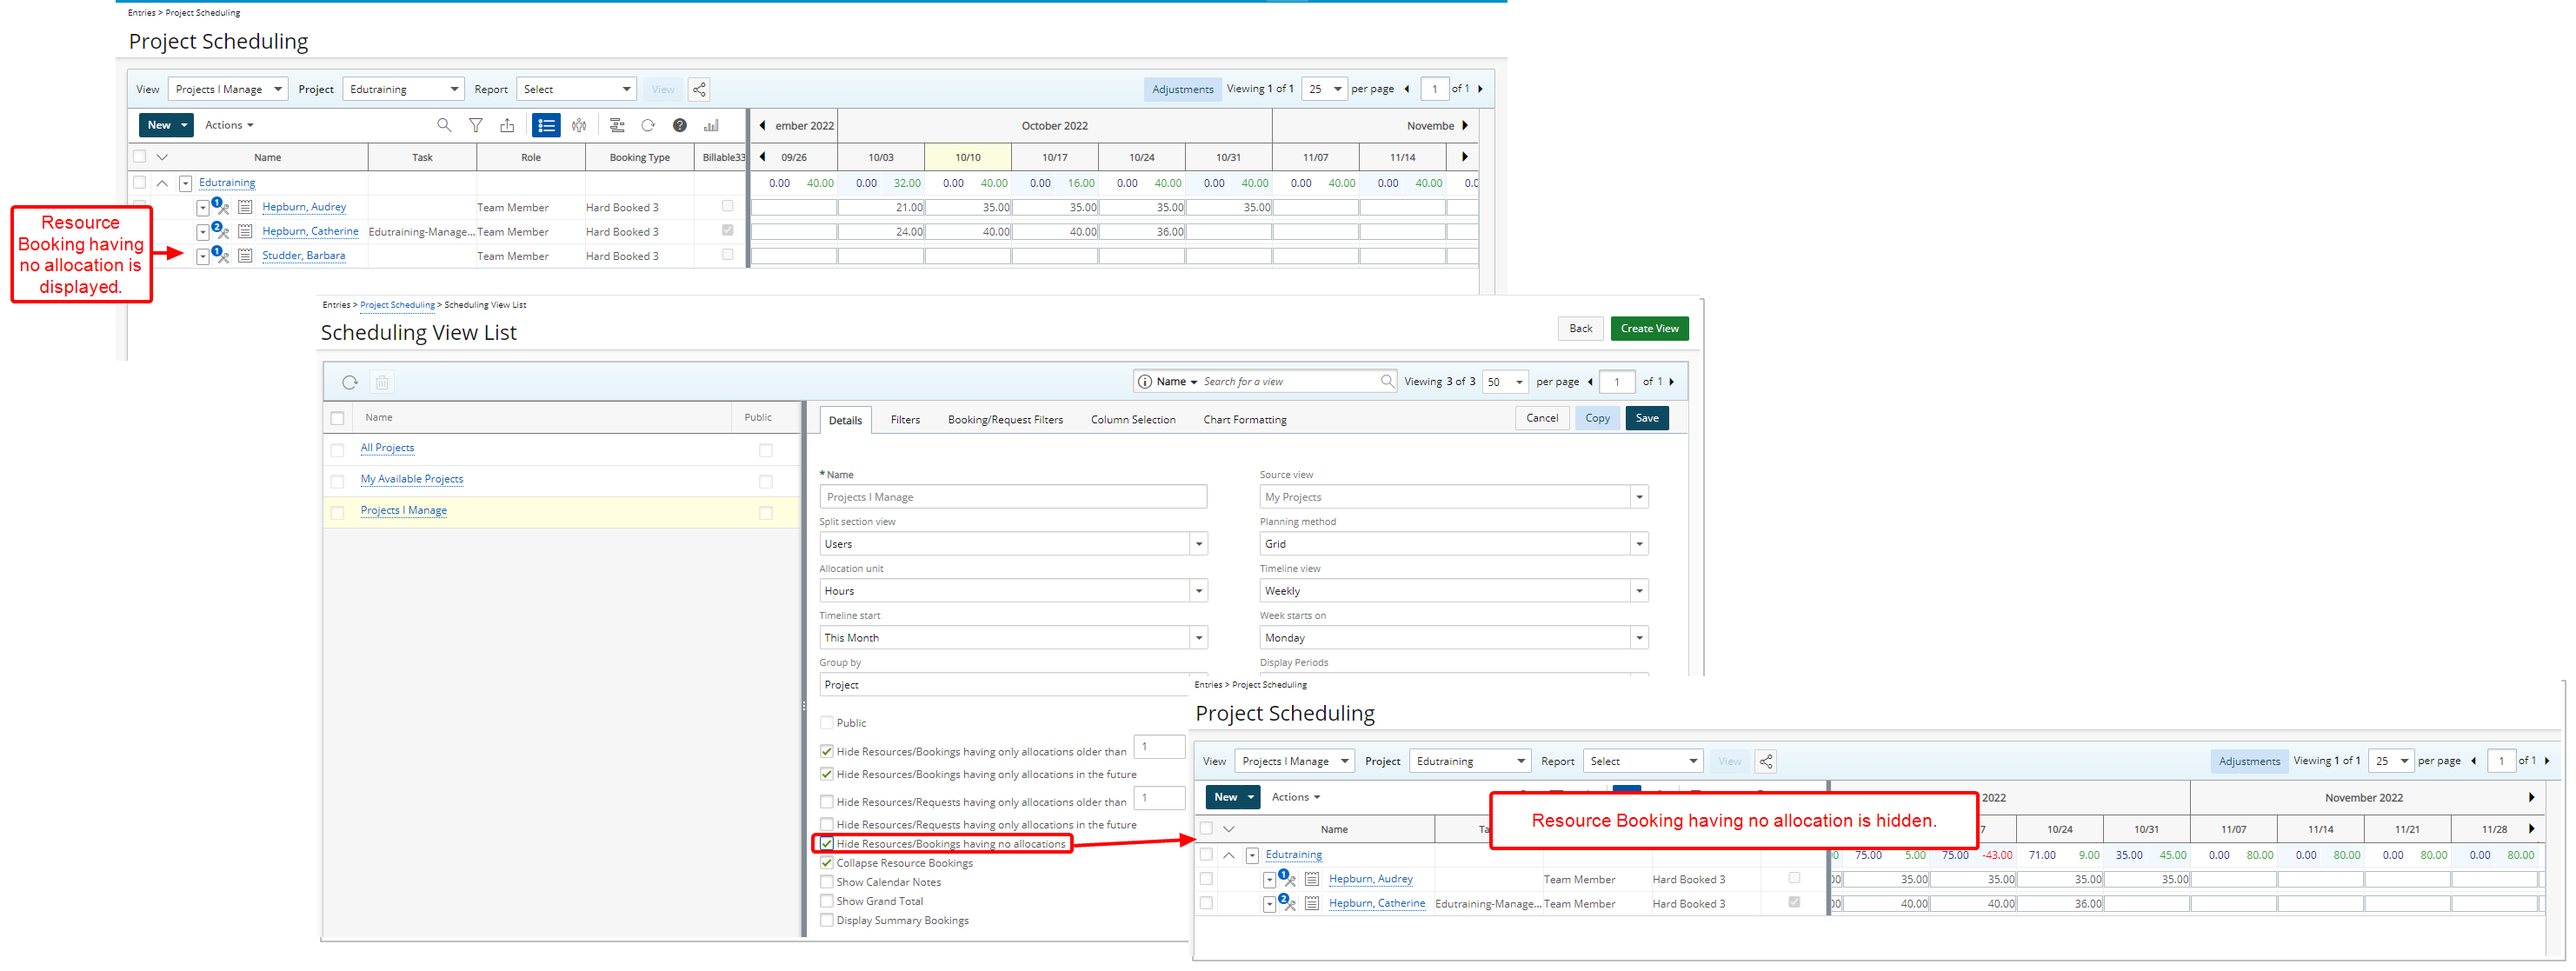
Description: You can now choose to Hide Resources/Bookings having no allocations when managing/creating/editing the details of the following Work Plans:
- Resource Scheduling (Entries)
- Project Scheduling Work Plan (Entries)
- Project Work Plan (Project List > Project Edit > Planners Or Project List > Context Menu)
- Group Work Plan (Setup > Organization > Groups > Group Edit)
- User Work Plan (Setup > Organization > Users > User Edit)
- Role Work Plan (Setup > Organization > Roles > Role Edit)
- My Work Plan (Entries)
Note: By default, the Hide Resources/Bookings having no allocations option is not selected.
Benefit: Allows you to only view bookings that have allocated hours.
For further details refer to Choosing to hide Resources/Bookings having no allocations
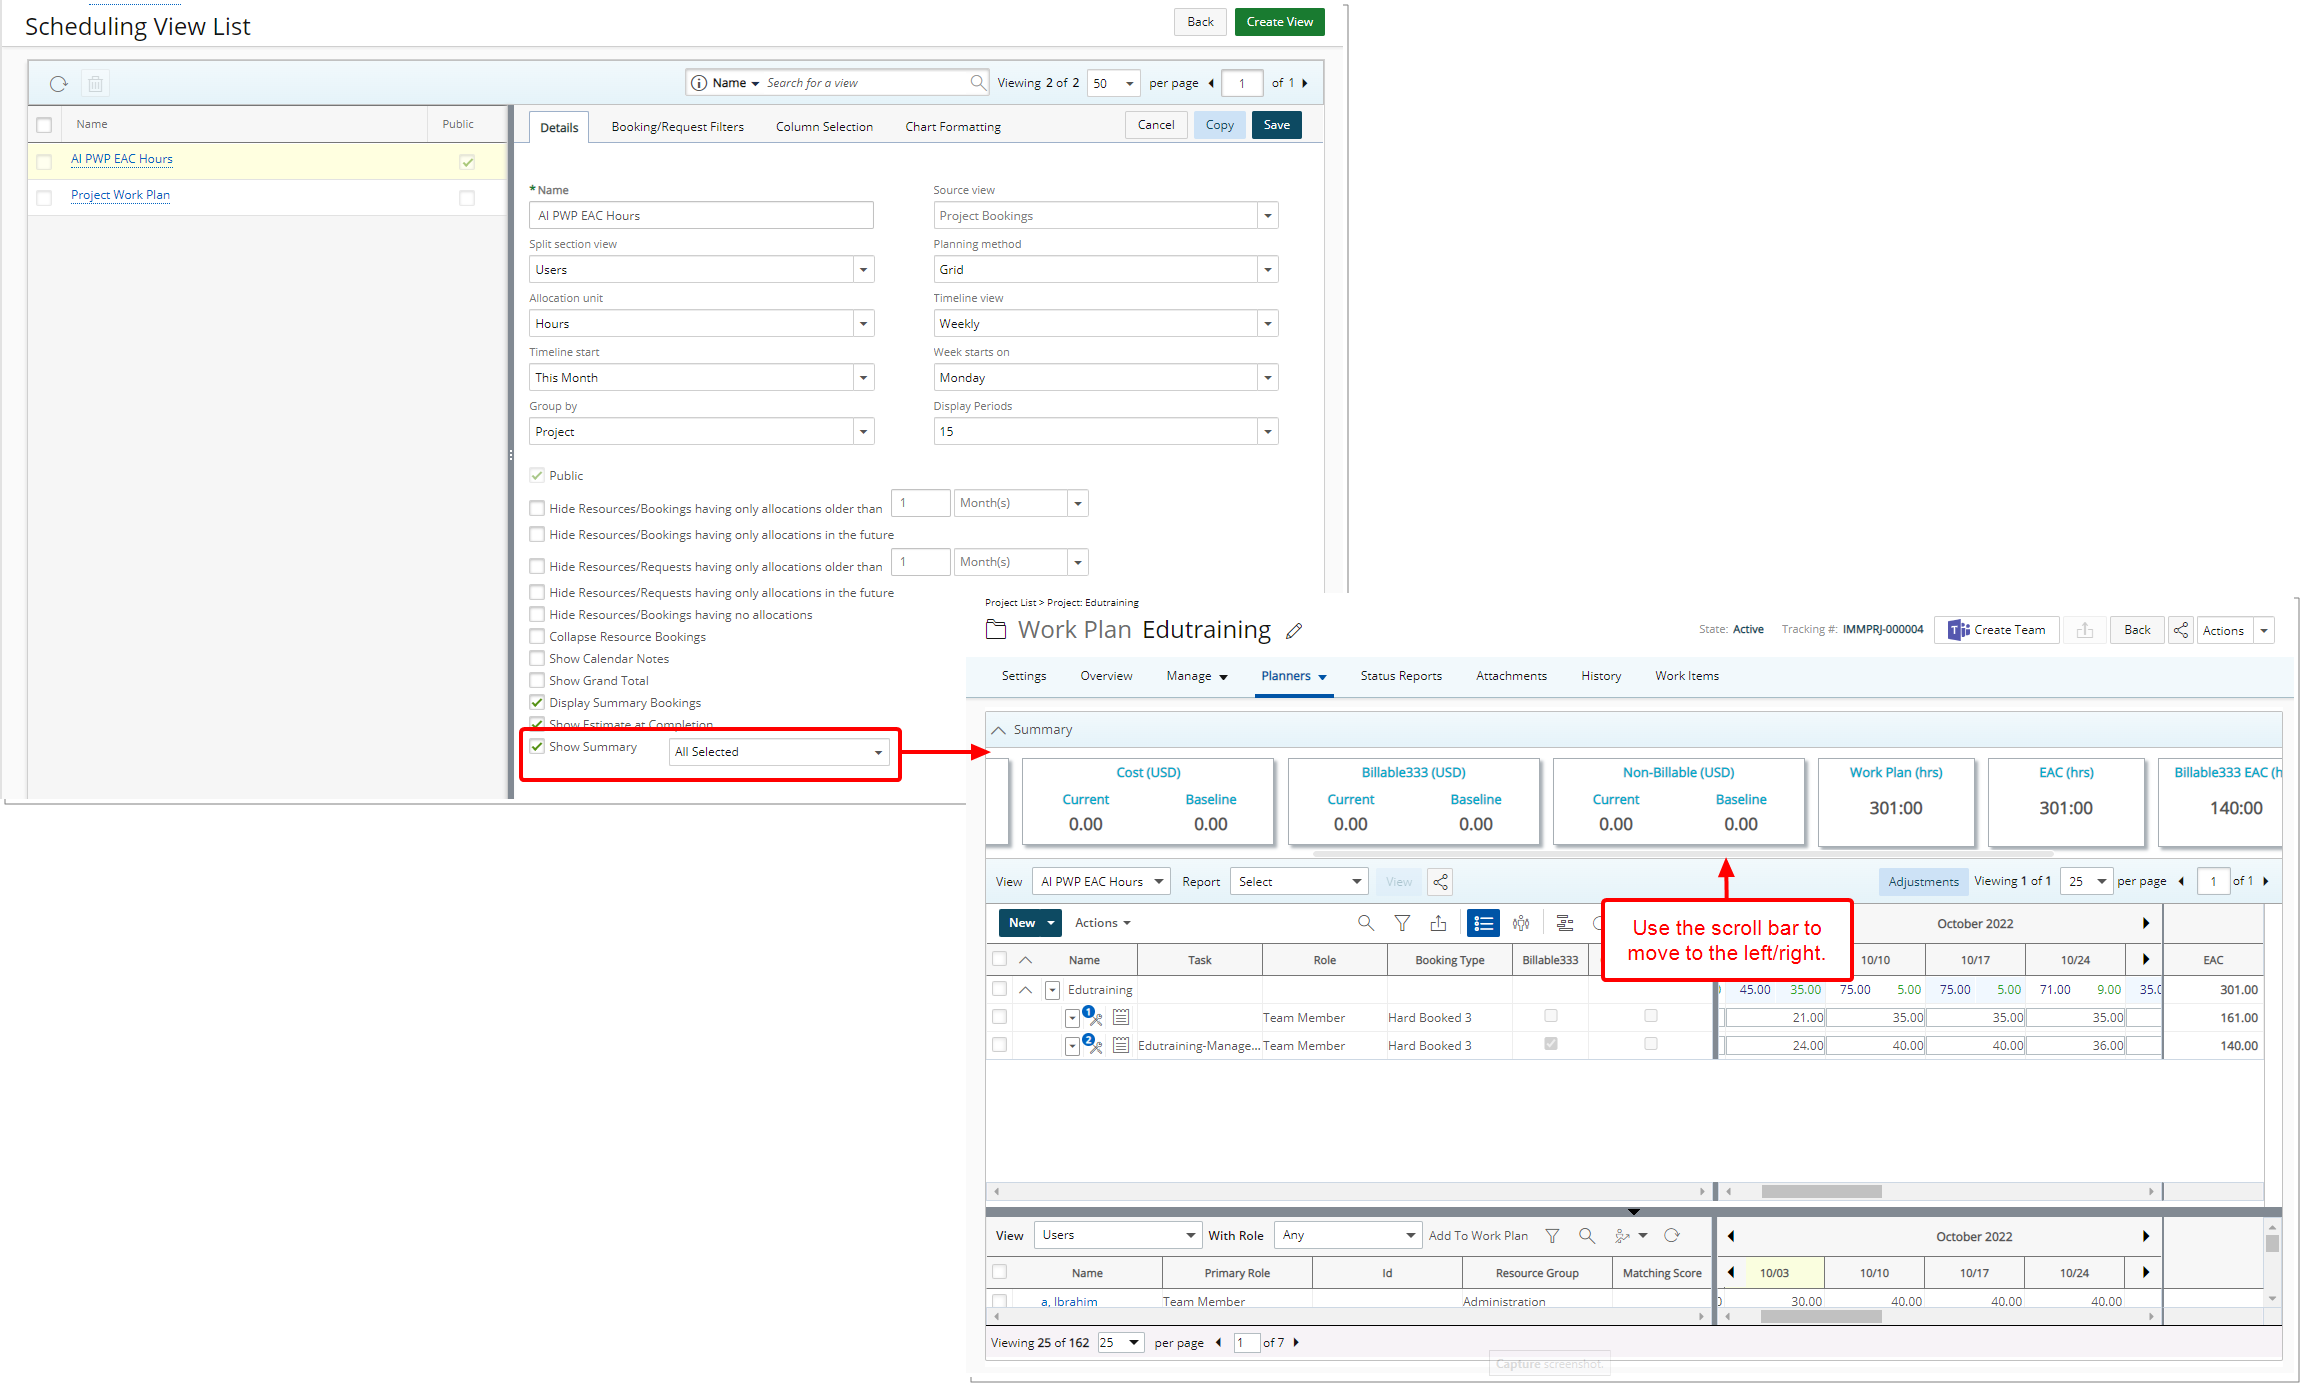
Description: The Display Budgets option within the Details tab of a Project Work Plan View has been replaced with Show Summary.
When Show Summary is selected, you can then choose to display the following KPIs within the collapsible Summary (former Budget Summary) section of the Project Work Plan:
- Select All
- Time (hrs)
- Non-billable Time (hrs)
- Cost (Currency)
- Billable (Currency)
- Non-Billable (Currency)
- Work Plan (hrs)
- EAC (hrs)
- Billable EAC (hrs)
- Non-billable EAC (hrs)
Your above-mentioned selections will then be displayed within the Summary section of the Work Plan when the View is selected.
For further details refer to:
- Enabling the Summary section to appear within the Project Work Plan
- Including the Sum of Grand Total of all bookings on the entire project in the Grand Total column within the Project Work Plan
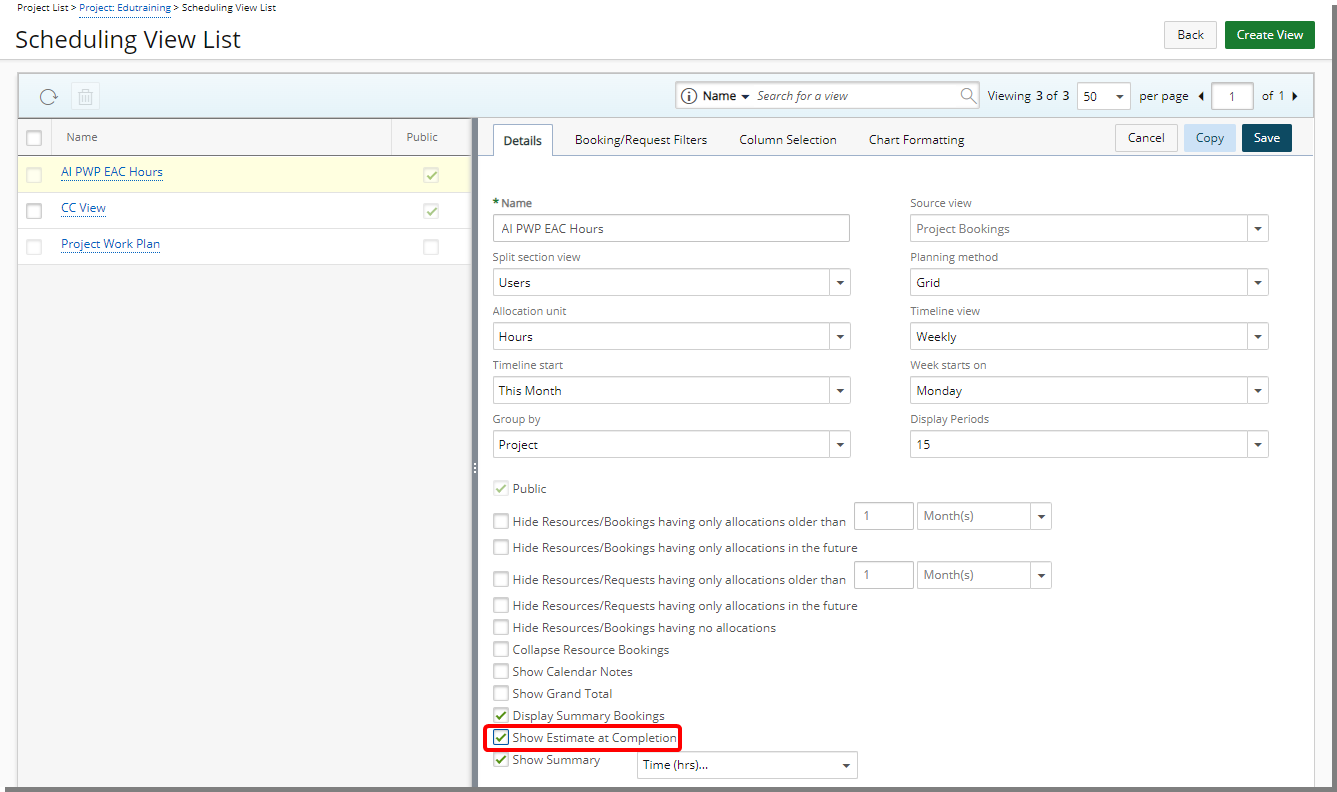
Description: The Show Estimate at Completion is now available when managing/creating/editing the details of the Project Work Plan View.
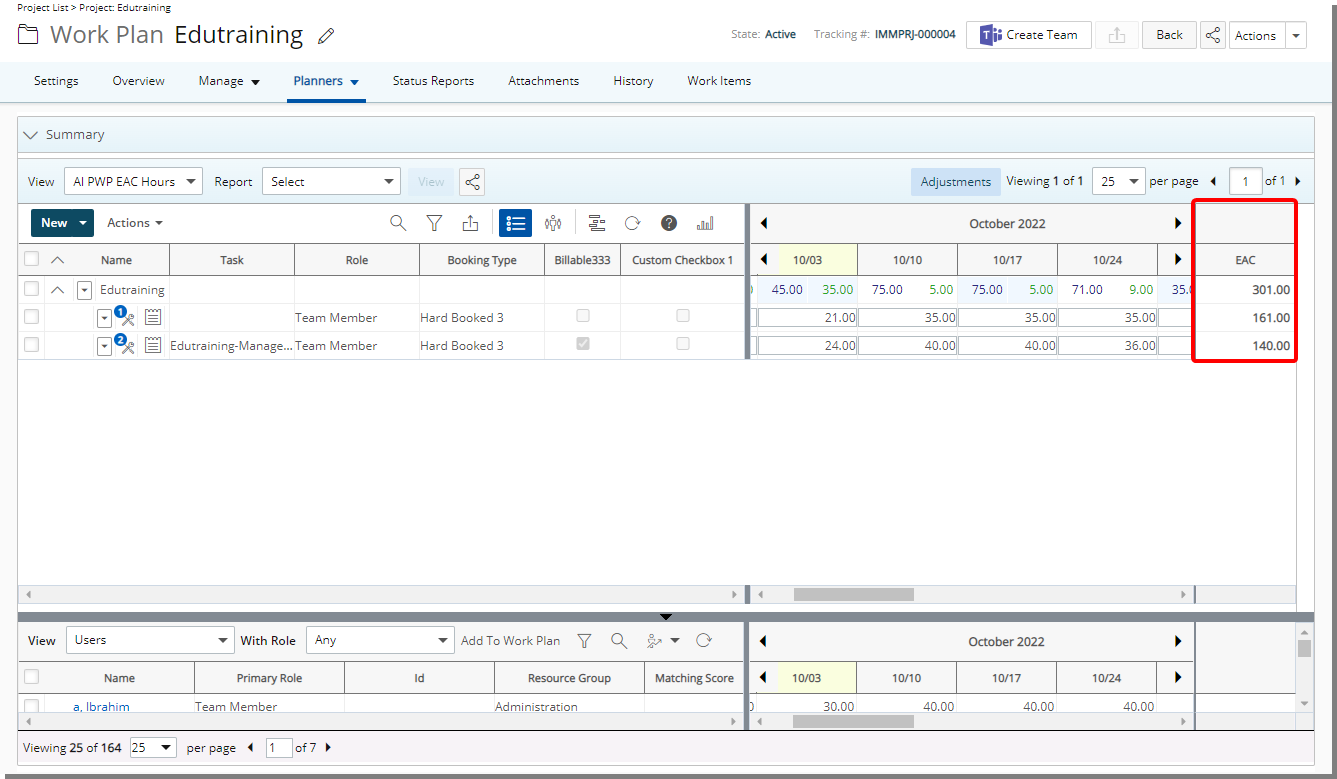
When selected, the EAC column is displayed on the Work Plan and calculated as: actuals for the past and current period + allocated booking hours for future period(s).
Note: The calculations are made based on your selections for Work Plan Hours to Include and Actuals to Include settings with the General tab as well as your selected Forecast Start Date within the View Settings tab of the Financial Planner Template associated to the Project.
For further details refer to Displaying the Estimate at Completion (EAC) column on the Project Work Plan
REST API/SDK
With this release, security was modified on these API Endpoints:
| API Endpoint | Required Security |
|---|---|
| ~/api/v2/ClientPOs POST/PUT/DELETE | Setup > Work > ClientPO |
| ~/api/v2/IntegrationObjectMappings GET/POST | Setup > Financial > Accounting |
| ~/api/v2/InvoiceBatches POST/PUT | Management > Financial > Invoices |
| ~/api/v2/Clients/{ID}/POs | Setup > Work > ClientPO |
| ~/api/v2/Clients/{ID}/POs/{POid} | Setup > Work > ClientPO |
| ~/api/v2/Clients/{ID}/POs/{POid}/Item s POST | Setup > Work > ClientPO |
| ~/api/v2/Clients/{ID}/POs/{POid}/Item s/{ID} PUT/DELETE | Setup > Work > ClientPO |
| ~/api/v2/Clients/{ID}/POs/{POid}/Item s/{ID}/Associations GET/POST/PUT | Setup > Work > ClientPO |
| ~/api/v2/Clients/{ID}/POs/{POid}/Item s/{ID}/Associations/{ID} GET | Setup > Work > ClientPO |
| ~/api/v2/Clients/{ID}/InvoiceOptions GET/PUT | Setup > Work > Clients |
| ~/api/v2/Currencies/{ID} DELETE | Setup > Financial > Currency s |
| ~/api/v2/Currencies/{ID}/exchangerates/{ID} PUT | Setup > Financial > Currency Exchange |
| ~/api/v2/UserPlanningRoles POST/PUT ~/api/v2/Calendars/4/details PUT | Setup > Organization > User Setup > Workforce Planning > Calendar |
Caution: It is highly encouraged to use a Security Profile with Administrative privileges when working with the API. However, if you need to use a less privileged Security Profile, please ensure that all required permissions are granted.
Timesheet
The initiative to redesign My Timesheet is aimed to address client feedback, incorporate newer technology as well as enhance the user experience.
To allow Users access to the new and improved My Timesheet in your Sandbox/Implementation/Production environments, you must add them to the New Timesheet list. For further details refer to Adding users to the New Timesheet list. If you prefer, you may choose to enforce the use of New Timesheet for all Users.
Expand each heading to view more details of the enhancements:
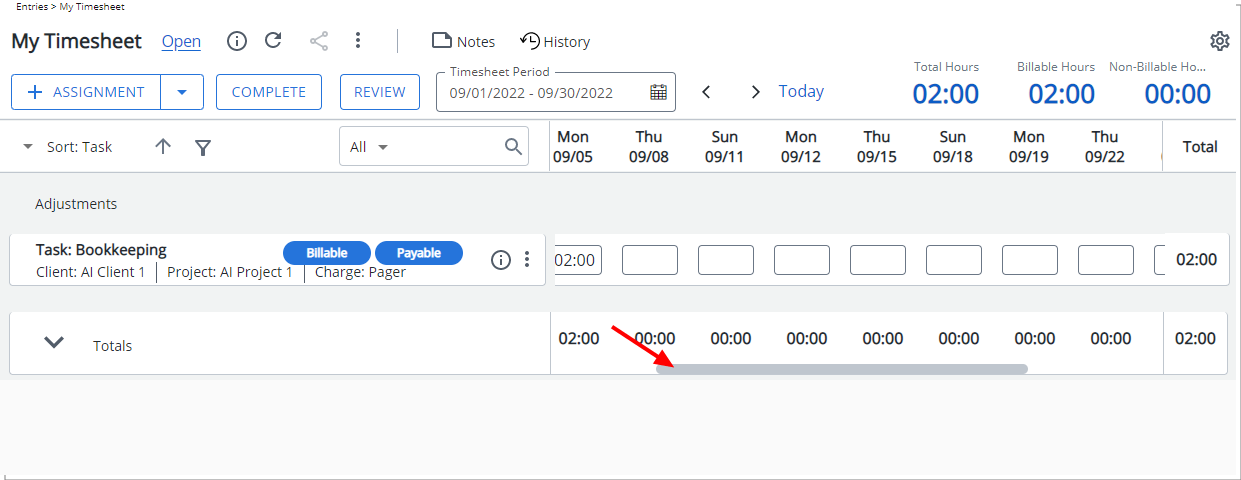
Description: A vertical scroll bar is now available for the Time Entries section for Bi-weekly, Semi-monthly and Monthly Timesheet Periods.
As a result, the following two features previously available for Bi-weekly, Semi-monthly and Monthly Timesheet Periods, are deprecated:
- The Number of days section located under the Timesheet Display settings
- The navigational buttons allowing you to move the Time Entry panel to the next/previous week(s) keeping the Assignment panel fixed.
Benefit: The vertical scroll bar allows you to easily scroll through the days and Time Entries against your Assignments while keeping the Assignment panel and the Totals fixed.
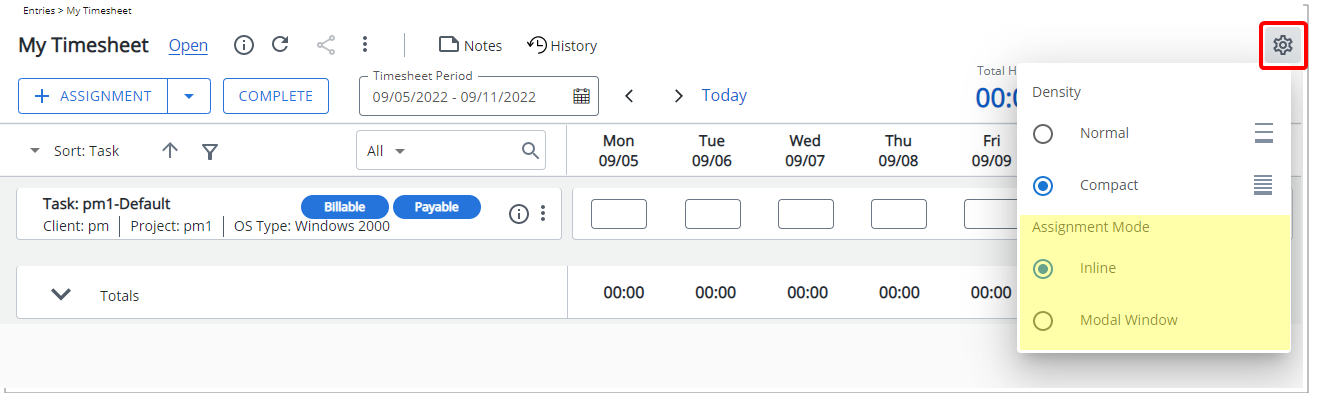
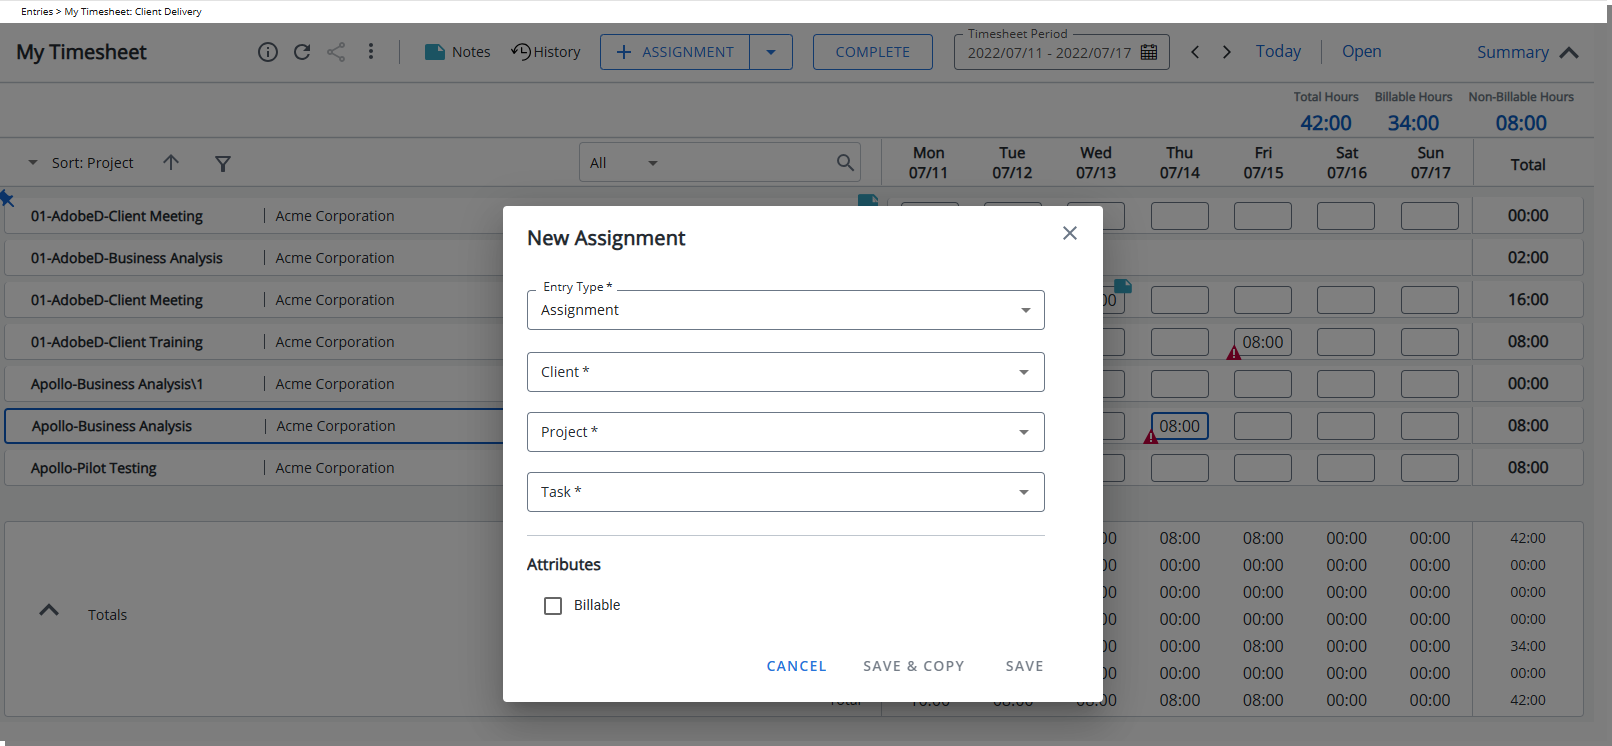
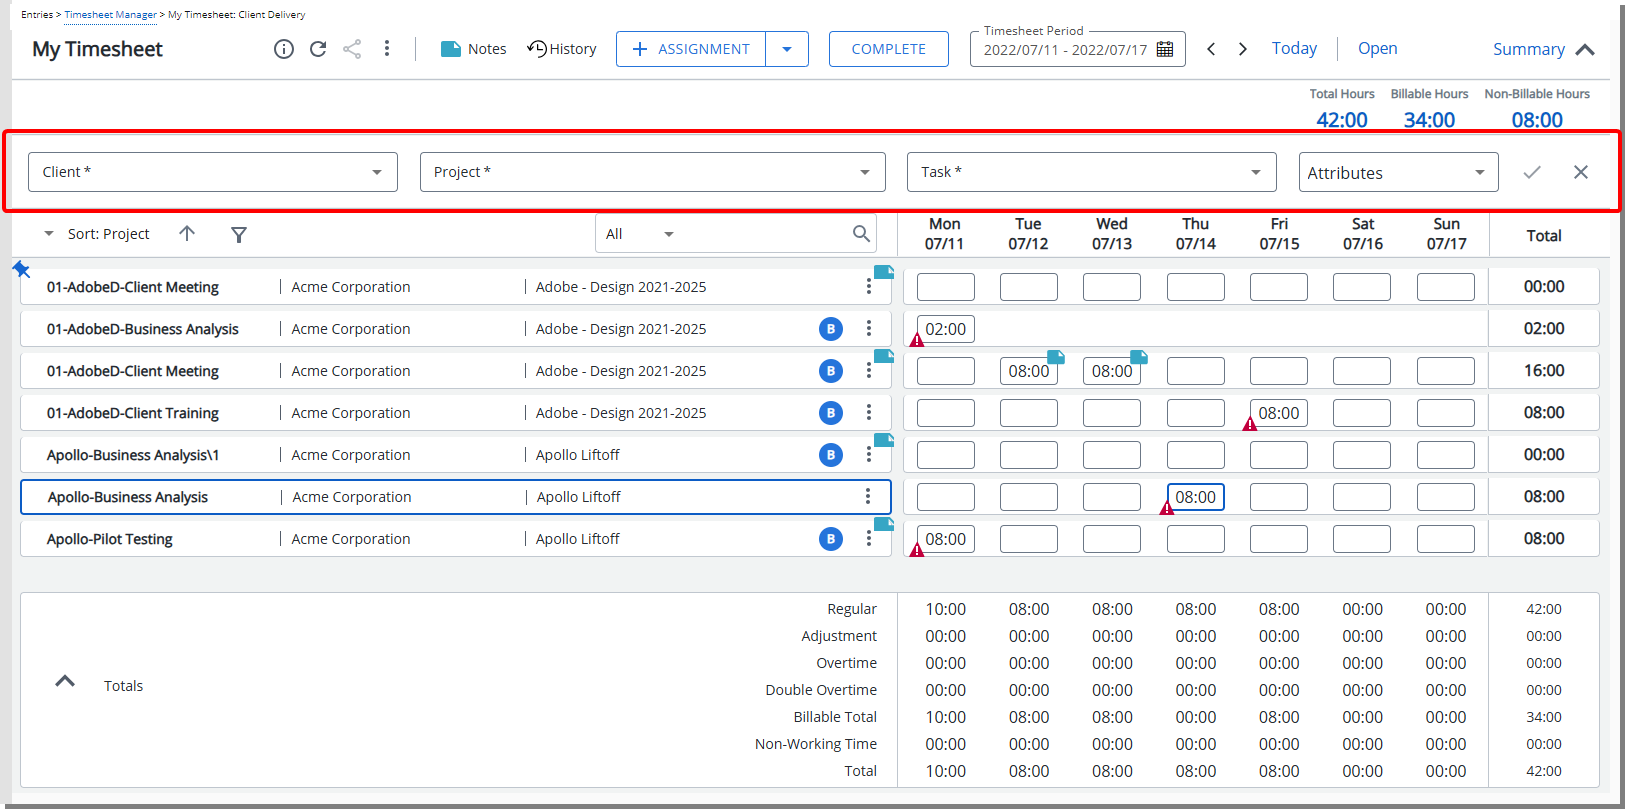
Description: The Inline and Modal Window Assignment Mode options are now available from the Timesheet Display settings.
When Modal Assignment Mode is chosen, upon clicking the +Assignment button, a modal window will be displayed allowing you to pick your Assignment as in previous releases.
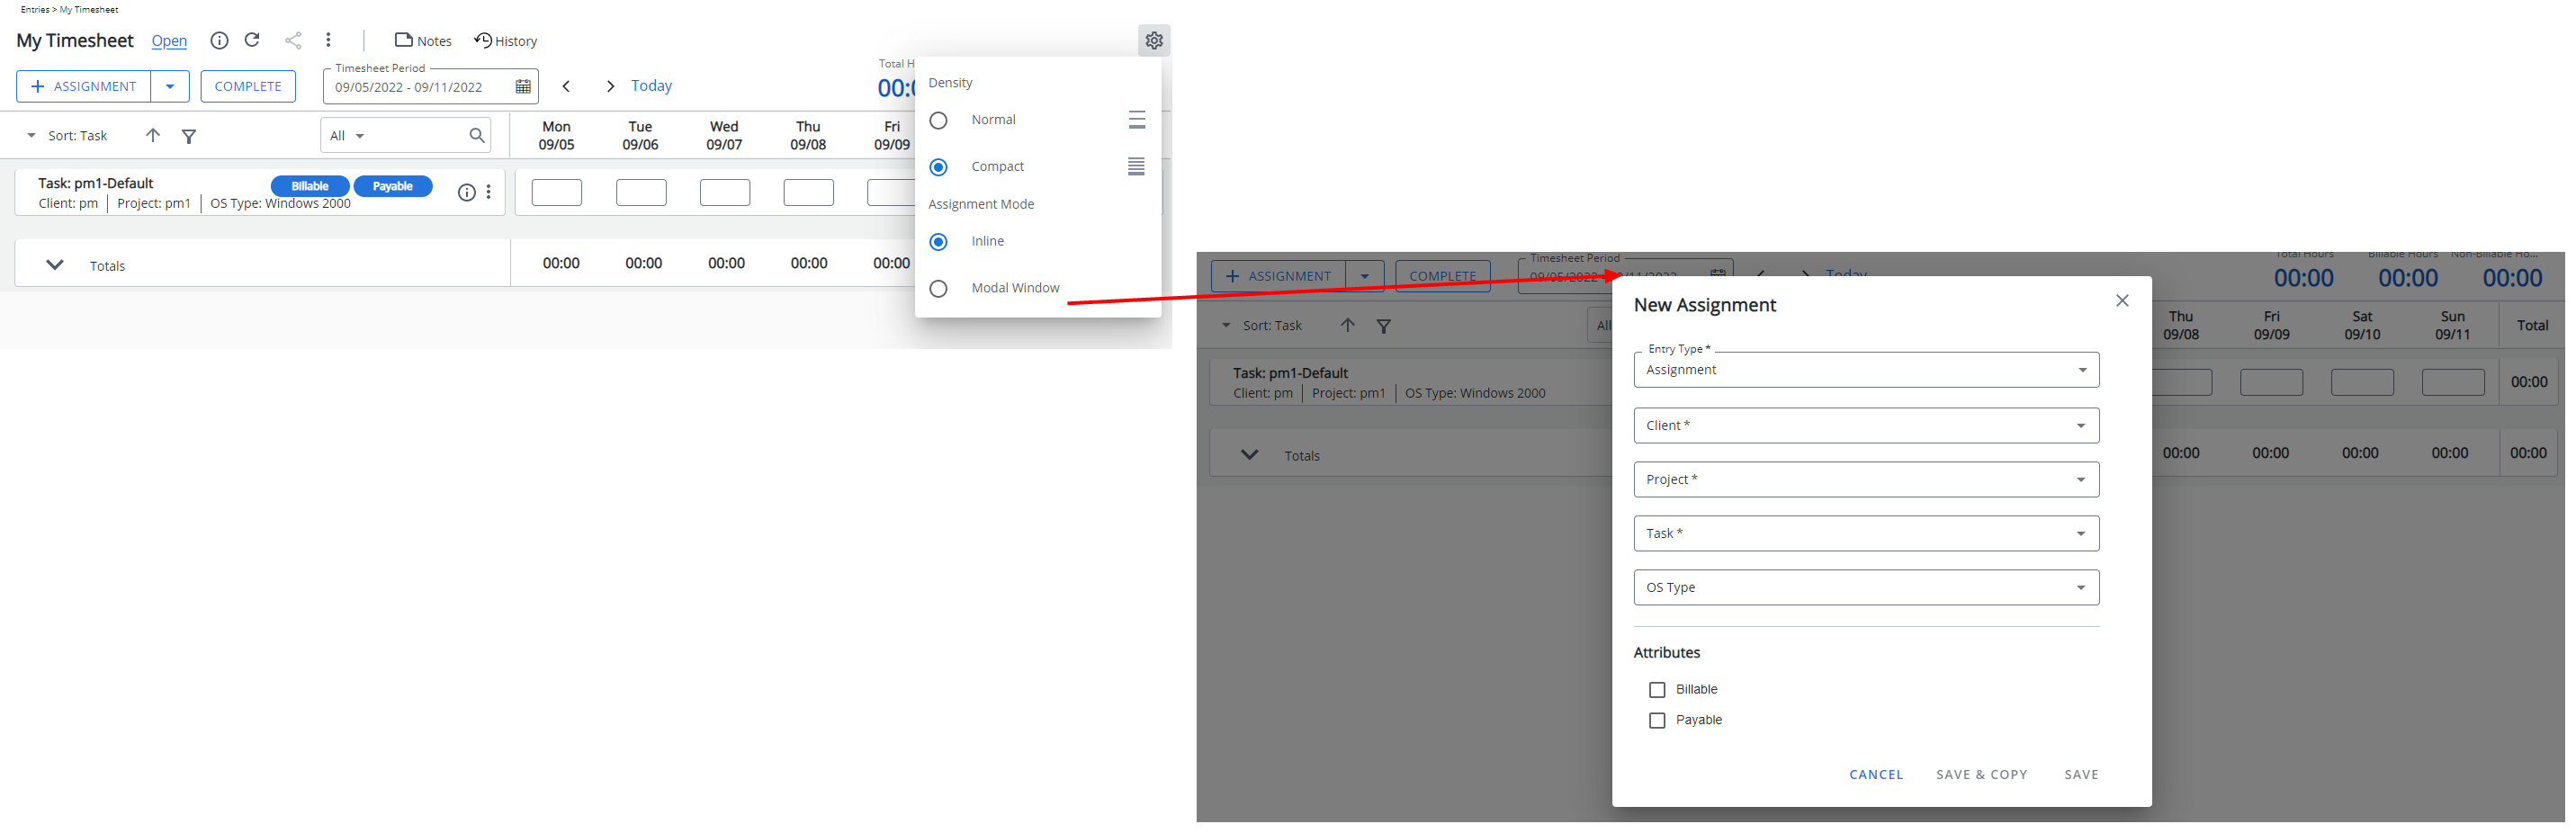
When Inline Assignment Mode is chosen, upon clicking the +Assignment button you can pick your assignment directly from your Timesheet. Clicking Save will add the assignment to your Timesheet.
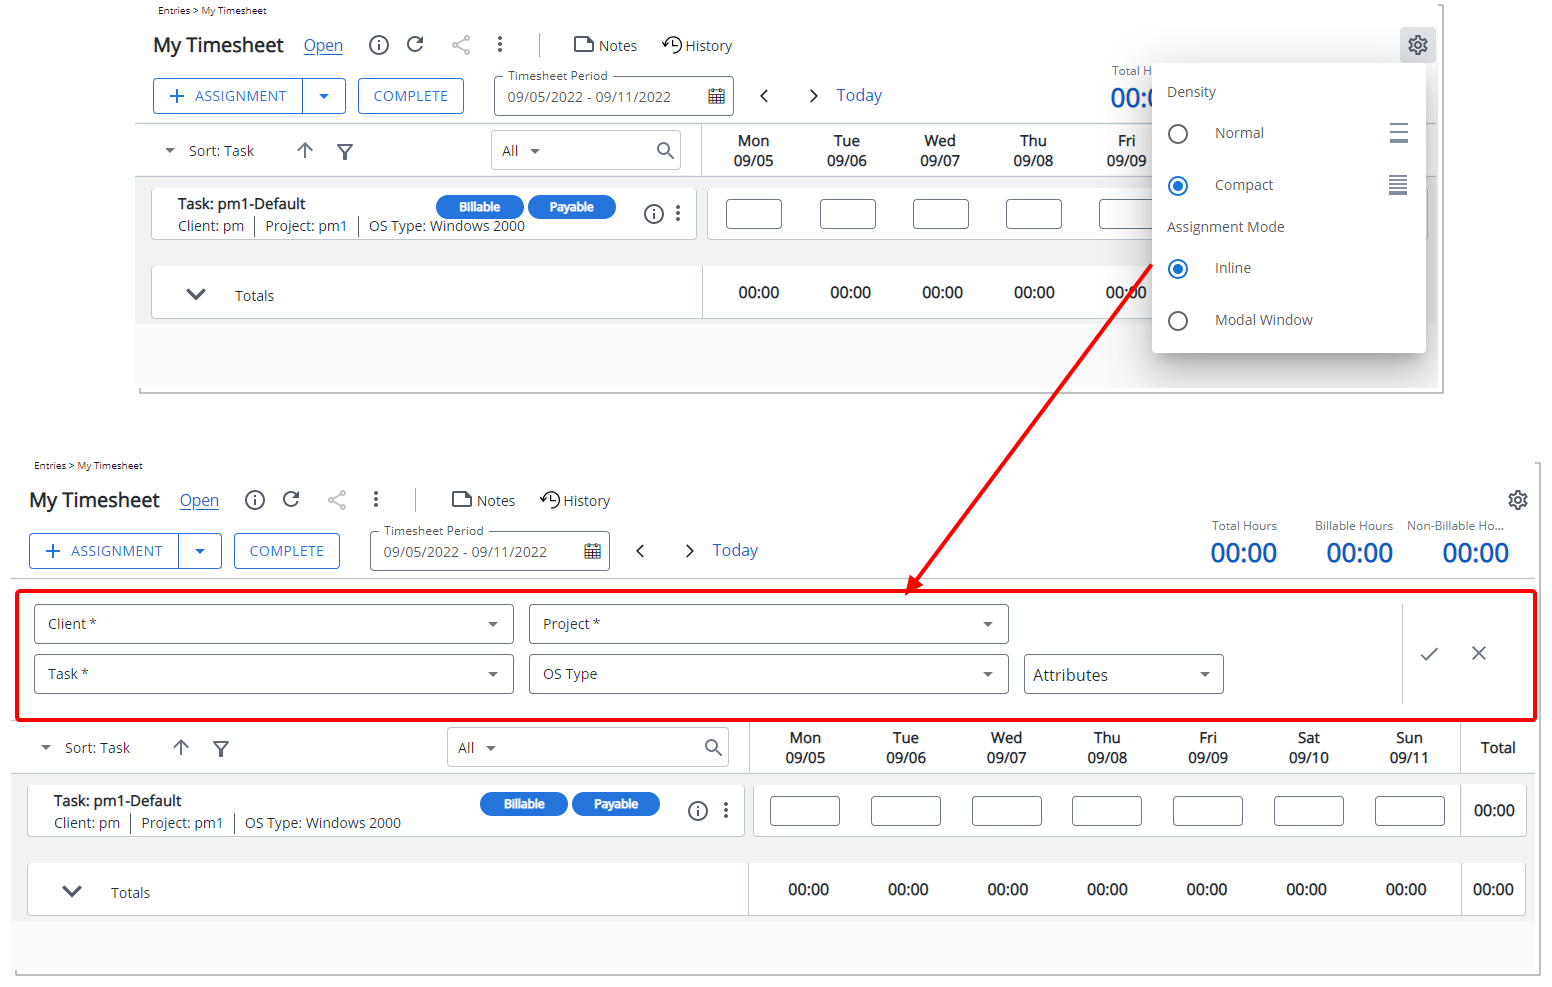
Note: The inline assignment box remains open until the Close button is clicked.
Benefit: You now have the option to choose the attributes to create a new Assignment more efficiently without significant click-through directly from your Timesheet.
For further details refer to My Timesheet Display Settings
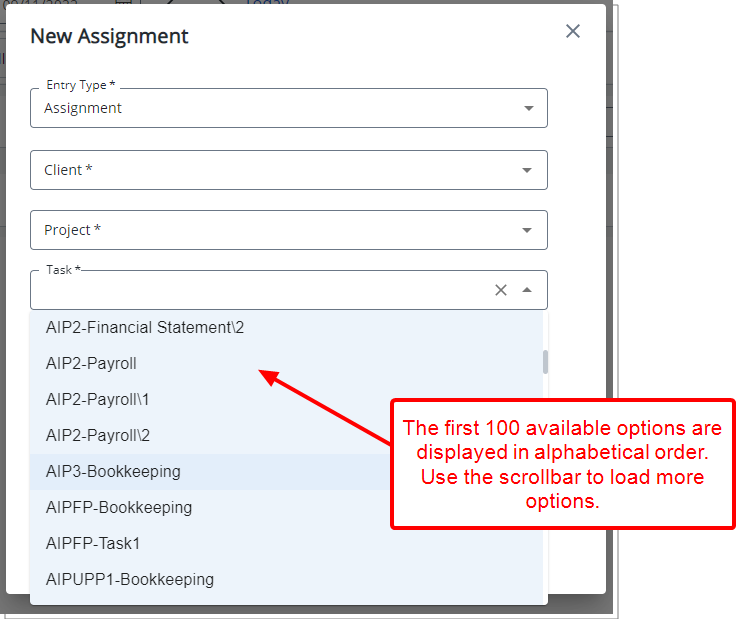
Description: When picking an Assignment, the list of available Clients, Projects, or Tasks (as an example) now displays the first 100 available options in alphabetical order. You can use the selection boxes’ scroll bar to load more options.
Benefit: With this improvement you can now use the scroll bar to easily view all available options and then select the required items, significantly improving your user experience.
For further details refer to:
- Timesheet Assignments
- Picking an Assignment
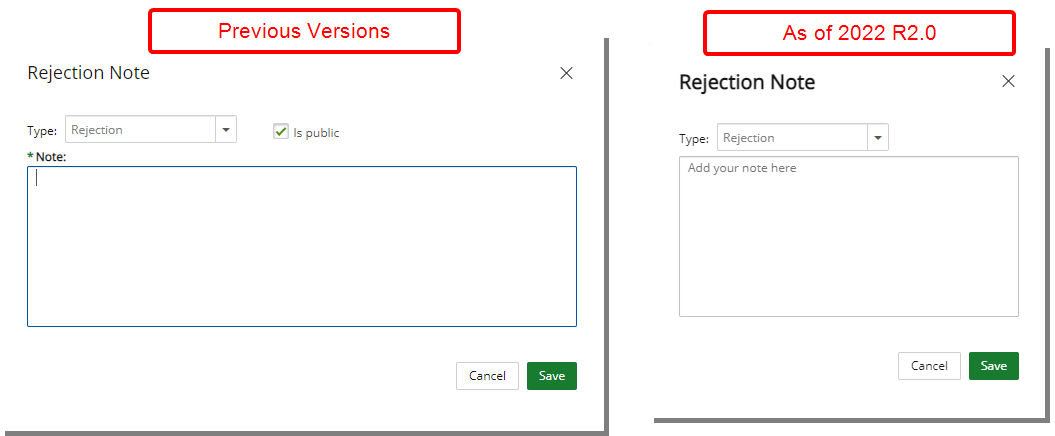
Description: The Rejection Note dialog box accessed through Timesheet Manager has been redesigned to improve overall user experience and establish consistency across all pages.
Furthermore, both the Type and Public options have been deprecated when rejecting a Timesheet through the Timesheet Manager page.
Benefit: With these overall modifications, the look and feel are further improved, as well in keeping with the Upland One mindset, wherein the layout of various elements within the page support the unified experience across Upland products. Consequently, the user experience is further elevated.
For further details refer to Rejecting Timesheets through Timesheet Manager
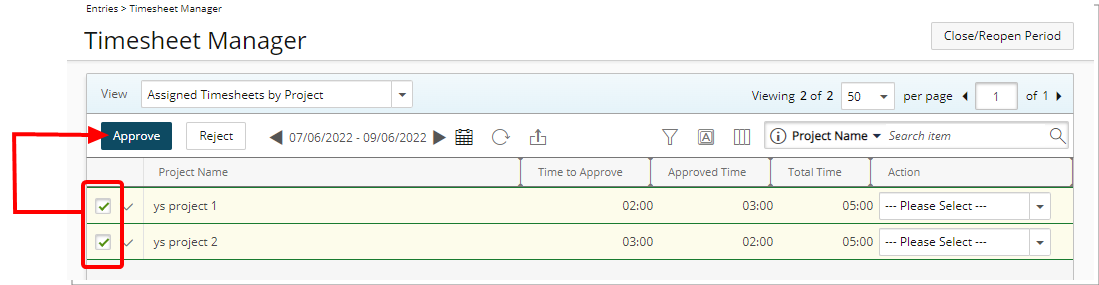
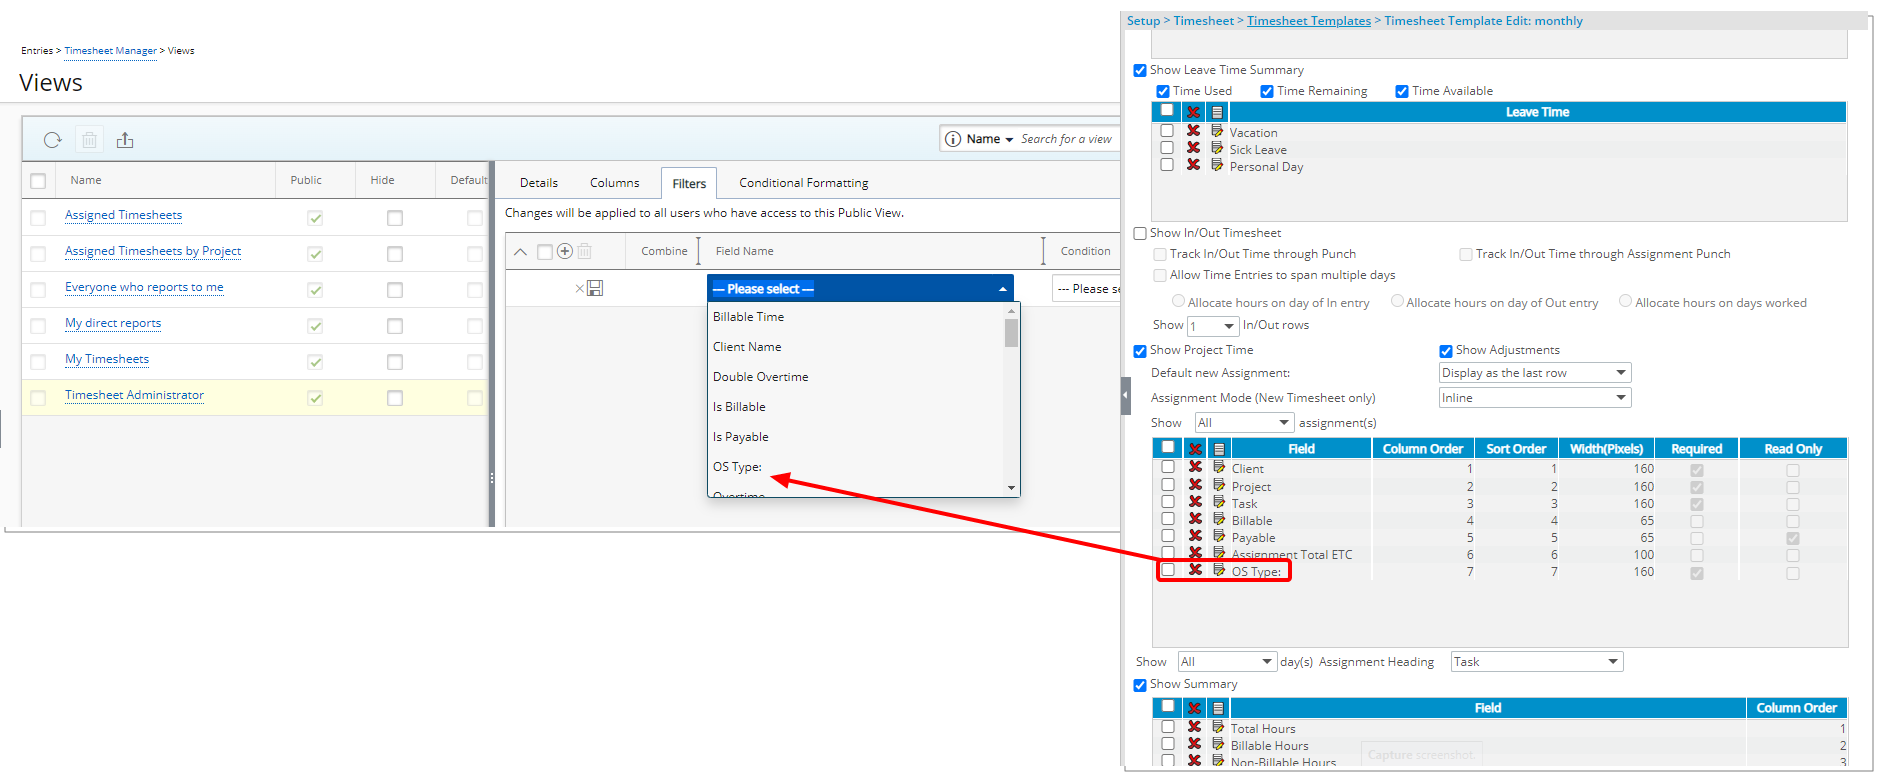
Description: You can now select multiple Timesheets to Approve or Reject from the Assigned Timesheets by Project View (Entries > Timesheet Manager).
Benefit: With this improvement you can now Approve/Reject multiple Timesheets quickly and easily from the Assigned Timesheets by Project View.
For further details refer to
- Assigned Timesheets by Project View
- Timesheet Manager page | Available Views
Description: You can choose to Filter the Timesheet Manager Views based on any User Defined Fields associated to Timesheets.
Benefit: This improvement allows you to filter the list based on associated User Defined Fields.
For further details refer to Timesheet Manager page | Available Views

Description: The warning messages that display when exceeding the budgeted time for Assignment, Task or Project have been improved to now include information regarding the exceed budget type and exceeded number of hours for:
- Total Assignment budgeted time
- Billable Assignment budgeted time
- Non-billable Assignment budgeted time
- Total Project budgeted time
- Total Project Billable budgeted time
- Total Project Non-Billable budgeted time
- Total Task budgeted time
- Total Task Billable budgeted time
- Total Task Non-Billable budgeted time
Benefit: You now have a clearer understanding of issue causing a warning message.
Description: Selected choices within My Timesheet Display Settings are now saved and maintained upon revisiting the page by the same User across all browsers.
Benefit: Your preferred Display Settings are now maintained when accessing My Timesheet from different browsers/computers for a more streamlined user experience.
For further details refer to My Timesheet Display Settings
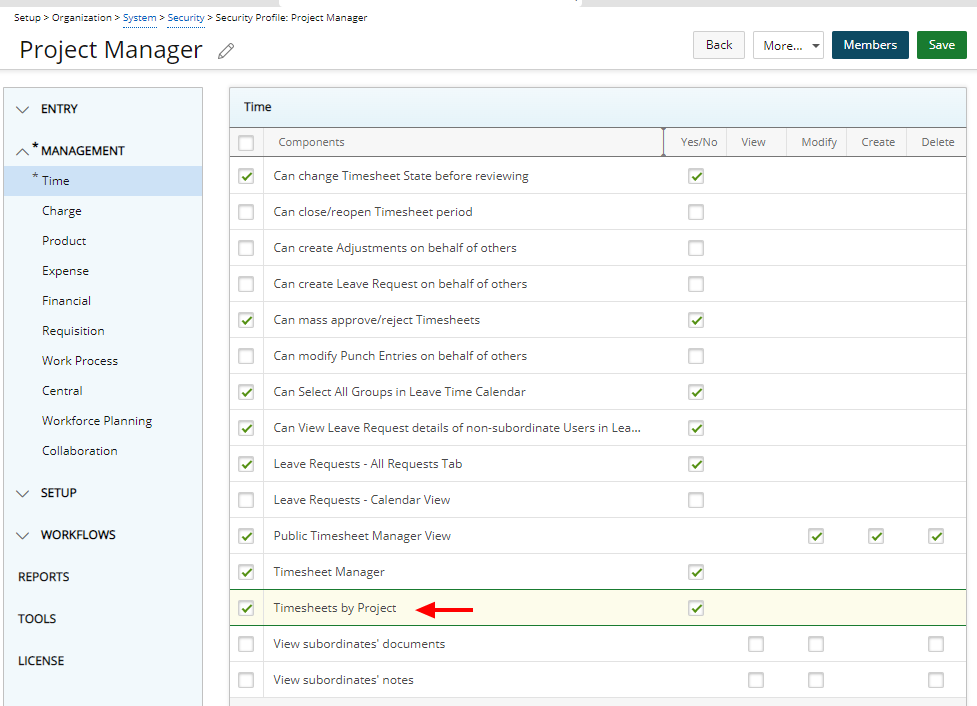
Description: The new Timesheets by Project View permission has been added under Management > Time with Yes/No rights allowing you to grant the rights to the new Timesheets by Project View (Entries > Timesheet Manager).
Note: By default, the Timesheet by Project View permission is unchecked.
This View provides you with a list of all Timesheets, grouped by Project which you are managing.
From this View you can:
- Choose the Period you wish to see from the period picker.
- Refresh the page
- Export the list to Excel.
- By default, Search based on Project Name, Project Code and Project Id.
Users with the Modify permission to the Public Timesheet Manager View, defined for the Security Profile under which they fall (Setup > Organization > System > Security), can configure the following:
- Filter
- Column Terminology
- Column Selection
From the respective Project drawers, you can Refresh the list and Export it to Excel. Furthermore, User Timesheets can be accessed by clicking their respective User Names.
Note: You cannot perform any actions when accessing a Timesheet through the Timesheets by Project View. Timesheets accessed through this View are read-only.
By default, the Following columns are displayed within the drawer: User Name, Approval Group, Start Date, End Date, Billable Total Time, Time to Approve, Approved Time, Rejected Time, Total Time, State and Template. You can choose to include the Leave Time column from the drawer Column Selection.
For further details refer to
- Granting the rights to the Timesheets by Project View
- Timesheet Manager page | Available Views
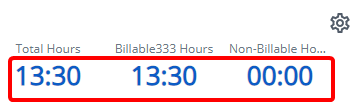
Description: Minor modifications have been made to improve your user experience with My Timesheet including:
- Values within the Summary section are now center aligned
- The tab widths within the Assignment Details panel have been adjusted to avoid scrollbars
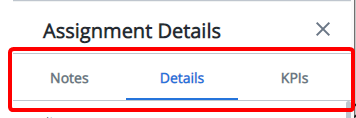
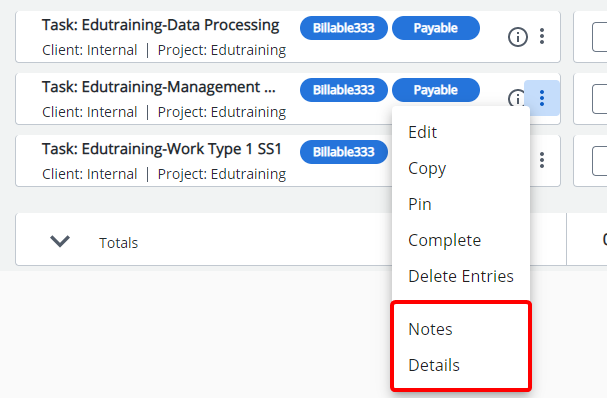
- The order of Details and Notes within the Assignment context menu has been modified to now read Notes followed by Details
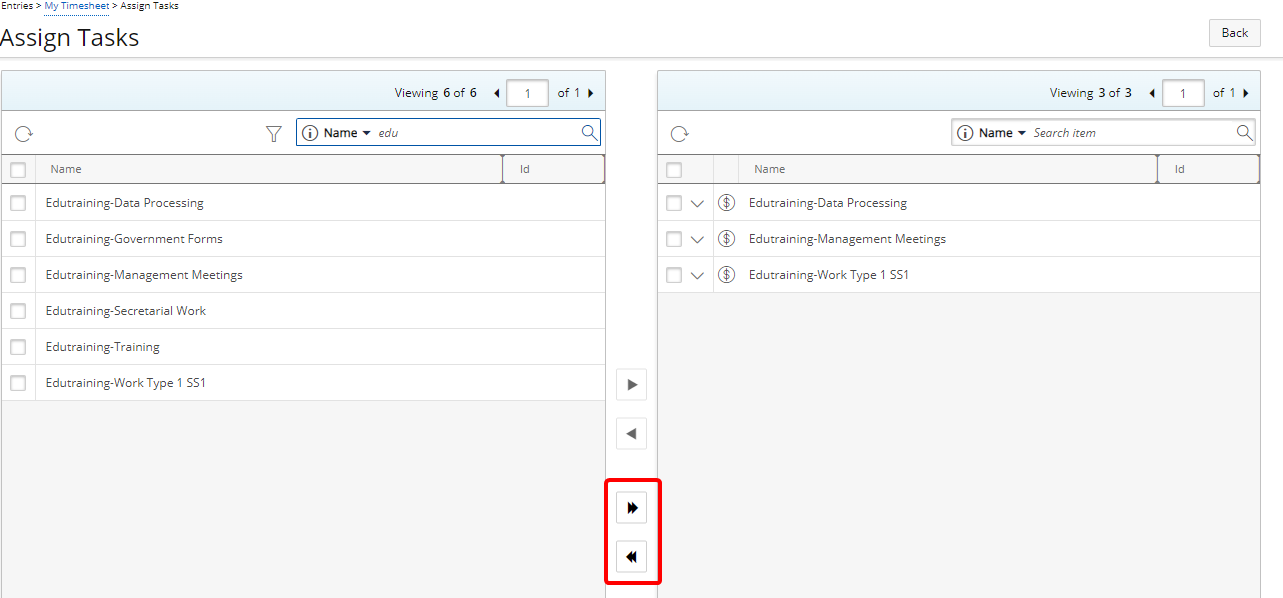
- The Add All and Remove All buttons have been moved to the bottom of the Assign Tasks page.
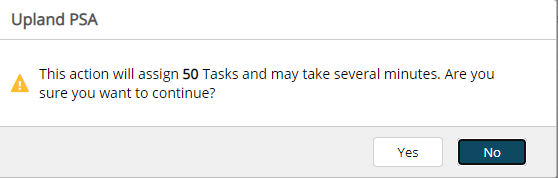
- The warning message box when trying to add/remove several Tasks from the Assign Tasks page has been modified to include a warning icon and now reads: This action will assign {0} Tasks and may take several minutes. Are you sure you want to continue?
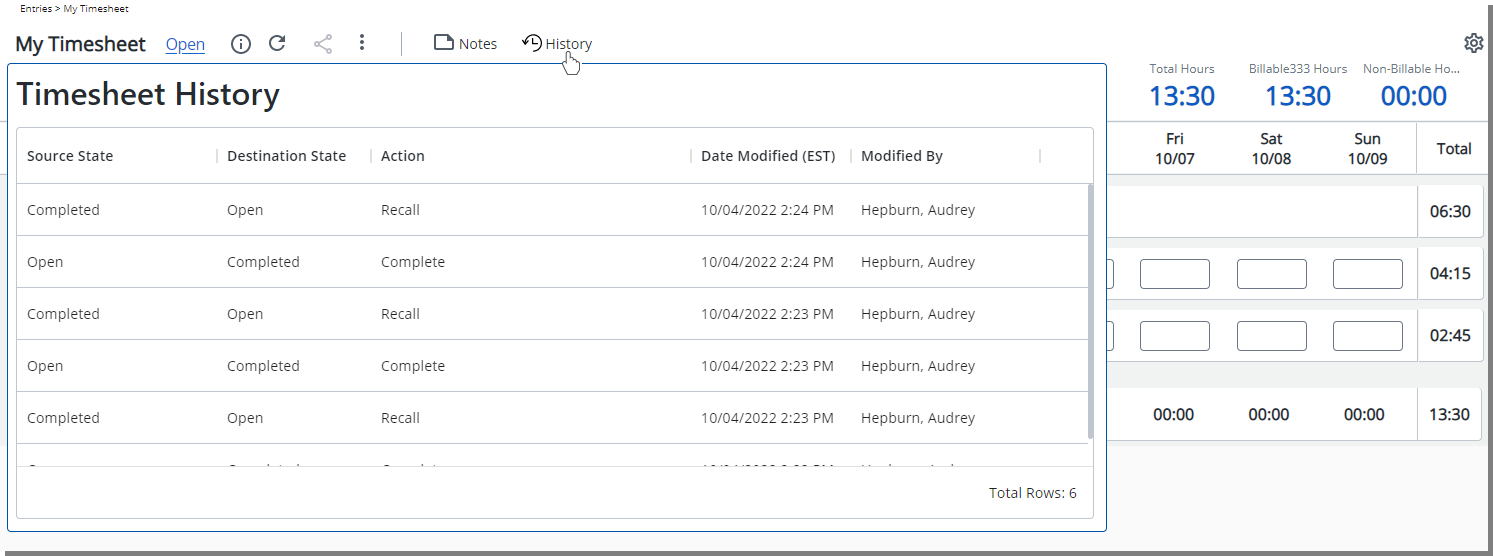
Description: A new ![]() History button is now available from the header section of new My Timesheet. Hovering over this button will allow you to view a detailed history of the State changes made on your Timesheet. The tool tip displays the Source State, Destination State, Action, Date Modified and well as the Modified By information.
History button is now available from the header section of new My Timesheet. Hovering over this button will allow you to view a detailed history of the State changes made on your Timesheet. The tool tip displays the Source State, Destination State, Action, Date Modified and well as the Modified By information.
Note: All dates and time stamps are displayed in the logged Users Active Site Time Zone.
Benefit: You can now readily access the history of the State changes from new My Timesheet.
For further details refer to Available options through My Timesheet
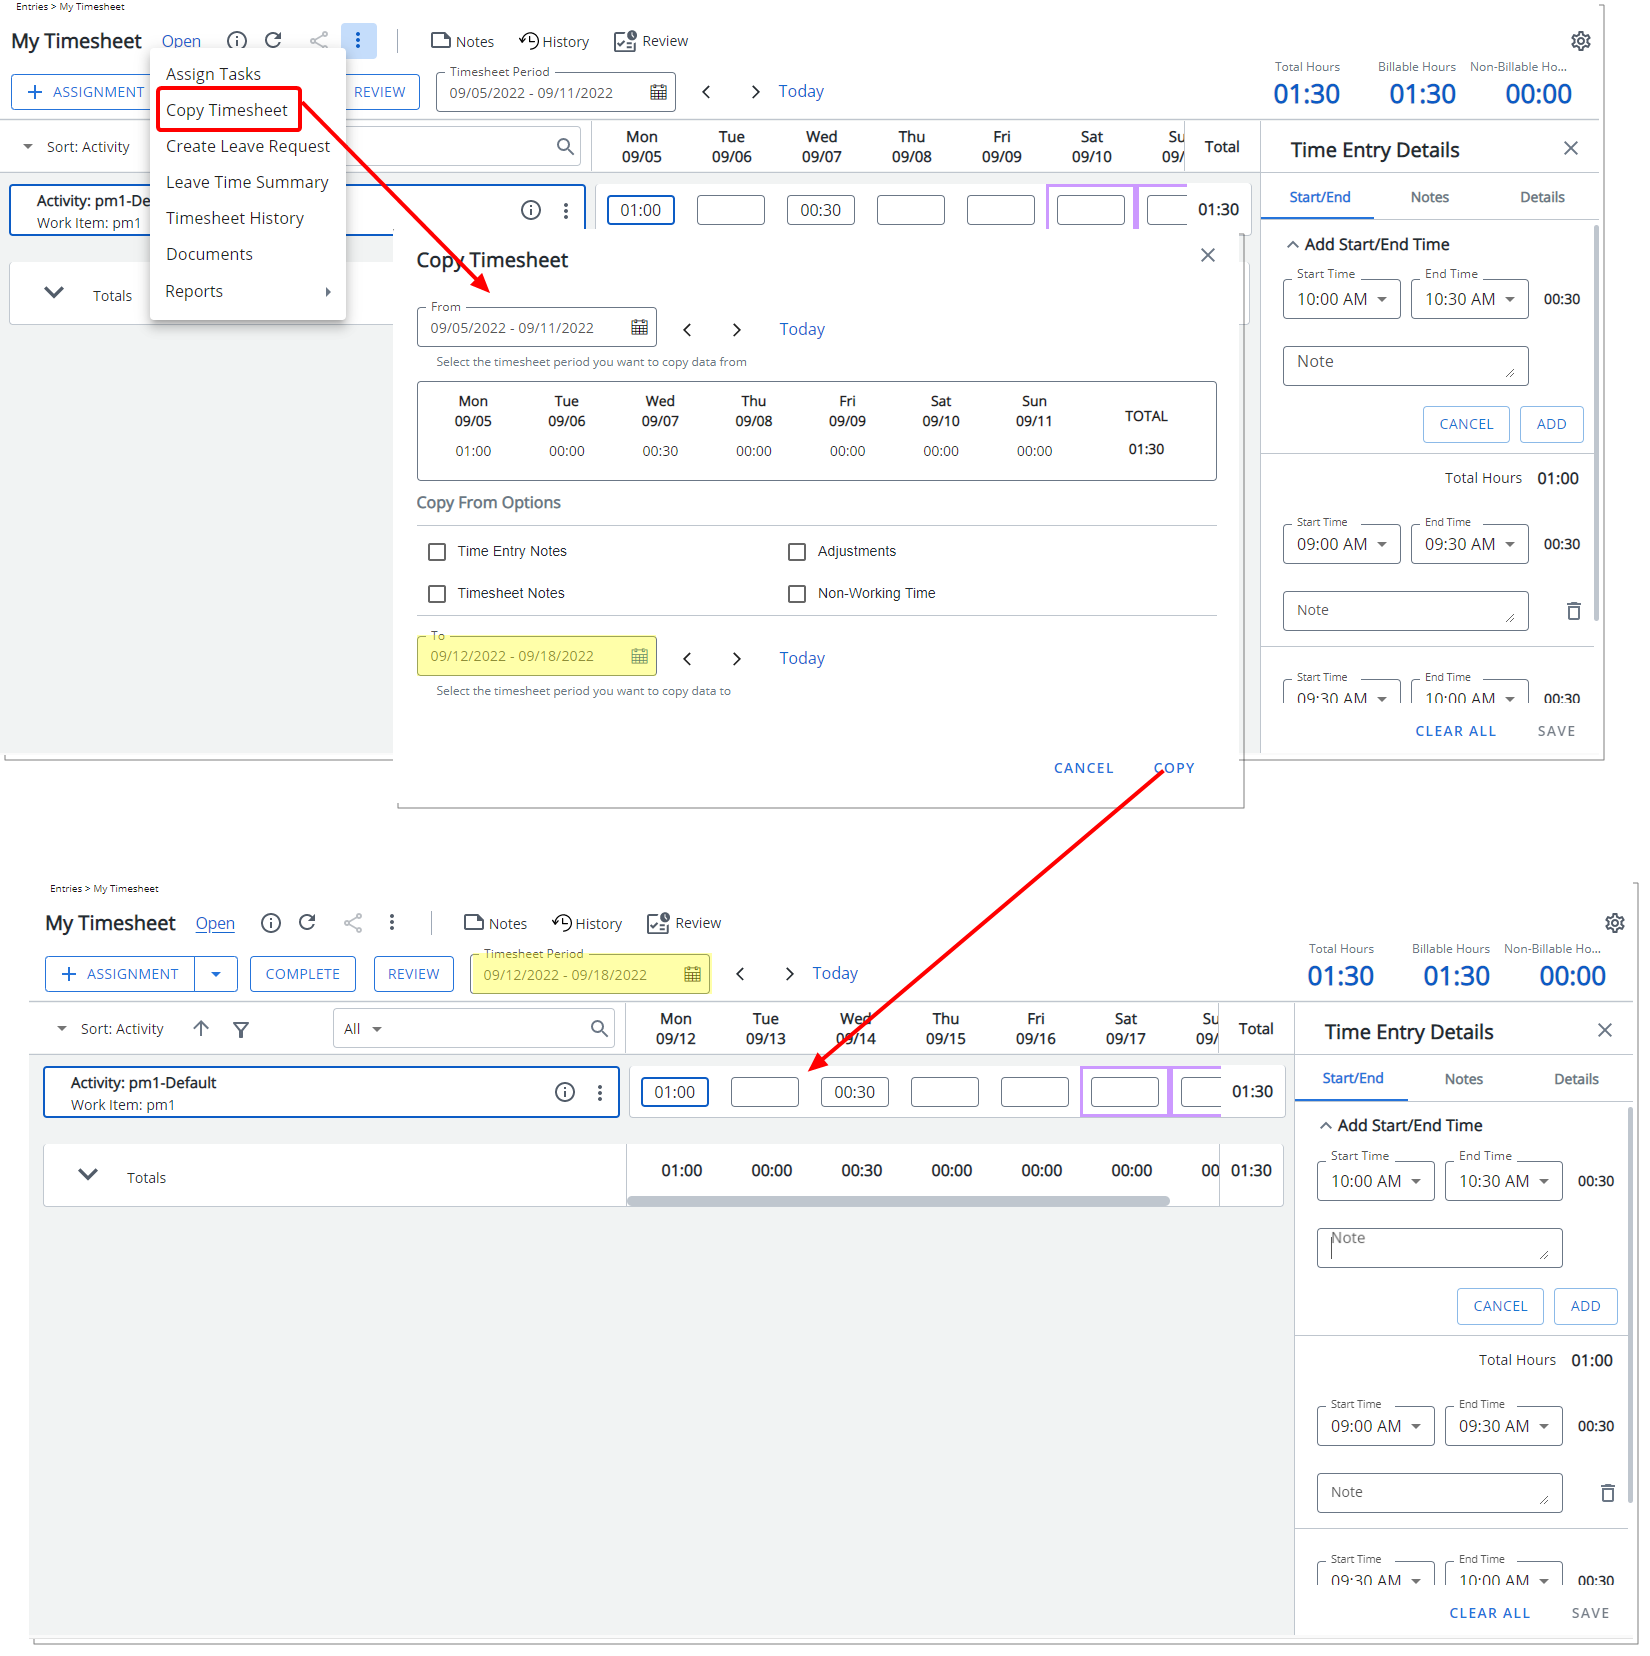
Description: The Copy Timesheet option is now available from the Timesheet menu when the Enforce Start and End Time is turned on.
From the Copy Timesheet dialog box, select the Timesheet period you want to copy Time Entries From. Then choose if you wish to also copy the Time Entry Notes, Adjustments, Timesheet Notes and/or Non-working Time.
Note: An information icon is present against Time Entries with Non-Working Time or timesheet Adjustments. A tool tip containing additional information is displayed upon hovering over the icon(s).
Then select the Timesheet period you want to copy Time Entries To. Upon copying the Timesheet note that the dialog box will close, a green success banner will be displayed, and you will be taken to the copy destination period.
Note:
- By default, the source period is set to the period from where you clicked the Copy Timesheet link, and the destination period is set to current period.
- The source and destination periods cannot be the same.
for further details refer to Copying a Timesheet (Start/End Time)
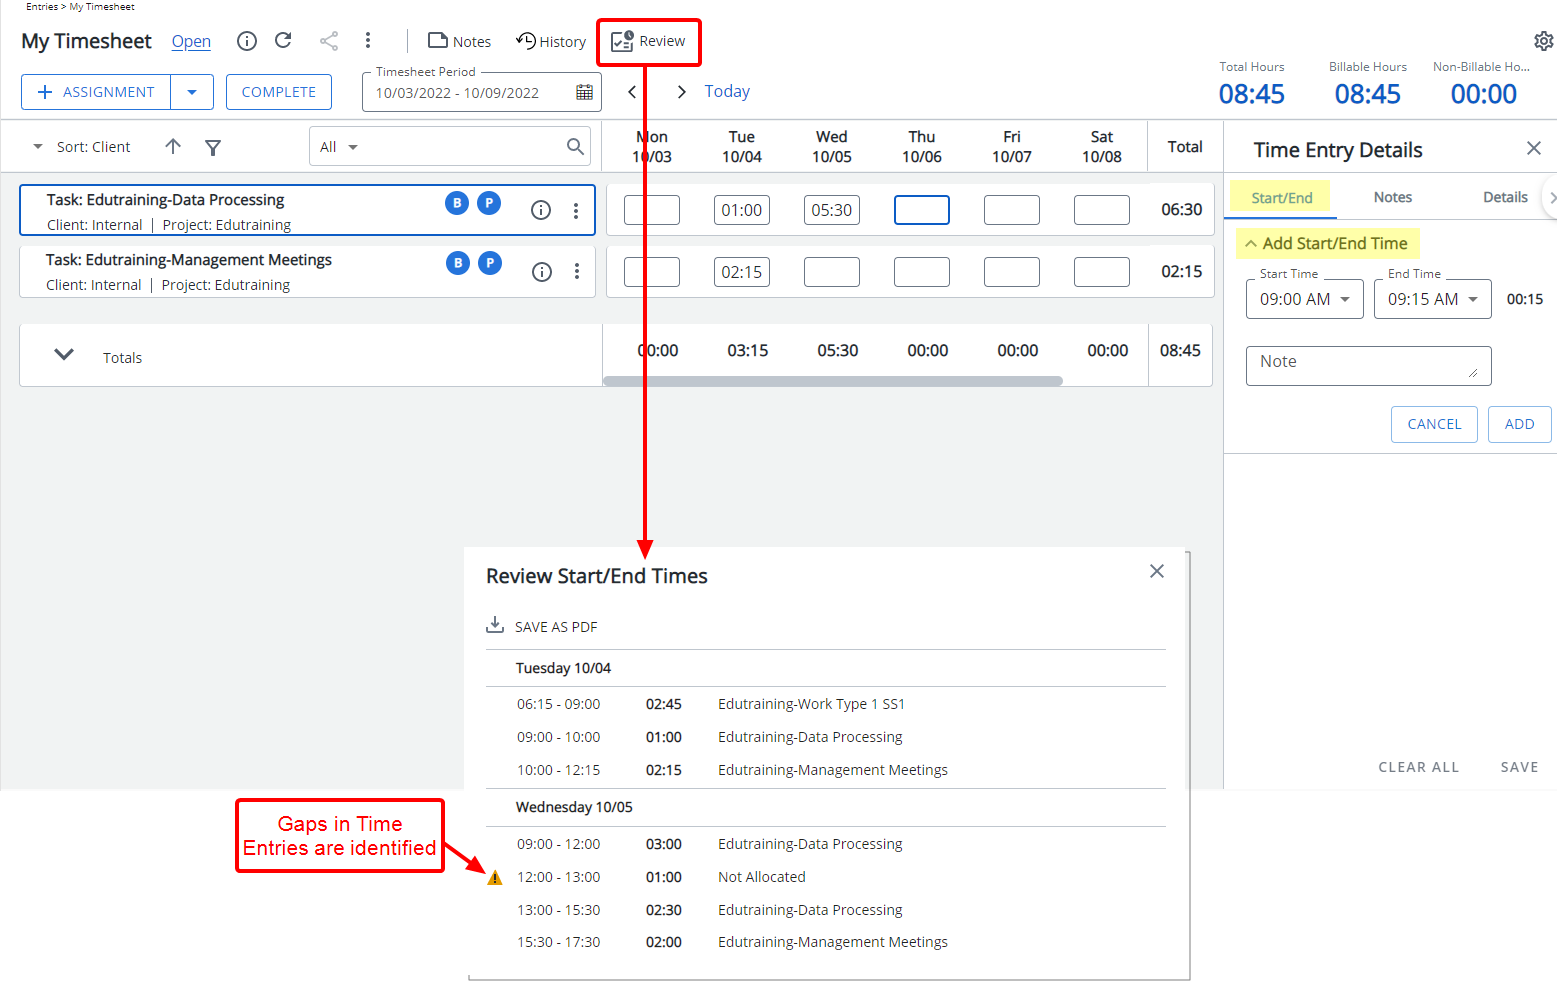
Description: In past releases when the Enforce Start and End Time was turned on, the review process of such Timesheets required that the reviewer navigated between the time entry cells. As of this release a new Review button is now available allowing you to access the newly added Review Start/End Times dialog box.
The page lists all Start and End Times for the Period, allowing you to pinpoint any gaps in Time Entries and make the necessary corrections. Furthermore, you can save the list as a PDF file.
Furthermore, within the Time Entry Details panel:
- The Hourly tab has been renamed to Start/End
- The collapsible Add Hourly Time title has been renamed to Add Start/End Time
Benefit: With this addition, Timesheets can now be easily reviewed, powering up user productivity.
For further details refer to Reviewing Start/End Time Entries (Start/End Time)
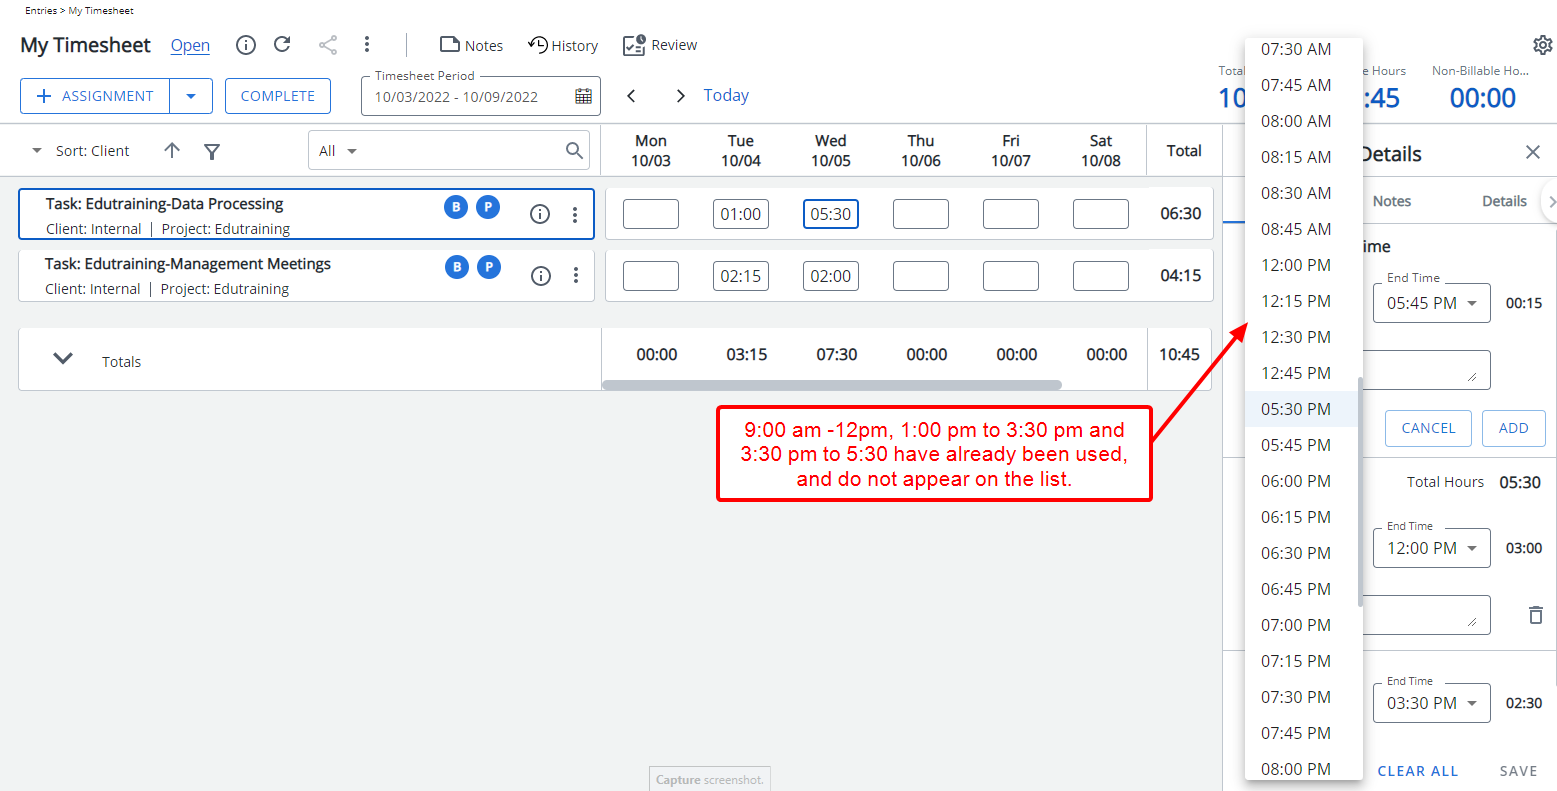
Description: When clicking on the down arrow against a Start Time entry cell, the list now returns only the available Start Times, omitting any Time intervals that have already been used.
Benefit: With this addition it is now easier to select the appropriate Start Time.
For further details refer to Entering Regular Time (Start/End Time)
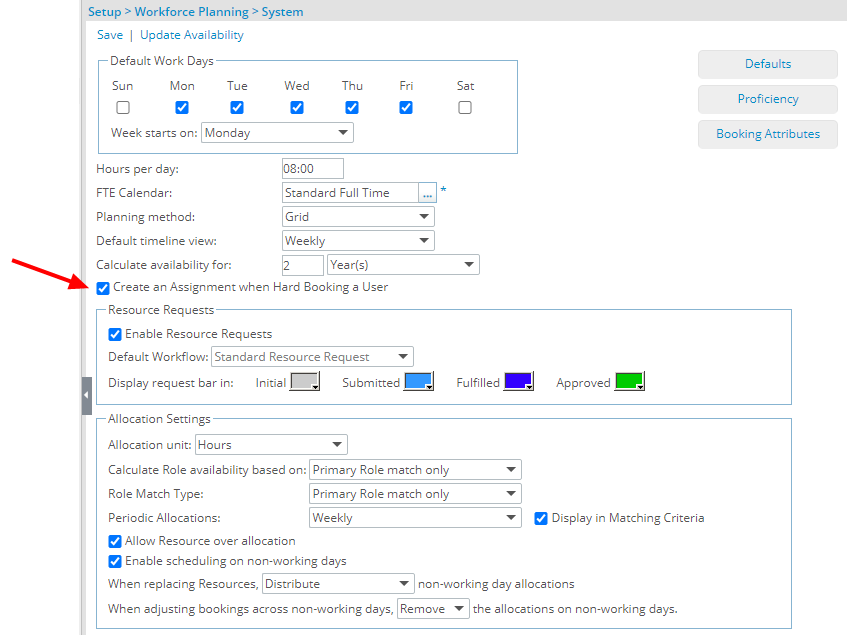
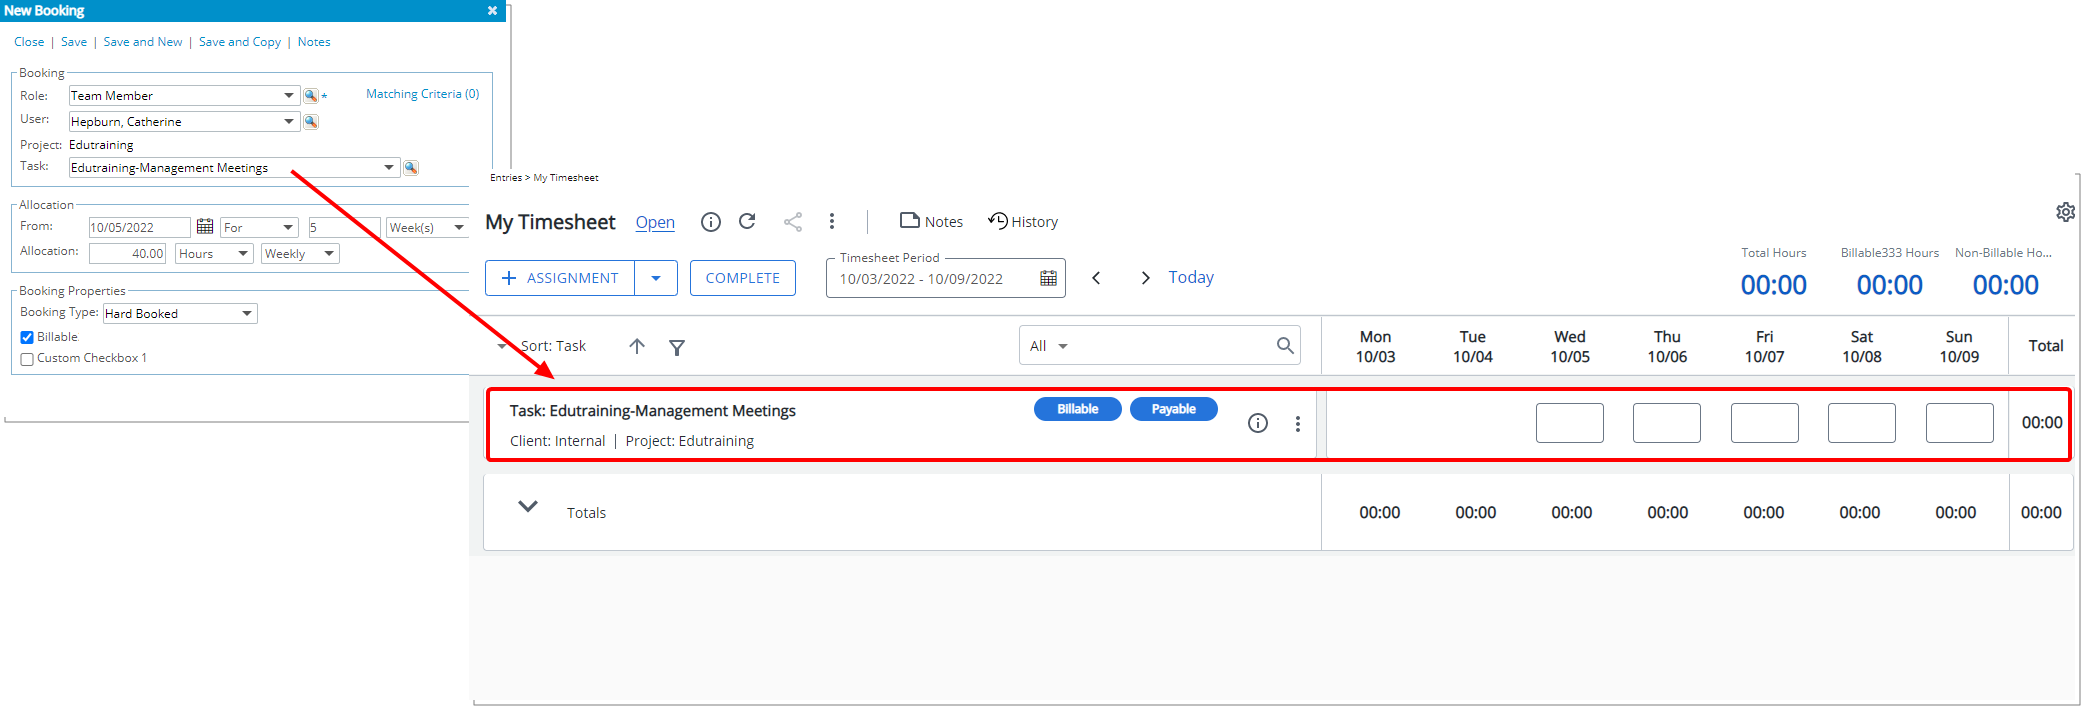
Description: The option Create an Assignment when Hard Booking a User is now available from the Workforce Planning System page. When turned on, upon Hard Booking a User against a Task, the Assignment is created automatically within the User’s Timesheet.
Prerequisites:
- The option Create an Assignment when Hard Booking a User is turned on.
- The Project Planner Synchronize with Timesheet option must be turned off for the Project.
- The Booking is a Hard Booking for which a Task and allocation hours are defined.
- The selected Task is set to be Used by Timesheet.
- User creating the Booking must have the Create right to Assign Users to Task (Setup > Work) permission in their Security Profile (Setup > Organization > System > Security).
Use case: Audrey is tasked to create multiple Hard Bookings and the corresponding Timesheet Assignments for her Project Team members. She can now quickly complete this task by having her system administrator enable the Create an Assignment when Hard Booking a User setting. Upon creating the Hard Bookings against the required Task(s) in Resource Management, corresponding Timesheet Assignments are then added to the assigned Users Timesheet automatically.
Note: By default, the Create an Assignment when Hard Booking a User option is turned off.
For further details refer to Create an Assignment when Hard Booking a User
Timesheet Templates
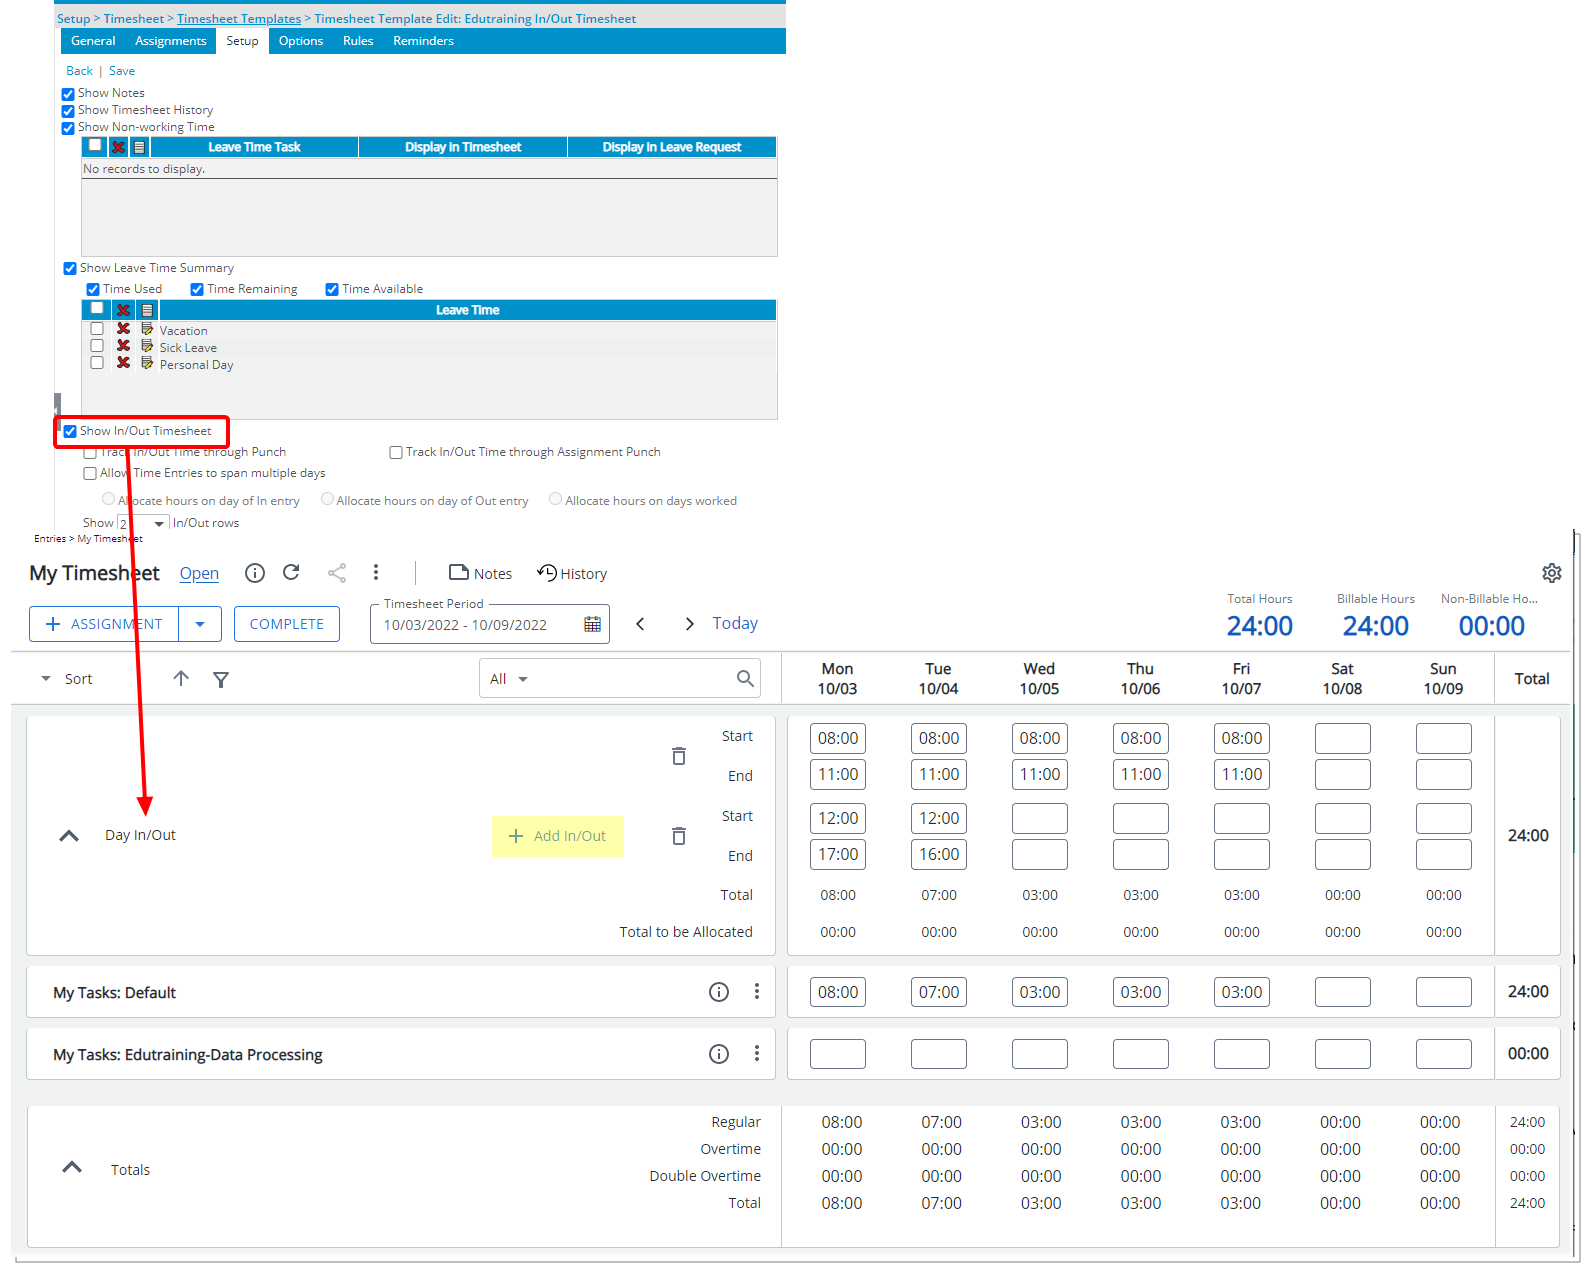
Description: When the Show In/Out Timesheet option is selected within a Timesheet Template, user(s) assigned to it will now have a new collapsible Day In/Out section available to them when accessing new My Timesheet.
You can then enter Time against the Start and End boxes for each day. New In/Out Time rows can be added by clicking the + Add In/Out link.
Within the In/Out section:
- The sum of the In/Out Time Entries is displayed against the Total row
- The (sum of the In/Out Time Entries) – (total for the assignments of the day) is displayed against the Total to be Allocated row
The entered time will be displayed against My Tasks: Default row just above any Assignments you may have.
Note: All other options related to In/Out Timesheet listed below only apply to the legacy Timesheet:
- Track In/Out Time through Punch
- Track In/Out Time through Assignment Punch
- Allow Time Entries to span multiple days
- Allocate hours on day of In entry
- Allocate hours on day of Out entry
- Allocate hours on days worked
- Show [] In/Out rows
For further details refer to Showing the In/Out Section on User Timesheets
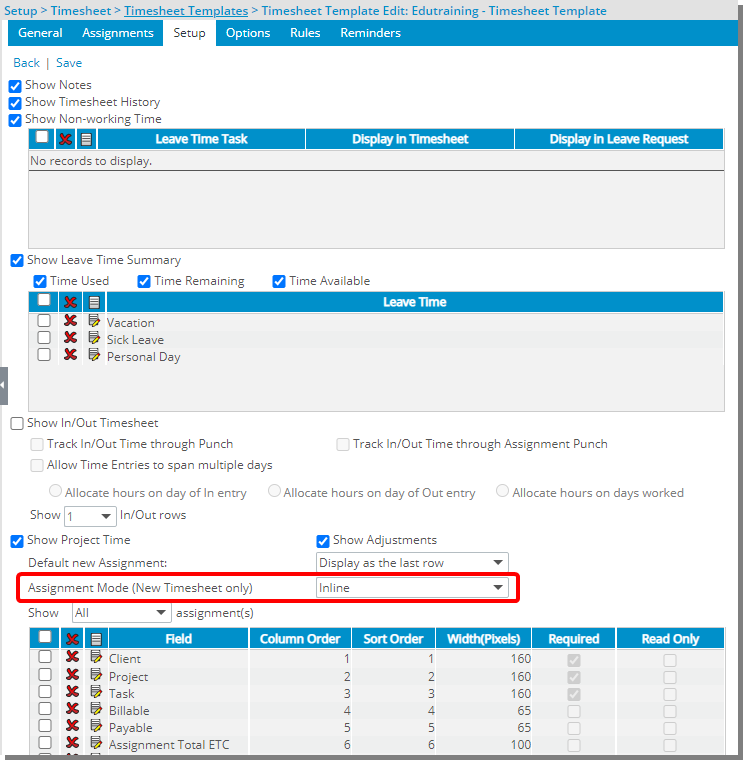
Description: From the Setup tab of a Timesheet Template edit page, you can now choose the Inline or Modal Window Assignment Mode for users of New Timesheet.
Modal Window Assignment Mode allows Users of the Timesheet Template to pick their Assignments, as in previous releases, from a modal window.
Inline Assignment Mode allows Users of the Timesheet Template to pick their Assignments directly from their Timesheet.
Note:
- Users can override the default Assignment Mode set at the Timesheet Template level by accessing their Display Settings context menu available from the top right corner of My Timesheet.
- Modal is selected by default.
For further details refer to Configuring the Assignment Mode at the Timesheet Template level
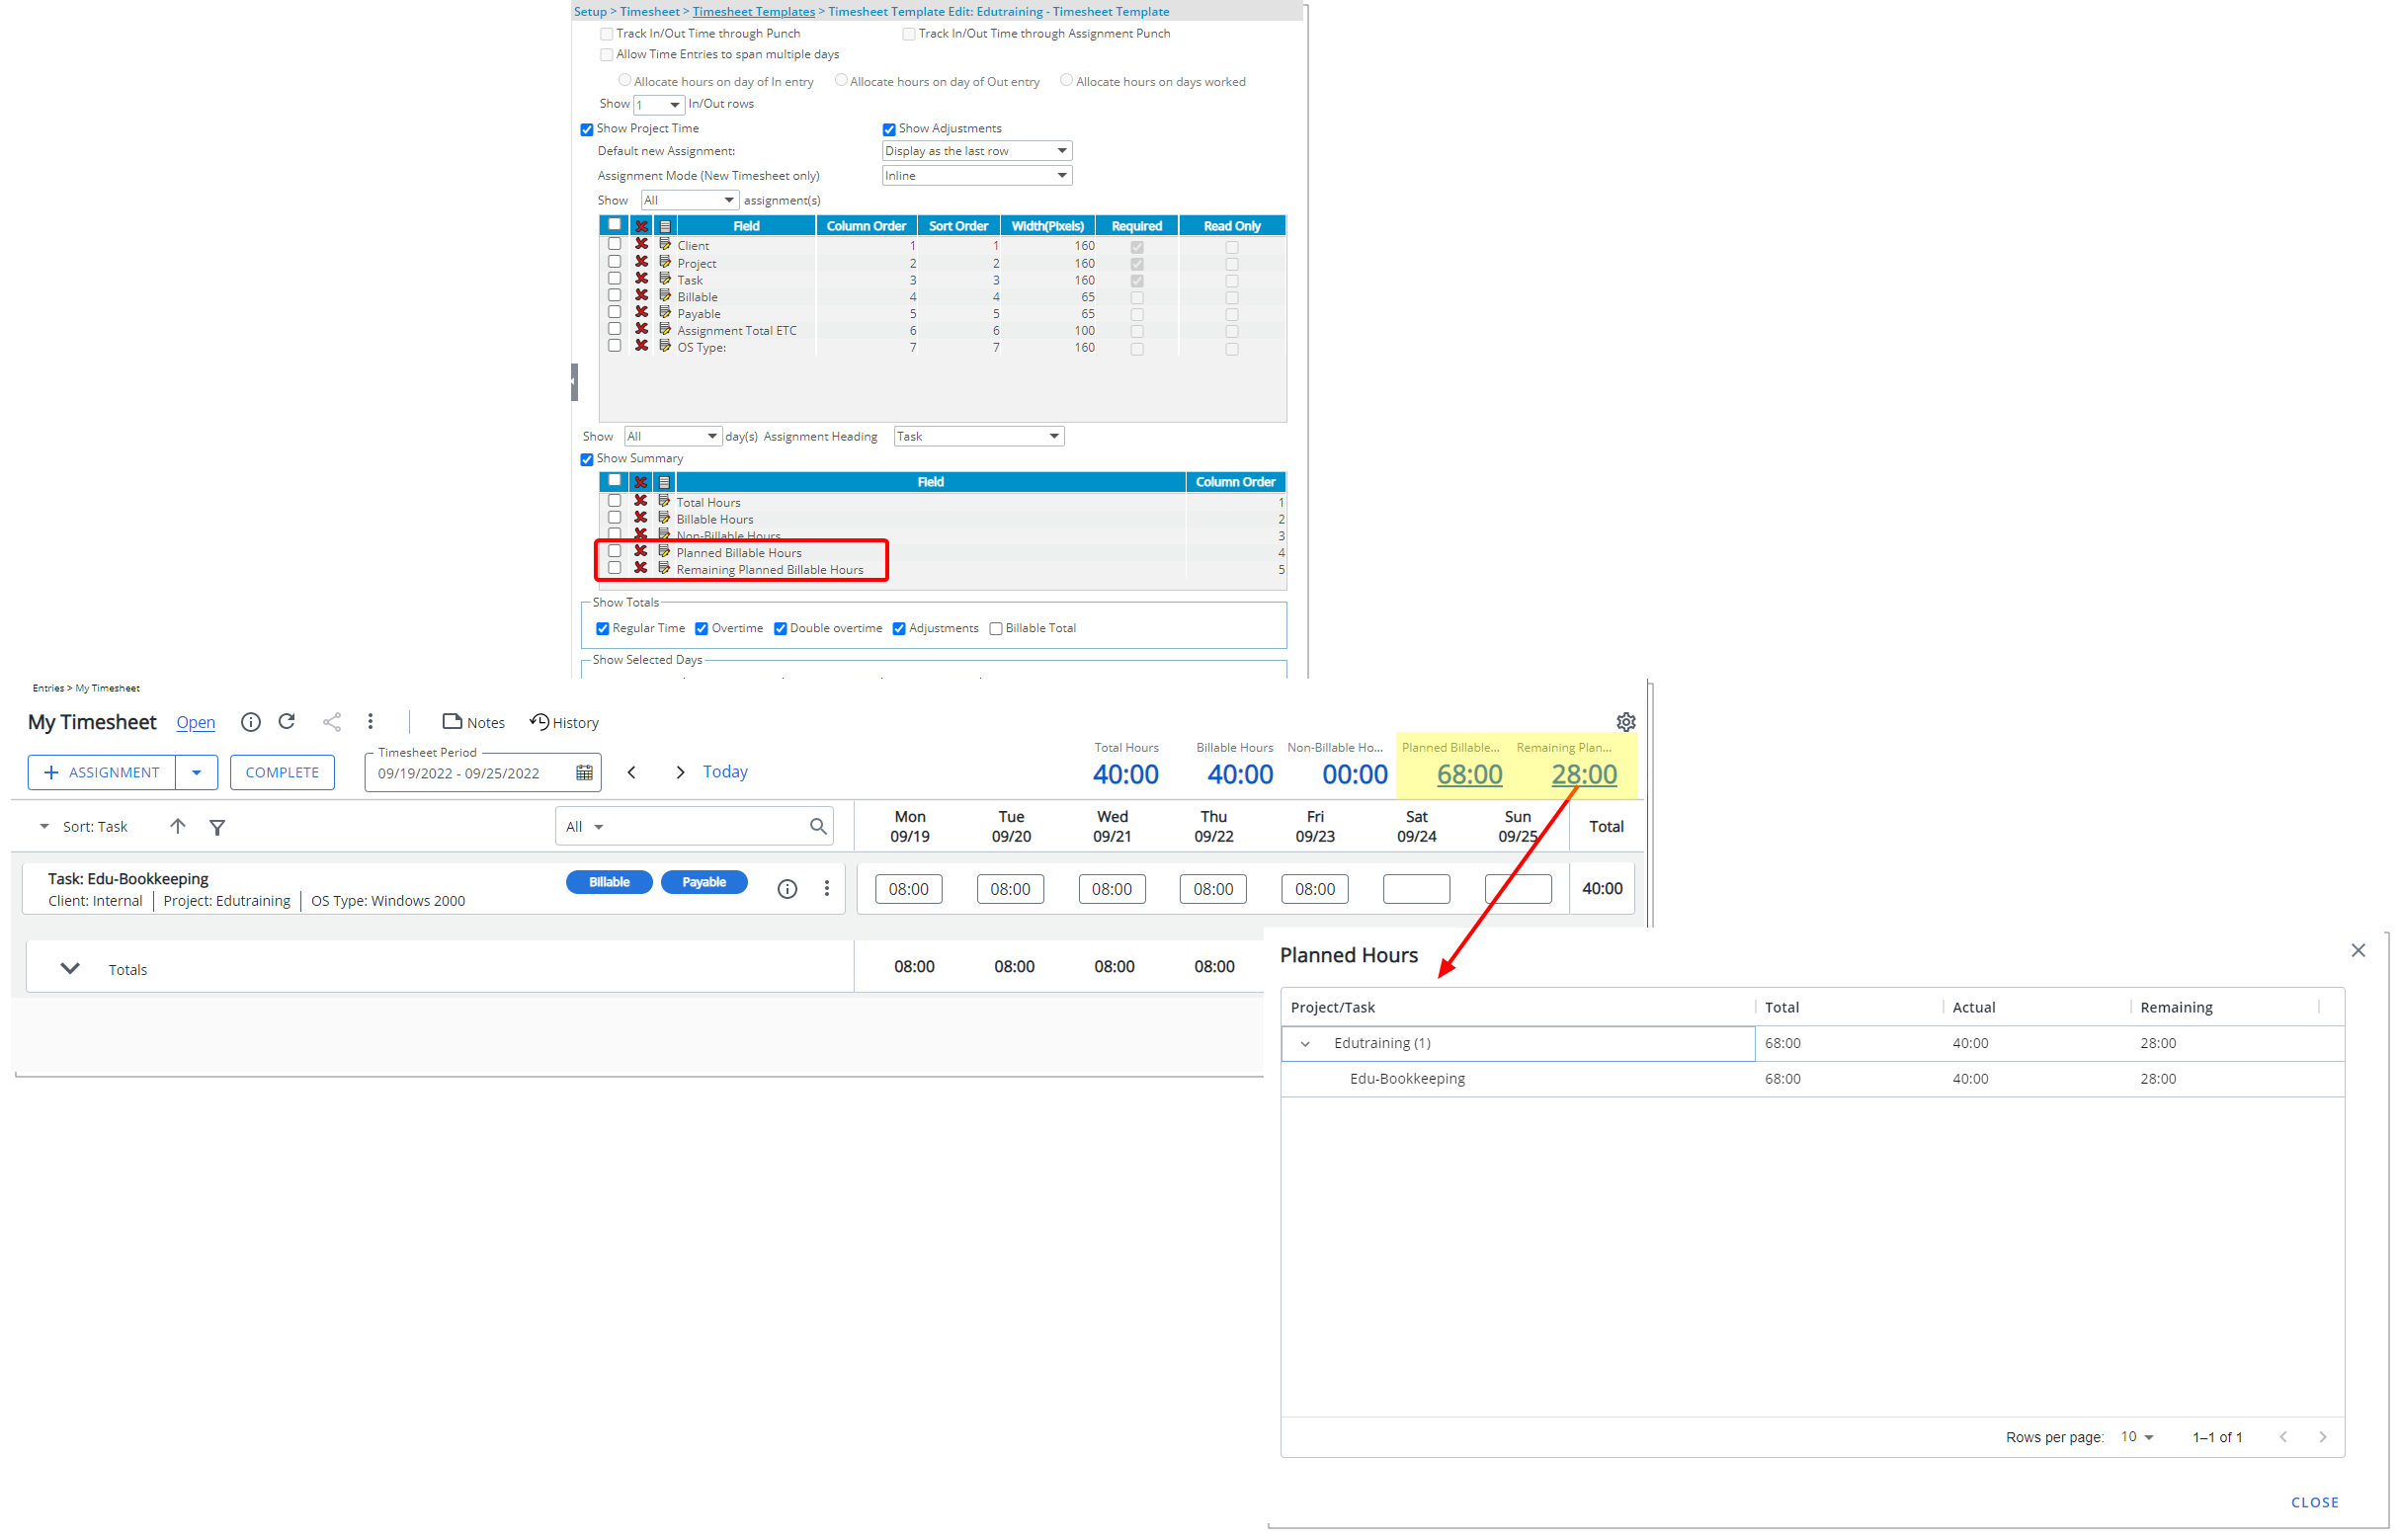
Description: From the Show Summary section of Timesheet Templates, you can now choose to display the following Fields within the Summary section of My Timesheet:
- Planned Billable Hours – calculated as: The Total Billable Hard Booked Hours for the logged user for the current period
- Remaining Planned Billable Hours – calculated as: Planned Billable Hours - Actual Hours
Benefit: You can now have real-time insight on the Planned Billable Hours and Remaining Planned Billable Hours from My Timesheet.
For further details refer to Adding/Editing/Removing Summary Fields from a Timesheet Template
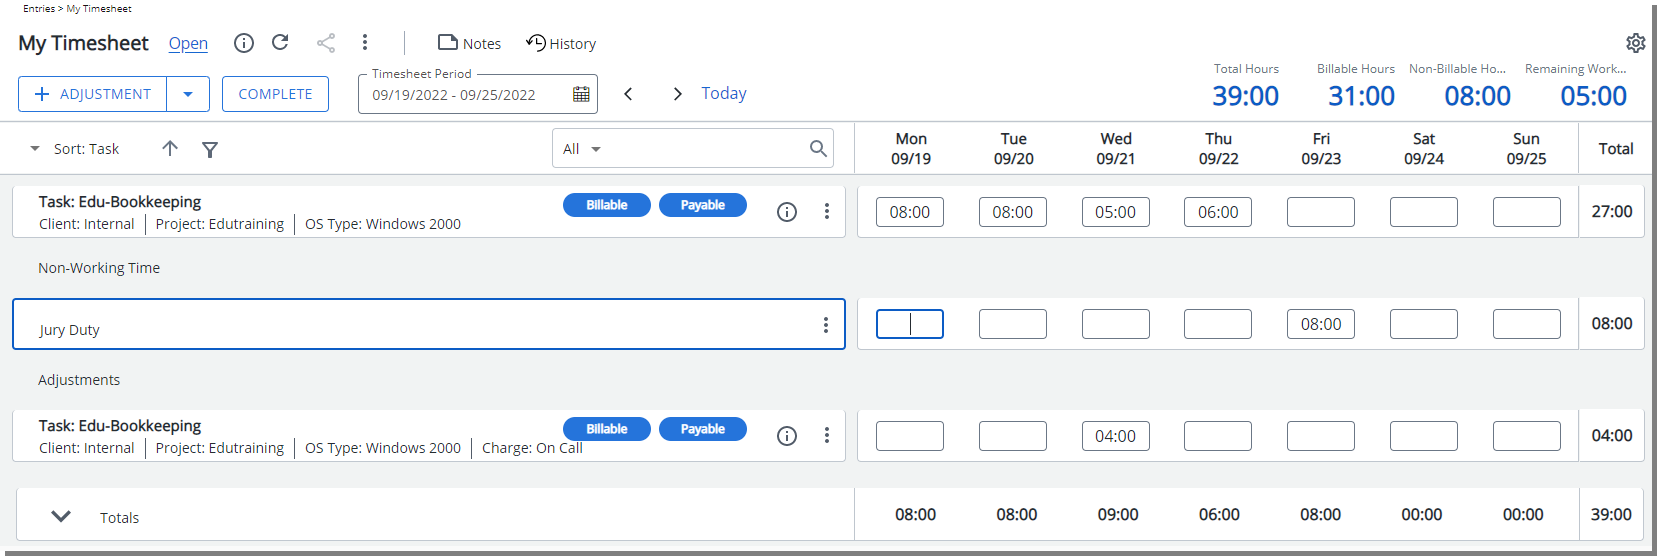
Description: Modifications have been made to the way the Remaining Working Hours KPI in my Timesheet was calculated. As of this release any Non-working hour entries are also reduced from the Remaining Working Hours KPI.
Remaining Working Hours = Working Hours - Actual Hours - Non-working Hours
Benefit: With this improvement, this KPI now reflects the remaining number of hours that you need to enter in your Timesheet.
For further details refer to Adding/Editing/Removing Summary Fields from a Timesheet Template
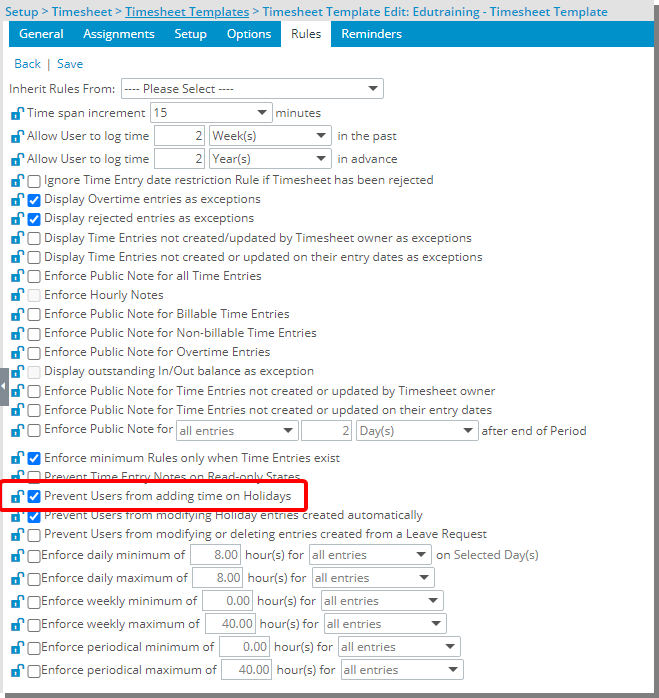
Description: The option to Prevent Users from adding time on Holidays is now available through the Rules tab of Timesheet Templates. When selected, Users assigned to the Timesheet Template will be prevented from entering time against any Entry cells except for Adjustments.
Note: By default, the Prevent Users from adding time on Holidays option is turned off.
For further details refer to Preventing users from adding time on Holidays
Timesheet Workflows
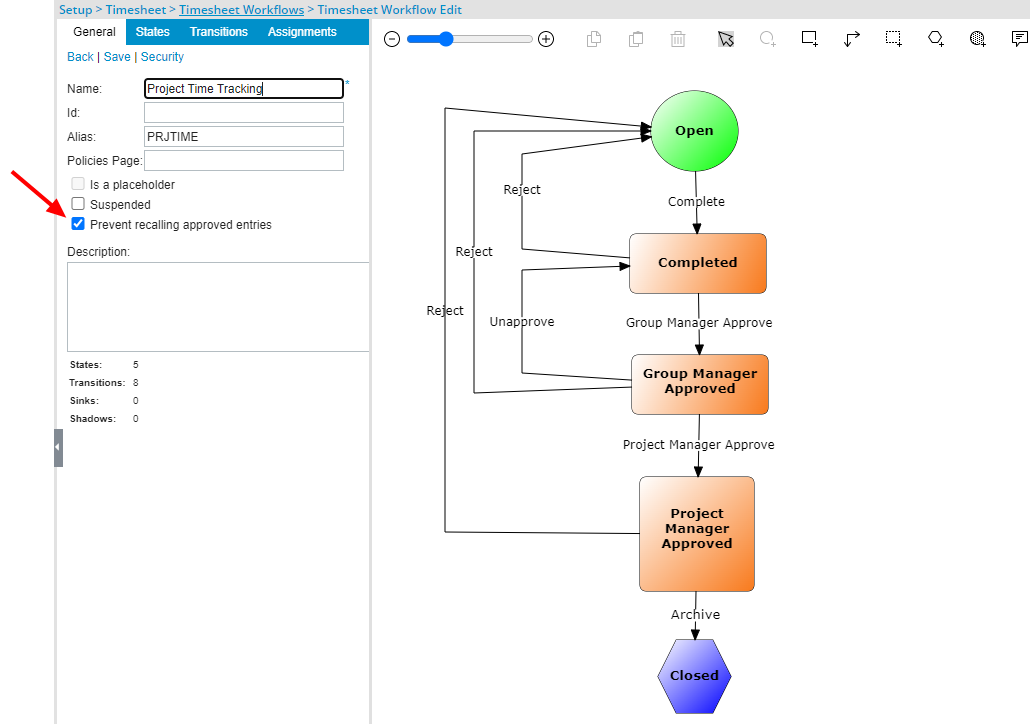
Description: A new option to Prevent recalling approved Entries is now available from the General tab of Timesheet Workflows Edit page (Setup > Timesheet > Timesheet Workflows). When selected, any Time Entries approved from an Approval State assigned to the Project Manager will remain fixed (unmodifiable) and approved while still allowing users to modify other entries in a recalled Timesheet.
Note: By default, the Prevent recalling approved Entries option is unselected.
Benefit: This addition reduces the duplication of re-approving entries already approved by the Project Manager.
For further details refer to Preventing recalling of approved Time Entries
User Defined Fields
In addition to many improvements to the User Defined Fields, this release introduces Advanced User Defined Fields associated to Projects and Project Status Templates. This new Type of User Defined Field relies on database stored procedures to perform complex calculations on any category of record in PSA.
Note: Upon upgrading to 2022 R2.0, the Type of a saved User Defined Field cannot be modified.
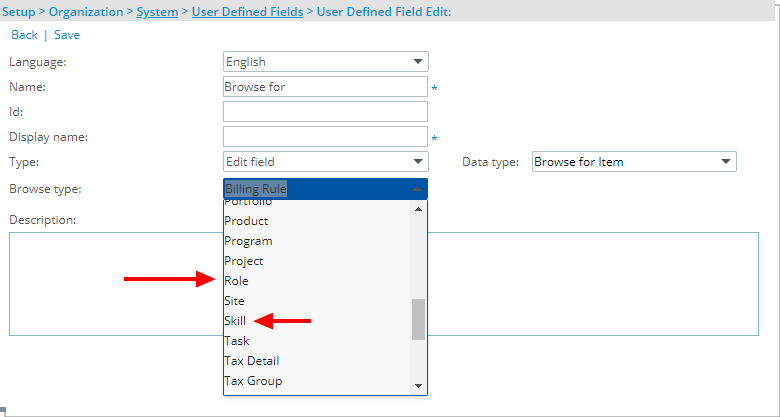
Description: When creating a User Defined Field of Data type Browse, you can now choose to display a list of Resource Planning Roles or Skills.
Benefit: This addition enables you to include a list of Roles or Skills based on your organizational needs.
For further details refer to Available UDF Types
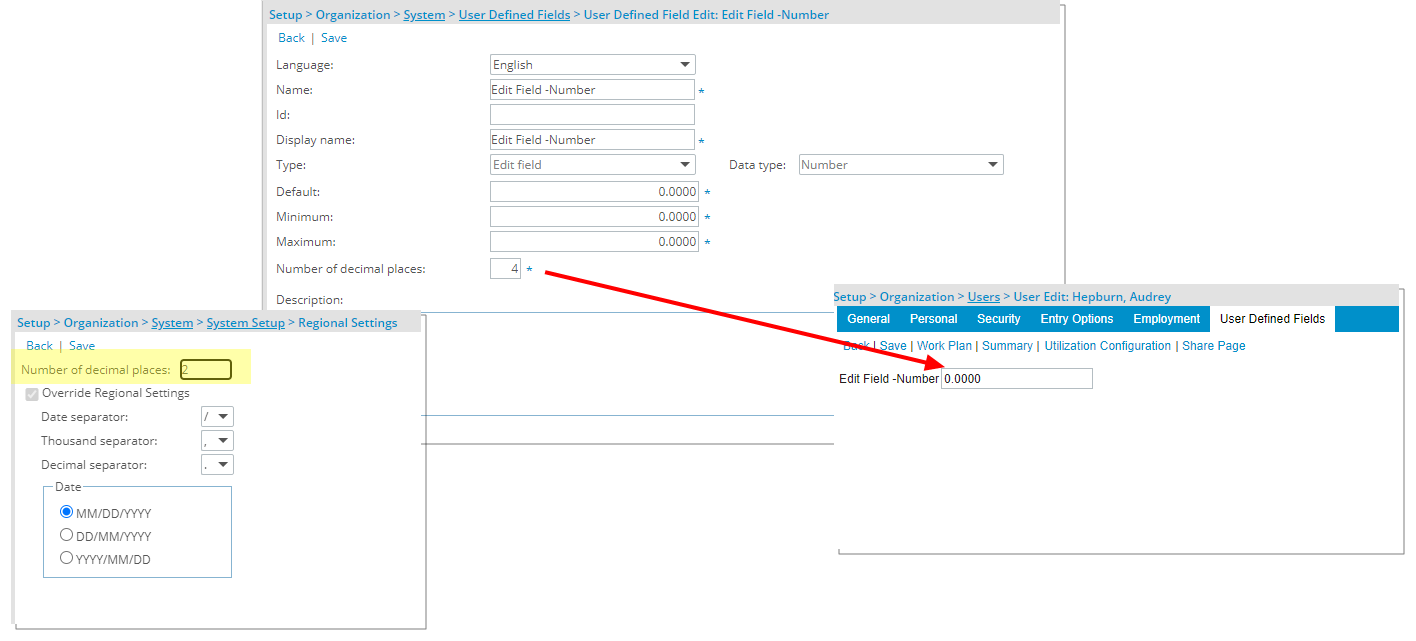
Description: Addition of the Number of decimal places option for Edit Type User Defined Fields of Data type Number, Currency, and Percentage.
Note: By default, 2 is selected. You can choose up to 8 decimal places.
Benefit: With this addition you can now set the required decimal places for Number, Currency, and Percentage Edit type User Defined Fields without being constrained by the Regional Settings.
Furthermore, the Maximum value is now by default set to the maximum value allowed for the User Defined Field Type:
- Integer: 2,147,483,647
- Number: 9,999,999,999,999.99
- Currency: 999,999,999.99
- Percentage: 1,000,000,000
Caution: In Upland Analytics, the decimals set at User Defined Fields level (in PSA) are not taken into consideration. As a workaround, you can manually modify the View in Upland Analytics and update the number of decimals as well as type. This limitation will be addressed in future releases.
For further details refer to Available UDF Types

Description: The following two new options are now available from the properties dialog box of User Defined Fields associated to Projects and Project Status Templates allowing you to have an insight on the modified values:
- Keep History
- Count of records
Select the Keep History option to keep a history of the modified values, then enter the number of records you would like to keep for each User Defined Field in the Count of records box.
Note: By default, 10 records are kept.
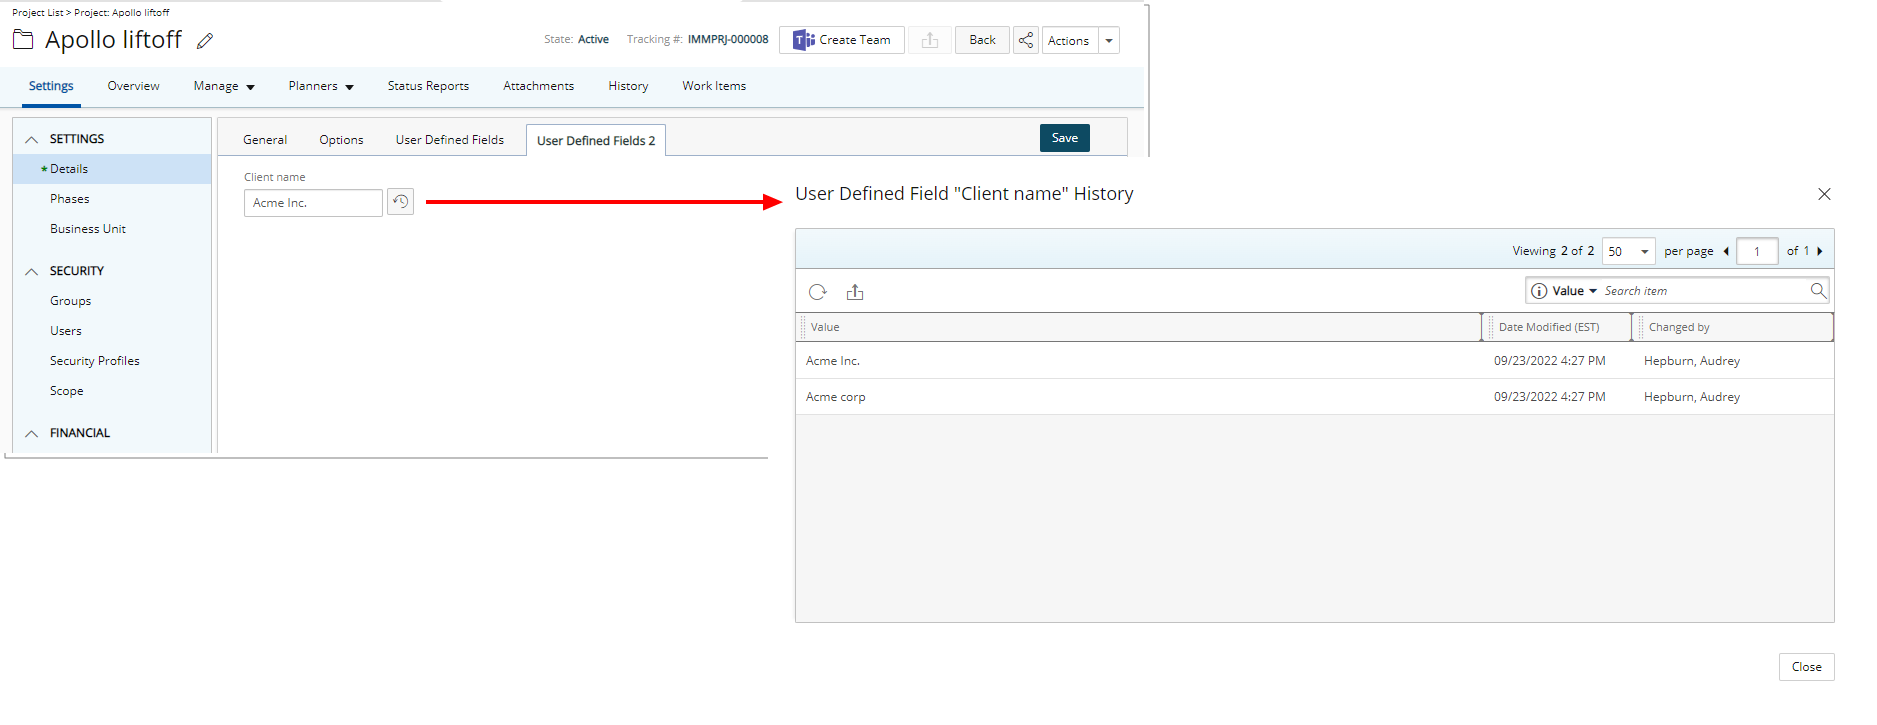
You can then access the Project Edit page and click the History button to view the detailed History page.
From the History page you can:
- Refresh the list.
- Export the list to Excel.
- Search the list based on Value, Date Modified and Changed by criteria.
- Pagination is available at the top right corner to facilitate easy navigation across pages.
Note: All dates and time stamps are displayed in the logged Users Active Site Time Zone.
For further details refer to Keeping the historical values of User Defined Field associated to Projects
Description: When associating a User Defined Field for the first time to an item, the User Defined Field properties dialog box now displays automatically.
Benefit: This new improvement reduces the click-through currently required upon first-time association, improving user experience.
This release introduces the Advanced User Defined Fields associated to Projects and Project Status Templates in PSA. This new Type of User Defined Field relies on database stored procedures to perform complex calculations on any category of record in PSA.
Note: To create the formula in an Advanced User Defined Field, contact PSA Support to discuss your specific business requirements.
This new User Defined Field allows you to:
- Define a calculation schedule
- Choose to manually recalculate the Field instantly
- Keep the historical values for reference
- Choose to associate it to only selected Projects based on set filter criteria
Furthermore, you can also report on the Advanced User Defined Fields in Upland Analytics.
For further details refer to Advanced User Defined Fields
The Advanced option is now available when modifying an Edit Type User Defined Field of Data type Integer, Number, Date, Percentage, Currency, and Timespan associated to Projects or Project Status Templates.
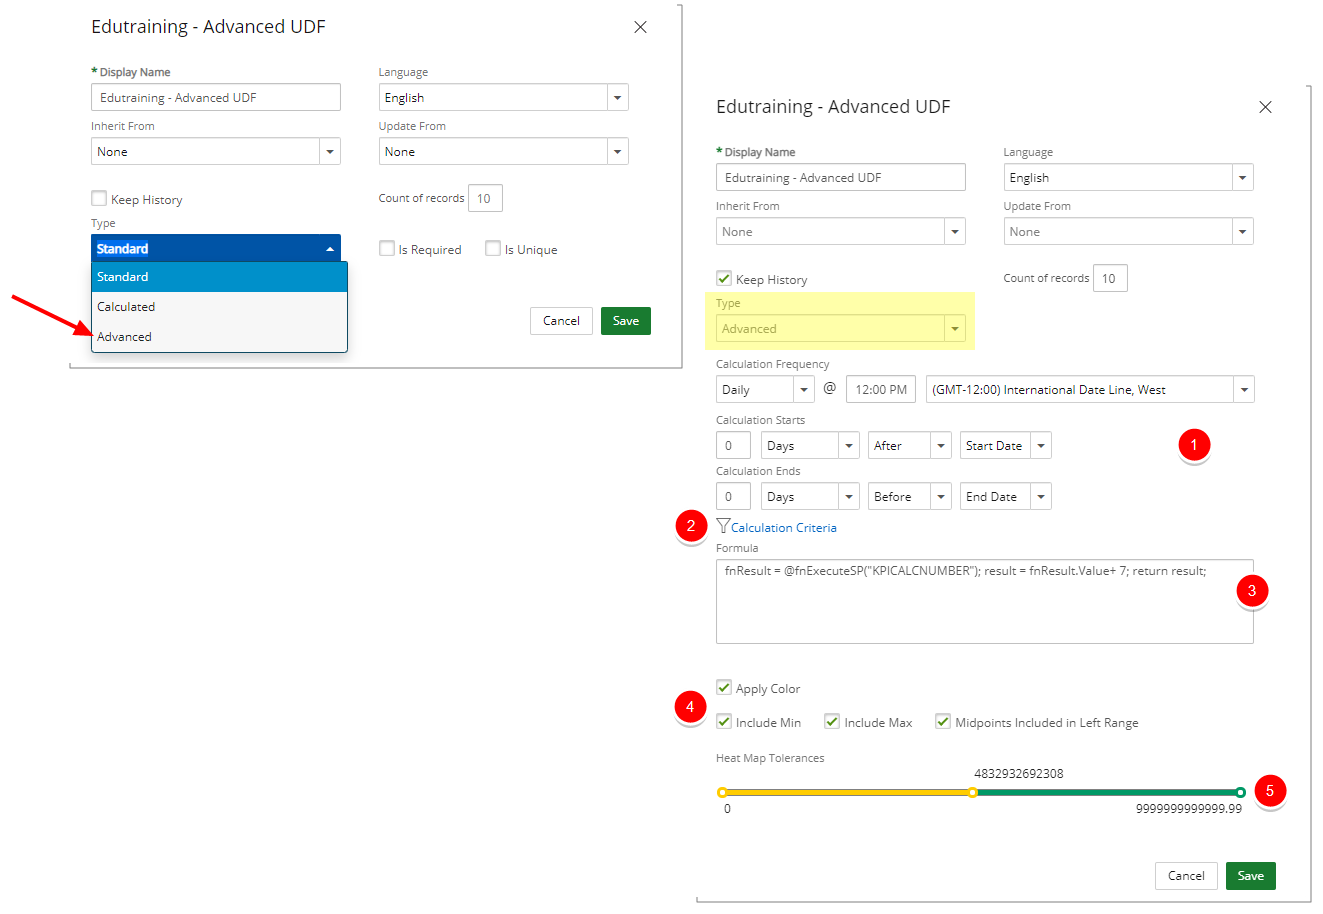
Upon selecting Advanced Type, the following options are then available to you where you can define your Advanced User Defined Field settings:
- Define a Calculation Frequency and then choose the options for when Calculation Starts and Ends.
Note: The default calculation frequency values will take effect if no frequency is defined.
- Calculation Criteria Filter: Click to filter the list of Projects where the User Defined Field will be associated to. The User Defined Field will be displayed on the Project Edit page of Projects meeting the defined criteria.
- Formula: To create the formula in an Advanced User Defined Field, contact PSA Support to discuss your specific business requirements.
- Select Apply Color if you would like to use color indicators for this calculated field then choose the following options:
- Include Min: When selected, the min value(s) within the ranges will have a color indicator.
- Include Max: When selected, the max value(s) within the ranges will have a color indicator.
- Midpoints Included in Left Range: When selected, the midpoints will have the color of the lower range, otherwise, the higher range is used.
- Heat Map Tolerance: Drag the slider located at the far right to create as many ranges as necessary.
For further details refer to
- Advanced User Defined Fields
- Advanced User Defined Fields associated to Projects
- Advanced User Defined Fields associated to Project Status Templates
- Calculation Criteria Filter
- Calculation Criteria Filtering Fields
Description: Upon Saving and exiting the User Defined Field properties dialog box, note that a Recalculate button (![]() ) is now available on the associated Field. You can click the button to immediately recalculate the value, otherwise, the calculation will be triggered automatically based on the defined schedule in Calculation Frequency.
) is now available on the associated Field. You can click the button to immediately recalculate the value, otherwise, the calculation will be triggered automatically based on the defined schedule in Calculation Frequency.
The values of Advanced User Defined Fields will be recalculated for all applicable Projects if recalculation is triggered from either the:
- Projects association page
- Newly available Process Advanced UDFs Automation Processing Service
Note: Advanced User Defined Fields are not recalculated for Suspended and Placeholder Projects.
The values of Advanced User Defined Fields will be recalculated for all applicable Project Status Reports if recalculation is triggered from either the:
- Project Status Templates
- Newly available Process Advanced UDFs Automation Processing Service
Note: Advanced User Defined Fields are not recalculated for Submitted Project Status Reports.
For further details refer to:
- Process Advanced UDFs Automation Service
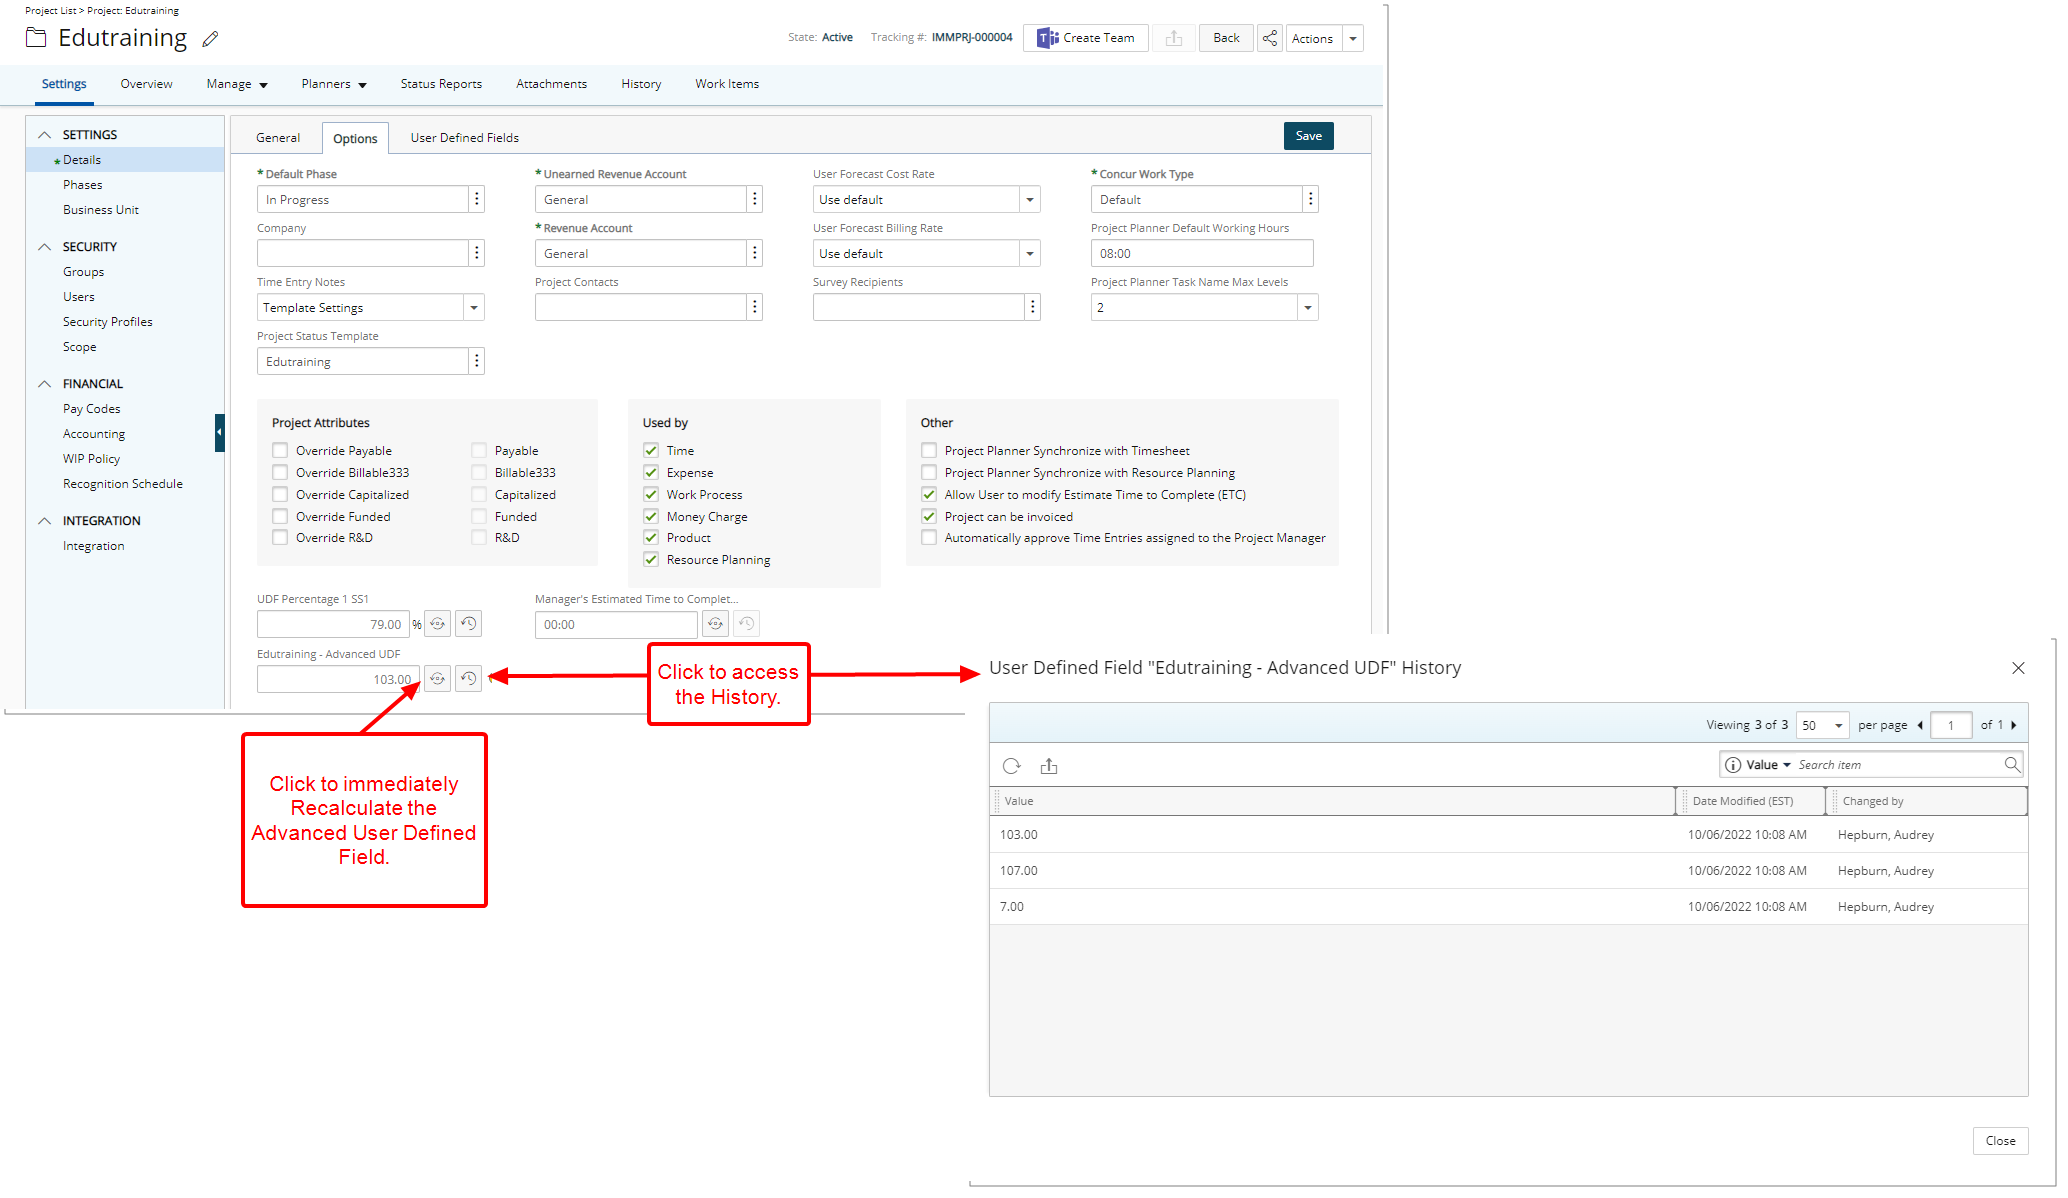
The Advanced User Defined Field will appear on the Project Edit page of the Project(s) that match your Calculation Criteria Filter. If no Filter was defined, then the User Defined Field will be available on all Project Edit pages.
From the Project Edit page, you can:
- Click the Recalculate Values button to immediately recalculate the value of the Advanced User Defined Field for the current project only.
- Click the History button to access the detailed History page.
Note: The values of Advanced User Defined Fields will be recalculated for all applicable Projects if recalculation is triggered from either the:
- Projects association page
- Newly available Process Advanced UDFs Automation Processing Service
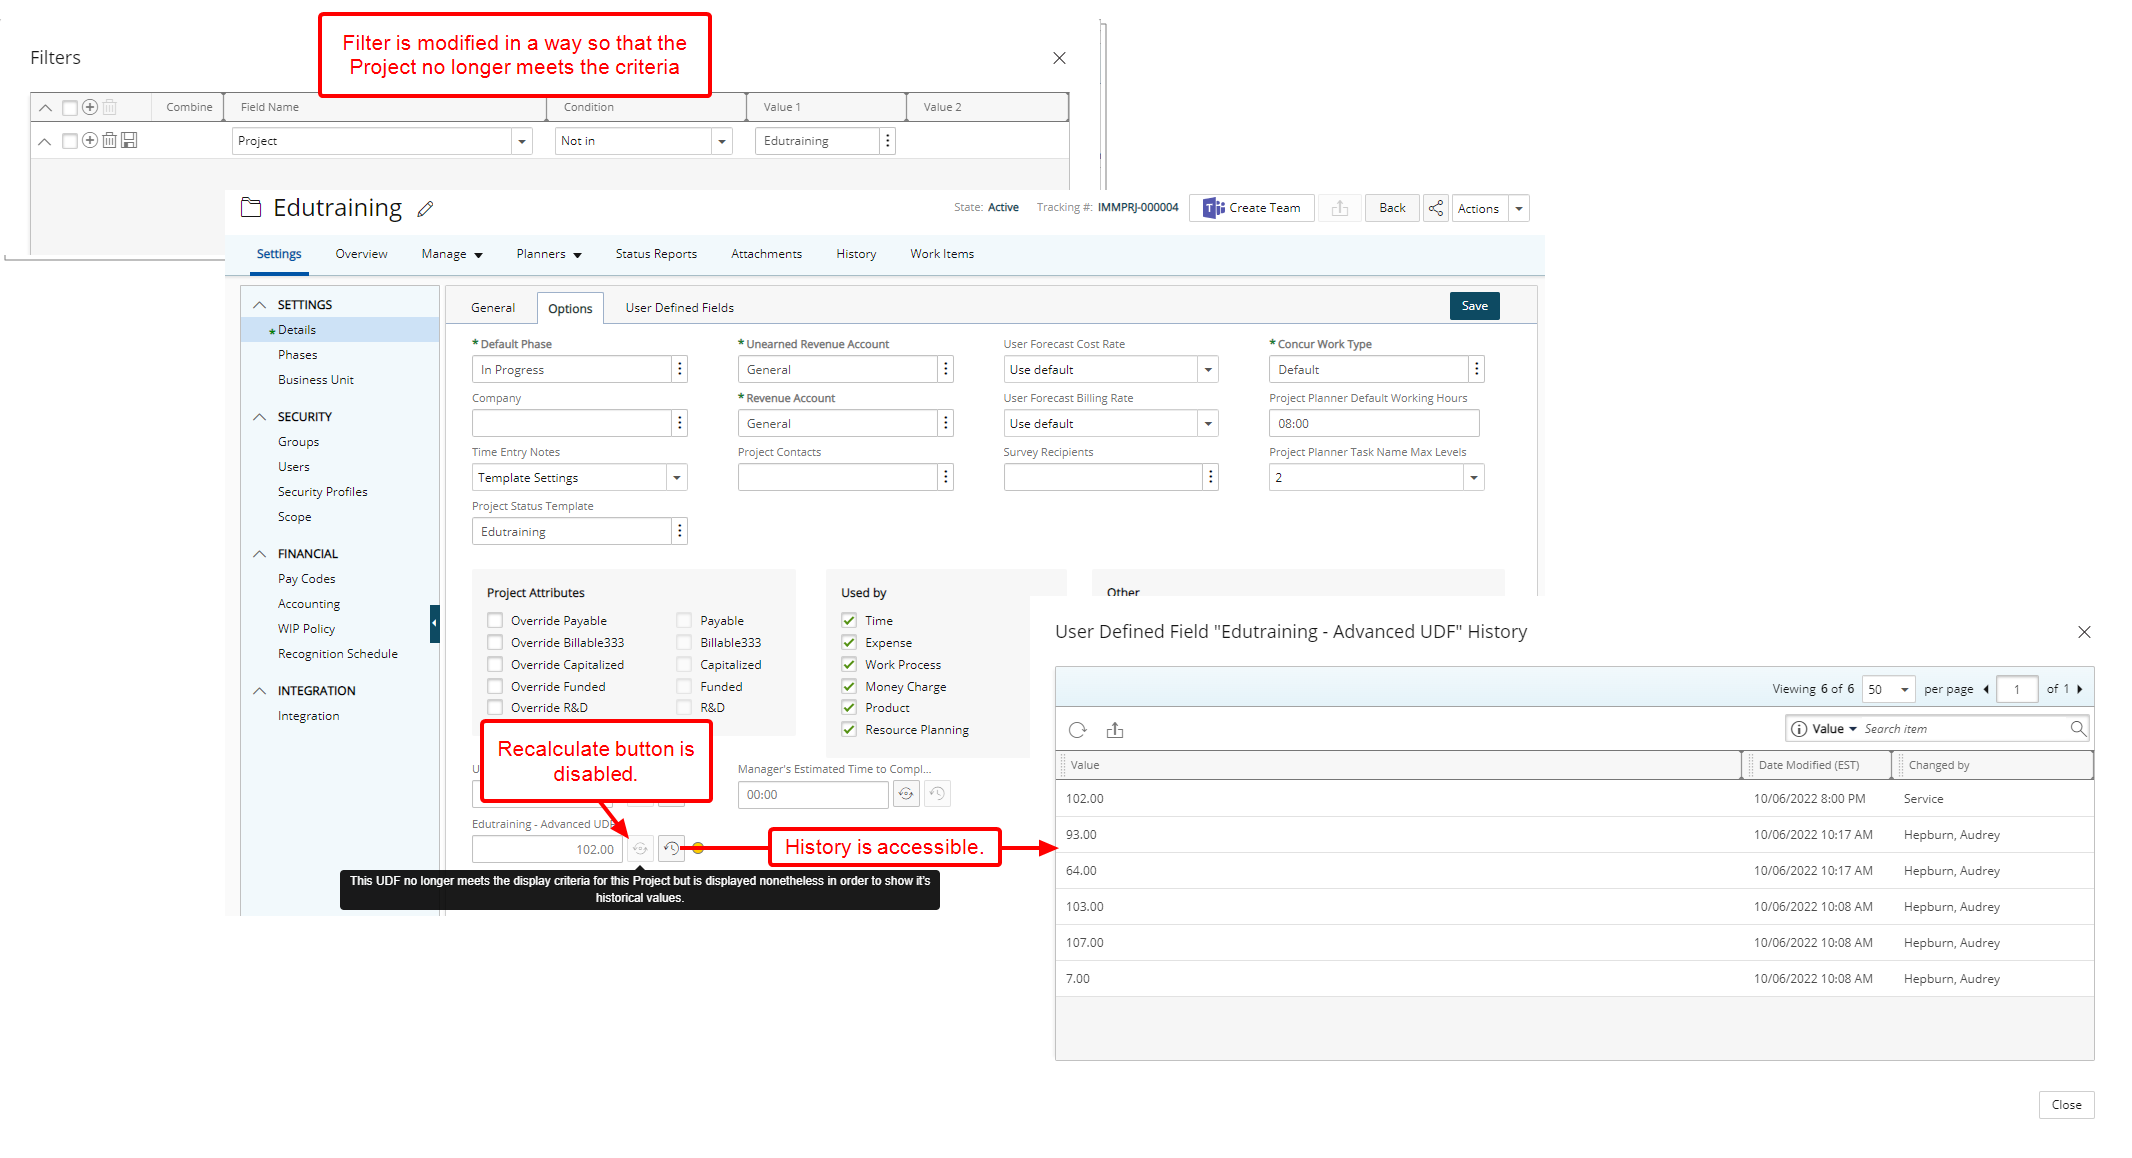
Upon modifying the Filter of an Advanced User Defined Field in a way so that a Project no longer meets the criteria:
- If previous historical values are preserved/retained, the Advanced User Defined Field will be displayed on the Project Edit page. The Recalculate button will be disabled, and you can access and view the historical values.
- If no previous historical values are preserved/retained, the Advanced User Defined Field will no longer be displayed on the Project Edit page.
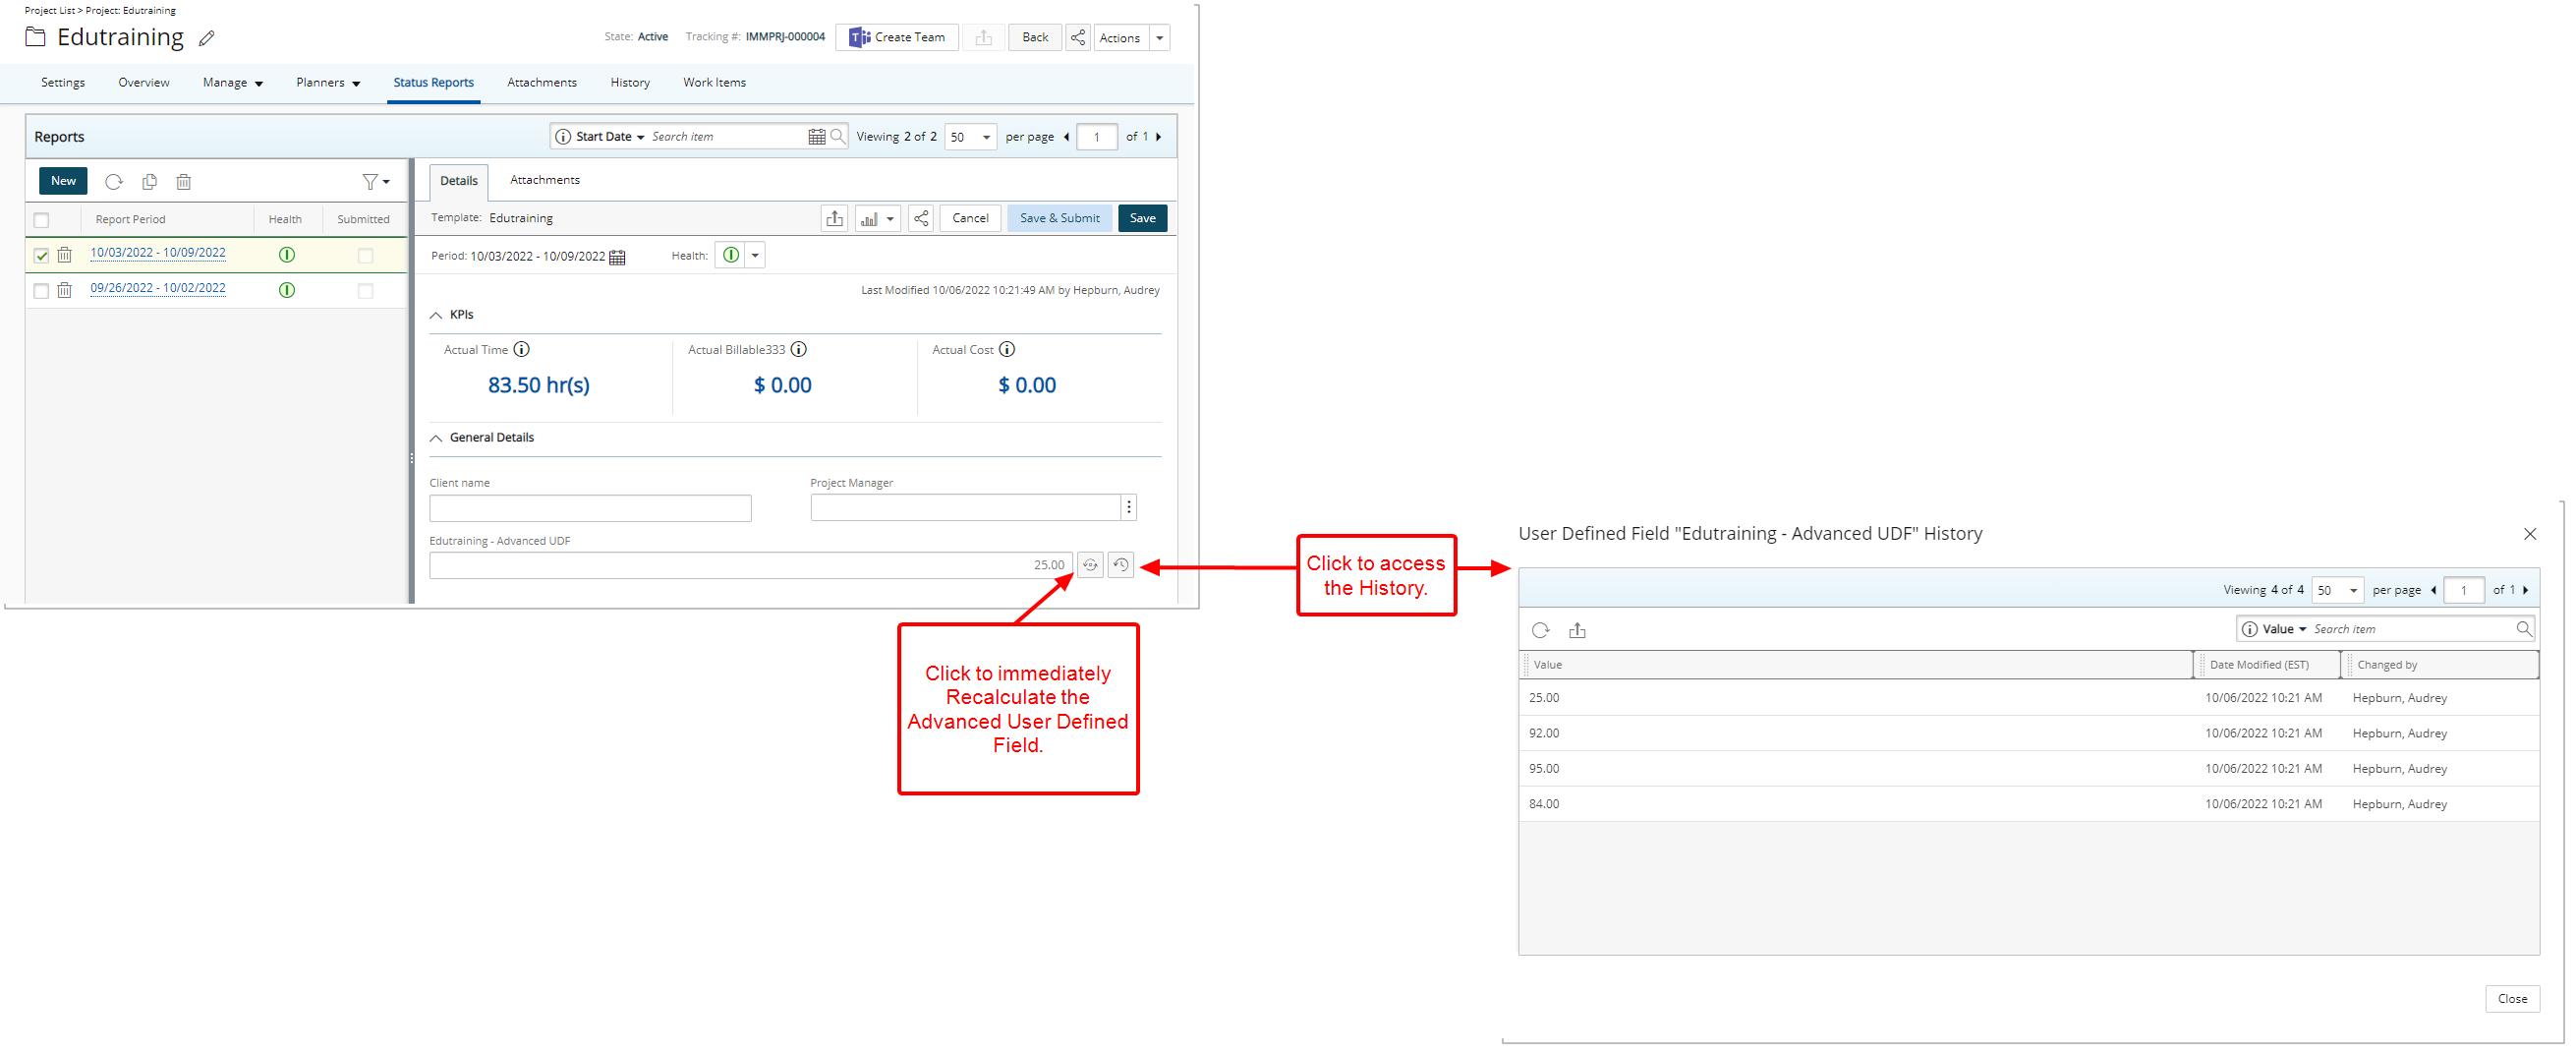
The Advanced User Defined Field associated to the Project Status Template will be displayed on the tied Project Status Reports that match your Calculation Criteria Filter.
If no Filter was defined, then the User Defined Field will be available on all Project Status Reports pages associated to the Project Status Template.
From the Project Status Report page, you can:
- Click the Recalculate Values button to immediately recalculate the value of the Advanced User Defined Field for the current Project Status Report only.
- Click the History button to access the detailed History page.
Note: The values of Advanced User Defined Fields will be recalculated for all applicable Project Status Reports if recalculation is triggered from either the:
- Project Status Templates
- Newly available Process Advanced UDFs Automation Processing Service
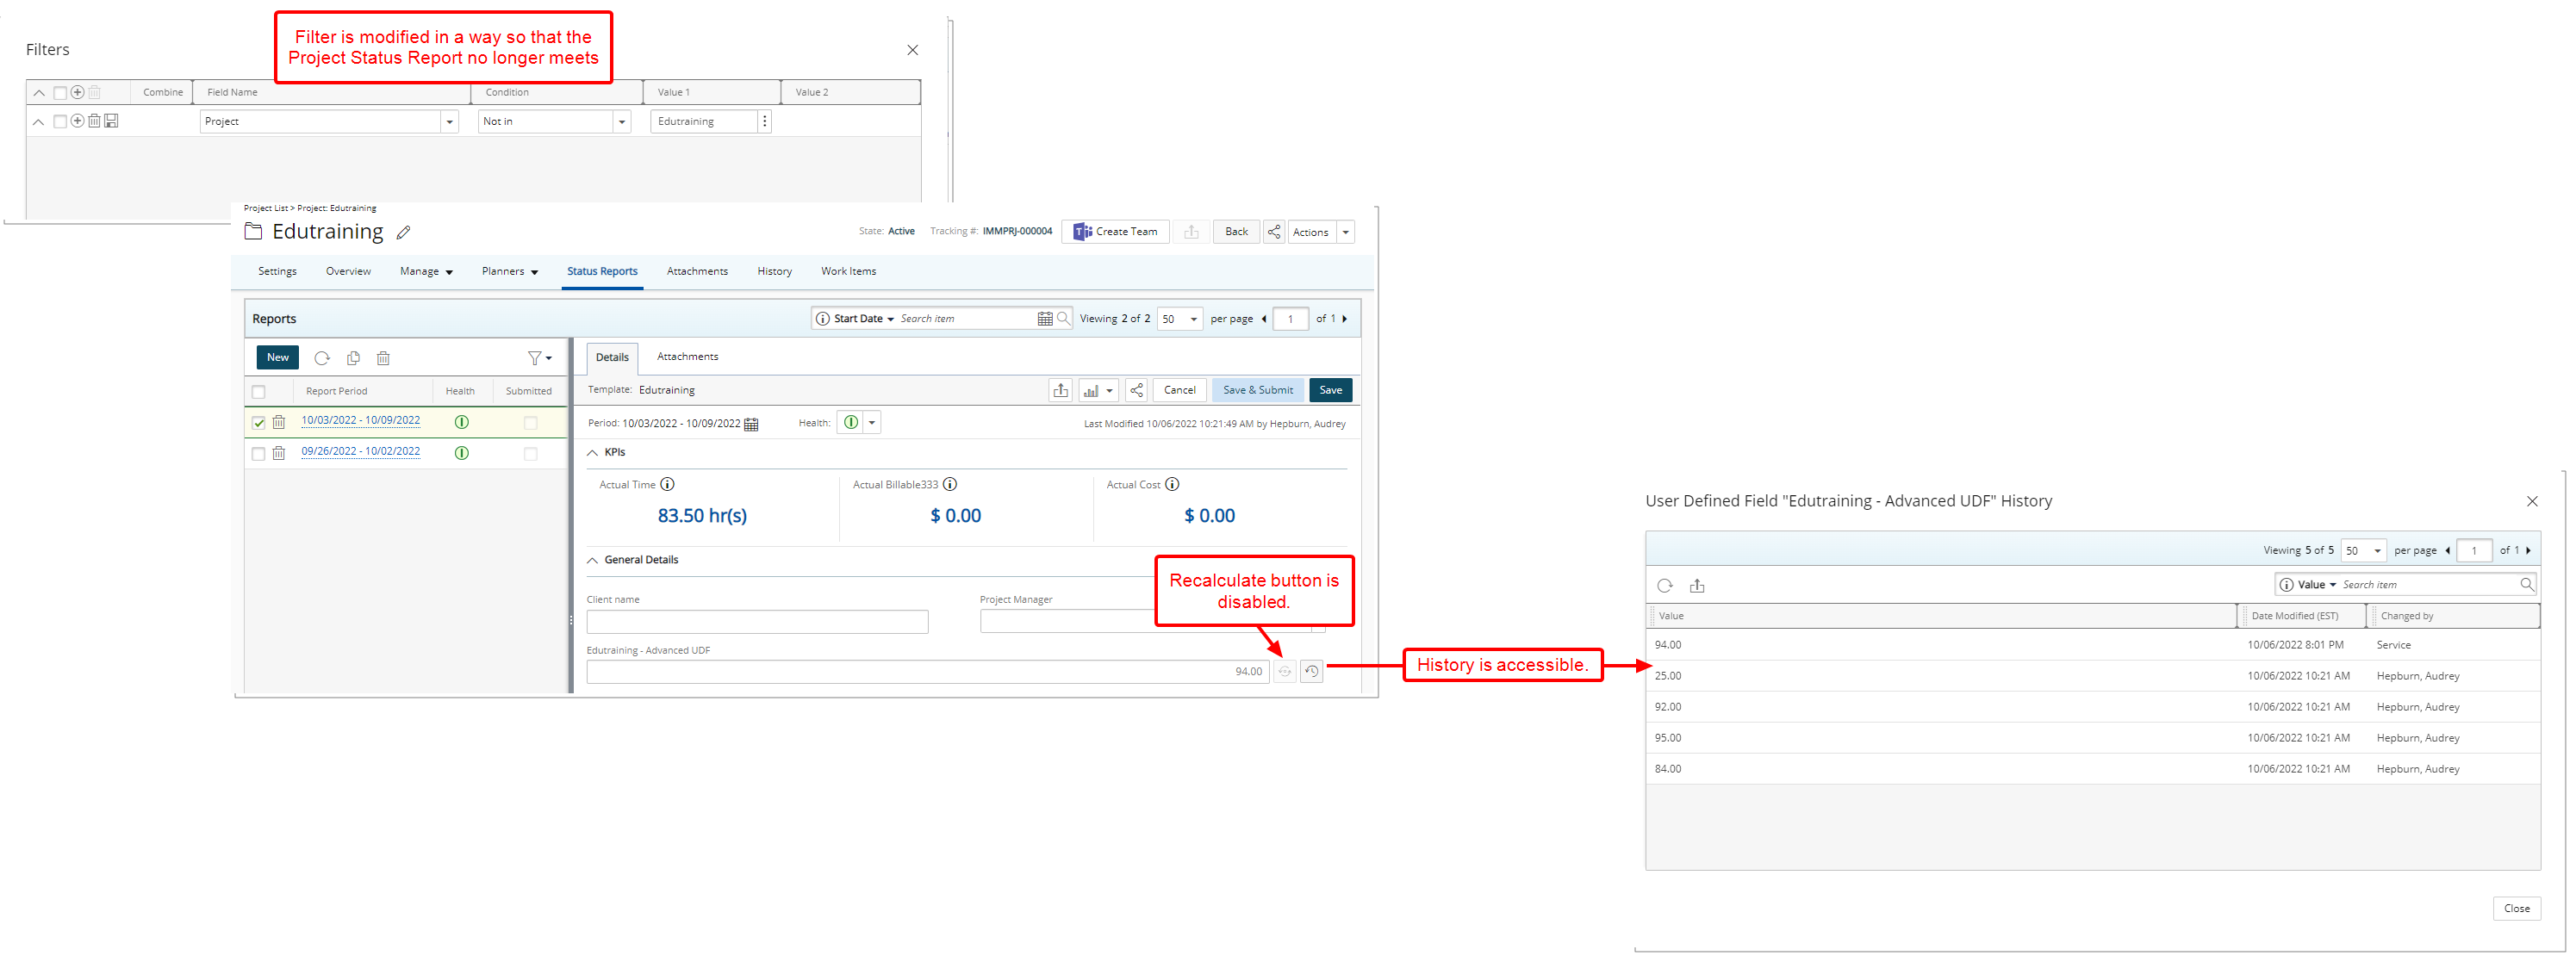
Upon modifying the Filter of an Advanced User Defined Field in a way so that a Project Status Report no longer meets the criteria:
- If previous historical values are preserved/retained, the Advanced User Defined Field will be displayed within the associated Project Status Report. The Recalculate button will be disabled, and you can access and view the historical values.
- If no previous historical values are preserved/retained, the Advanced User Defined Field will no longer be displayed the associated Project Status Report.
Upland Analytics
The current version of PSA release expands Upland Analytics Classic and New Analytics highlighting many powerful new enhancements as well as improvements to the user experience. More information on New Analytics can be found https://help.uplandsoftware.com/NewAnalytics/Home.htm.
Description: Improvements have been made to the Synchronize Integrations Automation Service wherein suspending/decommissioning a User in PSA will set the User inactive in Upland Analytics when the Service is run.
The reports created by this User will continue to be available for other Users accessing Upland Analytics (Provided they have the permission to do so).
For further details refer to Synchronize Integrations Automation Service
Description: The User Alternate Role Field is now available within the User View located under the following Data Sources:
- Assignment Budget
- Cost & Billing Rule
- Expense
- Financial
- In/Out Timesheet
- Invoice
- Invoice Entry Details
- Leave Time History
- Money Charge
- Product
- Project Budget
- Project Entry Details
- Project Planning
- Resource Bookings
- Resource Request
- Skill Associations
- Timesheet
- User Scheduling
Benefit: You can now report on User Alternate Role.
Description: The following Fields are now available through the Expense Entry Basic View located within the Expense Data Source:
- Expense Entry Item Payable Segment Code
- Expense Entry Item Payable Account
- Expense Entry Item Receivable Segment Code
- Expense Entry Item Receivable Account
For further details refer to The Expense Data Source and related views
Description: The following Fields were added to the Work Data Source:
Project Overview View:
- Project Total Billed in Project Curr
- Project Total Billing in Project Curr
- Project Total Billed in Client Curr
- Project Total Billing in Client Curr
- Project Total Billed in Company Curr
- Project Total Billing in Company Curr
Furthermore, the following Views have been also added to the Work Data Source:
- Client Currency
- Company Currency
- Project Currency
Moreover, the following Fields were renamed:
- Project Total Billed to Project Total Billed in Base Curr
- Project Total Billing to Project Total Billing in Base Curr
For further details refer to Work Data Source and related views
Description: The Impersonated By User View is now available through the Audit Trail Data Source allowing you to report on the following Fields:
- Impersonated By User First Name
- Impersonated By User Last Name
- Impersonated By User Name
For further details refer to Audit Trail Data Source and related views
Description: The following Views are now available through the Financial Planner Combined Data Source:
Financial Planner Combined Detail View allowing you to report on the following Fields:
- Total Deferred Revenue Amount In Base Curr
- Total Deferred Revenue Amount In Client Curr
- Total Deferred Revenue Amount In Project Curr
Financial Planner Combined Summary View allowing you to report on the following Fields:
- Grand Total Deferred Revenue Amount In Base Curr
- Grand Total Deferred Revenue Amount In Client Curr
- Grand Total Deferred Revenue Amount In Project Curr
- Total Actual Deferred Revenue Amount In Base Curr
- Total Actual Deferred Revenue Amount In Client Curr
- Total Actual Deferred Revenue Amount In Project Curr
For further details refer to Financial Planner Combined Data Source and related views
Description: Addition of a new Expense Workflow History Data Source with these Views: Approval Alternate Group Manager, Approval Group Manager, Base Currency, Client, Expense Report Client Currency, Expense Report Summary, Expense Workflow History, Expense Workflow History Modified By User, Portfolio, Project, User, User Approval Group and User Currency.
Scoping is available for: All Groups, All Projects, Available Projects, My Approval Groups, My Functional Group, My Portfolios and My Projects.
Benefit: With the addition of the new Expense Workflow History Data Source, you now have access to report on the Expense Workflow History.
For further details refer to Expense Workflow History Data Source and related views
Description: Addition of a new Invoice Workflow History Data Source with these Views: Alternate Project Manager, Client, Client Currency, Company Currency, Invoice Currency, Invoice Summary, Invoice Workflow History, Invoice Workflow History Modified By User, Portfolio, Project and Project Manager.
Scoping is available for: All Projects, Available Projects, Client Contacts and My Projects.
Benefit: With the addition of the new Invoice Workflow History Data Source, you now have access to report on the Invoice Workflow History.
For further details refer to Invoice Workflow History Data Source and related views
Work Breakdown Structure (WBS)

Description: The following two new KPIs are now available through the Project list Column Selection:
- Current Billable Time Budget: The sum of Current Billable Time Budgets of the Project.
- ∆ Current Billable Time Budget: The Difference between Current Billable Time Budget and Actual Billable Time.
For further details refer to Out-Of-The-Box Column Selection options | Project List
Description: A warning message is now displayed when setting a Milestone Billing Date outside of the Project Start/End Dates. You must then adjust the Milestone Billing Start/End Date(s) before attempting to save.
Furthermore, upon modifying a Projects’ Start/End Date(s) if the Milestone Billing Date falls outside of the new Project Star/End Date(s) the Errors dialog box is now displayed. You can choose to copy the error message(s) to your clipboard to make the necessary corrections
Note: Upon upgrading to PSA 2022 R2.0 if any exiting Milestone Billing Date(s) fall outside of their Project Start/End Date(s), the Project Manager will receive an Email upon running the Complete Milestones Automation Service informing them that the Billing Date(s) of the listed Milestone(s) is/are outside of the Project dates.
Benefit: With these improvements, the Complete Milestones Automation Service will now run without interruption/errors.
For further details refer to Creating a Milestone
Description: In previous releases the Effective Start Date and End Date for a Project Task Hourly Billing Rate (Project List > Project Edit > Task Edit > Associated Billing Rules) defaulted to Current date. As of this release improvements have been made so that these dates default to Start and End dates of the associated Task respectively.
Note: The End Date of Billing Rules will default to Current date if the End Date of the associated Task is set to Open ended.
Benefit: You can now efficiently create a Project Task Hourly Billing Rate, without significant click-through.
For further details refer to Associating an Hourly Billing Rule to a Task
Description: You can now set the Project Task Cost/Billing Rate Rule Start and End Dates to Database start date and Open Ended.
Benefit: This improvement ensures that the Project Cost/Billing Rate Rules are not incorrectly set to 0$.
Note:
- For Fixed Cost/Billing Rate Rules, you cannot set the End Date to open ended.
- For Milestone Billing, the Rate Rule must be within the Project Start/End Dates.
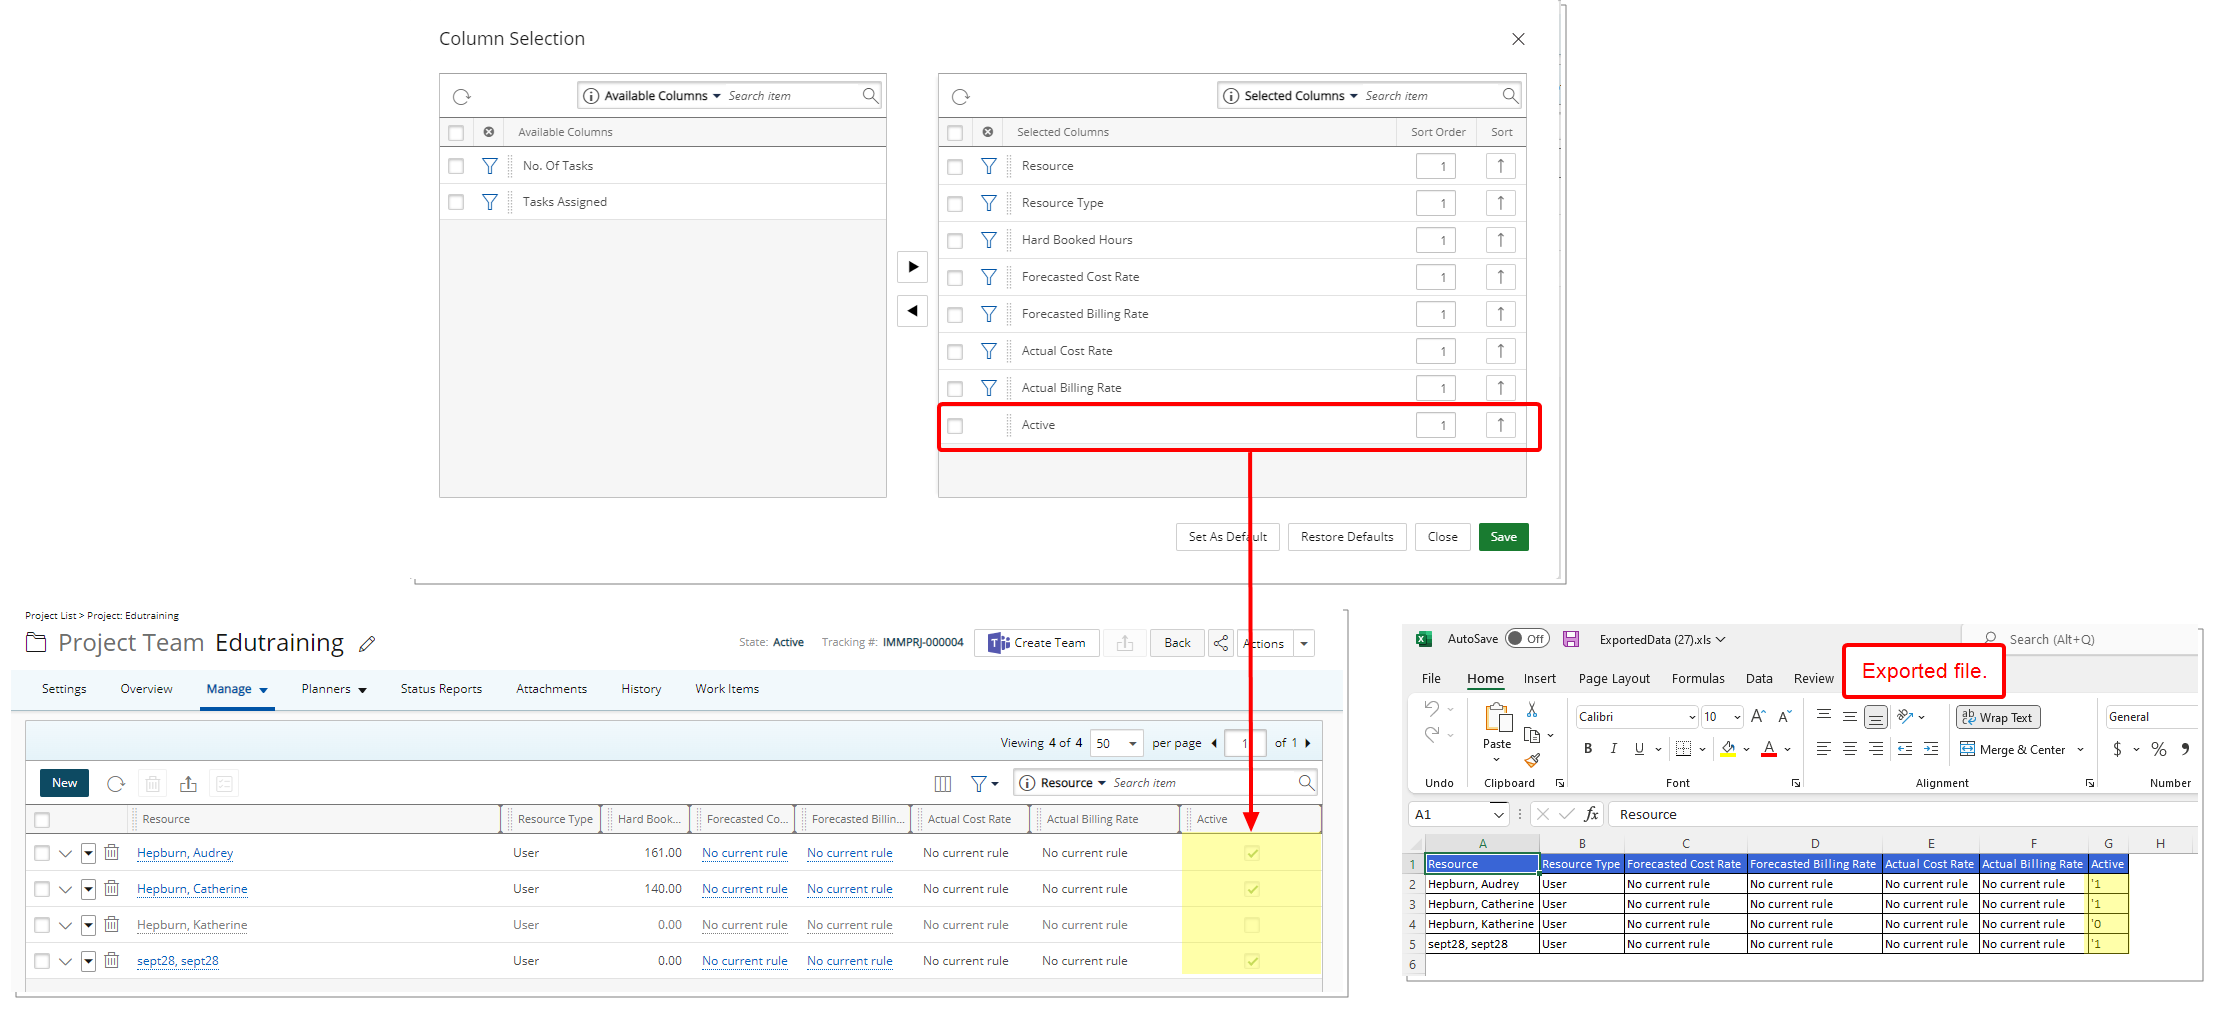
Description: From the Column Selection of the Project Team page, you can now choose to include the Active option.
Note: When exporting the list to Excel, Active column values are:
- 0 for Suspended or Decommissioned Users.
- 1 for Active Users.
Benefit: With this addition you can conveniently view the status of Project Team members.
For further details refer to Project Team page
Description: In past releases there were inconsistencies with Task Assignment Dates when assigning Tasks from various areas of the application. As of this release Improvements have been made to the following pages, wherein the Assignment Start Date is now set to the Task Start Date:
- Setup > Organization > Users > Assign Tasks
- Portals > Resource Central > User’s Summary > Assign Tasks
- Setup > Work > Tasks > Assign Users
- Setup > Work > Tasks > Task Edit > Assign Users
- Project List> Project Edit > Manage tab> Tasks > Assign to
- Project List> Project Edit > Manage tab > Project Team > Assign

Description: The Assign Users to Task dialog box accessed through Project Tasks page (Project List > Project: Edit > Manage tab > Tasks > Assign Users) has been redesigned to improve overall user experience and establish consistency across all pages.
Furthermore, the Team and Resource Type Search by options have been deprecated and the Last Name, First Name options have been replaced by Name.
Benefit: With these overall modifications, the look and feel are further improved, as well in keeping with the UplandOne mindset, wherein the layout of various elements within the page support the unified experience across Upland products. Consequently, the user experience is further elevated.
For further details refer to Assigning Users to a Task through the Project Edit page
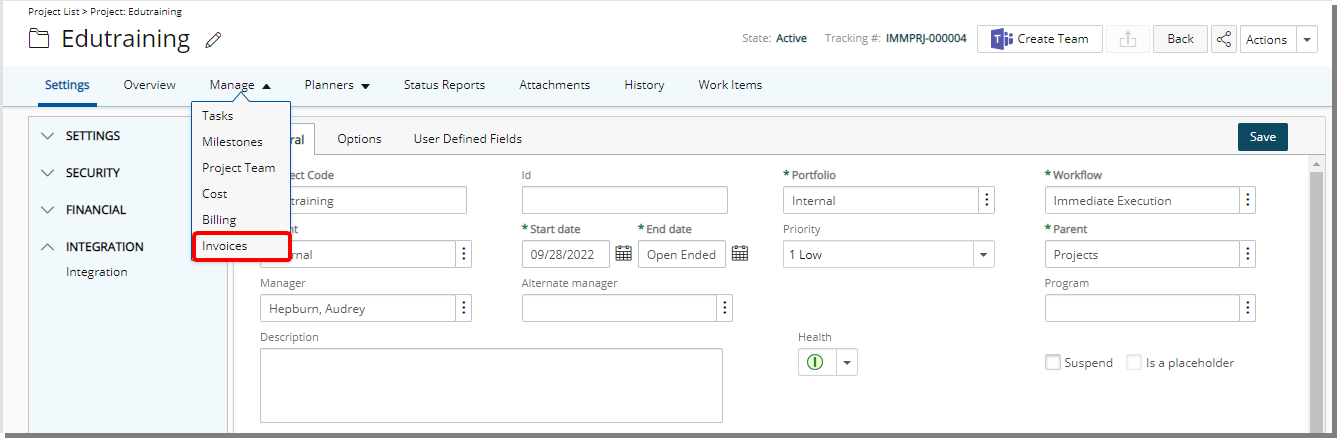
Description: A new Invoices option is now available from the Project Edit Manage tab navigation.
From the Invoices page you can:
- Create a New Invoice. By default, the current Project is selected. Note that other projects related to the same Client can also be selected.
- Manage existing Invoices
- Refresh the list
- Export the list to Excel
- Search for Invoices based on Invoice #, From/To dates, State and Assigned to criteria
- Sort columns based on your needs.
Note:
- Invoices can only be deleted from the Invoice Manager (Financial > Invoice Manager).
- You must have the Create right to Invoices, otherwise the Invoices option will be unavailable to you from the Project Edit Manage tab navigation.
Benefit: You can now efficiently access your Project related Invoices, without significant click-through directly from the Project Edit page.
For further details refer to
- Creating and Managing Invoices from Project Edit
- Creating Invoices from Project Edit
General
Description: The user interface of the List pages when choosing a Role, Users, Projects, Tasks, Clients etc. have been improved for better user experience and consistency throughout the application.
These List pages can be accessed from various areas throughout PSA such as when choosing a User while creating a New Booking from Entries > Resource Scheduling.
Benefit: With these overall modifications, the look and feel are further improved, as well in keeping with the UplandOne mindset, wherein the layout of various elements within the page supports the unified experience across Upland products. Consequently, the user experience is further elevated.
Deprecated/Unsupported Functionality
Description: SharePoint document management is deprecated and no longer supported in PSA.
Description: The legacy Dashboards are no longer available in PSA. As a result the Dashboards button previously available from the following pages have has removed:
- Organization System Setup page (Setup > Organization > System)
-
Group edit page (Setup > Organization > Groups)
The new Dashboards can be managed from a User or Client Security Profile.
Description: The Integrate with MS Project Professional is no longer available from the Project Planning page (Setup > Organization > System).