PSA 2023 R1.0 - Product Enhancements
Below is a summary of the features included in PSA 2023 R1.0.
- Audit Trail
- Charge Entries
- Expense
- Financial
- Integration
- Invoicing
- Notifications
- Organization Breakdown Structure (OBS)
- Project Status Reporting
- Resource Management
- Timesheet
- Timesheet Templates
- Timesheet Manager
- Upland Analytics
- Work Breakdown Structure (WBS)
- General
Click here to watch the PSA 2023 R1.0 feature summary video.
2023.01.24.2023R1.0.V1.EB
Note: This page may be updated as new information becomes available. Visit regularly for the latest updates.
Audit Trail
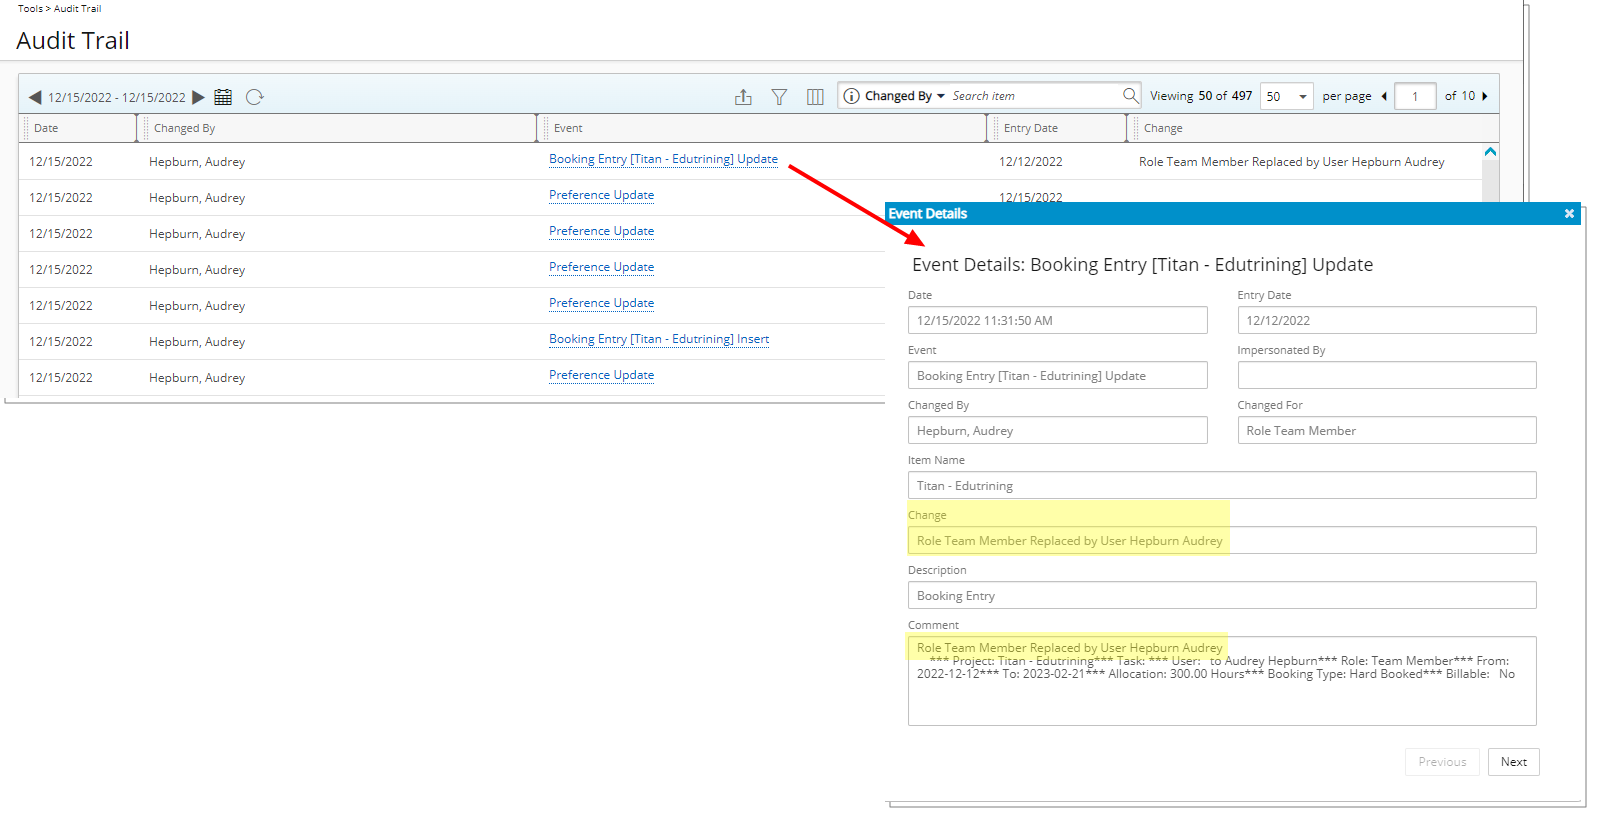
Description: Improvements were made to the Booking Entry Audit Trail Event type (Setup > Organization > System > Security > Audit Setup > Entry > Workforce Planning) to track the Update details when replacing a Role with a User within the Work Plans.
Benefit: The replacement of a Role by a User is now being tracked to indicate when it was made, by whom and to identify the modification.
For further details refer to: Audit Trail Event Types
Charge Entries
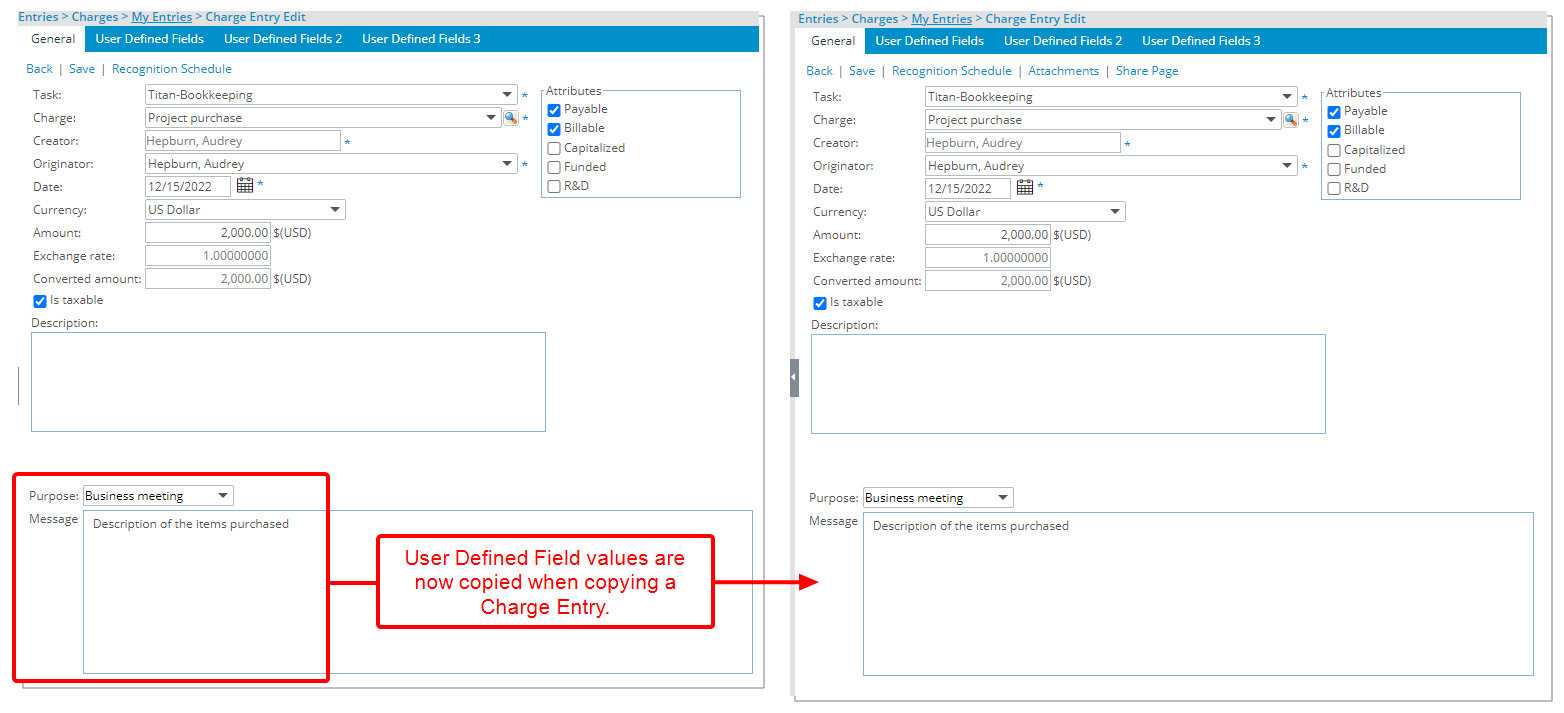
Description: When copying a Charge Entry, all associated User Defined Fields are now copied from the source to the copied Charge Entry.
Benefit: This addition reduces the duplication of re-entry of the information in the newly created Charge Entry.
For further details refer to: Copying a Charge Entry
Expense
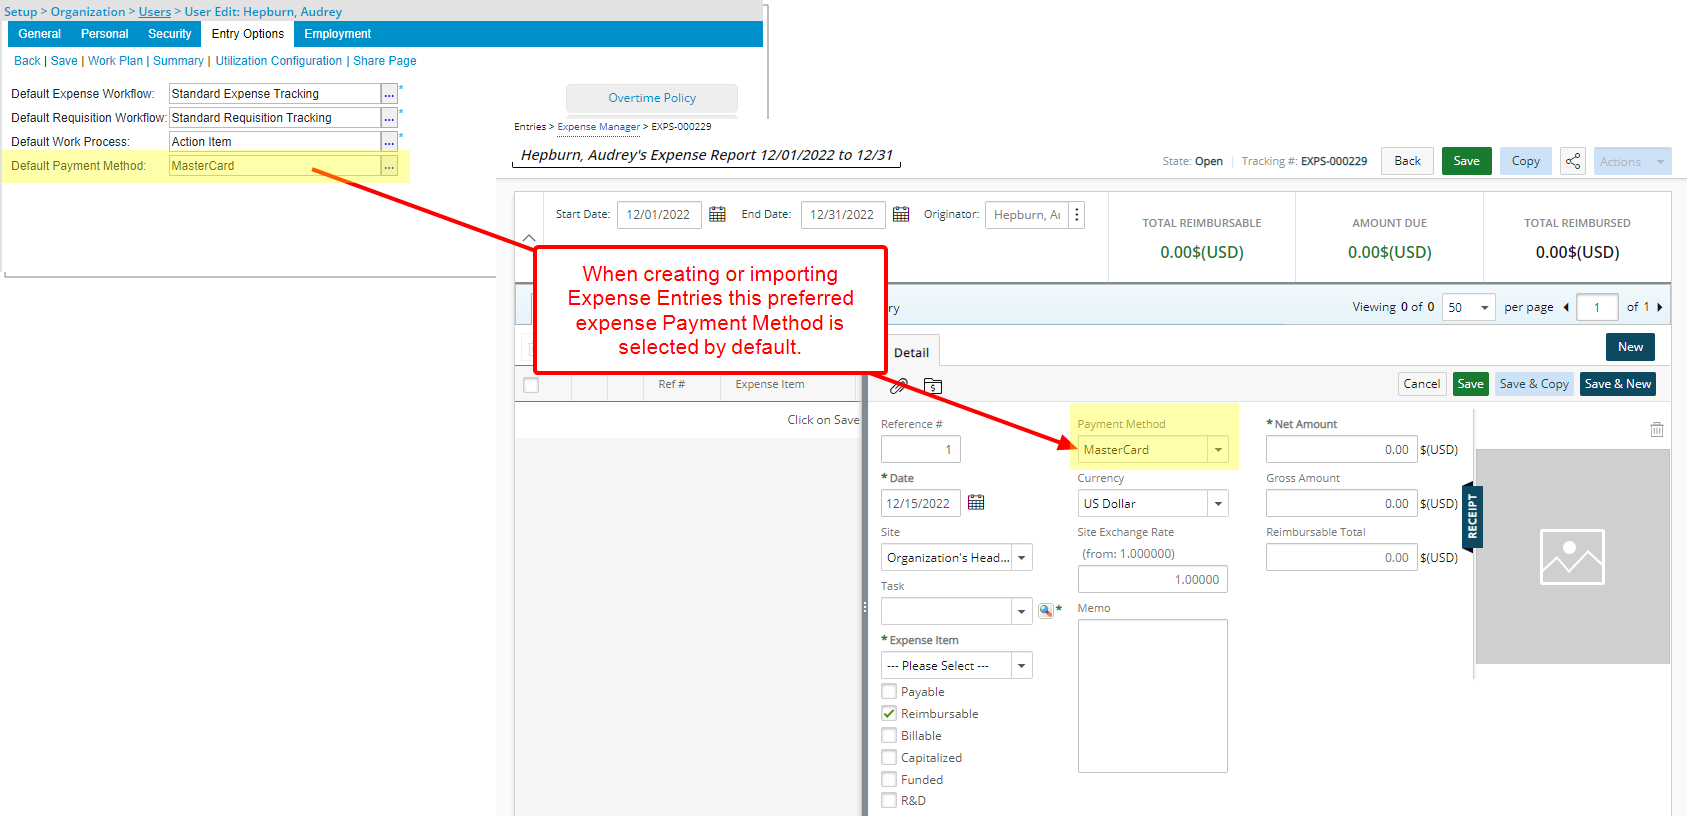
Description: From the Entry Options tab, you can now select a Default Payment Method when creating or modifying a User.
When a Default Payment Method is selected for a User, upon creating or importing Expense Entries this preferred expense Payment Method will be selected by default.
Note: If a Payment Method is not defined for a User, the Expense Payment Method at the System level (Setup > Expense > System) will be selected by default when creating an Expense Entry.
Benefit: With this improvement, you can now choose a different default payment method for a select number of Users.
Use case: The system administrator Audrey is tasked to set the Payment Method to the corporate credit card for a select number of Users within her corporation while setting the default payment method as “Personal” for all other users. She can now create a Personal Expense Payment Method at the System level and set it as the default for her organization. Then modify the Payment Method for the select Users to default to the corporate credit card.
For further details refer to:
- User's Default Payment Method
- Setting up Expense Payment Methods (system)
Description: Improvements have been made to the Expense Report Notes so that upon saving, the Note Edit dialog box now closes automatically.
Benefit: With this improvement, you can now efficiently create Expense Report Notes, without significant click-through.
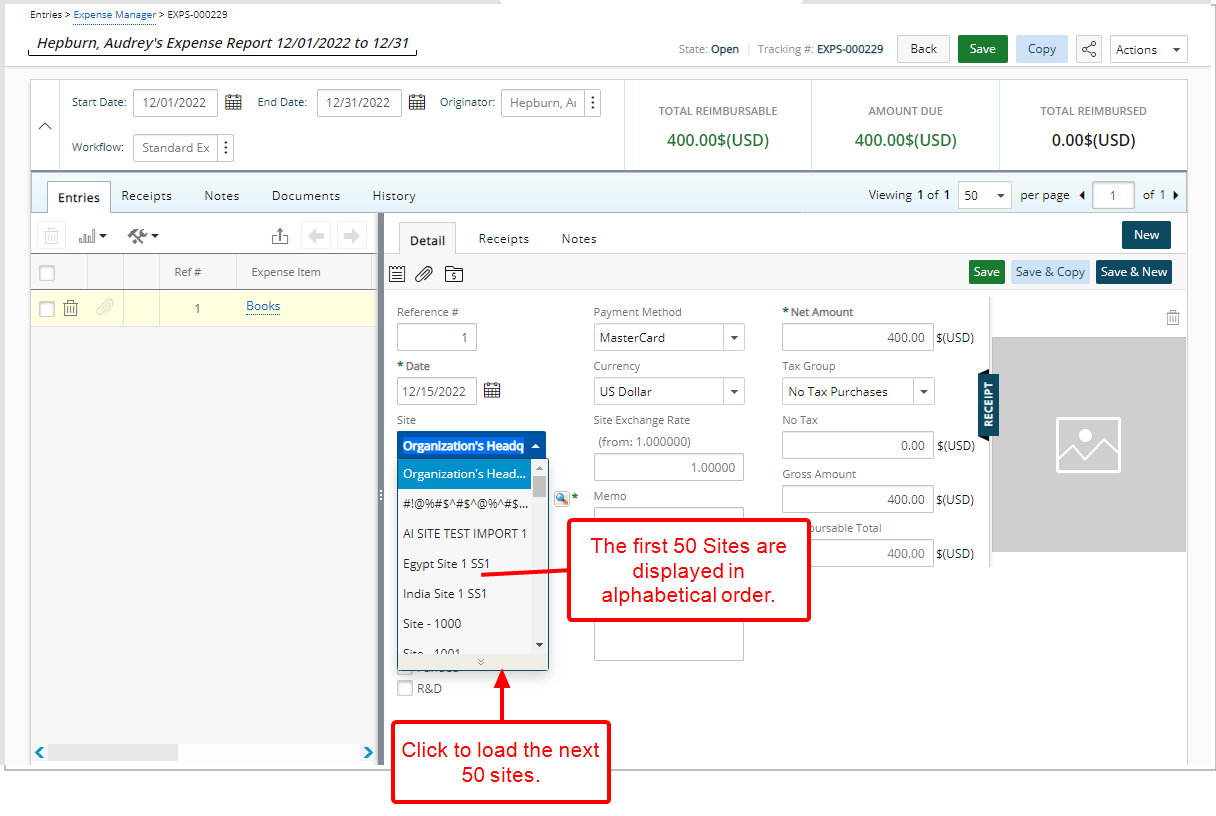
Description: Improvements have been made to the Site selection box when creating/modifying an Expense Entry to now display the first 50 available options in alphabetical order. You can use the selection boxes’ scroll bar to load more options.
Benefit: Users in organizations with large number of Sites, will experience improved performance when creating/modifying an Expense Entry.
For further details refer to: Information that can be entered while creating an Expense Entry
Financial
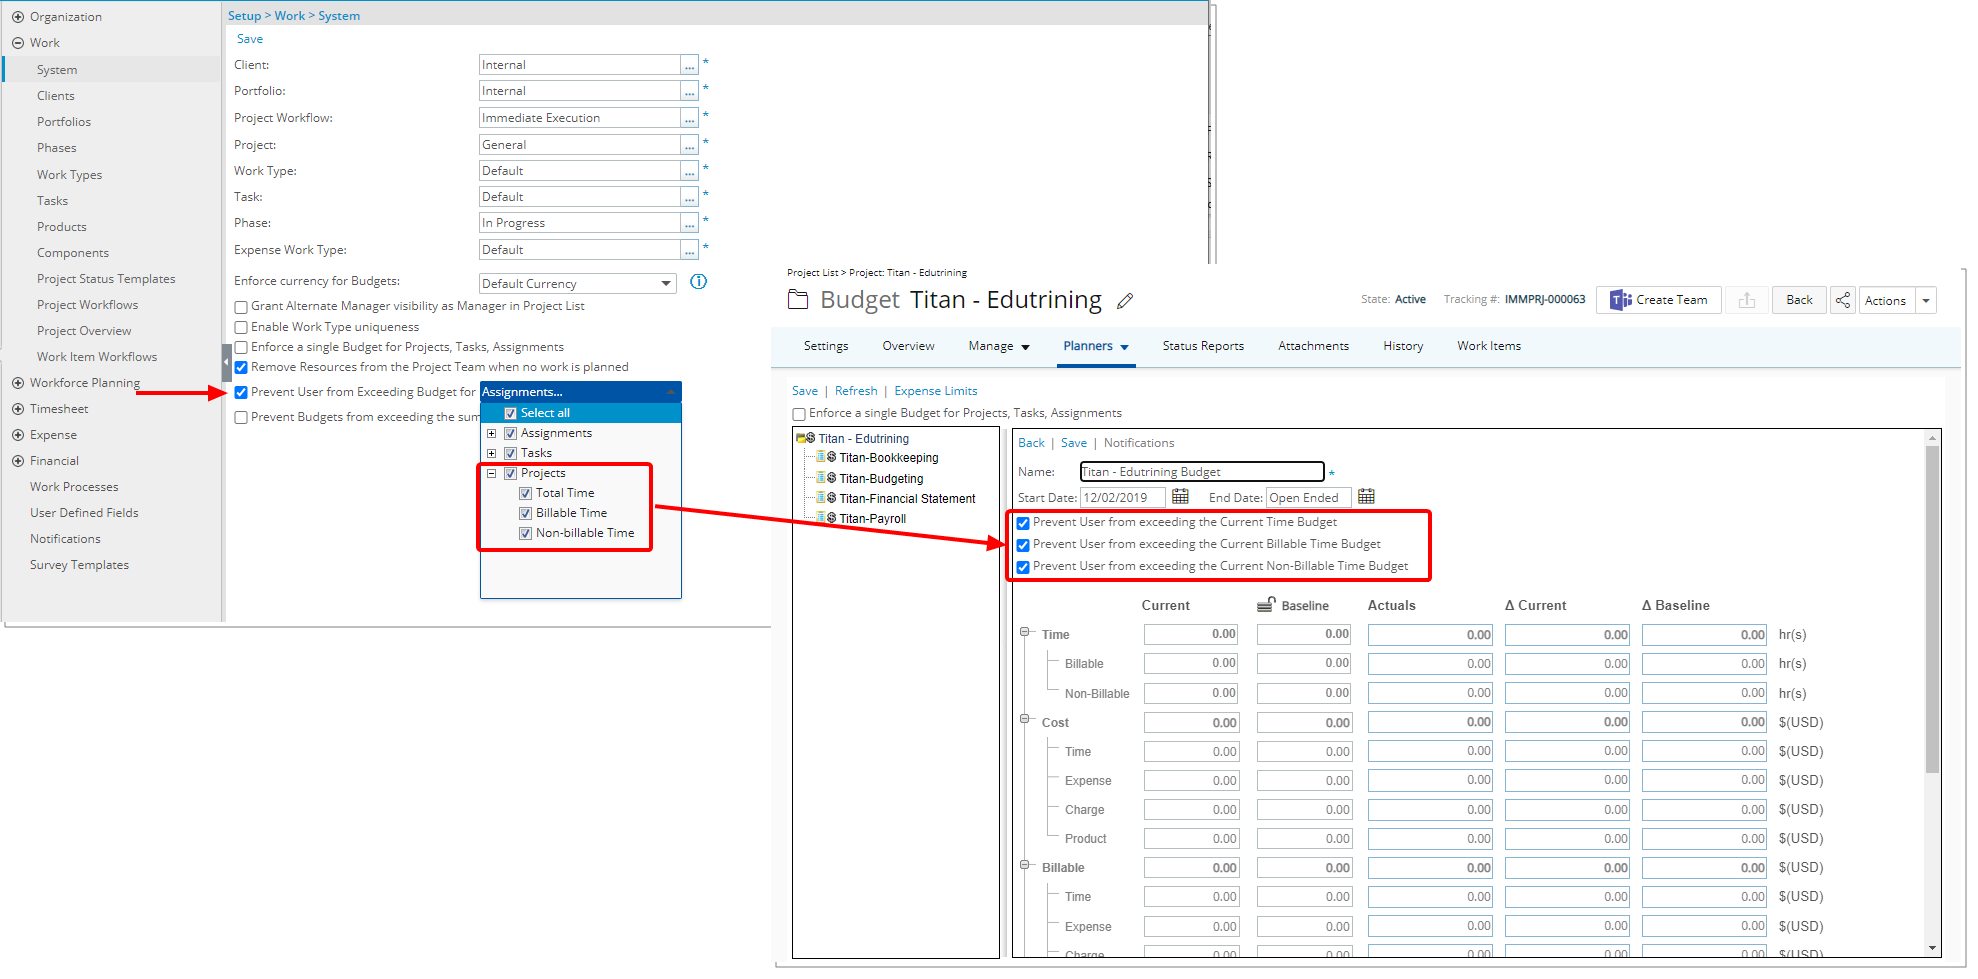
Description: Addition of the option Prevent Users from Exceeding Budget for within the Work System page (Setup > Work > System).
When enabled, you can choose to Select All or pick the following relevant settings from the available options:
- Assignments:
- Total Time
- Billable Time
- Non-Billable Time
- Tasks:
- Total Time
- Billable Time
- Non-Billable Time
- Projects:
- Total Time
- Billable Time
- Non-Billable Time
Your selection at the system level will be reflected when creating new Assignment/Task/Project Budgets.
For further details refer to: Preventing Users from Exceeding Budget
Integration
Description: When importing (Entries > Expense Manager > Import Transaction) already imported Amex file(s), a confirmation message is now displayed informing you that the file(s) were already processed. You can then choose to continue, which will result in duplicated imported data or to cancel the import process.
Note: This duplicate file validation is only applicable when importing transactions using a .csv or .txt file from Entries > Expense Manager > Import Transaction.
Benefit: With this improvement you can now avoid having duplicated data.
For further details refer to: Importing transactions using a .csv or .txt file
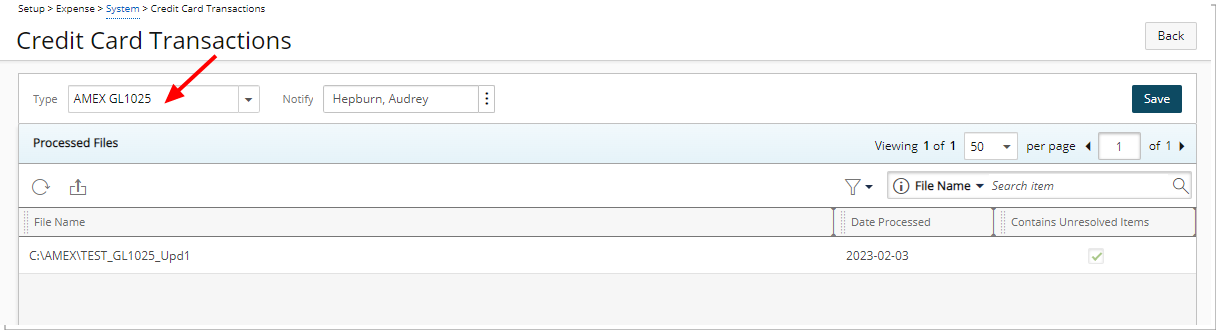
Description: In addition to the already supported KR1025 file format, you can now also choose to import GL1025 file from the Type selection box located within the Credit Card Transactions setup page (Setup > Expense > System).
Benefit: You can now also import AMEX credit card transactions from the new GL1025 file format.
For further details refer to: Importing Credit Card Daily Transactions Using Automation Processing
Invoicing
Description: PSA now offers the option to convert PDF Receipt attachments to JPG images. When the Convert Attachments to Image is turned on, any new PDF Receipts/Attachment to an Expense Report/Entry is converted to a single JPG file according to the set resolution (DPI).
Please contact PSA Support for the exact location of your files and usage examples.
Benefit: With this improvement, the converted Receipts can now be referenced and included in your custom RDLC reports.
Note: The (PDF) Convert Attachments to Image must be turned on. If you are interested in using this functionality, contact PSA Support to discuss your specific business requirements.
Notifications
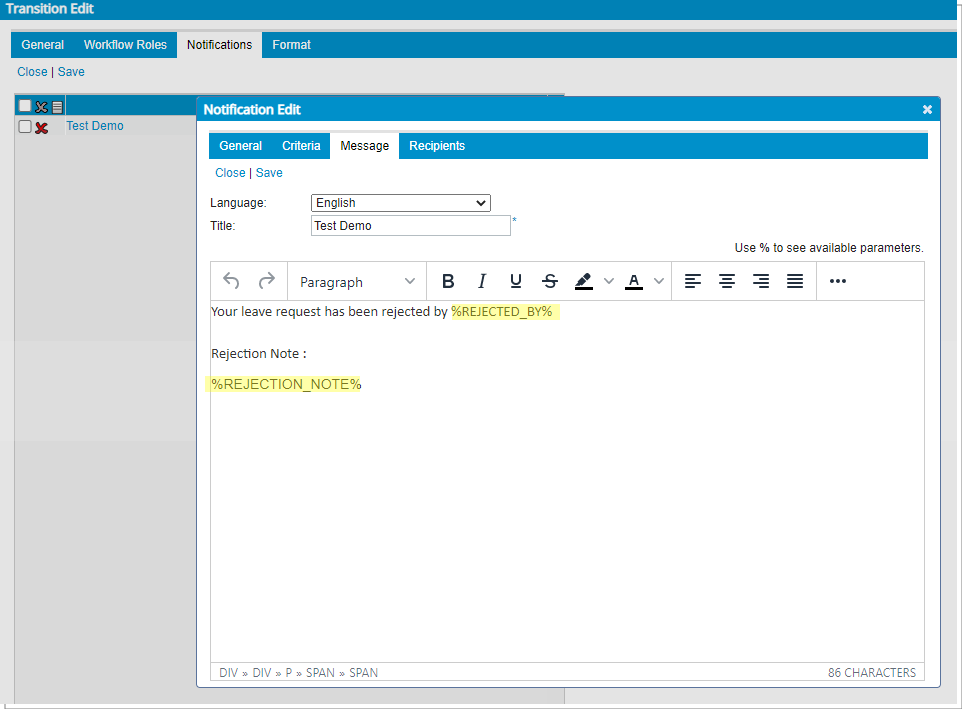
Description: When creating/modifying Leave Request Workflow Notifications you can now use the following new Parameters:
- %REJECTED_BY%: The Name of the User who rejected the request (if the Leave Request was rejected)
- %REJECTION_NOTE%: The rejection Note.
Benefit: You can now use these new Parameters to inform your users why their Leave Request was rejected and by whom.
For further details refer to: Workflow Notification Parameters
Description: A unique Message-ID is now added to the header of all Email Notifications.
Benefit: This will ensure that an email Notification is not rejected by the customer email server.
Organization Breakdown Structure (OBS)

Description: The maximum allowed length of the Title ID box has increased from 16 characters to 32 characters.
Benefit: This accommodates for longer Ids for Titles.
Use case: Brittany is tasked to import Titles. She can now easily import these titles using a long ID for identification purposes.
For further details refer to: Creating a Title
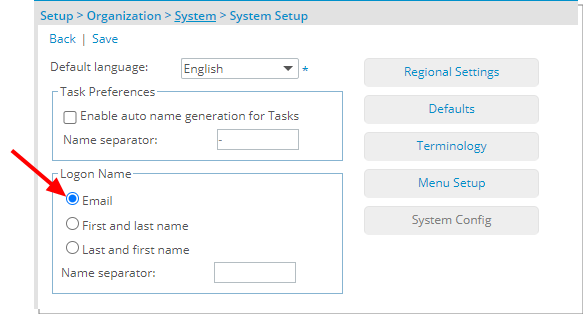
Description: A new Email option is now available from the Logon Name section of the System Setup page (Setup > Organization > System).
When selected, upon creating a User, if an Email is entered within the General tab of the User edit page, it will be used as the default Logon name within the Security tab.
Note: Upon upgrading to 2023 R1.0, the Email option will be selected by default.
Benefit: This addition allows you to choose to default a new User’s Logon Name to their Email address reducing the duplication of re-entry of information when creating a new User.
Use case: The Administrator Audrey is tasked to create User accounts for their organization and to set the Users login Names to their respective email address. She can now choose the Email option within the Logon Name section of the System Setup page. When creating Users, the Logon Name will default to the User’s Email address.
For further details refer to:
- System Setup (OBS)
- User Edit
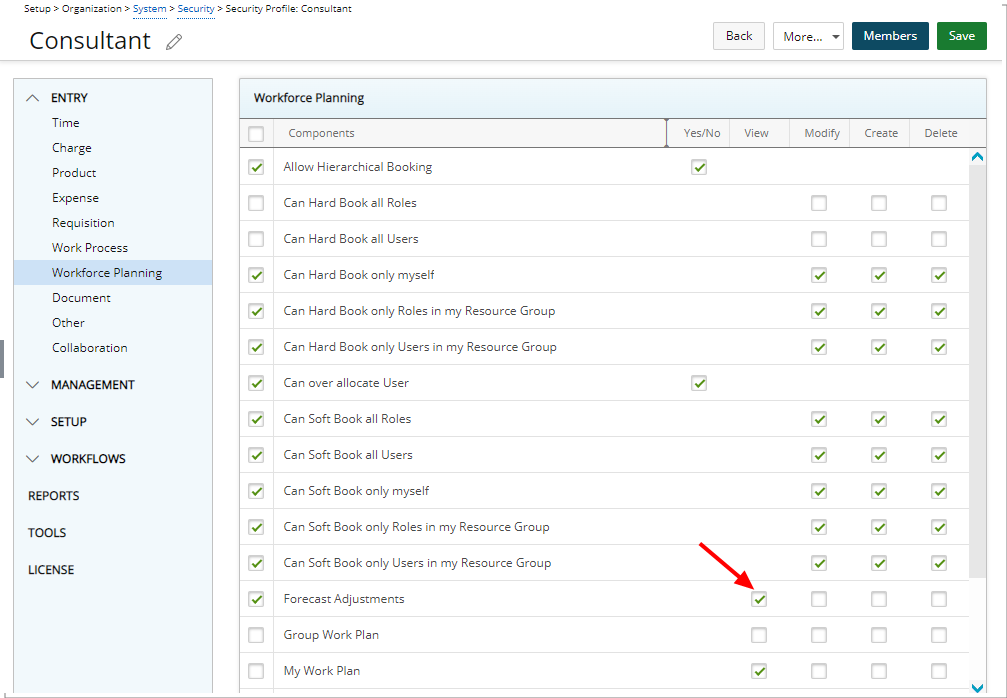
Description: A new View permission is now available for the already existing Forecast Adjustments access right.
Benefit: With this addition, you can now choose to grant Users only the View right to the Forecast Adjustments without the ability to Modify, Create or Delete.
For further details refer to:
- Available Security Permissions for Security Roles within the Security Profile page
- Granting the right to Forecast Adjustments
Project Status Reporting
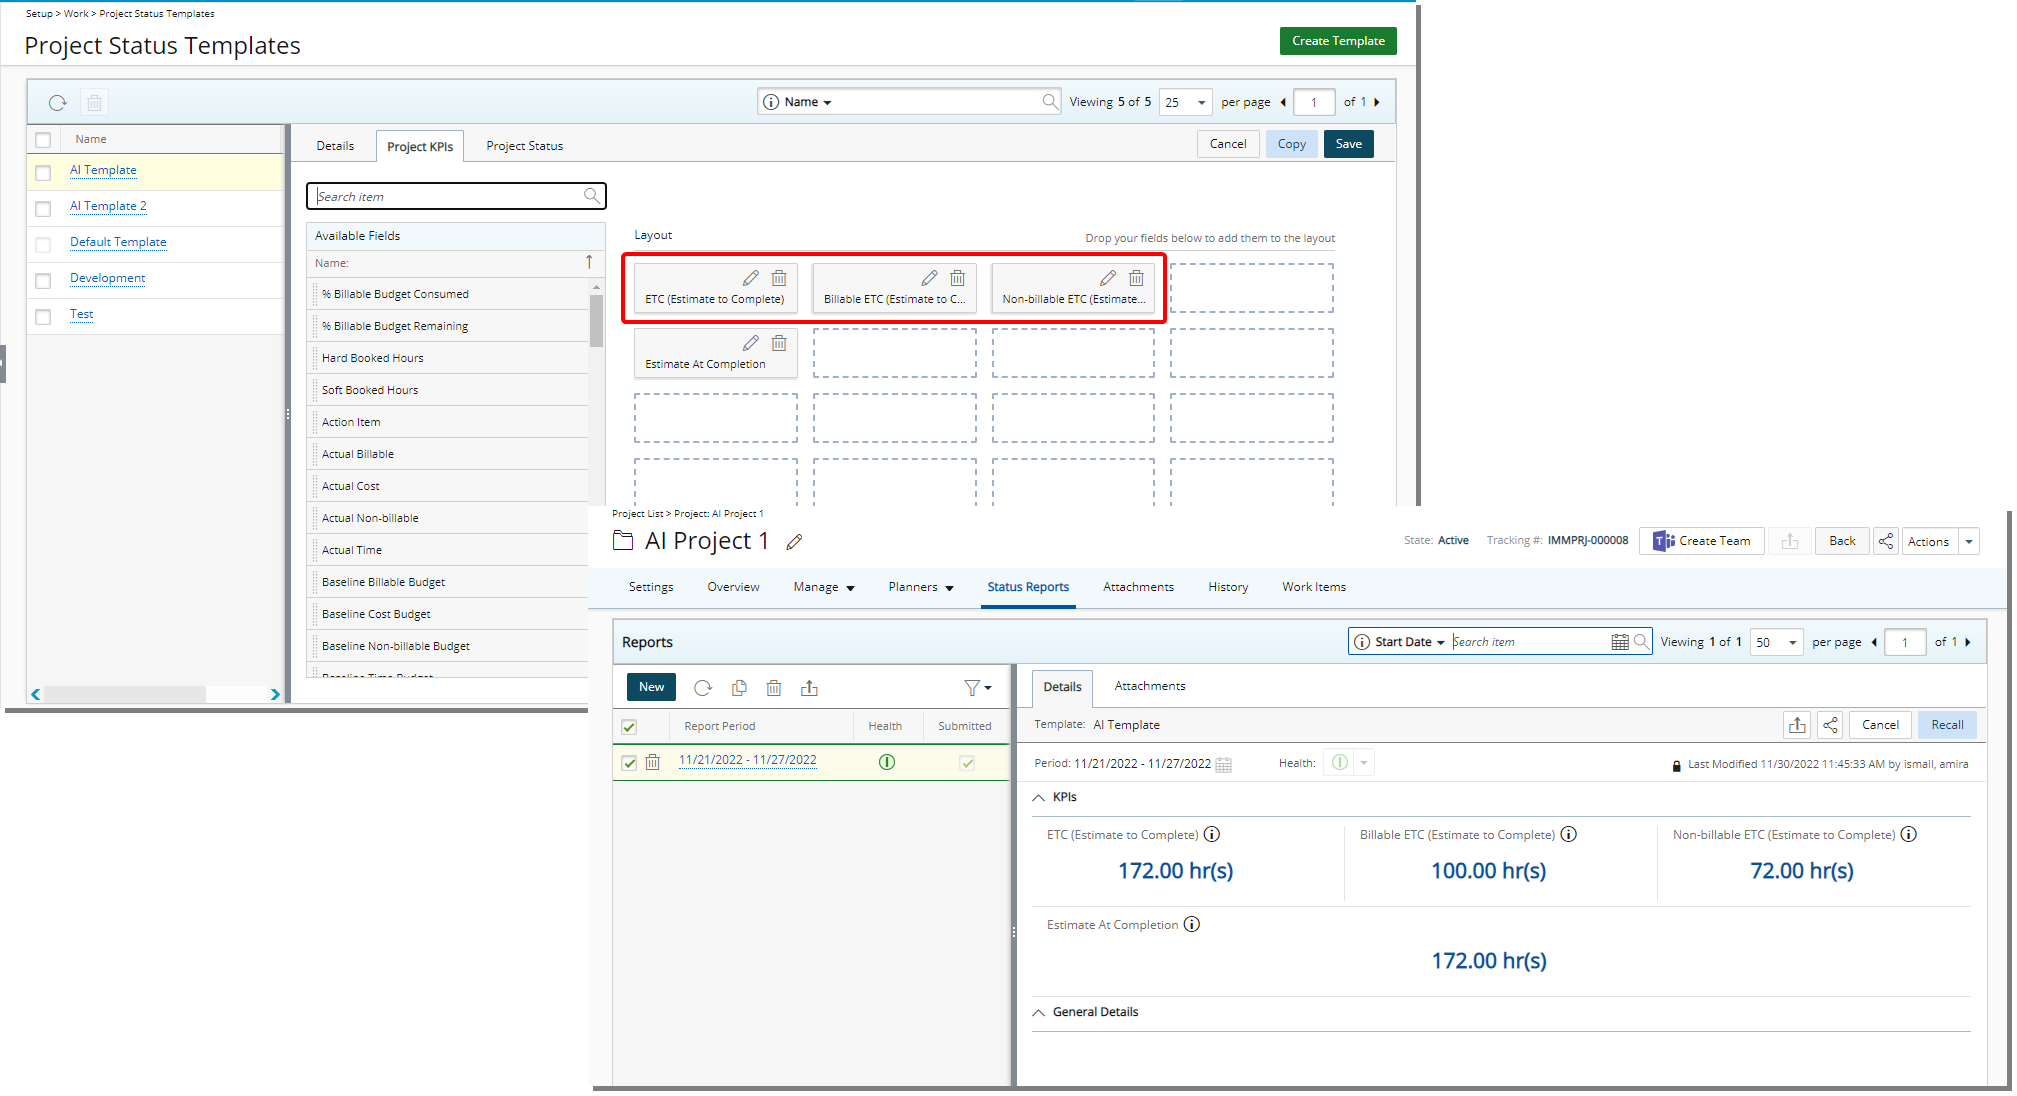
Description: The following new KPIs are now available from the Project KPI’s tab when modifying/creating a Project Status Template:
- ETC (Estimate to Complete): This is the total number of Hours expected to spend in the future to complete the Project.
- Billable ETC (Estimate to Complete): This is the total number of Billable Hours expected to spend in the future to complete the Project.
- Non-Billable ETC (Estimate to Complete): This is the total number of Non-Billable Hours expected to spend in the future to complete the Project.
The ETC value will read N/A:
- For Projects that don’t have the Financial Planner initialized.
- For Projects that have the Financial Planner initialized but the Time Category is not present in the Financial Planner Template.
Note: The calculations are made based on your selections for Work Plan Hours to Include and Calendar settings within the General tab as well as your selected Forecast Start Date within the View Settings tab of the Financial Planner Template associated to the Project.
For further details refer to: Key Performance Indicators in PSA
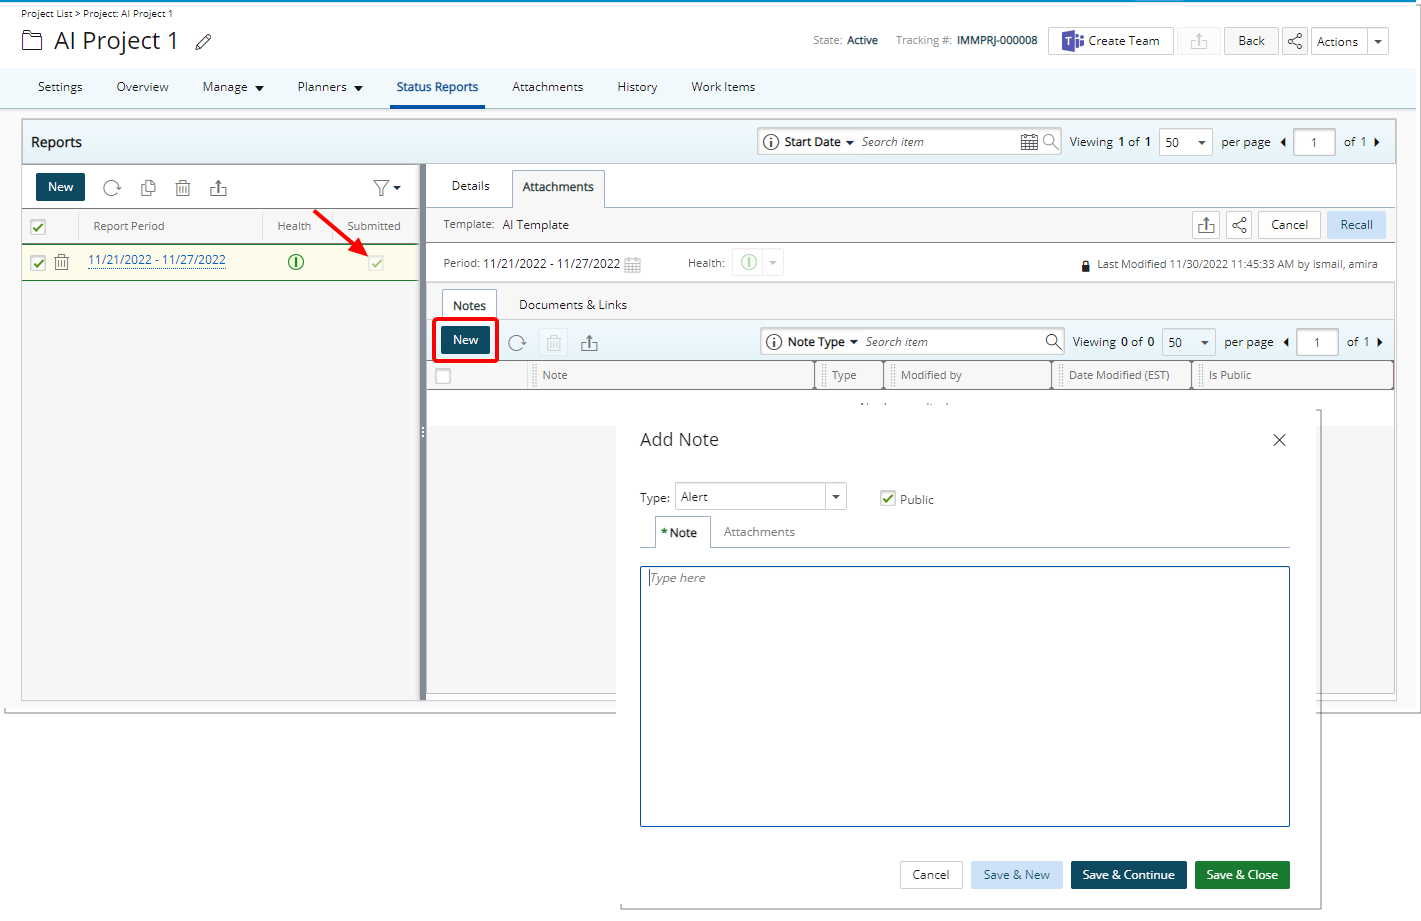
Description: The New button, located within the Notes as well as the Documents & Links tabs of a submitted Project Status Report is now active.
Benefit: With this improvement you can now create Notes and attach Documents & Links to a submitted Project Status Report.
For further details refer to: Adding Notes, Documents and Links to a Project Status Report
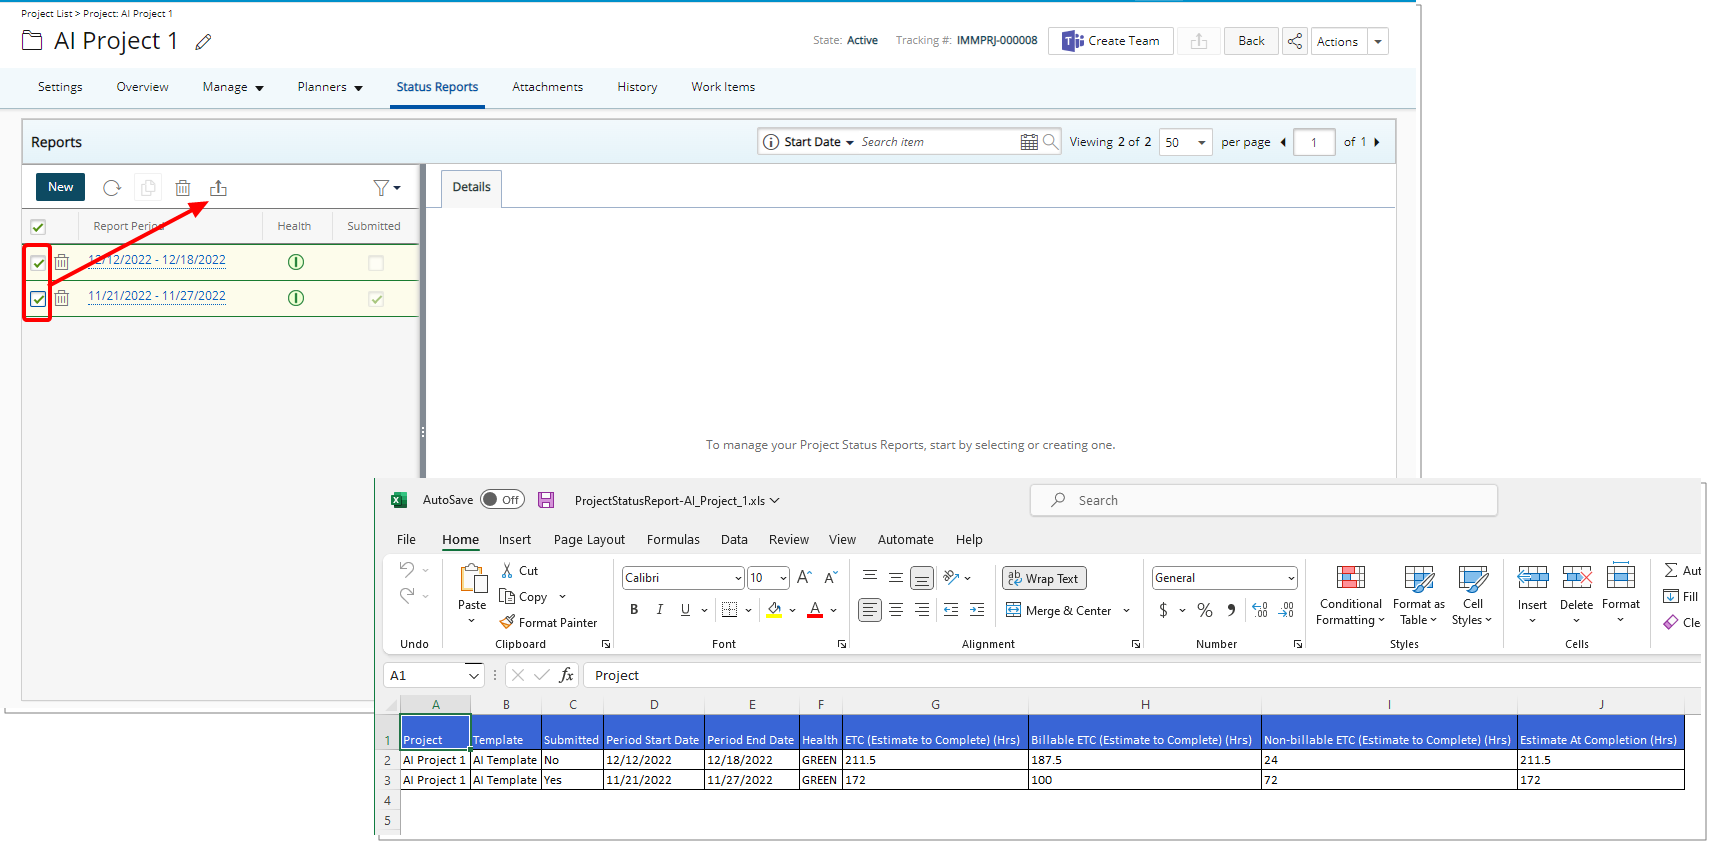
Description: The Export to Excel button is now available when selecting a single or multiple Project Status Reports from the left pane.
Benefit: With this improvement you can now export multiple Project Status Reports to the same Excel file allowing you to easily compare the data.
Note: The exported cells will remain empty, when the Project Status Reports belong to different Templates and where some Fields may be missing or when no data is present.
For further details refer to: Exporting Project Status Report(s)
Resource Management
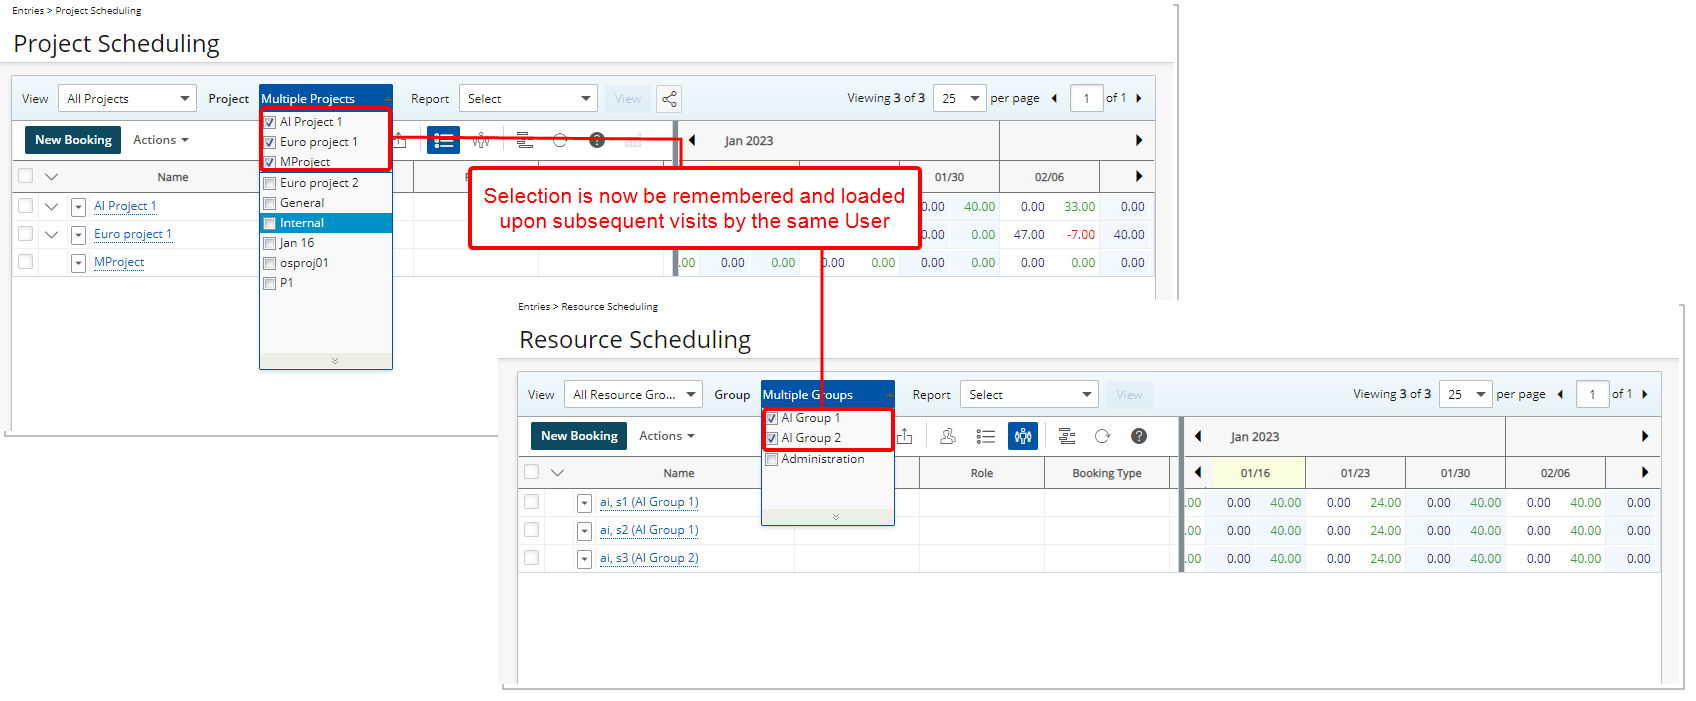
Description: The selected Groups within a Resource Scheduling View and Projects within a Project Scheduling View, will now be remembered and loaded upon subsequent visits by the same User.
Benefit: When navigating away from these Work Plans, users no longer need to reapply the selected Groups or Projects for a View, making for a smoother transition and a more streamlined user experience.
For further details refer to:
- Viewing the work plans for multiple projects simultaneously within Project Scheduling page
- Viewing the work plans for multiple Groups simultaneously within Resource Scheduling page
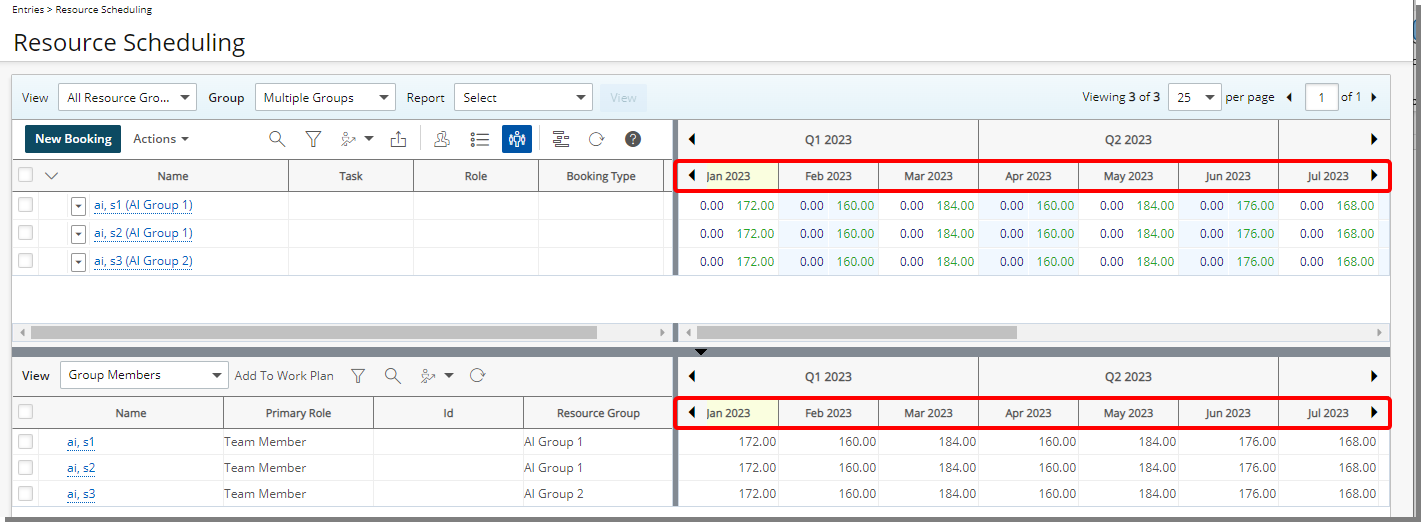
Description: The displayed names of the months within the top and bottom grids of all Work Plans are now abbreviated to three characters.
Benefit: With these overall modifications, the look and feel are further improved.
Description: A new Find Matches button is now available from the Matching Criteria dialog box. Upon creating the Matching Criteria, you can now click Find Matches which will update the Matching Resources list, allowing you to add other criteria without closing the dialog box and to further narrow down the Matching Resources list.
Benefit: With this improvement, you can now efficiently find matching resources, without significant click-through.
For further details refer to: Finding Matches to replace a Role based Booking
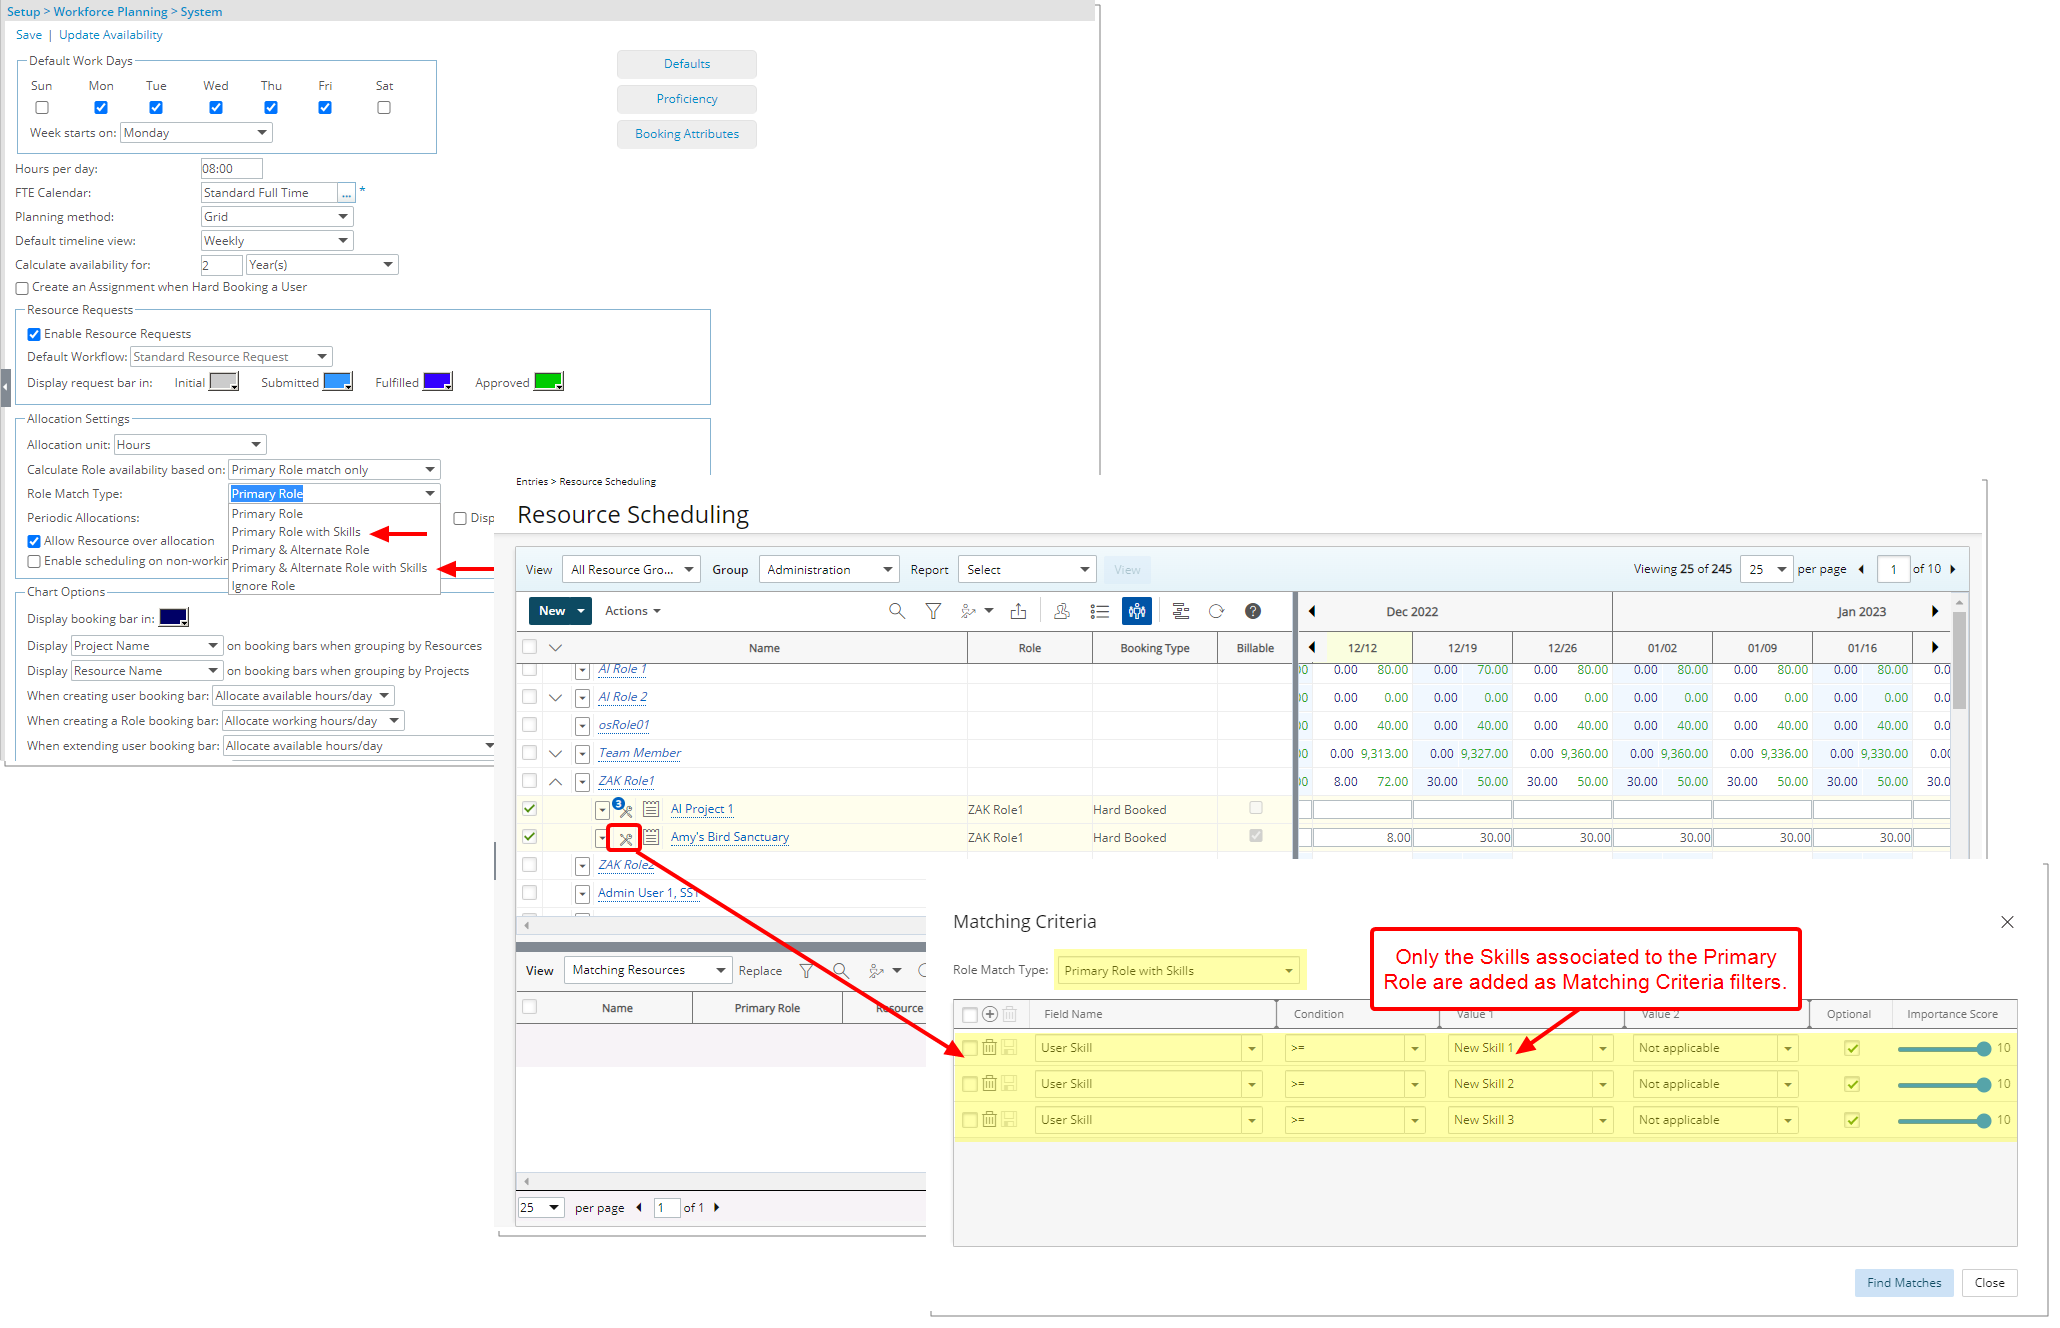
Description: The following two new options are also available from the Workforce Planning System setup page and the Matching Criteria dialog box:
- Primary Role with Skills: Filters the result set based on the Primary Role. The calculation for the Matching Score is based on the percentage of matching between the Skills associated to the Role and the User.
- Primary & Alternate Role with Skills: Filters the result set based on the Primary and Alternate Roles. The calculation for the Matching Score is based on the percentage of matching between the Skills associated to the Role and the User.
Note: When you select either option, only the Skills associated to the Primary Role are added as Matching Criteria filters.
Benefit: This improvement, eliminates the need to manually create the Matching Criteria.
For further details refer to:
- Workforce Planning System Settings Page
- Role Match Type
- Finding Matches to replace a Role based Booking
Description: Improvements have been made to the way EAC is now calculated:
- In Group by Resource View, a Grand total value is added for each Resource/Role (Grand Total is the sum of all bookings related to the Resource/Role)
- From the View Settings you can now choose to Show Estimate at Completion (Note that EAC will only display in Group by Resource View)
The calculation for EAC = Actual Hours in the past + the Forecast Hours in the future. In this calculation:
- The definition of past and future are based on the selected Forecast Start Date in Financial Planner Template associated to the Project.
- The Actual Hours is based on the selected Actuals to include in Financial Planner Template associated to the Project.
- Forecast Hours in the future are Allocations in the future and depend on the chosen Workplan Hours to include option of the Financial Planner Template associated to the Project.
A matching algorithm is now in place for the calculation of the Actual Hours. This algorithm matches the Timesheet hours and Forecast booking in the following order User > Task > Billable or Non-billable.
- The Work Plan is checked for the same Task with the same attribute as those present in the Timesheet.
- Upon finding a match the hours are added to the EAC of that Booking in the Work Plan.
- If there is one and only one hard booking match (booking row) with the same user/task/billable or non-billable attribute, Timesheet hour is allocated to this booking line.
- If there are multiple matching hard bookings, Timesheet hour is allocated to the first created booking that has allocations.
- If there are Hard Booking and Soft Booking, Timesheet hour is allocated the Hard Booking row.
- If there are no Hard Booking rows but one and only one Soft Booking row, and if Hard booked and soft booked is selected in the associated Financial Planner Template, the system matches the User/Task/Billable or Non-billable attribute and the Timesheet hours are allocated to the Soft Booking line.
- If there are multiple Soft Bookings, Timesheet hours are allocated to the first created booking that has allocations.
- If there is a booking but it is hidden based on some View settings, the related hours are added to the EAC at the Resource level
Benefit: Project Manager can have insight on the EAC of their projects.
For further details refer to: Estimate at Completion (EAC) column - Project Work Plan
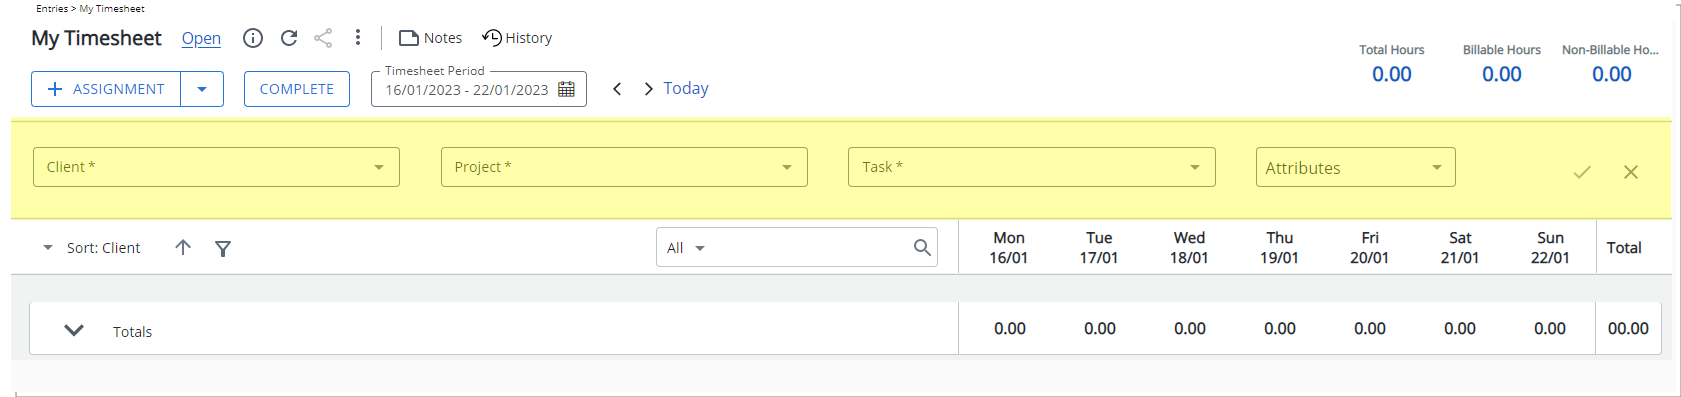
Timesheet
In this release we have made modifications to enhance new My Timesheet which is aimed to:
- Address client feedback and to have a responsive interface where you can view Assignments without significant scrolling.
- Have better control over the appearance of the Assignments section.
To allow Users access to the new and improved My Timesheet in your Sandbox/Implementation/Production environments, you must add them to the New Timesheet list. For further details refer to: Adding users to the New Timesheet list. If you prefer, you may choose to enforce the use of New Timesheet for all Users.
Expand each heading to view more details of the enhancements:
Description: The following improvements have been made to the Display Settings functionality of My Timesheets:
- The Display Settings button has been removed from the right top corner of My Timesheet. You can now access the Display Settings from the Timesheet context menu instead.
- The Normal Density option has been renamed to Default.
- The Compact Density option has been renamed to Comfortable.
- A new Compact Density option is now available which allows you to view between seventeen and twenty Assignment rows (depending on your resolution) without the need to scroll.
- To utilize the available space most efficiently, the label of the objects (Project, Client, Task as an example) is no longer displayed. You can however view this information upon hovering over the displayed text.
For further details refer to: My Timesheet Display Settings
Description: Improvements have been made to the way the Timesheet rows are displayed for all Display Settings:
- The maximum available space is allocated to the Timesheet Assignment Fields.
- The minimum width of the Assignment section is the sum of the widths defined for each Field in the Timesheet Template.
- When a panel is opened, or if the minimum width of the Assignment section is greater than the available space, only two Time Entry columns are displayed as a minimum (based on your screen resolution). You can scroll horizontally to access all columns within your timesheet period.
Benefit: The Assignments and the Time Entries are distributed in a way that show as much information as possible to minimize truncated text due to space limitations. Furthermore, you can now define the minimum width for each Field and customize how the Assignments are displayed based on your needs.
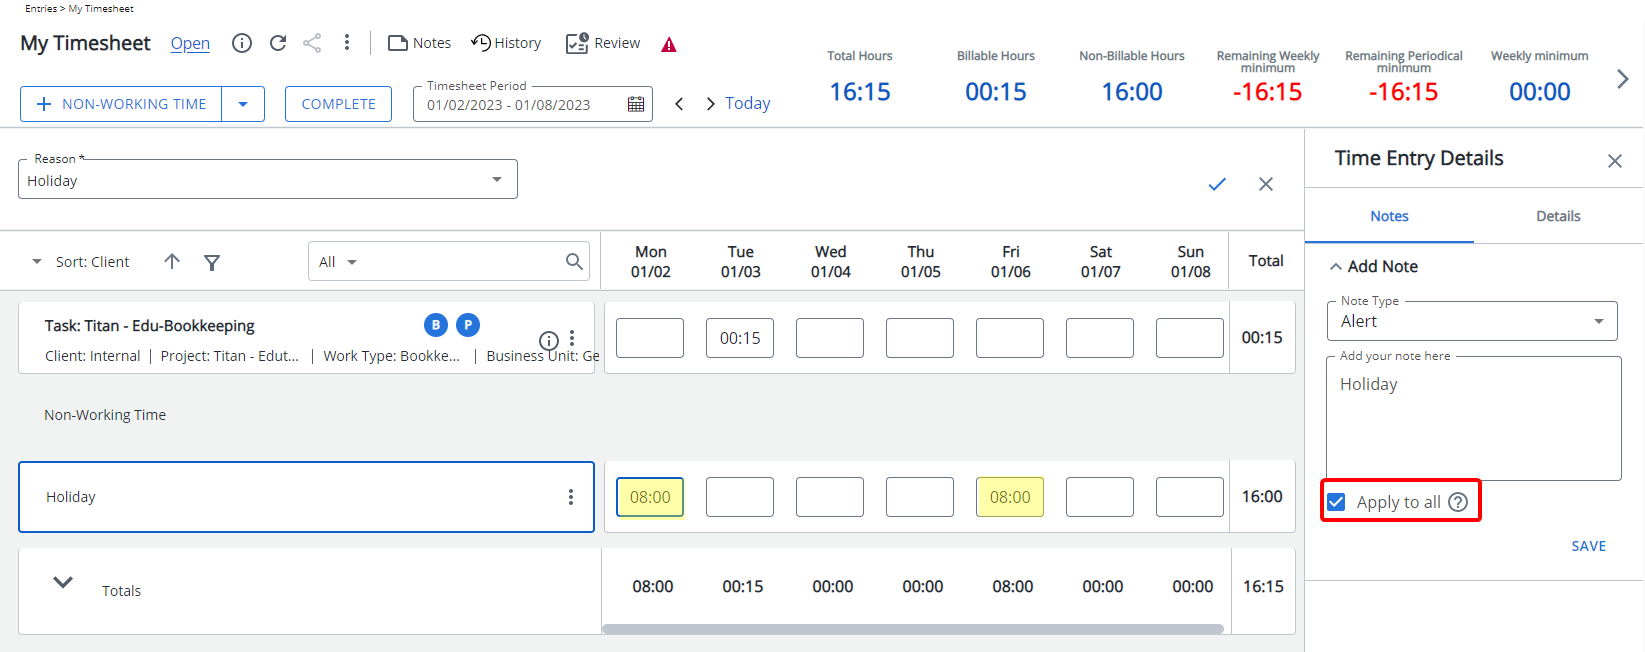
Description: A new Apply to all selection box is now available within the Notes tab of the Time Entry Details panel for Non-Working Time. Upon saving, the Note will be applied to all Time Entries against the Non-Working Time within the current Period.
Benefit: With this improvement, you can enter a Note and apply it to all Time Entries against a Non-Working Time within the current Period, powering up user productivity.
For further details refer to: Entering Non-Working Time
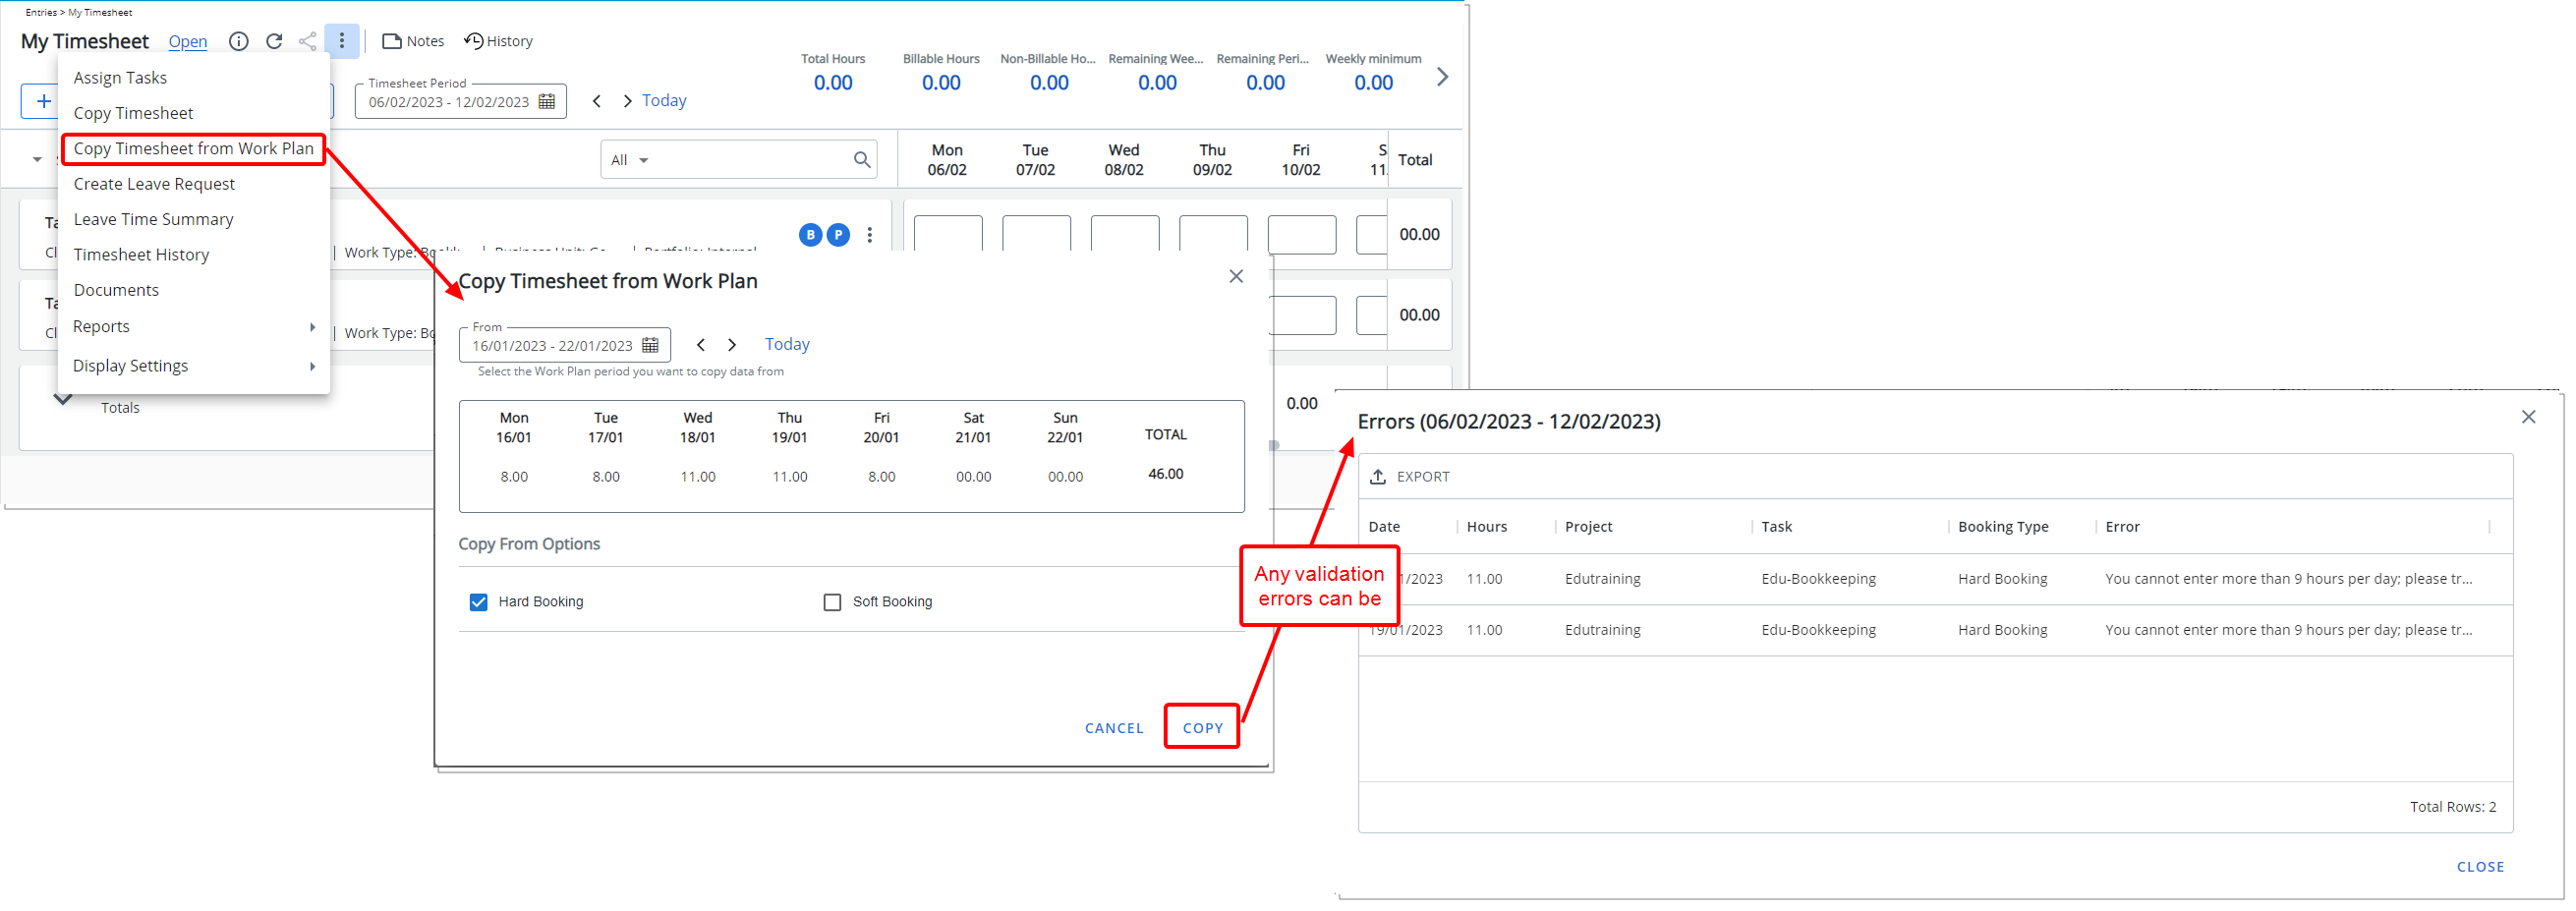
Description: Users assigned to a Timesheet Template where the Allow User to Copy Timesheet option is enabled, can now choose to Copy Timesheet from Work Plan through the Timesheet context menu.
From the Copy Timesheet from Work Plan dialog box, select the Work Plan period you want to copy data From. Then choose if you wish to Copy Hard Booking and/or Soft Booking hours.
The following precedence order applies when creating Time Entries:
- Billable Hard booked hours
- Non-Billable Hard booked hours
- Billable Soft booked hours
- Non-Billable Soft booked hours
Any validation errors (example: The hours exceeded the daily limit) are displayed in the Copy Error dialog box from where you can conveniently export them to Excel or Print.
Prerequisite: The Booking is a Hard or Soft Booking for which a Task and allocation hours are defined.
Benefit: With this addition, you can now easily copy the Hard/Soft Booking allocations to your Timesheet, powering up user productivity.
For further details refer to: Copy Timesheet from Work Plan
Description: Minor modifications have been made to improve your user experience with My Timesheet including:
- When Adding/Editing an Assignment while using the Inline Assignment Mode: The width of the selection boxes is dynamically set to fit on one line based on your screen resolution.
- When using the Day In/Out Timesheet, if the Total to be Allocated is negative, a warning icon is now displayed. Hovering over it, will trigger a tooltip where you can view more information.
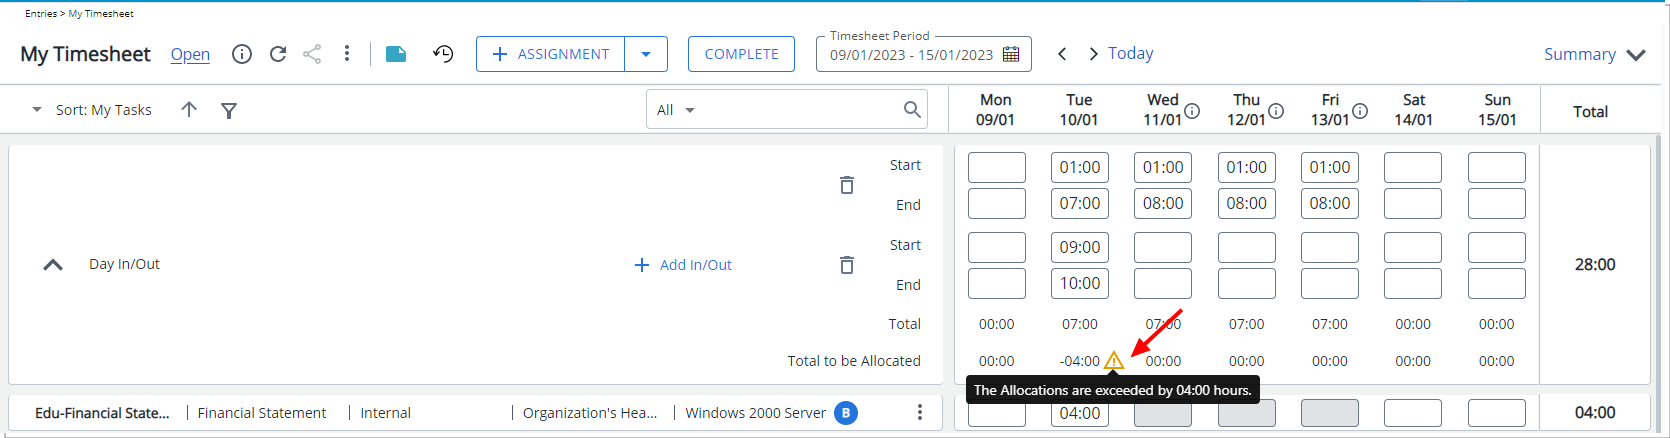
For further details refer to: Entering Regular Time (Day In/Out Time)
- When using the Start/End Timesheet, the Total Hours is now displayed in bold and moved to the top right corner of Start/End tab.
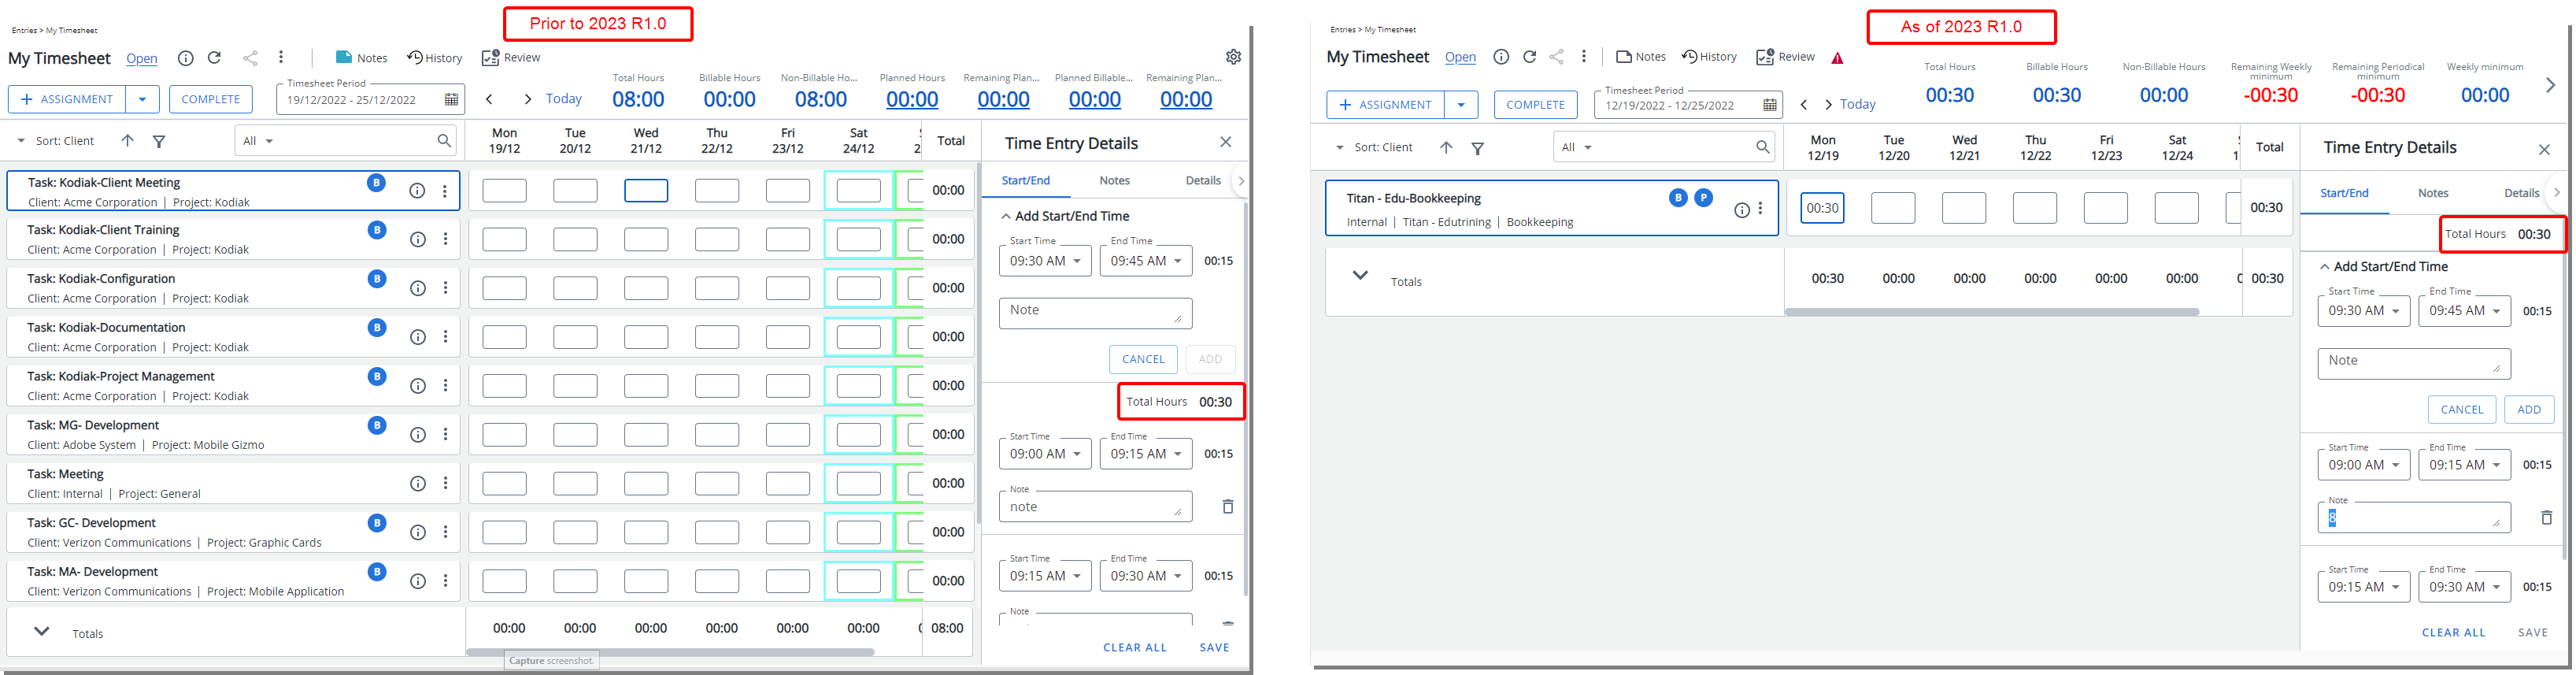
For further details refer to: Entering Regular Time (Start/End Time)
- Improved the spacing between the various buttons located within the header section of My Timesheet.

- Summary section

- The Font of the values and spacing between them has been decreased.
- The label of KPIs is now split across two lines if the length of the label is longer than the available space.
- The appearance of next/previous buttons were modified.
- The Summary section of a Compact Density view is now displayed in a drawer which by default is closed.
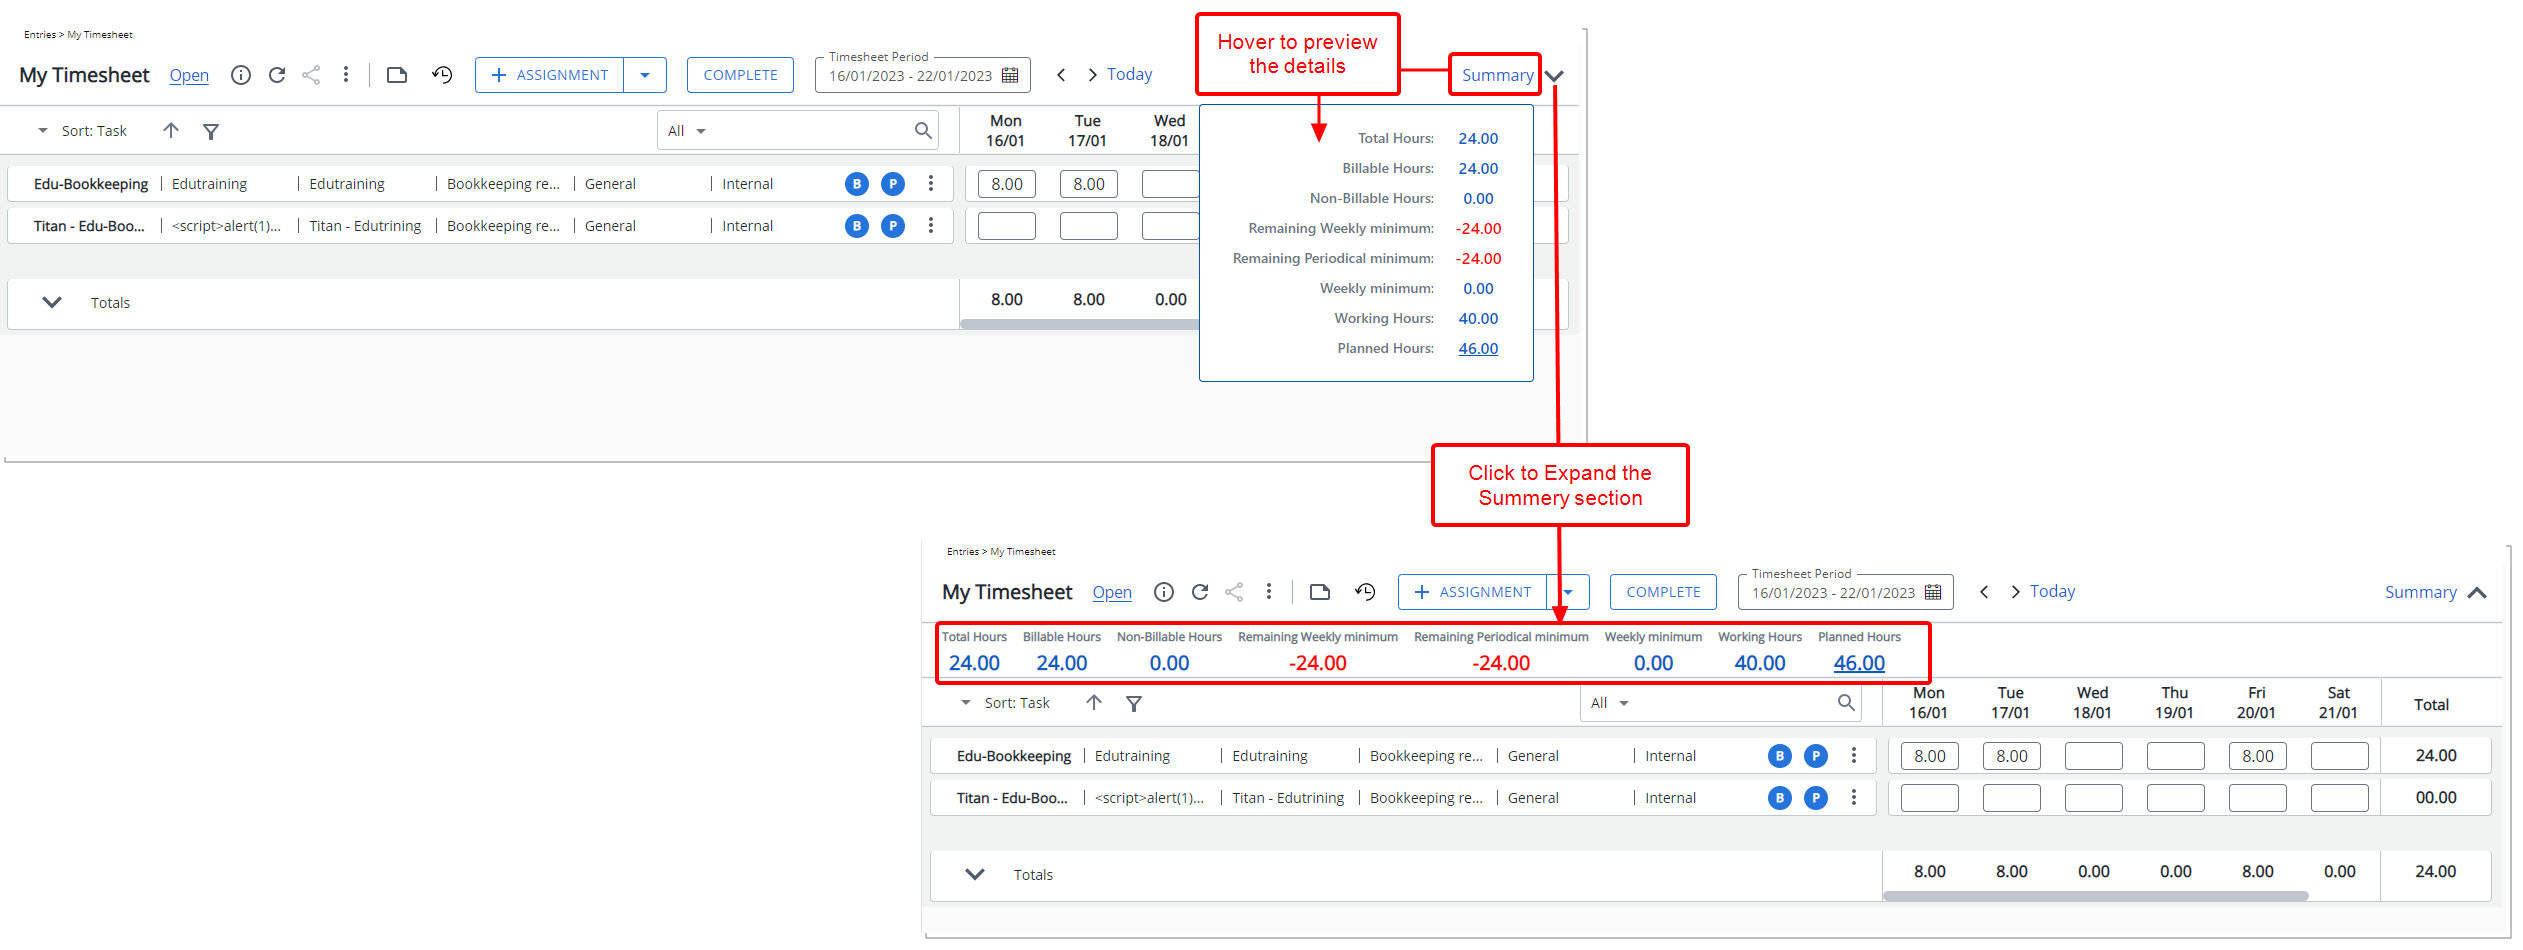
- Upon hovering over the Summary label, a tooltip is now triggered, allowing you to view the Summary information.
- Click the Expand
 button to expand the section.
Timesheet Templates
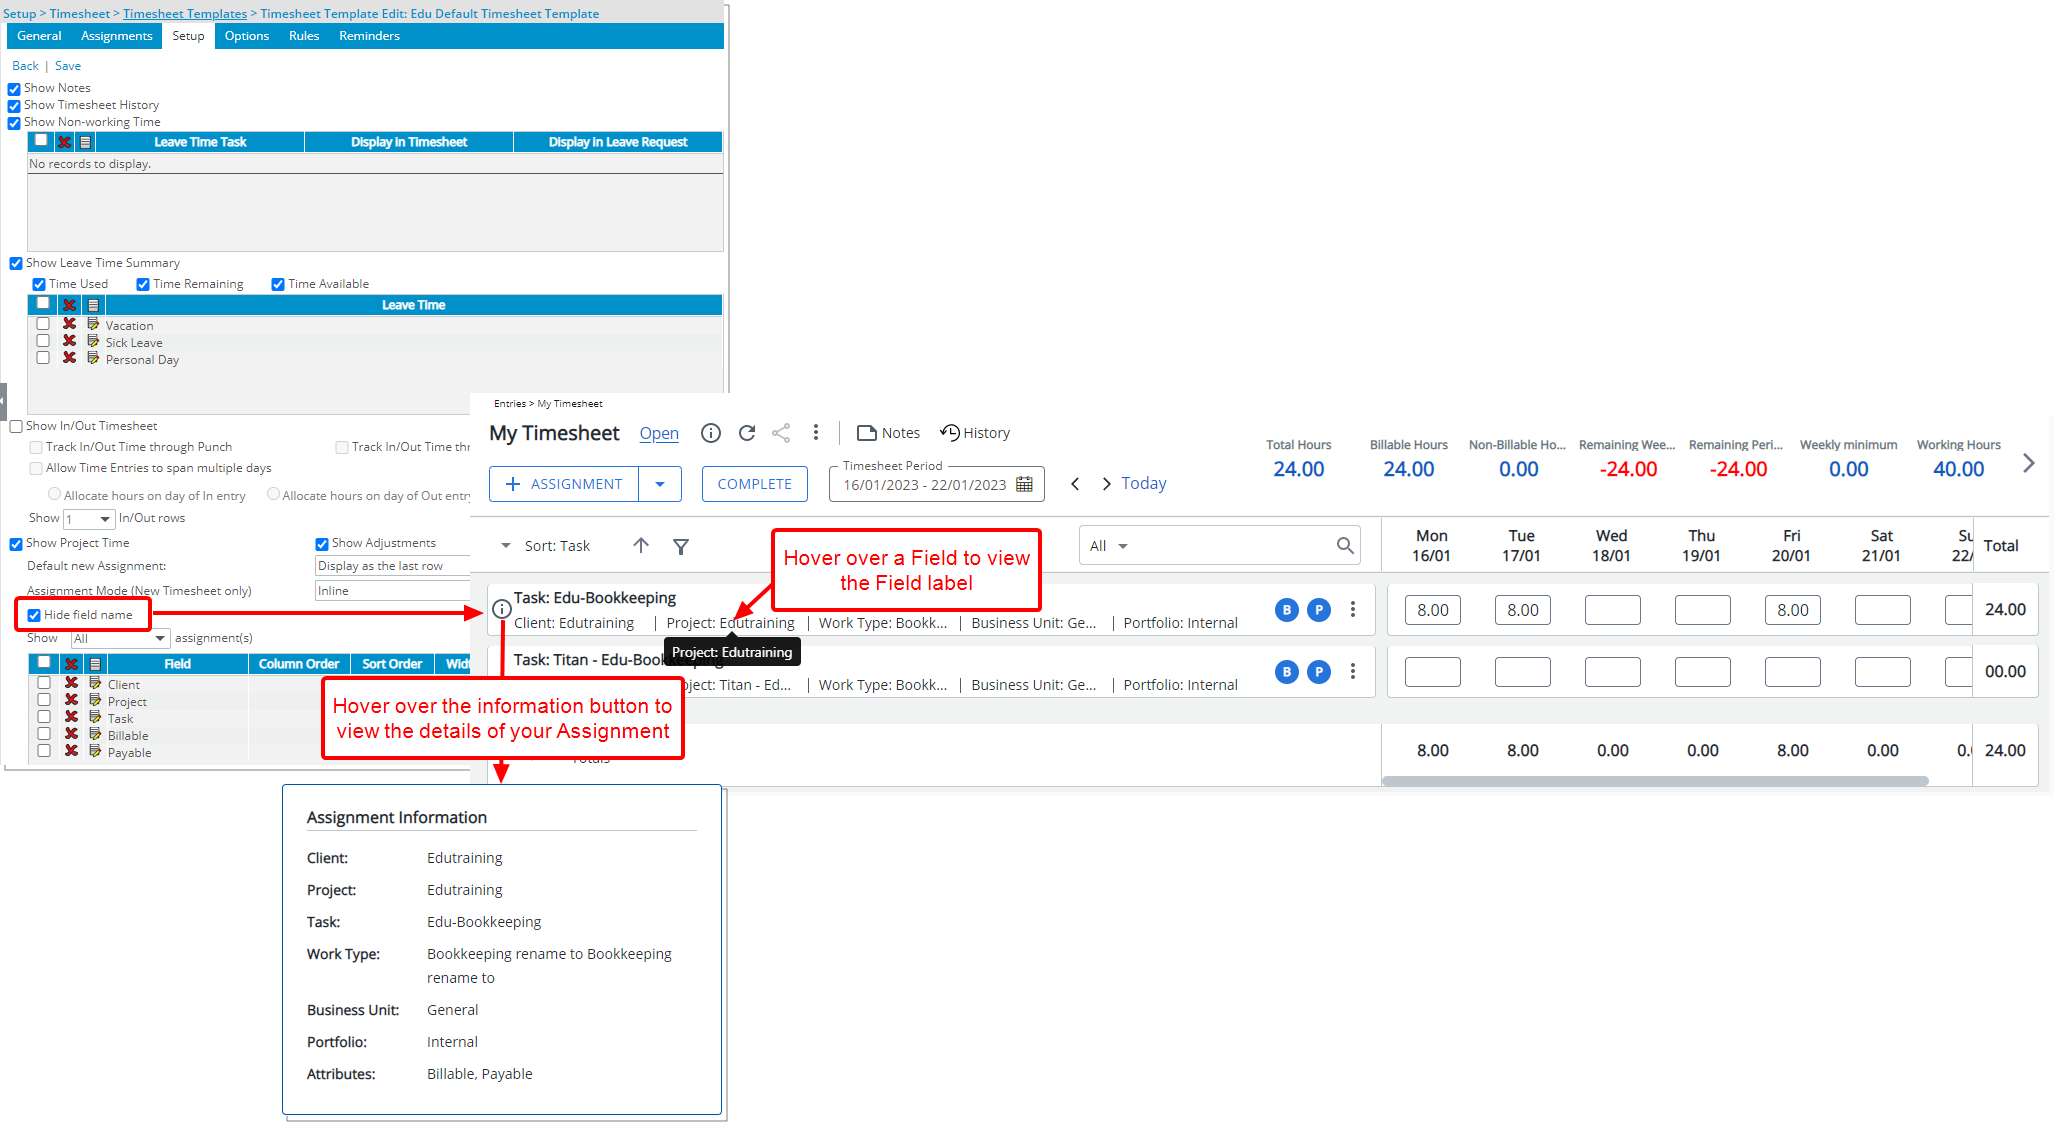
Description: You can now select the newly added Hide field name option when creating/modifying a Timesheet Template. When selected, the Timesheet Field labels will be hidden from the Assignment rows for the Default and Comfortable view Density only.
- Hover your mouse over a Field to view the tooltip displaying the Field label.
- An information icon is displayed upon hovering over an Assignment. Move your mouse over this icon to view the Assignment Information.
Note: The labels are always hidden for the Compact Density view.
For further details refer to:
- Default Timesheet Display Density
- Hiding Assignment Field Labels
- My Timesheet Display Settings
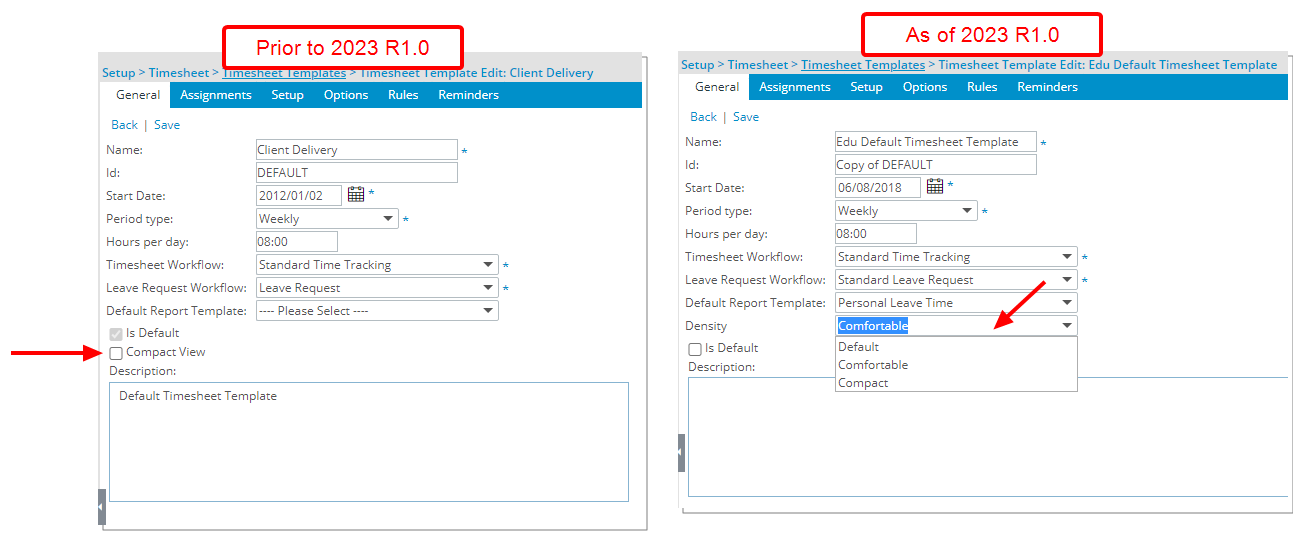
Description: A new Density selection list is now available, which allows you to choose a default view Density for the assigned Users. Available options are: Default, Comfortable or Compact
Note:
- The Comfortable Density is selected by default.
- Users can override the default view Density set at the Timesheet Template level by accessing their Display Settings available from the Timesheet context menu.
As a result of this improvement, the Compact View selection box which in the past release allowed you to set the Compact view Density as the default has now been removed from the General tab of a Timesheet Template edit page.
Benefit: With this addition, you can now select a default Density for Users assigned to a Timesheet Template.
For further details refer to: Default Timesheet Display Density
Timesheet Manager
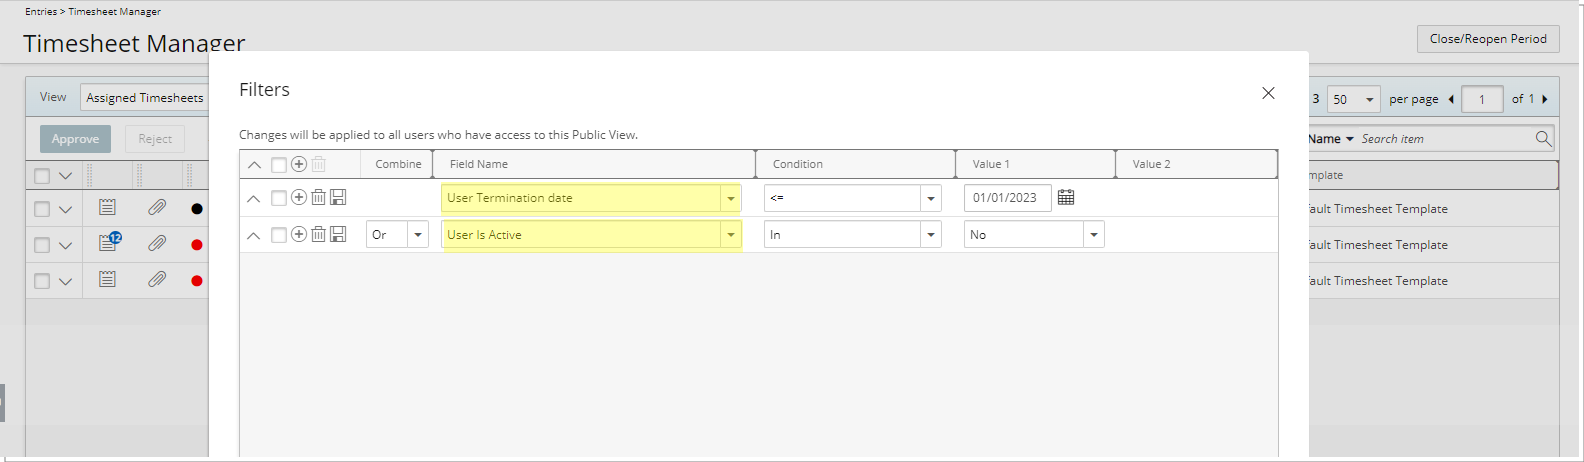
Description: The following filter criteria are now available when creating an on-page Filter or a View Filter within the Timesheet Manager page.
- User Termination Date
- User is Active
Benefit: Managers can now filter the list of Timesheets based on Terminated/Decommissioned/Suspended users and act on them on their behalf.
For further details refer to:
- Applying a Filter to the Timesheet Manager list
- Creating Custom Timesheet Manager Views
Upland Analytics
Description: As a result of performance issues, the new Fields and Views added to the Work Data Source as part of TE-69396 in our 2022 R2.0 release have been reverted.
The following Fields have been removed from the Project Overview View:
- Project Total Billed in Project Curr
- Project Total Billing in Project Curr
- Project Total Billed in Client Curr
- Project Total Billing in Client Curr
- Project Total Billed in Company Curr
- Project Total Billing in Company Curr
The following Views have been removed from the Work Data Source:
- Client Currency
- Company Currency
- Project Currency
Furthermore, the following Fields were renamed:
- From Project Total Billed in Base Curr to Project Total Billed
- From Project Total Billing in Base Curr to Project Total Billing
For further details refer to: The Work Data Source and related views
Description: The following Fields are now available through the Client View:
- Client Date Created
- Client Date Modified
Furthermore, Client Created By User and Client Modified By User Views are now available through the following Data Sources: Assignment Budget, Client Purchase Order, Cost & Billing Rule Association, Enhanced Resource Request, Expense, Expense Workflow History, Financial, Financial Planner, Financial Planner Combined, Invoice, Invoice Entry Details, Invoice Workflow History, Milestone Task Association, Money Charge, Product, Program Management, Project Budget, Project Entry Details, Project Management, Project Planning, Project Scheduling, Project Status Report Entry, Resource Bookings, Resource Request, Revenue Batch, Task Budget, Task Scheduling, Timesheet, WIP, Work, Work Item Entry and Work Process Entry.
Benefit: With this addition you can now report on the created/updated dates as well as the User who created/updated a Client.
Note: For already existing Clients that have not been updated, the fields will be empty.
Description: The Project Contact Field is now available through the Project View located within the following Data Sources: Assignment Budget, Client Purchase Order, Cost & Billing Rule Association, Enhanced Resource Request, Expense, Expense Workflow History, Financial, Financial Planner, Financial Planner Combined, In Out Timesheet, Invoice, Invoice Entry Details, Invoice Workflow History, Milestone Task Association, Money Charge, Product, Program Management, Project Budget, Project Entry Details, Project Management, Project Planning, Project Scheduling, Project Status Report Entry, Resource Bookings, Resource Request, Revenue Batch, Task Budget, Task Scheduling, Timesheet, WIP, Work, Work Item Entry and Work Process Entry.
Benefit: With this addition you can now have visibility to the Project Contacts through your Upland Analytics Reports.
Description: The formula for calculating the Resource Available Hours has been modified to:
Total working hours - Hard Booking hours
Negative values are now displayed in UA reports for this Field instead of 0 (as in previous releases) when the result of this calculation is negative.
Work Breakdown Structure (WBS)
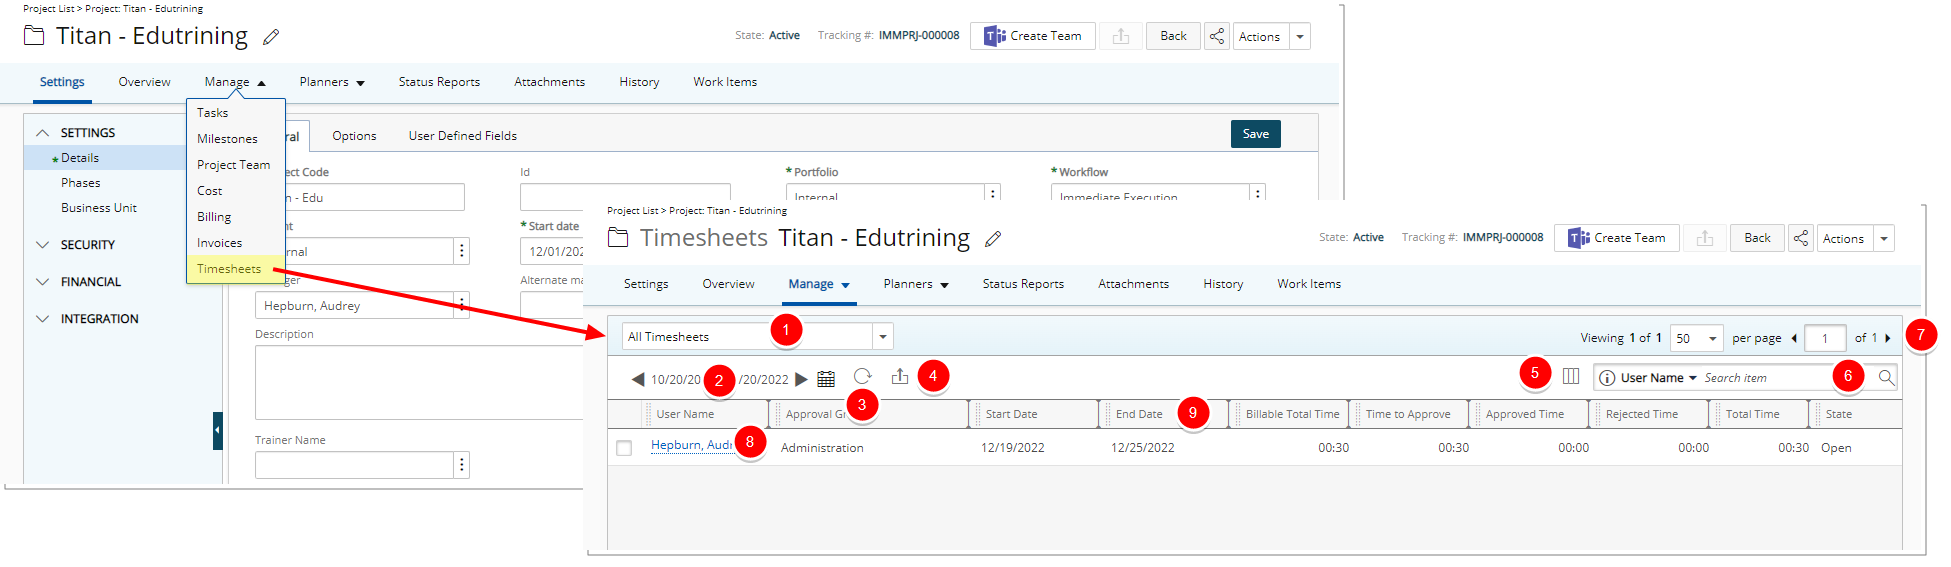
Description: Users with the right to the new Timesheets from Project permission (Management > Time), defined for their Security Profile (Setup > Organization > System > Security), can now access the new Timesheets page from the Project List context menu and the Project Edit Manage tab navigation allowing them to access these Views:
- Assigned Timesheets: list of all Timesheets assigned to logged user and related to the Project. Assigned Timesheets view is selected by default.
- All Timesheets: list of all Timesheets in any State that are related to the Project.
Note: This functionality is only available to Users who are using the New Timesheet. For more information on how to add users to the New Timesheet list refer to Adding users to the New Timesheet list.
From this Timesheets list you can:
- Select the required View.
- Modify the Period by either clicking the
 /
/ or the Calendar
  button to choose a new period. By default, the Date Range is set to Today.
 - Refresh
 the list.
 - Export
 all items to Excel.
 - Access the Column Selection
 . By default, these columns are displayed: User Name, Approval Group, Start Date, End Date, Billable Total Time, Time to Approve, Approved Time, Rejected Time, Total Time, State and Template. You can choose to include the Leave Time column.
 - Search
 for an Item by User Name.
 - Pagination facilitates easy navigation across pages.
- Access the User Timesheets.
- From the table header:
- You can easily sort the columns by ascending or descending order simply by clicking a column header. Note that an arrow indicates the descending (
 ) or ascending (
 ) order applied to the column.
 - You can now dynamically resize column(s), to your preferred width. Simply move your cursor to the column boundary
 you want to resize. When the cursor becomes a resize cursor, click and drag the column accordingly.
 - Click
 and move a column to the desired position.
- You can easily sort the columns by ascending or descending order simply by clicking a column header. Note that an arrow indicates the descending (
Furthermore, the Timesheets option can be Hidden, or the list can be Locked based on the Tab Security setting under (Setup > Organization > System > Security > Security Profile).
For further details refer to:
- Granting the right to Timesheets from Project
- Setting the access rights to Project tabs
- Managing Timesheets from Project
- Accessing the Timesheets list page from Project
- Accessing the Timesheets list page through the Project List
- Available options from Timesheets list page (accessed through Project)
General
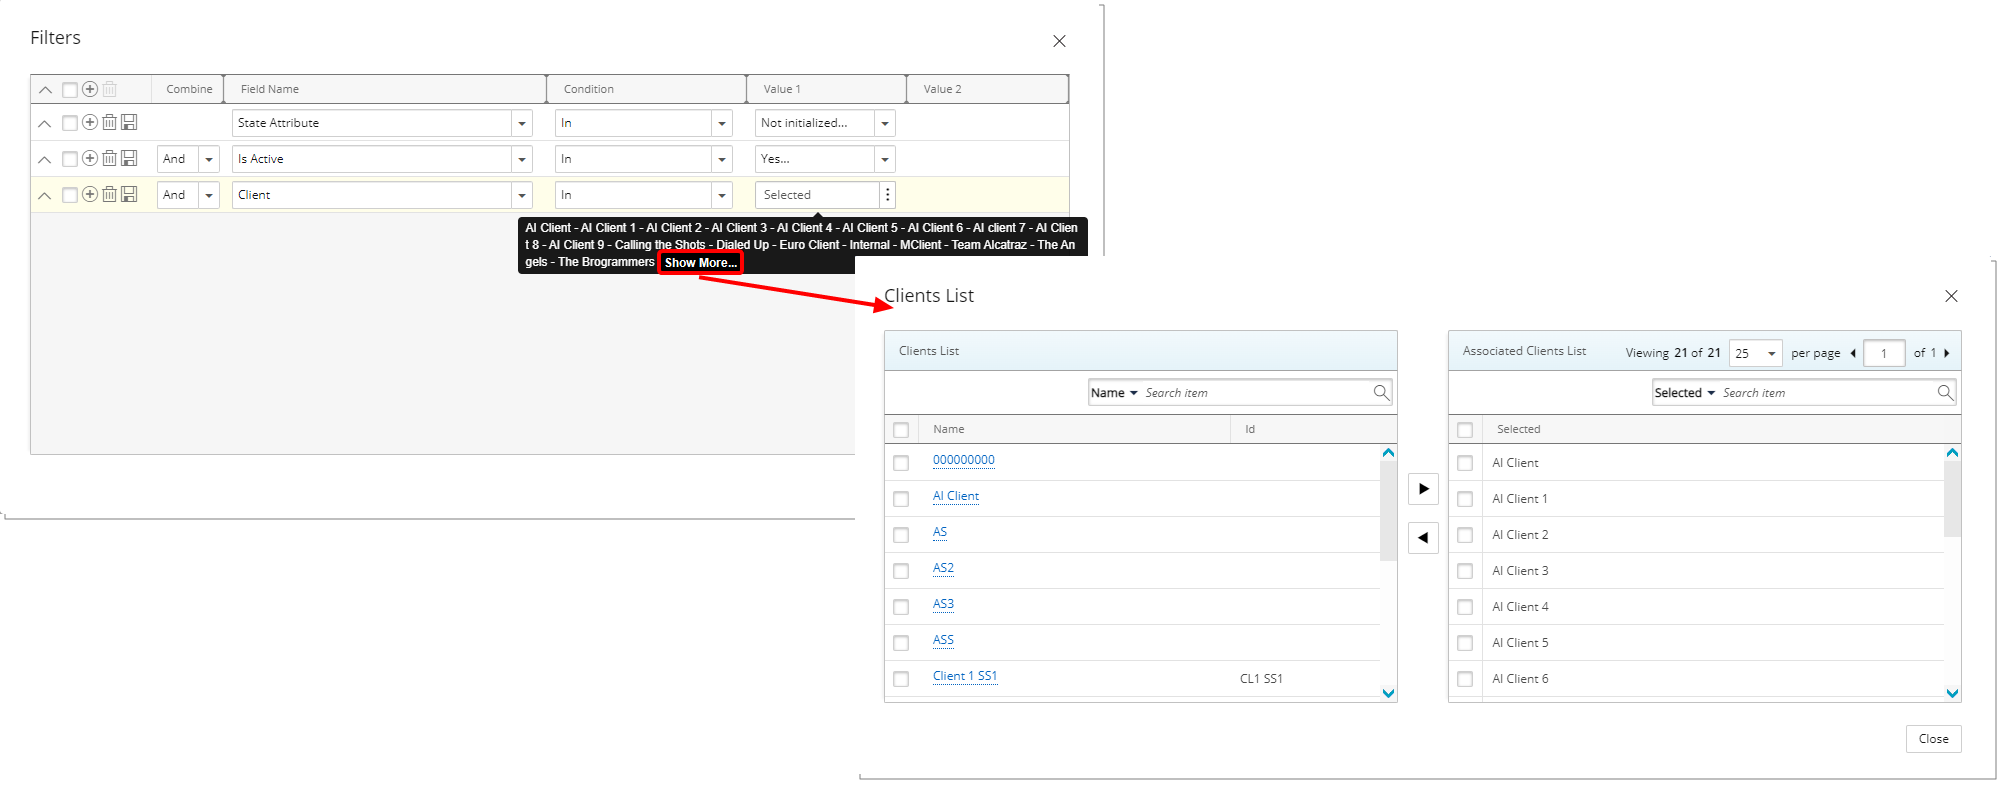
Description: A tool tip is now available when hovering over a Selected Value1/Value2 box. Each selected Value is separated by a Dash and a maximum of three lines are displayed. Clicking the Show More… link within this tool tip will open the corresponding List page where you can view your selections.
Benefit: This improvement allows you to quickly view and have a better insight on your selected values without significant click-through.
For further details refer to:
- Limiting a Security Profiles' impersonation right
- Applying a Filter to the Timesheet Manager list
- Applying a Filter to the Work Item Manager
- Applying a Filter to a Work Plan View
- Applying a Filter to the Project List
- Applying a Filter to the Program List
- Applying a Filter to the Audit Trail events list page
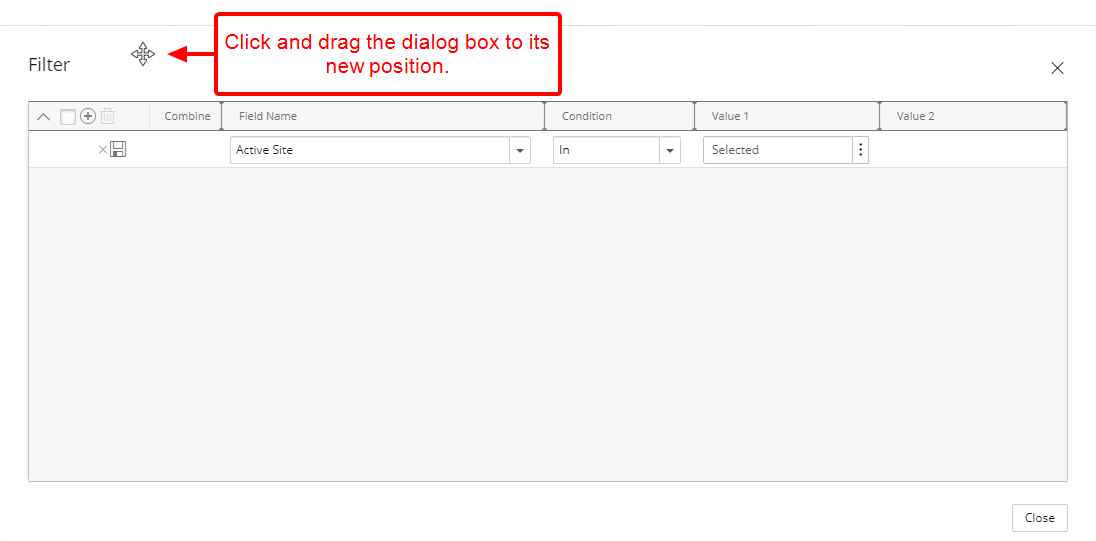
Description: Improvements have been made to the Filter dialog boxes, wherein you can now move them to a new position. Simply move your mouse to the header area, when your mouse pointer turns onto a move pointer ![]() , click and drag the dialog box to its new position.
, click and drag the dialog box to its new position.
The Filter dialog box can be accessed from the following areas of the application by clicking the Filter (![]() ) button:
) button:
- Impersonation Access (Setup > Organization > System > Security > Profile Edit)
- Timesheet Manager (Entries)
- Work Item Manager (Entries)
- My Work Plan (Entries)
- Resource Scheduling (Entries)
- Project Scheduling (Entries)
- User Work plan (Setup > Organization > Users > User Edit)
- Group Work plan (Setup > Organization > Groups > Group Edit)
- Role Work plan (Setup > Organization > Roles > Role Edit)
- Project Work plan (Project List > Project Edit > Planners Or Project List > Context Menu)
- Project List
- Program List
- Audit Trail (Tools)