PSA 2023 R2.0 - Product Enhancements
Below is a summary of the features included in 2023 R2.0.
- Expense
- Financial Planner
- Integration
- Leave Request
- Mobile
- Timesheet
- Rate Cards
- Resource Management
- Security
- Timesheet Manager
- Timesheet Templates
- Upland Analytics
- User Defined Fields
- User Experience Enhancements
- Users
- Deprecated/Unsupported Functionality
2023.05.17.2023R2.0.V1.EB
Note: This page may be updated as new information becomes available. Visit regularly for the latest updates.
Expense

Description: In a past release, a framework was implemented to enforce custom validation(s) when Inserting, Updating and Transitioning supported items within PSA, which allows organizations to validate user actions by building custom rules based on their business needs.
In this release, improvements were made to now show the Expense Item and Ref# within the Errors dialog box when such validations are implemented for Expense Entry.
Use case: Audrey, an PSA Administrator is tasked to enforce a custom validation to bar users creating an Expense Entry from selecting Billable Expense Items against non-billable and non-funded Tasks. She can now communicate her business needs with PSA Support and have this custom validation enabled for her organization. Upon implementing the solution, the Expense Item and Ref# are now also displayed in the Errors dialog box.
Note: This functionality must be enabled by the PSA Technical Services Team. If you are interested in using this functionality, contact PSA Support to discuss your specific business requirements.
Financial Planner
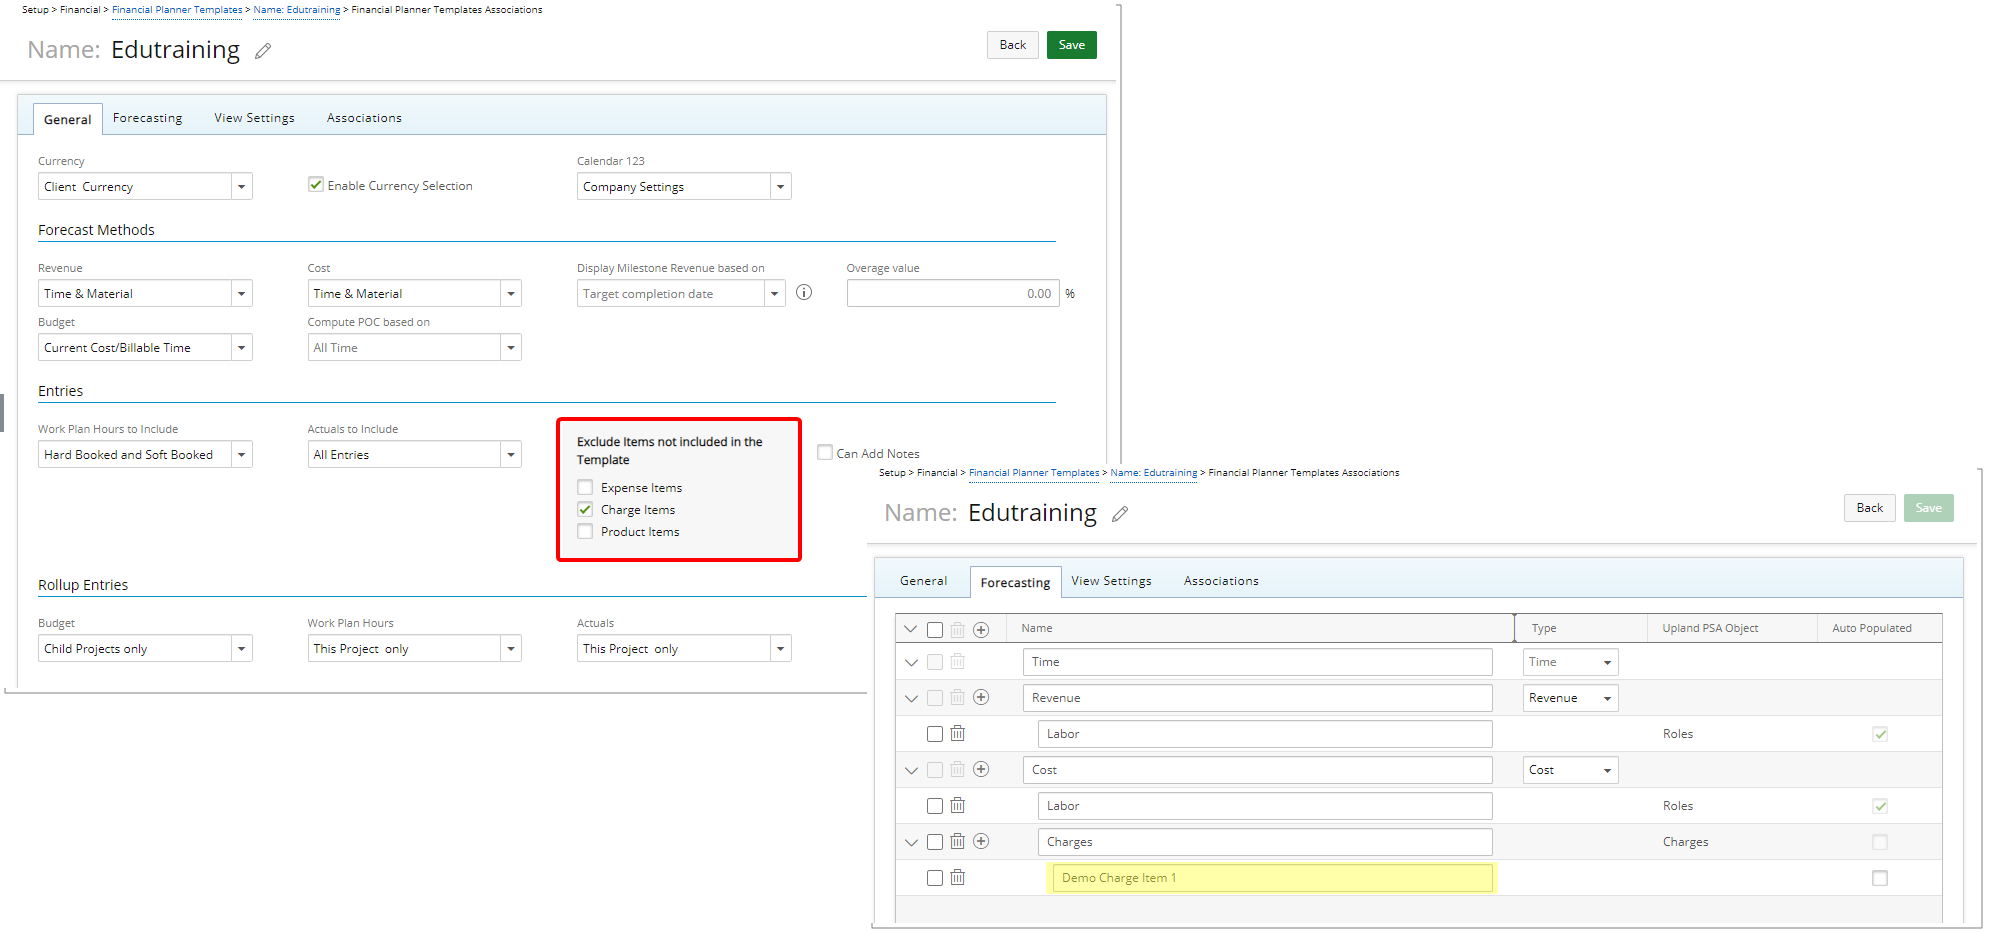
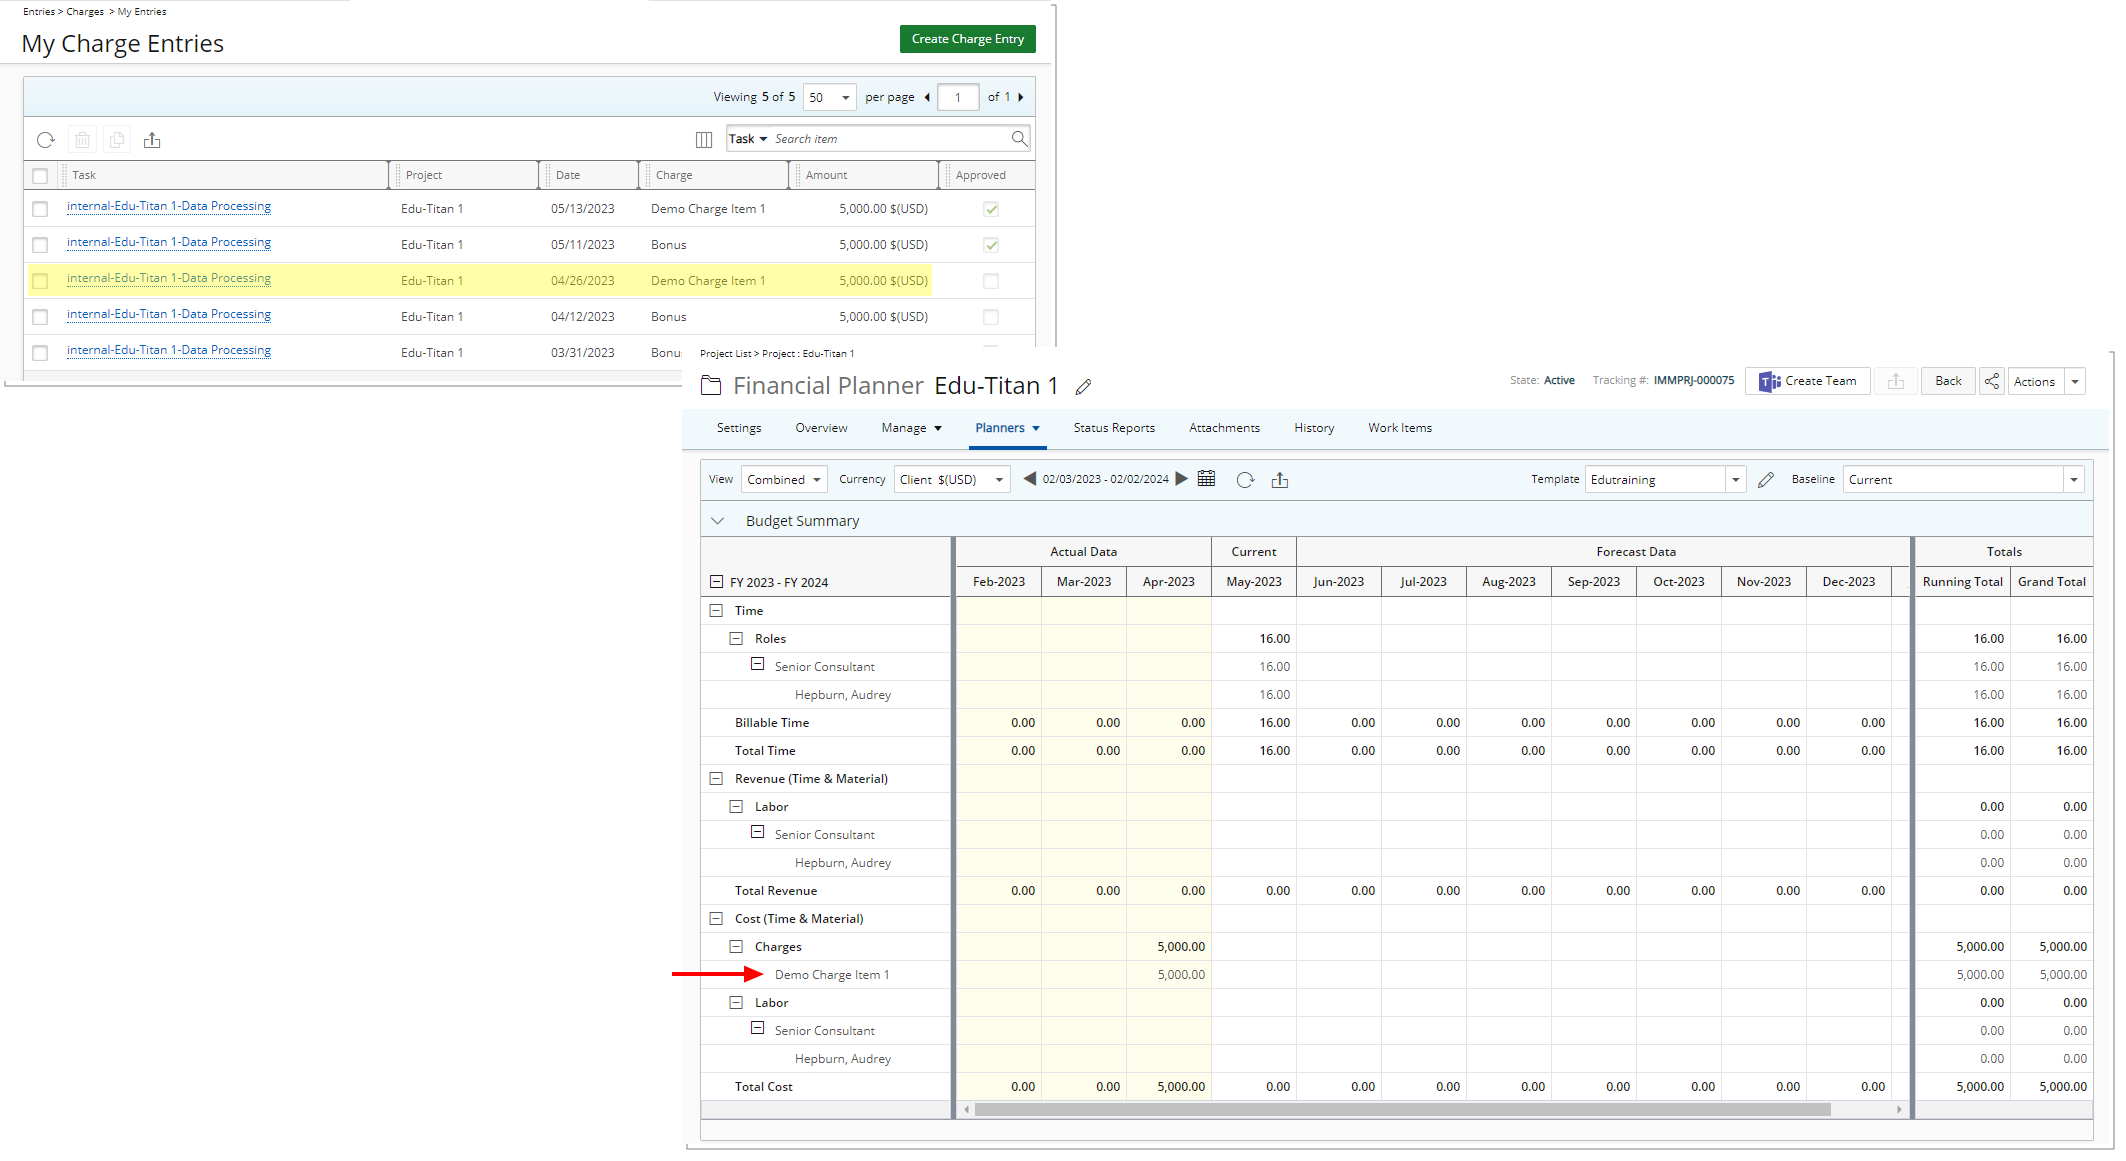
Description: In previous releases, the Financial Planner included all Actual Expense, Charge and/or Product Entries even if they were not part of the Template. With this release, you can choose to Exclude Items not included in the Template. So, when an entry is made against an item that is not in the Template, it will no longer automatically be added to the Template and appear in the Financial Planner of the associated Project.
When you select Exclude Expense Items, any Expense Items that are not added to the Financial Planner Template (Forecasting tab) will not be displayed when viewing the Financial Planner of an associated Project. Similarly, selecting Exclude Charge Items or Exclude Product Items will hide any Charge or Product Items that are not included in the Financial Planner Template.
As an example, we chose to exclude Charge Items not included in the Template. From the Forecasting tab we added the Demo Charge Item 1 to the template. When Viewing the Financial Planner note that only the Demo Charge Item 1 is displayed.
Benefit: This new addition to the Financial Planner Template allows you to exclude Expense, Charge, and/or Product Items that are not categorized as Revenue from your Financial Planner.
For further details, refer to:
- Excluding Items that are not manually included in the Financial Planner Template
- Creating a Financial Planner Template
- Financial Planner Template - General tab
Description: A new Rollup Entries section is now available in the General tab of Financial Planner Templates from where you can now choose to rollup Budget, Work Plan Hours, and Actuals for This Project only, Child Project only or This Project and child Projects.
Note:
- The Rollup Entries option is available for Percentage Of Completion (POC) and Time & Material Revenue Forecast Methods only.
- This Project only is selected by default.
Benefit: You can now create a parent project to act as the main contract where the budget is defined and distributed for all sub-projects/efforts. This will help you keep track of the finances for the whole contract from the parent project, including the actual costs and forecast.
For further details, refer to:
- Rollup Entries
- Creating a Financial Planner Template
- Financial Planner Template - General tab
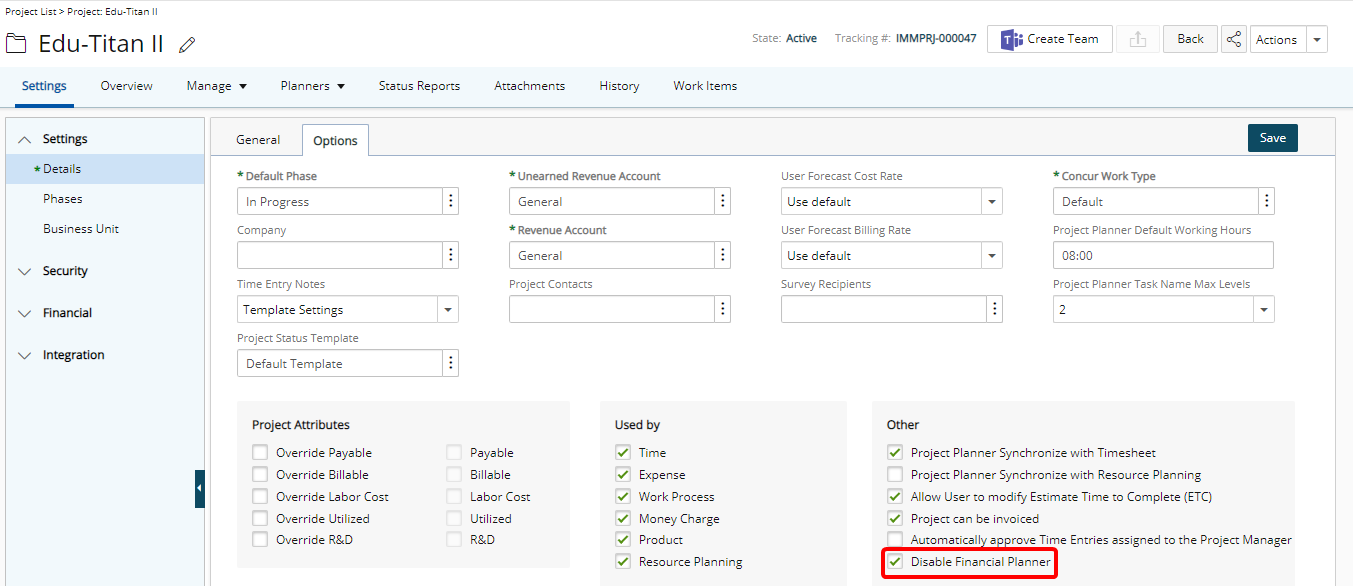
Description: The Disable Financial Planner selection box is now available from the Options tab when modifying a Project. When selected:
- The Financial Planner link will no longer be available for this Project.
- Upon the execution of the Regenerate Financial Planner Data Automation Service, projects with the Disable Financial Planner flag are excluded from the process.
Benefit: With this addition, you can now selectively choose to include/exclude projects from the Regenerate Financial Planner Data Automation Service improving the process and performance.
For further details, refer to Disable Financial Planner.
Integration
Description: In past releases exporting of Payroll or Payable Batches to an ADP system required the use of Internet Explorer. As of this release, improvements have been made so that this export process is browser independent.
Note: For non-Internet Explorer browsers, the exported file will not be downloaded in the Data Exchange Directory, and it will follow browser default settings.
Benefit: You can now use your preferred browser to export Payroll or Payable Batches to ADP.
For further details, refer to PSA - Automatic Data Processing (ADP) Connector.
Leave Request

Description: Improvements have been made to the error handling when approving a Leave Request made against a Closed Timesheet Period.
When the Create Time Entries on Approval option is checked for the Approve Transition for the Leave Request Workflow, upon trying to approve a submitted Leave Request, an error message is now displayed informing you that Time Entries cannot be created, updated or deleted because the Timesheet Period is closed.
Likewise, if for a reason, you decide to Reject an already approved Leave Request for which Time Entries were created in a User’s Timesheet and the Period was subsequently closed, an error message will be displayed informing you that Time Entries cannot be created, updated or deleted because the Timesheet Period is closed. Provided that the Delete Time Entries on Rejection option is selected for the Reopen Transition in the Leave Request Workflow.
Benefit: This enhancement ensures that no Time Entries can be created, updated or deleted when a Timesheet Period is closed.
For further details, refer to Approving / Rejecting Leave Request(s).
Mobile
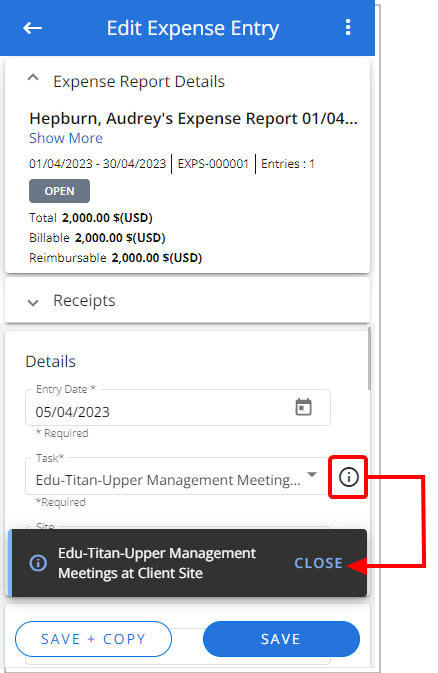
Description: An information icon is now displayed against the Task selection box when creating/modifying an Expense Report. Tapping this icon will show a tooltip allowing you to view the complete Task name.
Benefit: With this improvement, you can now view the complete name of truncated Tasks when creating/modifying an Expense Report.
For further details, refer to PSA Mobile - Creating an Expense Entry.
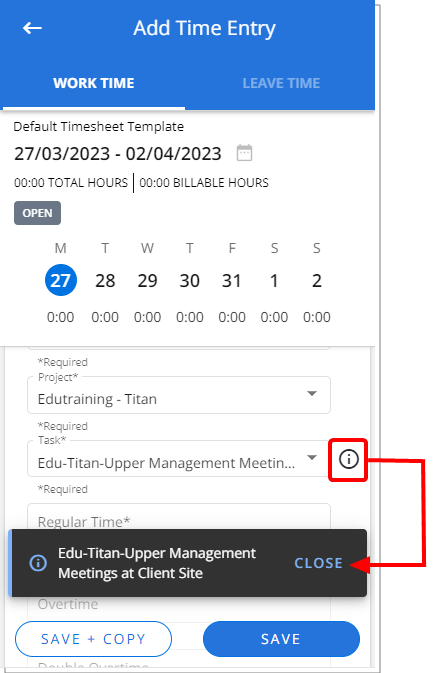
Description: An information icon is now displayed against the Task selection box when creating/modifying a Time Entry. Tapping this icon will show a tooltip allowing you to view the complete Task name.
Benefit: With this improvement, you can now view the complete name of truncated Tasks when creating/modifying a Time Entry.
For further details, refer to PSA Mobile - Entering Time.
Timesheet
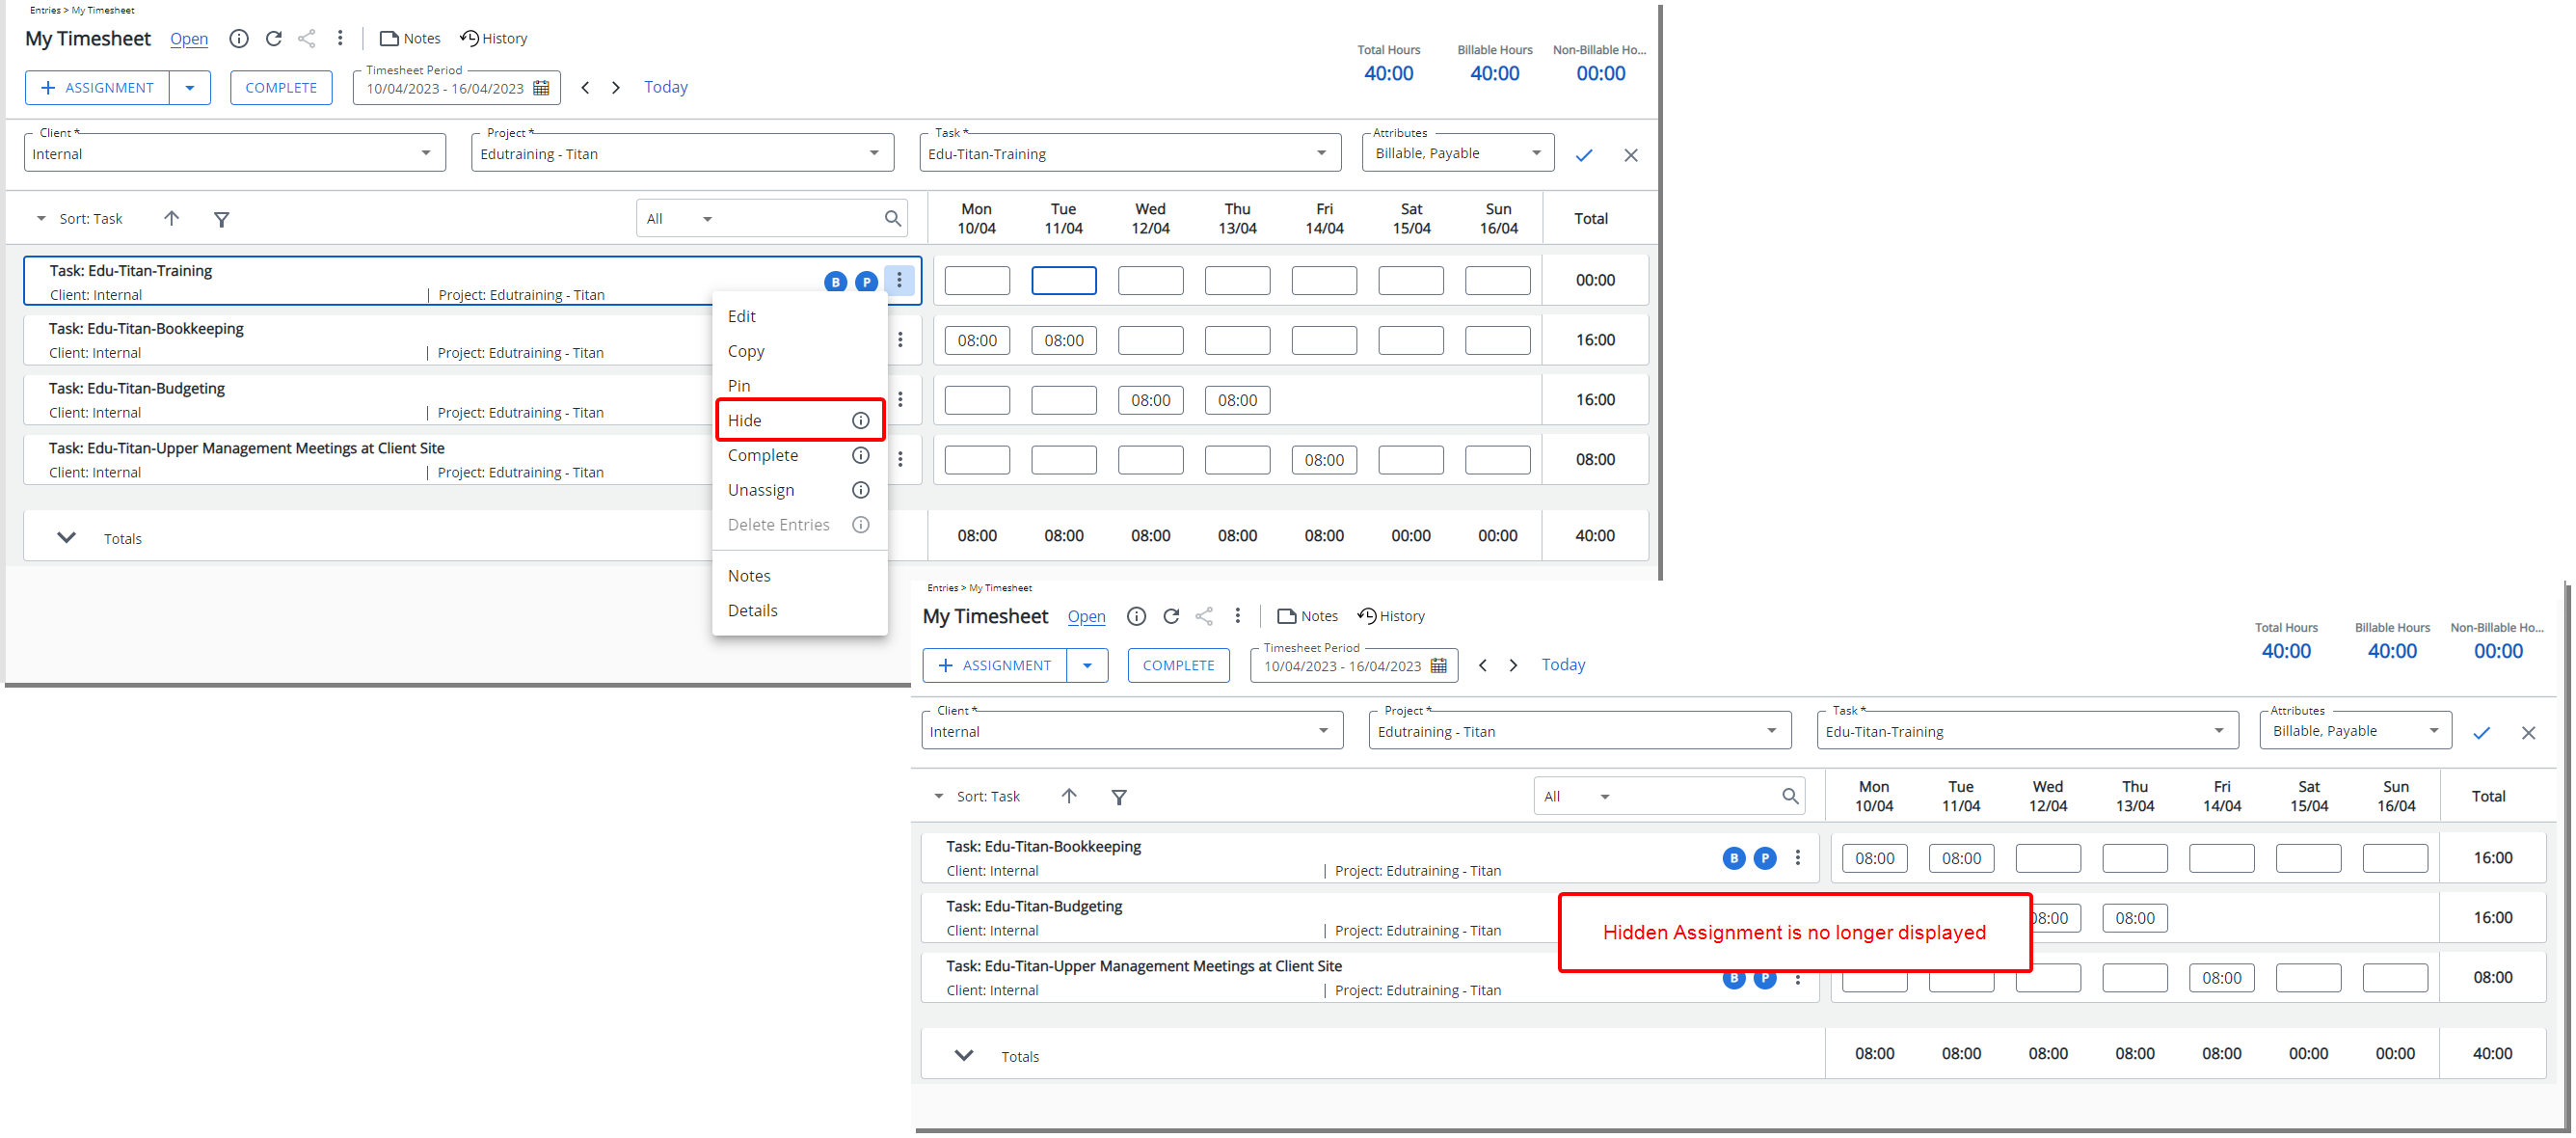
Description: A new Hide option is now available from the Assignment context menu. A Hidden Assignment is no longer displayed in the Timesheet. It can be made visible again by using Add Assignment.
As an Example, John has multiple Assignments, but he is not working on one of them for this and next period. He can now easily hide it from view. The task will still be assigned to him, and he can easily add it to his timesheet in a future period as need be.
Note: The Hide option is grayed out if there are Time Entries for the Assignment.
Benefit: This allows you to conceal Assignments from view without deleting them. It can help remove visual clutter, making the Timesheet easier to read.
For further details, refer to Hiding an Assignment.
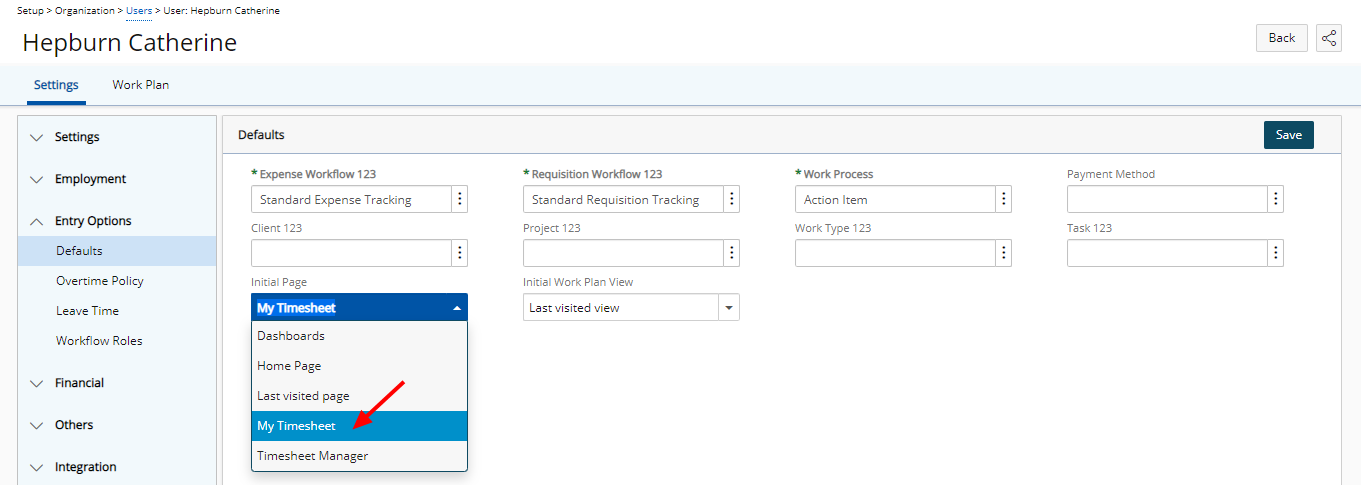
Description: My Timesheet option is now available as an Initial Page from the following two locations:
- Defaults page located under the Entry Options section when creating/modifying a User:
- From the User Settings:
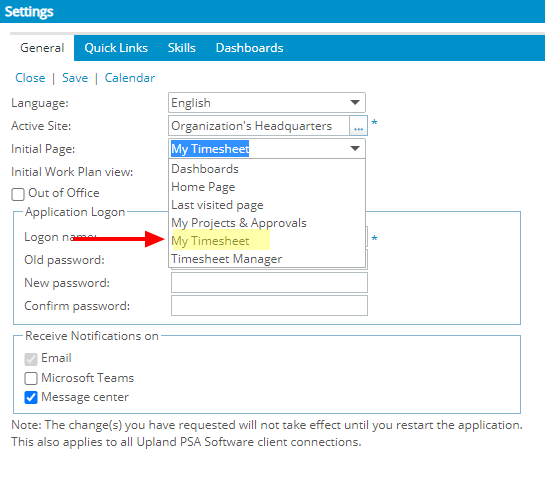
When selected, My Timesheet page will be displayed upon logging into the PSA application.
Benefit: With this addition, you can now quickly and easily enter time without having to first navigate to the My Timesheet page.
For further details, refer to:
- Selecting an Initial Page for a User
- Choosing a specific Home page to display upon logging in
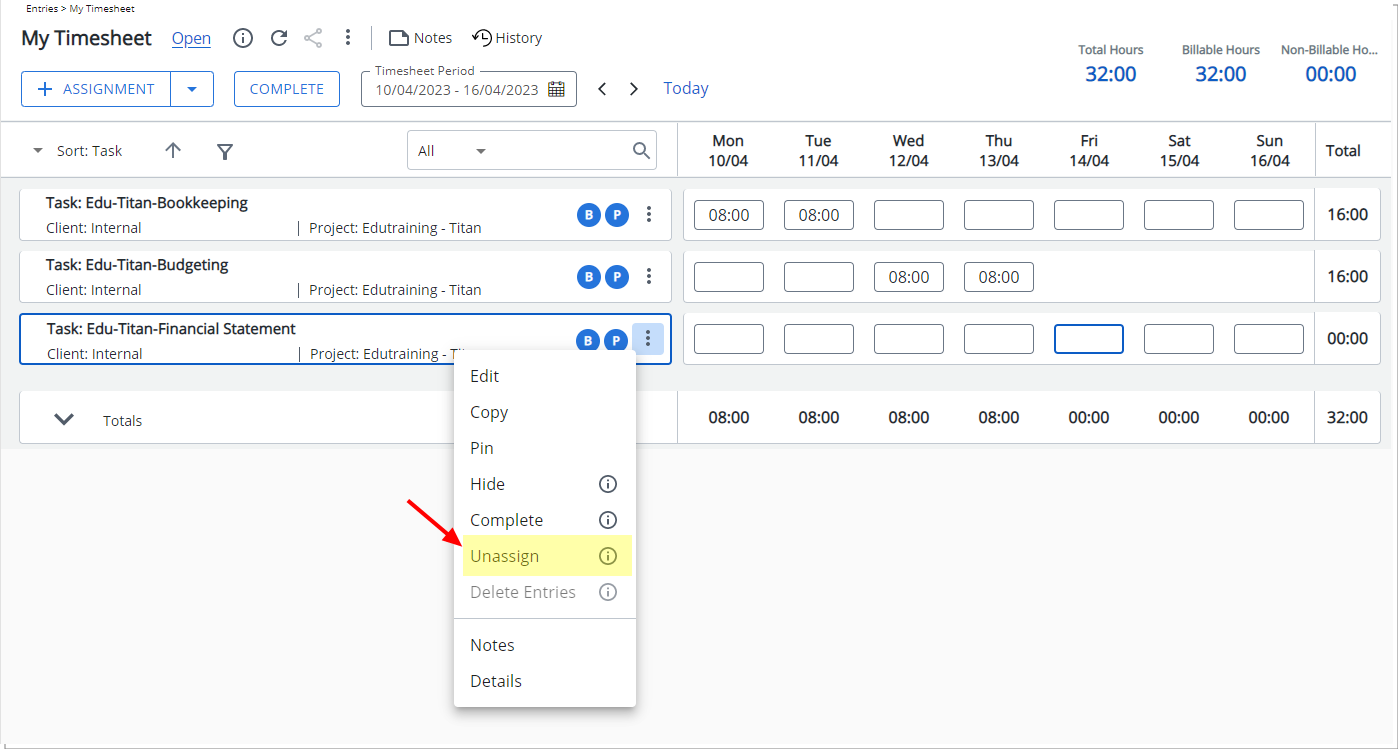
Description: A new Unassign option is now available from the Assignment context menu.
When trying to Unassign an Assignment with Time Entries a warning message is displayed informing you that: There are Time Entries for some of the selected Assignments and therefore they cannot be removed from the current Period. However, the End Dates of these Assignments have been set to the End Date of the Period in which the latest Time Entry is found. Please note that these Assignments will not appear in future Periods.
Note: If you have the Modify right to Assign Task Component in your Security Profile and the option Allow User to access Assignments page is enabled in your Timesheet Template, then you will be able to use the Unassign option.
Benefit: You can now Unassign an Assignment directly from My Timesheet without significant click-through.
For further details, refer to Unassigning an Assignment.
Description: When accessing My Timesheet through tablet devices, the Density is by default set to Compact, and the Density options are now hidden.
Benefit: Users accessing My Timesheet on tablet devices will now have a more streamlined and compact interface by default. Additionally, the option to change the Density is hidden, preventing accidental changes. This improvement ensures a consistent experience across tablet devices, enhances usability, and makes it more efficient to enter time and manage your timesheets.
For further details, refer to My Timesheet Display Settings.
Rate Cards
A Rate Card is a new module where you can create standard Billing rates or price lists based on Roles. Rate Cards enable simplified management of sets of Billing Rates associated with Roles in your Projects.
A typical use case is to create a Rate Card at the system level to store hourly Billing rates/price list defined for a Role. As a project manager you can then select the relevant Rate Card for a customer's Projects and customize it as needed. The Billing Rates will be automatically applied to Resources with matching Roles to calculate accurate expected and actual Revenues.
Rate Cards are particularly useful for consulting firms, agencies and contractors where billable projects are worked on by resources with different skills, experience, location, and availability. As such, resources with different roles are billed at different rates, and having multiple Rate Cards provides the flexibility for accurately defined roles and rates.
Rate Cards are ideal for organizations where standardized Billing Rules are used for Roles meaning that you do not set individual billing rates for Team members. Instead, the rates billed will be determined by the Team member's Role on the project. As an example, all Designers have the same billing rate regardless of the user assigned to the role.
Note: Rate Cards take precedence over all other Rate Rules and apply only for Billing.
Two new Security Permissions are now available to control:
- Who can View, Modify, Create, and/or Delete Rate Cards at the System level.
- Who can modify Project Rate Cards
You can also manage who can access and modify Rate Cards at the Project level based on the Hidden and/or Lock Tab Security settings.
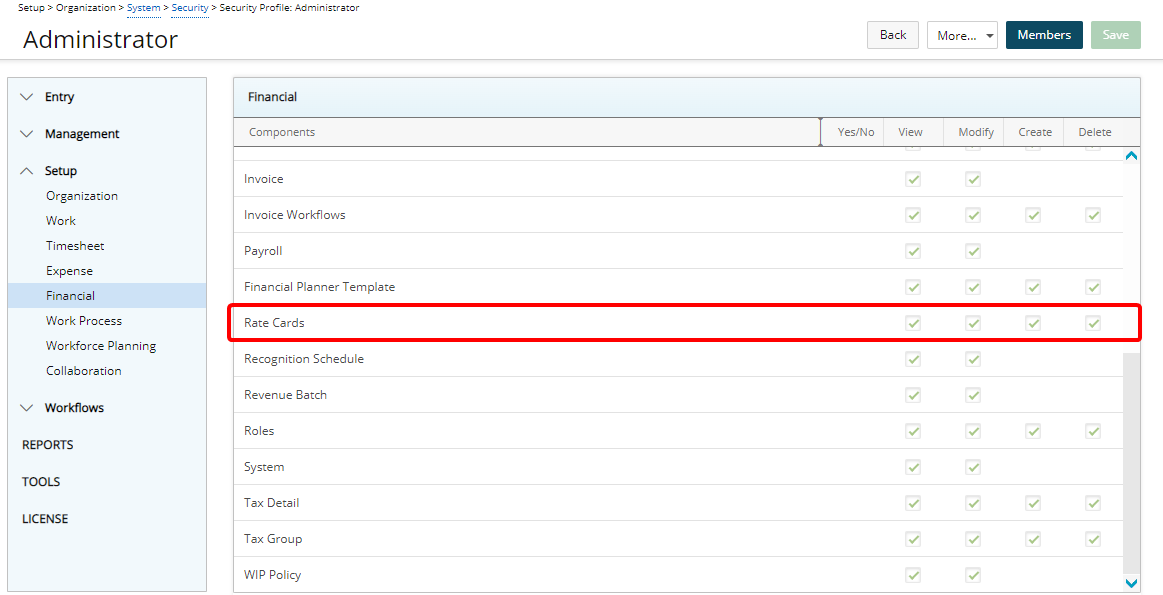
Description: Addition of Rate Cards Security permission to Setup > Organization > System > Security > Security Profile > Setup > Financial with View/Modify/Create/Delete access right.
Note: By default, the Rate Cards rights are granted to the Administrator security profile only.
Benefit: The Rate Cards security permission allows control over who can View, Modify, Create, and/or DeleteRate Cards at the System level (Setup > Financial).
For further details, refer to Granting Rate Cards rights.
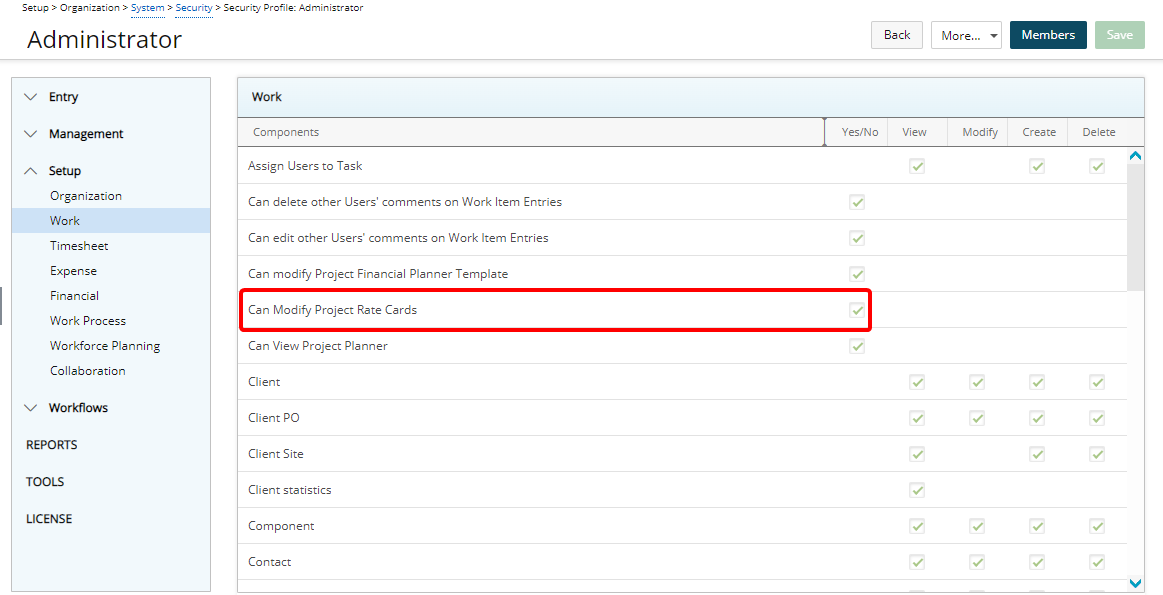
Description: Addition of Can Modify Project Rate Cards Security permission to Setup > Organization > System > Security > Security Profile > Setup > Work with Yes/No access right.
Note: By default, the Can Modify Project Rate Cards right is granted to the Administrator security profile only.
Benefit: The Rate Cards security permission allows control over who can modify Project Rate Cards (Project List > Edit Project > Manage tab navigation).
For further details, refer to Project Rate Cards Security permission.
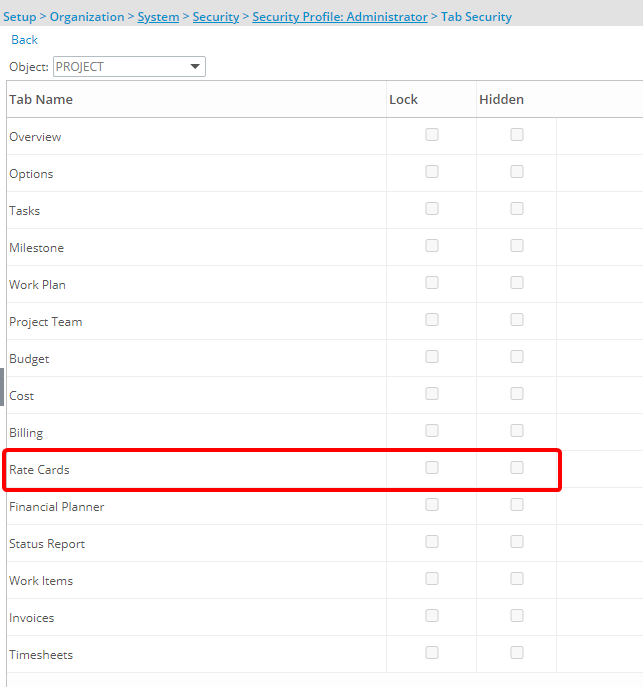
Furthermore, the Project Rate Cards can be Hidden or Locked based on the Tab Security setting under Setup > Organization > System > Security > Security Profile.
- When the Hidden option is turned on for a Security Profile, the Rate Cards option located under the Manage tab in Project edit will be hidden.
- When the Lock option is turned on for a Security Profile, associated Users can only view the Rate Cards: The Rate Cards option located under the Manage tab in Project edit will be available. However, upon accessing the page, the content will be locked, and they will not be able to make any changes to it.
For further details, refer to Setting the access rights to Project tabs.
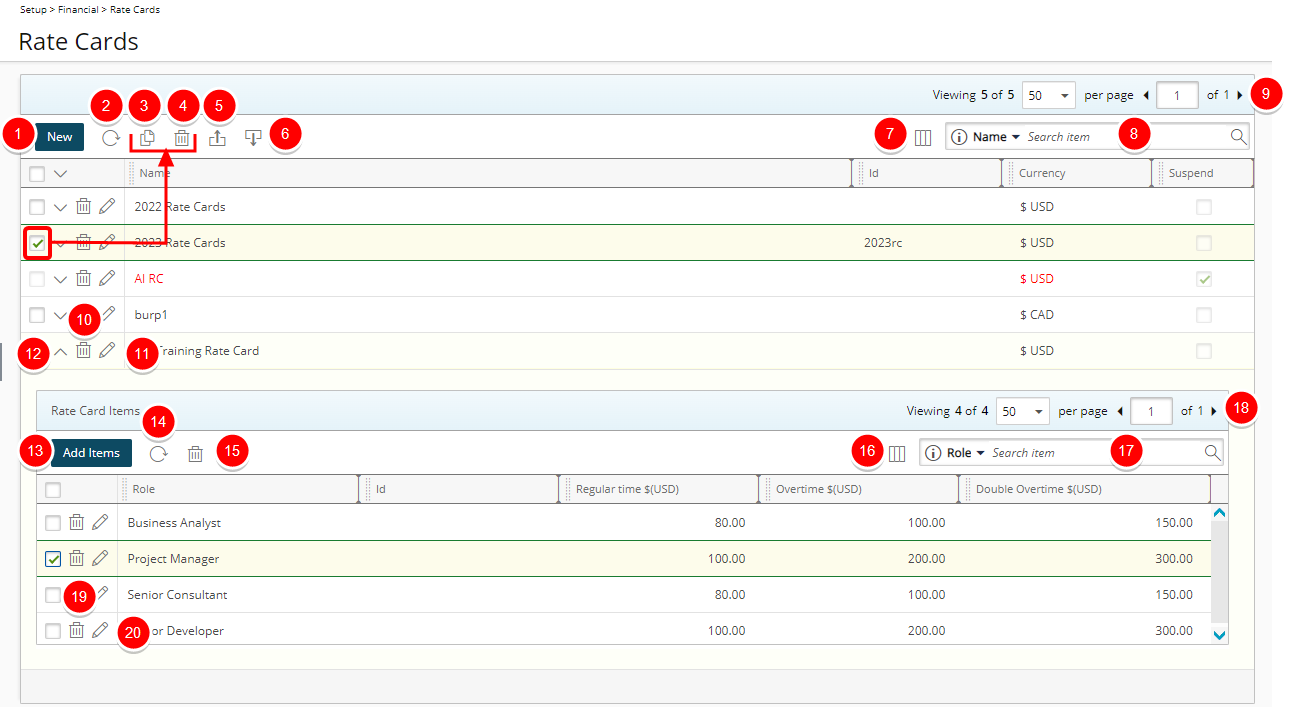
To create and manage Rate Cards based on your security permission, you can access the newly added Rate Cards list page from Setup > Financial.
By default, the page lists all Rate Cards in alphabetical order. You can:
- Create New Rate Card.
- Refresh
 the list.
 - Copy
 selected Rate Card.
 - Delete
 selected Rate Card.
 - Export
 the list of Rate Cards to Excel.
 - Import
 Rate Cards from a predefined Excel Template.
 - The following columns are displayed by default: Name, Id, Currency and Suspend. You can manage the columns from Column Selection
 .
. - Search
 for Rate Cards based on Name and Id. You can choose to include the Currency criteria from Column Selection .
 - Pagination is available at the top right corner to facilitate easy navigation across pages.
- Delete Rate Card.
- Modify
 Rate Card.
 - The Rate Card Items are created/managed from the drawer by clicking the expand arrow (
 ).
). - Click Add Items to add Roles and their associated rates to the Rate Card.
- Refresh the list.
- Delete selected Rate Card Item.
- The following columns are displayed by default: Role, Id, Regular time, Overtime and Double Overtime. You can manage the columns from Column Selection .
- Search for Rate Cards Items based on Role, Id, Regular time, Overtime and Double Overtime.
- Pagination is available at the top right corner to facilitate easy navigation across pages.
- Delete Rate Card Item.
- Modify Rate Card Item.
For further details, refer to Rate Cards list page.
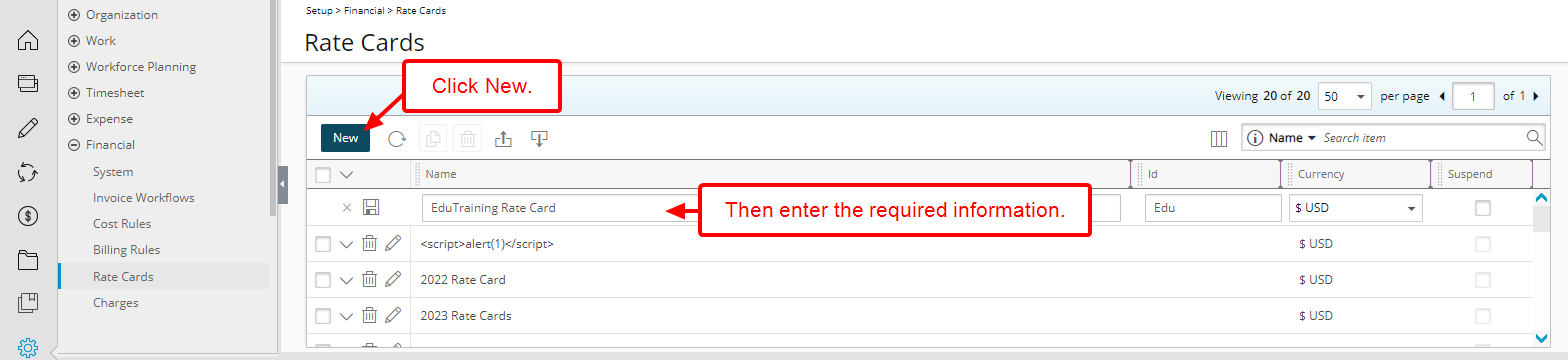
From the Rate Cards list page click the New button. A new line item is added allowing you to define the Name, Id and Currency.
Note:
- Currency cannot be changed once a Rate Card is saved.
- You can Suspend a Rate Card when editing it.
Upon saving the Rate Card you can then Add Items.
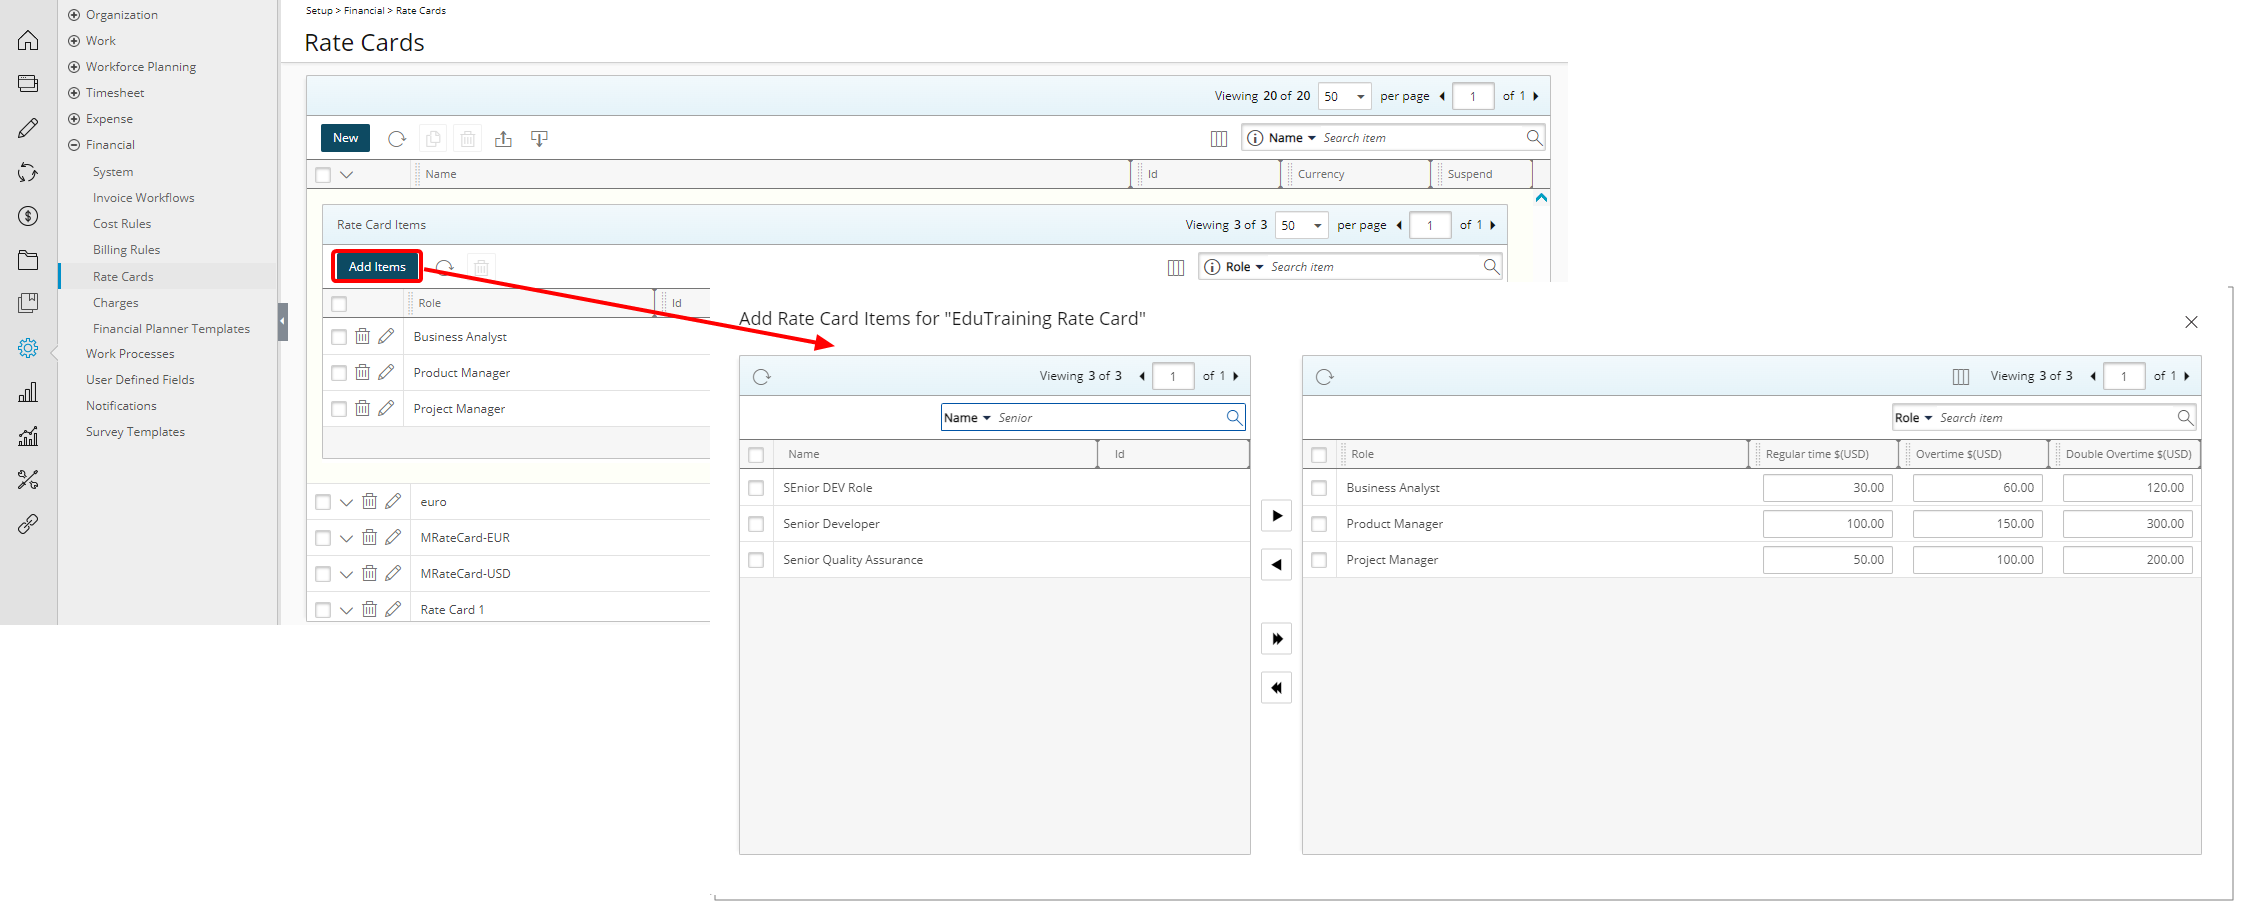
Select the required Roles from the left table and click the add button ![]() to add them to the selected items on the right.
to add them to the selected items on the right.
Note: You cannot:
- Use the same Role for multiple Rate Items.
- Suspend/delete a Role if it is used in Project Rate Card associations.
Enter the Regular time, Overtime and Double overtime amounts for each Role. Then close the dialog box to return to the list page where you will see your Rate Card Items in the drawer.
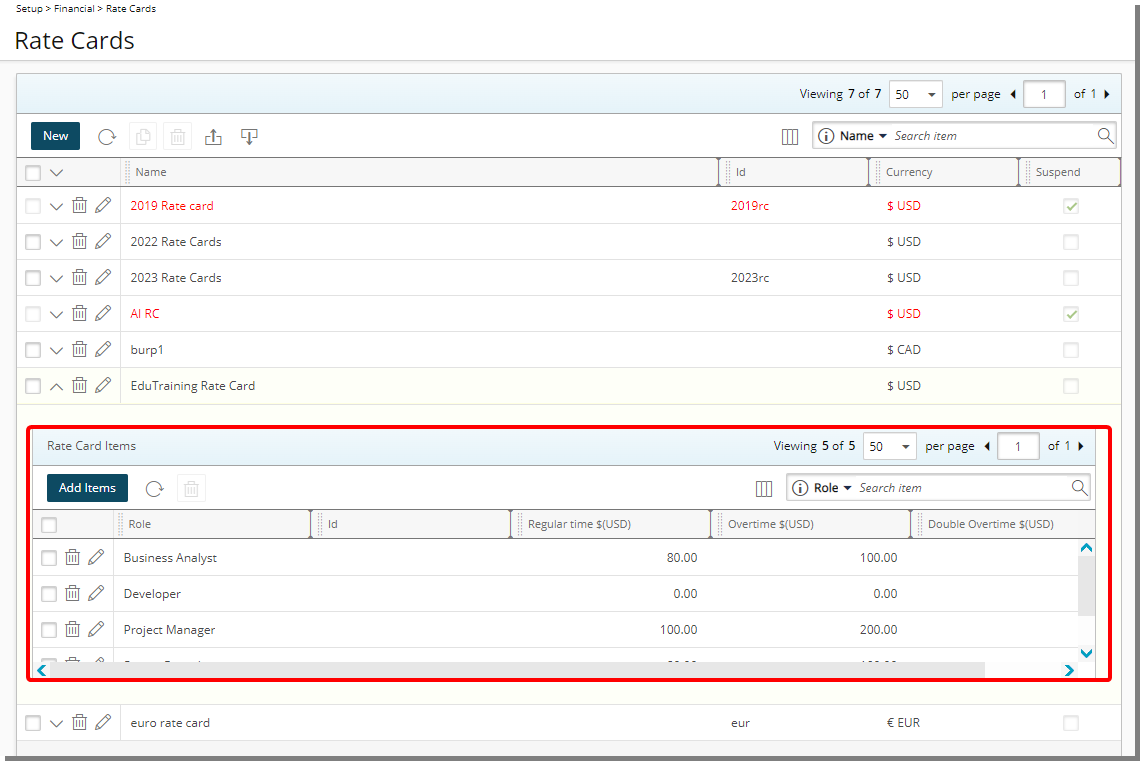
You can now assign this Rate Card to a Project.
Note: Any modifications made to the Rate Card at the Financial System level after the Rate Card is assigned to a Project will not be reflected at the Project level.
For further details, refer to Creating Rate Cards at the System level.
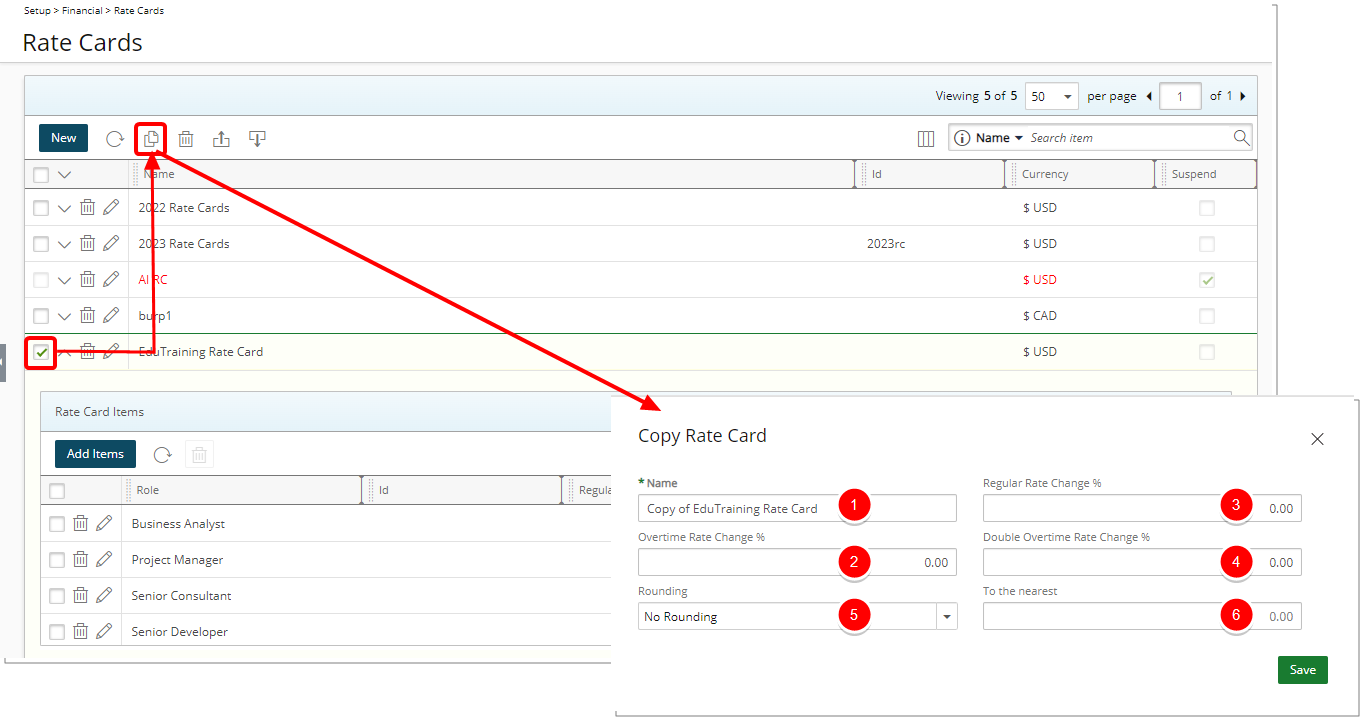
You can create a copy of an existing Rate Card from the Rate Cards list page by selecting the rate card you wish to copy and then clicking the Copy ![]() button.
button.
From the Copy Rate Card dialog box:
- Enter the Name of the rate card. By default, this is set to Copy of [the name of the copied rate card].
- You can modify all Regular Time, Overtime and Double overtime rates in your copied Rate Card by entering a numeric value for:
- Regular time rate change %
- Overtime rate change %
- Double Overtime rate change %
Example: If you wish to increase the Regular Time rates by 25% you can enter 25. If you wish to decrease the Regular Time rates by 25% then enter -25. The same concept applies to Overtime and Double Overtime rates.
- From the Rounding selection box choose:
- No Rounding: When selected, no rounding will be applied to the new rates created by the change% and the To the nearest field will be greyed out.
- Round Up: Rounds down the number (Ceiling function). As an example: Ceiling of (2.1, 2.2, ….2.9) = 3
- Round Down: Rounds down the number (Floor function). As an example: Floor of (2.1, 2.2, ….2.9) = 2
- Round: Rounds off the number. As an example: When the number is < .5 round down and when >= .5 round up.
- To the nearest field: Round the values to the nearest integer. The default value is 1.
Examples:
To the nearest 5
| Number | Rounding | Rounding Down | Rounding Up |
|---|---|---|---|
| 4.00 | 5 | 0 | 5 |
| 17.00 | 15 | 15 | 20 |
| 99.00 | 100 | 95 | 100 |
| 123.00 | 275 | 275 | 280 |
| 276.00 |
To the nearest 10
| Number | Rounding | Rounding Down | Rounding Up |
|---|---|---|---|
| 4.00 | 0 | 0 | 10 |
| 17.00 | 20 | 10 | 20 |
| 99.00 | 100 | 90 | 100 |
| 123.00 | 120 | 120 | 130 |
| 276.00 | 280 | 270 | 280 |
For further details, refer to Copying a Rate Card.
Rate Cards can be imported from a predefined Excel Template. You can download the PSA Rate Card Import template that includes the RateCards and RateCardsItems sheet tabs where you define the Rate Cards and associated Rate Card Items that can then be imported into PSA using the Excel Import tool.
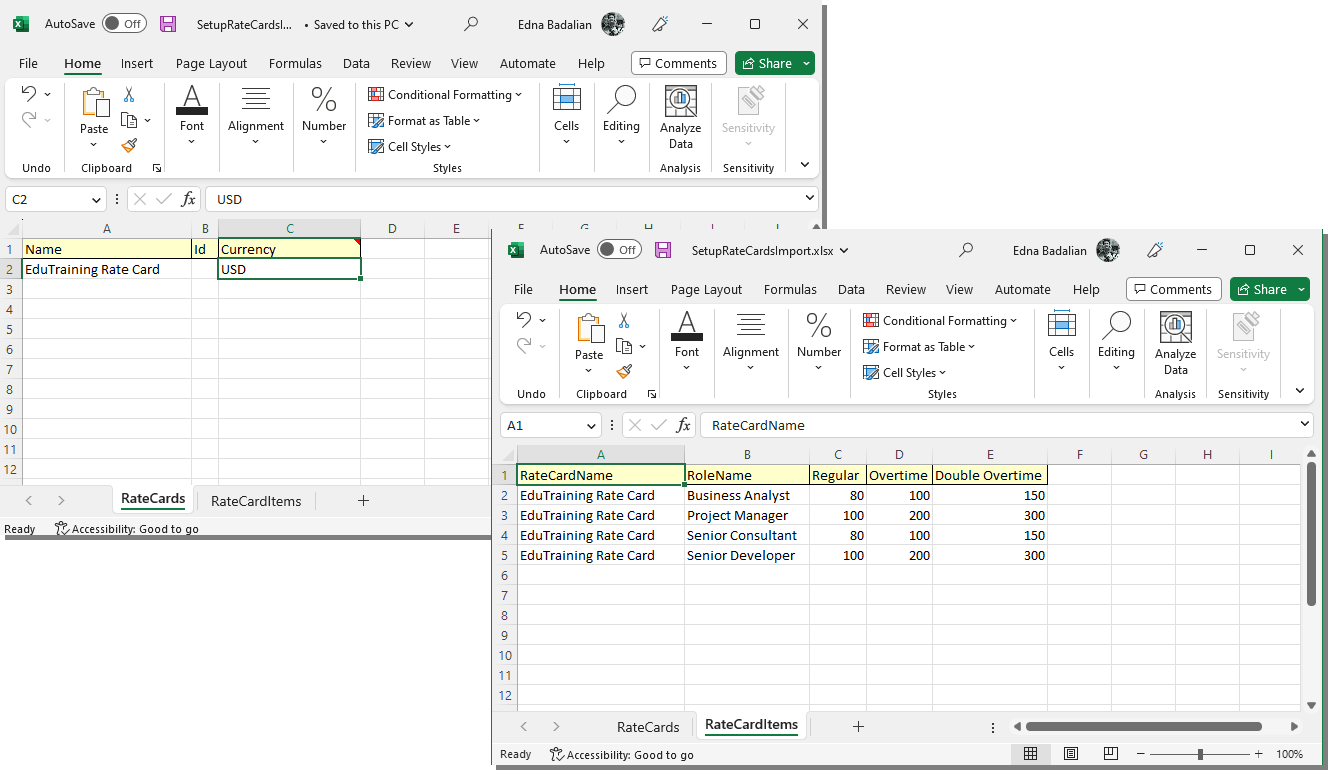
Define the Name, Id and Currency of the Rate Card(s). Then within the RateCardsItems sheet tab define the Role Name, Regular, Overtime and Double Overtime amounts for each Rate Card Name.
Select the Excel file and then Import the Rate Cards. Note that within the Import Status box you will see the status of your import.
Note: Currently Spreadsheets (.xls) and Excel Workbooks (.xlsx) are supported when importing Rate Cards. You can download the PSA Rate Card Import template in either .xls or.xlsx formats.
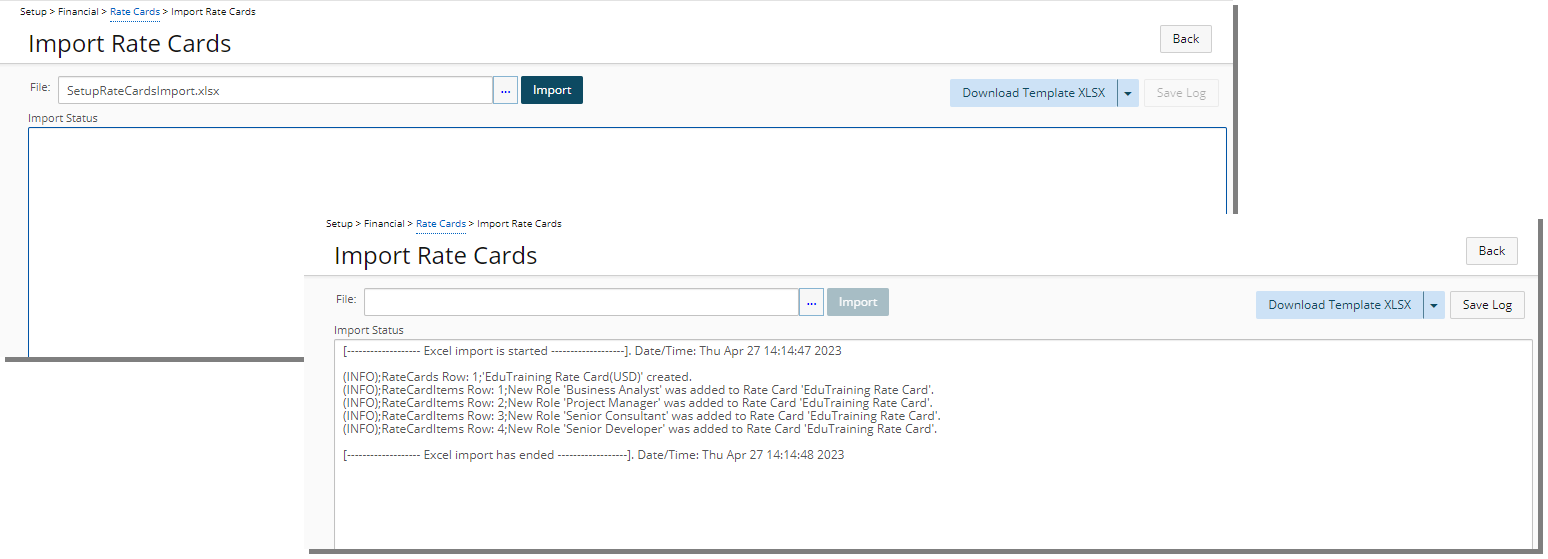
Click Back to return to the Rate Cards list page where the imported Rate Cards and Rate Card Items will be displayed.
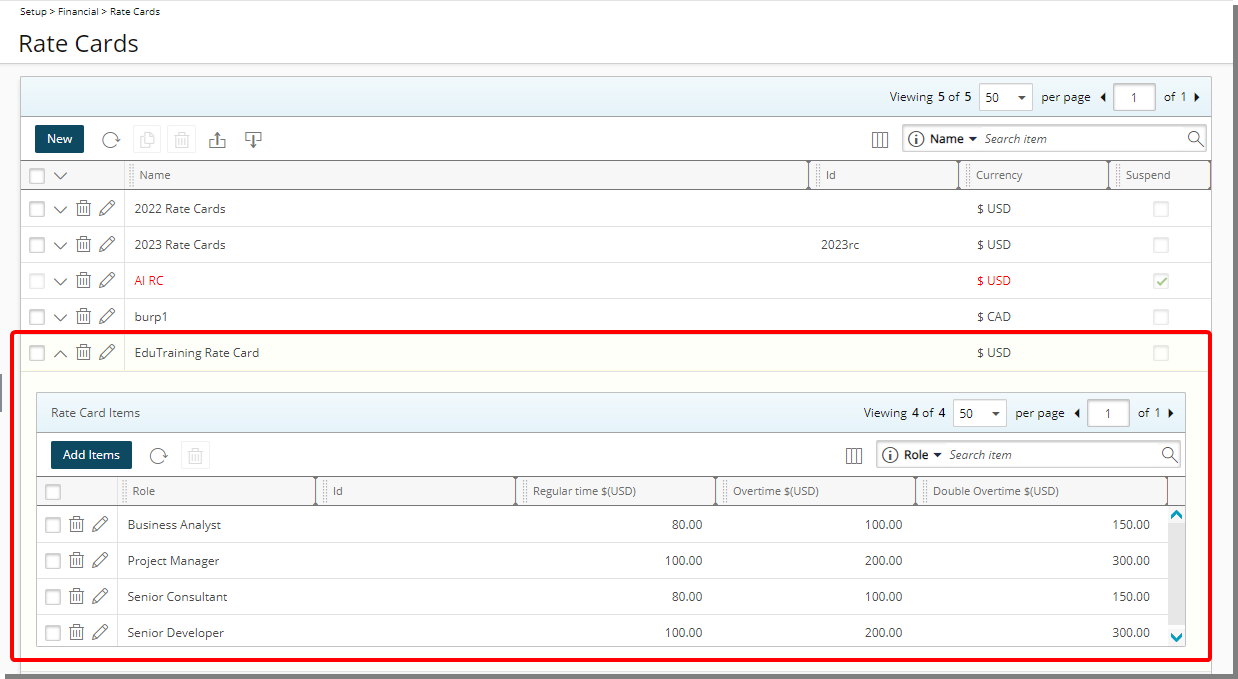
For further details, refer to Importing Rate Cards.
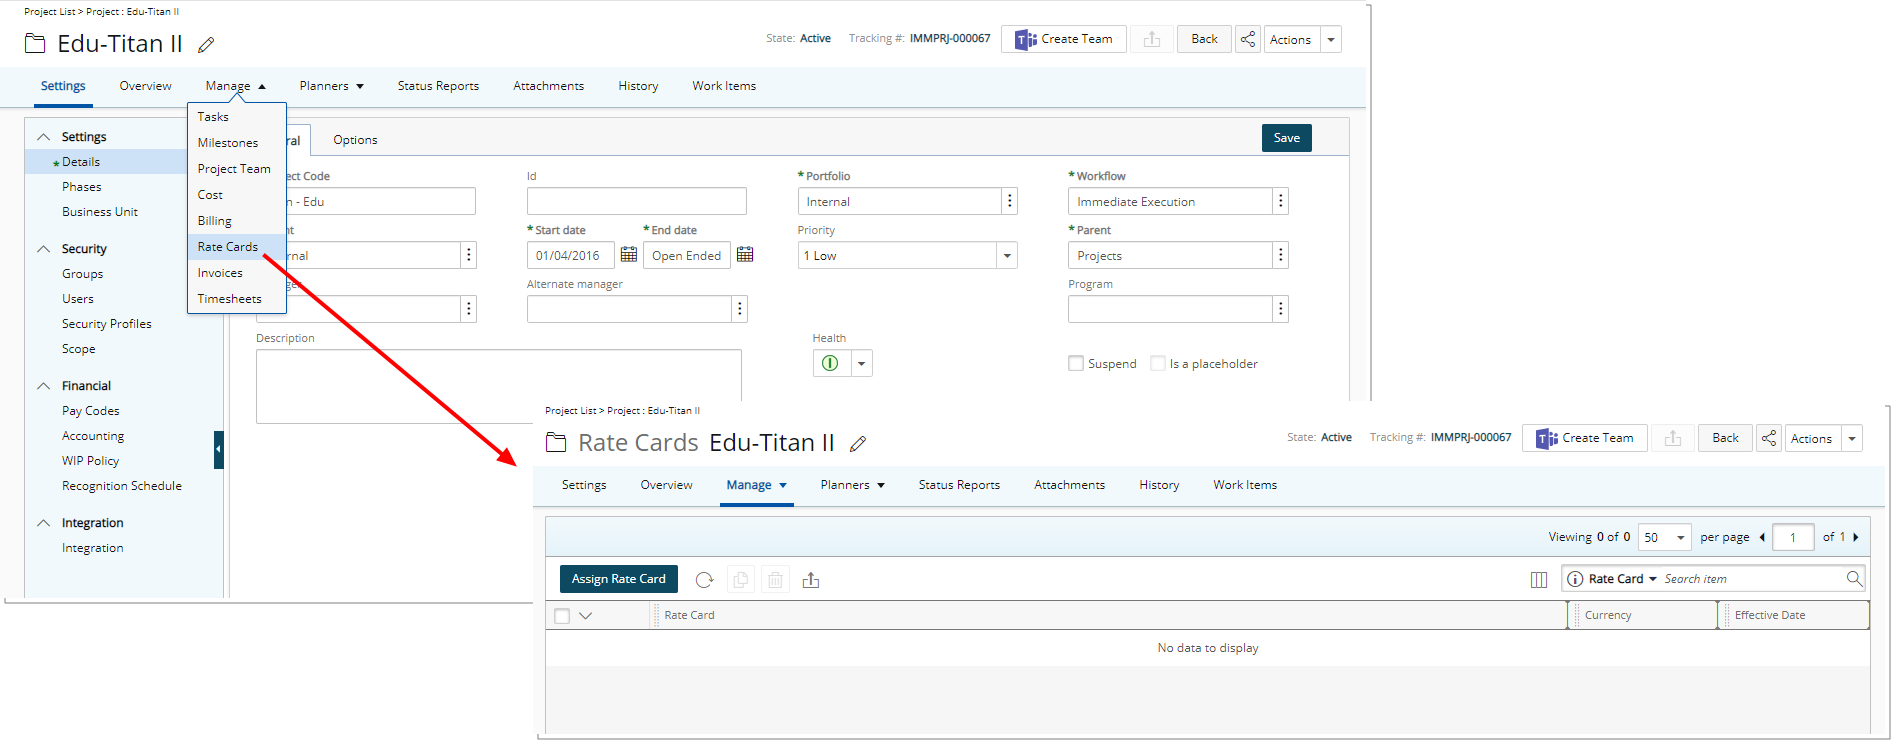
A new Rate Cards option is now available from the Project Edit Manage tab navigation.
From this Rate Cards page you can assign a Rate Card to the project.
Upon clicking Assign Rate Card, a new line item is inserted in the list with inline editing from where you can choose a Rate Card to assign to your project.
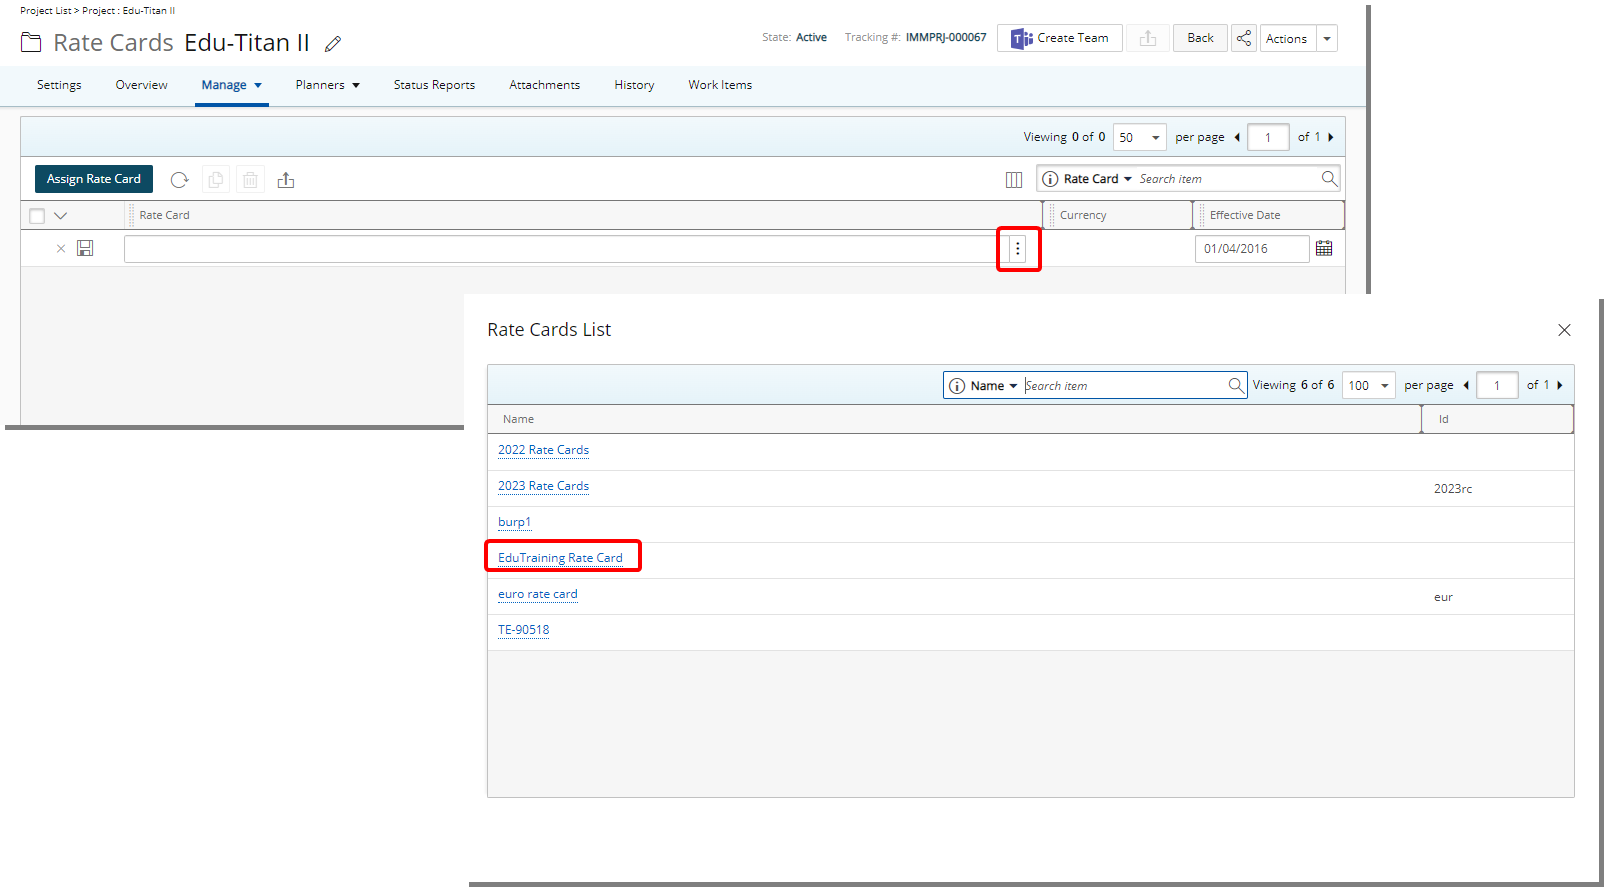
Select a Rate Card from the Rate Cards List dialog box. You will be redirected back to the Project Rate Cards page where you can set an Effective Date. By default, the Effective Date is set to the project Start date. Upon successfully saving, the page will refresh, and you will see your newly assigned Rate Card with an expanded (open) Rate Card Items drawer.
Note: Rate Card(s)/Rate Card Item(s) assigned to a Project cannot be deleted/modified if any Invoice associations exist.
For further details, refer to Assign Rate Card.
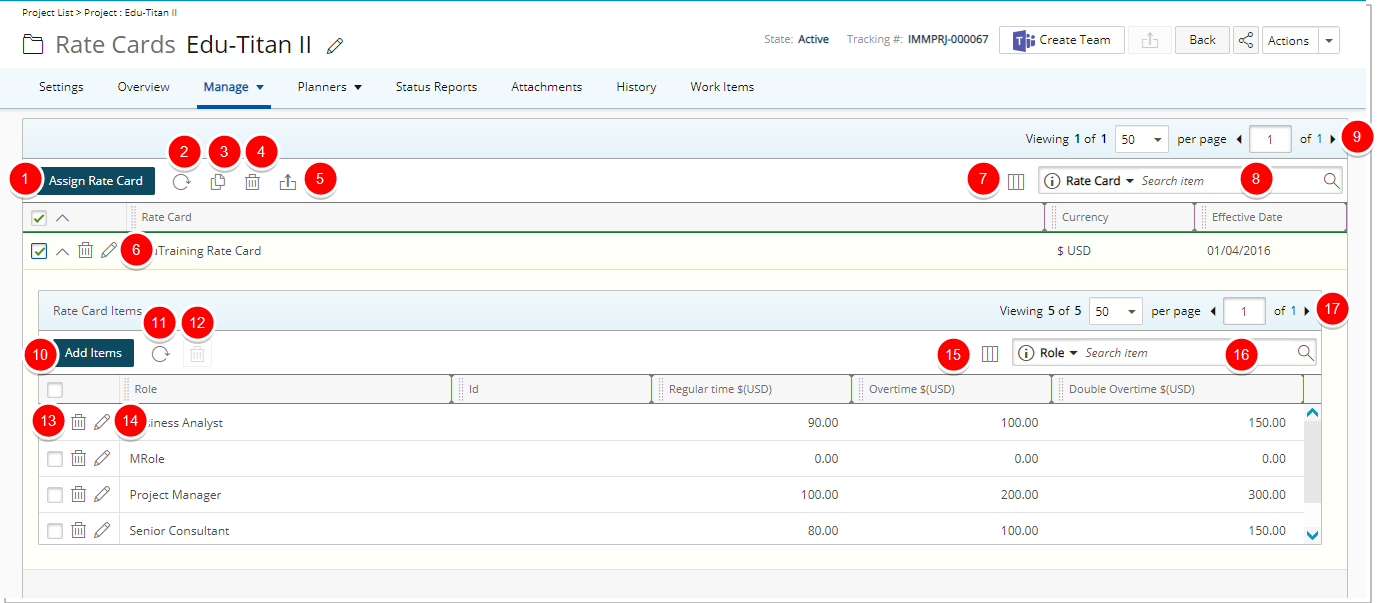
By default, the page lists all assigned Rate Cards in alphabetical order. You can:
- Assign a Rate Card.
- Refresh the list.
- Copy selected Rate Card.
- Delete selected Rate Card.
- Export the list of assigned Rate Cards to Excel
- Modify associated Rate Card
- The following columns are displayed by default: Rate Card name, Currency and Effective Date. You can manage the columns from Column Selection .
- By default, Search for assigned Rate Cards based on Name and Effective Date. You can choose to include the Currency criteria from Column Selection .
- The Rate Card Items added/managed from the drawer by clicking the expand arrow ().
- Click Add Items to add Roles and their associated rates to the Rate Card.
- Refresh the list.
- Delete selected Rate Card Item.
- Delete Rate Card Item.
- Modify Rate Card Item.
- The following columns are displayed by default: Role, Id, Regular time, Overtime and Double Overtime. You can manage the columns from Column Selection .
- Search for Rate Card Items based on Role, Id, Regular time, Overtime and Double Overtime.
- Pagination is available at the top right corner to facilitate easy navigation across pages.
Note: Any modifications made to the Project Rate Card will not be reflected on the Rate Card created at the Financial System level.
For further details, refer to Project Rate Cards.
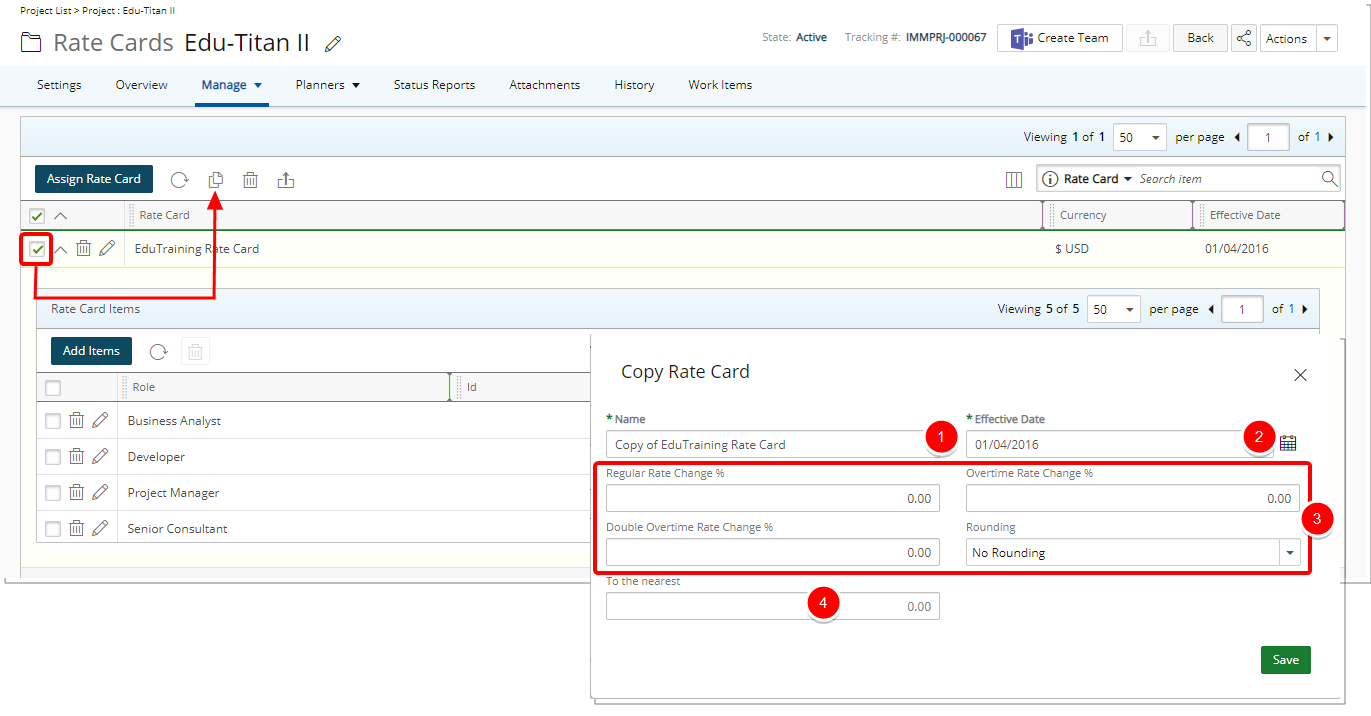
Users with the Can Modify Project Rate Cards security permission can create a copy of a Project Rate Card from the Rate Cards list page by selecting the associated rate card they wish to copy and then clicking the Copy button.
From the Copy Rate Card dialog box:
- Enter the Name of the rate card. By default, this is set to Copy of [the name of the copied rate card.
- Select an Effective Date. By default, the Effective Date is set to the project Start date.
Note: The Effective Date cannot conflict with an existing Rate Card Effective Date assigned to the project.
- You can modify all Regular Time, Overtime and Double overtime rates in your copied Rate Card by entering a numeric value for:
- Regular time rate change %
- Overtime rate change %
- Double Overtime rate change %
Example: If you wish to increase the Regular Time rates by 25% you can enter 25. If you wish to decrease the Regular Time rates by 25% then enter -25. The same concept applies to Overtime and Double Overtime rates.
- From the Rounding selection box choose:
- No Rounding: When selected, no rounding will be applied to the new rates created by the change% and the To the nearest field will be greyed out.
- Round Up: Rounds down the number (Ceiling function). As an example: Ceiling of (2.1, 2.2, ….2.9) = 3
- Round Down: Rounds down the number (Floor function). As an example: Floor of (2.1, 2.2, ….2.9) = 2
- Round: Rounds off the number. As an example: When the number is < .5 round down and when >= .5 round up.
- To the nearest field: Round the values to the nearest integer. The default value is 1.
Examples:
To the nearest 5
| Number | Rounding | Rounding Down | Rounding Up |
|---|---|---|---|
| 4.00 | 5 | 0 | 5 |
| 17.00 | 15 | 15 | 20 |
| 99.00 | 100 | 95 | 100 |
| 123.00 | 125 | 120 | 125 |
| 276.00 | 275 | 275 | 280 |
To the nearest 10
| Number | Rounding | Rounding Down | Rounding Up |
|---|---|---|---|
| 4.00 | 0 | 0 | 10 |
| 17.00 | 20 | 10 | 20 |
| 99.00 | 100 | 90 | 100 |
| 123.00 | 120 | 120 | 130 |
| 276.00 | 280 | 270 | 280 |
For further details, refer to Copying Project Rate Card.
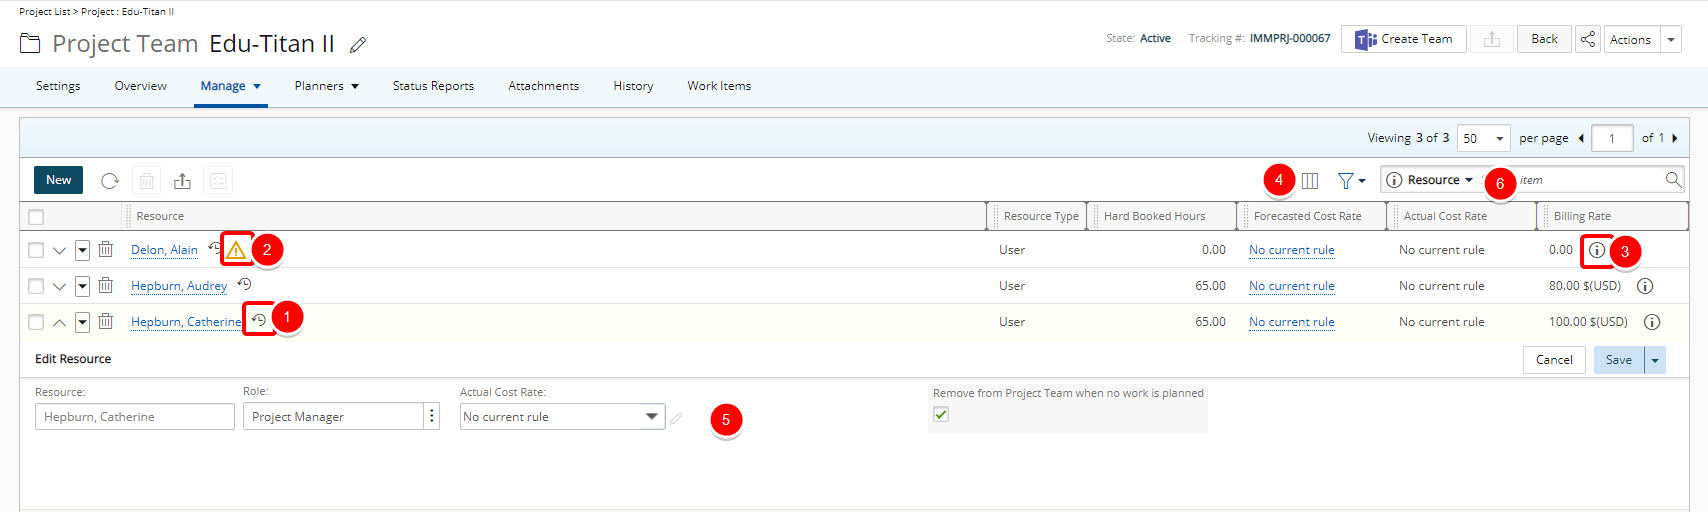
The following modifications have been made to the Project Team page when a Rate Card is assigned to the Project:
- The Rates History can be accessed by clicking the history (
 ) button located against the Resource name.
 - As a visual indicator, a warning information icon (
 ) is displayed when no rate is defined for a role.
 - As a visual indicator, an information icon (
 ) is displayed against the Billing Rate. Hovering over this icon displays a tool tip with the Rate Card information such as the Name, Overtime and Double Overtime values.
 - Columns Selection: The following columns are displayed by default: Resource, Resource Type, Hard Booked Hours, Forecasted Cost Rate, Actual Cost Rate and Billing Rate. In addition, you can choose to include the Active, No. Of Tasks and Tasks Assigned columns.
Note: The Forecasted Billing Rate and Actual Billing Rate are not displayed in the drawer.
- You can search the list based on: Resource, Resource Type, Hard Booked Hours, Forecasted Cost Rate, Actual Cost Rate, Billing Rate, Tasks Assigned and No. Of Tasks.
When adding a New Team Member by default, the Forecasted Cost, Actual Cost Rate and Billing Rate are displayed within the Assigned Resources table. You can choose to include the Resource Type and Remove from Project Team when no work in planned columns.

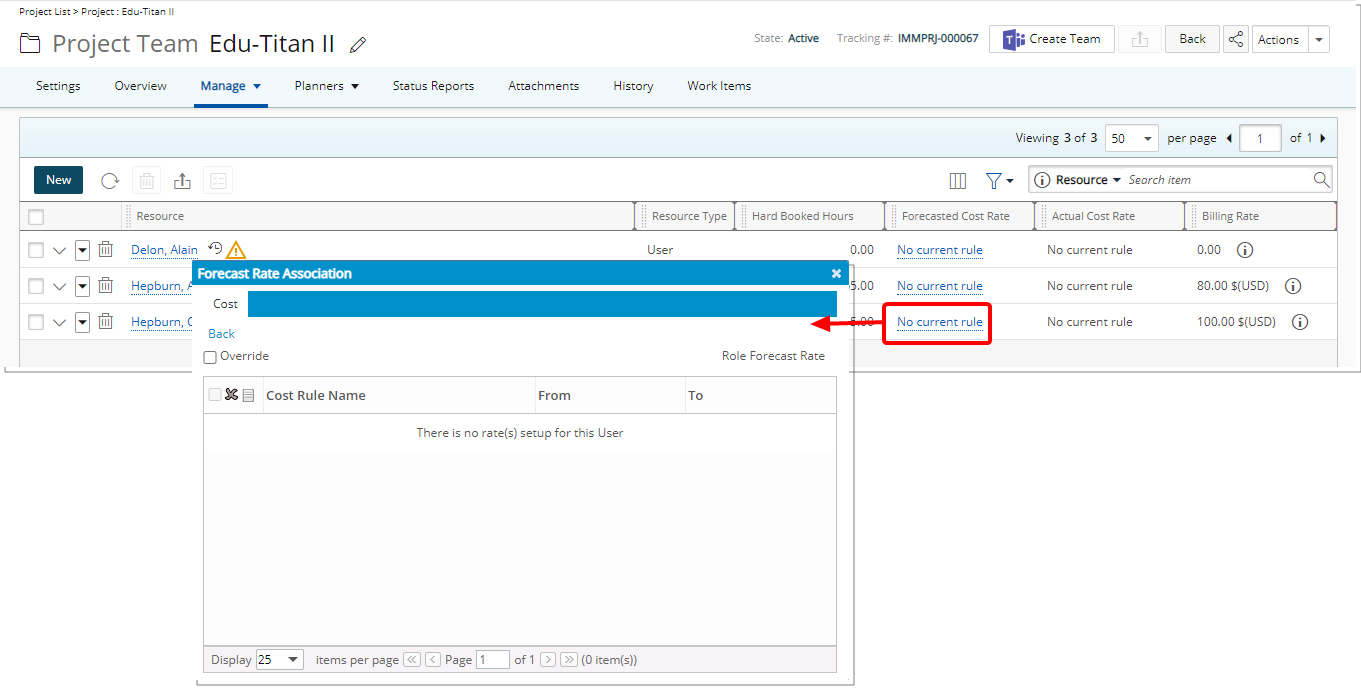
Only the Cost tab is displayed when accessing the Forecast Rate Association dialog box.
For further details, refer to Resource Rates History.
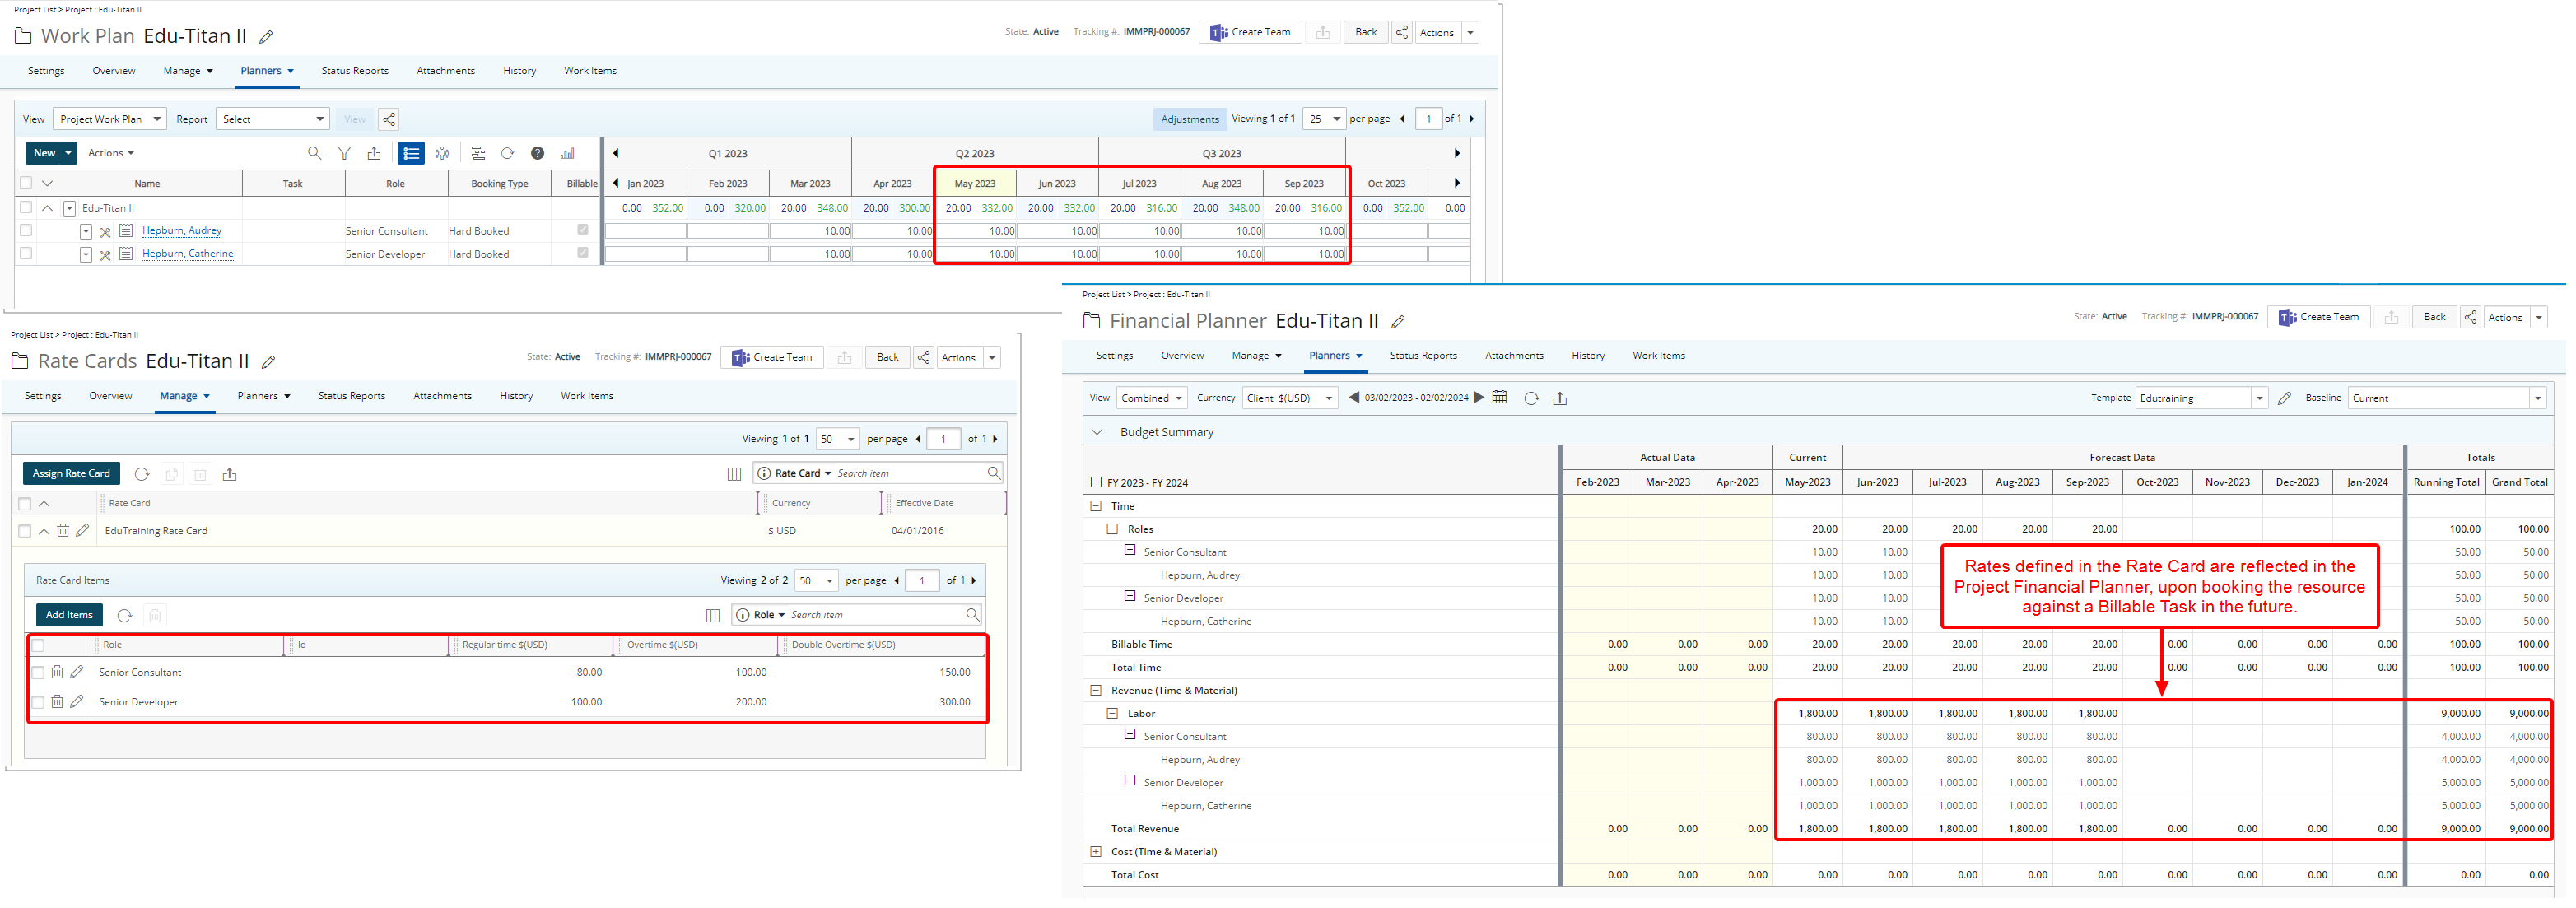
Upon associating a Rate Card to a Project and defining the Roles for the Project Team members, the rates defined in the Rate Card are reflected in the Project Financial Planner, upon booking the resource against a Billable Task in the future.
Note: Rate Cards take precedence over the existing Role Forecast Rules.
Let’s assume a Project is associated with a Rate Card wherein each Role in the project has Rate Items in the active Rate Card. There is a Forecast Rate associated to one or more Roles (Setup > Organization > Roles > Role Edit > Forecast Rate).
In this case:
- The Rate Card is more important than the Forecast Rate assigned to a user's Role. This means that the rates defined in the Rate Card take precedence over the Forecast Rate.
- If there is a period when the Project does not have a Rate Card assigned, the Financial Planner will not have any data for that period. During those periods, the Forecast Rate assigned to the user's Role is completely disregarded.
Let’s assume a Project where the Forecast Rate is Overridden, and its date is set to start on January 1, 2023, without a specific end date.
In this case:
- If you try to assign a Rate Card with an Effective date that overlaps with the overridden rate duration, you will see an error message. The Rate Card will not be assigned.
- To successfully assign the Rate Card, you must either remove the Override or adjust the Start and End dates, so they don't overlap with the Effective date of the Rate Card you wish to assign.
Let’s assume a Project is associated with a Rate Card wherein each Role in the project has Rate Items in the active Rate Card. There is a Forecast Rate associated to one or more Roles (Setup > Organization > Roles > Role Edit > Forecast Rate).
A selection is made for the User Default Forecast Billing Rate and the Enforce Billing Rule Rate Association dependency to.
In this case:
- The project revenue uses the rates defined in the Rate Card and any selection made for Billing Rules at the Financial System setup level are ignored.
For further details refer to: Project Rate Cards and Forecasting
Resource Management
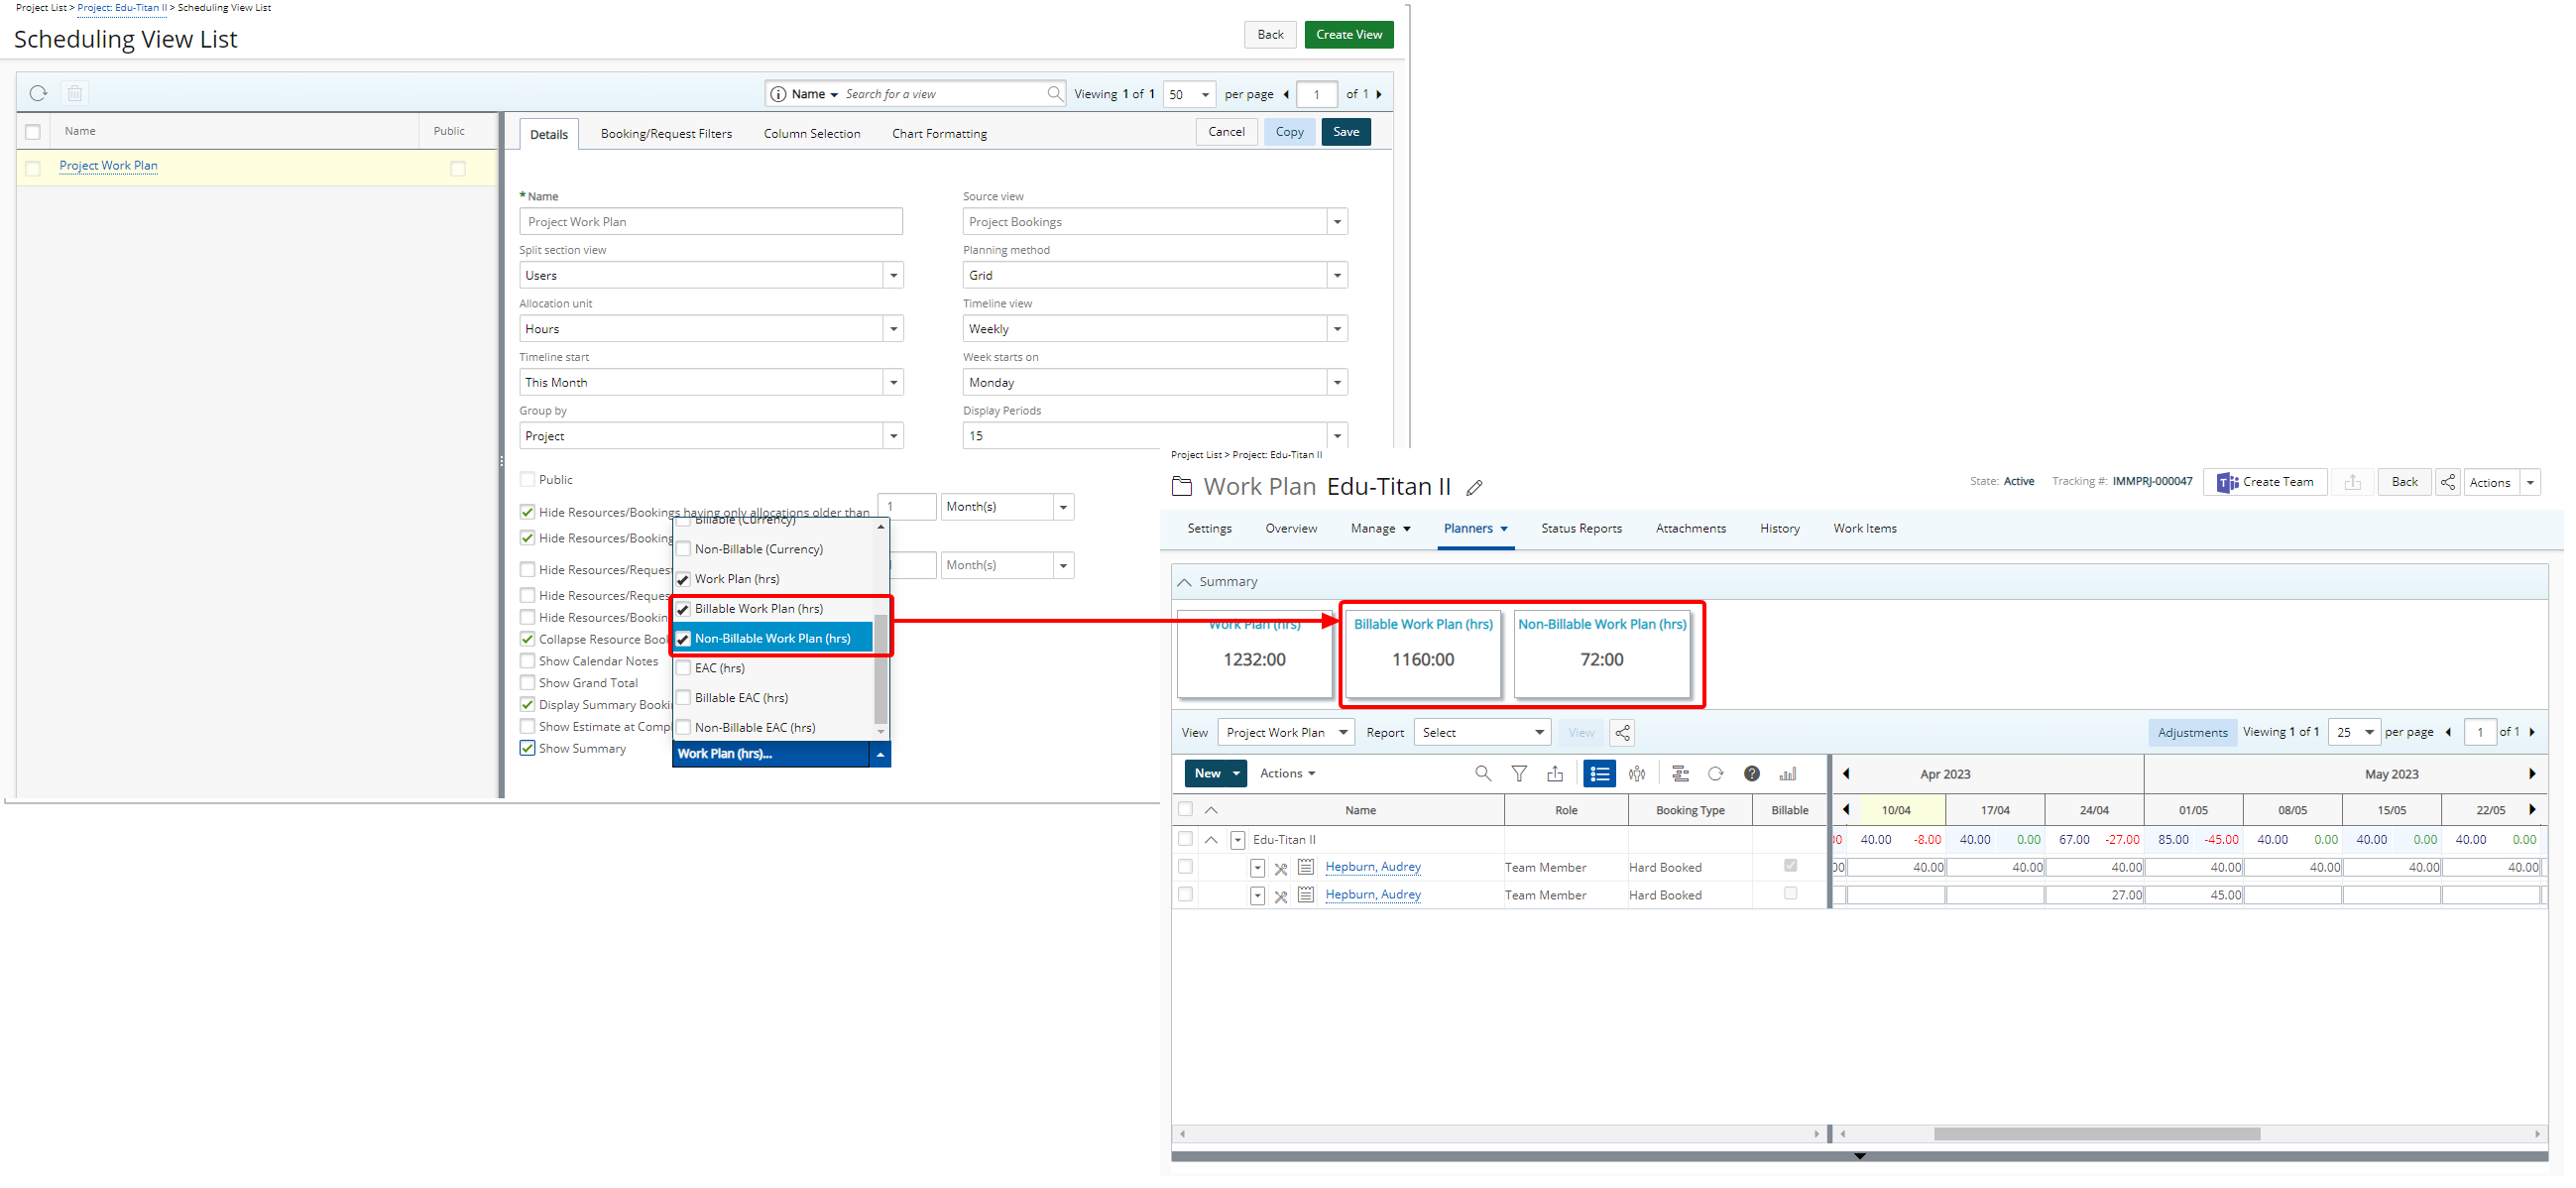
Description: You can now choose to show the Billable and Non-Billable Work Plan hours in the Summary section of a Project Work Plan. This can be done by selecting the new options available under Show Summary when modifying the View. Once selected, the Summary section will display the Billable Work Plan (hrs) and/or Non-Billable Work Plan (hrs) when expanded.
Benefit: This new feature enables you to quickly access and view the Billable/Non-Billable Work Plan hours within the Project Work Plan, providing greater transparency and clarity on project progress and resource allocation.
For further details, refer to Enabling the Summary section to appear within the Project Work Plan.
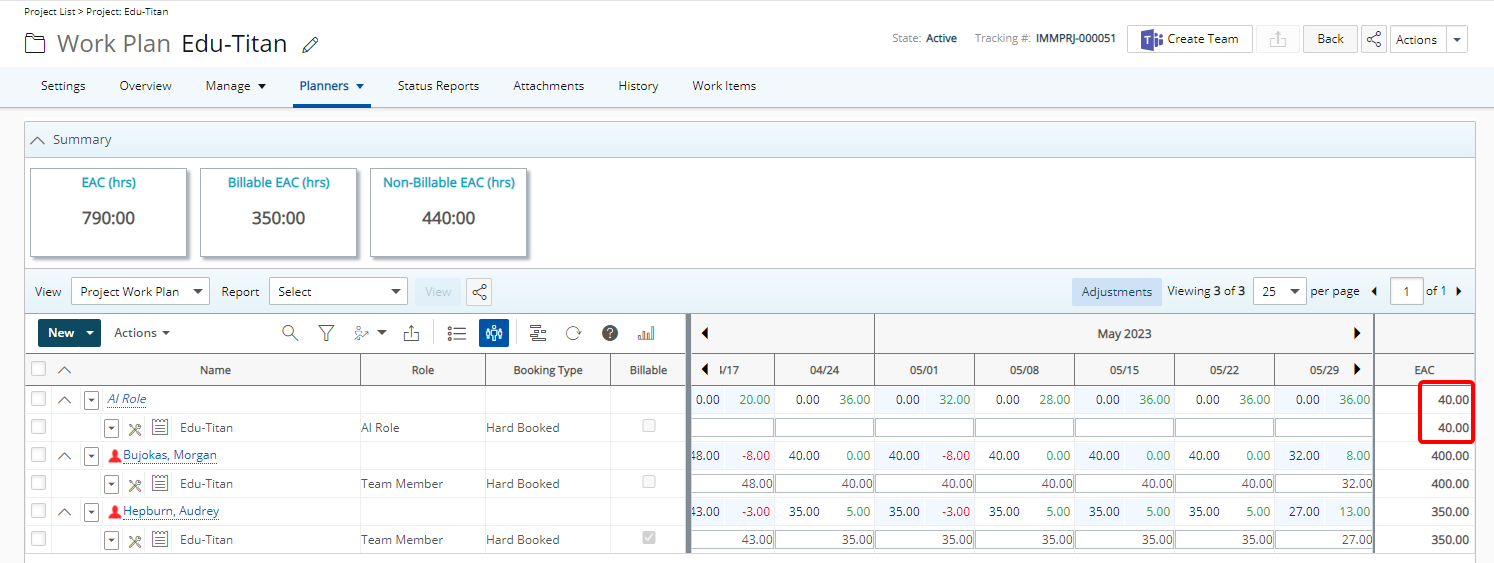
Description: In past releases, by selecting the Show Estimate at Completion when modifying the View, the Estimate at Completion could be shown at the User level within the Project Work Plan upon selecting Group by Resource.
As of this release the Estimate at Completion is also shown at the Role level when Group by Resource is selected.
The Estimate at Completion at the Role level is calculated as: Total hours in Work Plan in the future.
Furthermore, the calculations for the EAC (hrs), Billable EAC (hrs) and Non-Billable EAC (hrs) located within the Summary section also take the EAC at the Role level into account.
Note: The calculations are made based on your selections for Work Plan Hours to Include and Actuals to Include settings within the General tab as well as your selected Forecast Start Date within the View Settings tab of the Financial Planner Template associated to the Project.
Benefit: If the EAC and Grand Total values don't match, Project Managers are proactively informed that modifications are needed in their plan to ensure that their resources are performing as intended.
For further details refer to: Estimate at Completion (EAC) column - Project Work Plan
Security
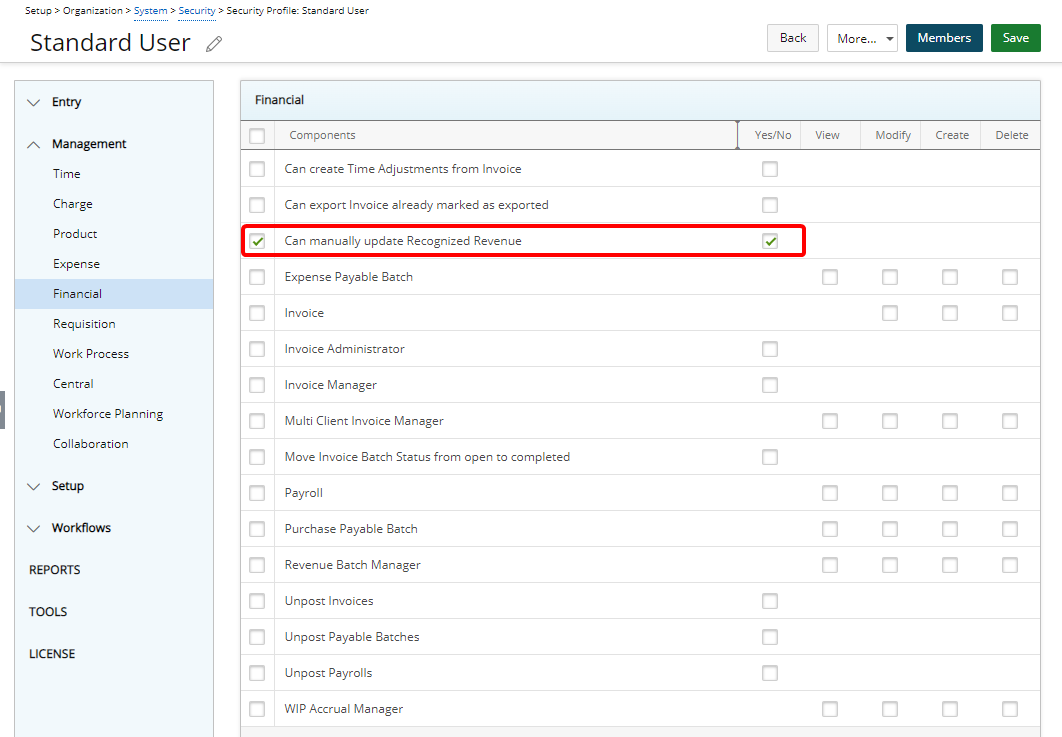
Description: Addition of Can manually update Recognized Revenue Security permission to Setup > Organization > System > Security > Security Profile > Management > Financial with Yes/No access right.
Note:
- Users must have the Modify right to the Financial Planner Grid Security permission.
- In the Financial Planner Template, the Display Recognized Revenue must be set to Manual.
- By default, the Can manually update Recognized Revenue Security permission is enabled (selected) for all Security Profiles.
Benefit: This security permission provides more precise control over who can modify the Recognized Revenue in the Financial Planner by allowing administrators to specify which Security Profiles have this ability.
For further details, refer to Granting the right to manually update Recognized Revenue.
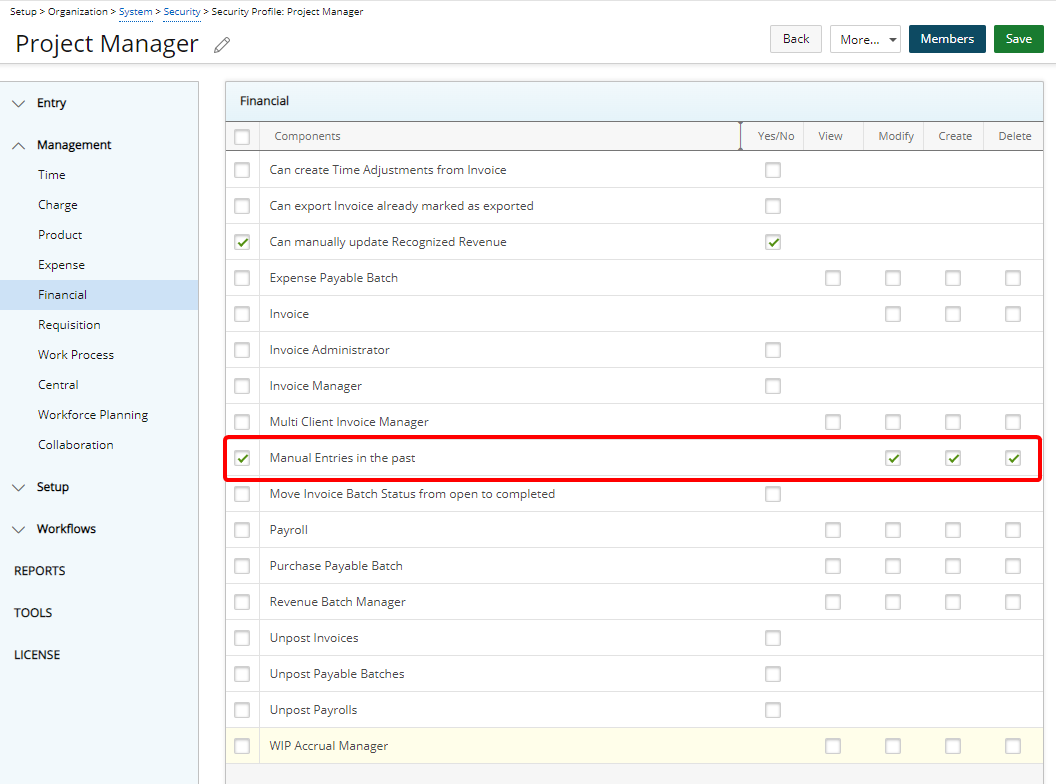
Description: Addition of Manual Entries in the past Security permission to Setup > Organization > System > Security > Security Profile > Management > Financial with Modify/Create/Delete access rights.
Note:
- Users must have the Modify right to the Financial Planner Grid Security permission.
- By default, the Modify/Create/Delete options to Manual Entries in the past are enabled (selected) for all Security Profiles.
Benefit: By limiting who can update manual entries in the past within the Project Financial Planner, you can now have greater control over who is able to alter sensitive data. This provides increased security and ensures that past data remains accurate and reliable.
For further details, refer to Granting access rights to the Manual Entries in the past.
Timesheet Manager
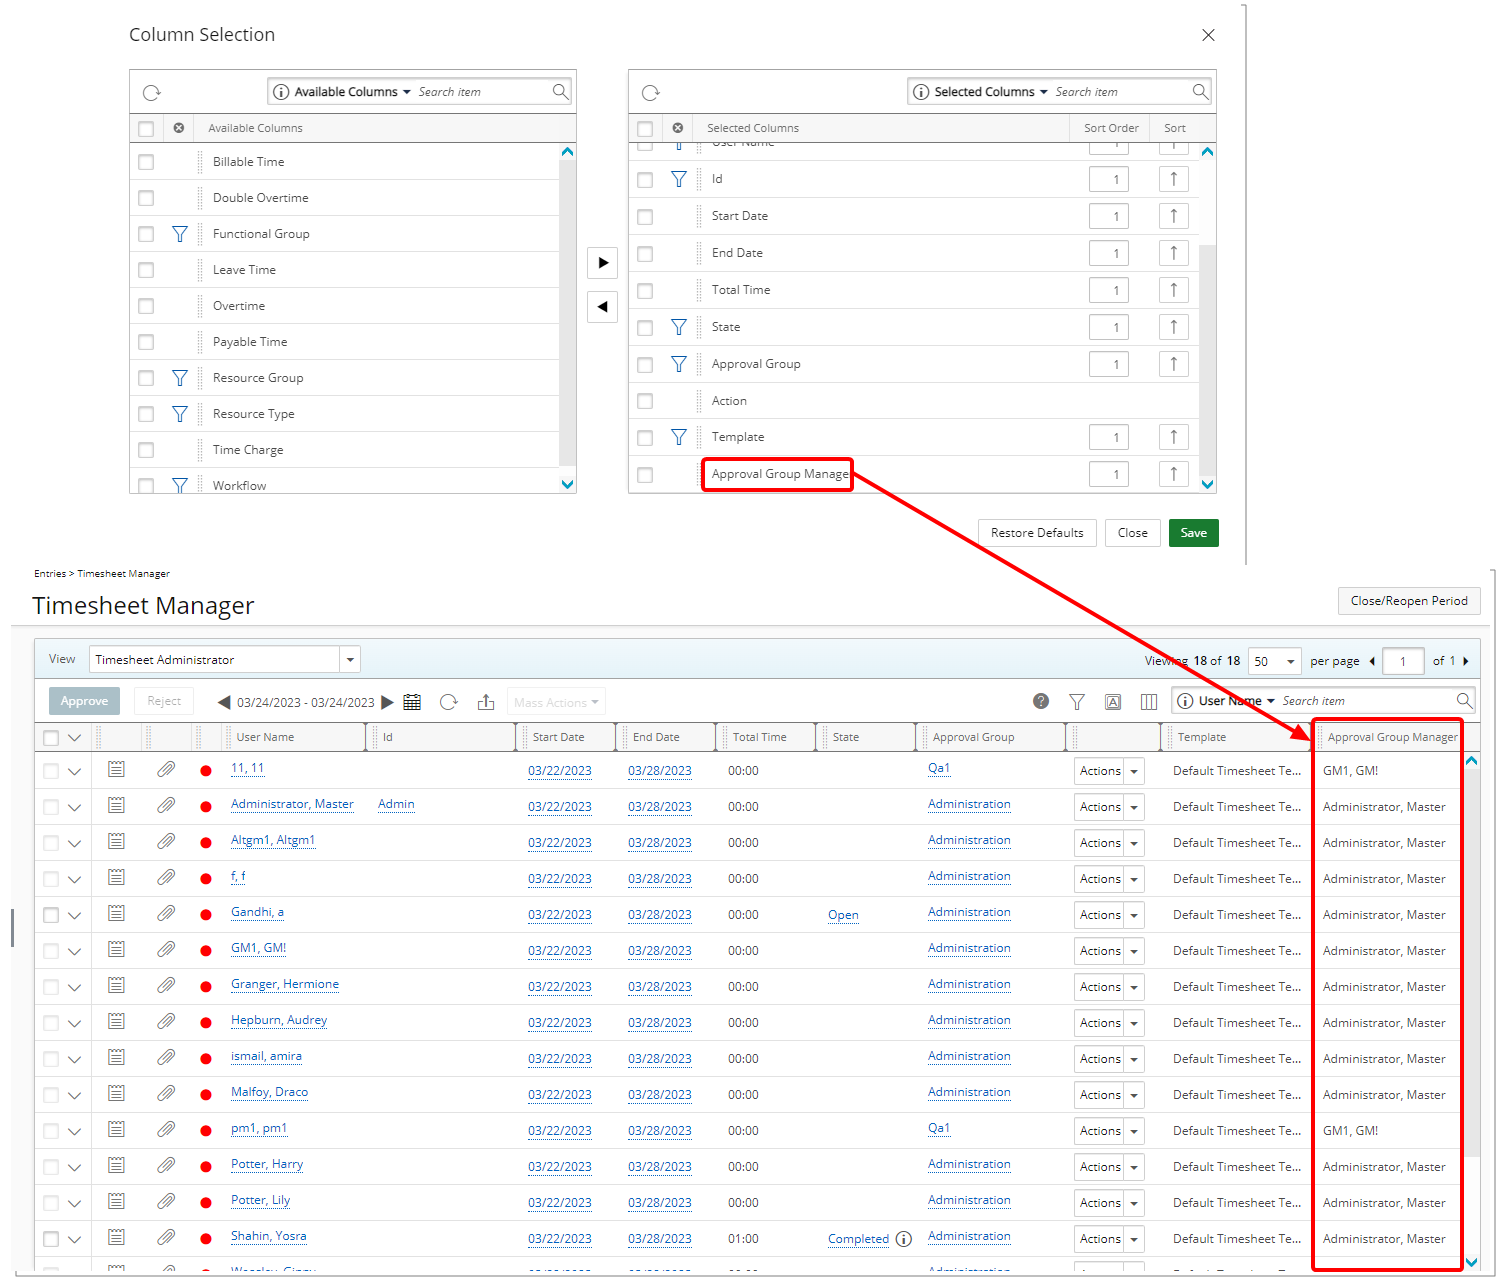
Description: The option to include the Approval Group Manager is now available from the Column Selection of Timesheet Manager.
If the Approval Group Manager is set to be Out Of Office in PSA, the Alternate Group Manager name will be displayed.
Note: For the Assigned Timesheet by Project View, the Approval Group Manager option is available for the Assigned Timesheets Column Selection only.
Benefit: With this addition, you can easily view the Approval Group Manager directly from the Timesheet Manager page.
For further details refer to: Timesheet Manager page | Available Views
Timesheet Templates
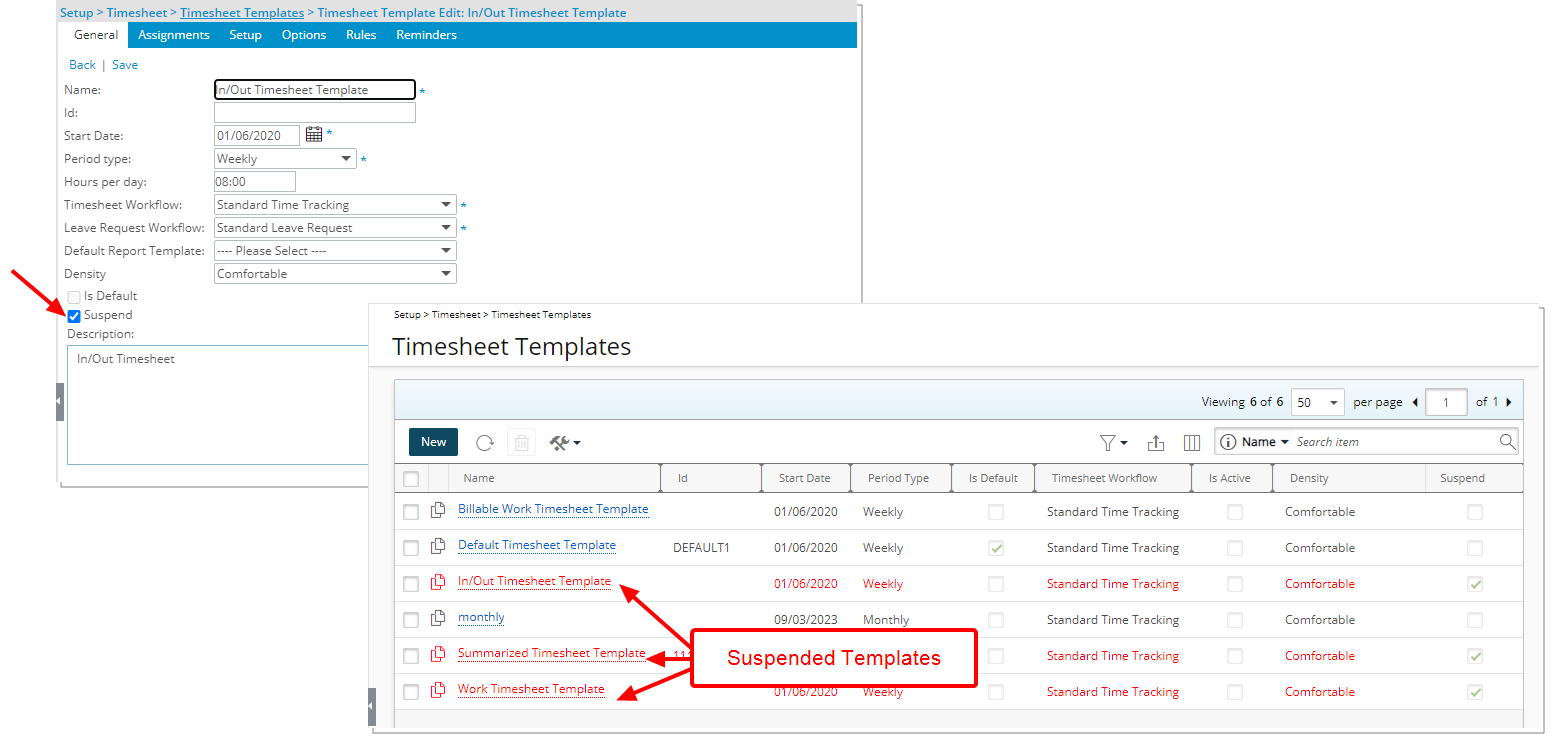
Description: The option to Suspend a Timesheet Template is now available from the General tab. When a template is suspended:
- You can no longer assign or modify an assignment as the Add and Edit buttons in the Assignments tab are no longer active.
- No new Timesheets can be created using a suspended Template.
- If you suspend a Template, any timesheet that was already been initiated, regardless of its current Workflow State, will continue to use the suspended template (A Timesheet instance is initiated when the Timesheet is accessed).
- Suspended templates are displayed in red within the Timesheet Templates list page.
- Suspended Templates are excluded from the list of templates within the Close/Reopen Period dialog box.
Furthermore, you can now Filter the list based on Active and Suspended Timesheet Templates.
Note:
- A Template with an Assignment End Date in the future cannot be suspended.
- The Default and Suspend settings are mutually exclusive.
Benefit: You can now mark any old or unused Timesheet Templates as suspended and easily identify them on the Timesheet Templates list page.
For further details refer to:
- Timesheet Template Edit page - General tab
- Suspending a Timesheet Template
- Timesheet Templates list page
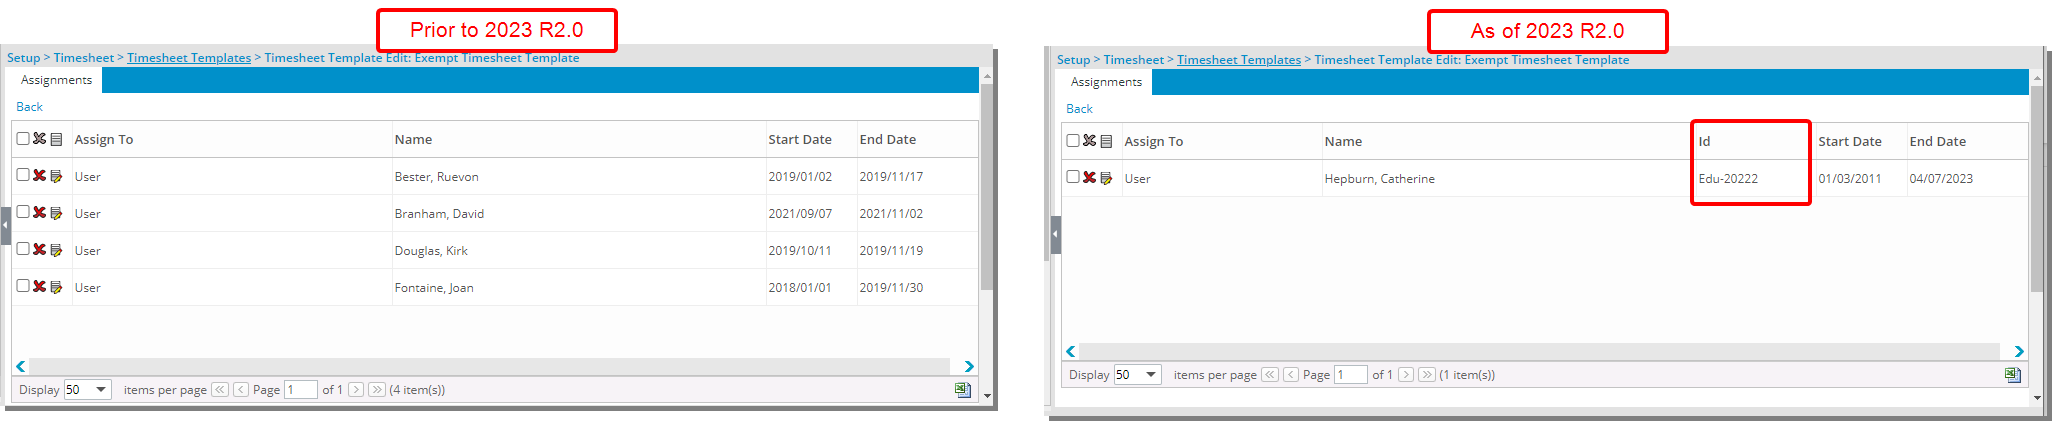
Description: The User ID is now also displayed within the Timesheet Exempt List page.
Furthermore, from the Add Template Assignment dialog box, upon accessing the Name list to choose a User, the ID is now also displayed in parentheses.
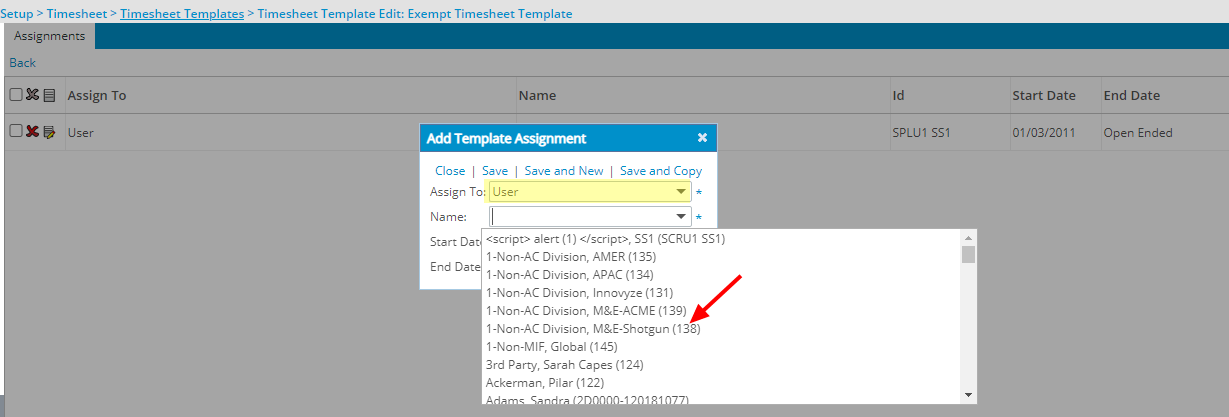
Benefit: You can now easily identify users by their ID when adding/removing, or when viewing the Timesheet Exempt List page as well as the Add Template Assignment dialog box.
For further details, refer to:
- Accessing the Exempt List page
- Assigning a User to the Exempt Timesheet Template
Upland Analytics
Description: The Project Allocation Booking Role Field is now available through the Project Scheduling Data Source.
Benefit: With this addition you can now have visibility to the Project Allocation Booking Role through your Upland Analytics Reports.
For further details, refer to Project Scheduling Data Source and related views.
Description: The following Fields were added to the User View of the Organization Data Source:
- User Payable Segment Code
- User Payable Account
- User Receivable Segment Code
- User Receivable Account
Moreover, these Fields were also added to the Project View of the Work Data Source:
- Project Payable Segment Code
- Project Payable Account
- Project Receivable Segment Code
- Project Receivable Account
Benefit: With this addition you can now have visibility to these fields through your Upland Analytics Reports.
For further details, refer to:
- Organization Data Source and related views
- Work Data Source and related views
Description: The following Views located under the Project Planning Data Source were renamed:
| Old View name | Current View name |
|---|---|
| Upp Assignment | Project Planner Assignment |
| Upp Baseline | Project Planner Baseline |
| Upp Dependency | Project Planner Dependency |
| Upp Schedule Item | Project Planner Schedule Item |
For further details, refer to Project Planning Data Source and related views.
Description: The User Payment Method Field is now available through the User View located within the following Data Sources:
- Assignment Budget
- Cost & Billing Rule Association
- Expense
- Expense Workflow History
- Financial
- In/Out Timesheet
- Invoice
- Invoice Entry Details
- Leave Time History
- Money Charge
- Organization
- Product
- Project Entry Details
- Project Planning
- Project Scheduling
- Resource Bookings
- Resource Request
- Skill Associations
- Task Scheduling
- Timesheet
- User Scheduling
- Work
Benefit: With this addition you can now have visibility to the User Payment Method Role through your Upland Analytics Reports.
Description: Addition of a new Project Rate Cards Data Source with these Views: Alternate Project Manager, Client, Project, Project Manager, Project Rate Card Currency, Project Team User Role, Project Team User Role Rate Association, Project Team Users, Rate Card, Rate Card Created By User, Rate Card Currency, Rate Card Item Role, Rate Card Items and Rate Card Modified By User.
Scoping is available for: All Projects, Available Projects, and My Projects.
Benefit: With the addition of the new Project Rate Cards Data Source, you now report on Project Rate Cards and Rate Card Items.
For further details refer to: Project Rate Cards Data Source and related Views
The newly added out-of-the-box Project Rate Cards reports in Upland Analytics (Upland Analytics > Dashboard & Reports > Project Rate Cards) allow you to have insight on Project Rate Cards as well as Rate Card Items. The following out-of-the-box Project Rate Cards reports are now available.
- Project Billing By Category: A Report detailing the Project Name, Project Code, Category, Role, User Name, Entry Date Month, Reg Hrs, OT Hrs, DOT Hrs, Reg Rate, OT Rate, DOT Rate, Billing Amount, Currency and Document Date. The report is filtered by Invoice Entry Type and Project.
- Project Billing By Resource: A Report detailing the Project Name, Project Code, User Name, Role, Category, Entry Date Month, Reg Hrs, OT Hrs, DOT Hrs, Reg Rate, OT Rate, DOT Rate, Billing Amount, Currency and Document Date. This report is filtered by Invoice Number, Project and User Name.
- Project Billing By Role: A Report detailing the Project Name, Project Code, Role, Category, Entry Date Month, Reg Hrs, OT Hrs, DOT Hrs, Reg Rate, OT Rate, DOT Rate, Billing Amount, Currency and Document Date. This report is filtered by Invoice Number, Project and User Name.
- Project Rate Cards: A Report detailing the Project Name, Project Code, Rate Card Name, Rate Currency, Rate Card Start Date, Rate Card End Date, Rate Card Role, Regular Rate, Overtime Rate and Double Overtime Rate. This report is filtered by Client, Project and Project Manager Last Name.
- Project Rate History by Resource: A Report detailing the Project Name, Project Code, Resource Name, Resource Role, Role Start Date, Role End Date, Rate Card Name, Rate Card Start Date, Regular Rate, Overtime Rate and Double Overtime Rate. This report is filtered by Project and Project Team User Name.
- Project Rate History by Role: A Report detailing the Project Name, Project Code, Rate Currency, Rate Card Role, Rate Card Start Date, Rate Card End Date, Regular Rate, Overtime Rate and Double Overtime Rate. This report is filtered by Project and Rate Card Item Role.
- System Rate Cards: A Report detailing the Report Rate Card Name, Rate Card Id, Currency, Created By, Created On, Modified By, Modified On, Role, Regular Rate, Overtime Rate and Double Overtime Rate. This report is filtered by Rate Card Name and Rate Card Created By User Name.
Note: The out-of-the-box Project Rate Card Reports are by default only shared with the Master Administrator Security Profile.
For further details, refer to Upland Analytics Out-of-the-Box Project Rate Cards Reports.
Description: The new Project Team Role View has been added to the Invoice Entry Details Data Source allowing you to report on these Fields:
- Project Team Role
- Project Team Role Description
- Project Team Role Id
- Project Team Role Is Active
For further details, refer to Invoice Entry Details Data Source and related views.
User Defined Fields
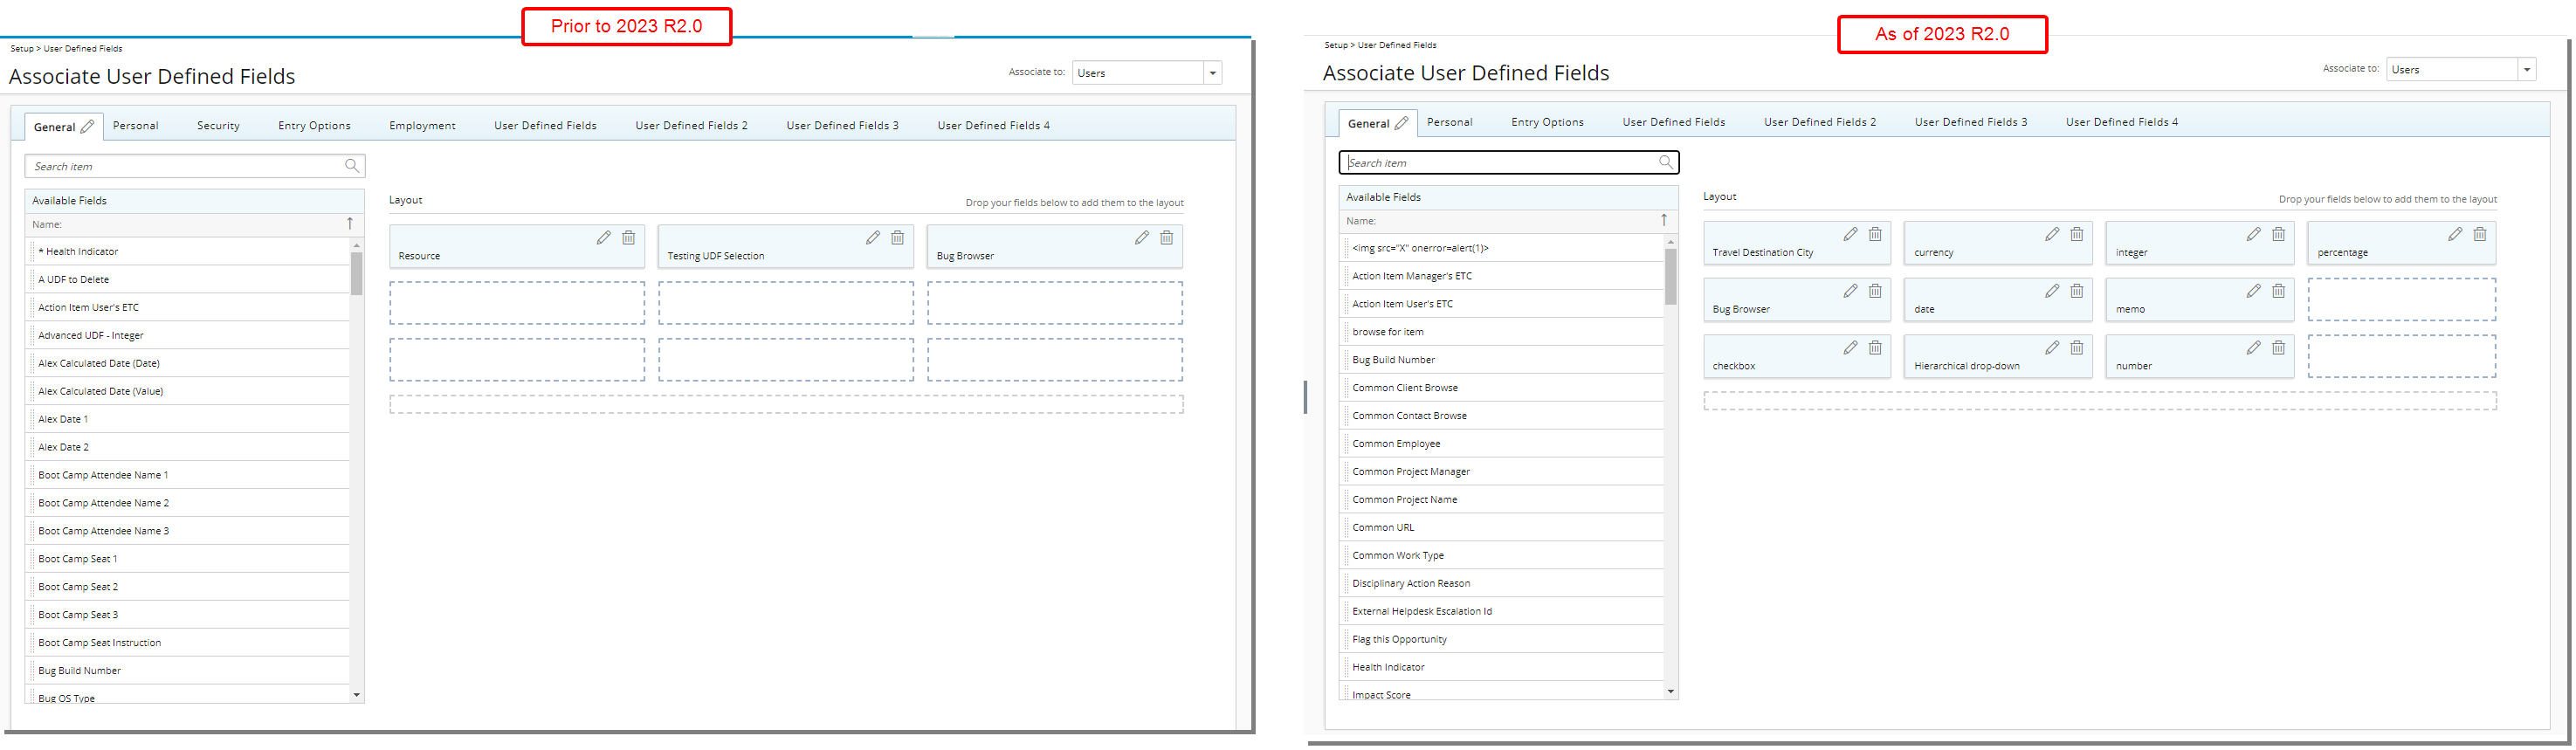
Due to the User Edit renovation, certain tabs were either removed or relocated. Consequently, the User Defined Fields (UDFs) that were associated within these tabs have also been relocated.
The Security and Employment UDF tabs are no longer available. Upon upgrading, all UDFs that were previously associated within these tabs will be moved to the General tab.
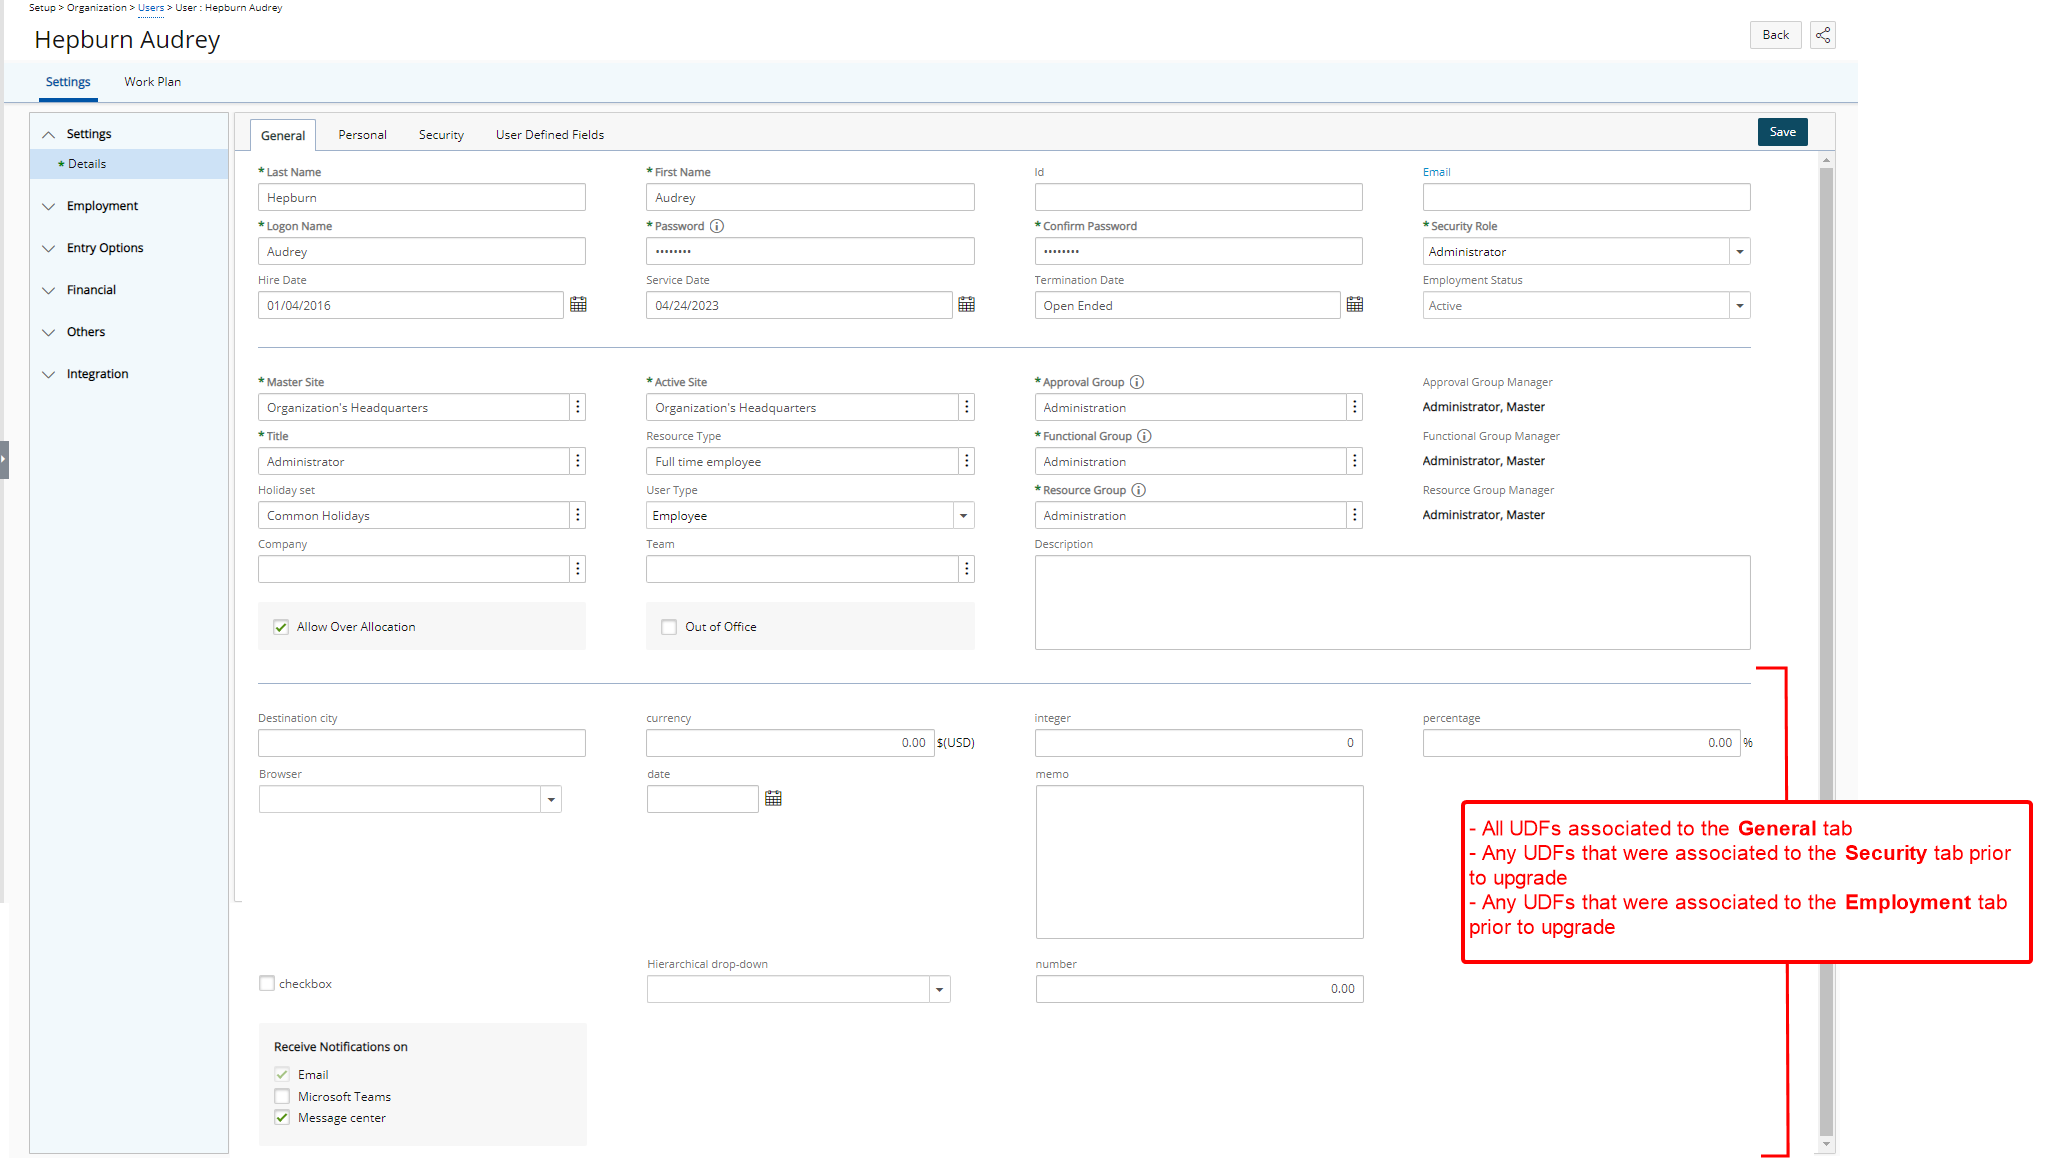
They will be displayed below any other UDFs that were already associated with the General tab when editing a User.
User Experience Enhancements
The improved tables, buttons, options, Dialog Boxes, Icons and Search all fall in line with the upgraded standards that have already been applied on several pages during the recent releases to enhance user experience and establish consistency across the application.
Although most of the features remain the same, the appearance and usability have been significantly improved to enhance your overall experience.
Client Edit Renovation (TE-87590, TE-87917, TE-88425, TE-89887, TE-5777)
The Client Edit pages are now structured in the same familiar format already in use in other areas of the application. Although most of the features remain the same, the appearance and usability have been significantly improved to enhance your overall experience.
For further details refer to: Configuring Clients (WBS)
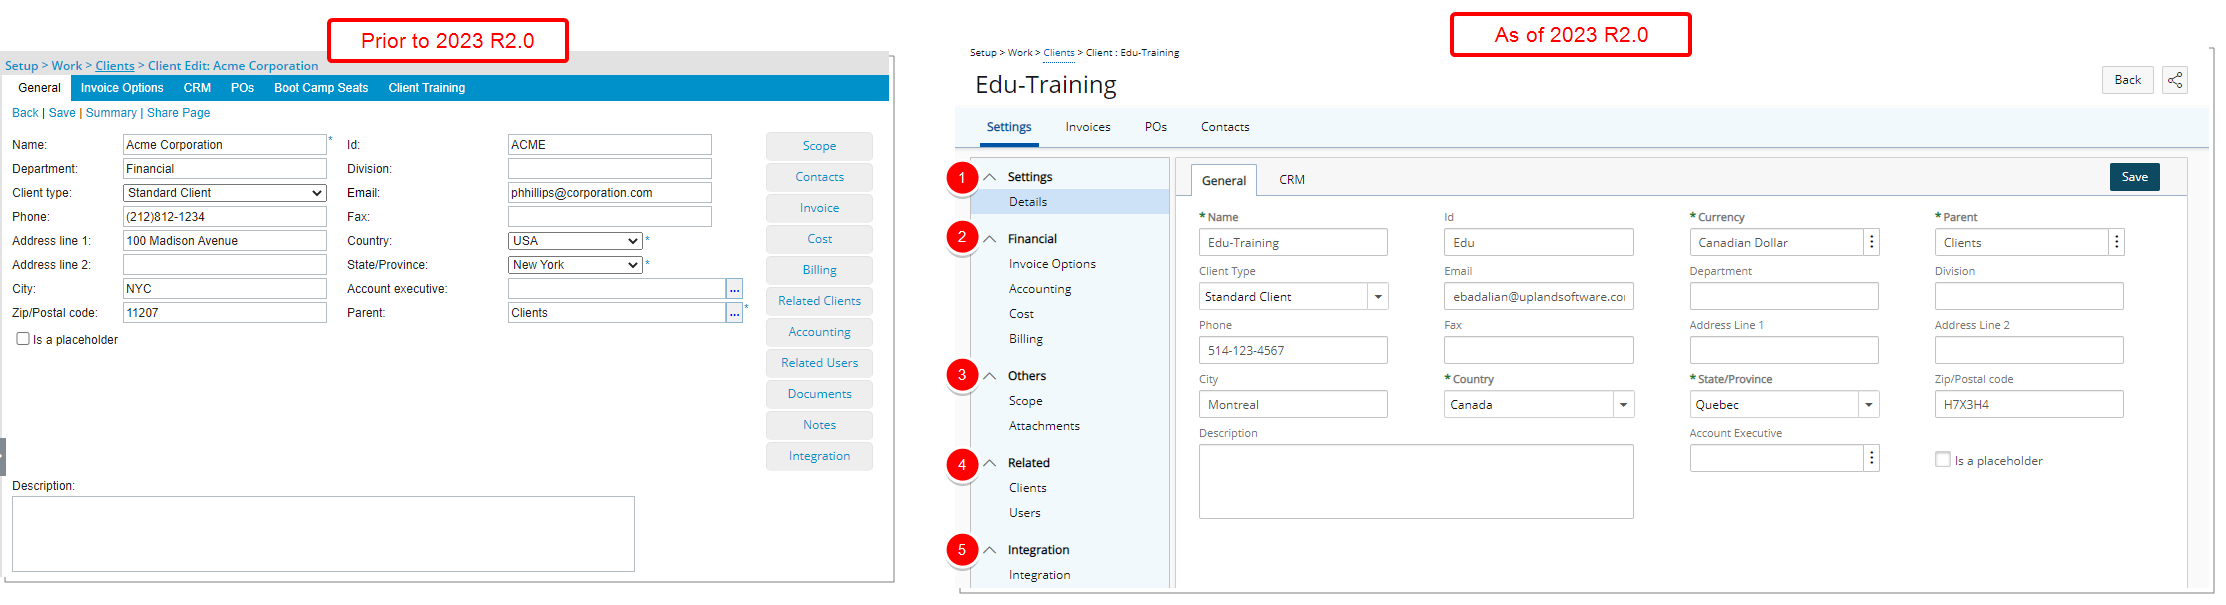
Description: The interface for creating and editing a Client has been revamped with an upgraded look and a new navigation. The new left hand side navigation is broken down into five major sections; Settings, Financial, Others, Related and Integration each of which are further broken down into components. From the tab navigation you can access related/associated objects such as Client Invoices, POs and Contacts.
When creating a new client, the only visible navigation item is Details with the General, CRM and any available UDF sub tabs. Once the minimum required information for creating a client are entered, upon clicking Save, the page will refresh and show all the other client elements that can be completed.
- Under the Settings section, you can find the Details.
- Under the Financial section, you can find the Invoice Options, Accounting as well as Cost and Billing components of your client.
- Under the Others section, you can find the Scope, and Attachments.
- Under the Related section, you can find the Clients and Users related to your Client.
- From the Integration section, you can set up the integration with various third-party applications.
With these overall modifications, the look and feel are further improved and the layout of various elements within the page supports the unified experience across PSA further elevating the user experience.
Furthermore, improvements have also been made to the following pages:
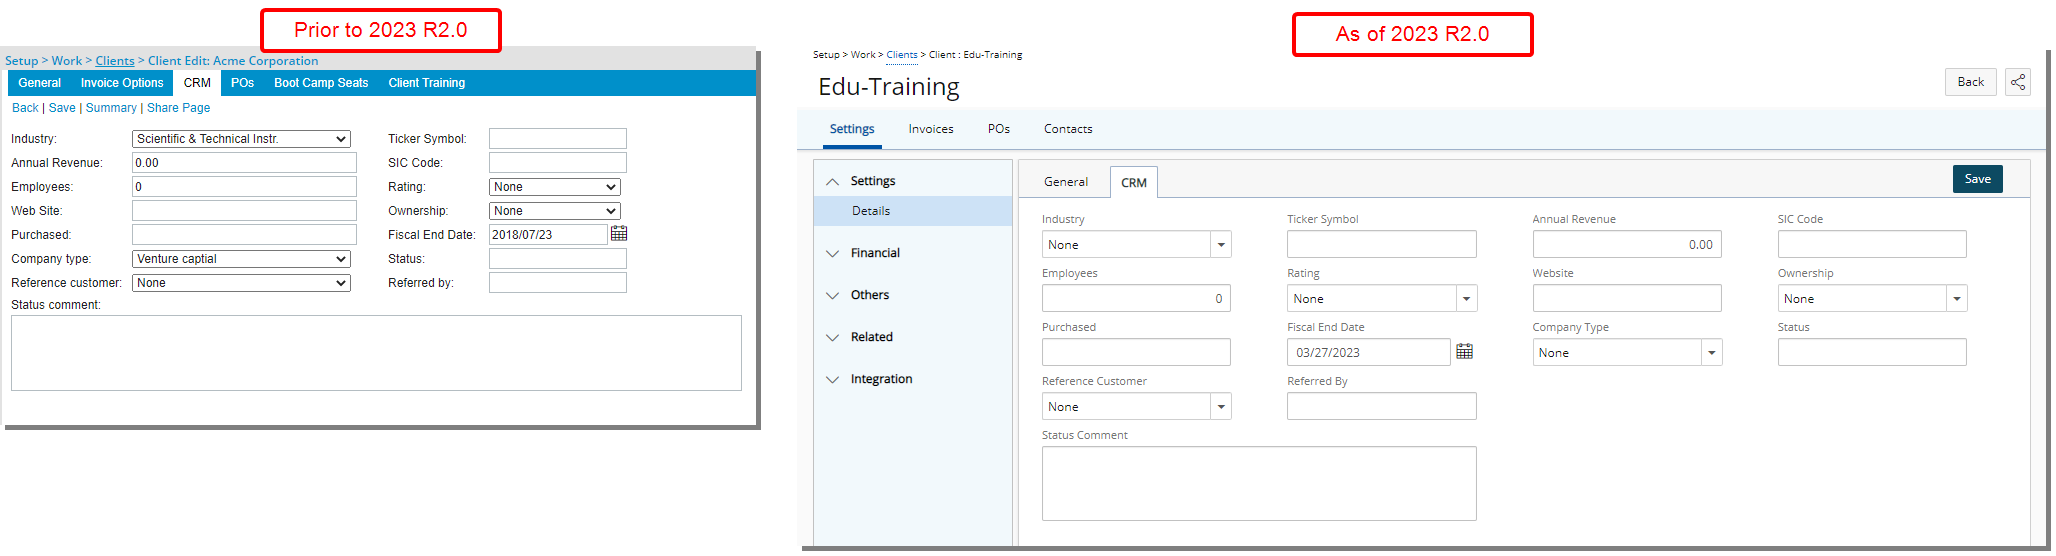
The CRM page (Setup > Client > Client Edit > Settings > Details) was redesigned for a better user experience. Most of the features remain the same, however the look and feel have been renovated to enhance the overall user experience.
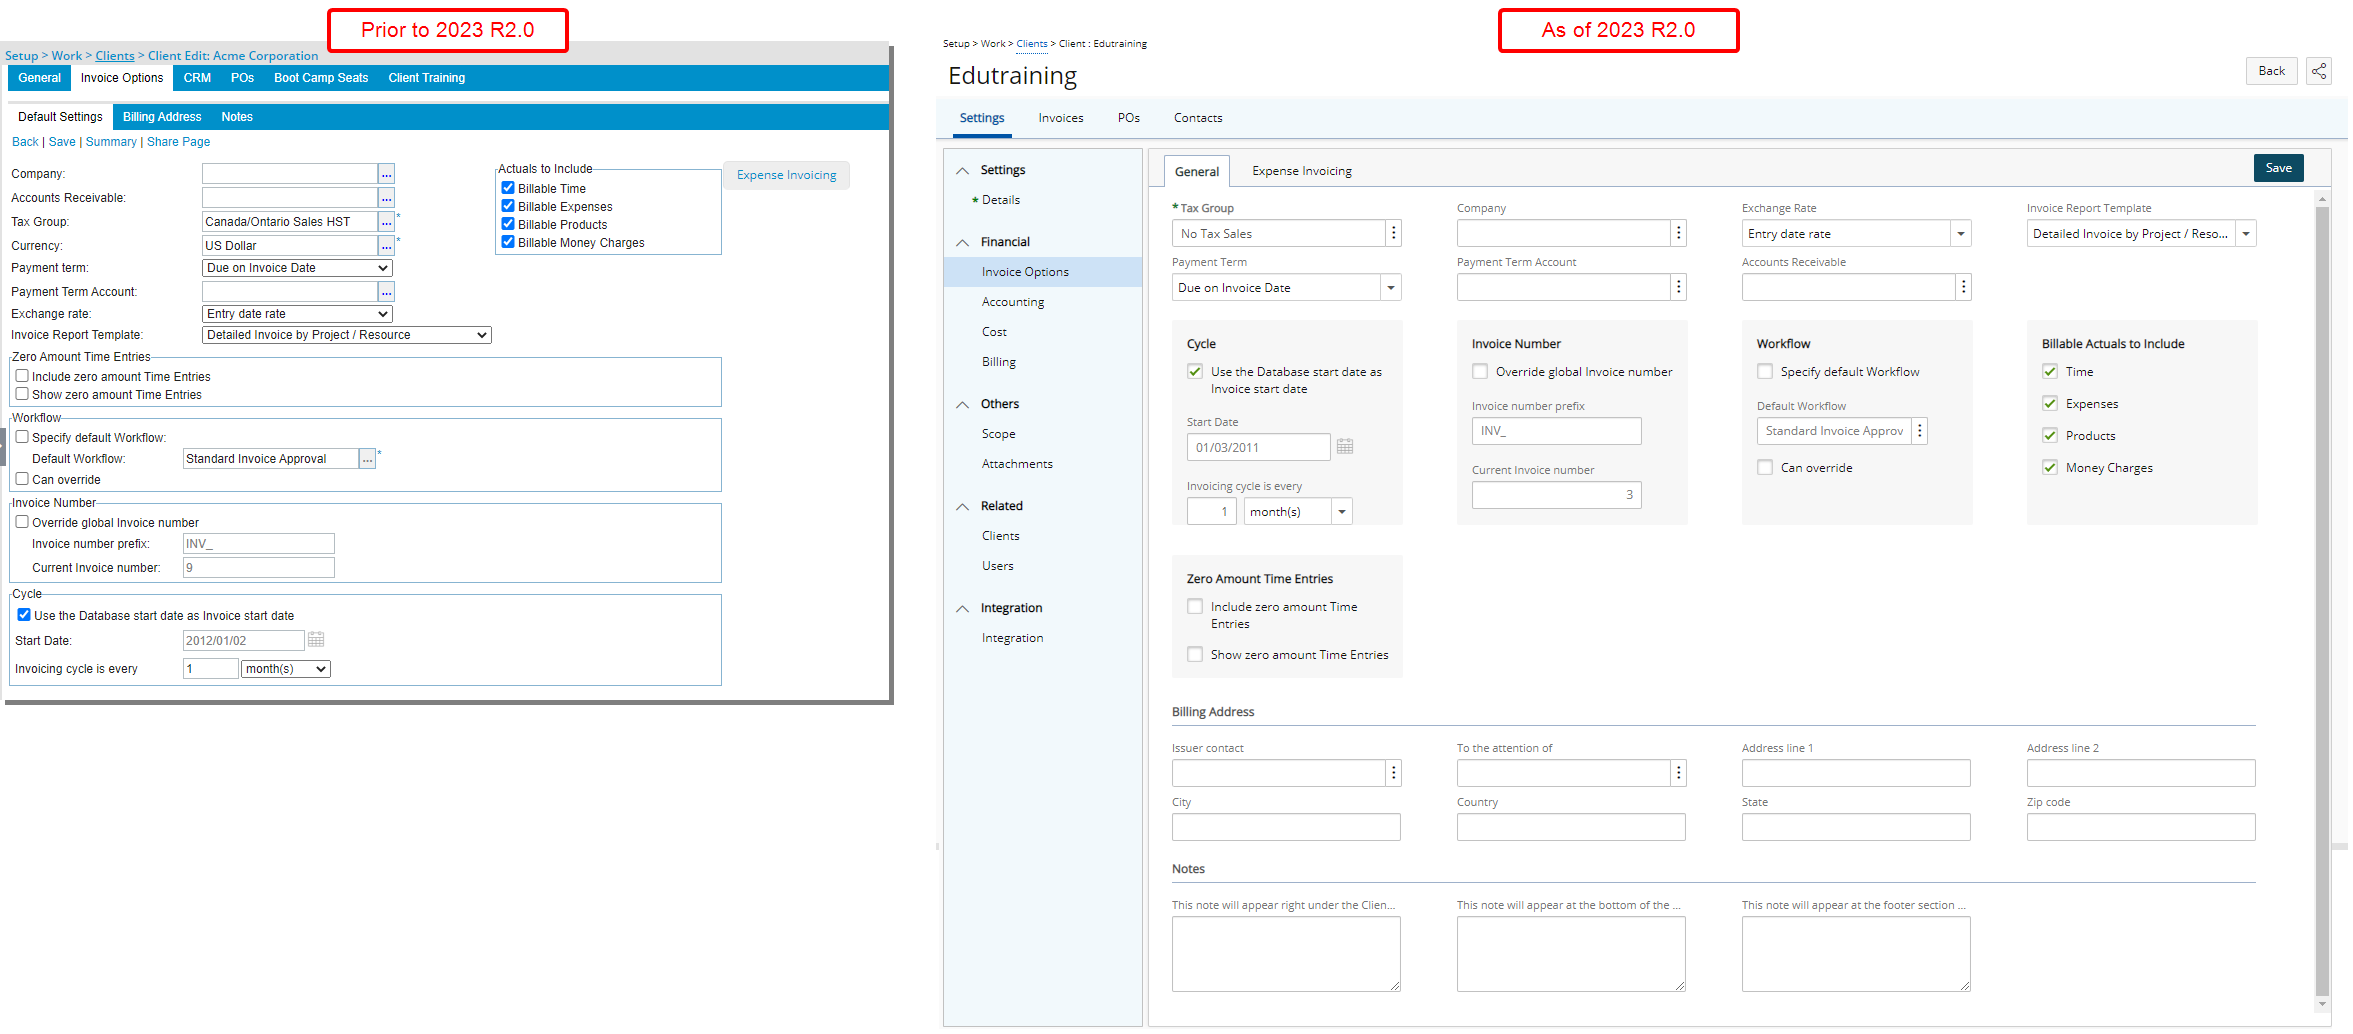
The Invoice Options page (Setup > Client > Client Edit > Financial > Invoice Options) was redesigned for a better user experience. Most of the features remain the same, however the look and feel have been renovated to enhance the overall user experience.
Furthermore, the Billing Address as well as Notes sub-tabs have now been merged into the General tab of Invoice Options. Improving the user experience by reducing the click-through.
Note: The Currency field, previously available from Invoice Options is now located under the General tab of Client Details (Settings > Details > General tab).
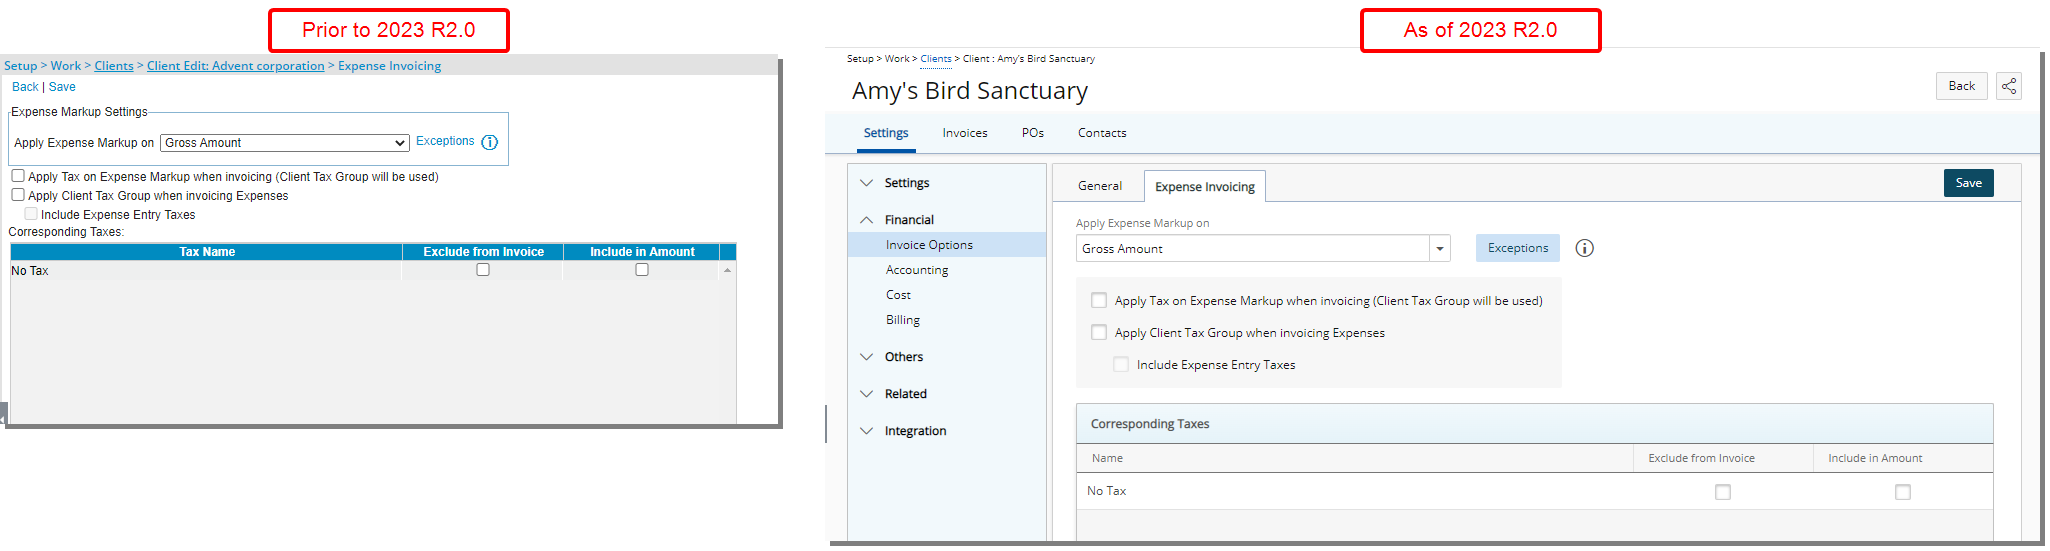
The Expense Invoicing options page was redesigned for a better user experience. Most of the features remain the same, however the look and feel have been renovated to enhance the overall user experience.
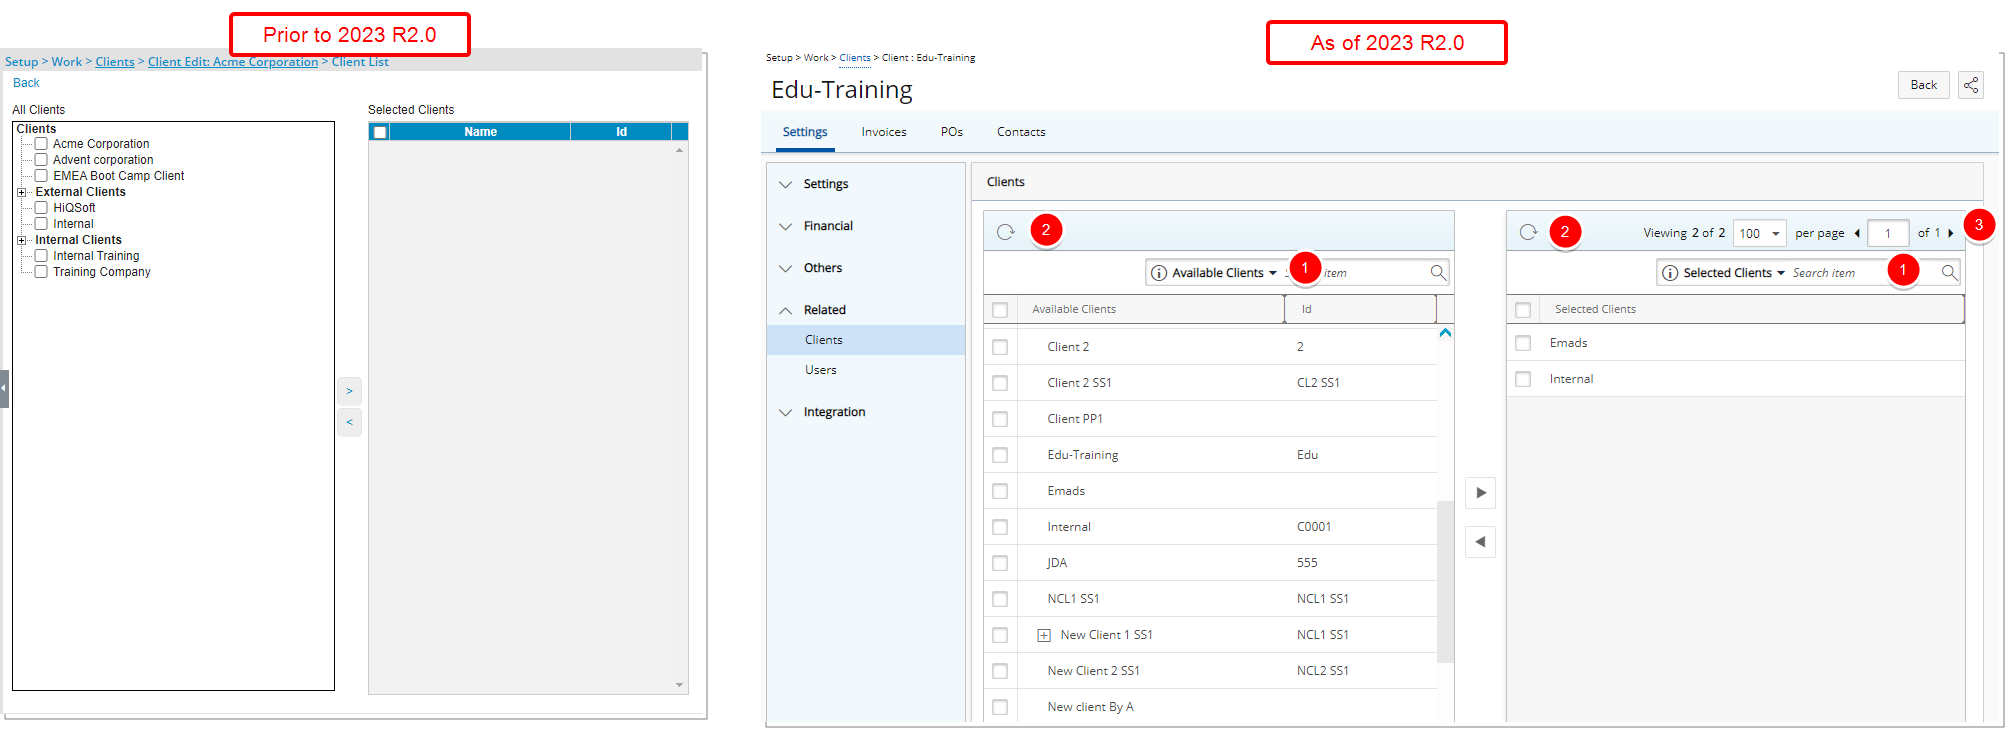
The layout of the Related Clients page, under Client Edit, has been improved for better user experience and consistency with the other updates that have been made thus far.
In addition to the improvements made to the spacing, colors, positioning, buttons, icons and fonts you can now:
- Search the Available Clients table based on Available Clients name and Id and Selected Clients table based on Selected Clients name.
- Refresh the lists.
- Change the number of Selected Clients displayed per page and view next / previous pages using the Pagination.
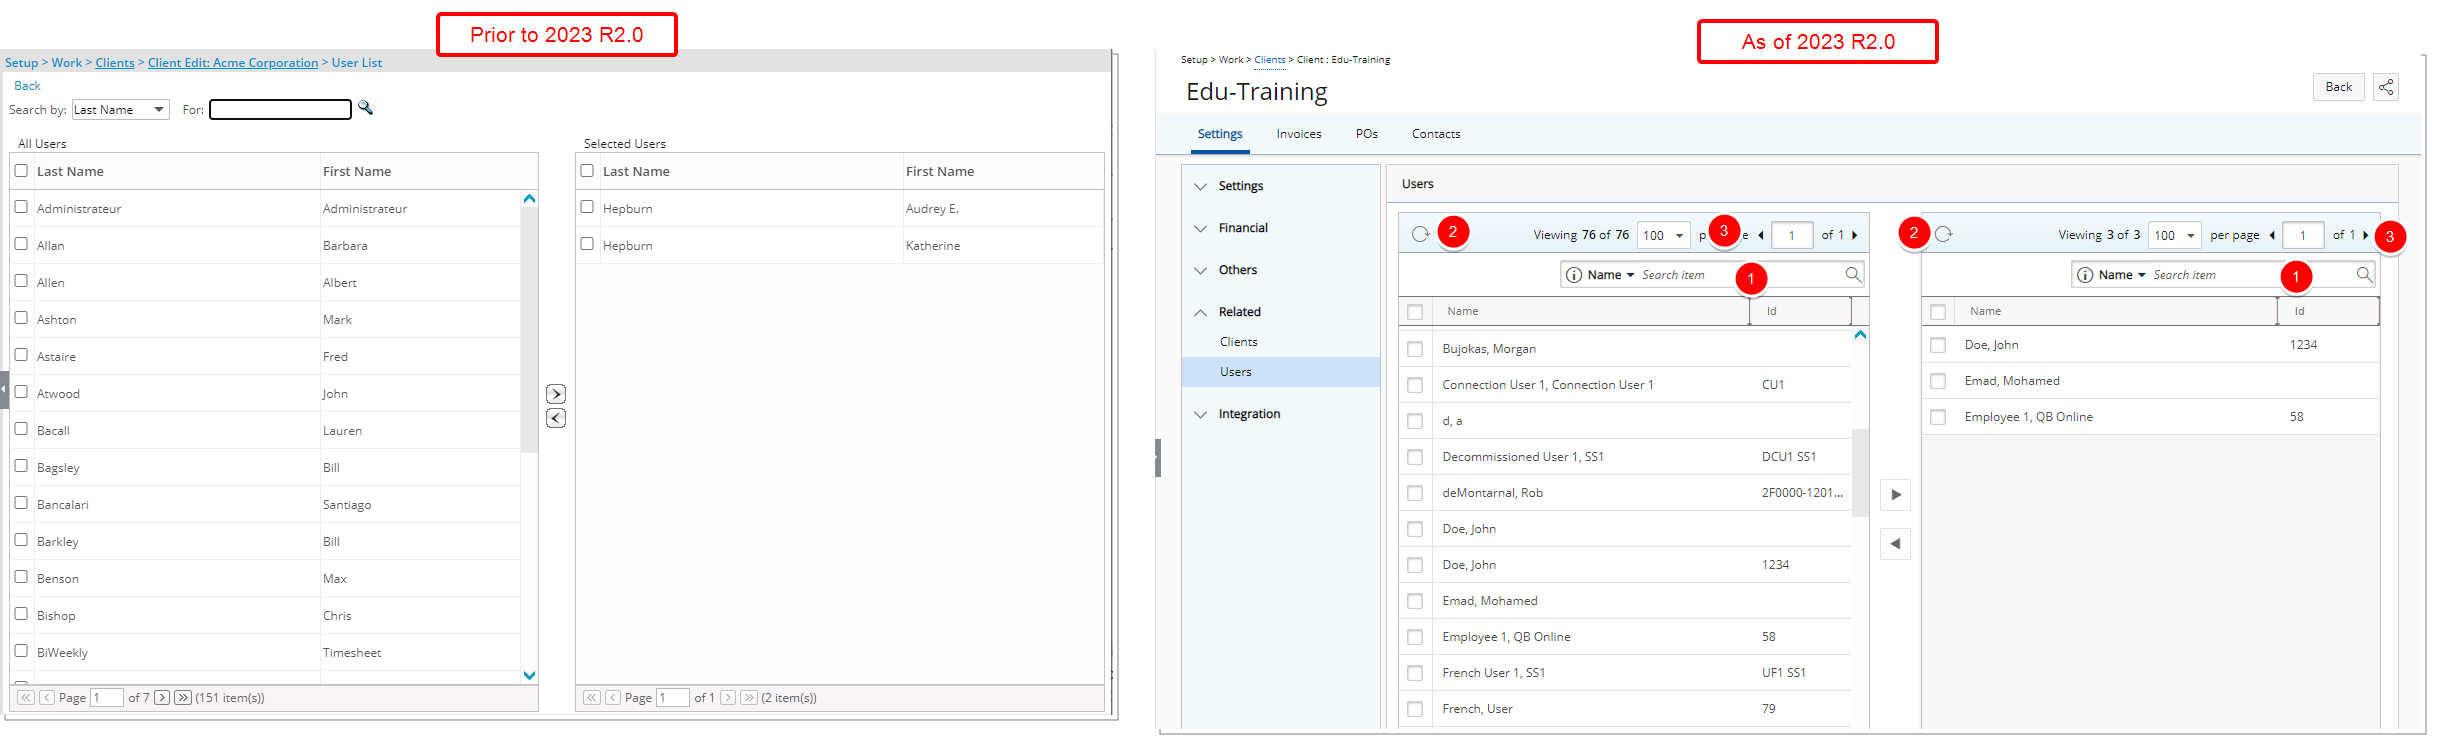
The layout of the Related Users page, under Client Edit, has been improved for better user experience and consistency with the other updates that have been made thus far.
In addition to the improvements made to the spacing, colors, positioning, buttons, icons and fonts you can now:
- Search the available or selected users table based on Name and Id.
- Refresh the lists.
- Change the number of Selected Users displayed per page and view next / previous pages using the Pagination.
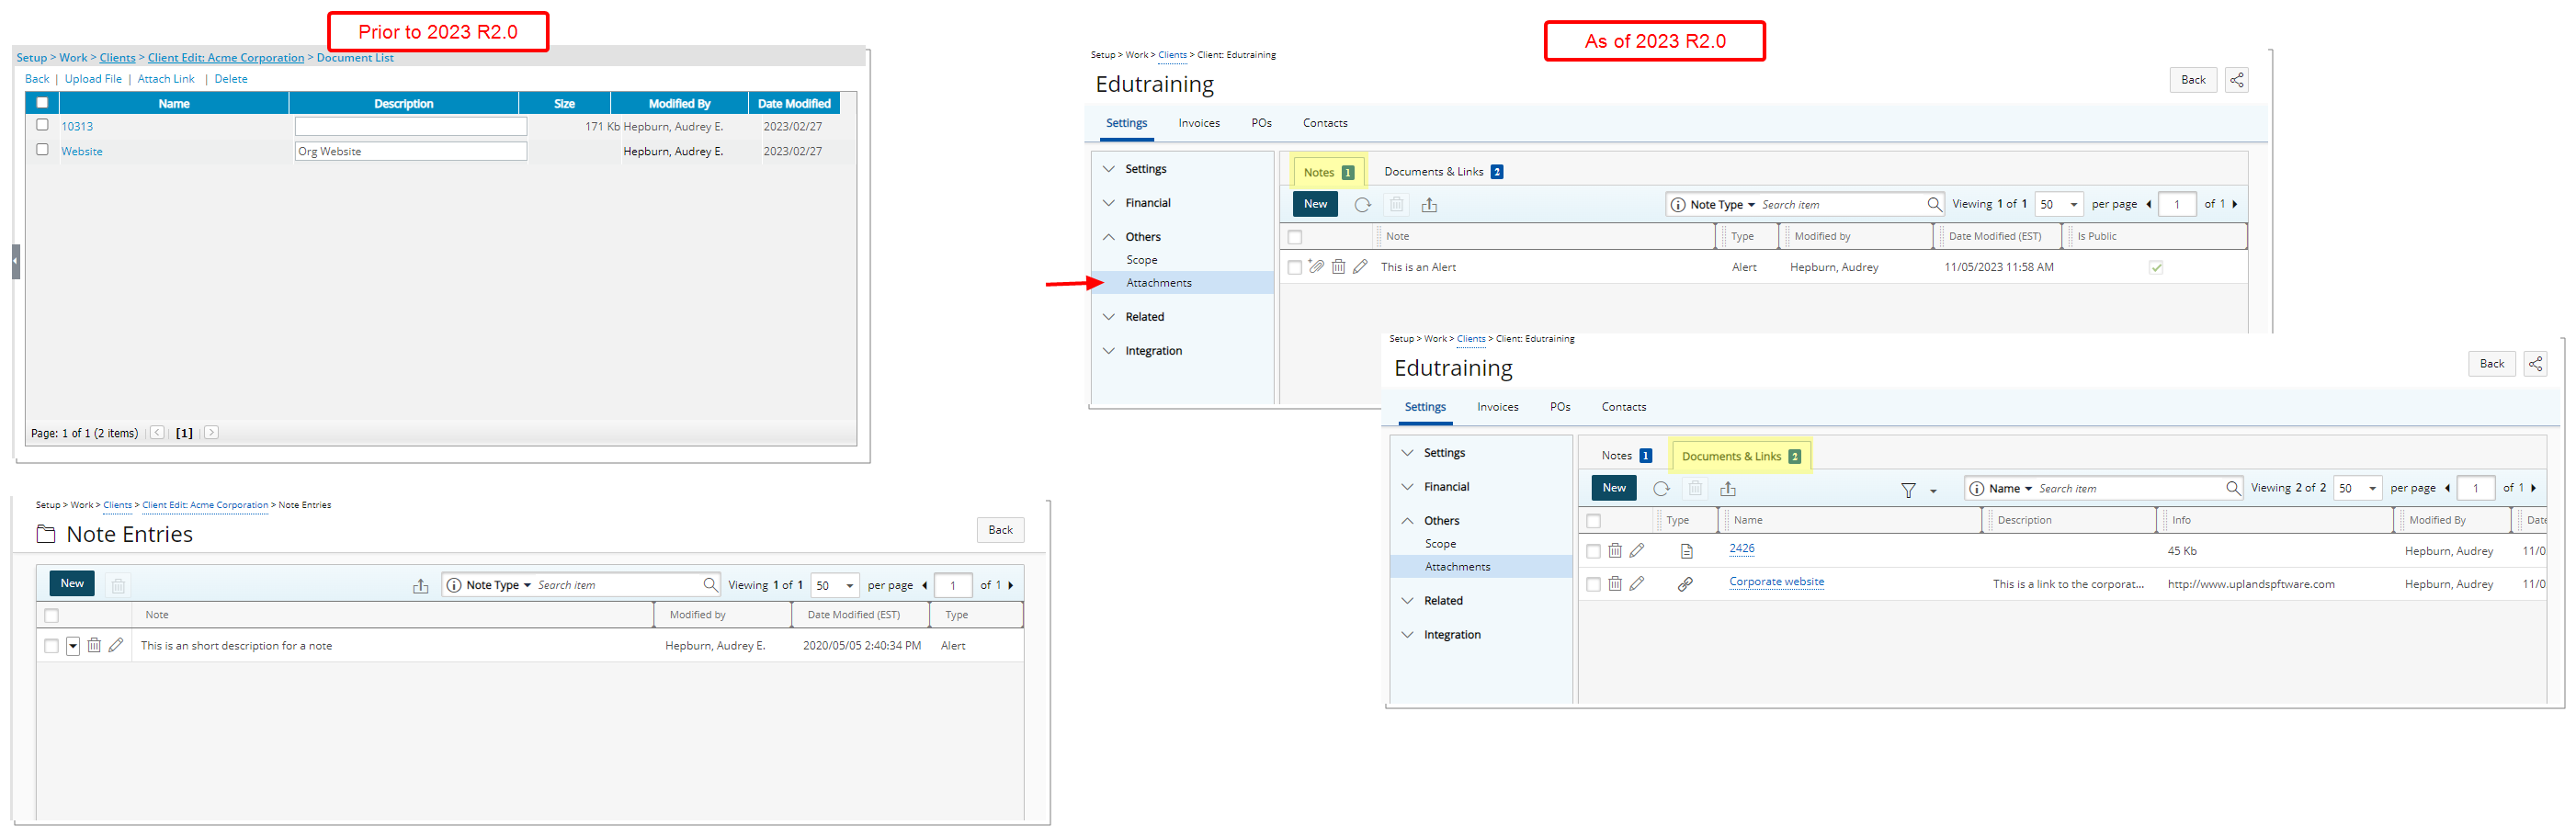
Improvements have been made to the management of Documents and Notes when modifying a Client for better user experience and consistency with the other updates that have been made thus far.
In previous releases, Documents and Notes were managed from separate pages. As of this release, the Documents and Notes pages are now merged into the familiar Attachments page accessed through the Others section of the Client Edit navigation.
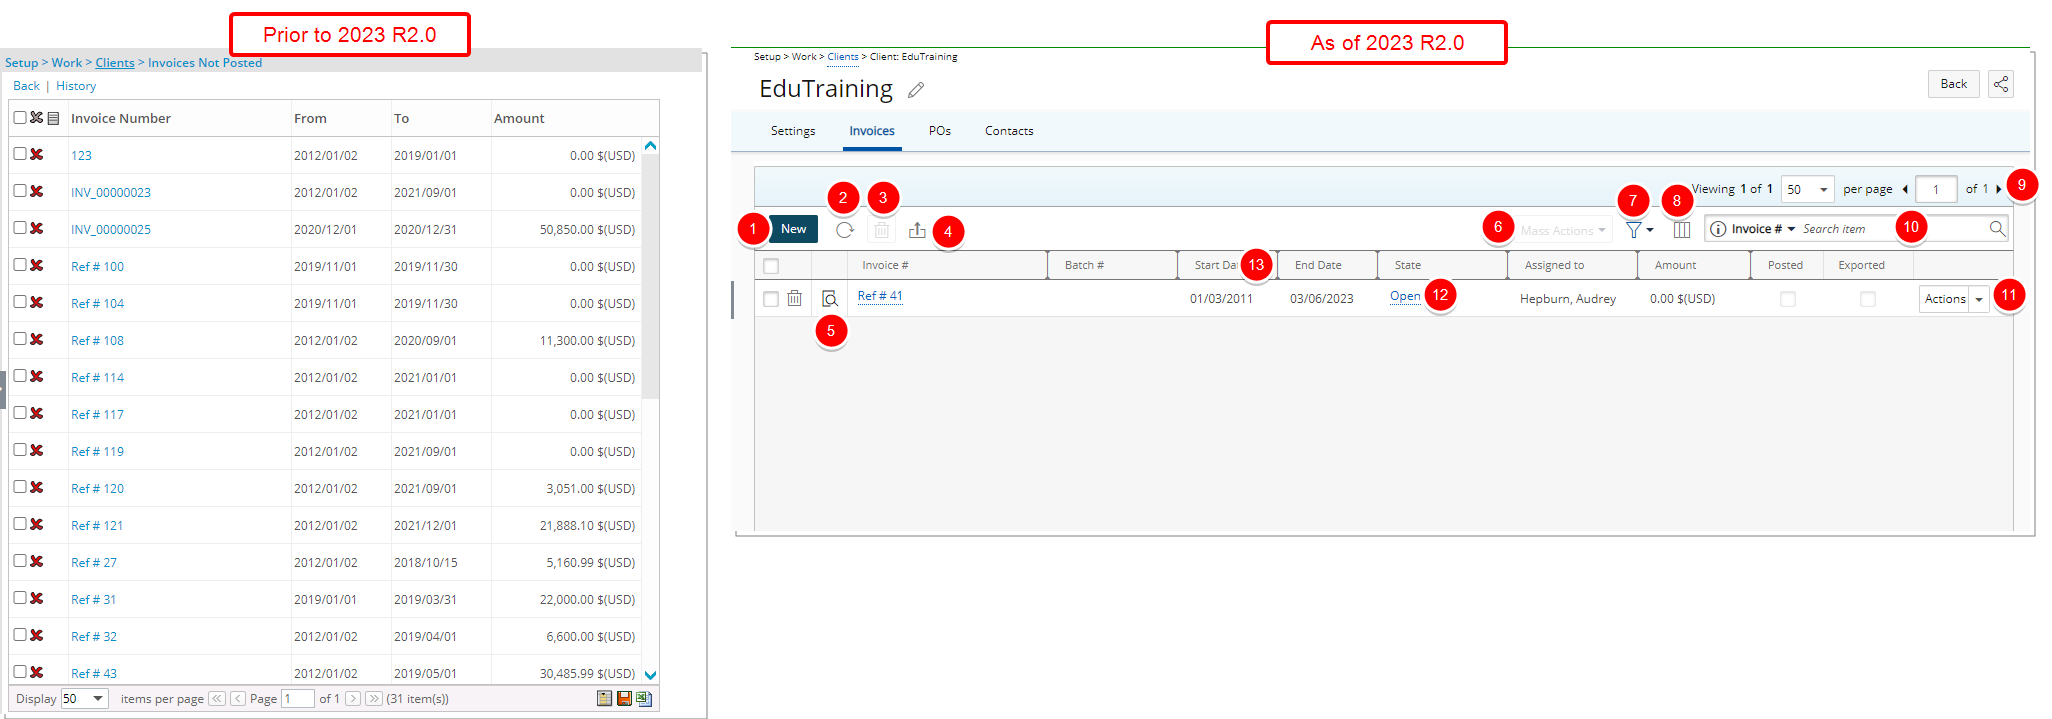
The user interface of the Invoices list page (Setup > Client > Client Edit > Invoices) has been improved for better user experience and consistency with the other updates that have been made thus far.
The following enhancements have also been made:
- The create New icon has been converted to a button and is now located in the header area.
- Click the newly added Refresh button to refresh the list.
- The Delete icon has been converted to a button and is now located in the header area.
- The Export to Excel button is moved to the header area.
- You can now Preview
 an Invoice directly from the list.
 - Select multiple invoices that are in the same State to perform Mass Actions such as: Approve, Reject or Submit
- Filter the page based on Posted/Not Posted invoices.
Note: Not Posted is selected by default.
- The Column Selection capability is now located on the table header area: By default, the following columns are displayed: Preview, Invoice #, Batch #, Start Date, End Date, State, Assigned to, Amount, Posted, Exported and Action. You can choose to include these columns: Created by, Document Date, Expenses, Money Charges, Products, Services, Total Taxes and Workflow.
- Pagination is available at the top right corner to facilitate easy navigation across multiple pages.
- Addition of “contains in” logic Search capability, with the following search criteria: Invoice #, Batch #, State, Assigned to, Workflow, Date, Project and User.
- From the Actions column you can now action on a single invoice.
- View the Workflow State of the invoice and access the Assignments.
- From the table header:
- You can easily sort the columns by ascending or descending order simply by clicking a column header. Note that an arrow indicates the descending (
 ) or ascending (
 ) order applied to the column.
 - You can now dynamically resize column(s), to your preferred width. Simply move your cursor to the column boundary you want to resize. When the cursor becomes a resize cursor, click and drag the column accordingly.
- You can easily sort the columns by ascending or descending order simply by clicking a column header. Note that an arrow indicates the descending (
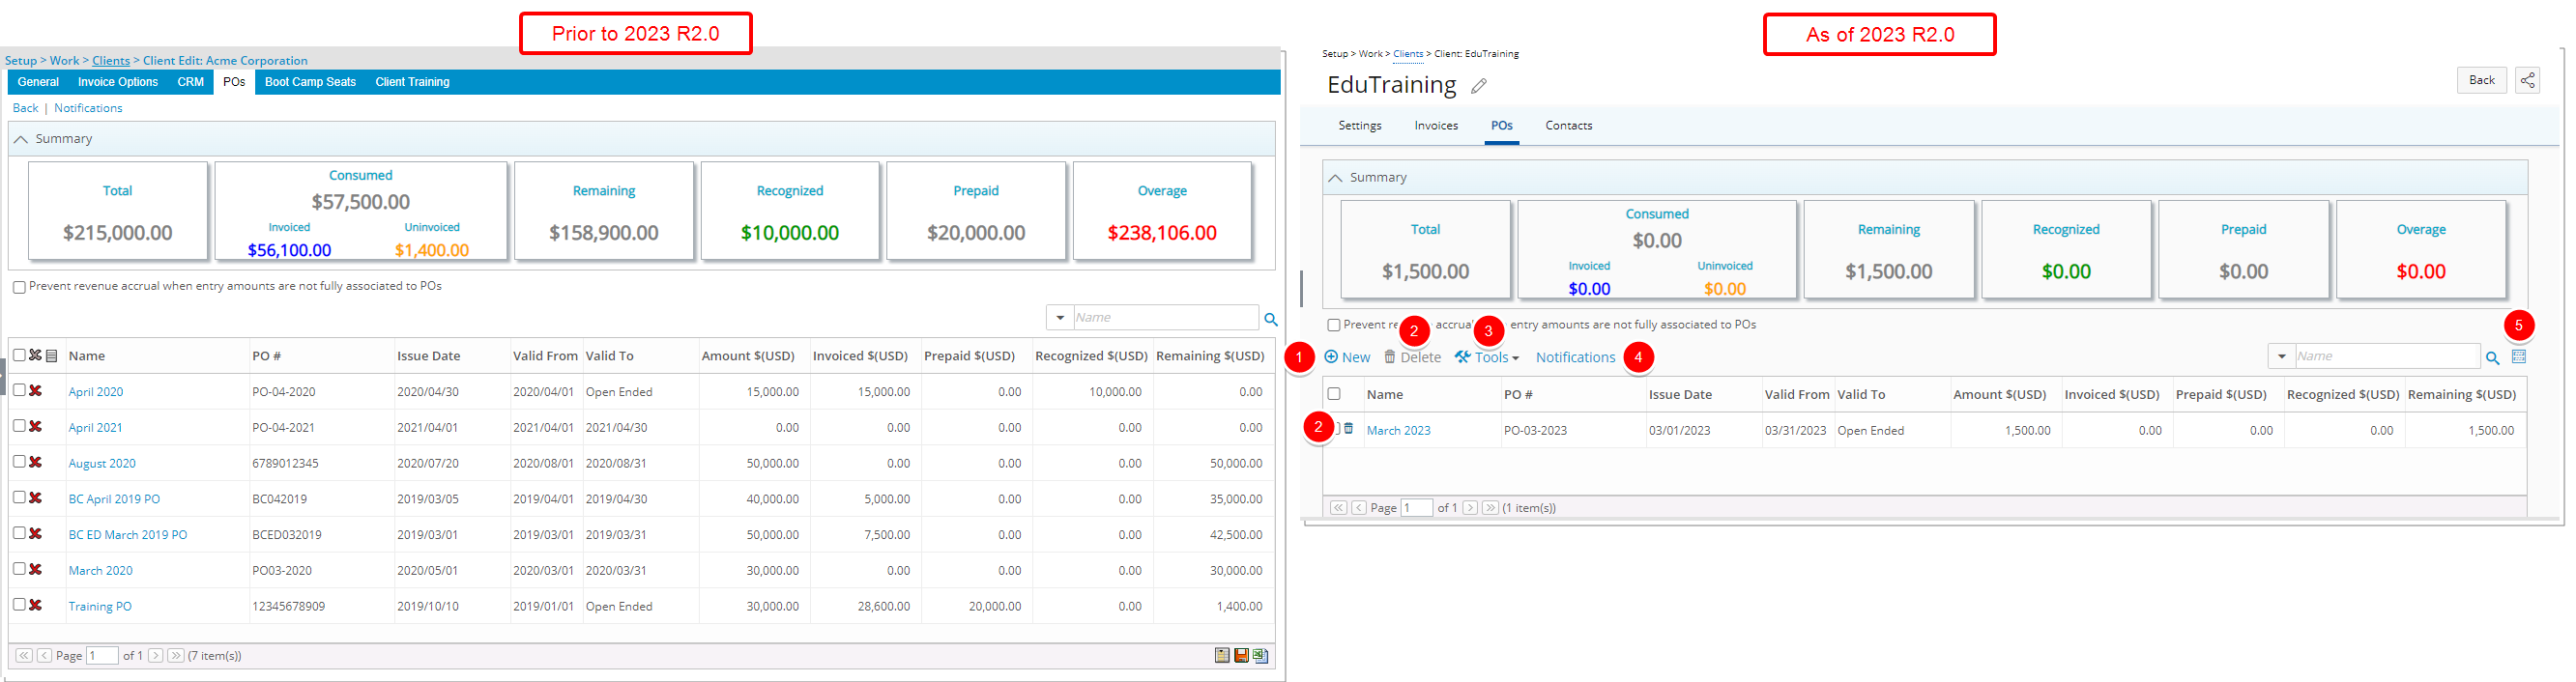
The following enhancements have been made to the Client POs page:
- Updated and repositioned New button.
- Updated and repositioned Delete button.
- Addition of Tools context menu from where you can Export the list to Excel.
- The Notifications link has been moved just above the POs table.
- The Column Selection button is updated and moved to the left of the Search bar.
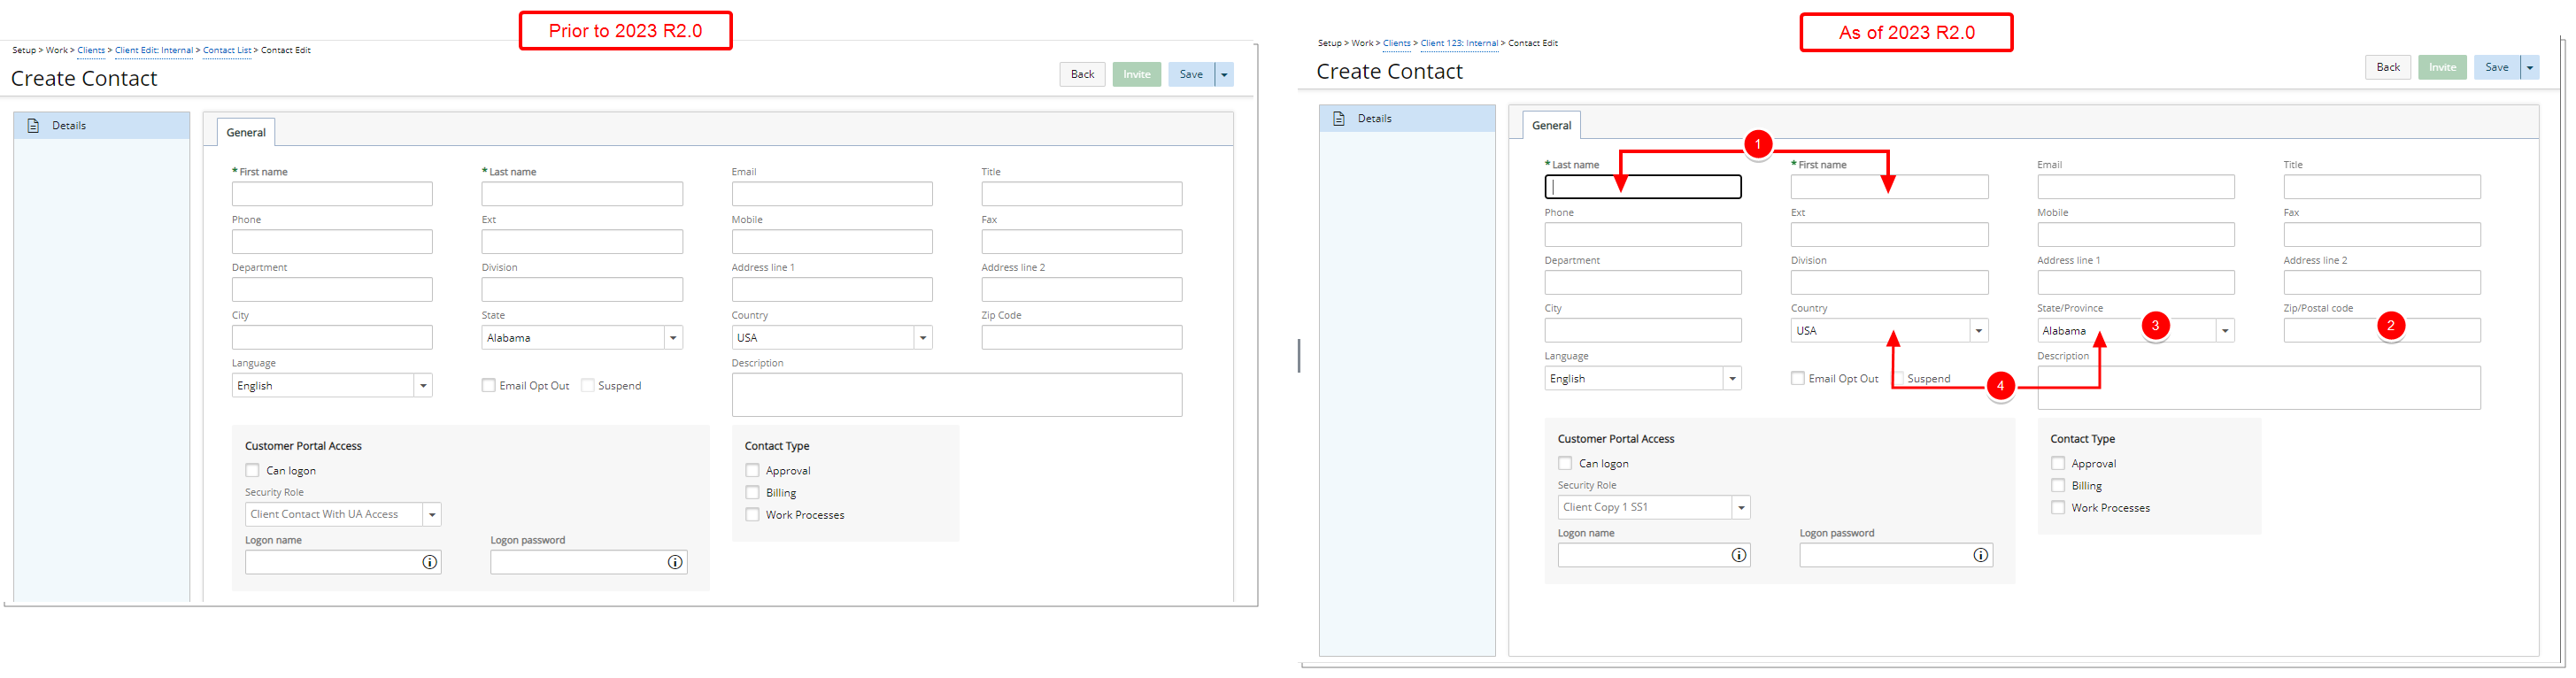
Minor modifications have been made when creating/modifying a Client Contact:
- The positions of the First Name and Last Name fields were swapped.
- Zip Code was renamed to Zip/Postal code.
- State was renamed to State/Province.
- The positions of the Country and State/Province fields were swapped.
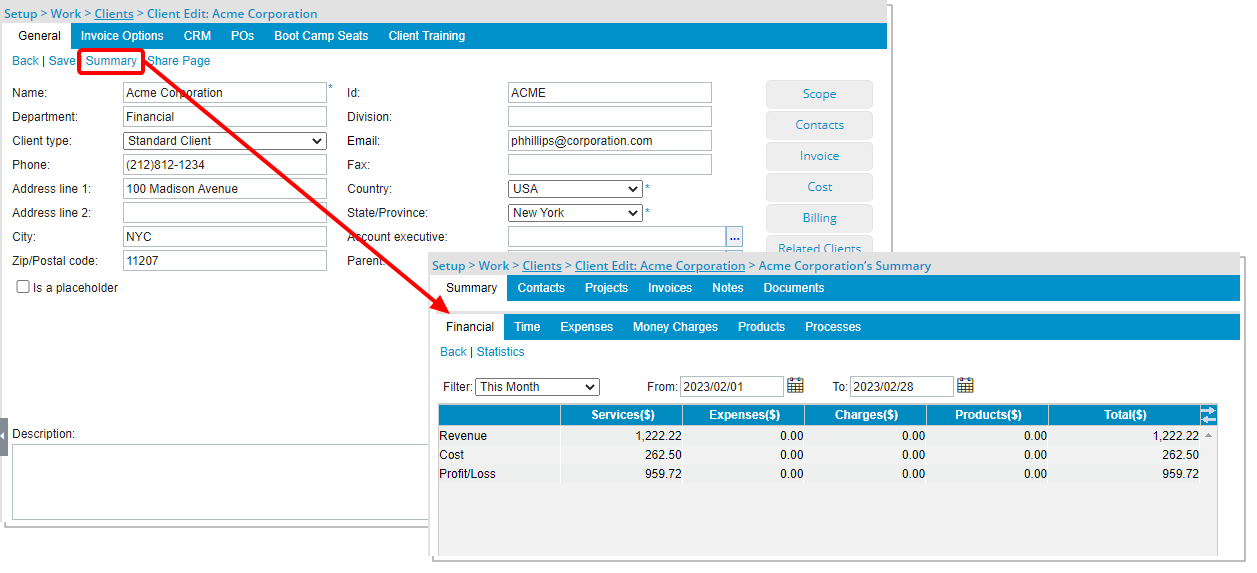
The Client Summary page, including all related subtabs, has been deprecated and is no longer available as of this release.
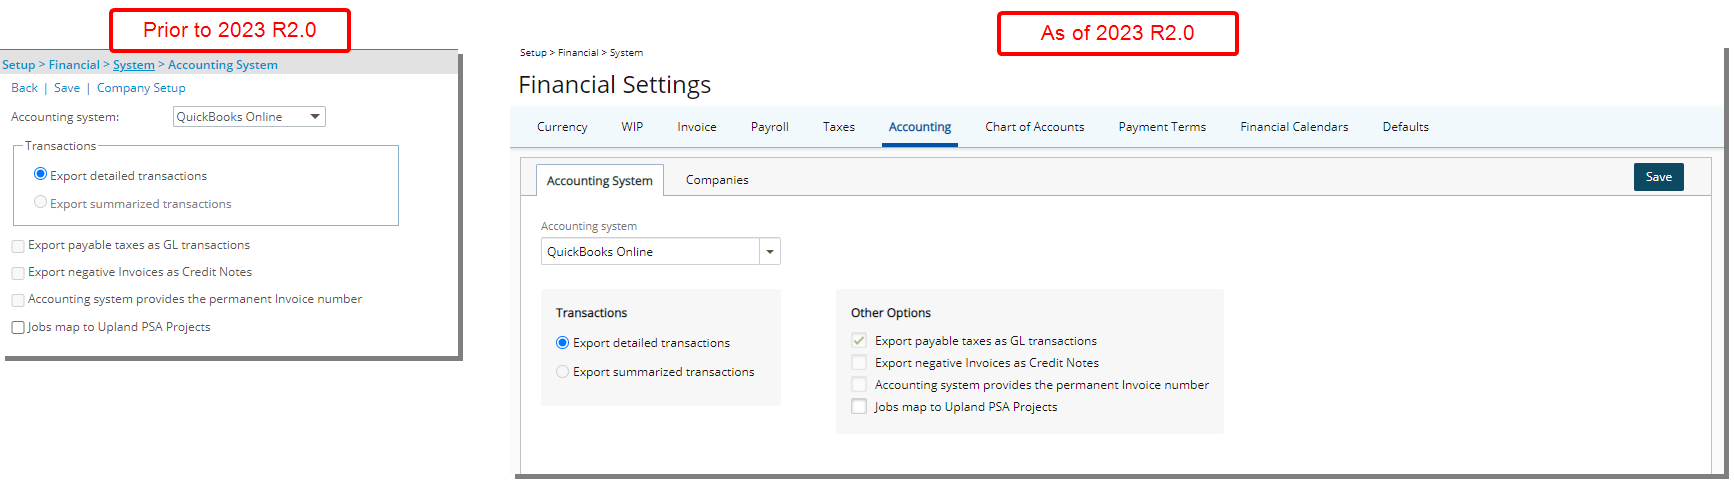
Financial Setup Renovation (TE-89122, TE-89573)
The Financial System pages are now structured in the same familiar format already in use in other areas of the application. Although most of the features remain the same, the appearance and usability have been significantly improved to enhance your overall experience.
For further details refer to: Financial System Setup
The various areas of the Financial System setup pages which were previously accessible through the buttons located on the right-hand side of the page are now accessible through the tab navigation.
- Currency: Setup and Exchange
- WIP: WIP Accrual and WIP Policies
- Invoice: General Invoice setup and Batch Templates
- Payroll: General Payroll setup, Pay Codes and Connection (for ADP Payroll system)
- Taxes: Tax Details and Tax Groups
- Accounting: Accounting System and Companies
- Chart of Accounts: Pay Code Priorities and Segmentation
- Payment Terms
- Financial Calendars
- Defaults
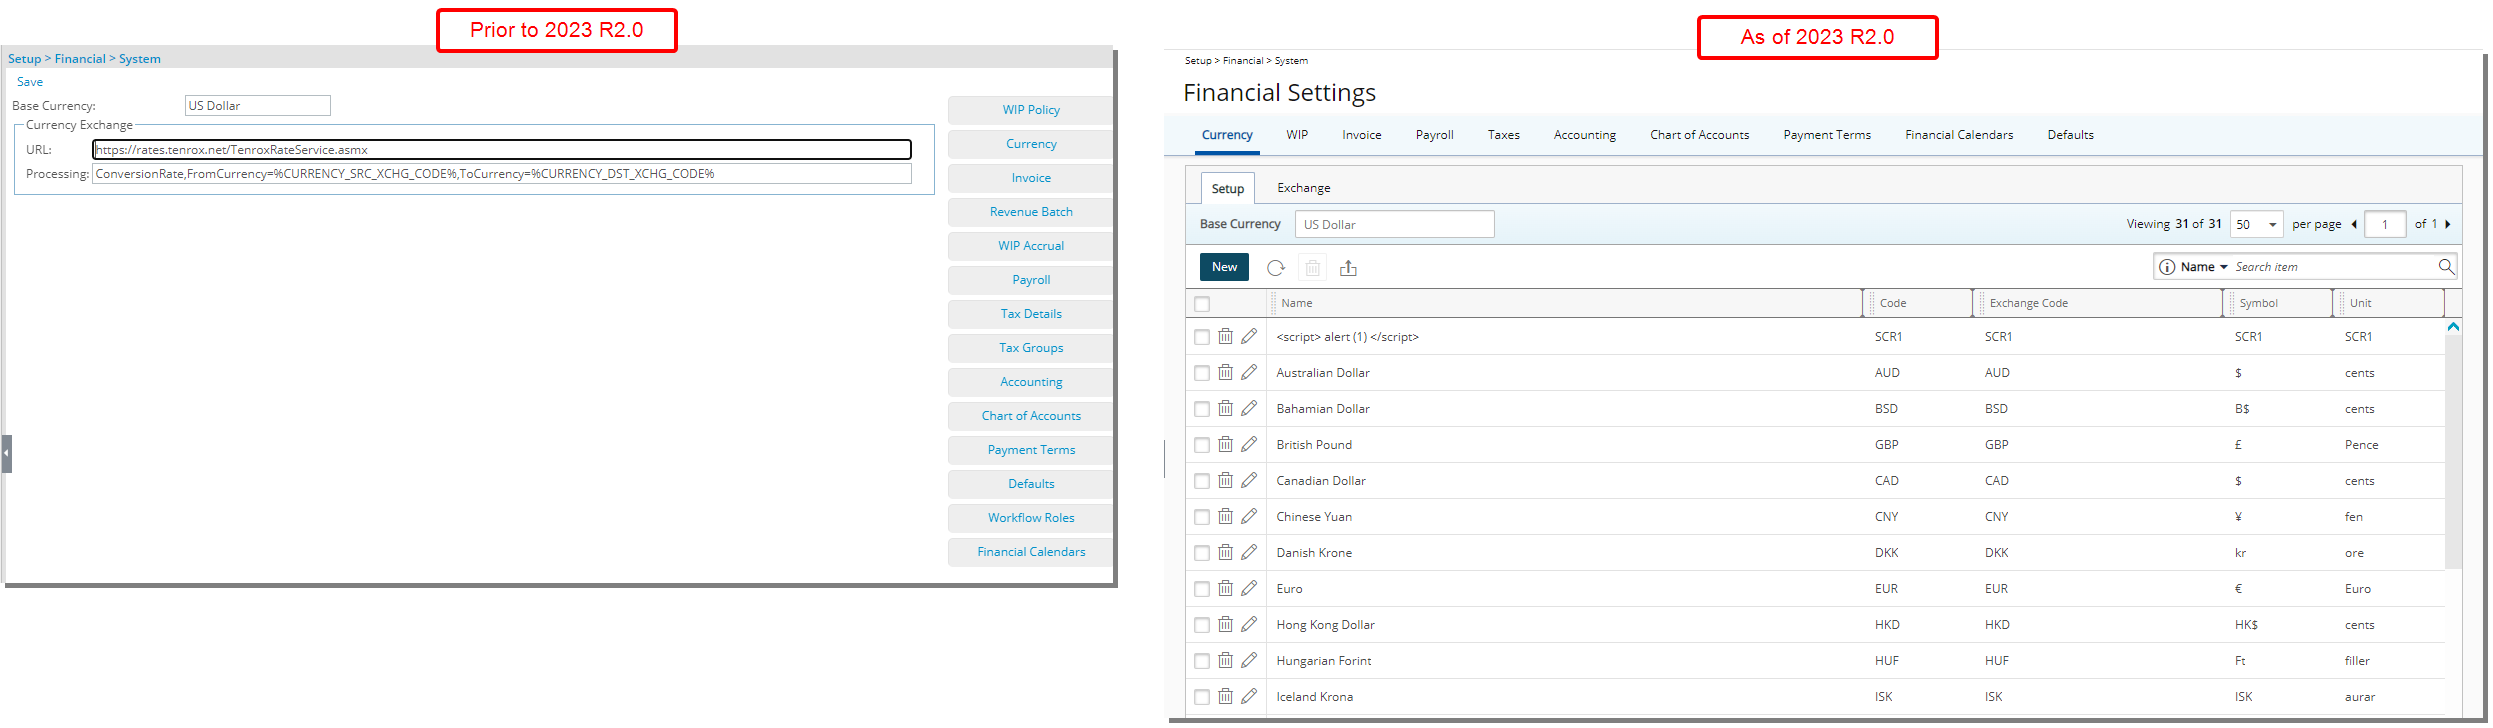
Note: The Currency Exchange URL and Processing fields, previously located on the Financial System Setup page, have been moved to the System Configuration page (Setup > Organization > System > System Setup) accessible only by the Master Administrator.
In addition to changes made to how you access these pages the user interface including spacing, colors, positioning, buttons, icons and fonts of the pages have also been improved and are detailed below:
The Currency Setup and currency Exchange setup pages are now located as sub-tabs under the Currency tab navigation.

Upon accessing the Financial System page from the navigation menu, the Currency Setup tab is displayed. The Currency Exchange page which was previously accessed through the navigation menu items of Financial Setup can be accessed by navigating to the Exchange subtab.
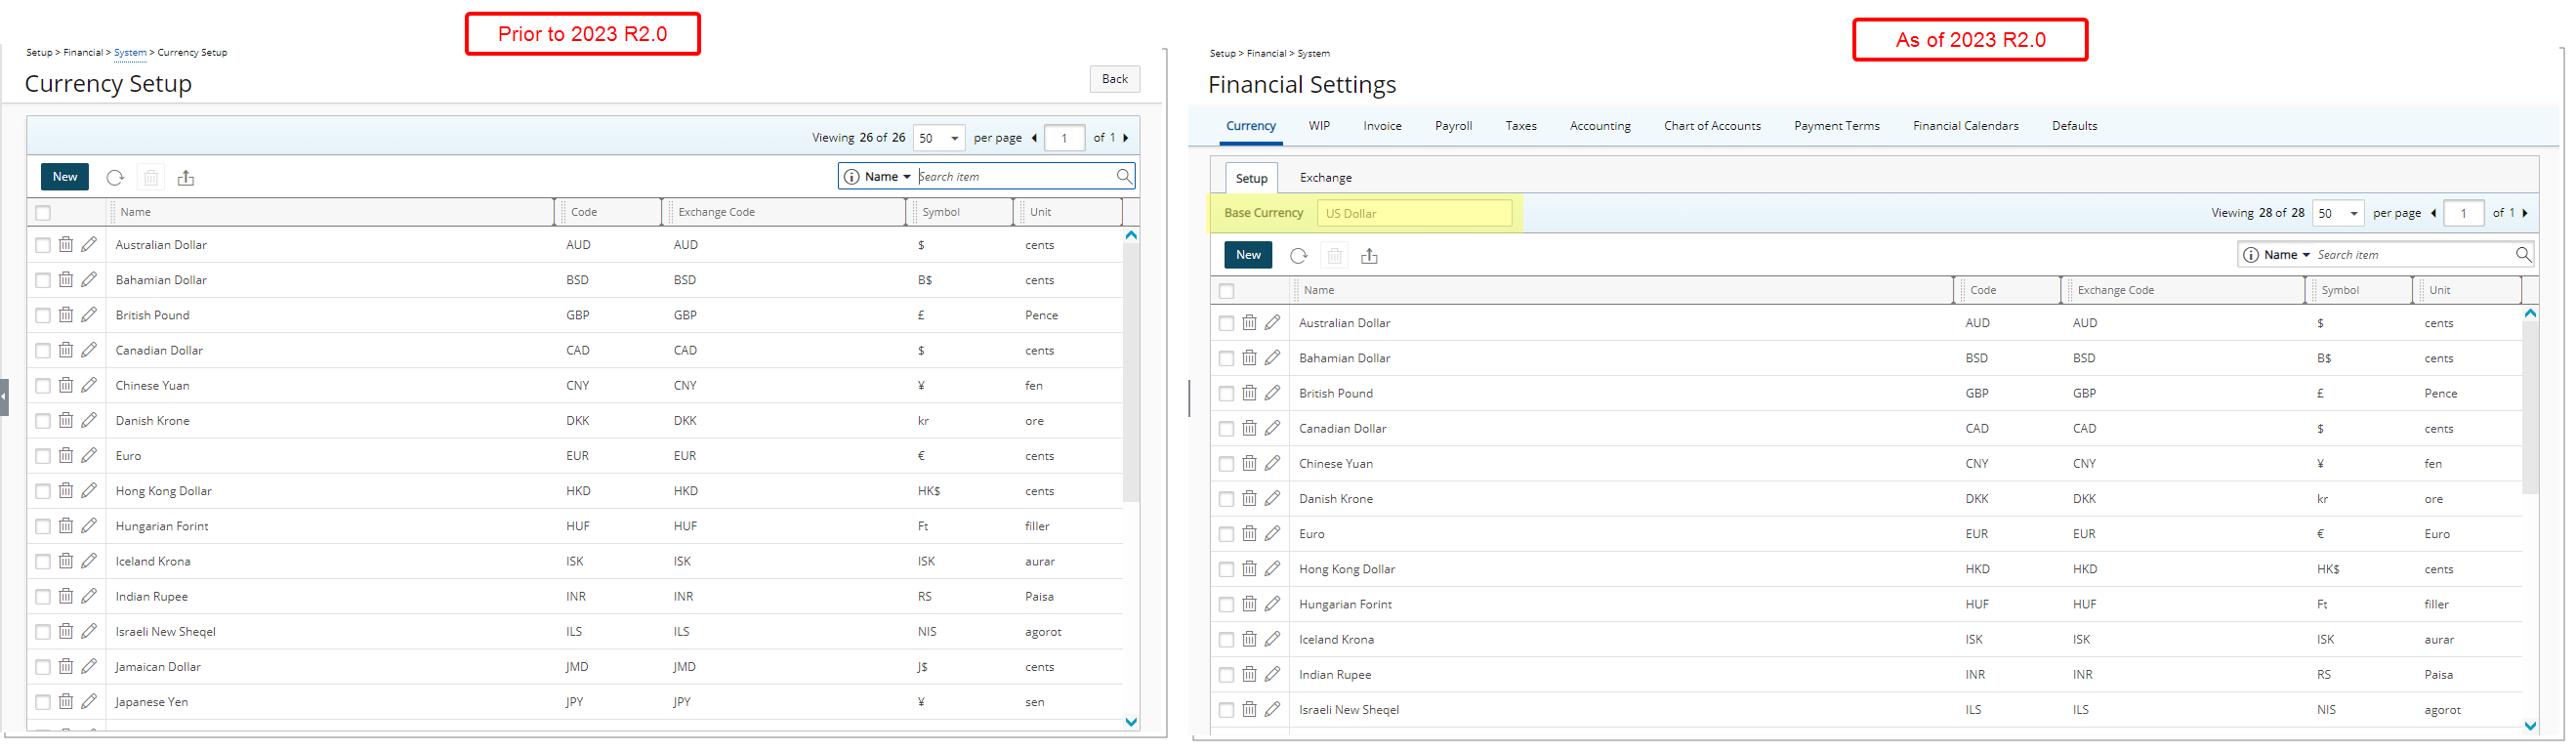
Upon accessing the Currency Setup tab, you will see most of the same functionality, look and feel with one improvement:
- The Base Currency is now displayed as a reference above the table.
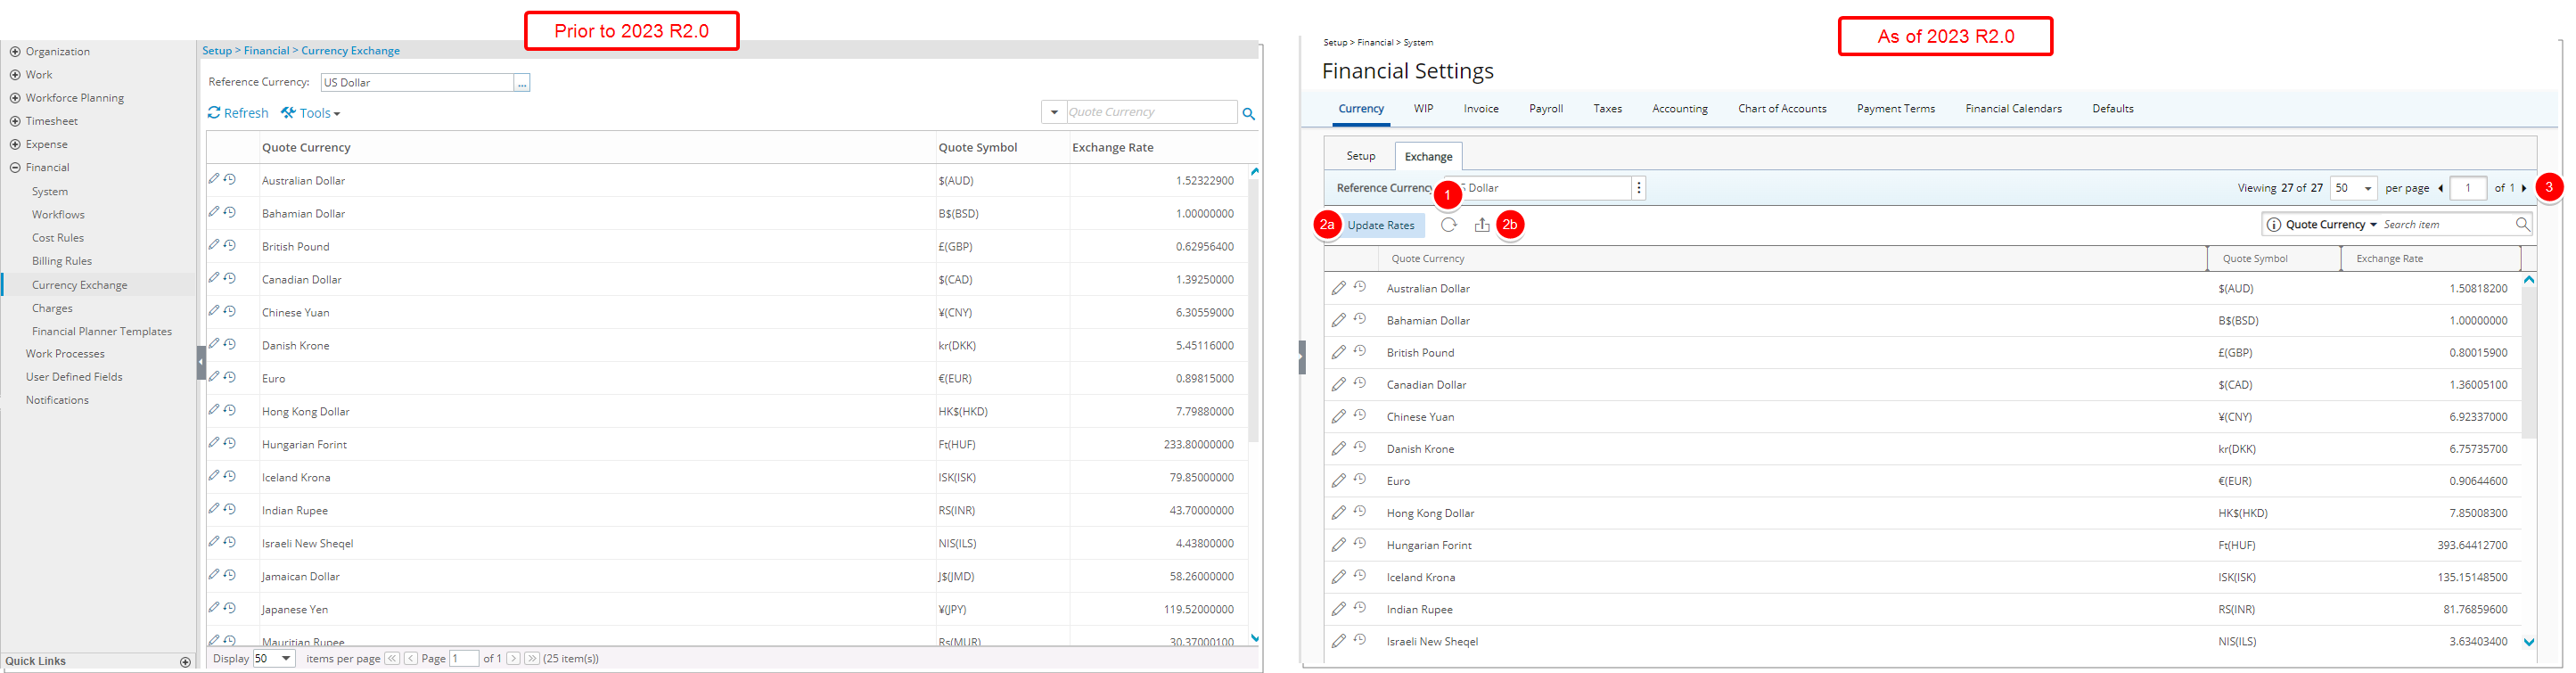
The layout of the Currency Exchange page has been improved for better user experience and consistency with the other updates that have been made thus far.
In addition to the enhancements made to the spacing, colors, positioning, buttons, icons and fonts the following improvements were also made:
- The Refresh button was redesigned and moved to the table header.
- The Tools context menu has been removed. The following two options which were previously under the Tools context menu are now located on the table header area:
- Update Rates
- Export to Excel
- Pagination is moved to the top right corner of the page to facilitate easy navigation across multiple pages.
The WIP Accrual and WIP Policies setup pages are now located as sections under the WIP tab navigation.

In addition to the overall user interface enhancements the following improvements have also been made:
The following Fields have been renamed:
| Old field label | New field label |
|---|---|
| Current WIP Accrual number | Current number |
| WIP Accrual number prefix | Number prefix |
| WIP Accrual - number of digits | Number of digits |
| Create incremental/reversal WIP Transactions | Transaction type |
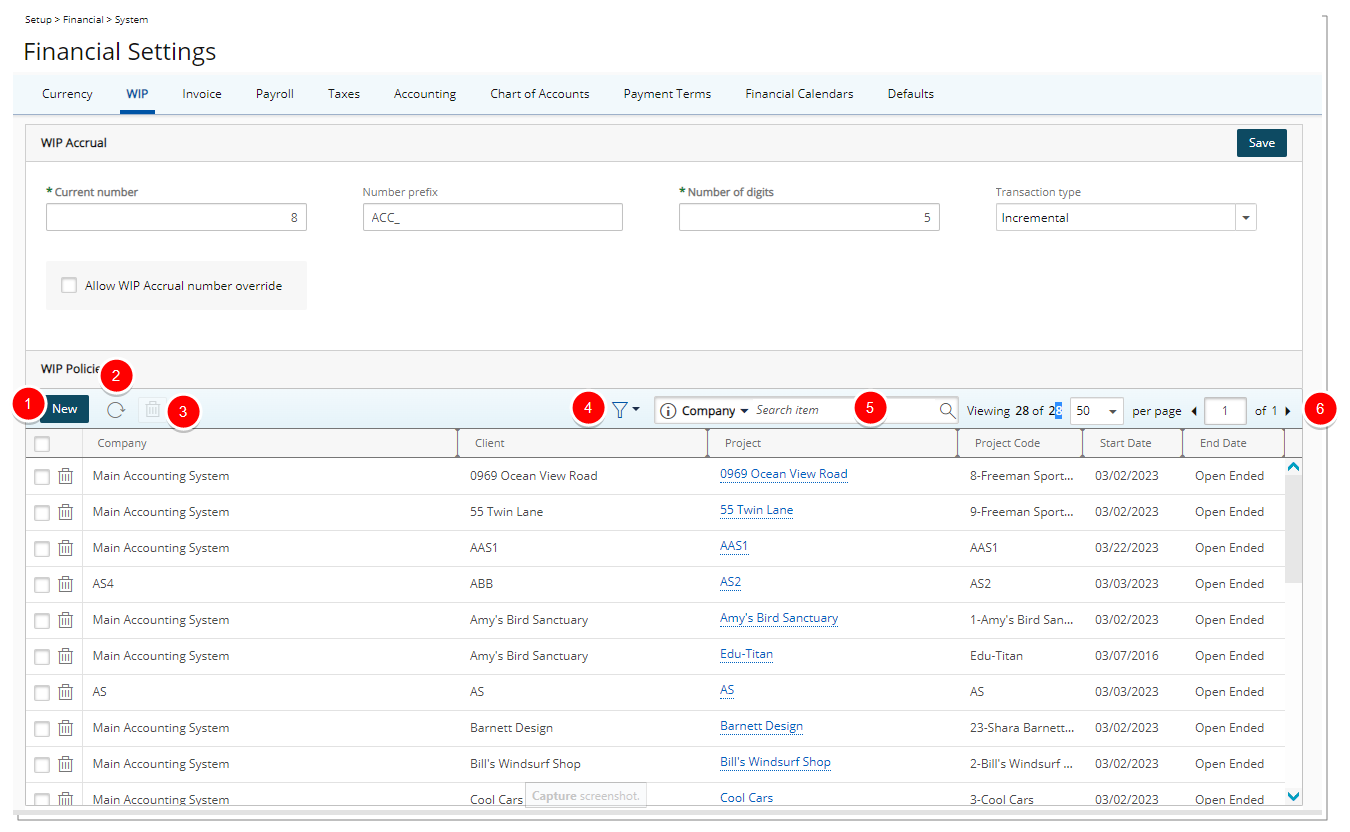
- The New link was converted to a button and is now located in the table header.
- Addition of a Refresh button allowing you to reload the page.
- The Delete link was converted to a button and is now located in the table header.
- The Show all active Projects only selection box is now a Filter
 .
. - Addition of Search capability allowing you to Search for WIP Policies based on Company, Client, Project, Project Code, Start Date and End Date.
- Pagination is moved to the top right corner of the table to facilitate easy navigation across multiple pages.
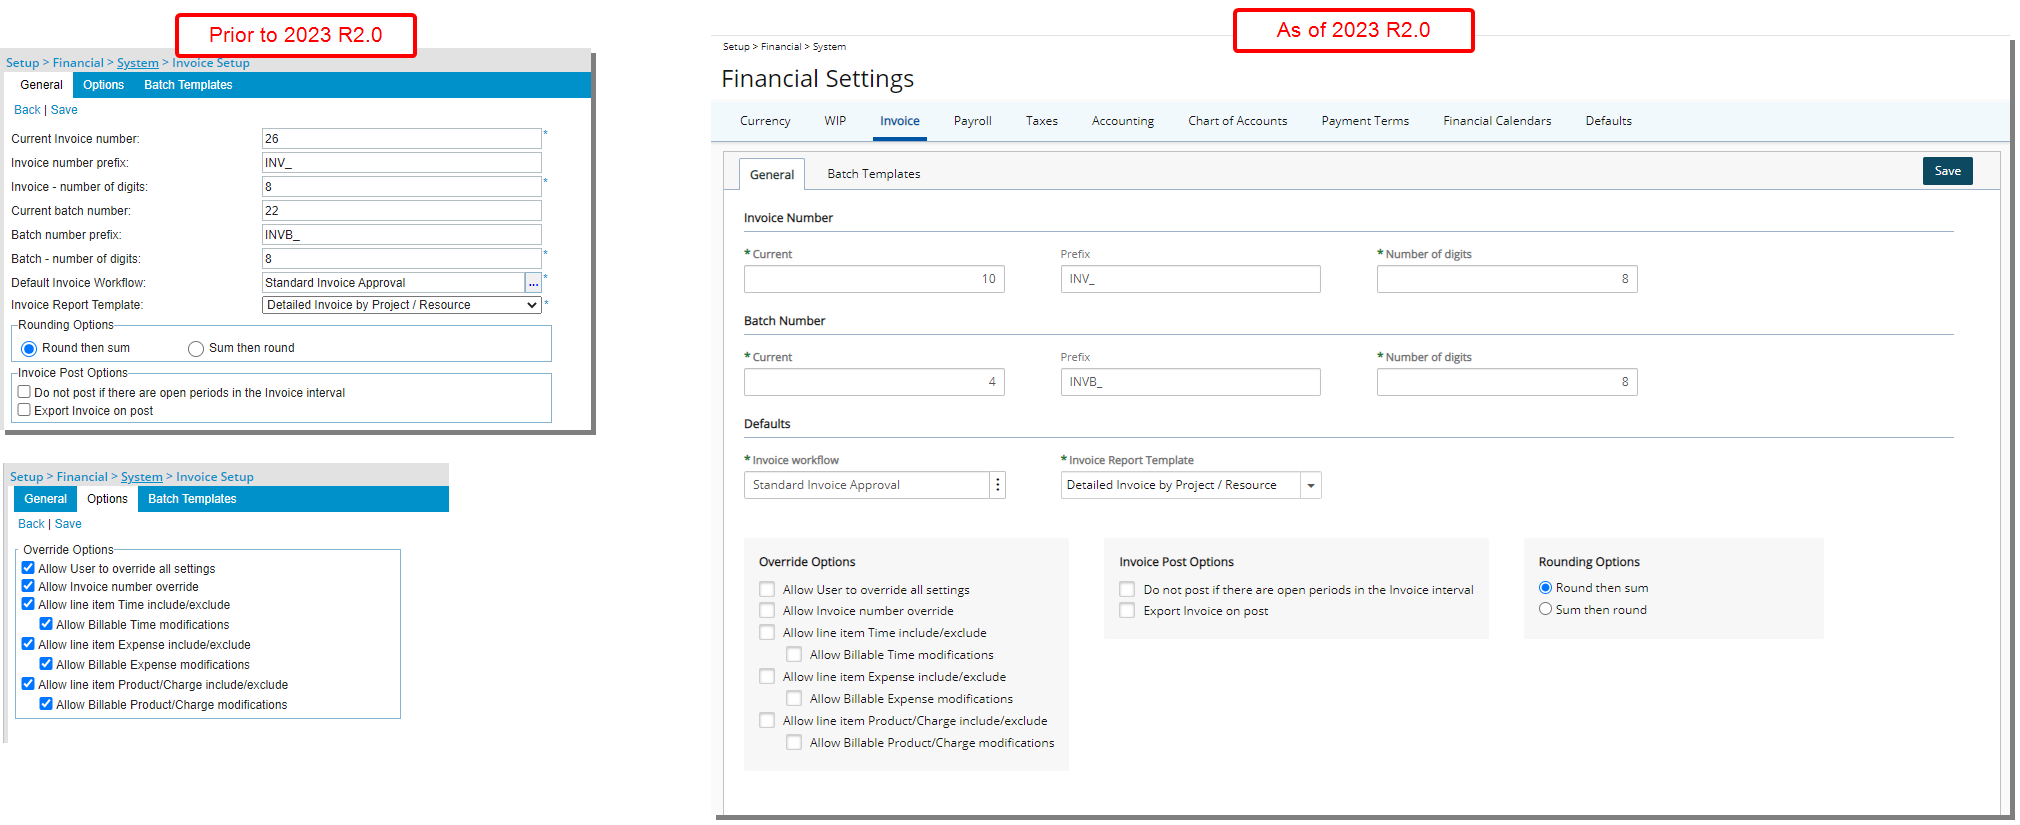
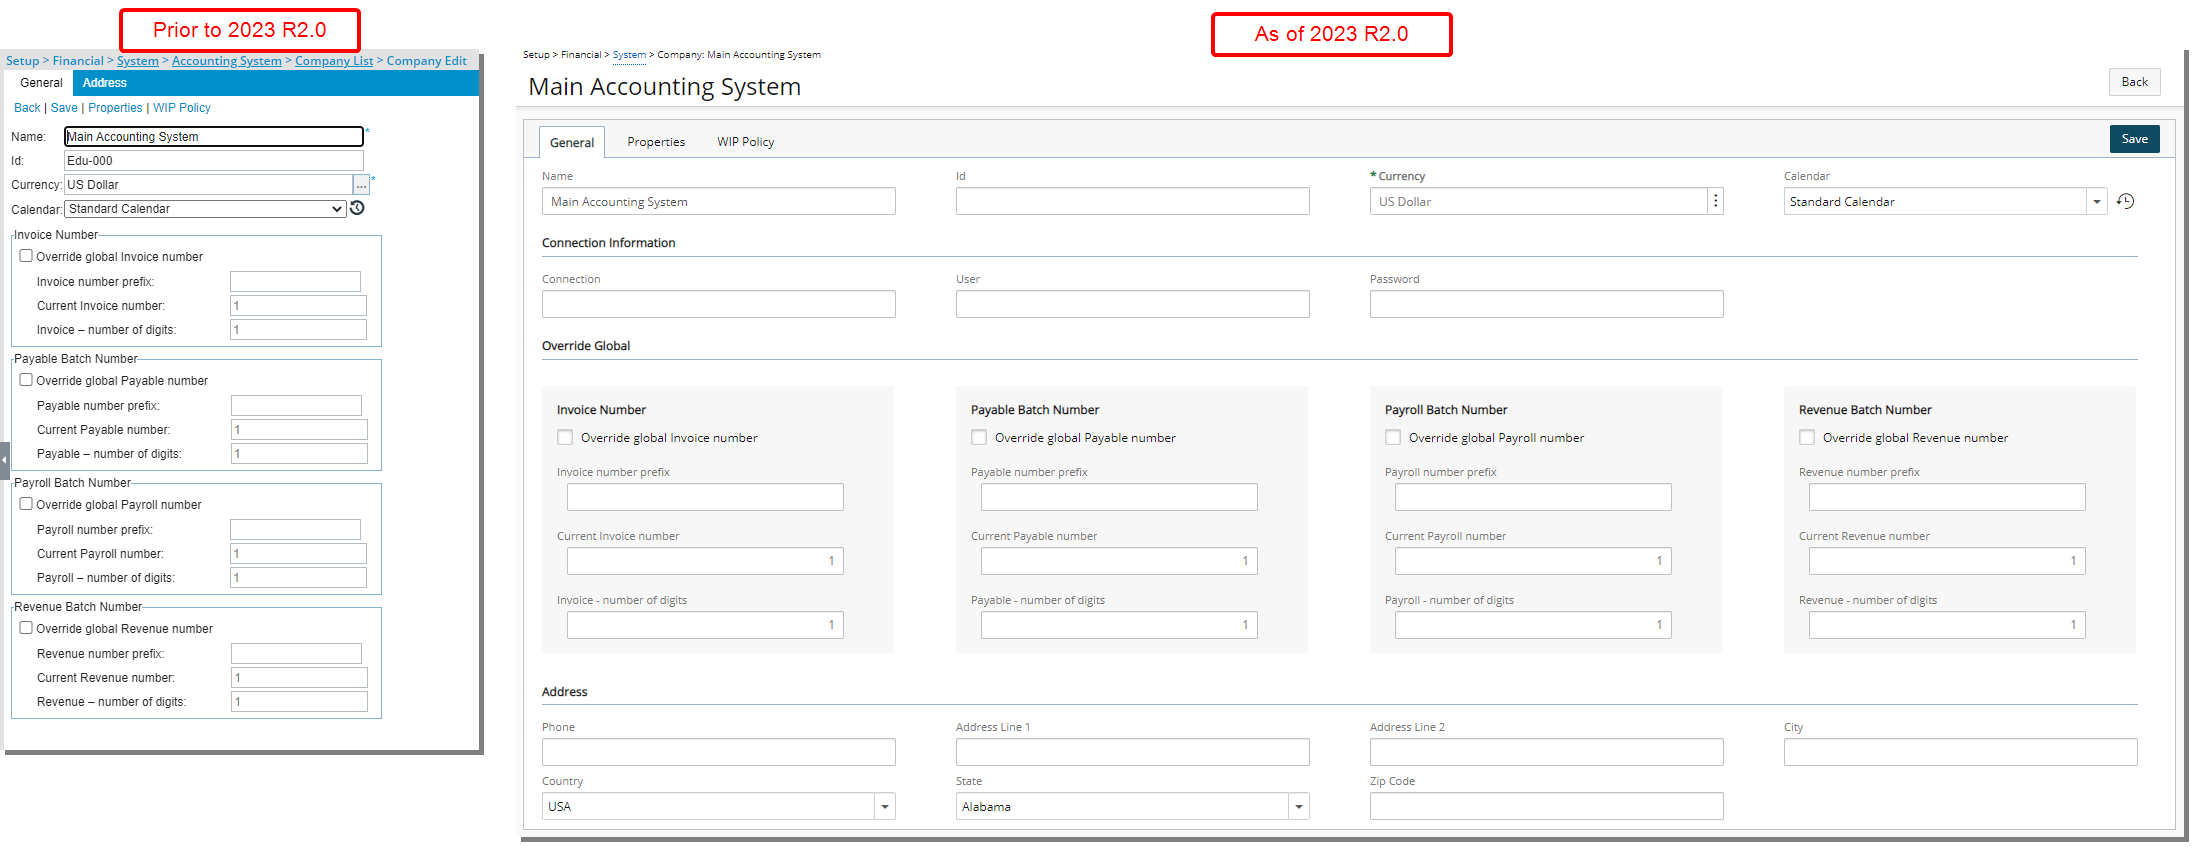
In previous releases there were three tabs (General, Options and Batch Templates) within the Invoice Setup page. As of this release the Override Options section has been moved to the General tab as a result of which the legacy Options tab is now deprecated and no longer available.
The General tab was also separated into three sections: Invoice Number, Batch Number and Defaults. As a result of which, the Default Pre-Billing Workflow, and Pre-Billing Report Template options were deprecated, and the following fields were renamed:
| Old field label | New field label |
|---|---|
| Invoice Number | |
| Current Invoice number | Current |
| Invoice number prefix | Prefix |
| Invoice - number of digits | Number of digits |
| Batch Number | |
| Current batch number | Current |
| Batch number prefix | Prefix |
| Batch - number of digits | Number of digits |
| Defaults | |
| Default Invoice Workflow | Invoice Workflow |
Furthermore, when clearing the selection box for a parent option within the Override Options section, if it has a child option selected, the child selection will be cleared as well.
Example: If both Allow line item Time include/exclude and Allow Billable Time modifications are selected, upon clearing the Allow line item Time include/exclude selection box the Allow Billable Time modifications will be cleared as well.

- The New link was converted to a button and is now located in the table header.
- The Refresh link was converted to a button and is now located in the table header.
- The Delete link was converted to a button and is now located in the table header.
- The Export to Excel button was redesigned and is now located in the table header.
- Redesigned Copy button.
- Addition of Search capability allowing you to Search for a Batch Template by Name.
- Pagination is moved to the top right corner of the page to facilitate easy navigation across multiple pages.
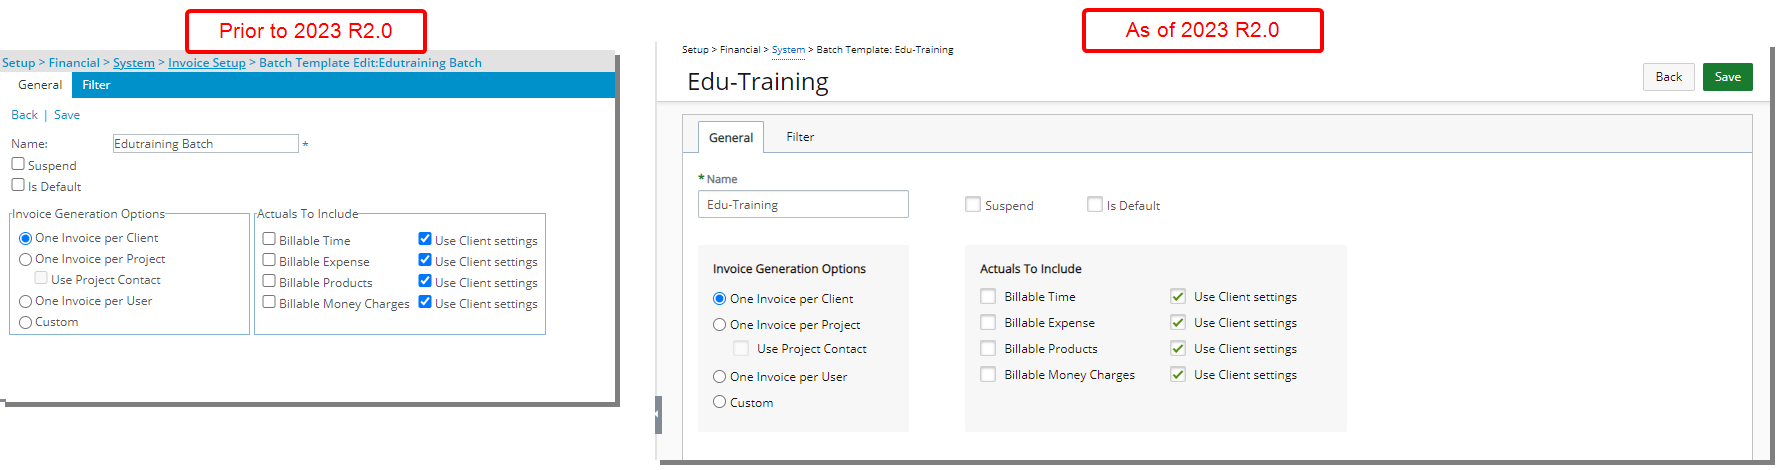
Furthermore, the user interface including spacing, colors, positioning, buttons, icons and fonts of the General and Filter tabs of the Batch Template edit page have been improved for better user experience and consistency with the other updates that have been made thus far.

General and Pay Codes can now be accessed from the Payroll tab.
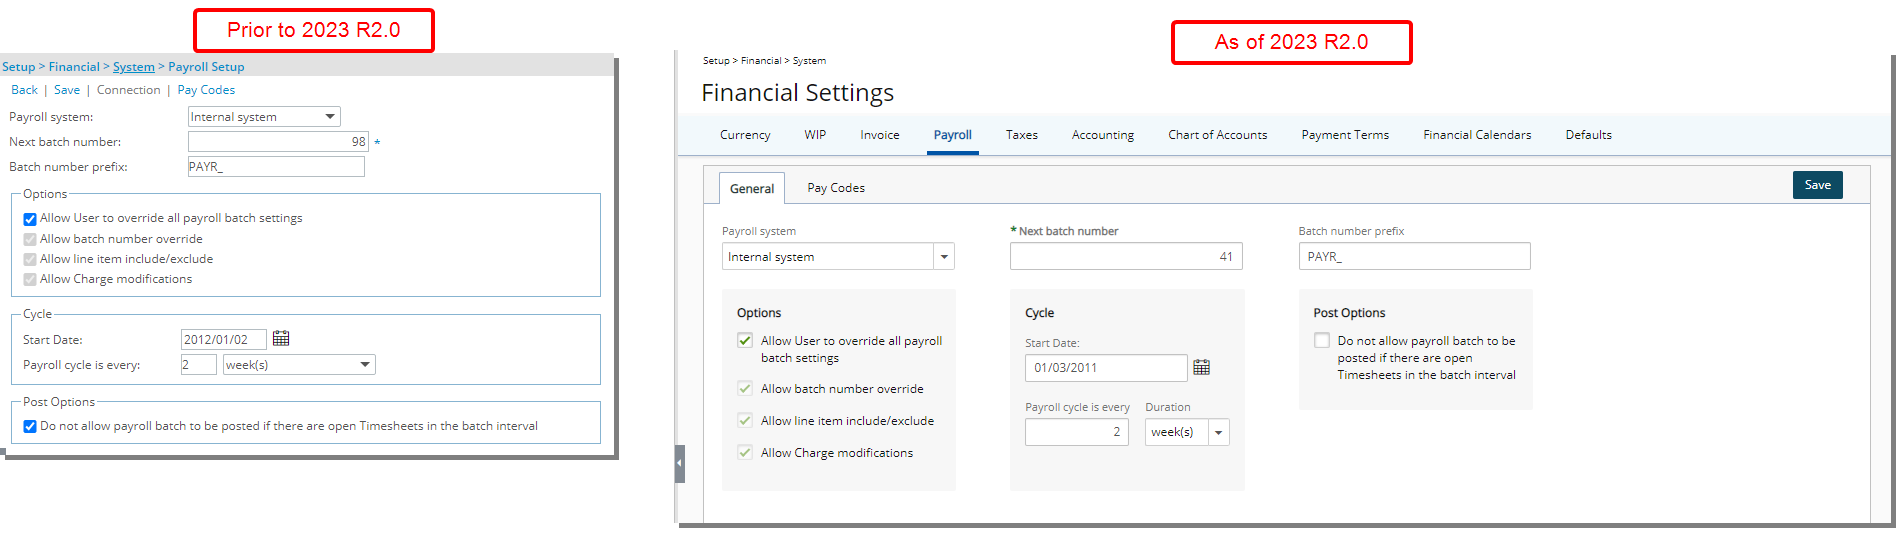
- You can access the Pay Codes list page by navigating to the Pay Codes tab.
- When the ADP Payroll system is selected, the Connection Details and Employee Matrix can now be accessed by clicking the Connection button located within the General tab of Payroll.
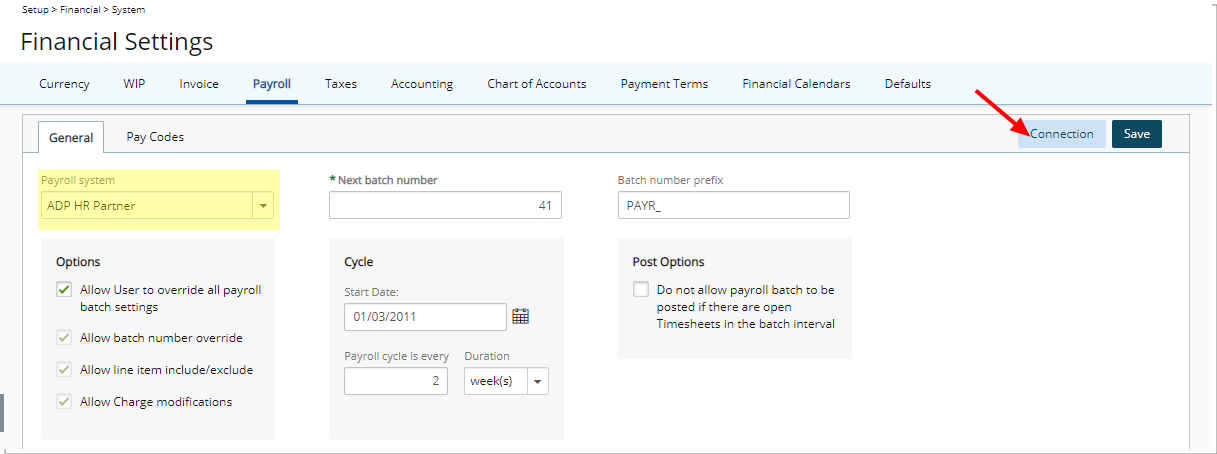
Furthermore, the Connection Details and Employee Matrix pages have been merged into one for improved user experience and consistency with the other updates that have been made thus far.
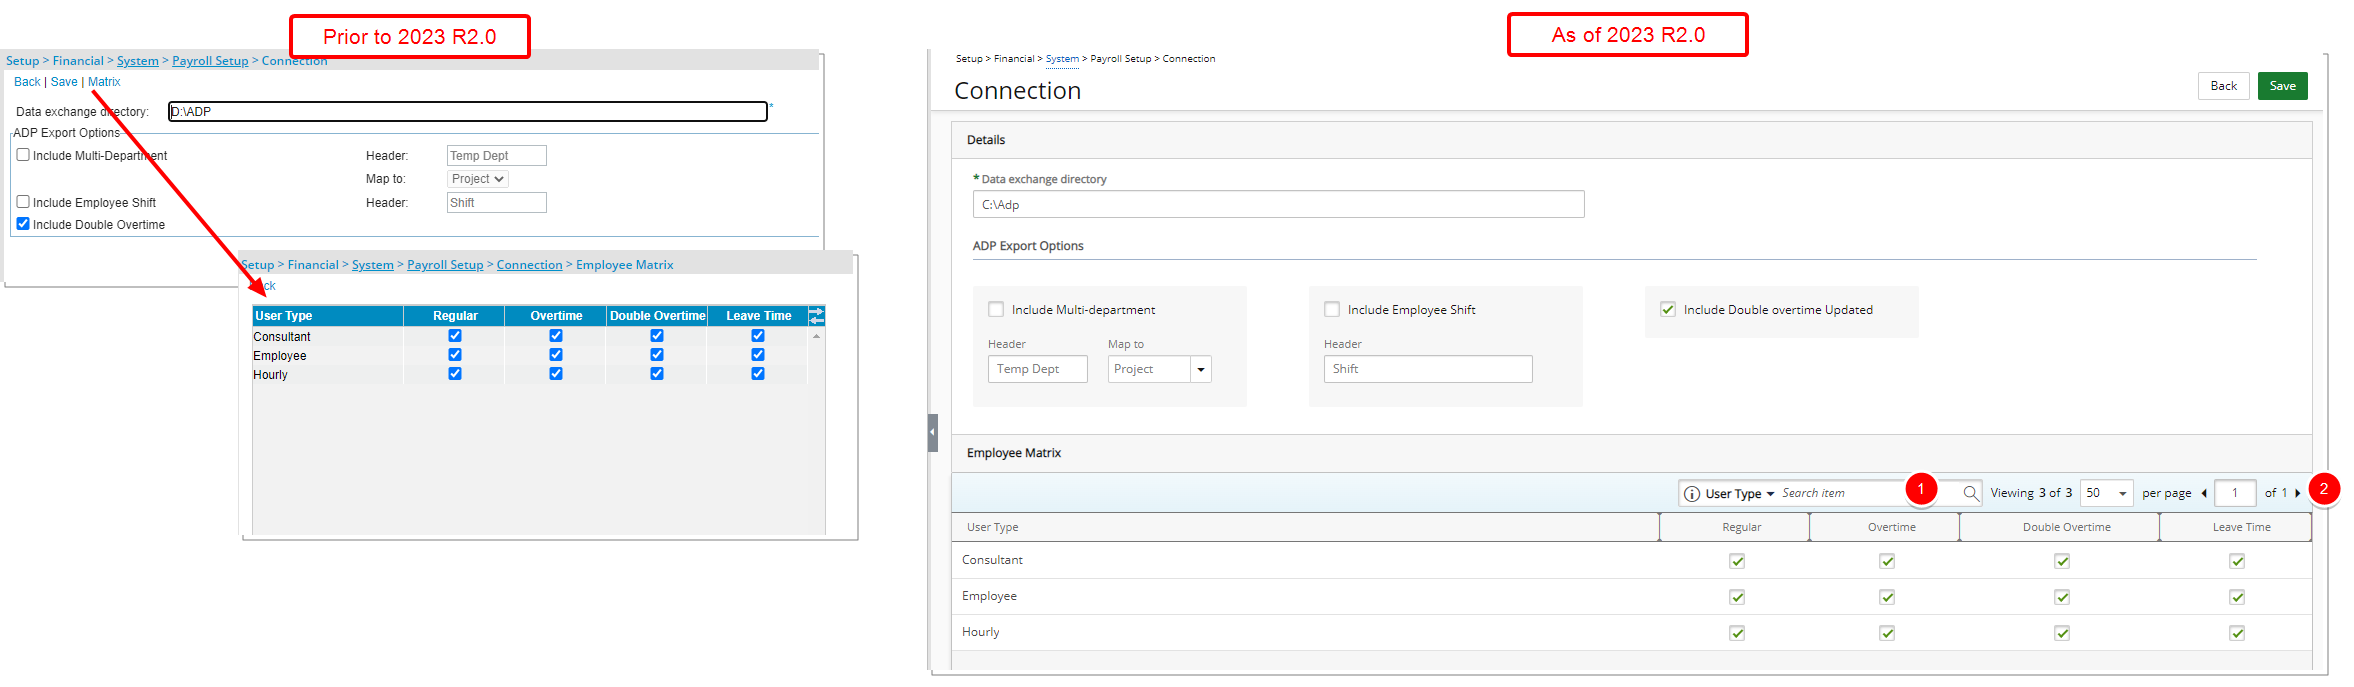
From the Employee Matrix section, you can now:
1. Search ![]() by User Type.
by User Type.
2. Pagination is also added to facilitate easy navigation across multiple pages.
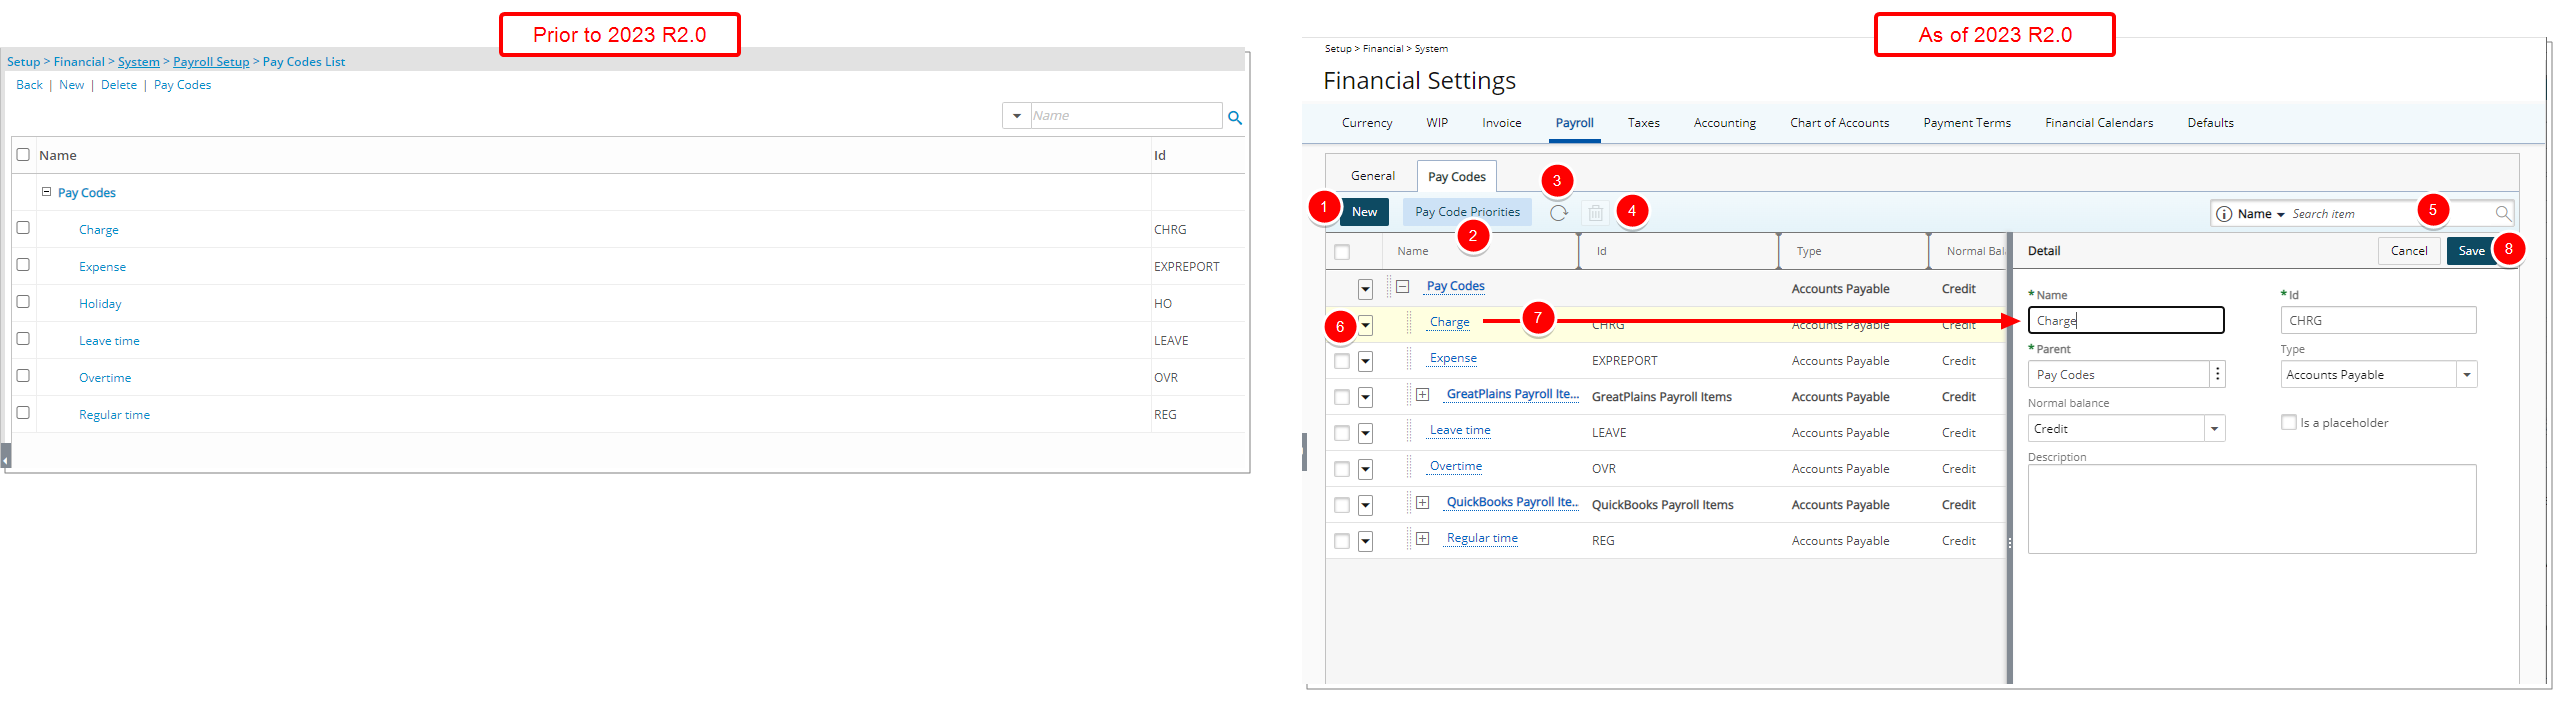
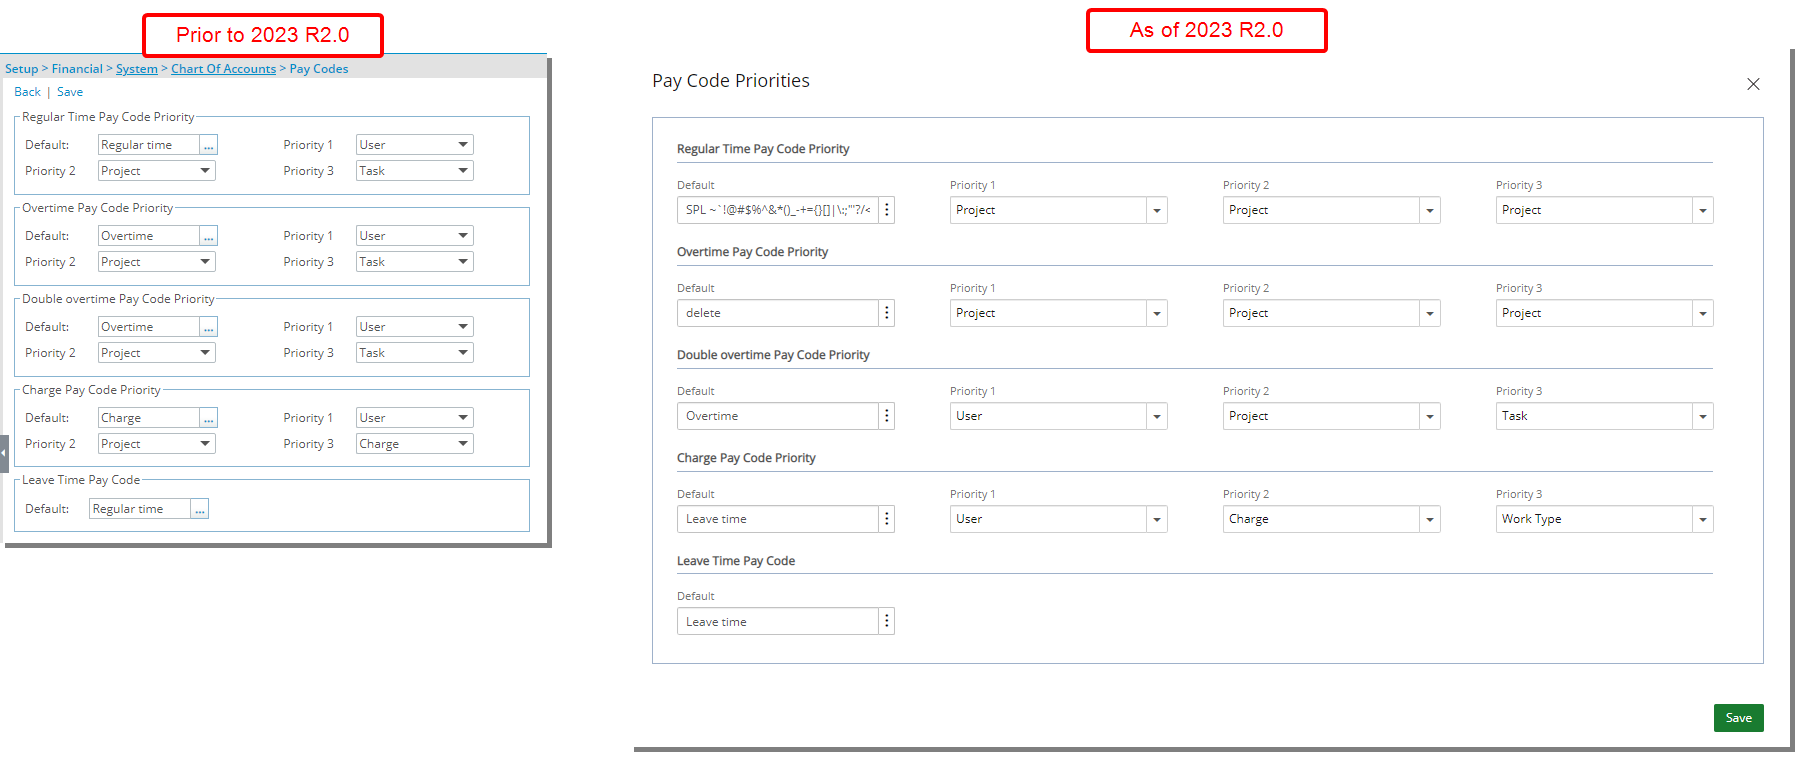
The Pay Codes list page was designed for a better user experience. The following modifications were made:
- The New link has been converted to a button and is now located in the table header.
- The Pay Codes link has been converted to a button and renamed to Pay Code Priorities.
- Addition of a Refresh button allowing you to reload the page.
- The Delete link has been converted to a button and is now located in the table header.
- In addition to the already existing Name and Id search criteria, you can now also search for a Batch Template Type and Normal Balance.
- You can now access the context menu by clicking the down arrow located against a Pay Code, allowing you to create New or Delete.
- You can access and modify the details of an existing Pay Code by clicking on its Name. The right pane will display the Detail of the selected Pay Code.
- Upon modifying a Pay Code, you can click Save or Cancel directly from the right pane.
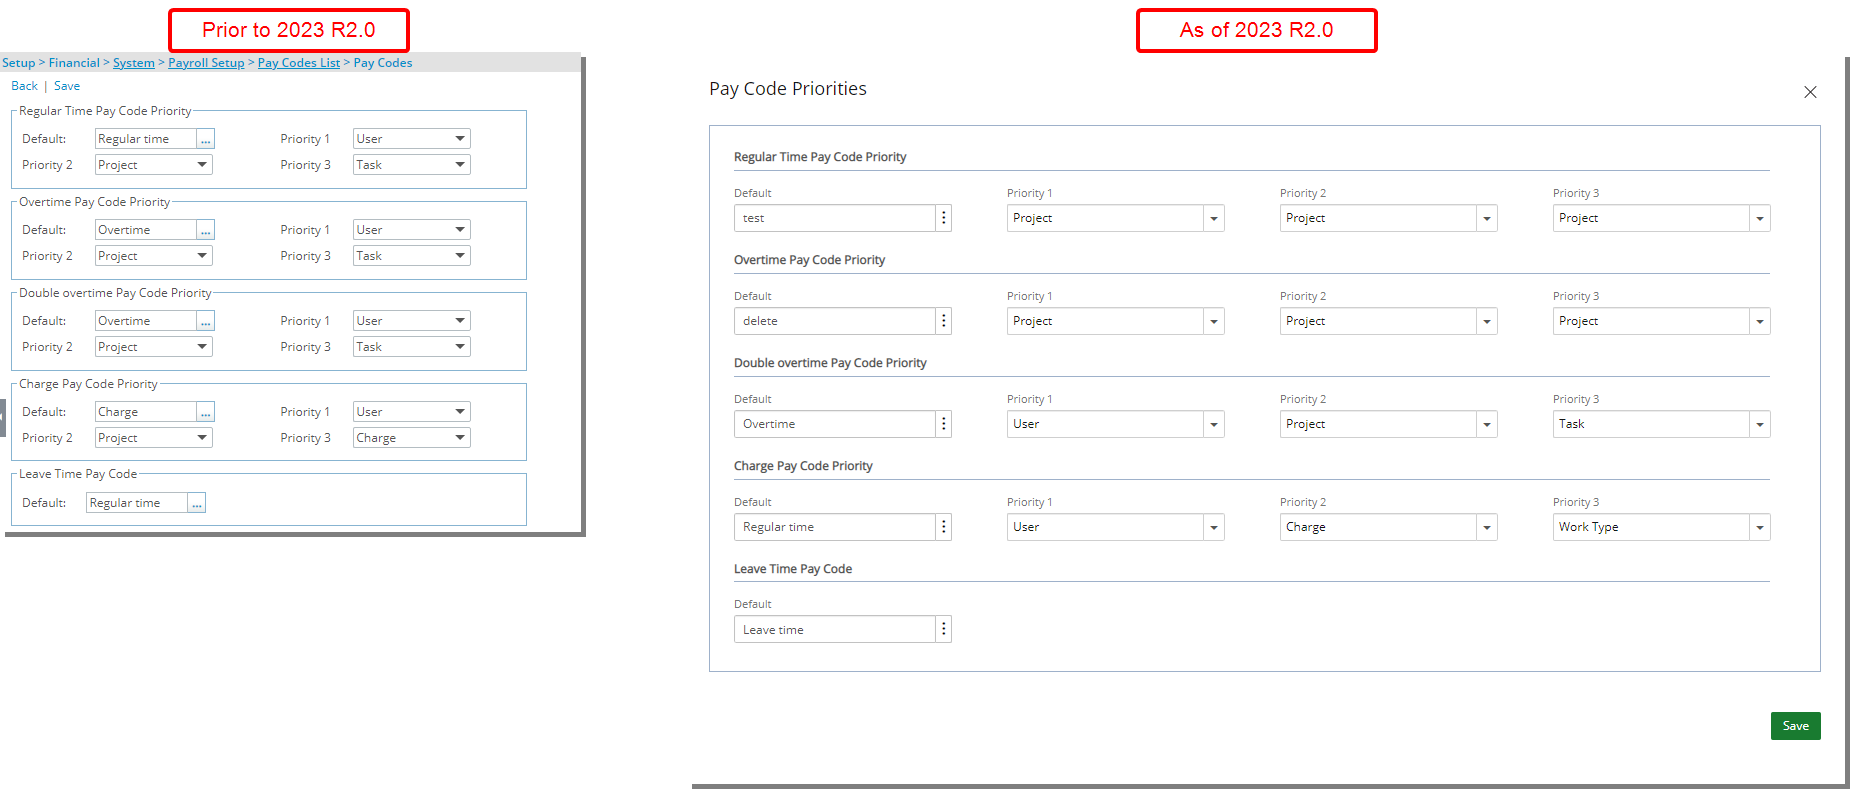
Furthermore, the Pay Code Priorities page is now a moveable dialog box and has been redesigned for a better user experience.
Tax Details and Tax Groups can now be accessed from the Taxes tab.

The Tax Details list page was redesigned for a better user experience. The following modifications were made:
- The New link has been converted to a button and is now located in the table header.
- Addition of a Refresh button allowing you to reload the page.
- The Delete button has been redesigned and is now located in the table header.
- The Export to Excel button was redesigned and moved to the table header area.
- Addition of Column Selection capability. By default, the following columns are displayed: Name, Id, Type and Rate %. You can choose to include the following columns from the Column Selection dialog box: Account, Corresponding tax, Include in report, Is taxable, Maximum taxable amount and Minimum taxable amount.
- Addition of Search capability allowing you to Search for a Tax rule by Name, Id and Type.
- Pagination is moved to the top right corner of the available/selected tables to facilitate easy navigation across multiple pages.
- You can access and modify the details of an existing Tax rule by clicking on it’s Name. The right pane will display the Detail of the selected Tax rule.
- Upon modifying a Tax rule, you can click Save or Cancel directly from the right pane.
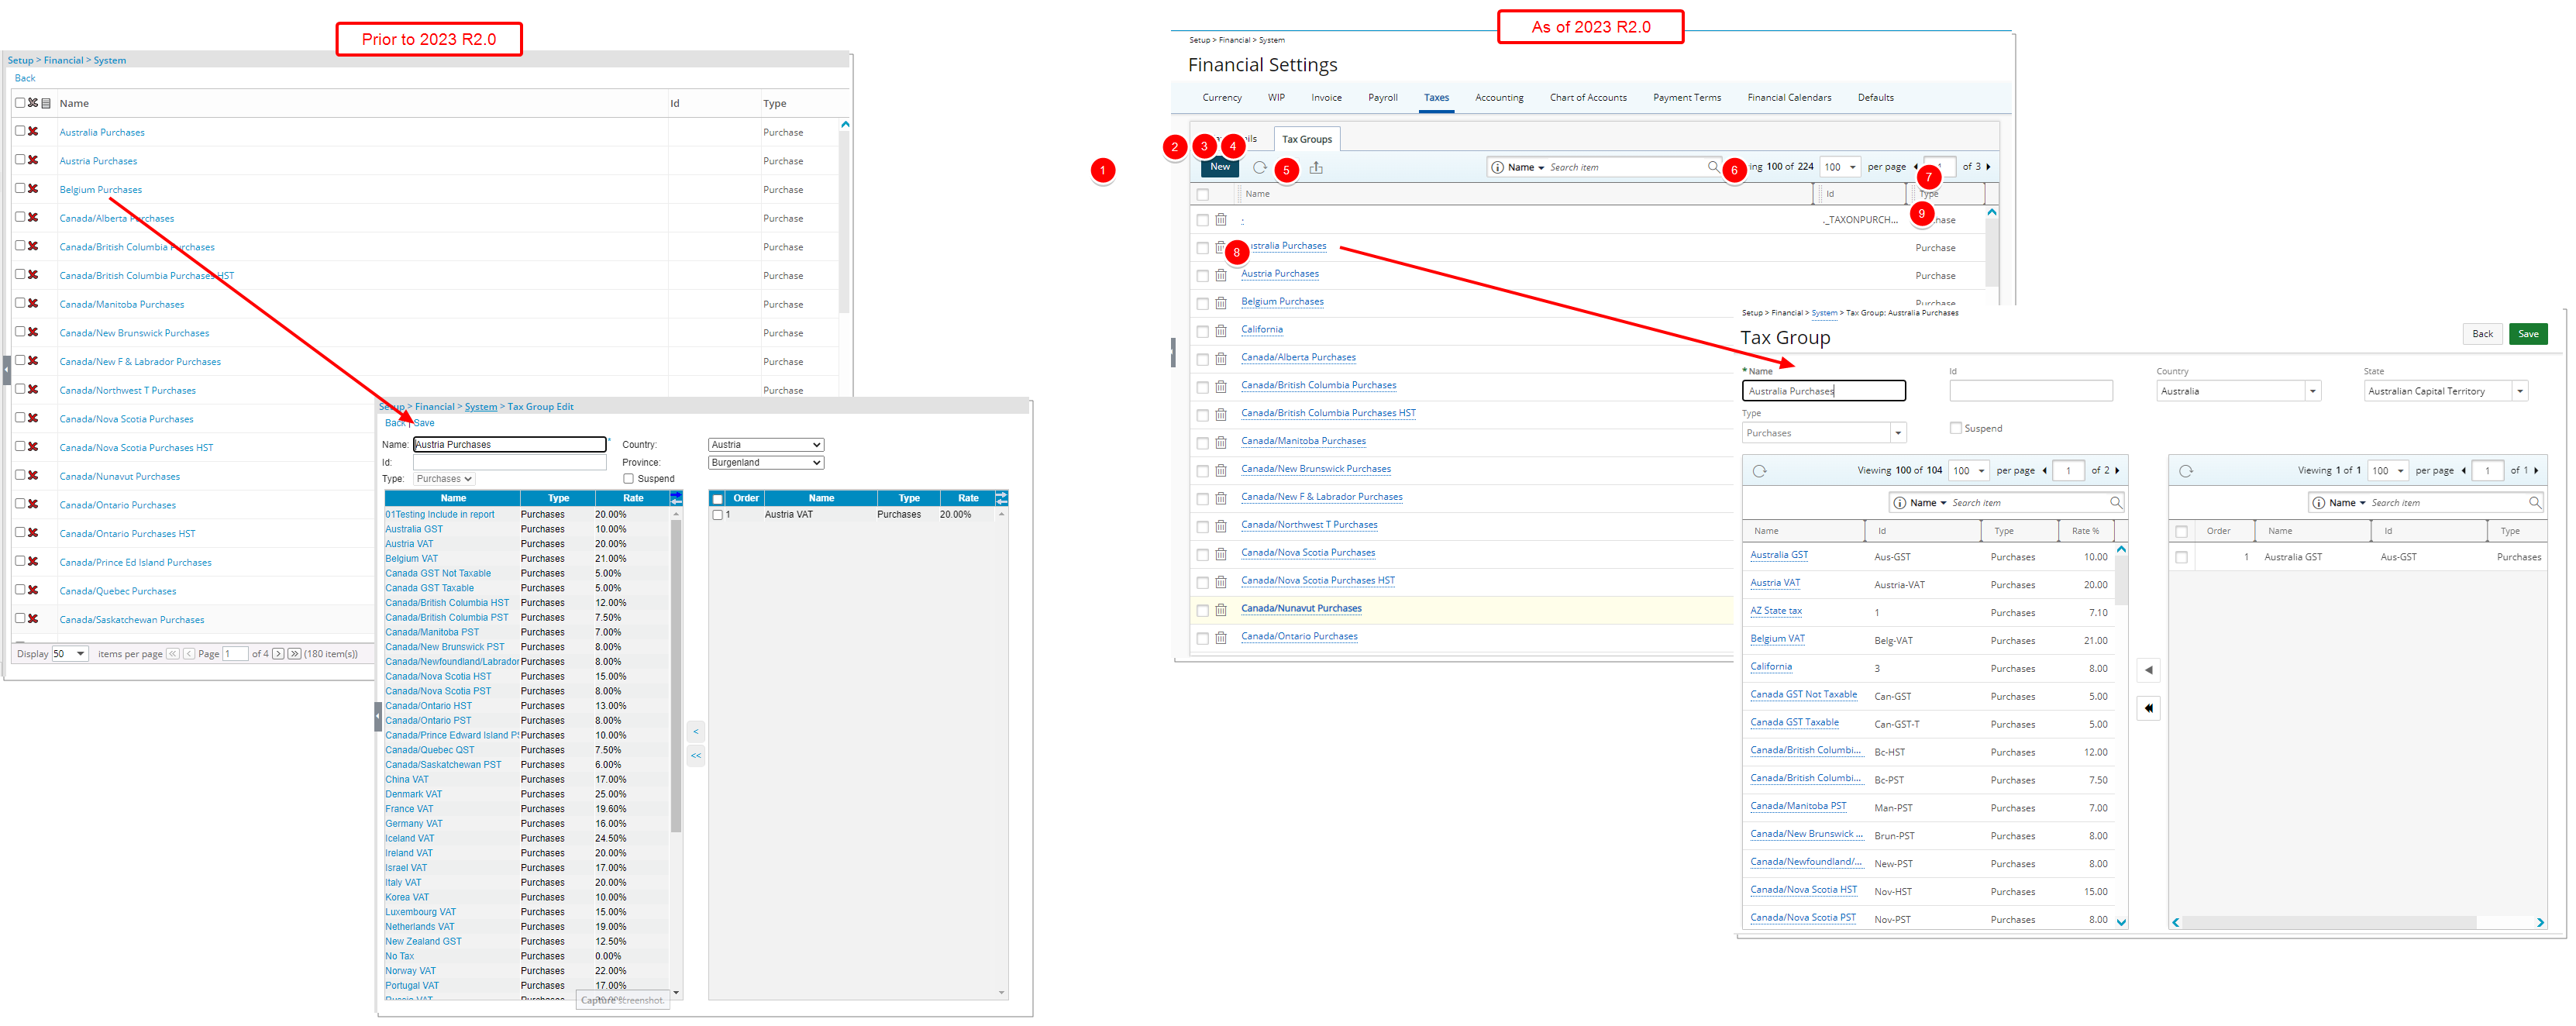
The Tax Groups list page was redesigned for a better user experience. The following modifications were made:
- The New link has been converted to a button and is now located in the table header.
- Addition of a Refresh button allowing you to reload the page.
- The Delete button has been redesigned and is now located in the table header.
- The Export to Excel button was redesigned and moved to the table header area.
- Addition of Search capability allowing you to Search for a Batch Template by Name, Id and Type.
- Pagination is moved to the top right corner of the available/selected tables to facilitate easy navigation across multiple pages.
- You can access and modify the details of an existing Tax Group by clicking on it’s Name.
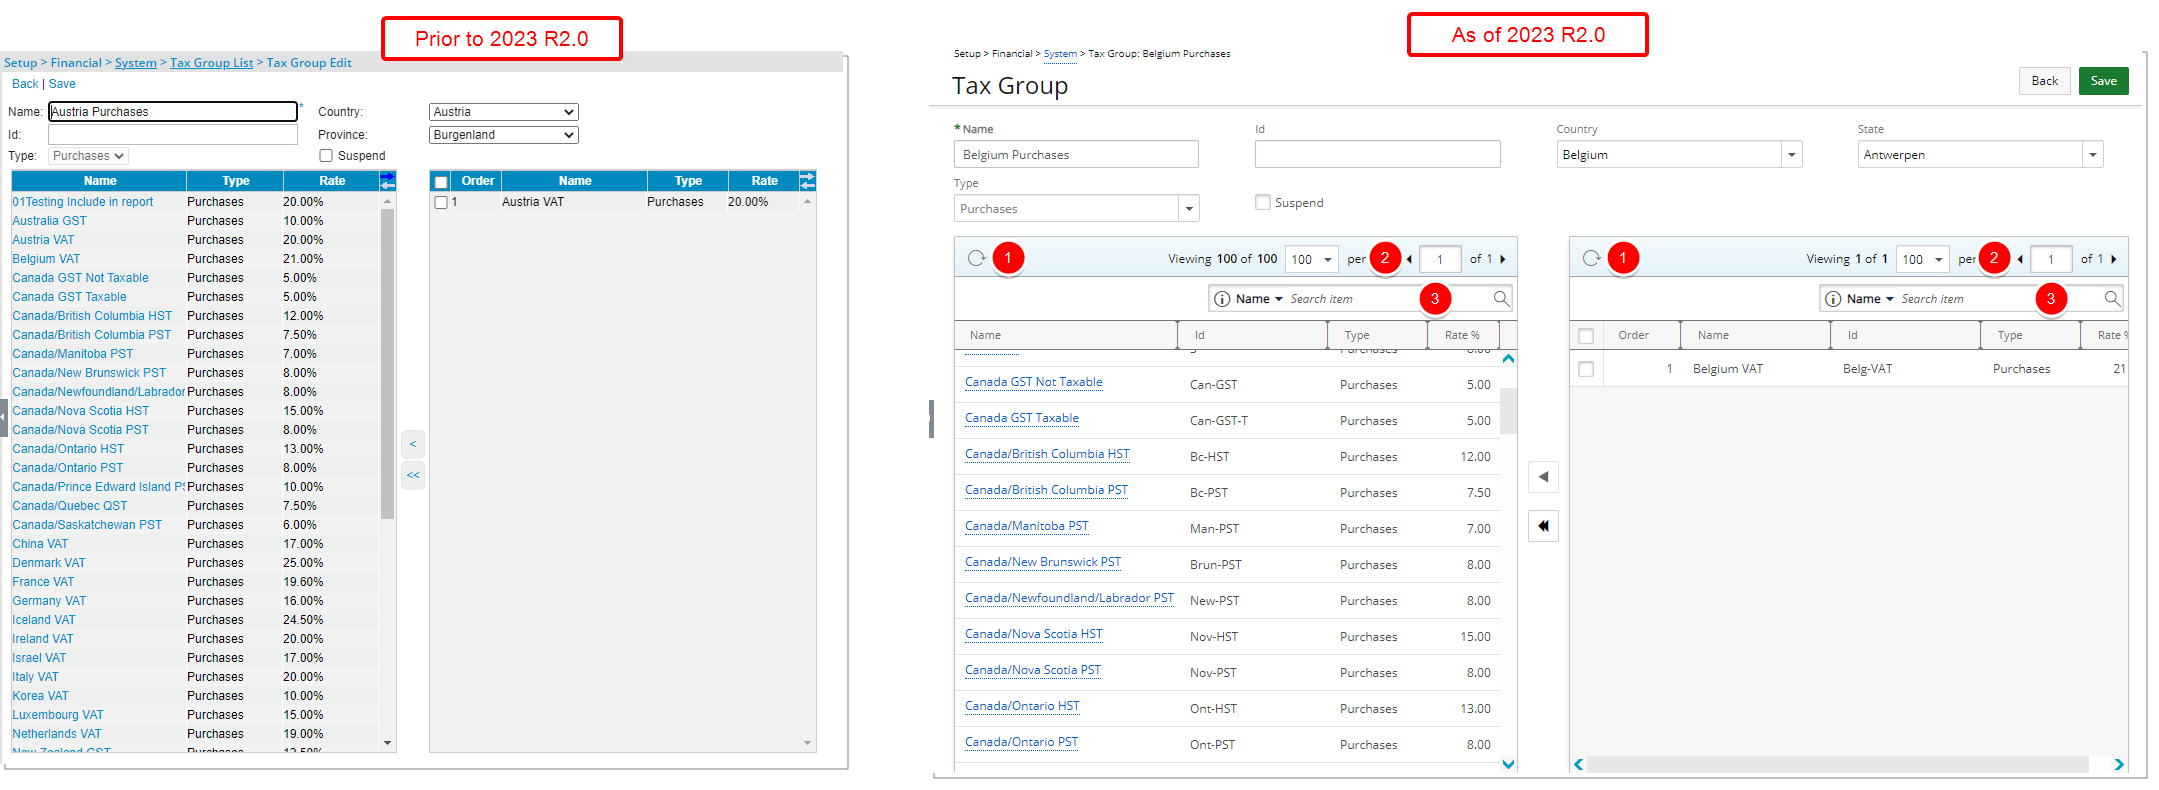
Furthermore, the Tax Group Edit page was also redesigned for a better user experience. In addition to the user interface modifications including spacing, colors, positioning, buttons, icons and fonts the following improvements have also been made:
- Addition of Refresh button for the available/selected tables
- Pagination is now available from the top right corner of the available/selected tables to facilitate easy navigation across multiple pages.
- You can Search the available/selected tables by Name and Id.
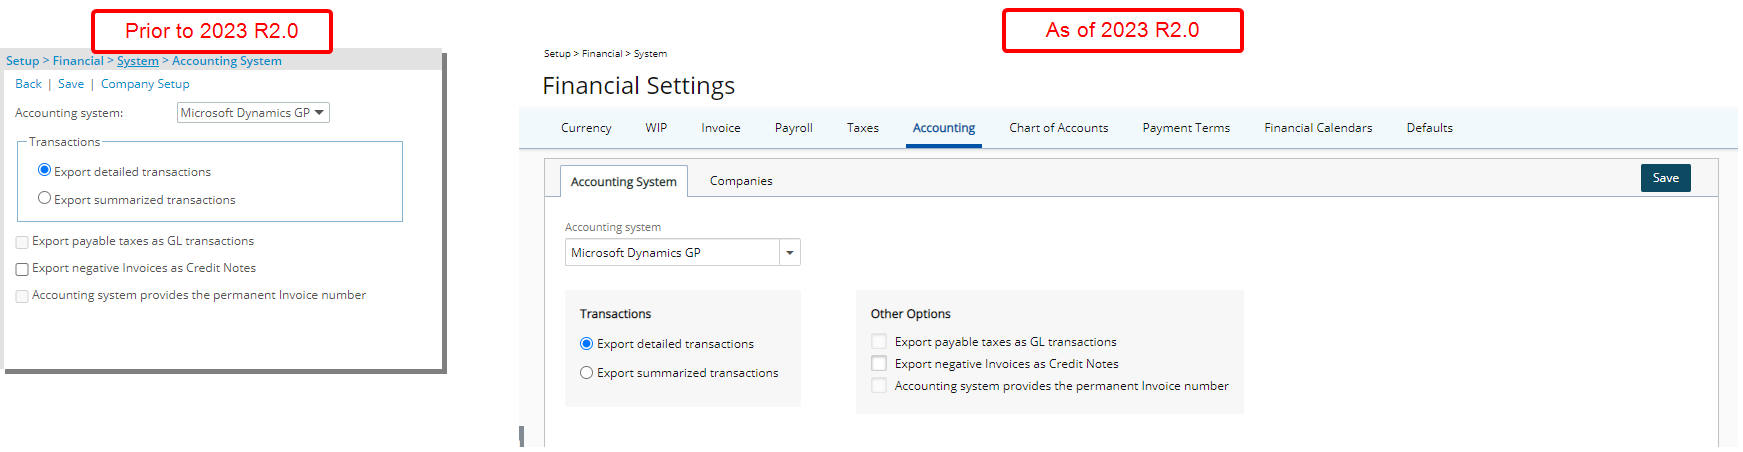
The Accounting System page was designed for a better user experience. Most of the features remain the same, however the look and feel have been renovated to enhance the overall user experience.
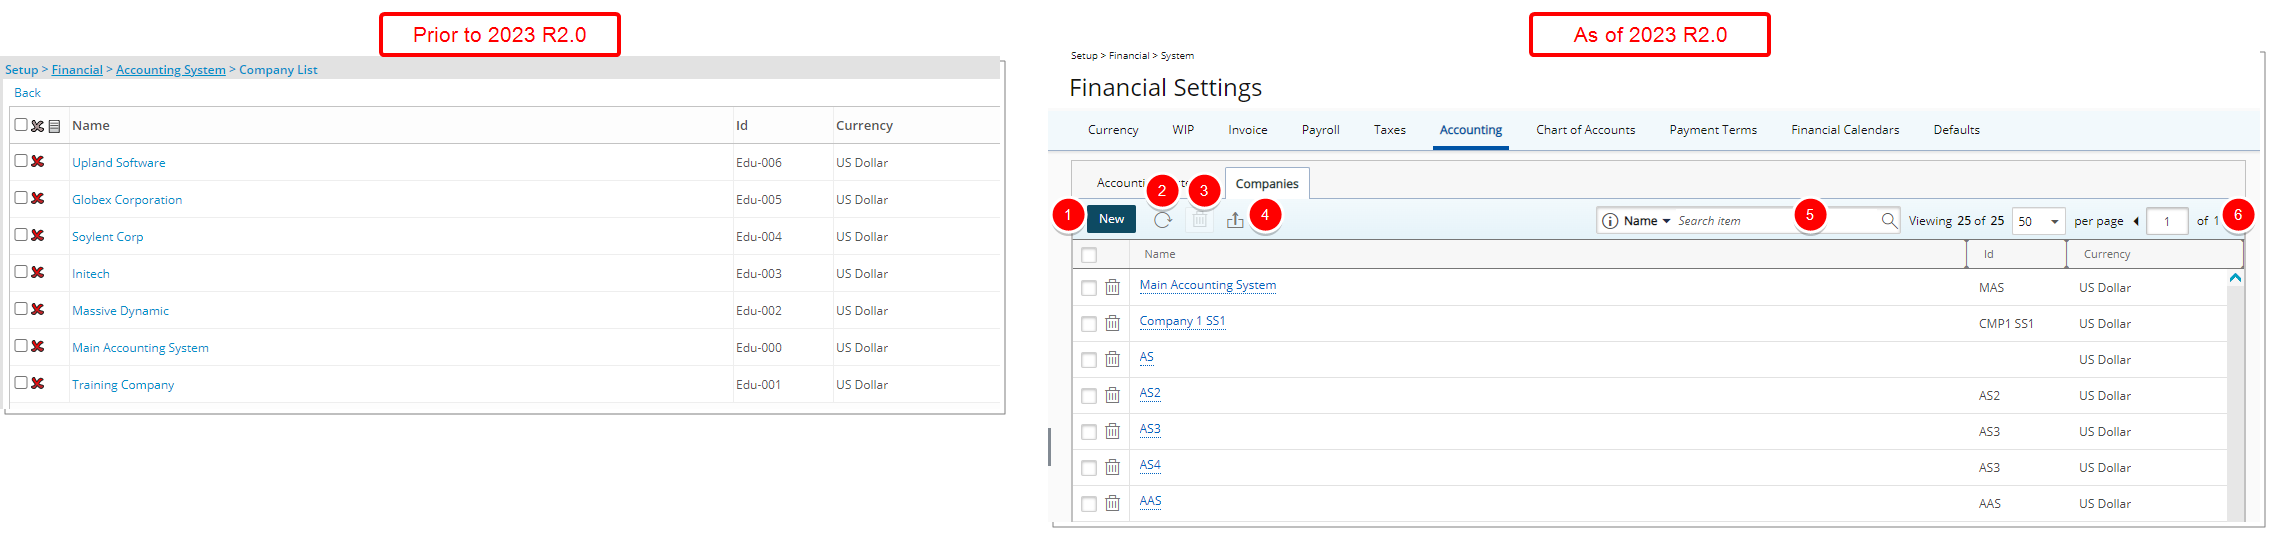
The Companies list page was designed for a better user experience. The following modifications were also made:
- The New button has been redesigned and moved to the table header.
- Addition of a Refresh button allowing you to reload the page.
- The Delete button has been redesigned and moved to the table header.
- The Export to Excel button was redesigned and moved to the table header area.
- Addition of Search capability allowing you to Search for a Company by Name, Id and Currency.
- Pagination is now available at the top right corner to facilitate easy navigation across multiple pages.
For all Accounting systems the WIP Policy page has been redesigned for a better user experience. Most of the features remain the same, however the look and feel have been renovated to enhance the overall user experience.
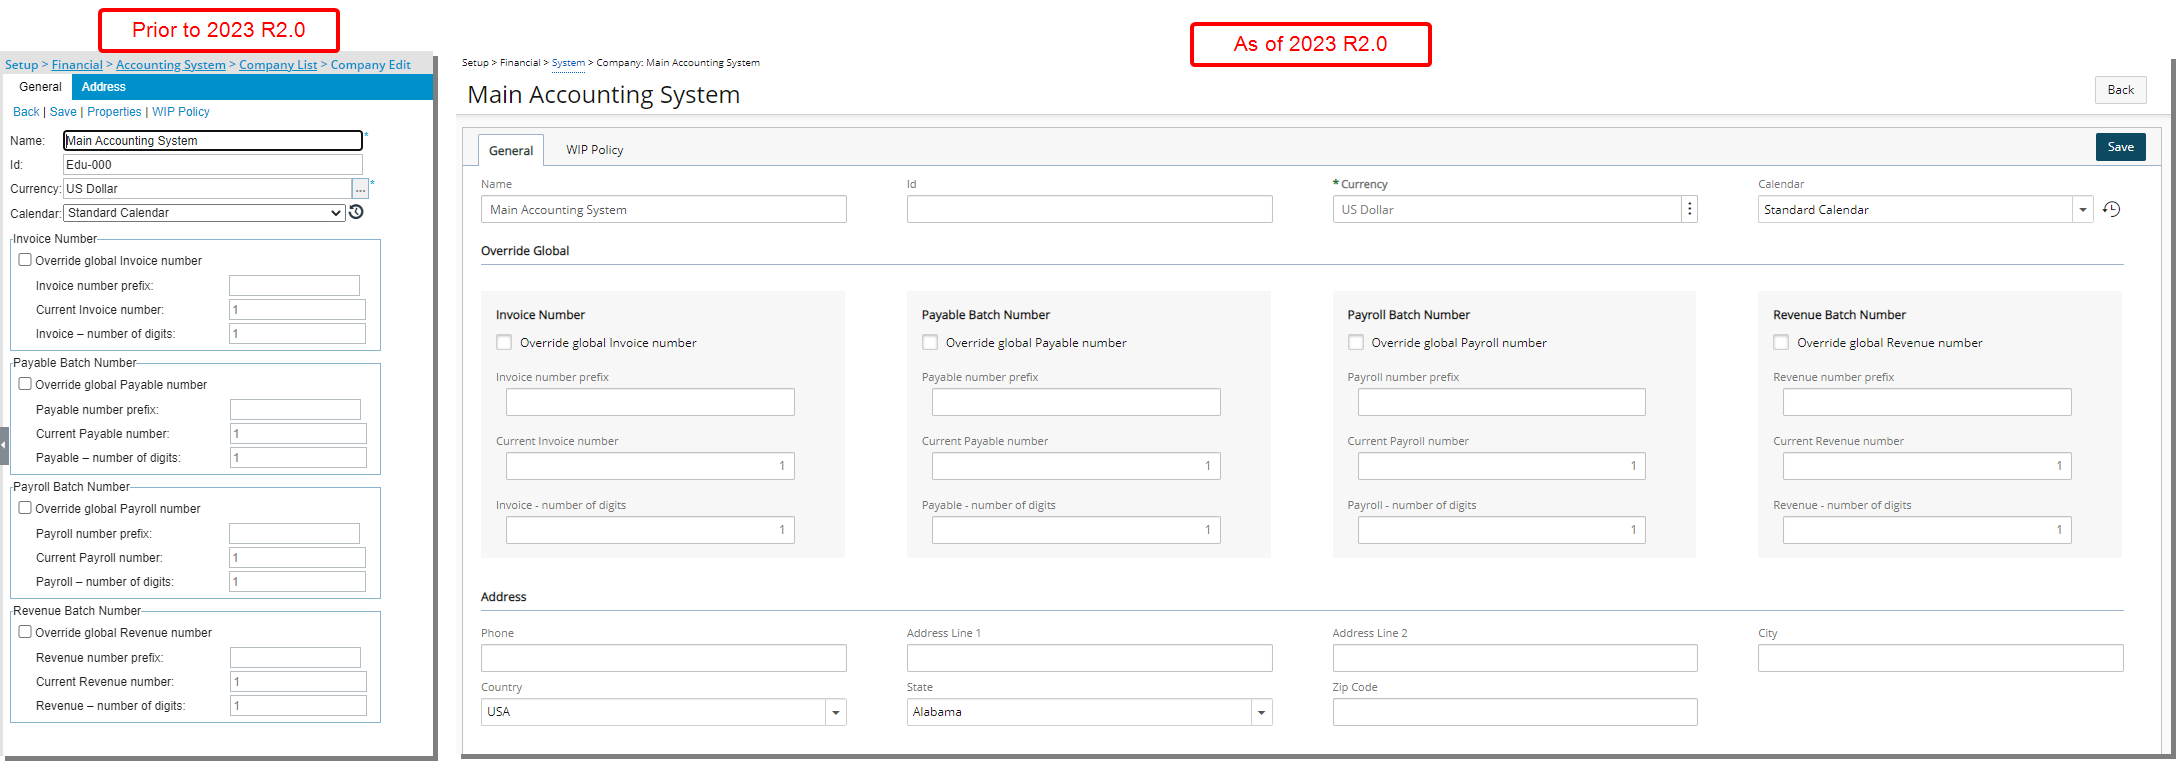
For Internal and Microsoft Dynamics GP Accounting Systems the Company Edit page has been redesigned for a better user experience. Most of the features remain the same, however the look and feel have been renovated to enhance the overall user experience.
Internal
Tor Internal Accounting System, the General and Address tabs are now merged into one.
Microsoft Dynamics GP
Tor Microsoft Dynamics GP Accounting System:
- The General and Address tabs are now merged into one.
- The Properties tab was designed for a better user experience. Most of the features remain the same, however the look and feel have been renovated to enhance the overall user experience.
WIP Policy
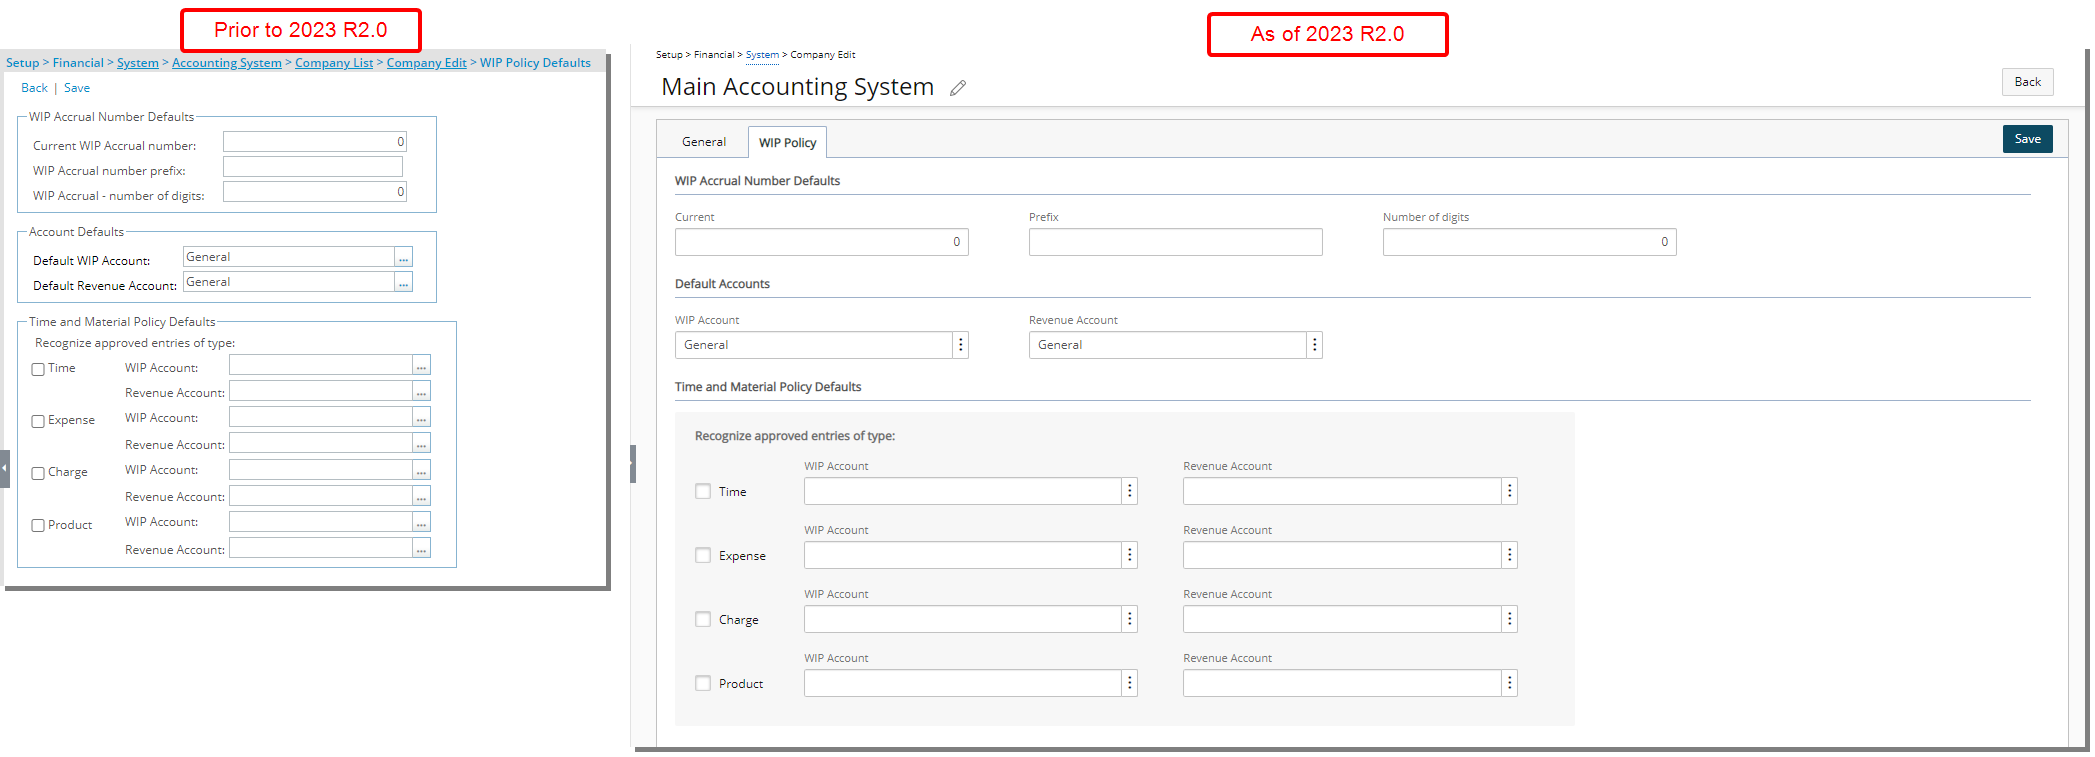
The WIP Policy page was designed for a better user experience. Most of the features remain the same, however the look and feel have been renovated to enhance the overall user experience.
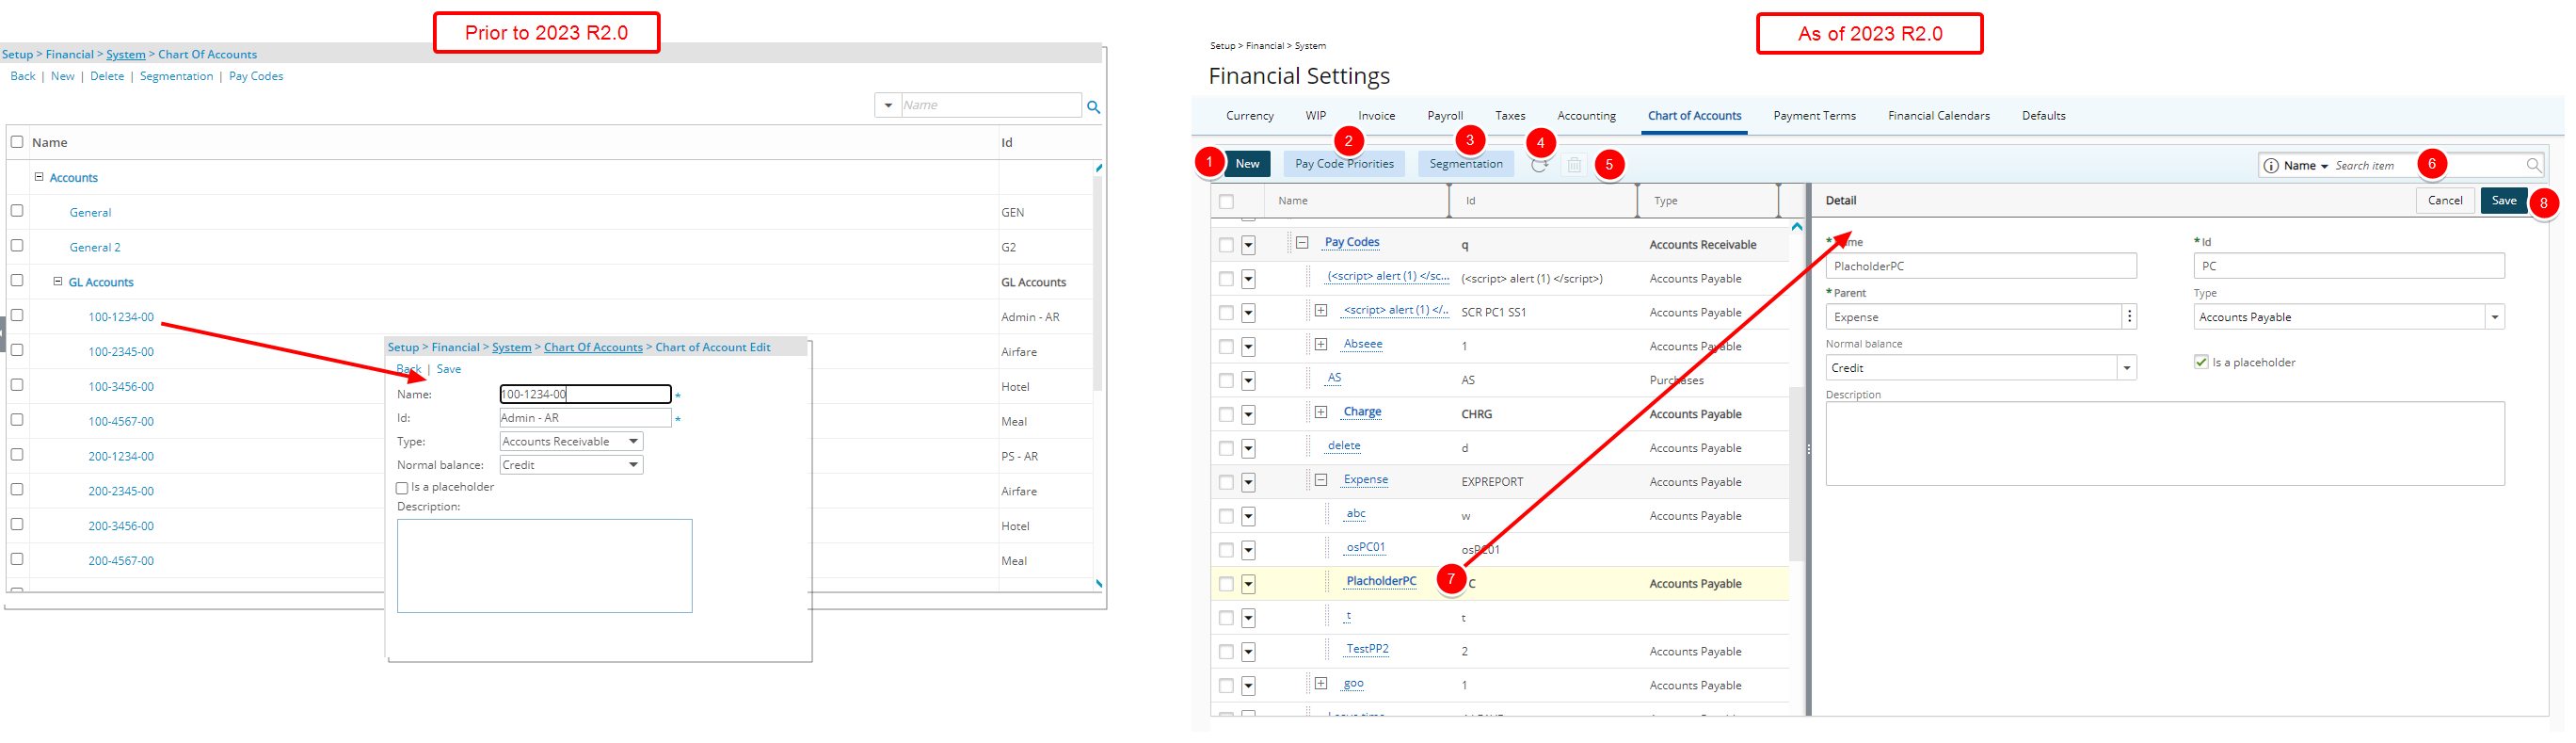
In addition to the user interface changes, the Chart Of Accounts list page and Chart of Account Edit pages are now merged into one.
1. The New link has been converted to a button and now located in the table header.
2. The Pay Codes link has been renamed to Pay Codes Priorities and converted to a button. It is now located in the table header.
3. The Segmentation link has been converted to a button and is now located in the table header.
4. Addition of a Refresh ![]() button allowing you to reload the page.
button allowing you to reload the page.
5. The Delete ![]() button has been redesigned and is now located in the table header.
button has been redesigned and is now located in the table header.
6. The improved Search ![]() capability now allows you to search for Chart Of Accounts by Name, Id, Type and Normal Balance.
capability now allows you to search for Chart Of Accounts by Name, Id, Type and Normal Balance.
7. You can access and modify the details of an existing Chart Of Account by clicking on its Name. The right pane will display the details of the selected Chart Of Account.
8. Upon modifying a Chart Of Account, you can click Save or Cancel directly from the right pane.
Furthermore, the user interface of the Pay Code Priorities has also been improved. You will see most of the same functionality, but the look and feel have been renovated to improve user experience.
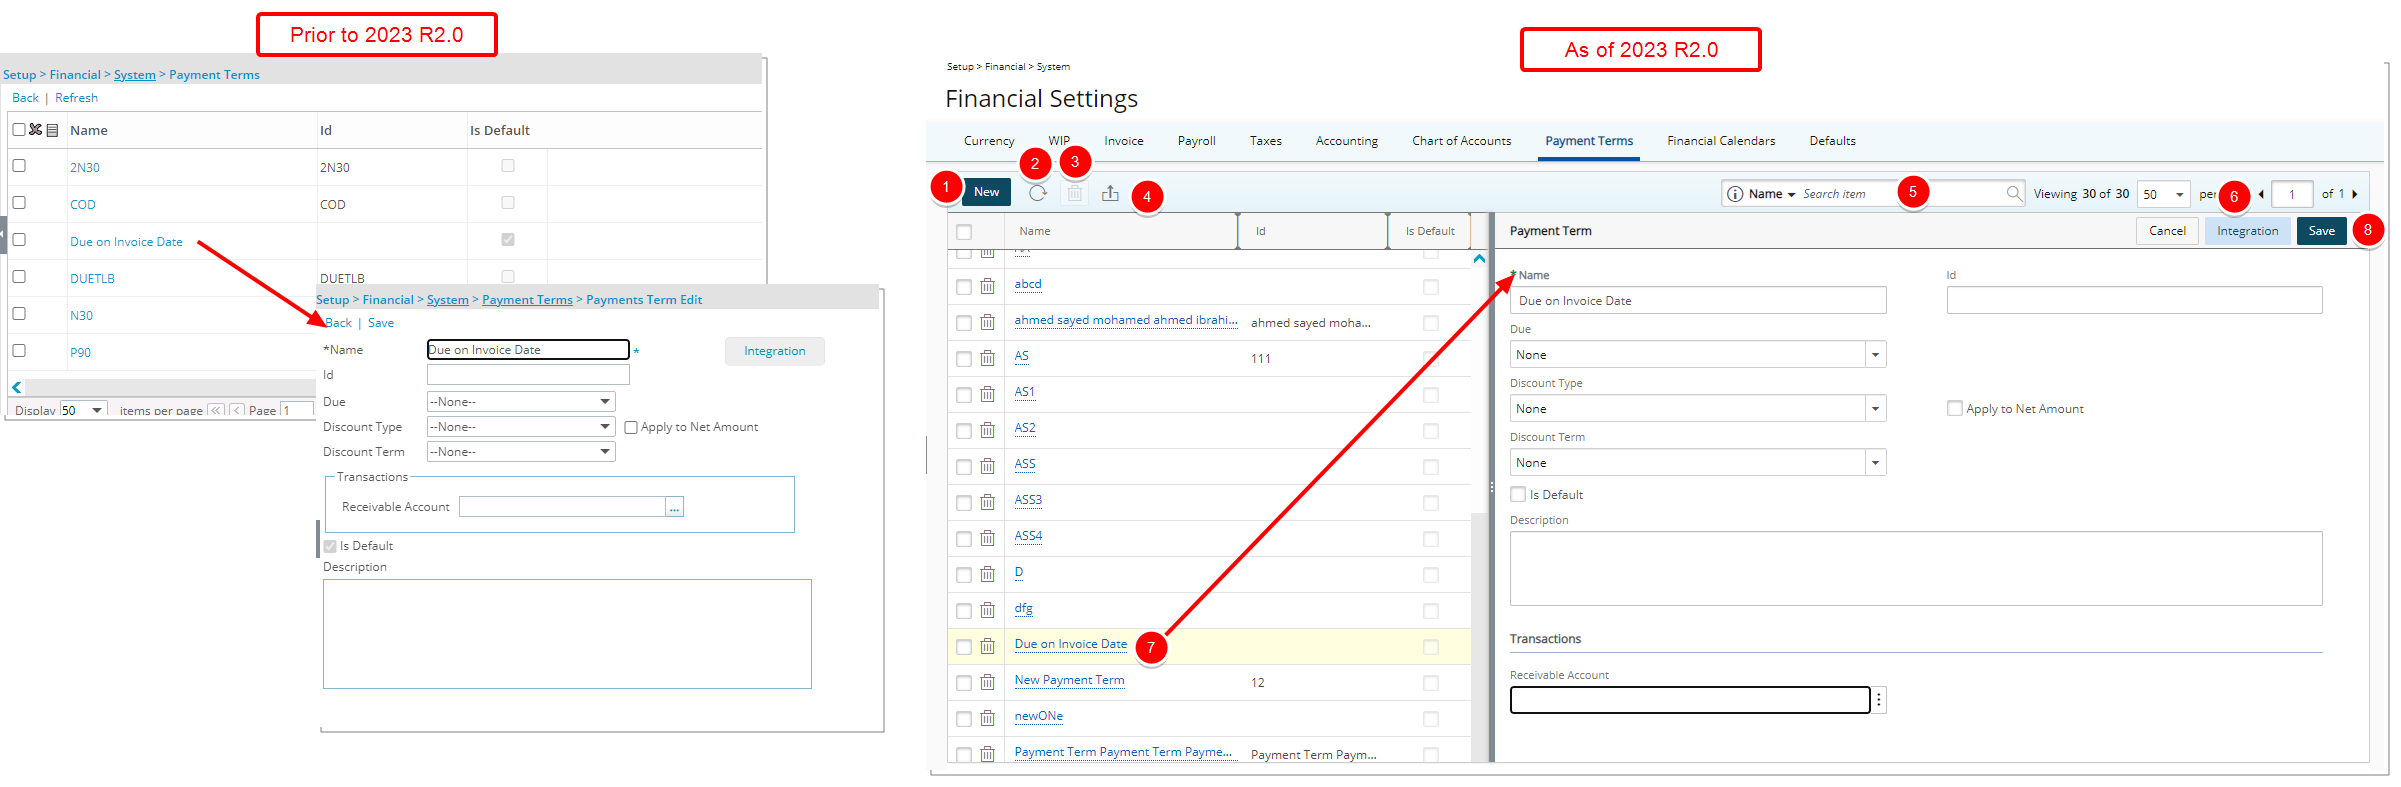
In addition to the user interface changes, the Payment Terms list page and Payments Term Edit pages are now merged into one. Furthermore, the following improvements have also been made:
- The New button was redesigned and is now located in the table header.
- Addition of a Refresh button allowing you to reload the page.
- The Delete button has been redesigned and is now located in the table header. Note that the default Payment Term cannot be deleted.
- The Export to Excel button was redesigned and moved to the table header area.
- Addition of Search capability allowing you to Search for a Payment Term by Name and Id.
- Pagination is now available at the top right corner to facilitate easy navigation across multiple pages.
- You can access and modify the details of an existing Payment Term by clicking on its Name. The right pane will display the details of the selected Payment Term.
- Upon modifying a Payment Term, you can click Save or Cancel directly from the right pane.
- The Integration button was redesigned and moved to the right pane.
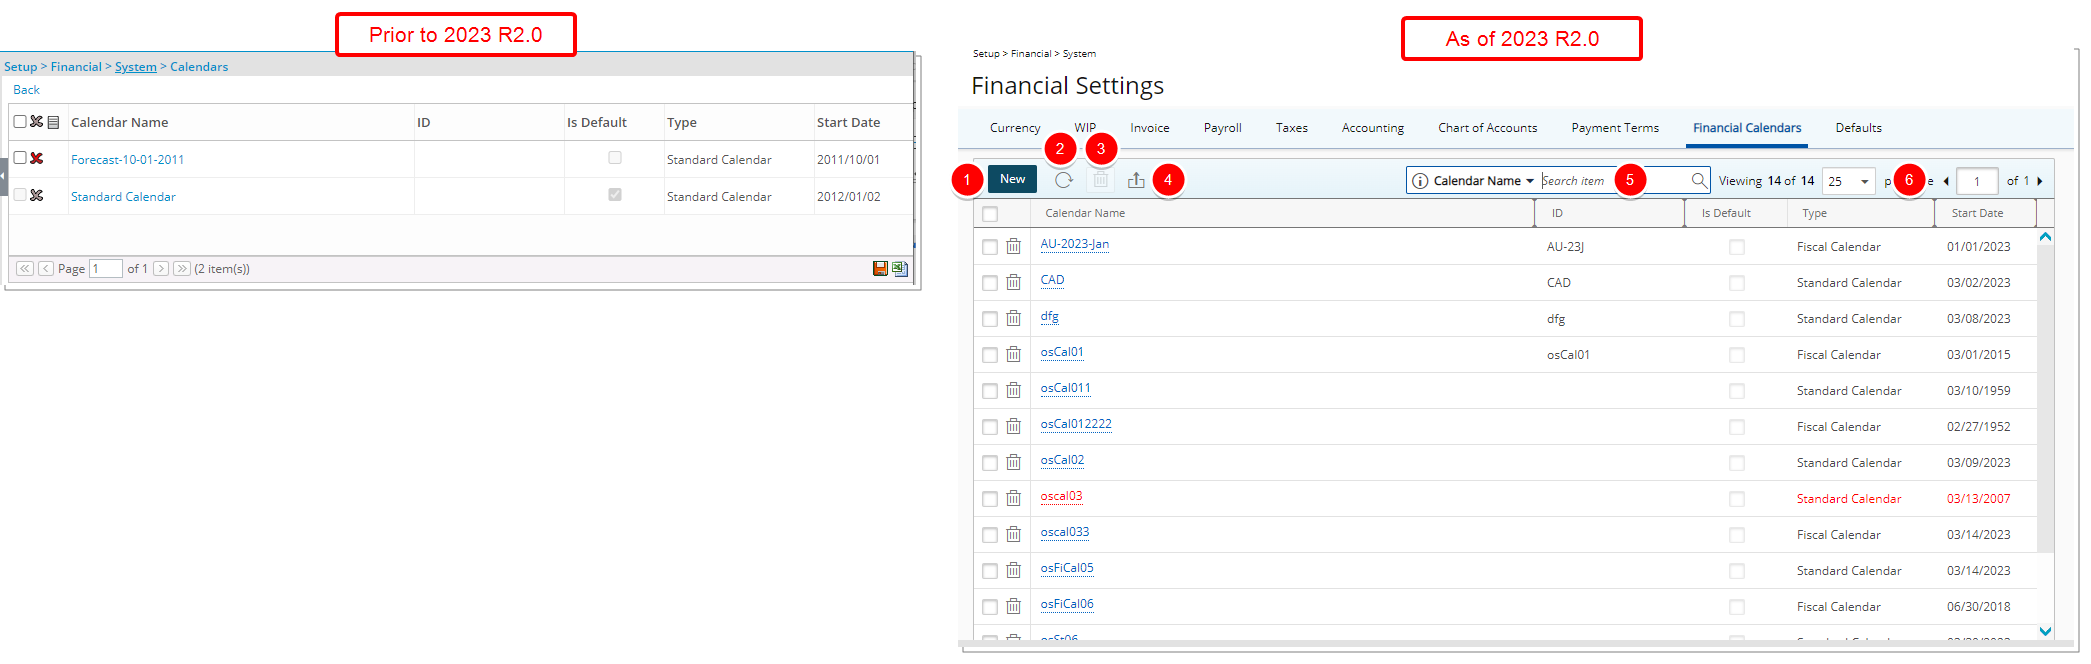
The Financial Calendars list page was designed for a better user experience. The following modifications were also made:
- The New button was redesigned and is now located in the table header.
- Addition of a Refresh button allowing you to reload the page.
- The Delete button has been redesigned and is now located in the table header. Note that the default Financial Calendar cannot be deleted.
- The Export to Excel button was redesigned and moved to the table header area.
- Addition of Search capability allowing you to Search by Calendar Name, Id and Type.
- Pagination is moved to the top right corner of the available/selected tables to facilitate easy navigation across multiple pages.
- You can access and modify the details of an existing Calendar by clicking on its Name.
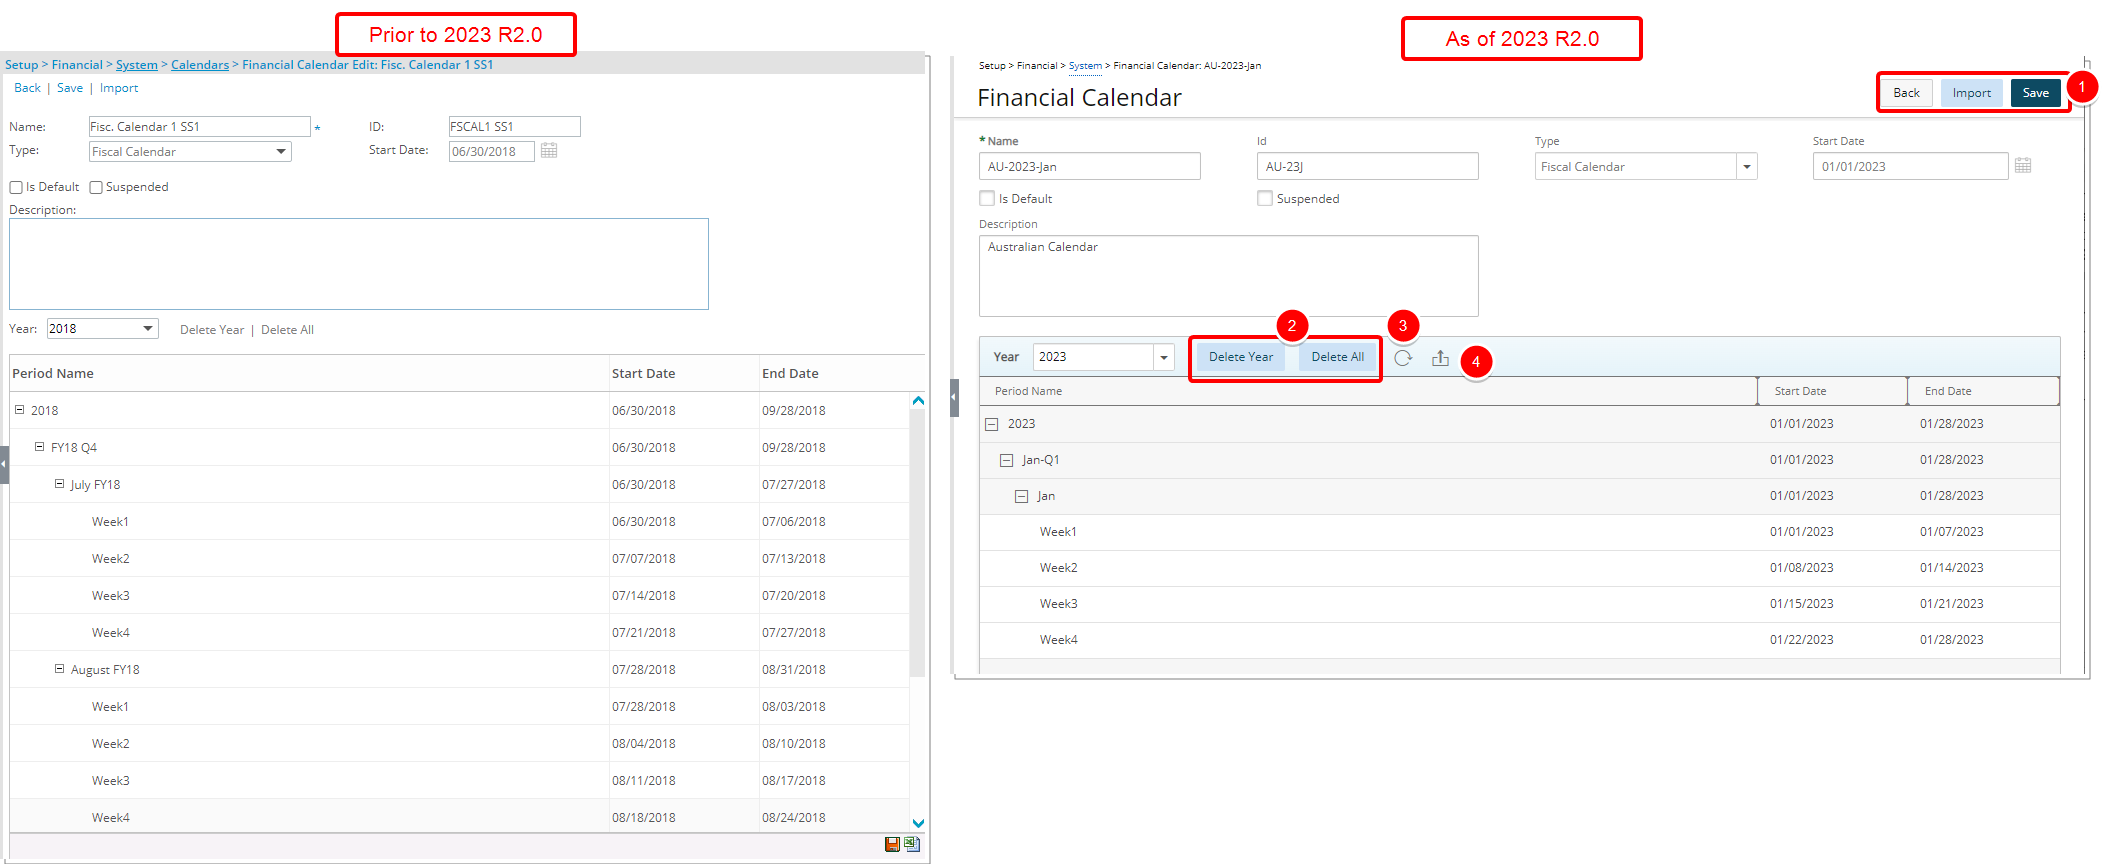
Furthermore, the Financial Calendar edit page was also redesigned and the following improvements have been made:
- The Back, Save and Import links are converted to buttons and are now located at the top right corner of the page.
- For Fiscal Calendars, the Delete Year and Delete All links were converted to buttons.
- Addition of a Refresh button allowing you to reload the page.
- The Export to Excel button was redesigned and moved to the table header area.

The Segmentation Setup page is now a moveable dialog box and has been redesigned for a better user experience. You will see most of the same functionality, but the look and feel have been renovated to improve user experience.
Note: Upon selecting None, all subsequent fields will be automatically updated to None. This concept is identical as deselecting the selection box against a Segment in previous releases.
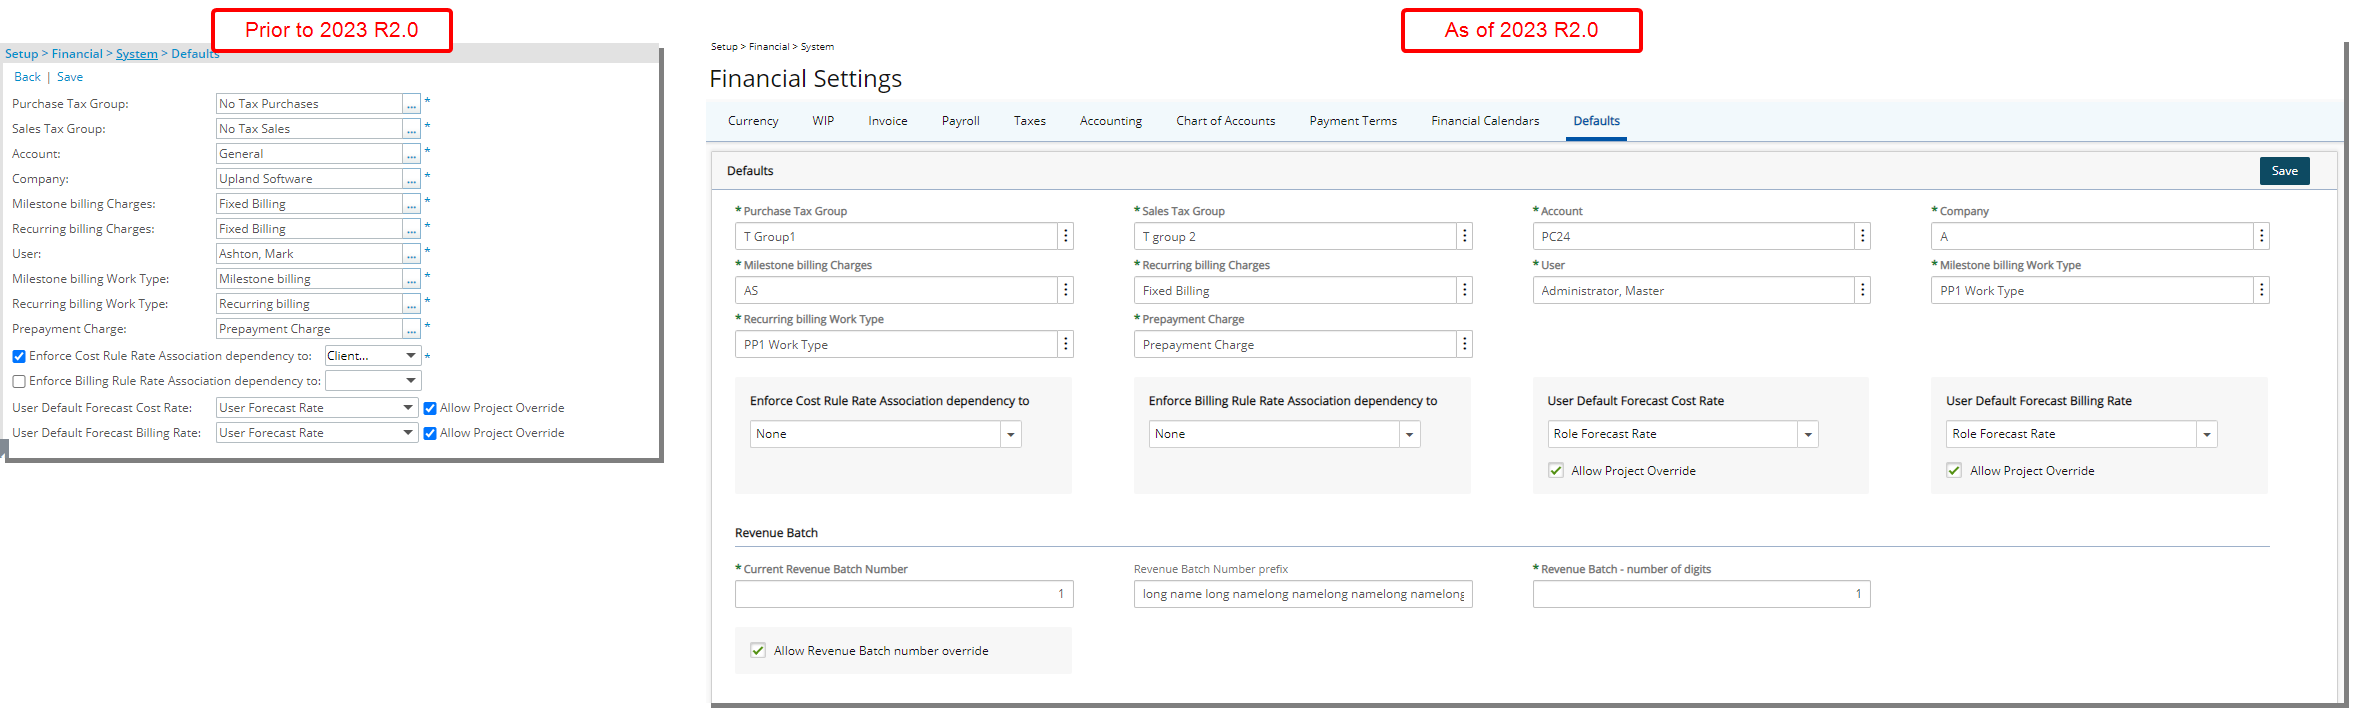
In addition to the user interface changes, the following fields and selection box which were previously located under the Revenue Batch Setup page (Setup > Financial > System) are now located in the Revenue Batch section of the Defaults tab:
- Current Revenue Batch Number
- Revenue Batch Number prefix
- Revenue Batch - number of digits
- Allow Revenue Batch number override
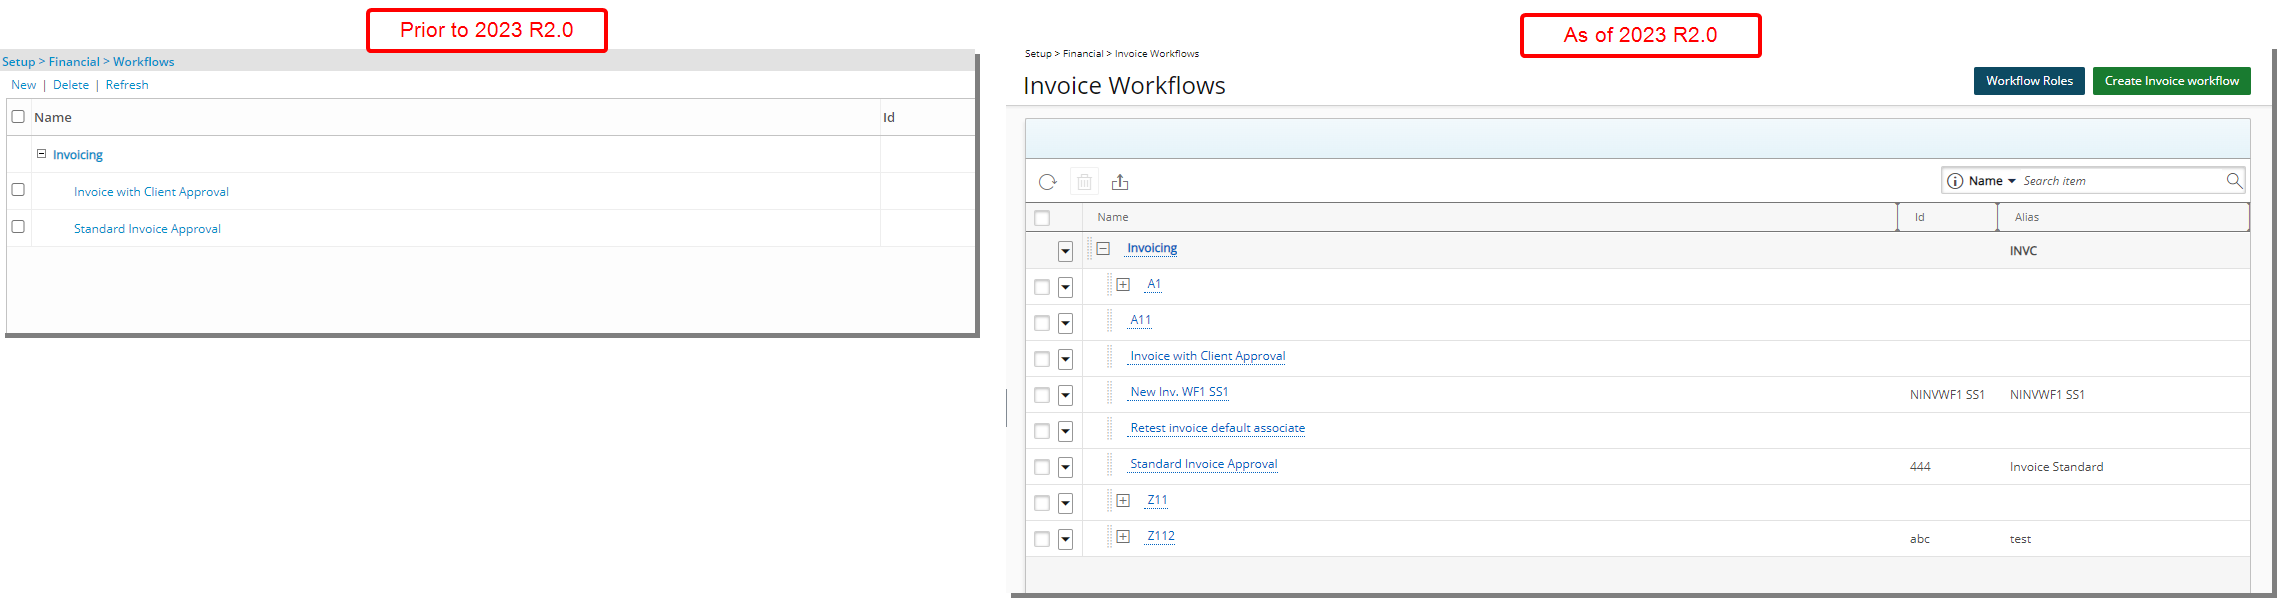
The user interface of the Invoice Workflows list page (Setup > Financial) has been improved for better user experience and consistency with the other updates that have been made thus far.
The following enhancements have also been made:
- The Refresh link was converted to a button and moved to the table header.
- The Delete link is converted to a button and moved to the table header.
- Addition of the ability to Export the list to Excel.
- You can access the Action context menu by clicking the newly added context menu button.
- The Workflow Roles button previously available from the Financial System Setup page is now located on the top right corner of the Invoice Workflows list page allowing you to access and manage the Invoice Workflow Roles.
- The New link is now converted to a button that reads Create Invoice Workflow and is located on the top right corner of the page.
- Addition of Search capability allowing you to Search for Invoice Workflows based on Name, Id and Alias.
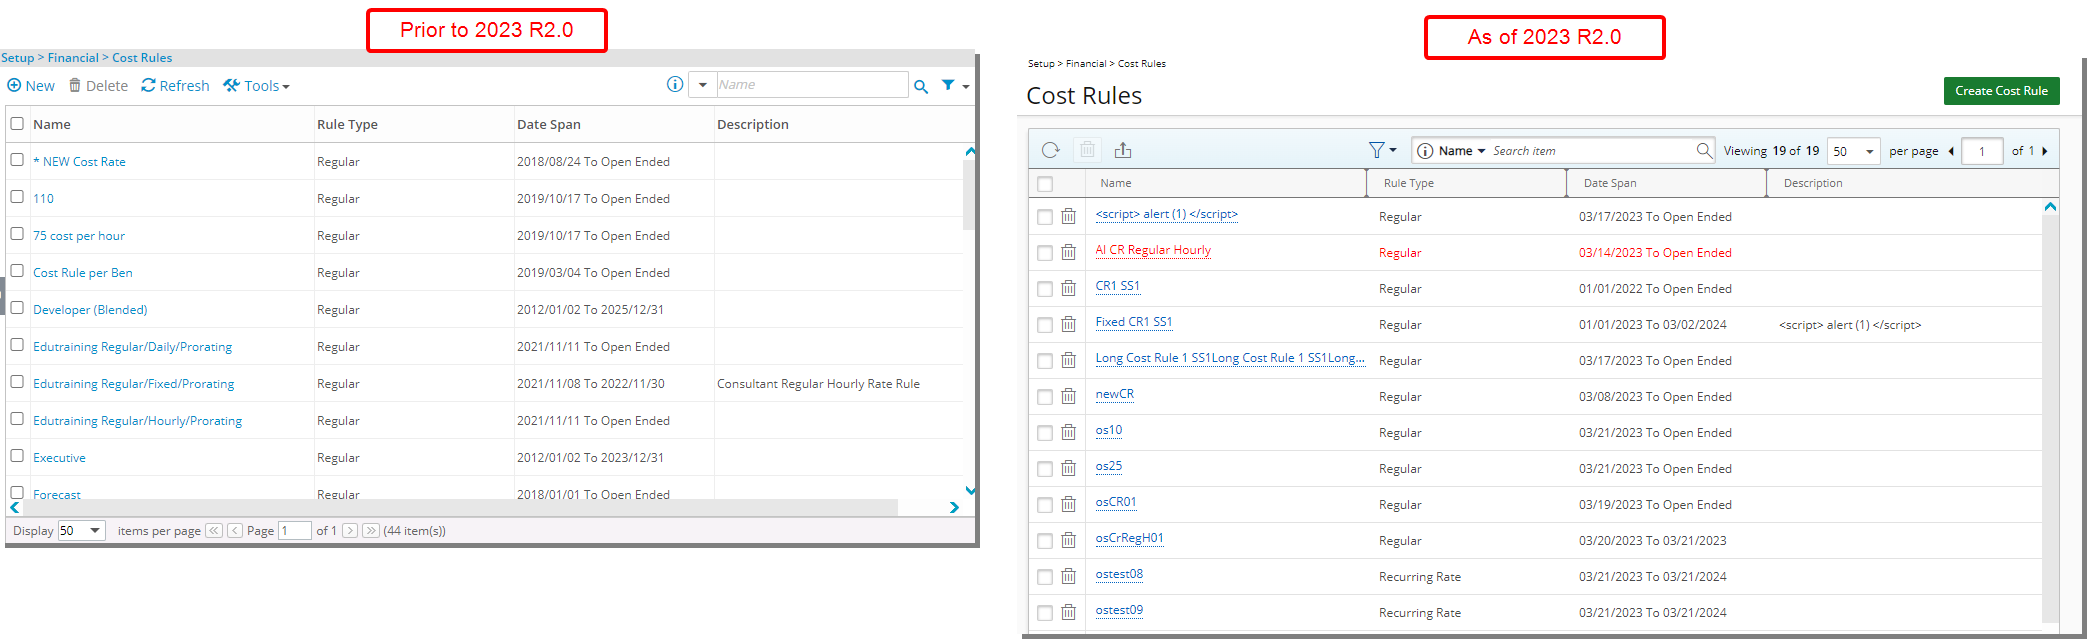
In addition to the user interface changes, the following enhancements have also been made:
- The Refresh and Delete buttons were redesigned and moved to the table header.
- The New link was converted to a button and now reads Create Cost Rule.
- The Tools context menu has been removed and the Export to Excel option is now a button located in the table header area.
- The Filter button as well as the Search box were redesigned and relocated to the table header area.
- Pagination is moved to the top right corner of the page to facilitate easy navigation across multiple pages.

In addition to the user interface changes, the following enhancements have also been made:
- The Refresh and Delete buttons were redesigned and moved to the table header.
- The New link was converted to a button and now reads Create Billing Rule.
- The Tools context menu has been removed and the Export to Excel option is now a button located in the table header area.
- The Filter button as well as the Search box were redesigned and relocated to the table header area.
- Pagination is moved to the top right corner of the page to facilitate easy navigation across multiple pages.
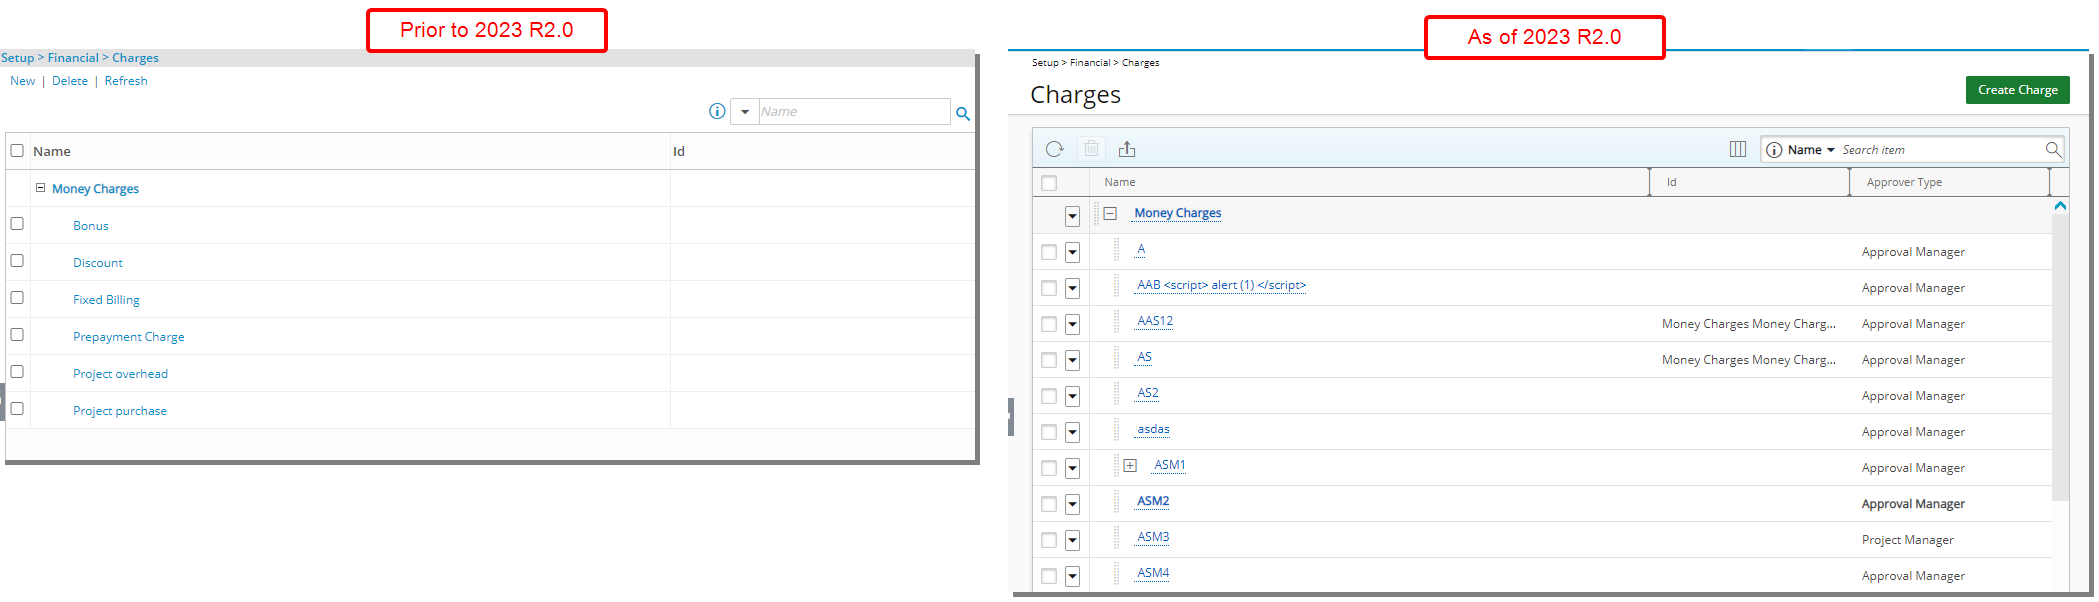
The user interface of the Charges list page (Setup > Financial) has been improved for better user experience and consistency with the other updates that have been made thus far. The following enhancements have also been made:
1. The Refresh ![]() link is converted to a button and moved to the table header.
link is converted to a button and moved to the table header.
2. The Delete ![]() link is converted to a button and moved to the table header.
link is converted to a button and moved to the table header.
3. Addition of the ability to Export ![]() the list to Excel.
the list to Excel.
4. The New link is now converted to a button that reads Create Charge and is located on the top right corner of the page.
5. Addition of Search ![]() capability allowing you to Search for Charges based on Name, Id, Approver Type and Parent.
capability allowing you to Search for Charges based on Name, Id, Approver Type and Parent.
6. Addition of Column Selection ![]() capability from where you can choose to add or remove the following columns: Name, Id, Approver Type and Parent.
capability from where you can choose to add or remove the following columns: Name, Id, Approver Type and Parent.
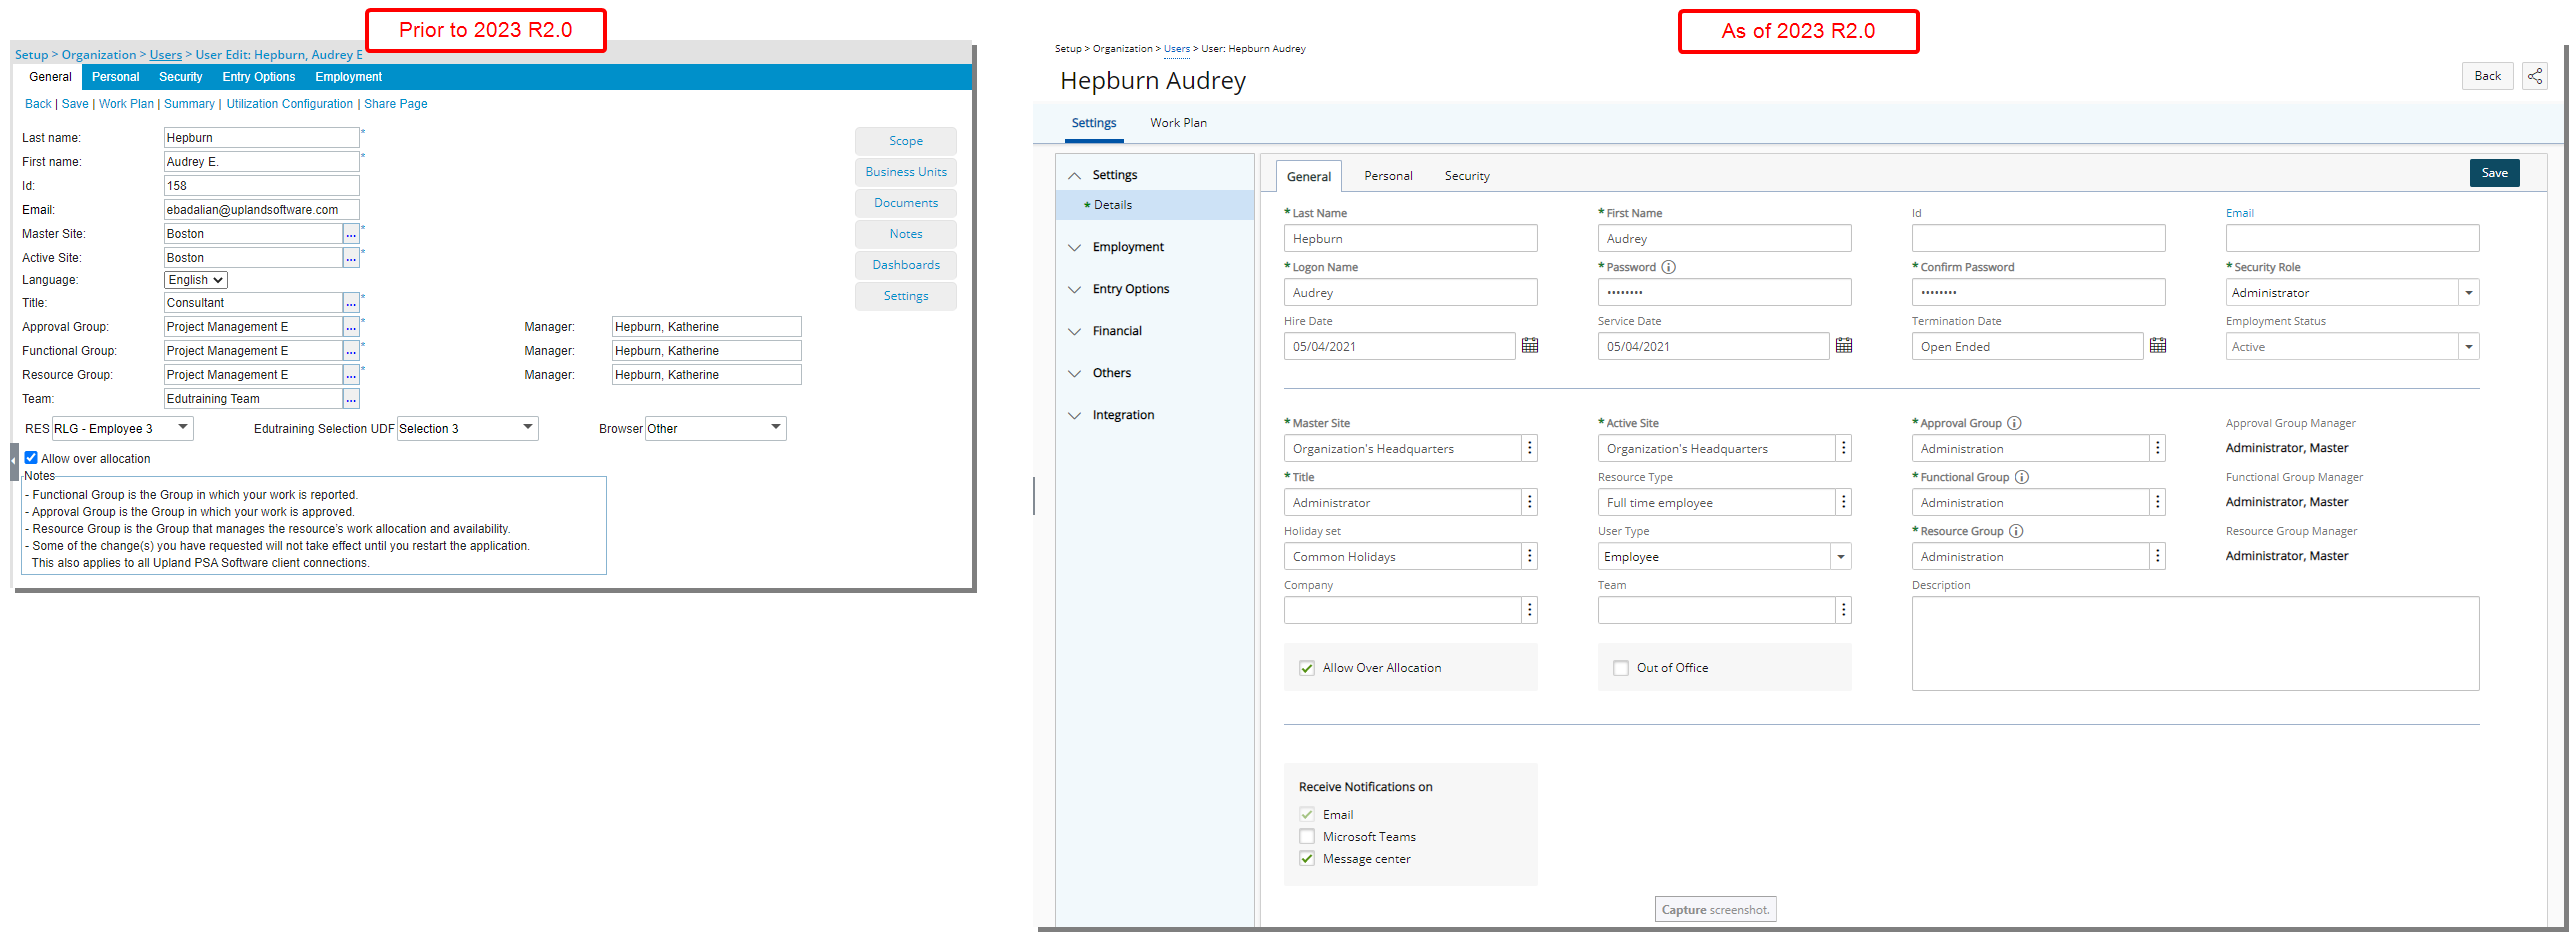
User Edit Renovation (TE-88080, TE-88082, TE-89867)
The interface for creating and editing users has been redesigned with a new look and improved navigation. There are now two tabs: Settings and Work Plan.
There are now six main sections on the left-hand side of the Settings tab: Settings, Employment, Entry Options, Financial, Others, and Integration. Each of these is further divided into components.
For further details refer to: Configuring a User (OBS)
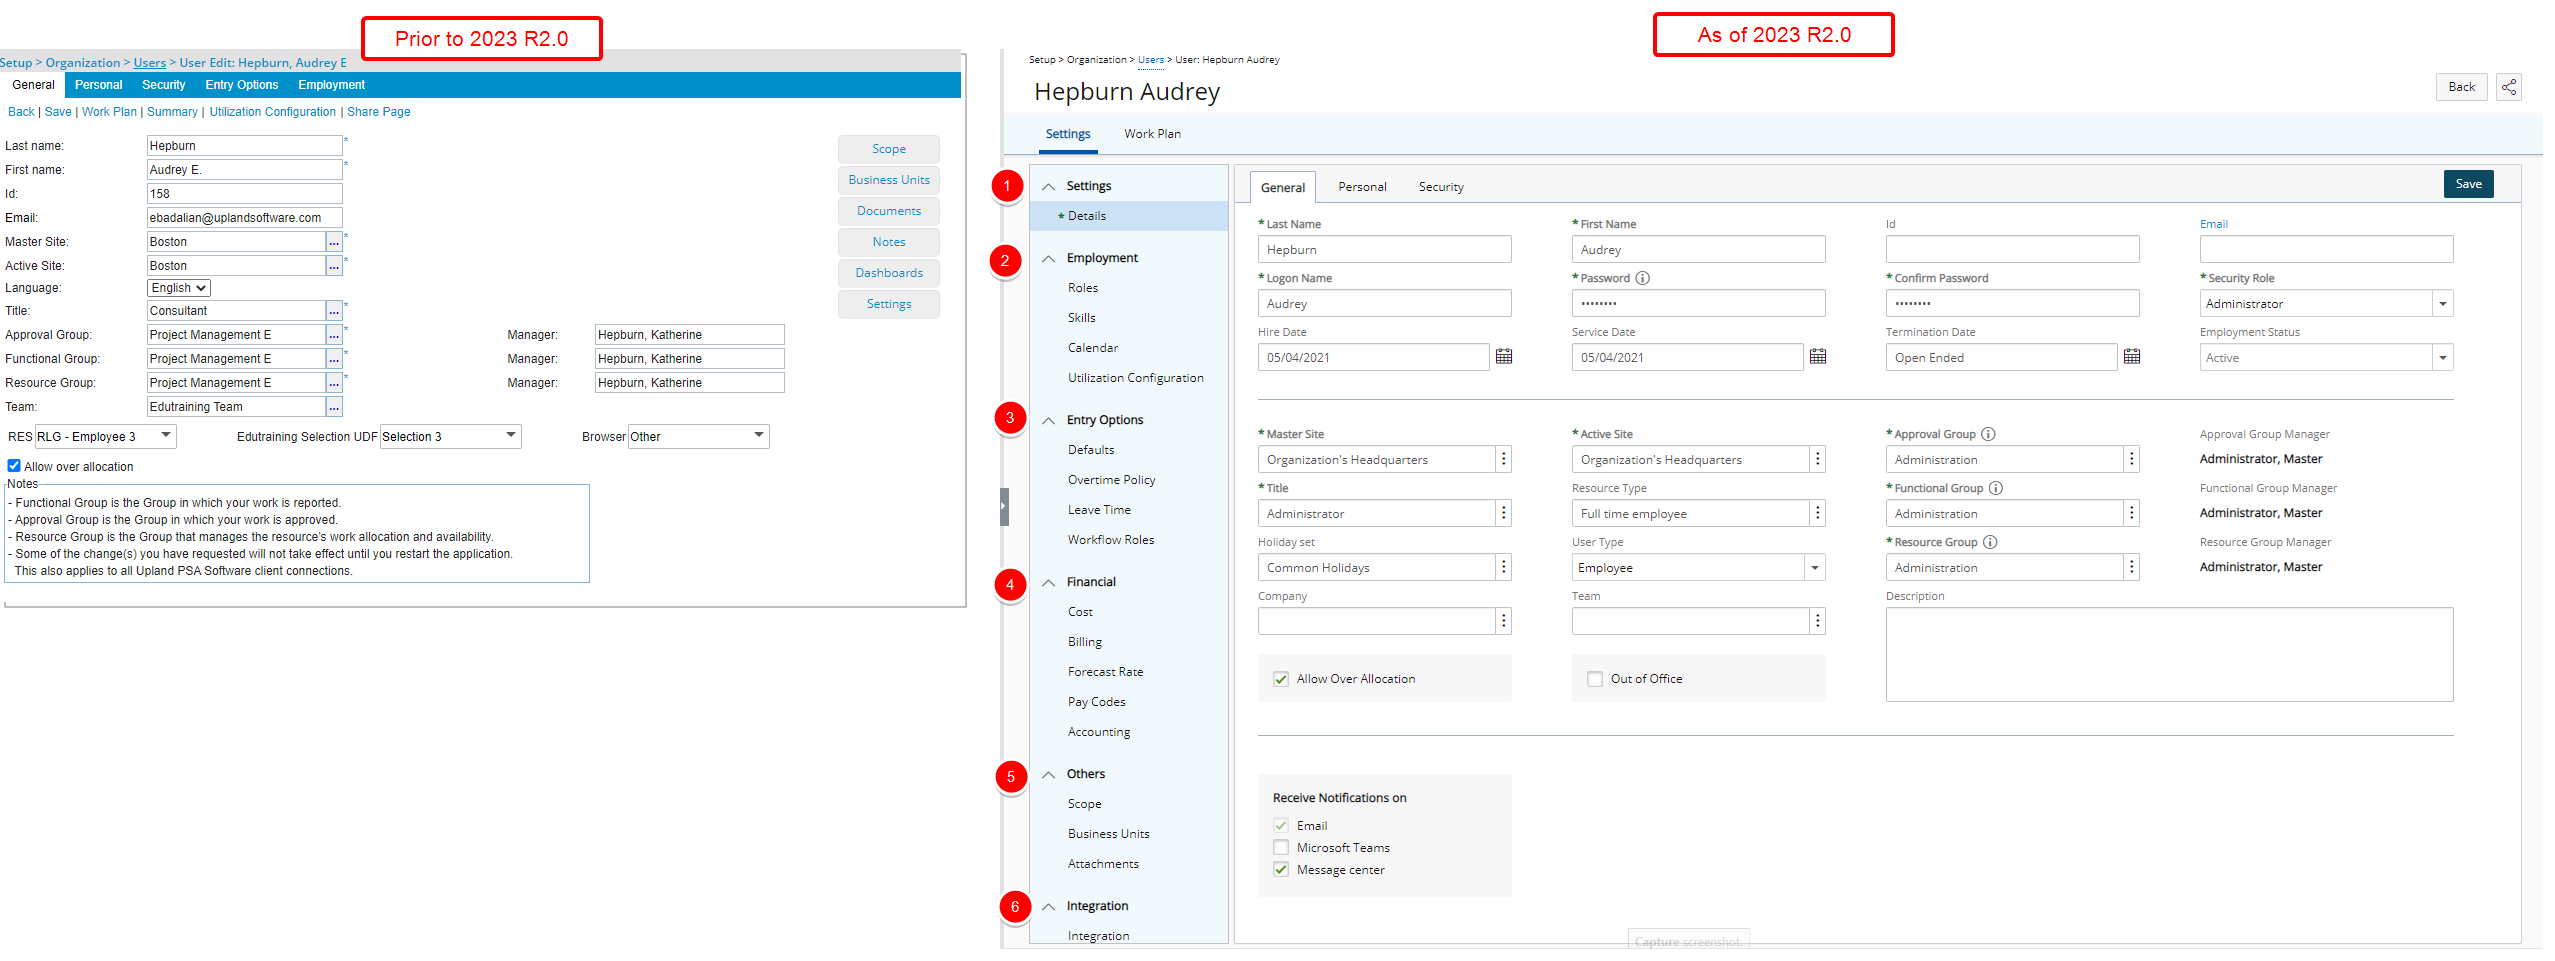
When creating a new user, you will only see the Settings Details with the General, Personal, Security, and any available UDF sub-tabs. After you enter the required information and save, the page will refresh showing all the other elements that you can complete for the user. From the tab navigation you can now access the Work Plan.
- Under the Settings section, you can find the Details.
- Under the Employment section, you can find the Roles, Skills, Calendar, and Utilization Configuration of your user.
- Under the Entry Options section, you can find the Defaults, Overtime Policy, Leave Time and Workflow Roles of your user.
- From the Financial section, you can find the Cost, Billing, Forecast Rate, Pay Codes and Accounting settings.
- From the Others section, you can find the Scope, Business Units and Attachments.
- From the Integration section, you can set up the integration with various third-party applications.
These changes to the interface result in an overall improvement to the look and feel, and help to create a more unified experience across PSA. Furthermore, the layout of various elements on the page has been adjusted to enhance the user experience even more.
Note: Upon upgrading, any UDFs associated to the legacy Security and Employment tabs will be displayed within the new General tab under any previously associated UDFs to the General tab.
Moreover, improvements have also been made to the following pages:
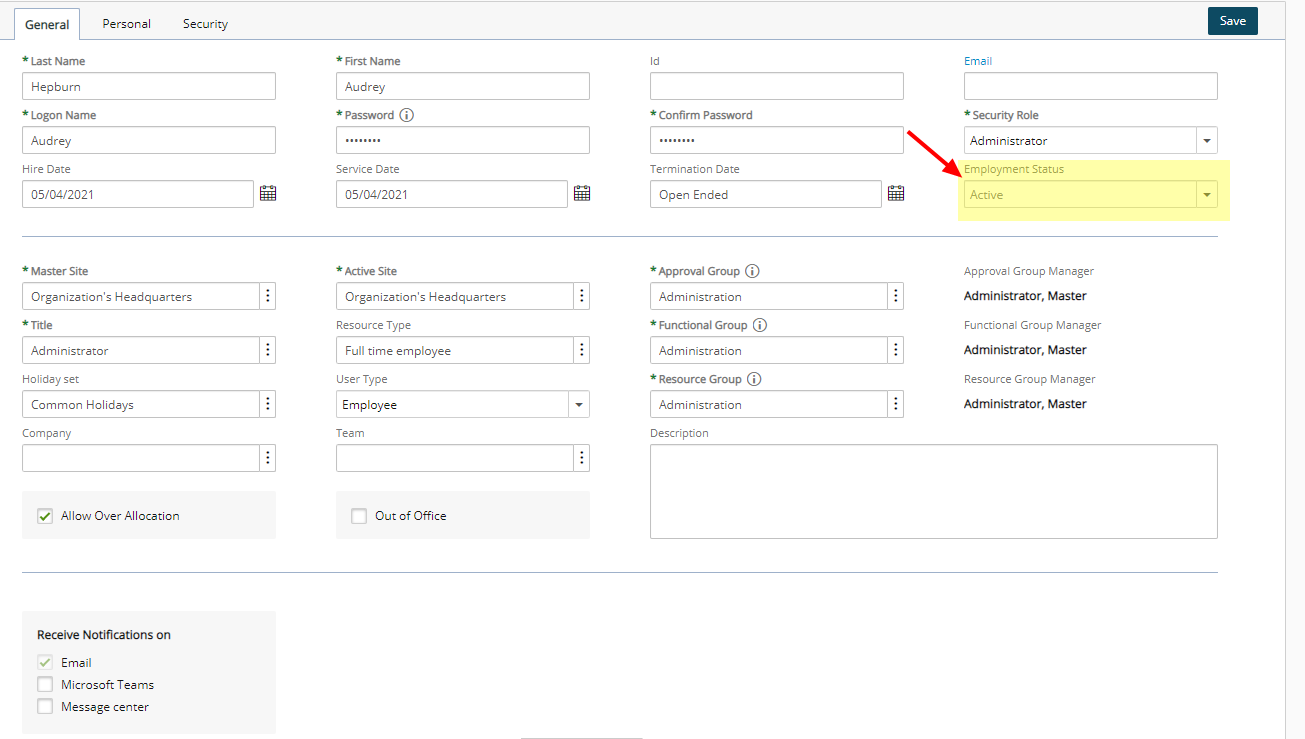
The General tab is now displayed as a sub tab under the User Details. In addition to the overall user interface improvements including spacing, positioning, and fonts, these improvements have also been made.
- The following fields which were formerly under the User Settings tab are now located under the General tab of the User Edit:
- Logon name
- Password
- Confirm Password
- Active Site
- Out of Office
- Receive Notifications on section
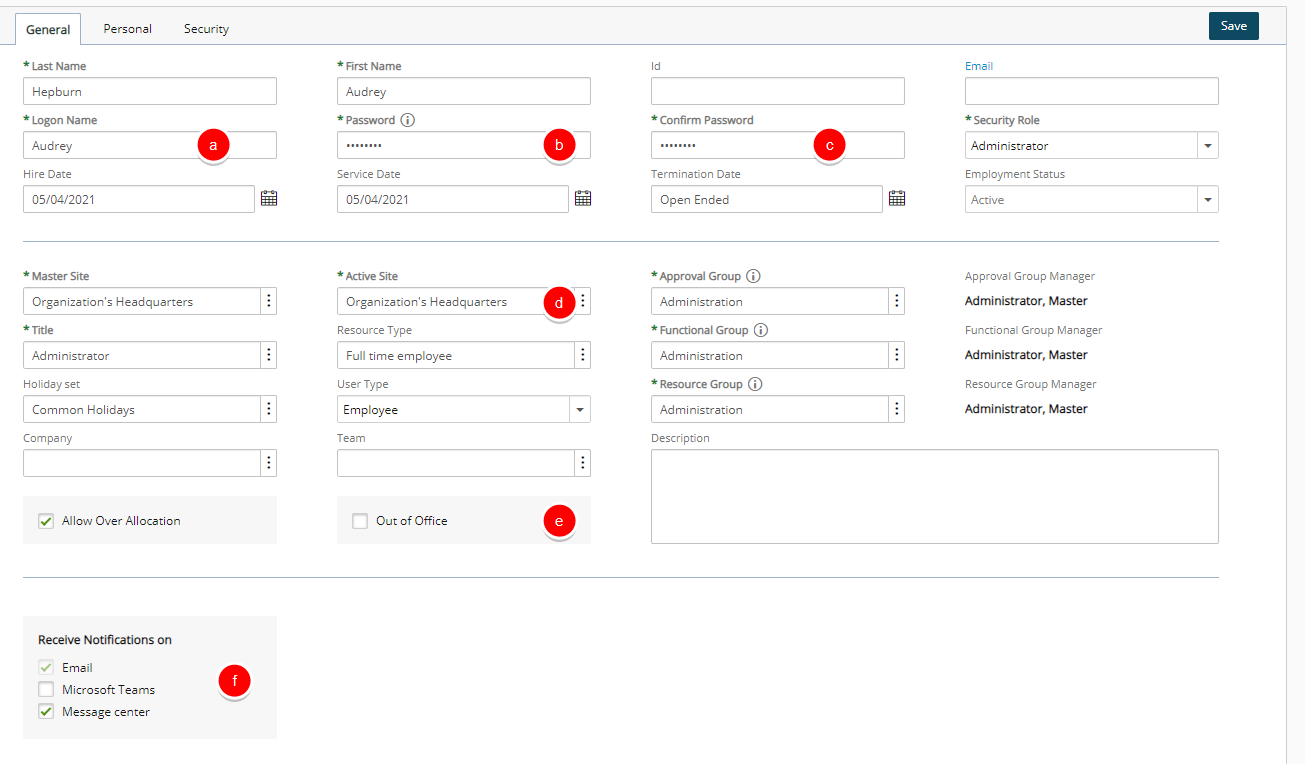
Note: The Notifications selection box was renamed to now read Message center.
- The following fields previously located under the Employment tab are now located in the General tab:
- Hire Date
- Service Date
- Termination Date
- Resource Type
- Holiday set
- User type
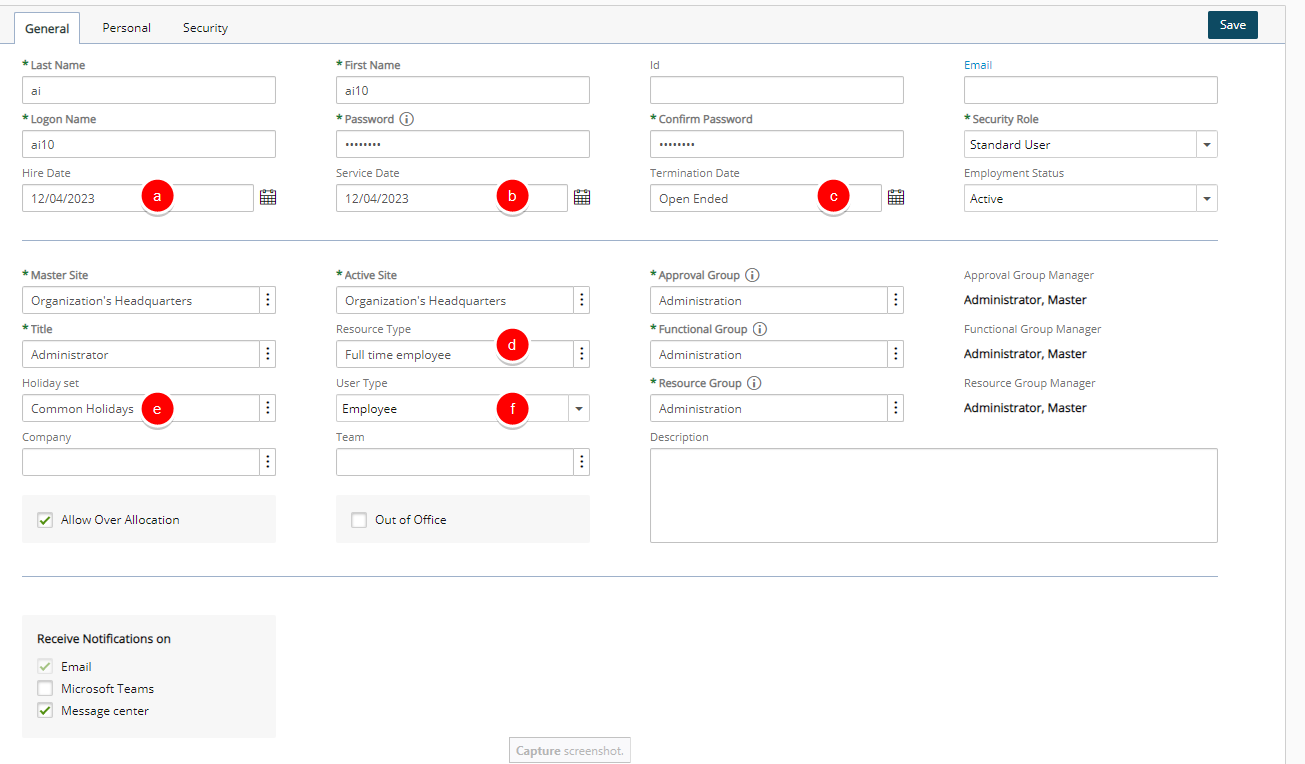
- The Suspend and Decommission selection boxes are now under the newly added Employment Status selection list.
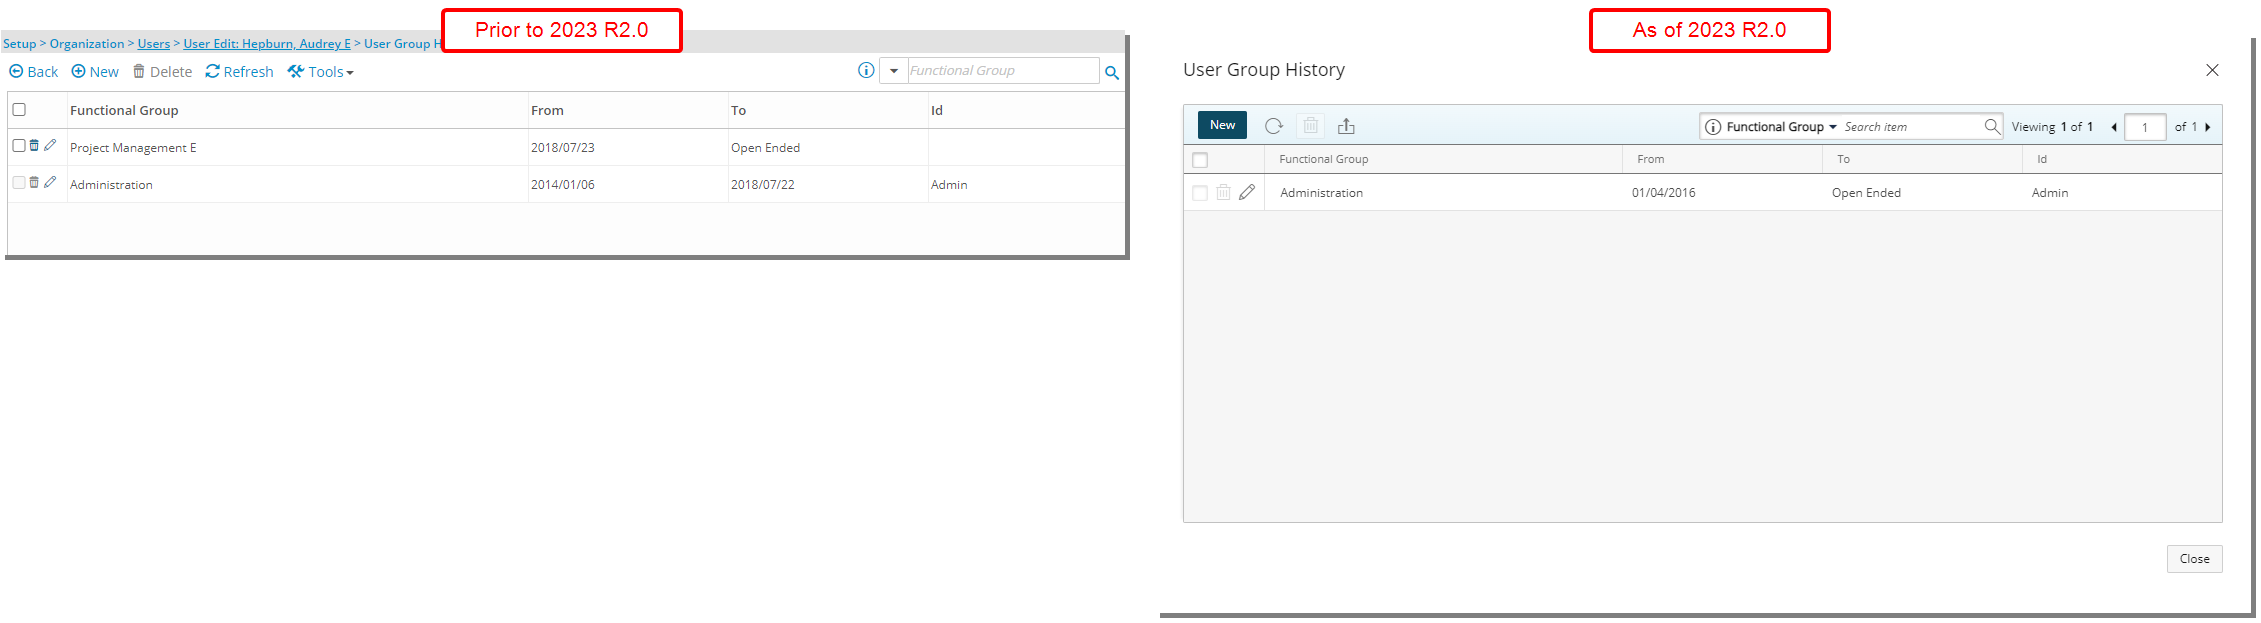
- Improved dialog boxes such as
- Title History
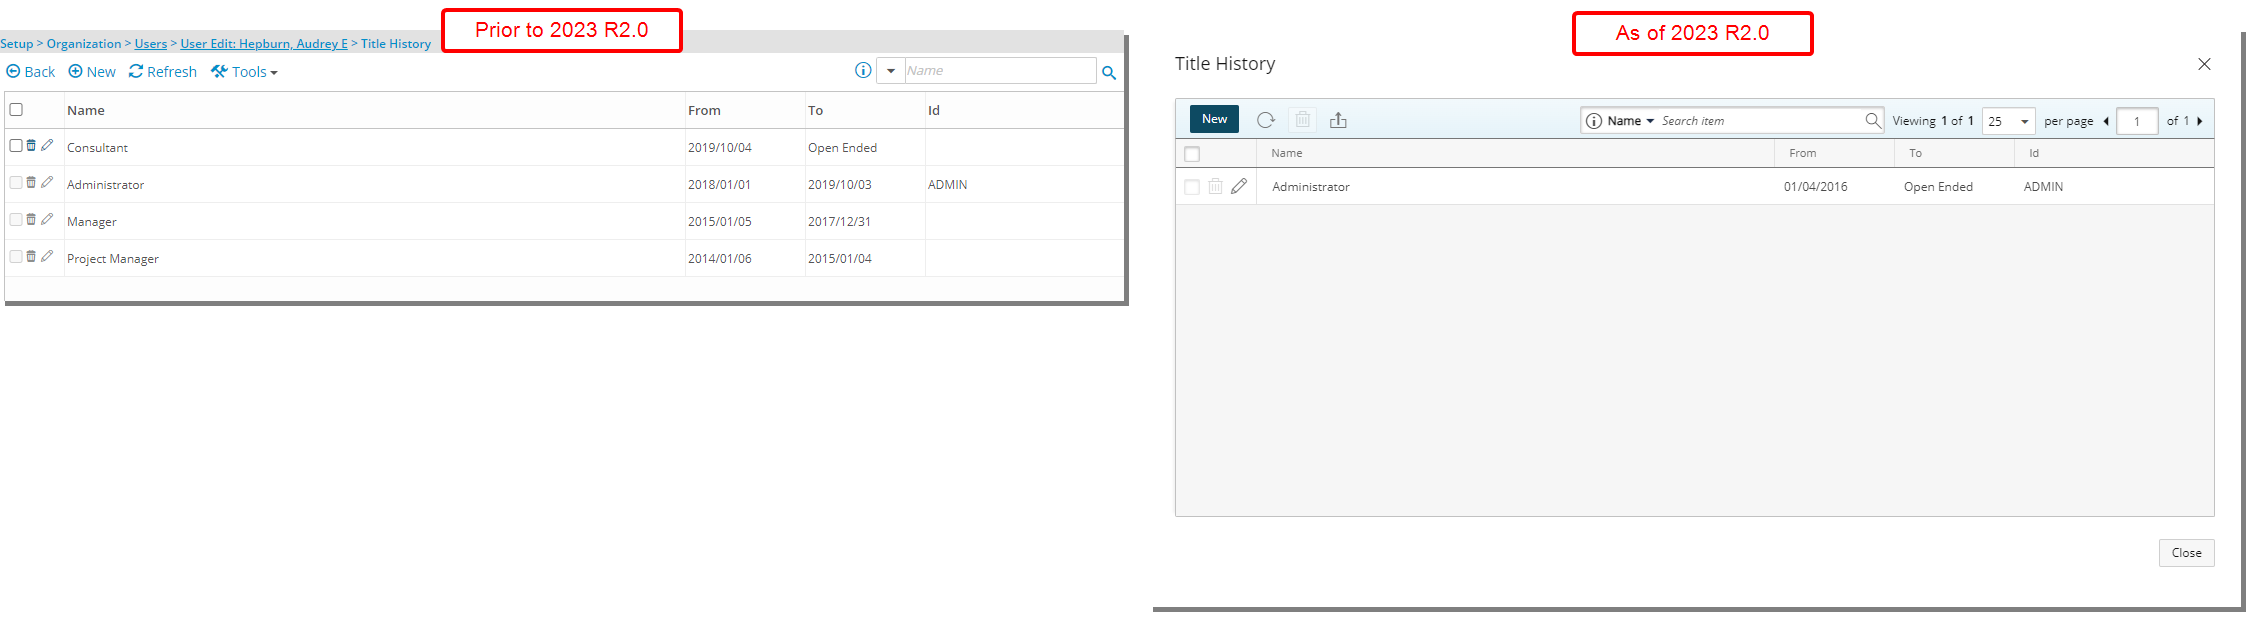
- User Group History
- Title History
Note: Upon upgrading, any UDFs associated to the legacy Security and Employment tabs will be displayed within the new General tab under any previously associated UDFs to the General tab.
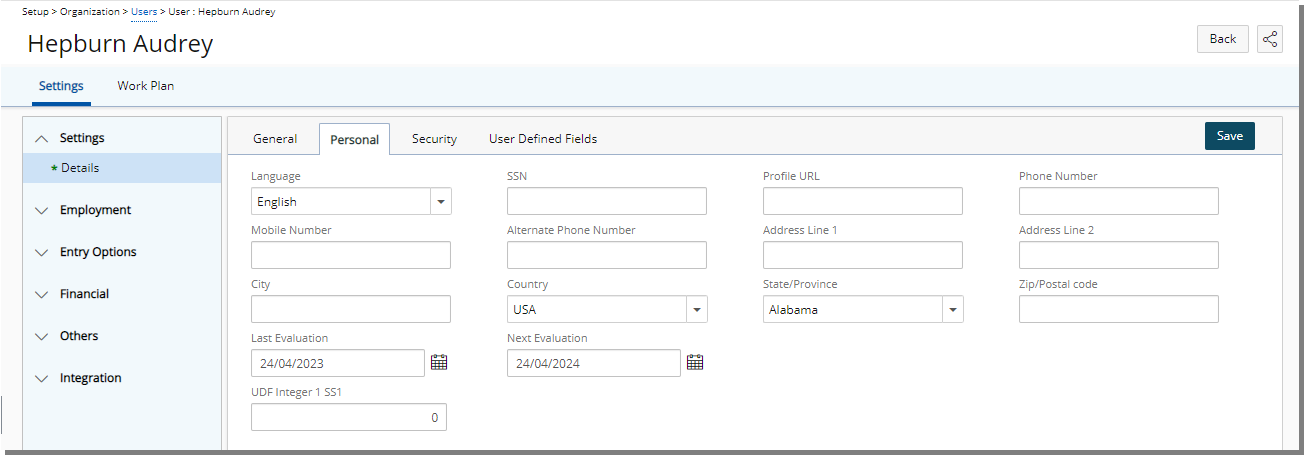
The Personal tab is now displayed as a sub tab under the User Details. In addition to the overall user interface improvements including spacing, positioning, and fonts The following modifications are also made:
- The Language field, previously located under the General tab, is now located in the Personal tab.
- The following fields previously located under the Employment tab are now located in the Personal tab:
- Last Evaluation
- Next Evaluation
- Some of the field labels located under the Personal tab have been renamed:
| Old field label | New field label |
|---|---|
| Business phone | Phone Number |
| Mobile | Mobile Number |
| Alternate phone | Alternate Phone Number |
| Web page | Profile URL |
| Address line 1 | Address Line 1 |
| Address line 2 | Address Line 2 |
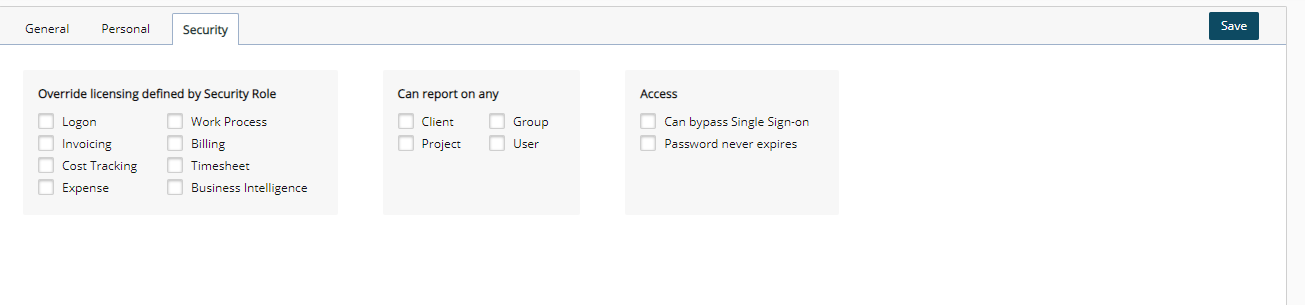
Under the Security tab you can:
- Choose to Override licensing defined by Security Role
- Select if the User Can report on any Client/Group/Project/User.
- And from the Access section, select if the User Can bypass Single Sign-on and/or select the option Password never expires.
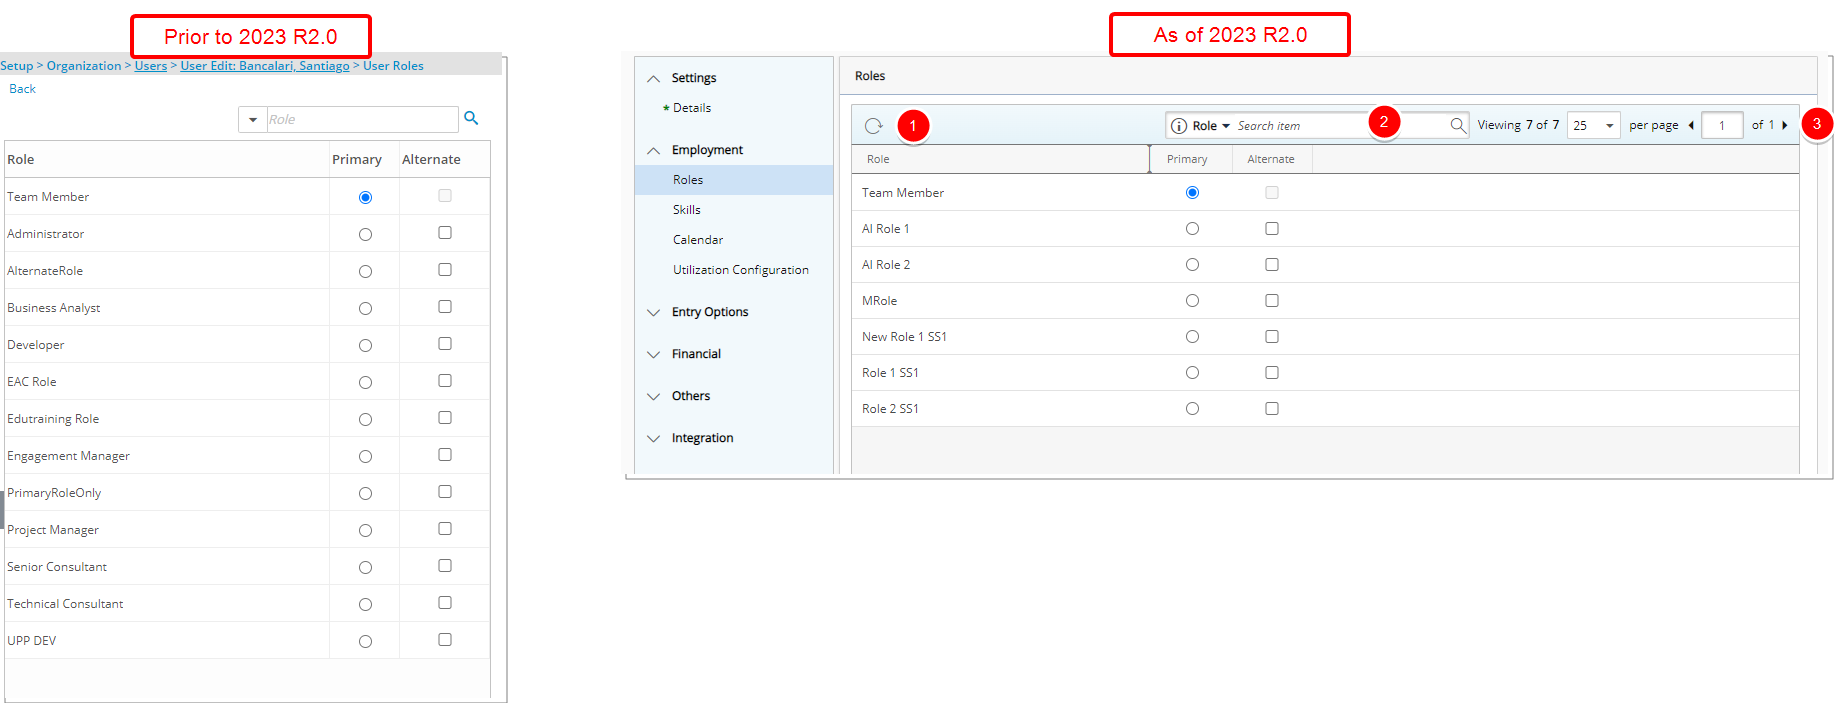
In addition to the overall user interface improvements including spacing, positioning, and fonts, the following improvements have also been made to the Roles page:
- Addition of a Refresh button allowing you to reload the page.
- The Search box is now located on the right side of the table header.
- Pagination is now available on the top right corner of the table to facilitate easy navigation across multiple pages.
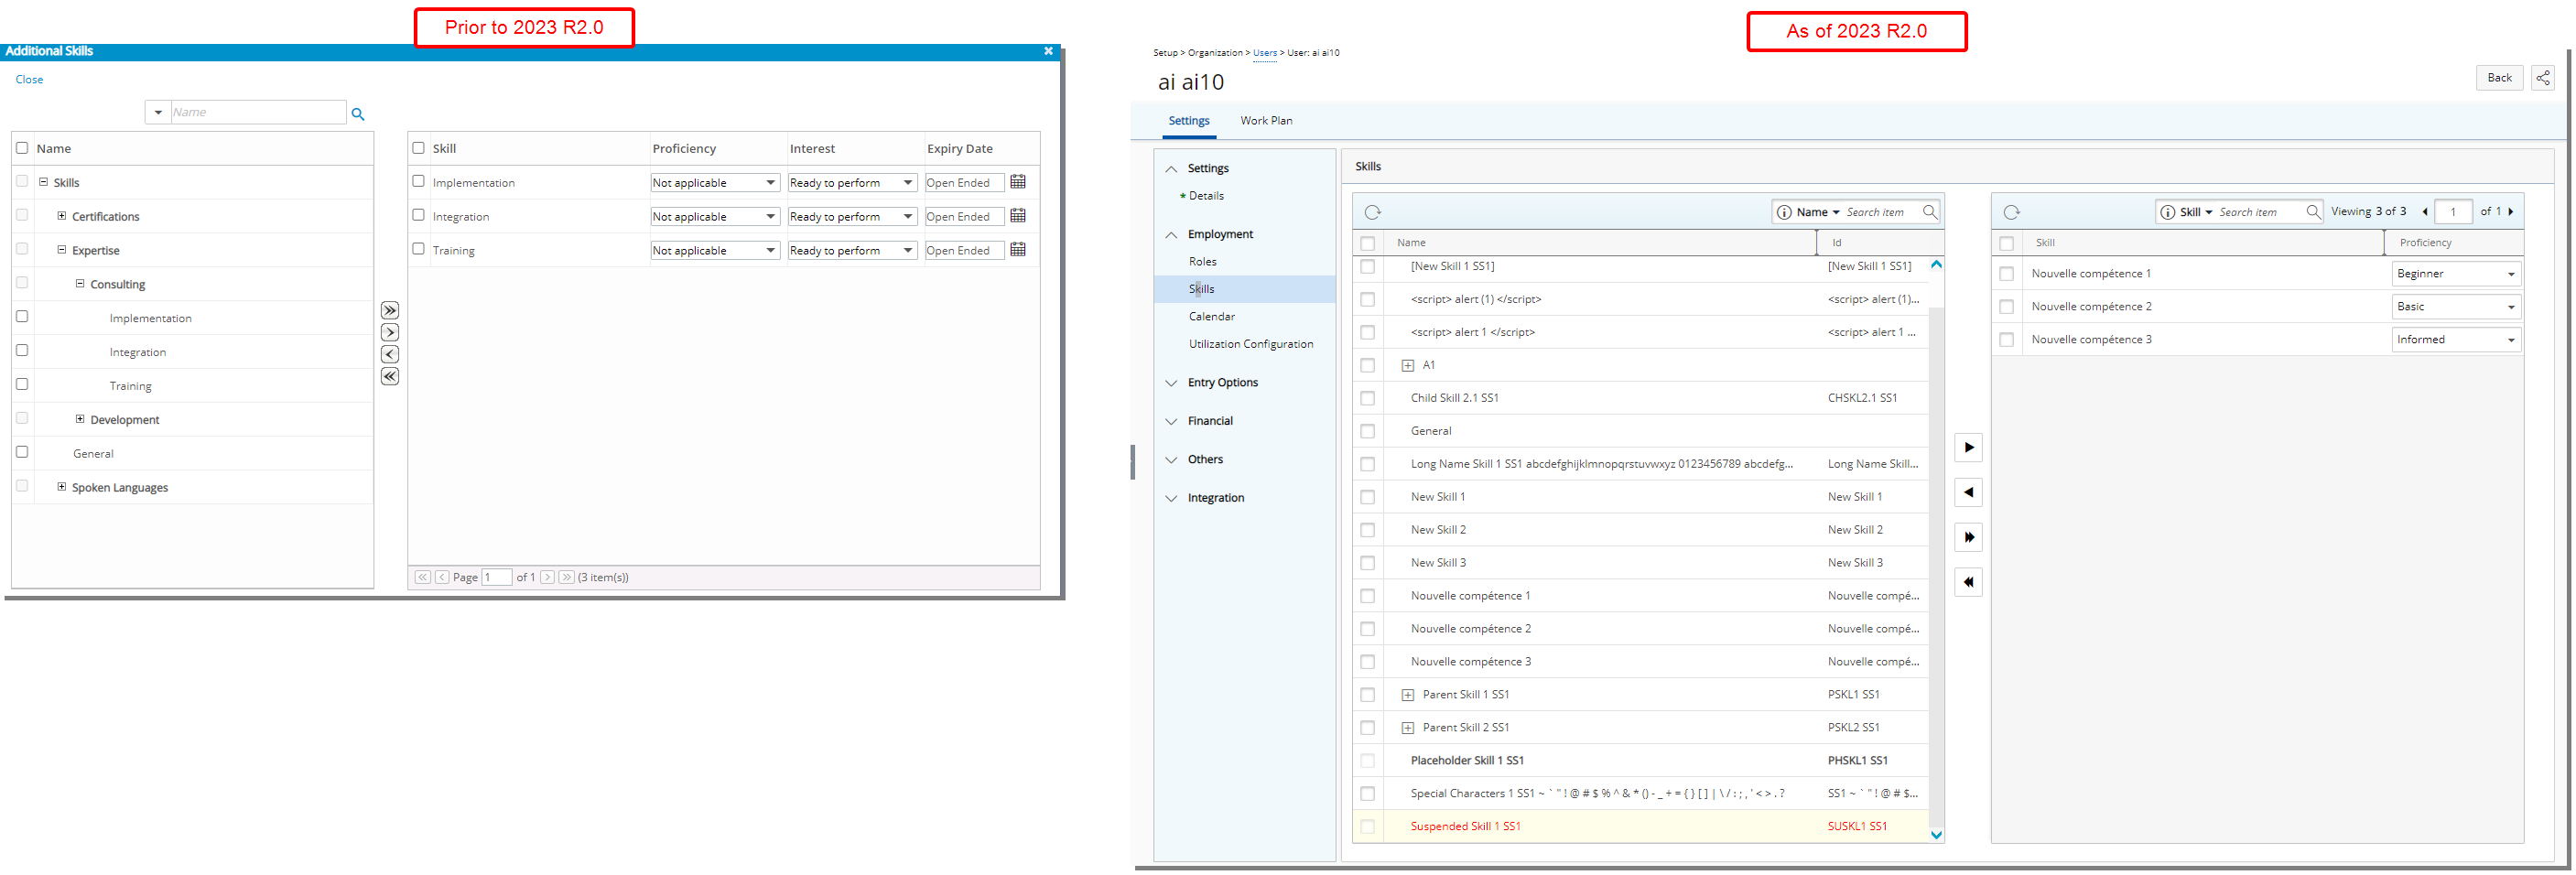
In addition to the overall user interface improvements including spacing, positioning, and fonts, the Skills dialog box was converted to a page. The following improvements were also made:
- Addition of a Refresh button allowing you to reload the available and selected tables.
- Addition of the ability to Search the selected list by Skill name.
- Pagination is also available for the selected table on the right to facilitate easy navigation across multiple pages.
Furthermore, the selected Skill Interest and Expiry Date columns were deprecated and are no longer available.
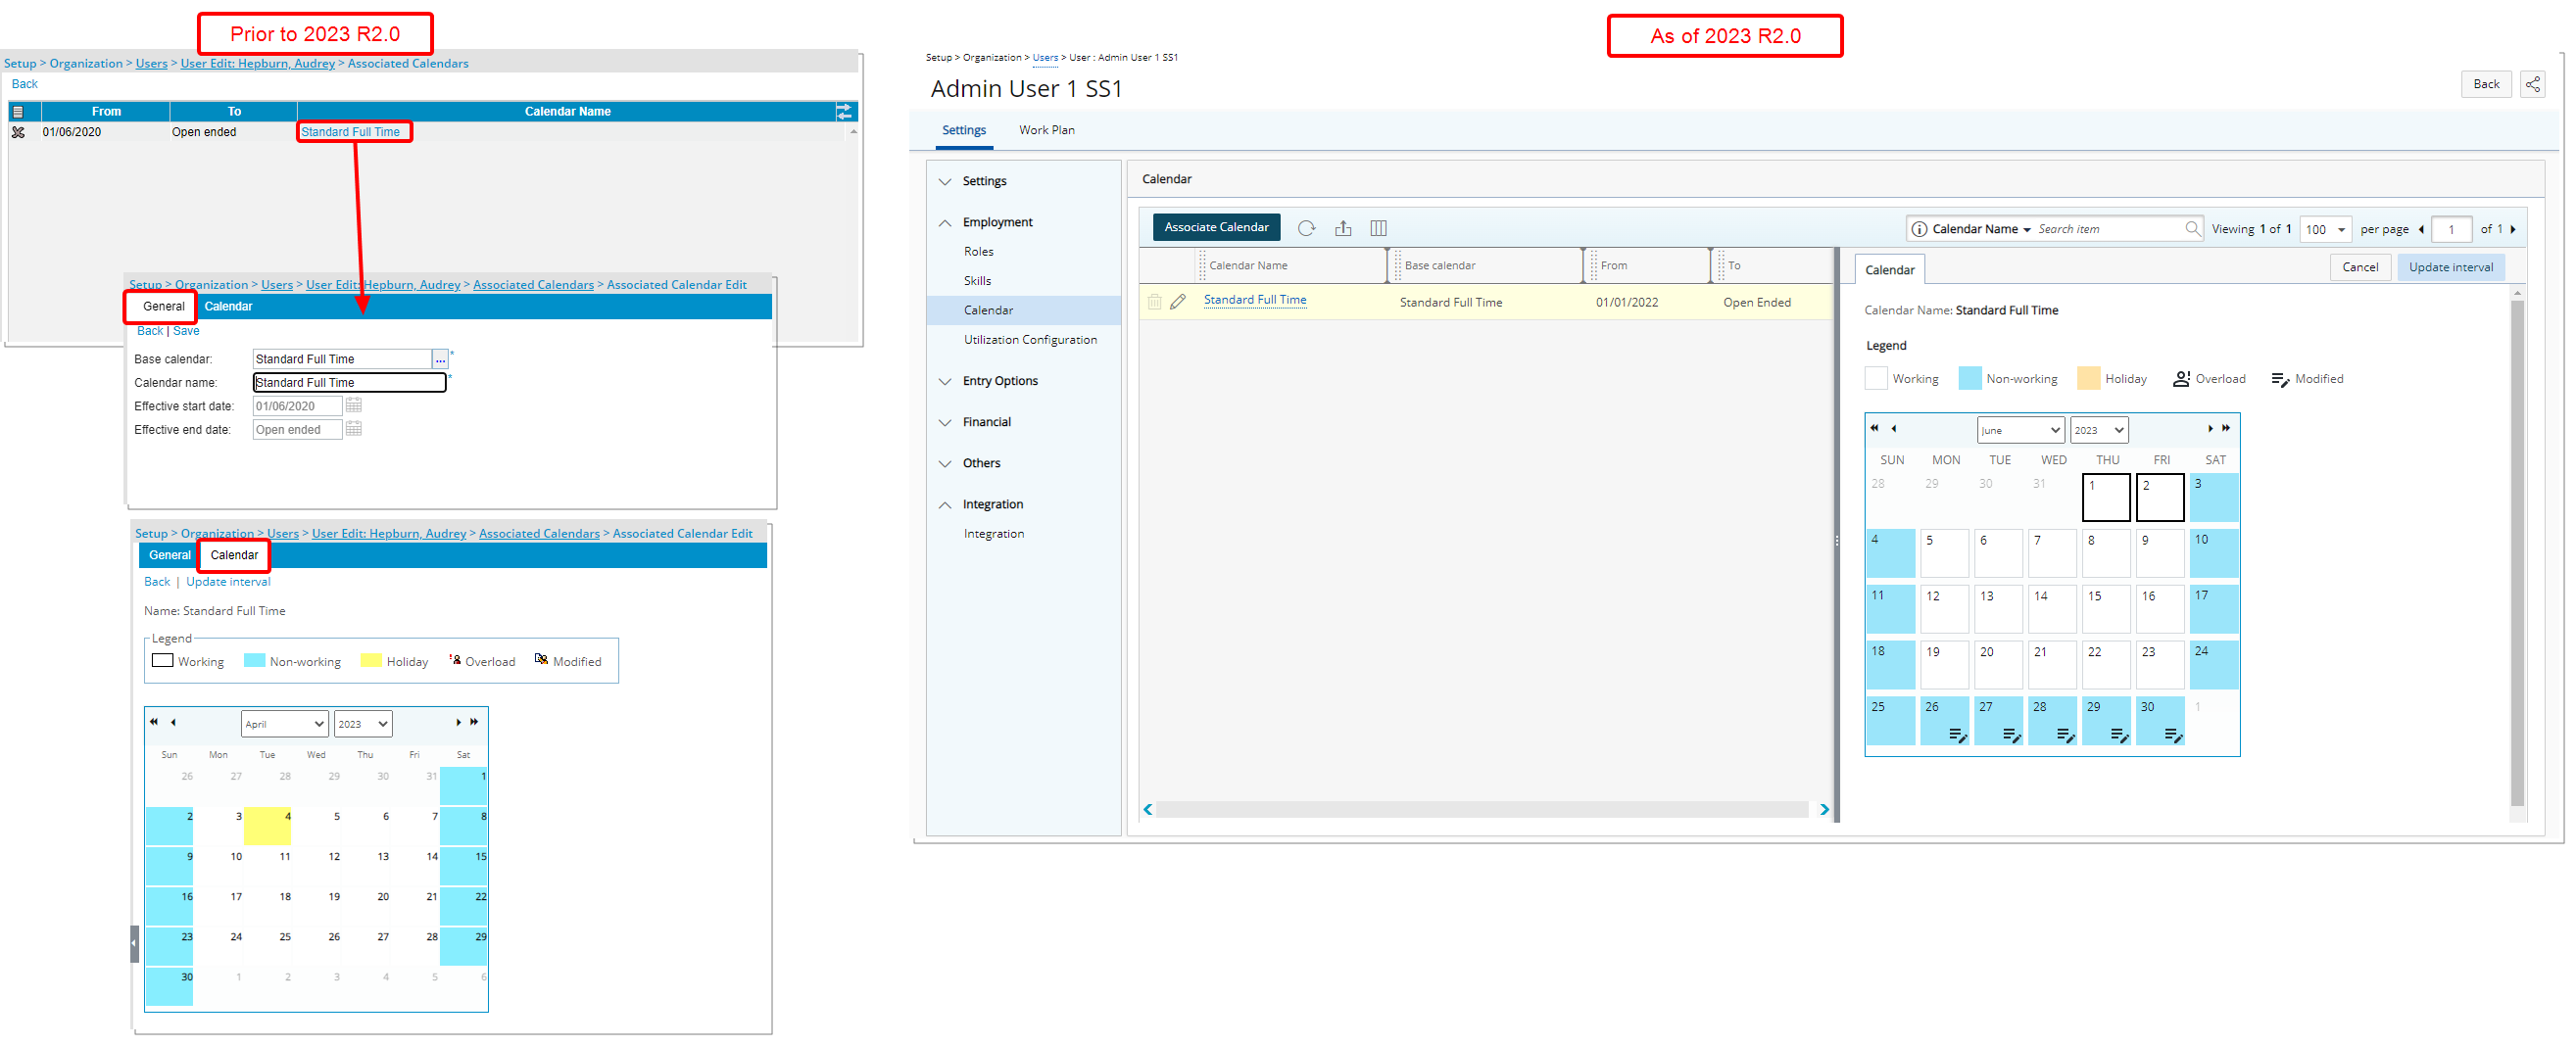
The Associated Calendars list page was redesigned for a better user experience. The following modifications were also made:
- The New button is renamed to Associate Calendar and is now located in the table header.
- Addition of a Refresh button allowing you to reload the page.
- Addition of the ability to Export the list of Associated Calendars to Excel.
- Addition of Column Selection capability. By default, the following columns are displayed: Calendar Name, Base Calendar, From and To.
- Addition of Search capability allowing you to Search by Calendar Name, Base Calendar, From and To options.
- Pagination is now available on the top right corner of the table to facilitate easy navigation across multiple pages.
- You can access and modify the associated Calendar by clicking on its Name. The right pane will display the Calendar details.
Note: Upon accessing the Calendars list page, the active Calendar (Current Date is within the Start and End Dates of an active Calendar) is selected by default.
Furthermore, user interface improvements including spacing, colors, positioning, buttons, icons and fonts have also been made to the Calendar which is accessed through the following areas of the application:
- User Settings (User Settings > Calendar)
- Workforce Planning (Setup > Workforce Planning > Calendars > Calendar Edit)
Benefit: The user interface is further improved for a better user experience and to establish consistency.
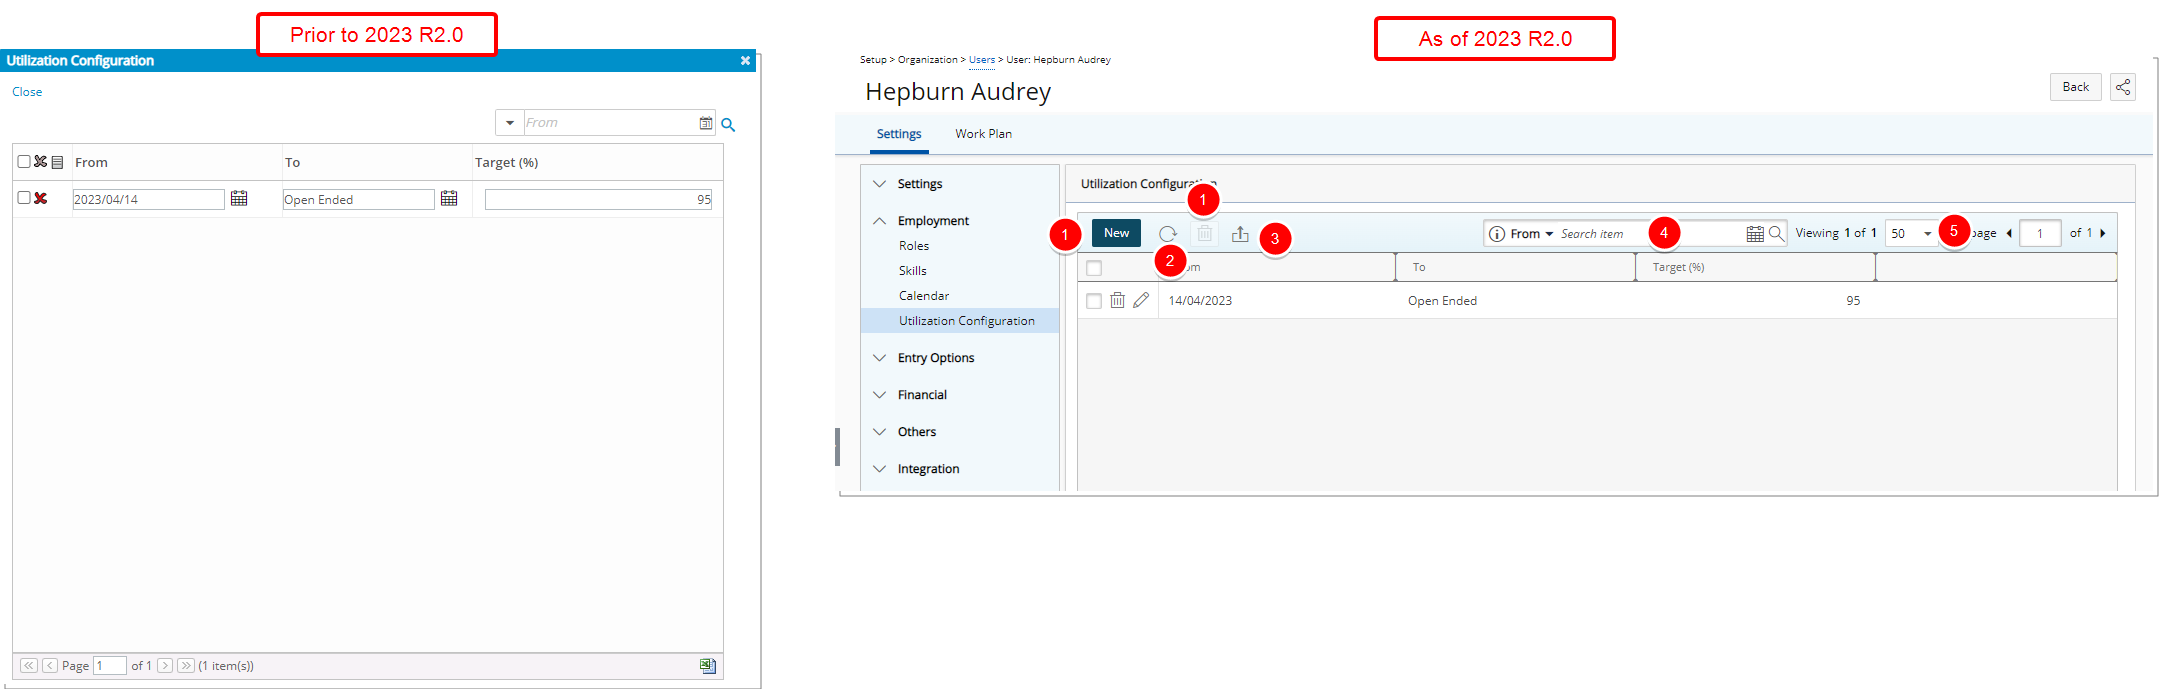
In addition to the overall user interface improvements including spacing, positioning, and fonts, the Utilization Configuration dialog box was converted to a page.
- The New and Delete buttons were redesigned and moved to the table header.
- Addition of a Refresh button allowing you to reload the page.
- The Export to Excel button was redesigned and moved to the table header.
- The Search box is now located on the right side of the table header.
- Pagination was moved to the right side of the table header.
From the Entry Options section in the menu, you can access the Defaults, Overtime Policy, Leave Time and Workflow Roles of your user.
The user interface including spacing, colors, positioning, buttons, icons and fonts of the pages within the Entry Options have been improved for better user experience and consistency with the other updates that have been made thus far.
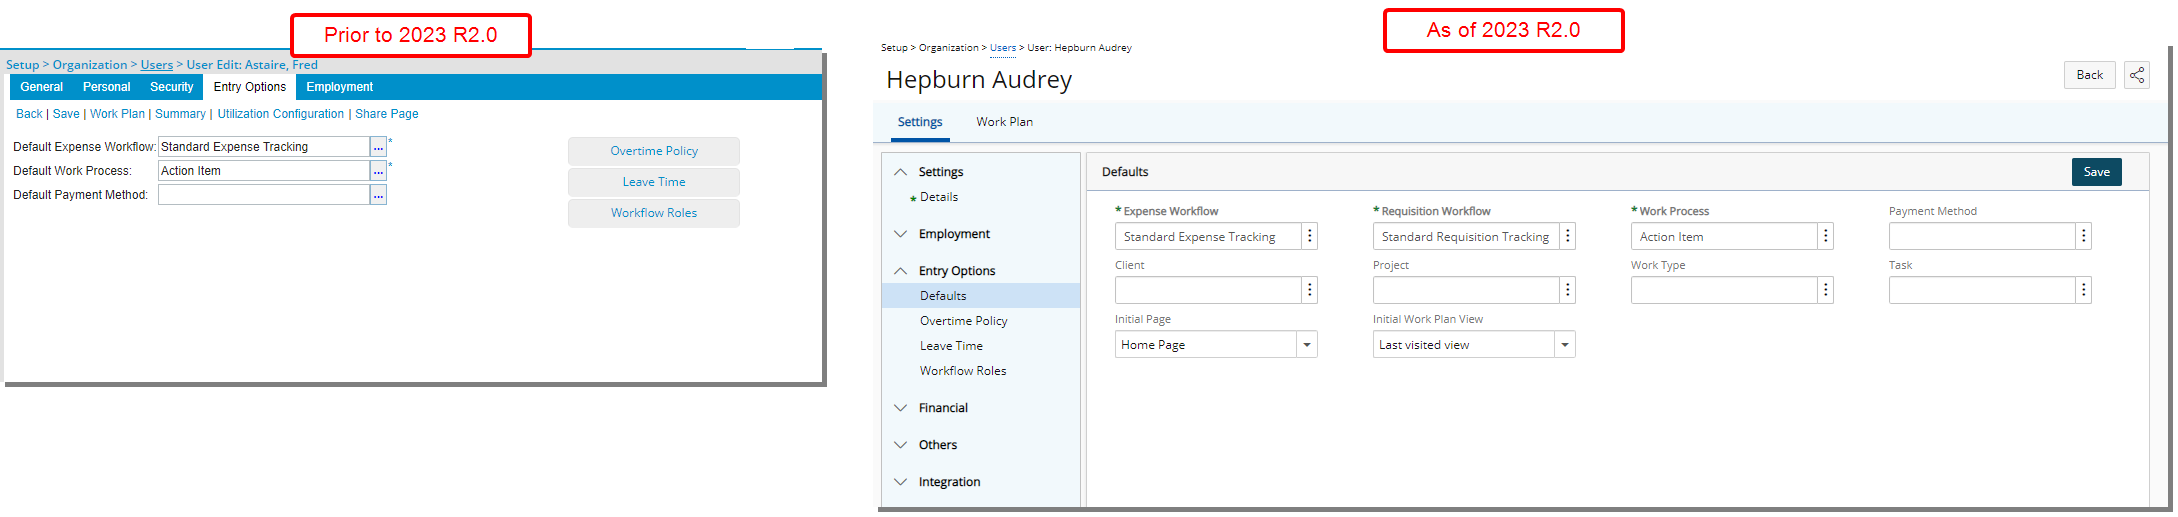
In addition to the overall user interface improvements, some the field labels located under the Defaults tab have been renamed:
| Old field label | New field label |
|---|---|
| Default Expense Workflow | Expense Workflow |
| Default Requisition Workflow | Requisition Workflow |
| Default Payment Method | Payment Method |
Furthermore, the following fields previously located under the Settings page, or the Employment tab are now located under the Defaults page:
| Field label | location in legacy version |
|---|---|
| Client | User Edit > Employment tab |
| Project | User Edit > Employment tab |
| Work Type | User Edit > Employment tab |
| Task | User Edit > General tab > Settings |
| Initial Page | User Edit > General tab > Settings |
| Initial Work Plan View | User Edit > General tab > Settings |
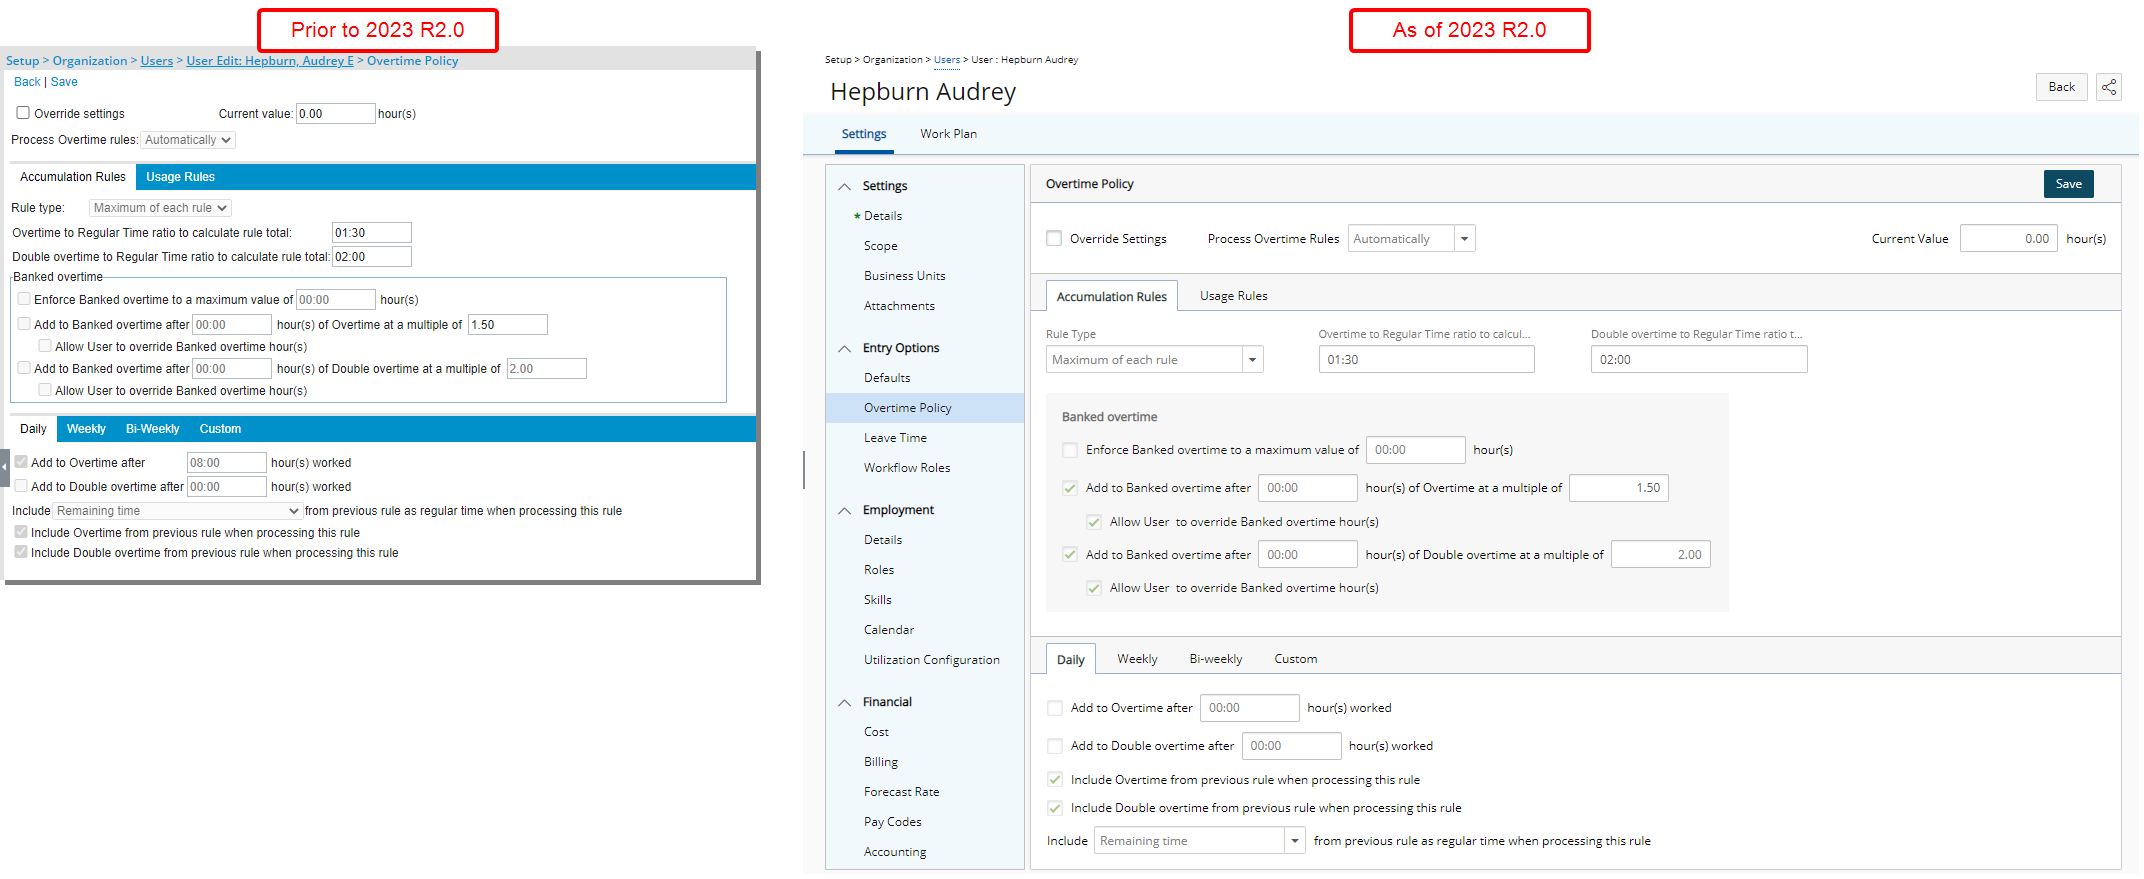
The user interface including spacing, colors, positioning, buttons, icons and fonts of the Overtime Policy page including all tabs and sub-tabs (Setup > User > User Edit > Entry Options) has been improved for better user experience and consistency with the other updates that have been made thus far.
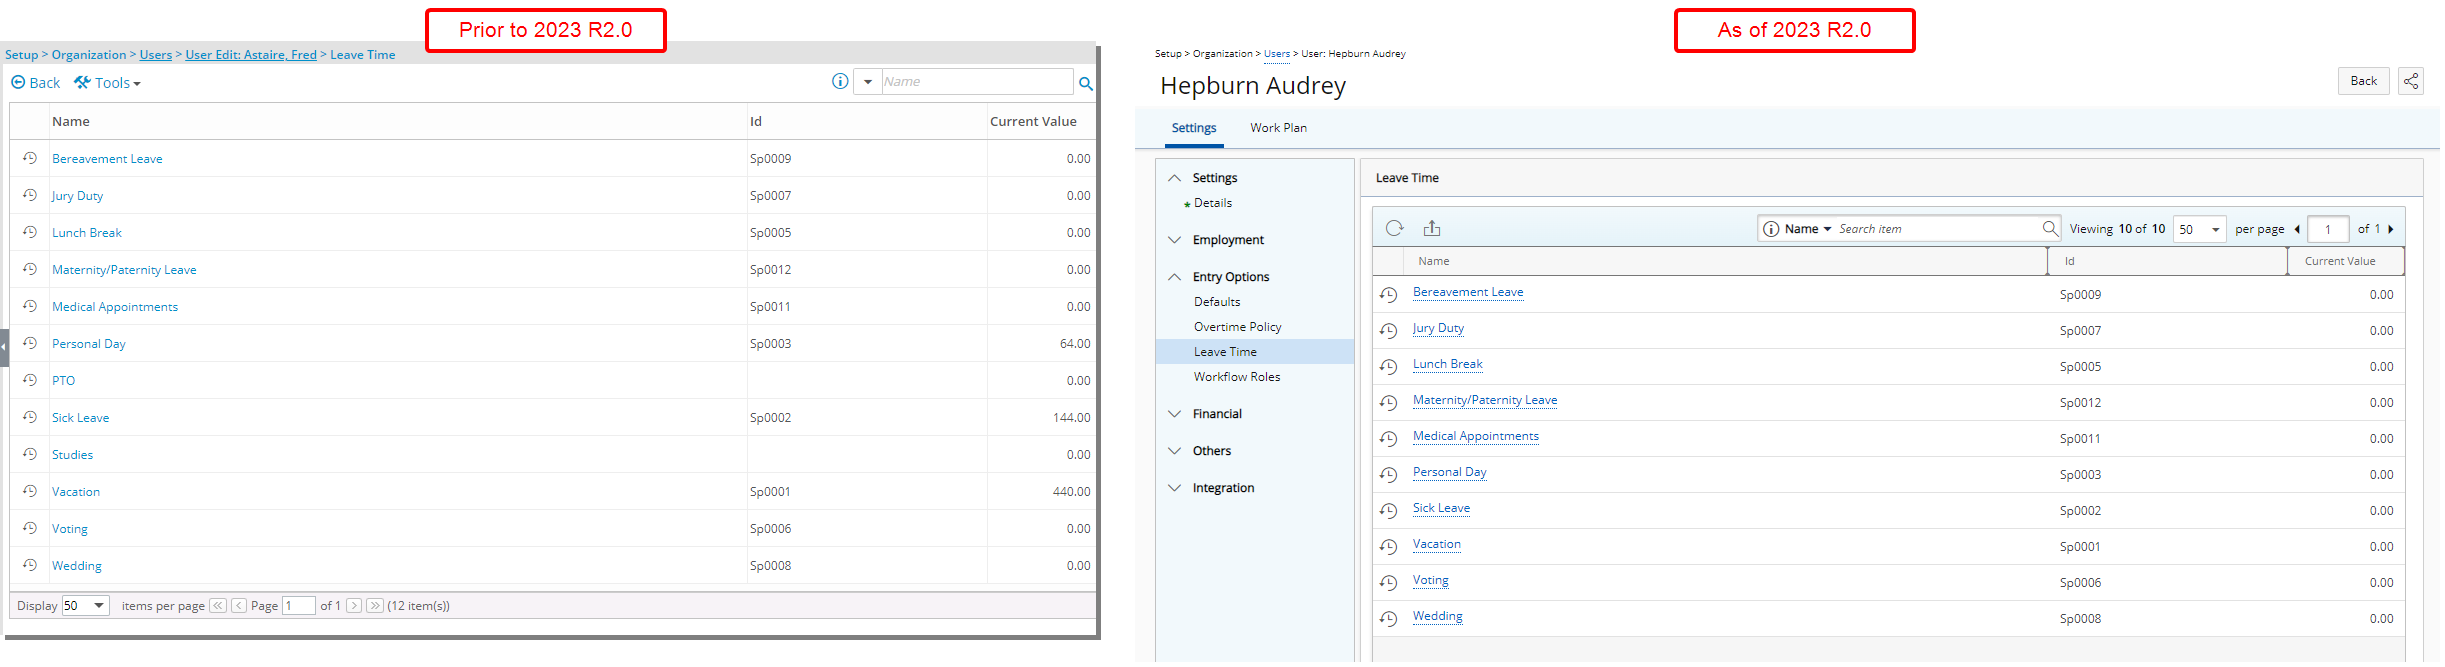
In addition to the user interface changes, the following enhancements have also been made to the Leave Time list page:
- Addition of a Refresh button allowing you to reload the list.
- The Export to Excel link is now a button and no longer located under the Tools context menu.
- Addition of “contains in” logic Search capabilities, with the following available search criteria: Name and Id.
- Pagination is moved to the top right corner of the table to facilitate easy navigation across multiple pages.
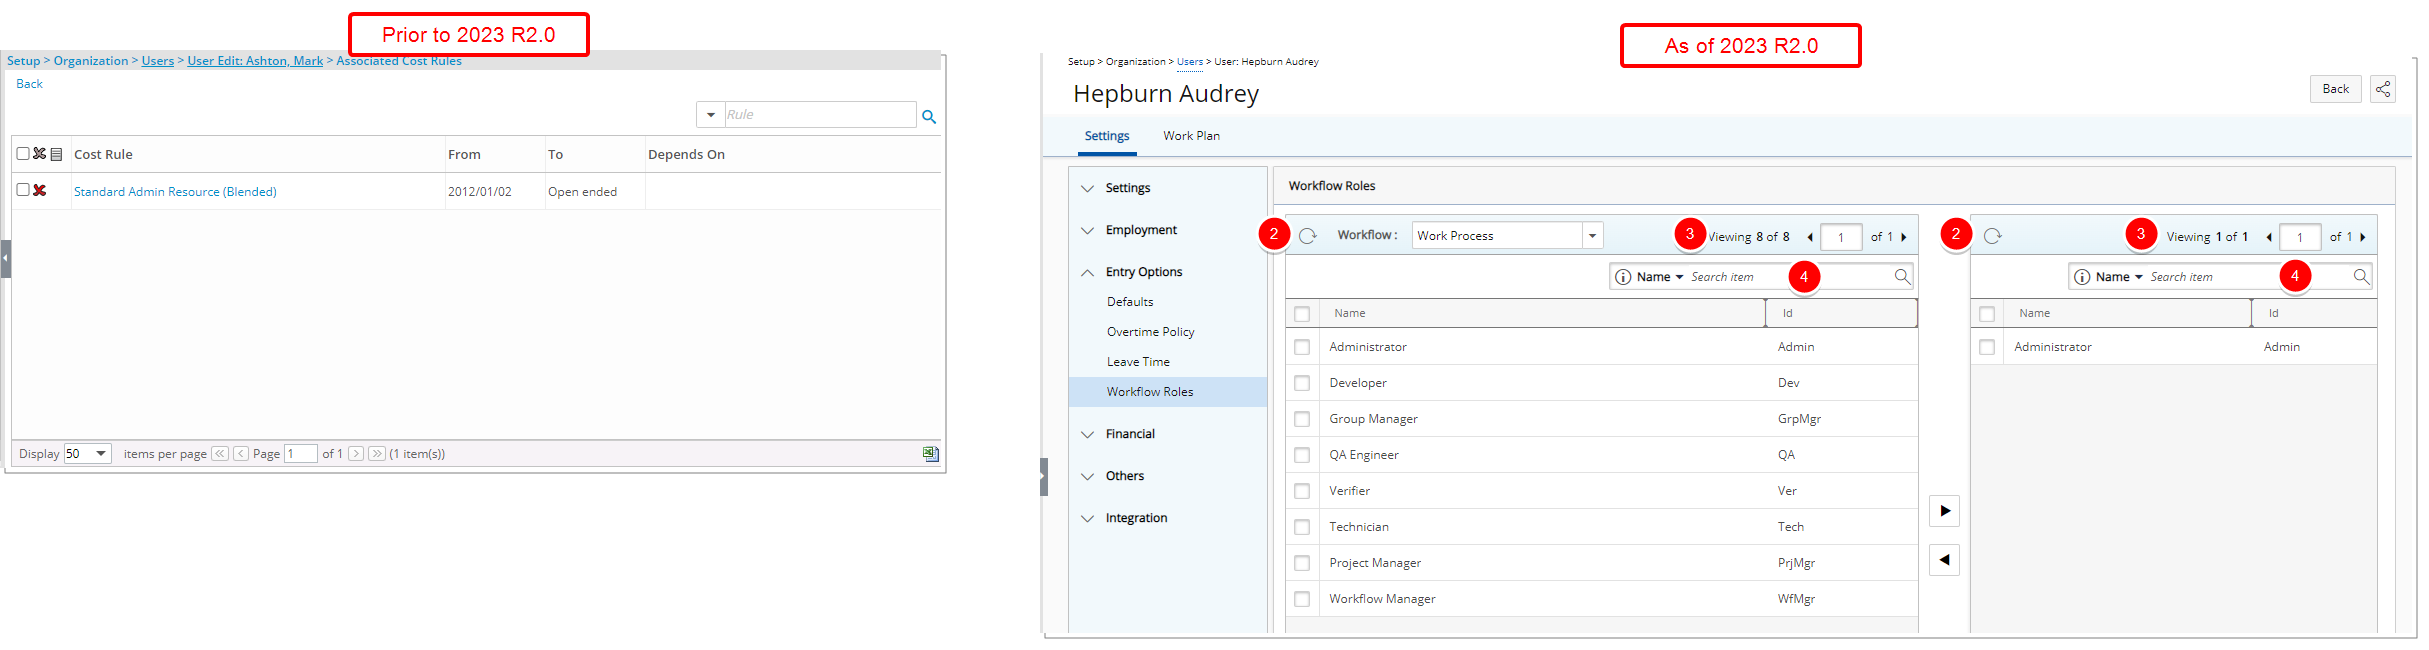
In addition to the user interface changes, the following enhancements have also been made:
- The Workflow Roles dialog box is now a page.
- Addition of a Refresh button allowing you to reload the available and selected tables.
- Pagination is moved to the top right corner of the available/selected tables to facilitate easy navigation across multiple pages.
- You can now Search for an available or selected Workflow Role by Name or Id.
- In previous releases by default the Work process Workflow option was selected. As of this release the list now defaults to the Timesheet Workflow.
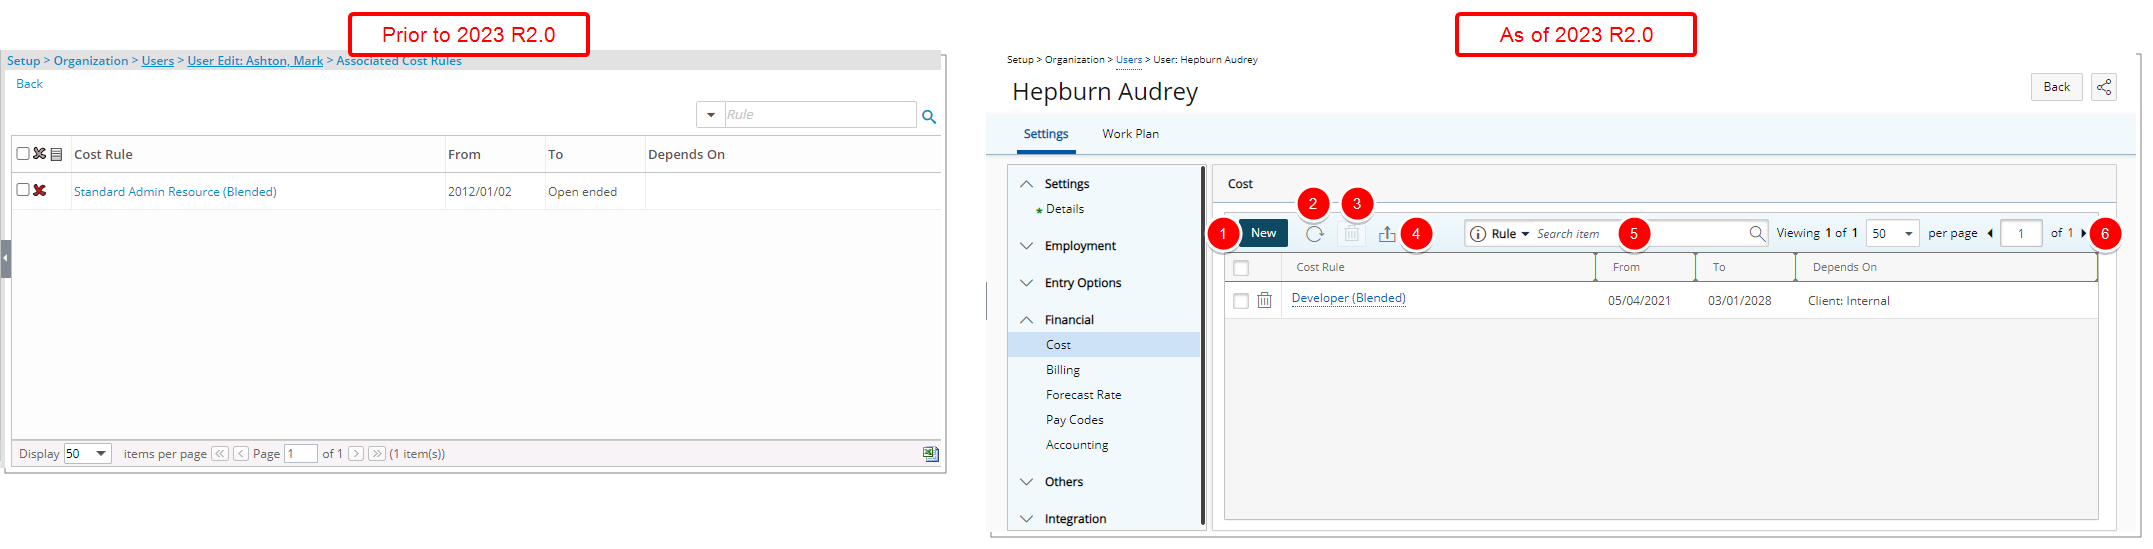
In addition to the user interface changes, the following enhancements have also been made:
- The New button was redesigned and moved to the table header.
- Addition of a Refresh button allowing you to reload the list.
- The Delete button was redesigned and moved to the table header.
- The Export button was redesigned and moved to the table header.
- The Search box was moved to the table header.
- Pagination is moved to the top right corner of the table header.
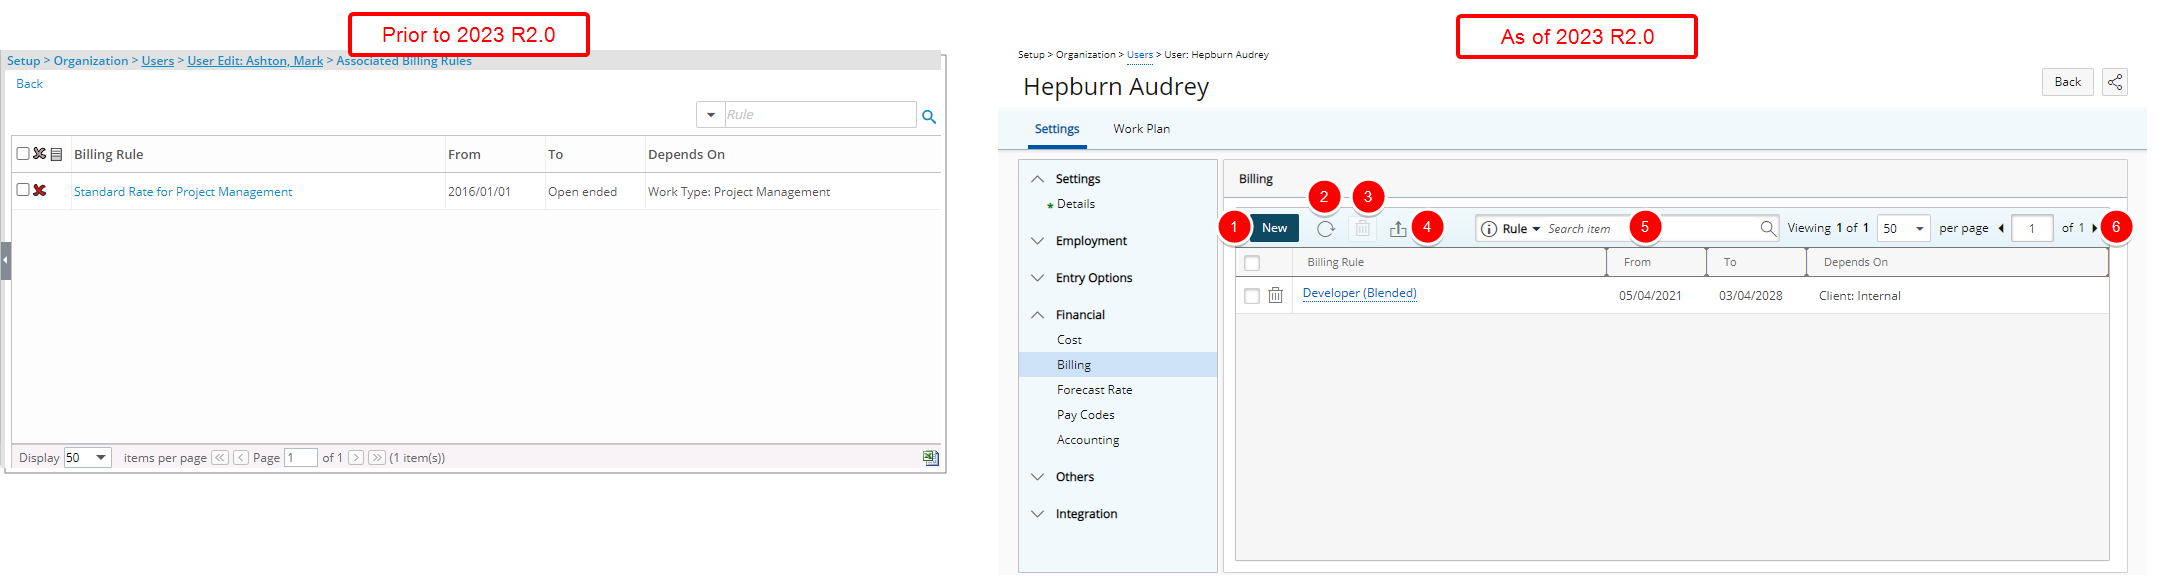
In addition to the user interface changes, the following enhancements have also been made:
- The New button was redesigned and moved to the table header.
- Addition of a Refresh button allowing you to reload the list.
- The Delete button was redesigned and moved to the table header.
- The Export button was redesigned and moved to the table header.
- The Search box was moved to the table header.
- Pagination is moved to the top right corner of the table.
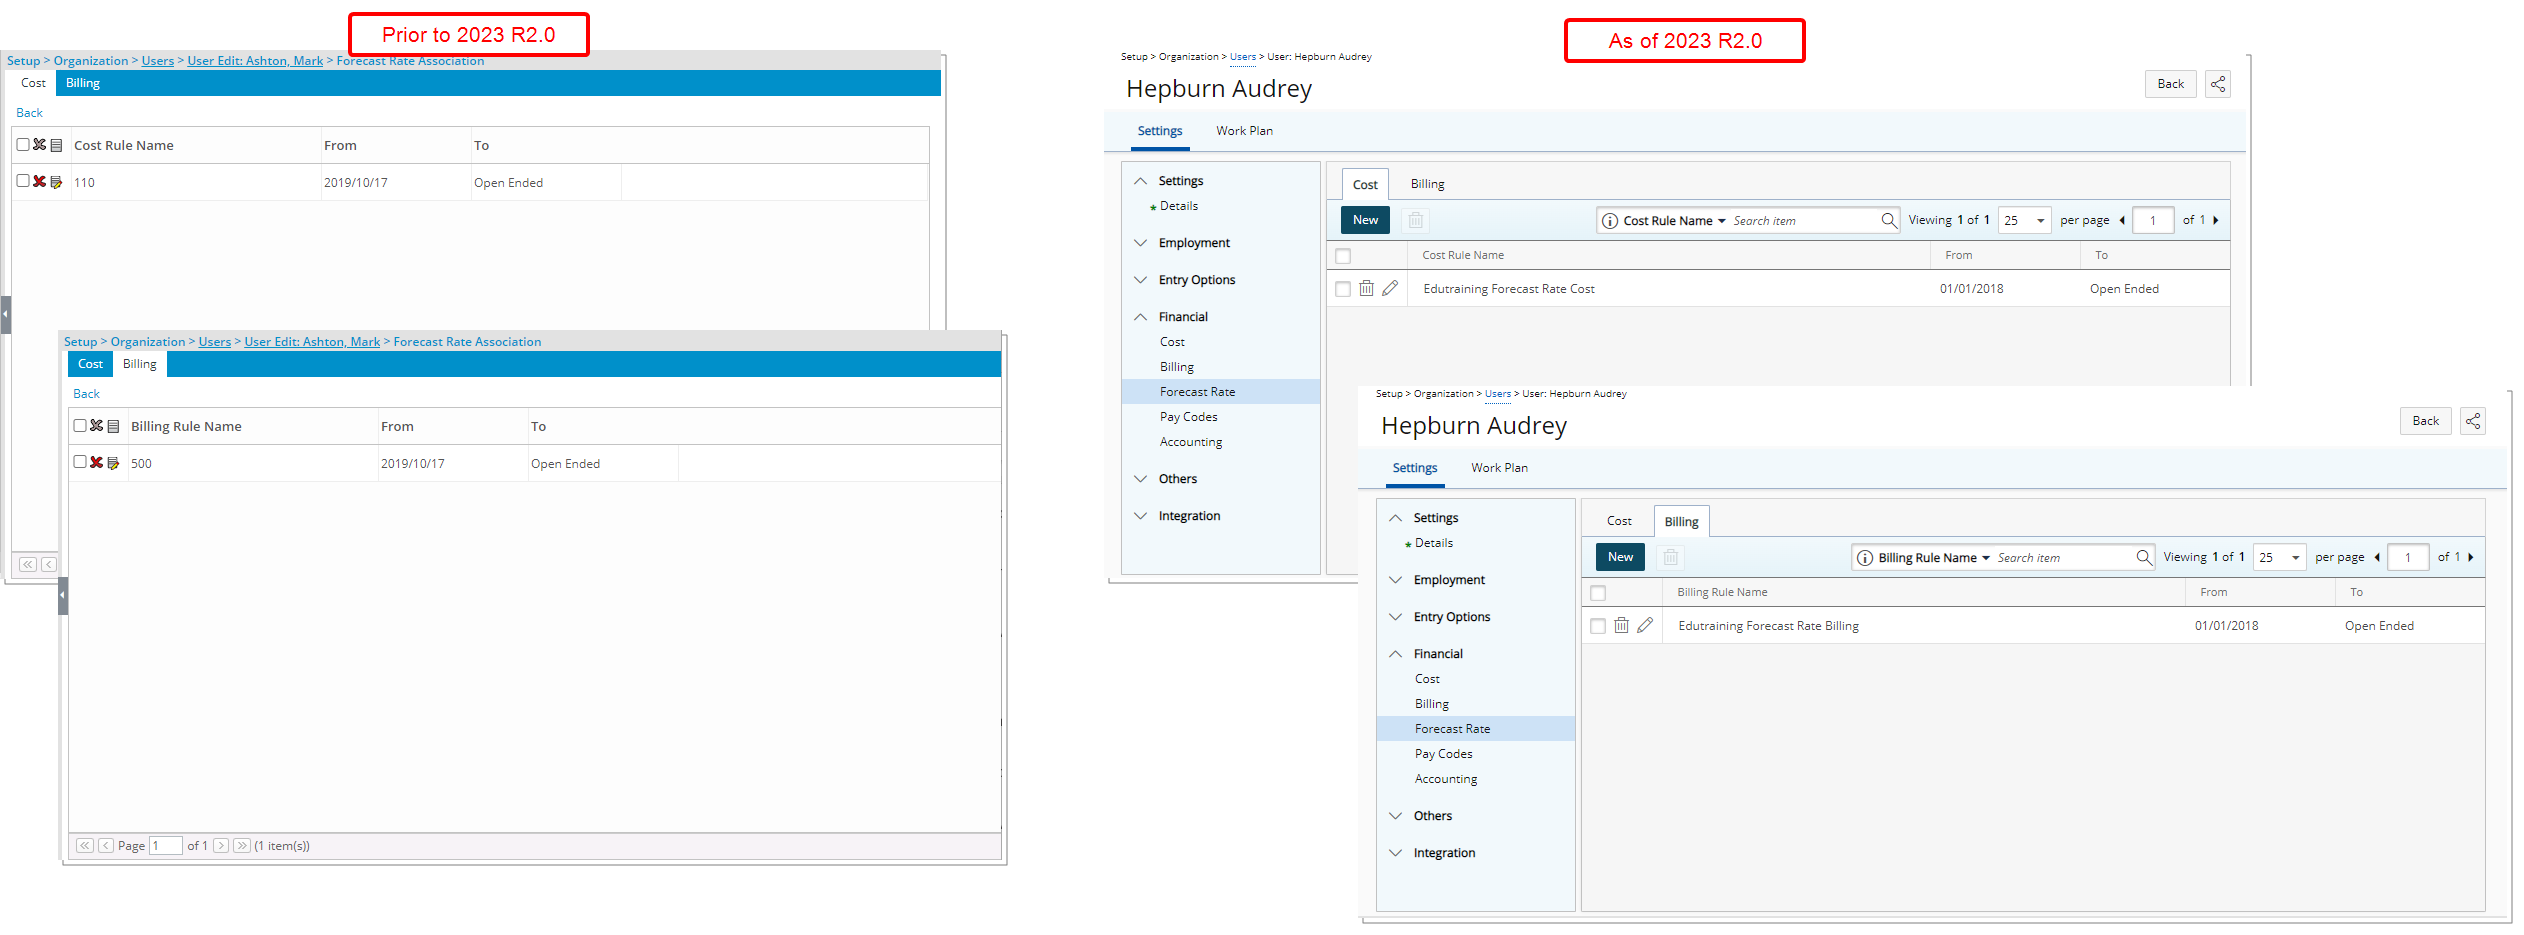
In addition to the user interface changes, the following enhancements have also been made to the Cost and Billing tabs:
- The New and Delete buttons were redesigned and moved to the table header.
- The inline Edit button was redesigned.
- Pagination is moved to the top right corner of the available/selected tables to facilitate easy navigation across multiple pages.
- Addition of Search capability allowing you to Search for
- Cost Rules based on Cost Rule Name, From and To criteria.
- Billing Rules Based on Billing Rule Name, From and To criteria
From the Others section, you can access the Scope, Business Units and Attachments pages.
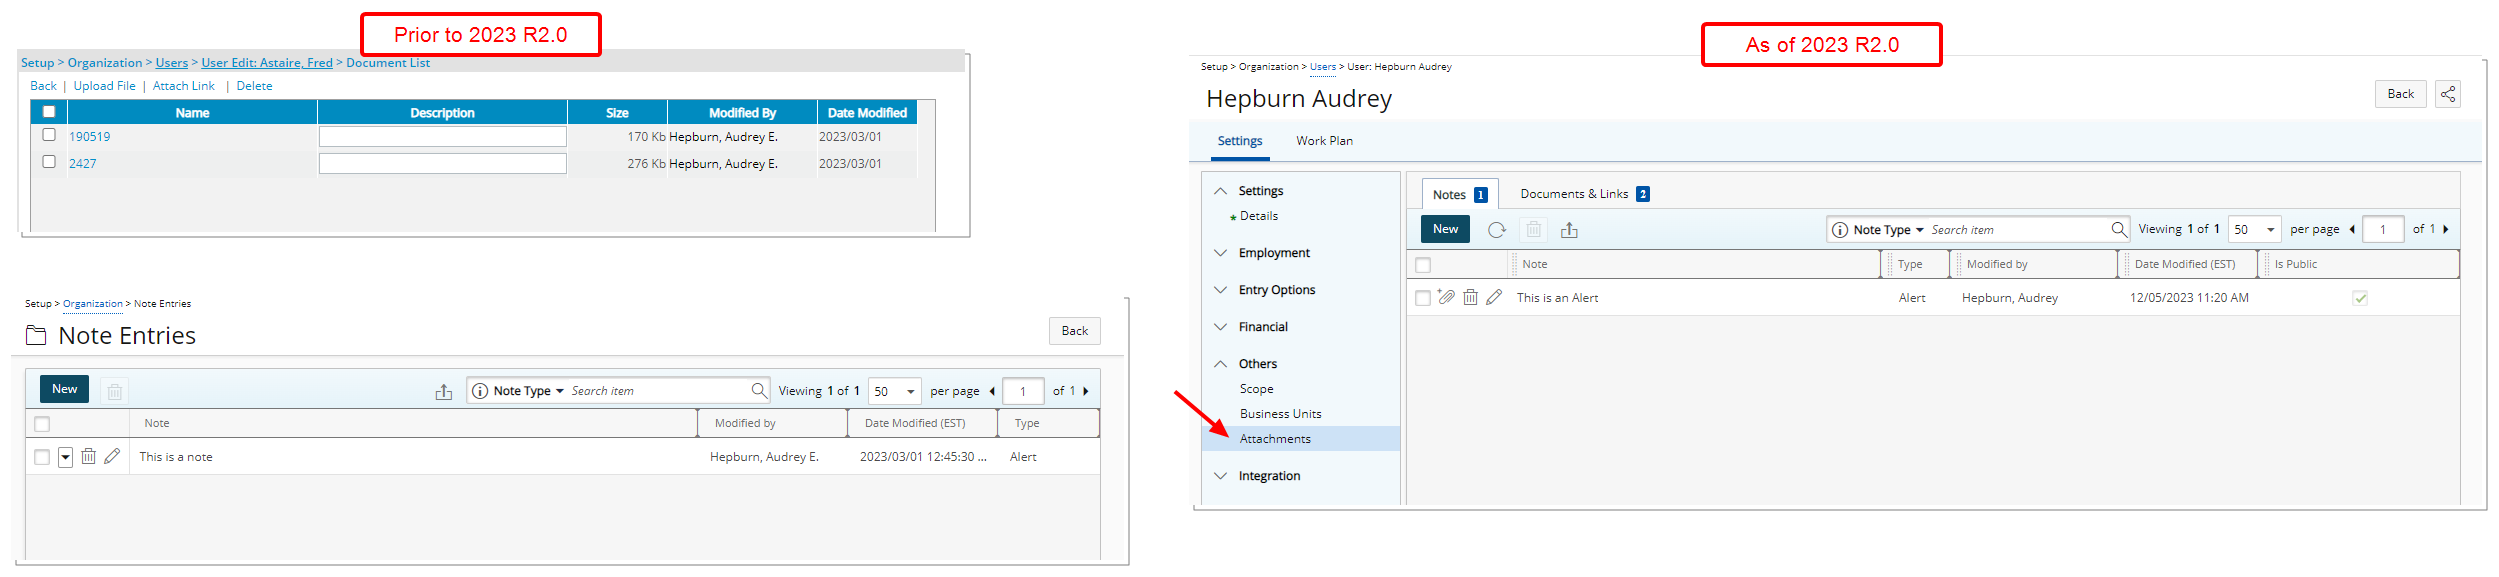
Improvements have been made to the management of Documents and Notes when modifying a User for better user experience and consistency with the other updates that have been made thus far.
In previous releases, Documents and Notes were managed from separate pages. As of this release, the Documents and Notes pages are now merged into the familiar Attachments page accessed through the Others section of the User Edit navigation.
- The User Summary page, including all related sub-tabs, is no longer available from User Edit. The Summary link has also been removed from the Project Team context menu. You can however access it through Resource Central.
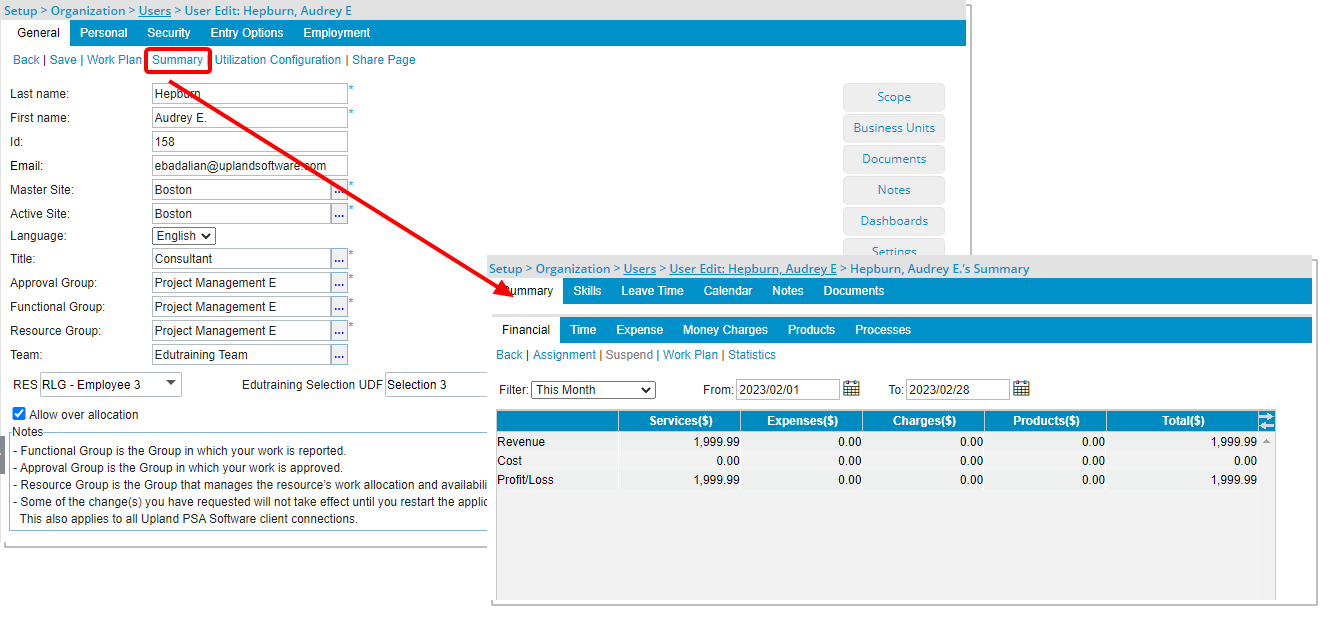
- The following fields are deprecated and no longer available from the Personal tab: Pager, FAX, IM sign-in name and IM password.
- The Default Purchase Workflow field is deprecated and no longer available from the Defaults page of Entry Options.
- The Dashboards page has been deprecated and is no longer available as of this release.
- The Statistics page (Setup > Organization > Users > Summary) has been deprecated and no longer available as of this release. As a result, the Statistics link has been removed from the Users list context menu (Setup > Organization > Users).
- The Settings page has been deprecated and is no longer available as of this release. As a result of this the Settings link has been removed from the Users list context menu (Setup > Organization > Users). All fields under this page are now located within the following tabs:
- Entry Options > Defaults
- Initial Page
- Initial Workplan View

- Setting Details > General tab
- Active Site
- Out of Office
- Logon name
- Password
- Receive Notifications on section
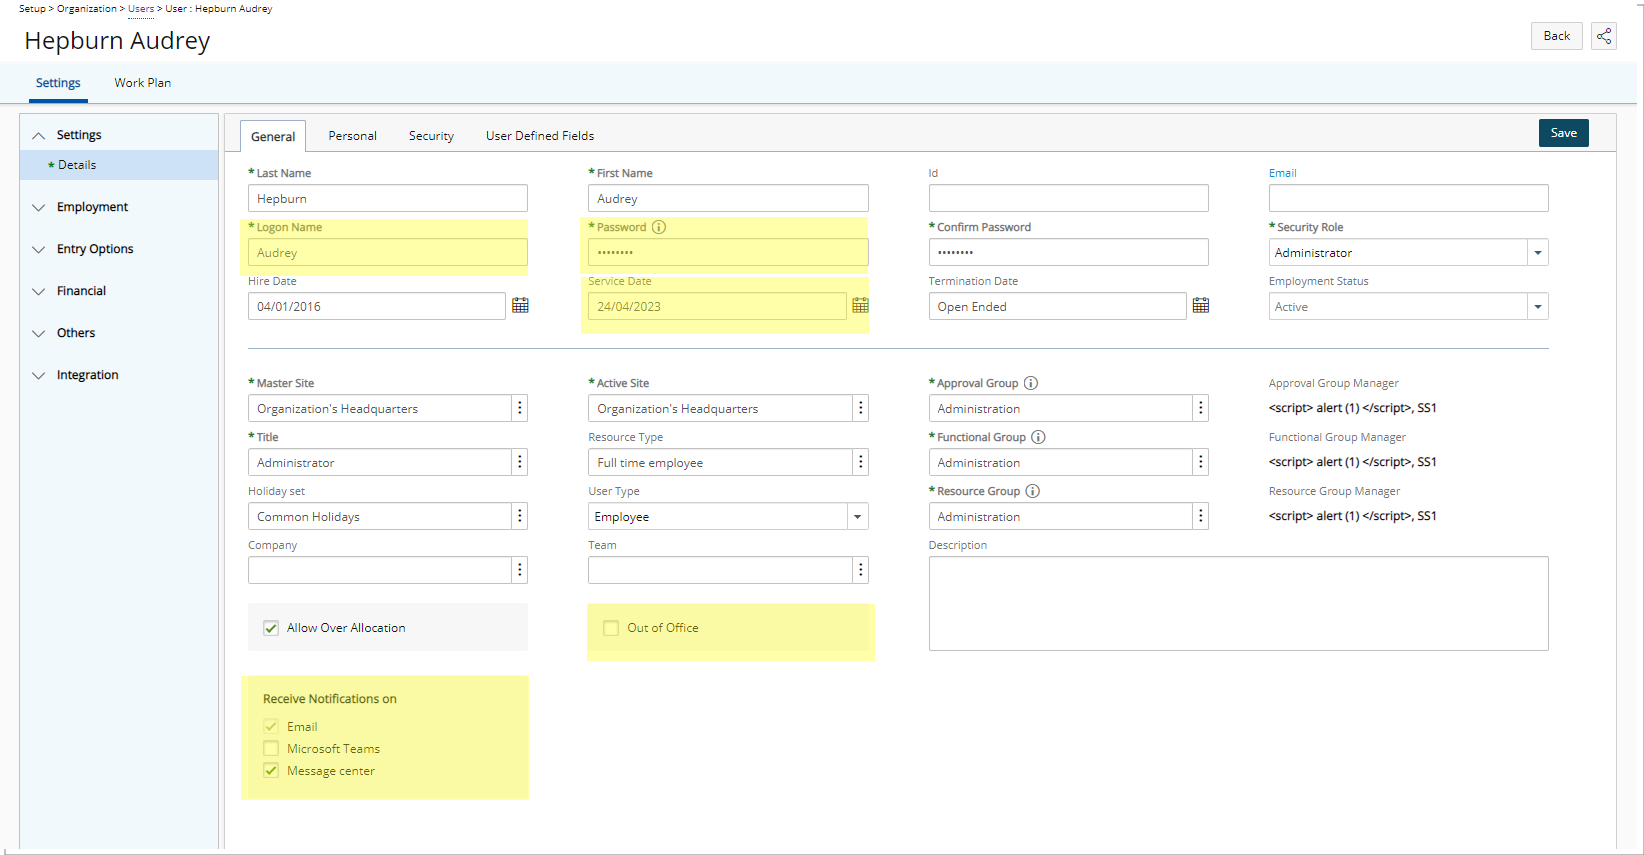
- Entry Options > Defaults
- The former Employment tab has been removed. Any associated UDFs to the Employment tab are now located under the General tab.
- The former Security tab has been removed. Any associated UDFs to the Employment tab are now located under the General tab.
- Work Schedule and Forecasting rates are no longer available.
Other
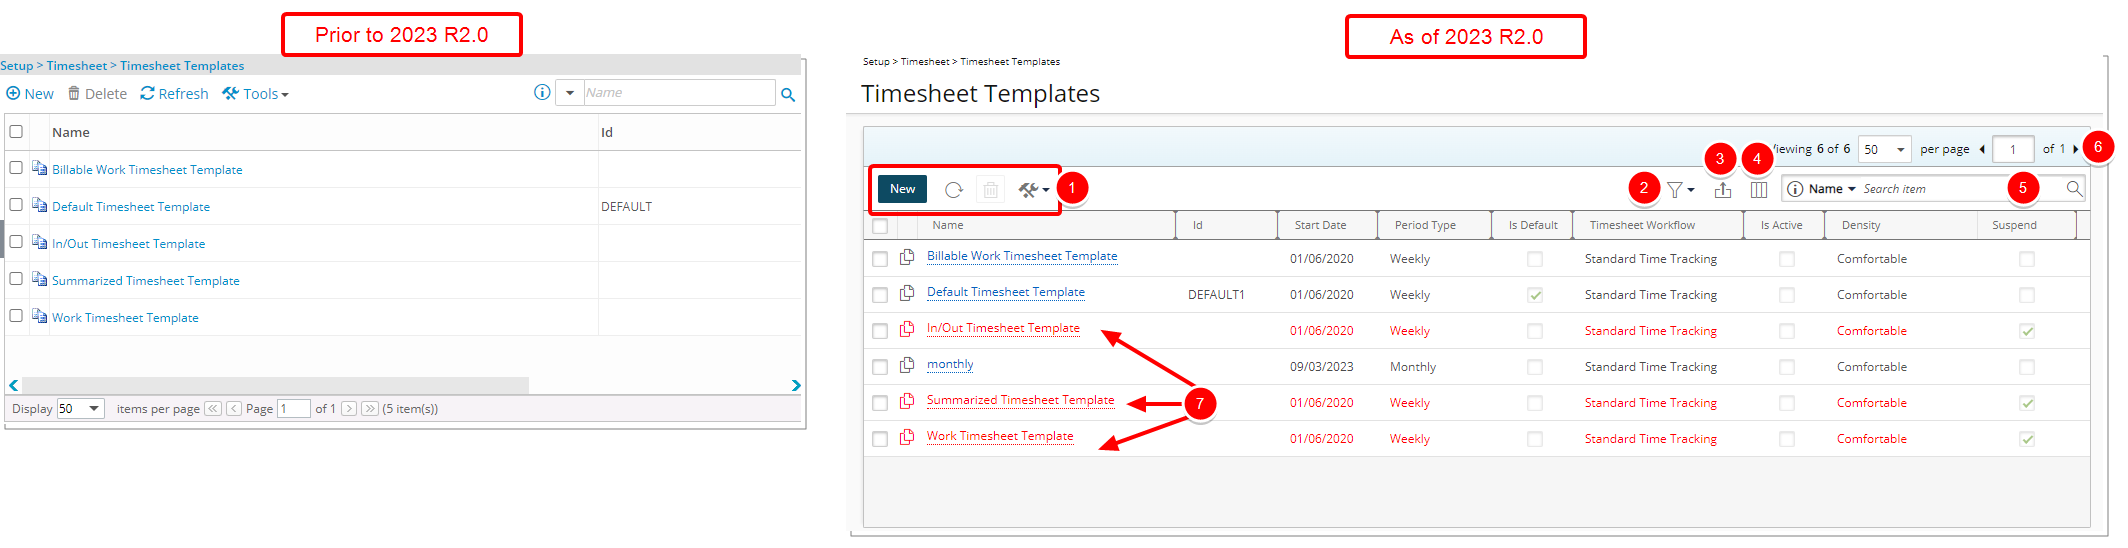
Description: The user interface including spacing, colors, positioning, buttons, icons and fonts of the Timesheet Templates list page (Setup > Timesheet) has been improved for better user experience and consistency with the other updates that have been made thus far. The following improvements have also been made:
- The New, Refresh, Delete and Tools buttons were redesigned and moved to the table header.
- Addition of a Filter button allowing you to filter the list based on Active and Suspended Timesheet Templates.
- The Export to Excel button is now located in the table header.
- Addition of Column Selection capability. By default, the following columns are displayed: Name, Id, Start Date, Period Type, Is Default, Timesheet Workflow, Is Active, Density and Suspend.
- In addition to the already-existing Name and Id criteria you can now also Search based on Period Type and Timesheet Workflow.
- Pagination is moved to the top right corner of the page to facilitate easy navigation across multiple pages.
- Suspended Templates are displayed in red.
For further details, refer to Timesheet Templates list page.
Throughout the application, improvements have been made to the management of Documents & Links and Notes for better user experience and consistency.
In previous releases, Documents & Links and Notes were managed from separate pages. As of this release, the Documents & Links and Notes pages are now merged into the familiar Attachments page accessed through these entry points:
| Available tabs under Attachments | ||
|---|---|---|
| Documents & Links |
Notes | |
| Setup > Organization > Sites > Site Edit |

|
|
| Setup > Organization > Business Units > Business Unit Edit |
|
|
| Setup > Organization > Groups > Group Edit |
|
|
| Setup > Organization > Users > User Edit |
|
|
| Setup > Organization > Roles > Role |
|
|
| Setup > Work > Clients > Client Edit |
|
|
| Setup > Work > Clients > Client Edit > POs tab > Create/Edit PO |
|
|
| Setup > Work > Clients > Client Edit > Invoice > Create/Edit Invoice |
|
|
| Setup > Work > Portfolios > Portfolio Edit |
|
|
| Setup > Work > Portfolios > Portfolio Edit > Projects > Tools |
|
|
| Setup > Work > Work Types > Work Type Edit |
|
|
| Setup > Work > Tasks > Task Edit |
|
|
| Financial > Invoice Manager > Invoice Edit |
|
|
| Financial > Invoices > Invoice Edit |
|
|
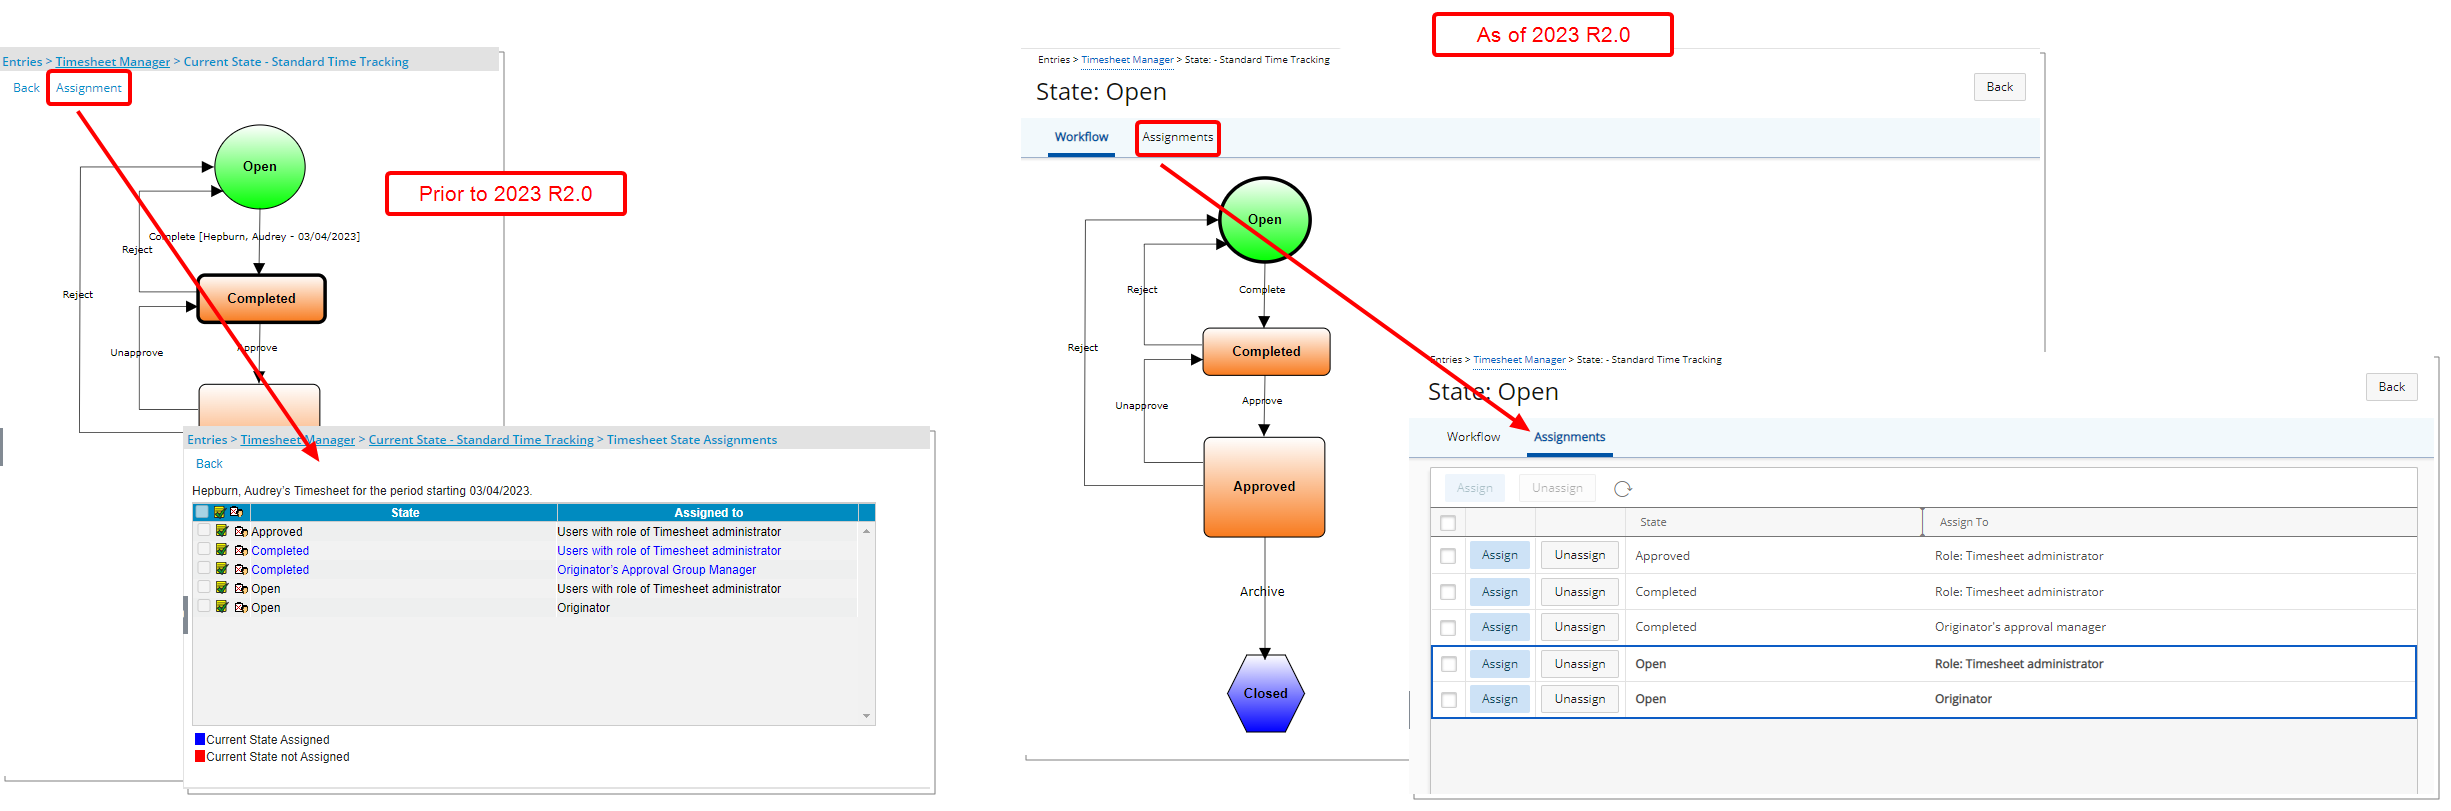
Description: Improvements have been made to the Assignments page accessed upon clicking the State of an item, such as Timesheet, Leave Request, Resource Request, Project, Expense Report, Invoice and Work Process. In addition to the overall user interface improvements, the following enhancements were also made:
- Redesigned Assign and Unassign buttons.
- Addition of a Refresh button, allowing you to reload the page.
- Your last selected tab is now remembered and loaded upon subsequent visits to the page.
- The current State is highlighted in bold. Consequently, the color coding of the states is deprecated.
Benefit: The user interface of the Assignments page is improved for a better user experience and to establish consistency.
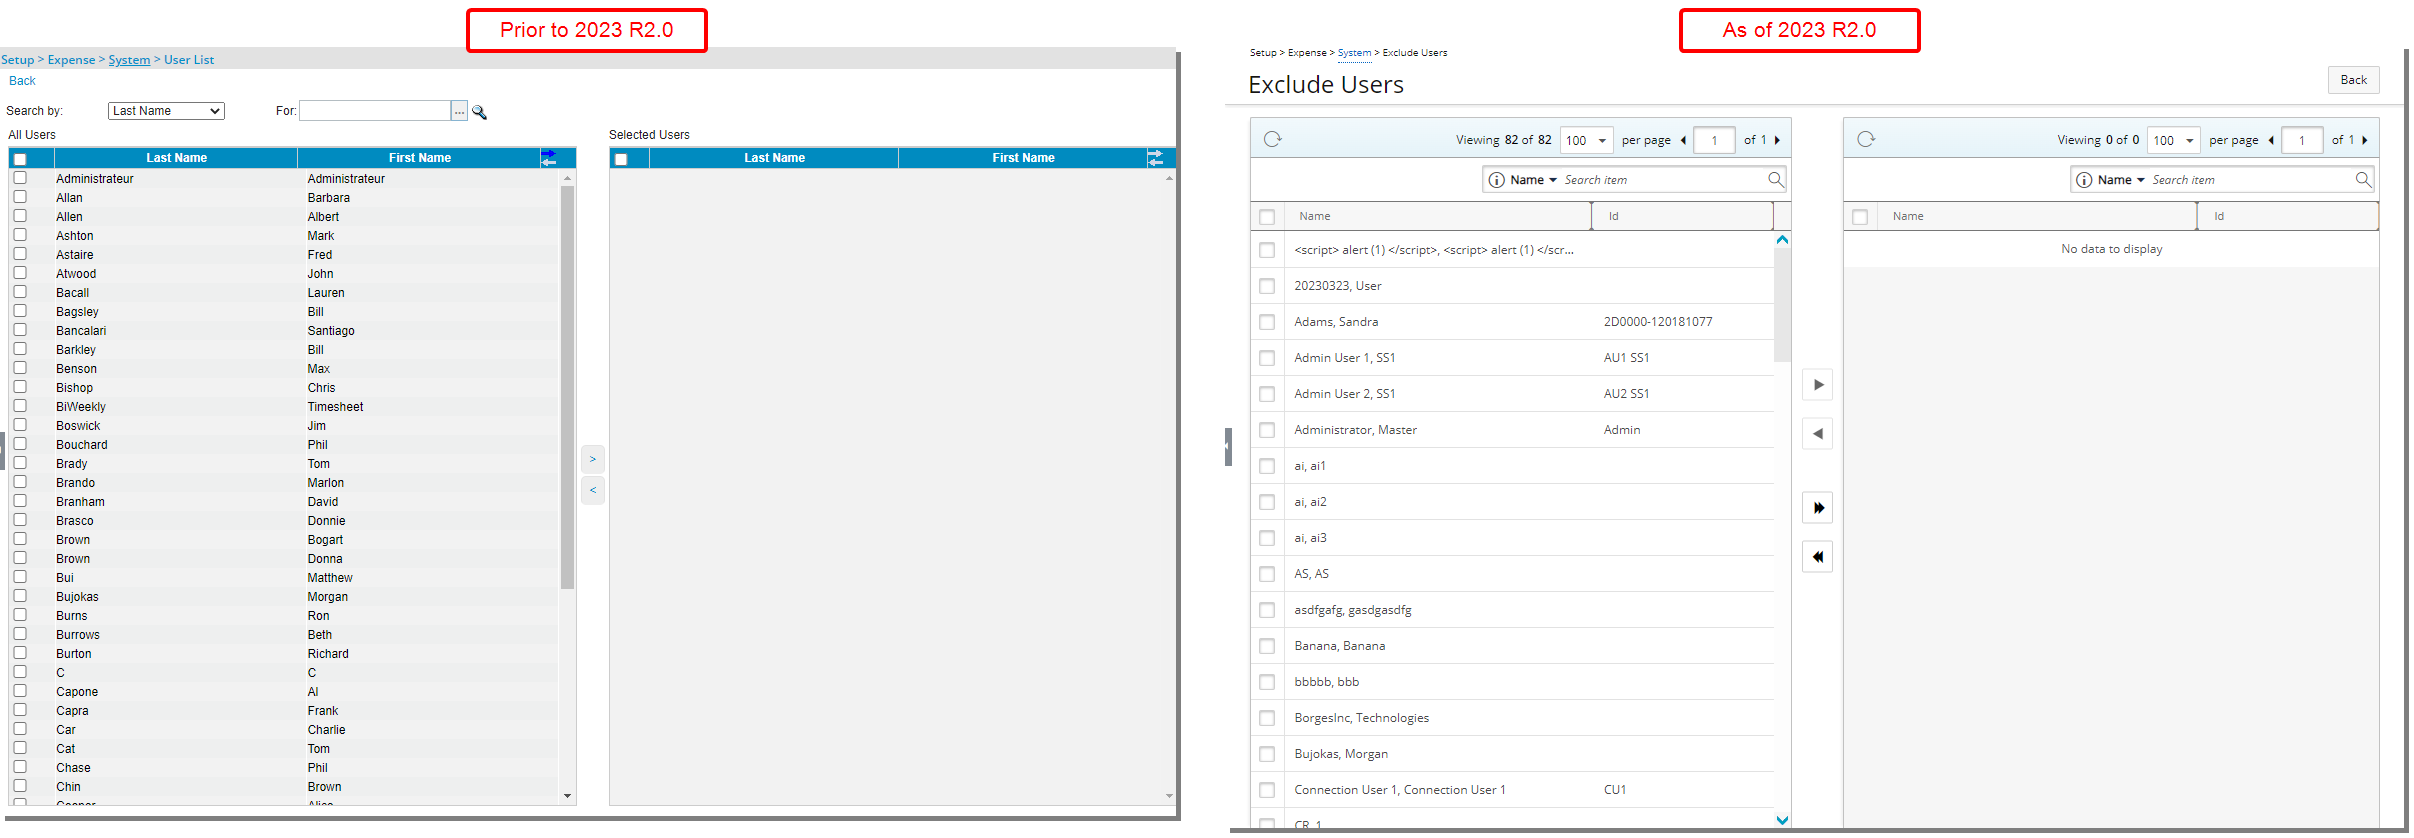
Description: The user interface including spacing, colors, positioning, buttons, icons and fonts of the Exclude Users page (Setup > Expense > System) has been improved for better user experience and consistency with the other updates that have been made thus far. The following improvements have also been made:
- Addition of Refresh button for the available/selected tables
- Pagination is now available from the top right corner of the available/selected tables to facilitate easy navigation across multiple pages.
- You can Search the available/selected tables by Name and Id.
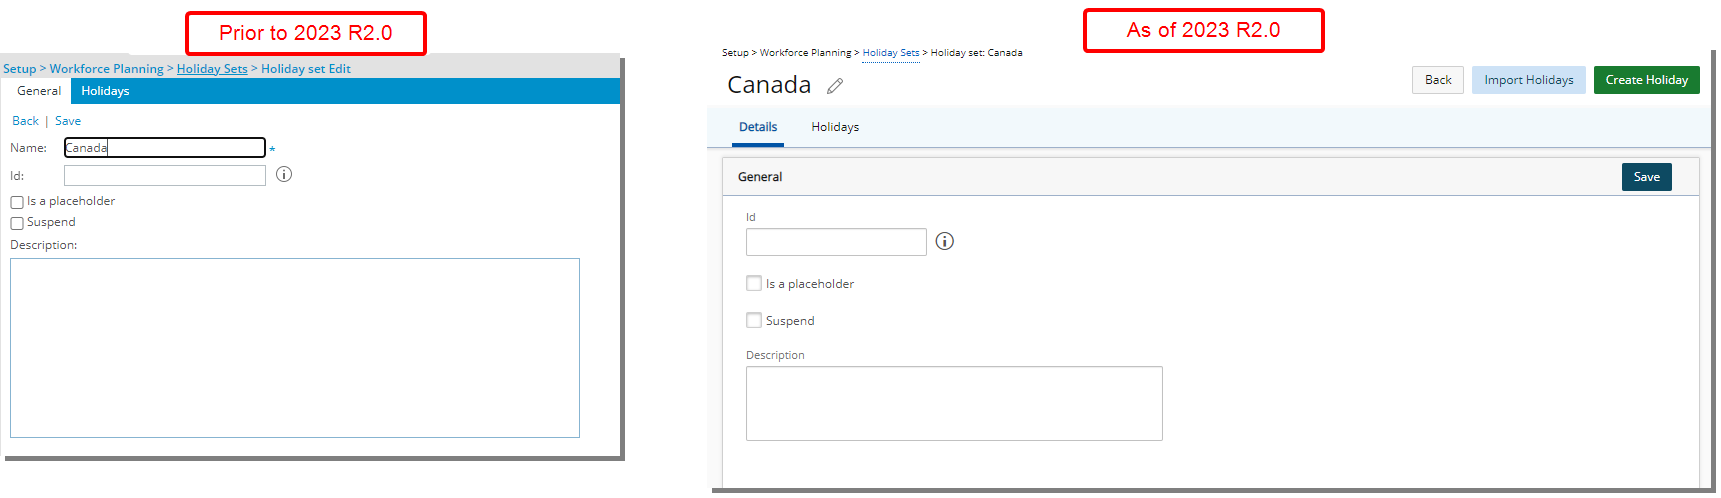
Description: In addition to user interface improvements including spacing, colors, positioning, buttons, icons and fonts of the Holiday Set edit page (Setup > Workforce Planning > Holiday Sets) the following enhancements have also been made:
- The name of the Holiday Set is now located on top of the page. You can modify it by clicking the Edit button.
- The Back, Save and Import Holidays links were converted to buttons and are now located on the top right corner of the page.
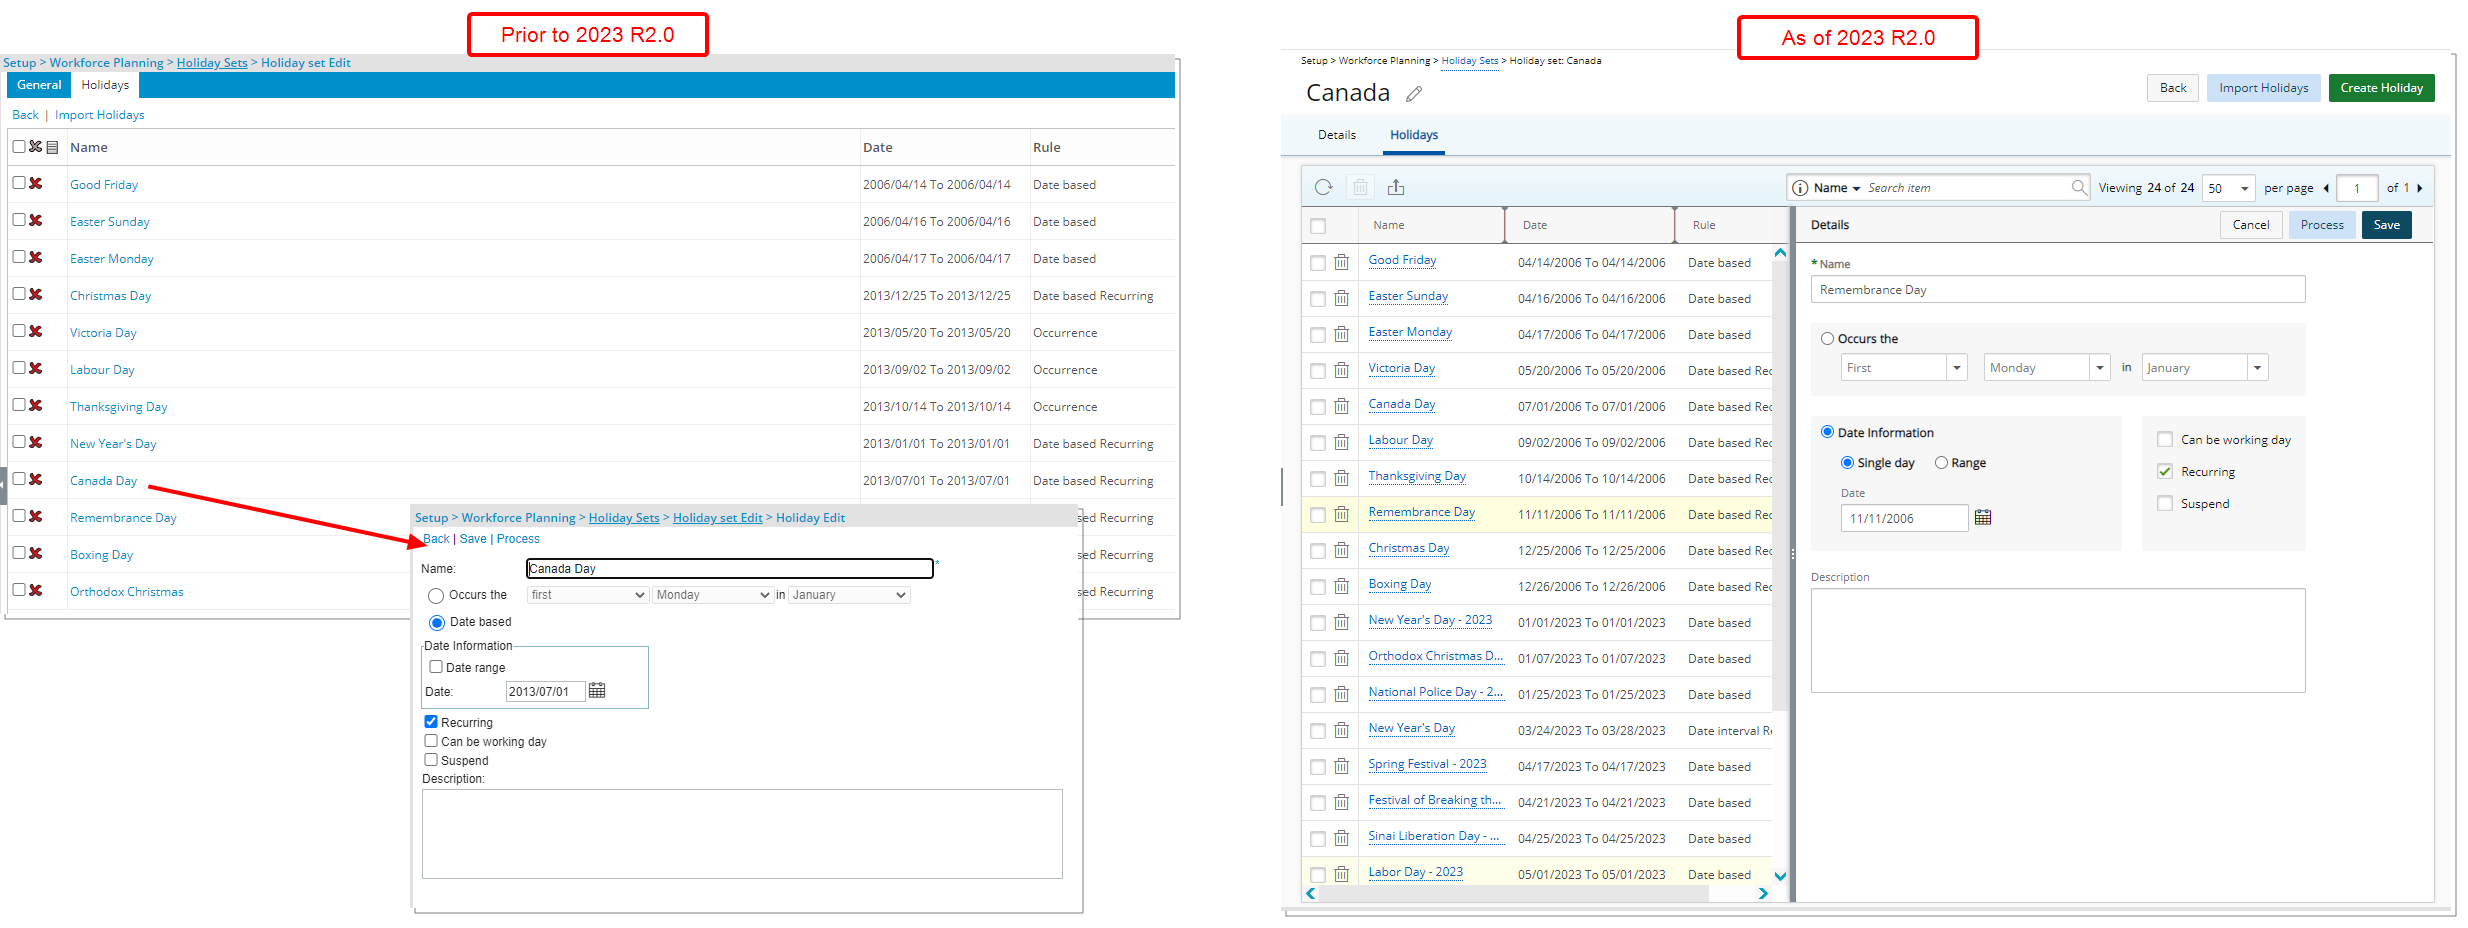
Furthermore, the Holidays list page was designed for a better user experience. The following modifications were made:
- Addition of a Refresh button allowing you to reload the page.
- The Delete button was redesigned and is now located in the table header.
- You can access and modify the details of an existing Holiday by clicking on its Name. The right pane will display the Detail of the selected Holiday.
- The Back, Save and Process links were converted to buttons and are now located on the top right corner of the right pane.
- Upon modifying a Holiday, you can click Save or Cancel directly from the right pane.
Benefit: You can now modify a Holiday more efficiently without significant click-through.
For further details refer to: Holiday Sets
Users
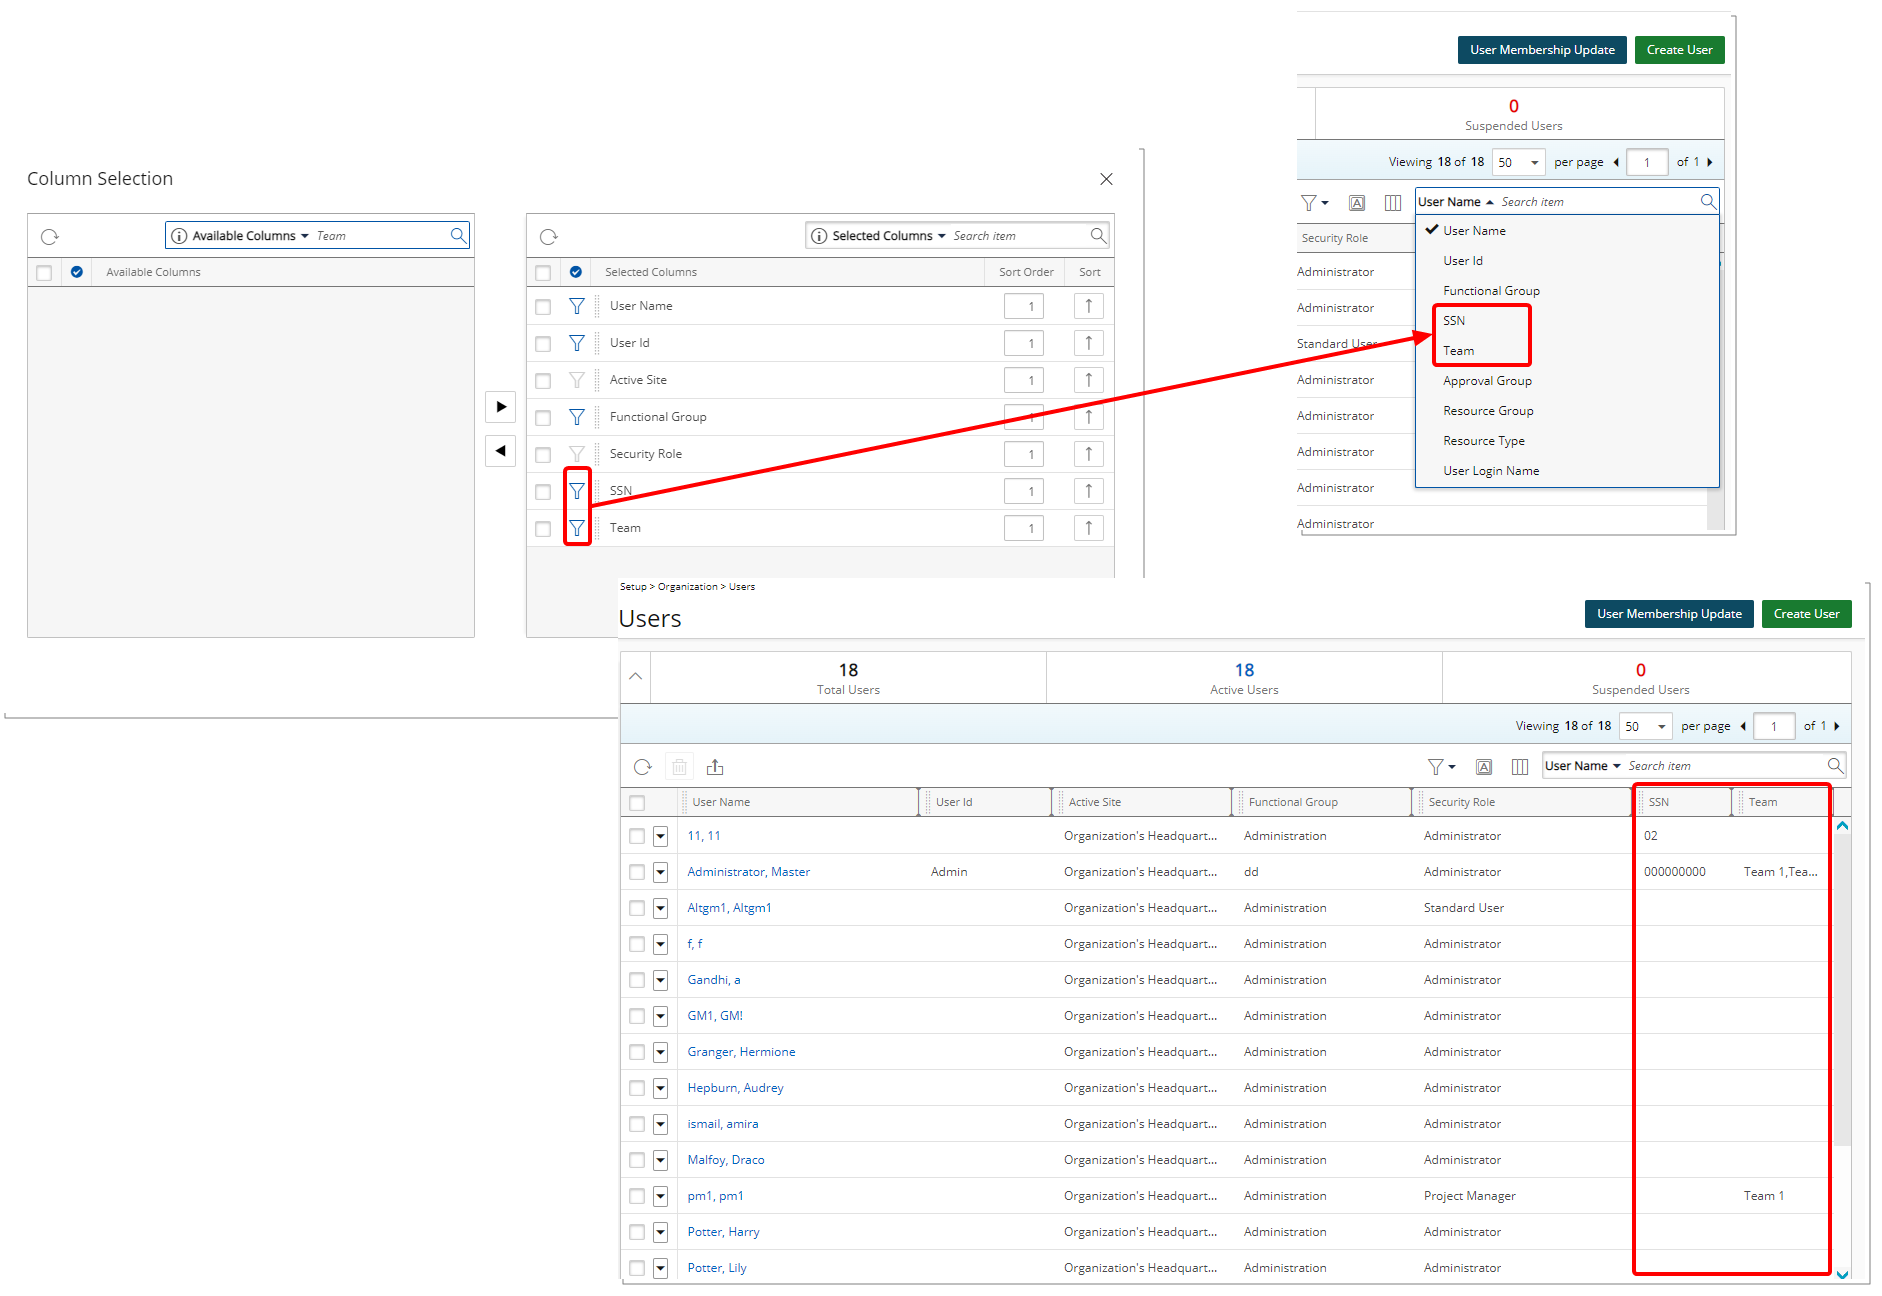
Description: The option to include the Team and SSN are now available from the Column Selection of Users list page (Setup > Organization). You can also choose to include these as Search criteria from the Column Selection dialog box.
Benefit: With this addition, the Team and SSN can easily and readily be viewed from the Users list page.
For further details refer to: Using the Users list
Description: You can no longer Scope the Master Administrator User Profile.
Note: Upon upgrading to 2023 R2.0 any existing scoping on the Master Administrator User Profile will be removed.
Benefit: This ensures that the Master Administrator is not scoped to a Site and therefore has complete access.
For further details refer to:
- Scope Setup for a User
- Modifying a User's Scope
Deprecated/Unsupported Functionality
As of this release the Create Action Item selection box will no longer be available.
The selection box has been removed from the Notification Edit dialog box when modifying a Workflow (State Edit > Notifications> Notification Edit).